Exercise - Identify and resolve inbound network connectivity
In our scenario, a change was made to the network configuration. You're receiving alerts that virtual machines in the back-end pool aren't responding to health probes. Now you need to diagnose the cause of these failures and fix them.
In this exercise, you use a script to reconfigure the environment and cause health probe failures. You use the skills learned in this module to return the load-balanced HTTP service back to full operation.
Reconfigure load balancer and retest
In Azure Cloud Shell, set the resource group name.
export RESOURCEGROUP=learn-ts-loadbalancer-rgGo to the src/scripts folder.
cd ~/load-balancer/src/scriptsRun the following command to reconfigure the load balancer, network, and virtual machines. This script introduces some problems that you'll diagnose and correct.
bash reconfigure.shRun the following commands to move to the src/stresstest folder.
cd ~/load-balancer/src/stresstestRun the stress test again where you replace <ip address> with the IP address of the load balancer. If you can't remember this address, run the src/scripts/findip.sh script again.
dotnet run <ip address>This time, the app won't generate any output and might eventually time out with the message "Error sending request to Load Balancer: The operation was canceled." Press Enter to stop the application.
In the Azure portal, select Dashboard > dashboard-learn-ts-loadbalancer.
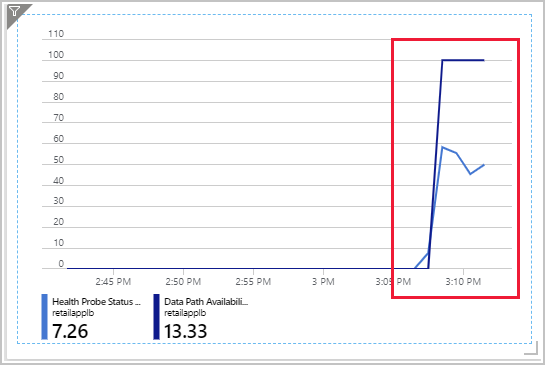
Review the dashboard that shows the health probe status and data path availability. You might need to change the time range to the past 30 minutes. It should look like the following chart, with both metrics dropped to zero.
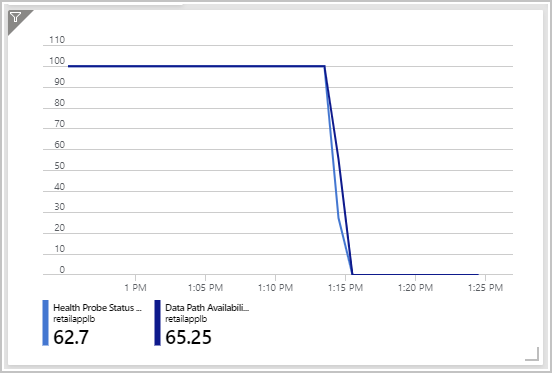
This chart shows that the virtual machines aren't responding to health probe requests from the load balancer. So they've been marked as unhealthy. There's no data path available between a client and the application running on these virtual machines.
Diagnose and fix issues
The first step is to check that the virtual machines are running. Let's resolve issues one virtual machine at a time. So let's look at appretailvm1 first. You'll examine appretailvm2 later.
Test the appretailvm1 virtual machine
You can't ping the appretailvm1 or appretailvm2 virtual machines directly because they have private addresses that are only available to other virtual machines on the same subnet. First, you connect to the jump box, which has a public IP address and is in the same subnet. Then, you can ping the virtual machines from there.
Return to Cloud Shell.
Run the following commands to get the IP address of the jump box virtual machine.
bash ~/load-balancer/src/scripts/jumpboxip.shRun the following command to get the password that you created when you ran the initial setup script. Copy this password for the next step.
cd ~/load-balancer/src/scripts
cat passwd.txt
Sign in to the jump box with the IP address and password from the previous command outputs. Replace azureuser if you used a different user name.
ssh azureuser@<jump box ip address>On the jump box, run the following command to test whether the retailappvm1 virtual machine is running.
ping retailappvm1 -c 10The retailappvm1 virtual machine should respond, indicating that it's running. The next step is to establish whether the web app is running on this virtual machine.
Run the following command to send an HTTP GET request to the retailappvm1 virtual machine.
curl -v http://retailappvm1Again, this command should be successful.
Check health probes and routing rules
The retailappvm1 virtual machine is up, and the application is running on that virtual machine. There must be a problem between the load balancer and the virtual machines in the back-end pool.
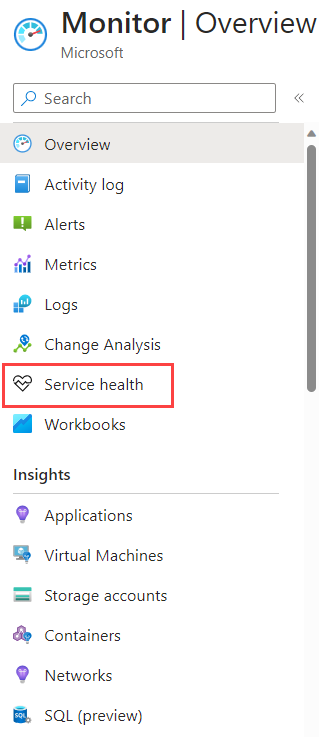
In the Azure portal, search for Monitor.
On the Monitor - Overview page, select Service Health.
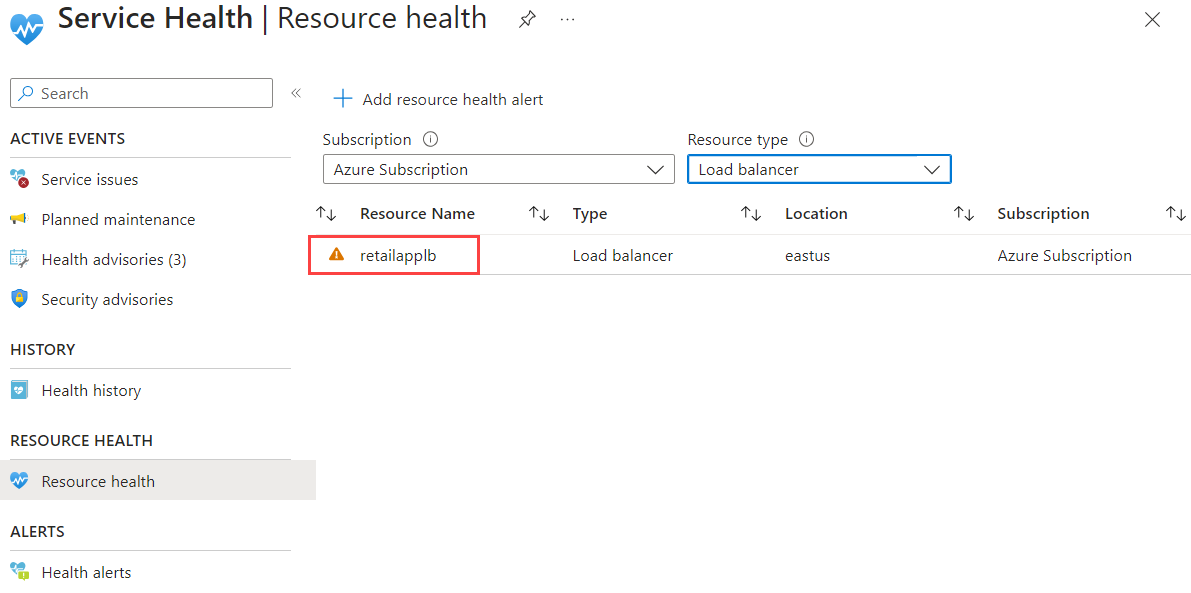
Select Resource Health.
In the Resource type box, select Load balancer. In the list of resources, select retailapplb.
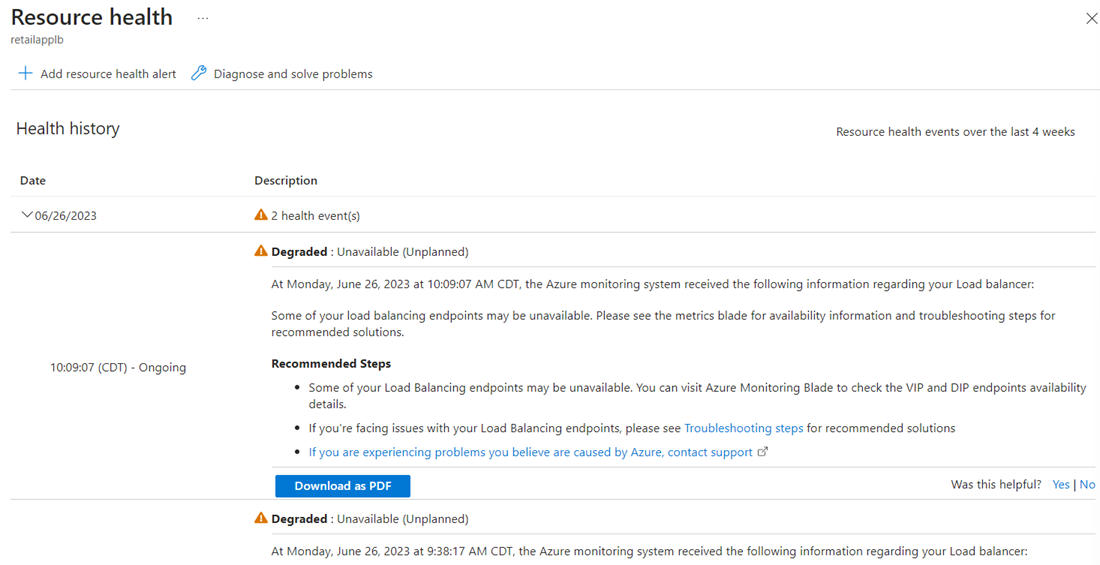
Wait a few minutes for the load balancer health to be evaluated.
Under Health history, expand the topmost event and review the recommended steps. These steps suggest checking the VIP (routing rule) and DIP (health probe) endpoints in the load balancer.
Go to the resource group learn-ts-loadbalancer-rg, and select retailapplb.
Select Load balancing rules > retailapprule. This rule receives Tcp traffic on port 80 of the front-end IP address, and sends it to port 80 on the selected virtual machine in the back-end pool. This configuration appears to be correct, although the port used by the health probe looks suspicious. It's currently set to port 85.
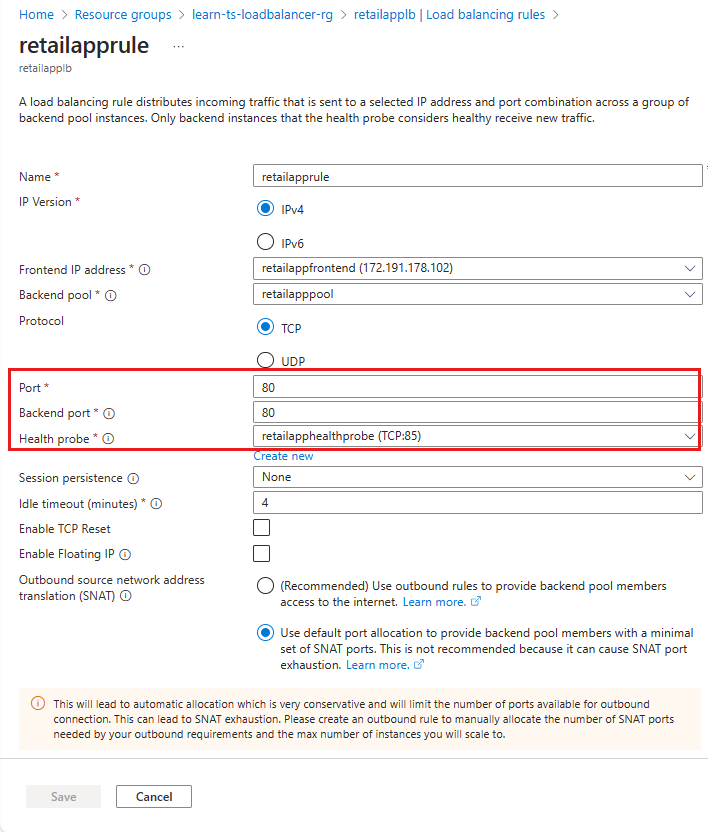
Close the retailapprule page.
Select Health probes > retailapphealthprobe.
Change the Port from 85 back to 80, and then select Save.
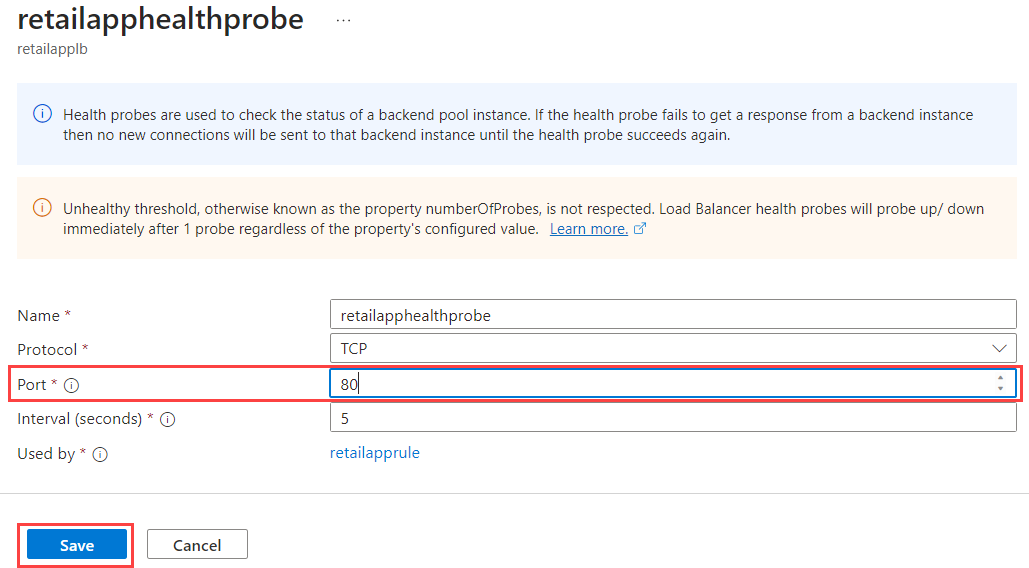
Wait a few minutes.
Select Dashboard in the menu on the left of the Azure portal.
On the dashboard, select the chart showing the Health Probe Status and Data Path Availability metrics. The Data Path Availability metric should rise to 100, but the Health Probe Status metric will hover around 50. There's now a path available from the load balancer to at least one virtual machine, but only 50 percent of the virtual machines are showing as healthy.
Select the chart to go to the metrics page for Load Balancer. This page enables you to refresh the chart and zoom in on a specific time period.
In Cloud Shell, run the following command to leave the jump box.
exitRun the stress test application again by using the load balancer's IP address.
cd ~/load-balancer/src/stresstest
dotnet run <ip address>
As before, the test still fails. There's now a path from the load balancer to at least one virtual machine, but this path doesn't work from a client running outside of the virtual network. Press Enter to stop the stress test app.
Check NSG rules for the subnet
The problem might be caused by a network security rule blocking external traffic.
In the Azure portal, go to the resource group learn-ts-loadbalancer-rg.
Select the retailappnsg network security group. This security group determines which traffic is allowed through the virtual network.
Select Inbound security rules. While there's a rule that allows incoming traffic from the load balancer running in the virtual network, there's no rule permitting traffic originating from outside the virtual network through port 80.
Select Add. The Add inbound security rule pane appears.
Enter the following settings, and then select Add.
Property Value Source Any Source port ranges * Destination Any Service Custom Destination port ranges 80 Protocol TCP Action Allow Priority 100 Name Port_80 Description HTTP port In Cloud Shell, run the stress test application again by using the load balancer's IP address.
cd ~/load-balancer/src/stresstest
dotnet run <ip address>
The application now runs, but you only get a response from the retailappvm1 virtual machine. Allow the application to run for two or three minutes. Press Enter to stop it.
In the Azure portal, go to the dashboard.
Select the chart for the average Packet Count metric. Note the peak value for the latest run of the stress test application. This value should be at least double that of the value recorded earlier when both virtual machines were available. Although you now have a functioning system, you're in danger of overloading the working virtual machine.
Test the appretailvm2 virtual machine
It seems that the appretailvm2 virtual machine might not be handling requests properly. You need to check whether this virtual machine is up, and whether Load Balancer can connect to it.
In Cloud Shell, sign in to the jump box with the IP address and password from the previous command outputs
ssh azureuser@<jump box ip address>Try to ping the appretailvm2 virtual machine.
ping retailappvm2 -c 10The virtual machine fails to respond, and the ping command reports 100 percent packet loss. Either the retailappvm2 virtual machine isn't running or there's a network problem.
In the Azure portal, go to the resource group learn-ts-loadbalancer-rg.
Select the retailappvm2 virtual machine.
The Overview page shows that the virtual machine has stopped. Select Start, and wait for the machine to begin running.

Return to Cloud Shell connected to the jump box, and repeat the ping command.
ping retailappvm2 -c 10This time, the ping operations should succeed.
Test whether the application running on the retailappvm2 virtual machine responds.
wget retailappvm2This command times out. Either the application isn't running or there might be a network issue. Select Ctrl+C to stop the command.
On the jump box, sign in to the retailappvm2 virtual machine. When prompted, enter the same password that you specified earlier.
ssh azureuser@retailappvm2Run the following command to test the application on this virtual machine.
wget retailappvm2The command should be successful and create the file index.html, which contains the response.
Examine this index.html file.
cat index.htmlThe file should contain the message retailappvm2 and show that this virtual machine responded as expected.
Close the connection to the retailappvm2 virtual machine.
exitClose the connection to the jump box.
exitThe retailappvm2 virtual machine is up and the app is running, but you can't connect to the app from outside the virtual machine. This issue suggests a network problem.
In the Azure portal, go to the resource group learn-ts-loadbalancer-rg.
Select the retailappnicvm2nsg network security group.
Select Inbound security rules.
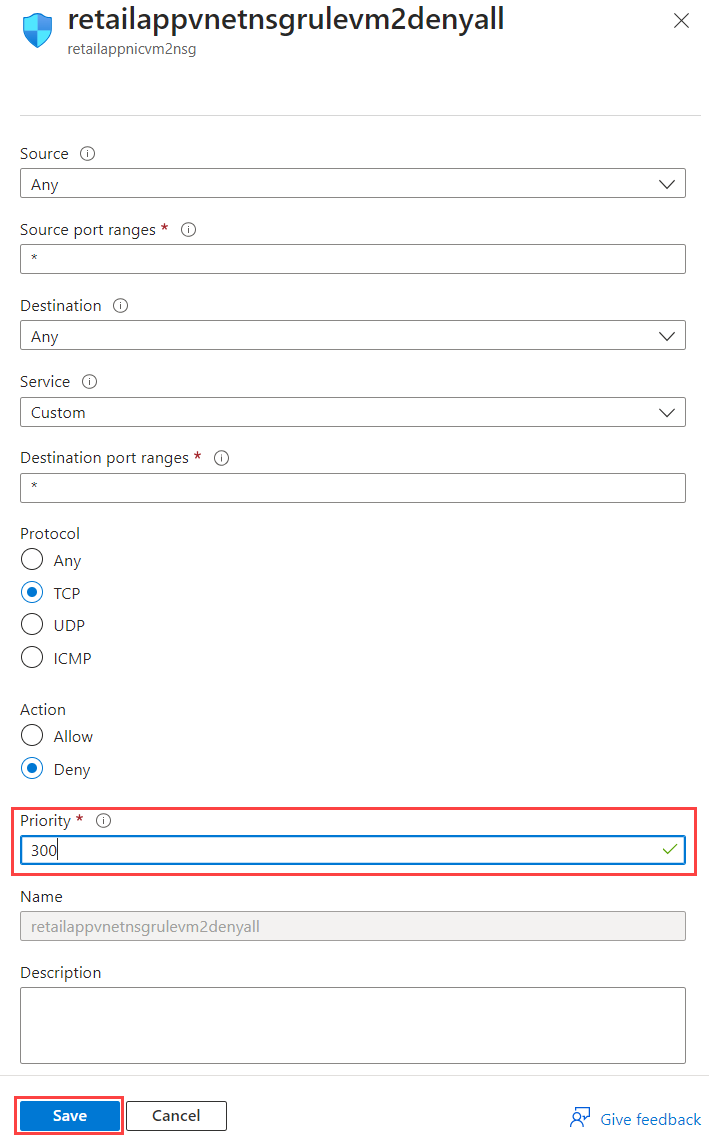
The network security group has an inbound rule that blocks all outside traffic using the TCP protocol. This rule has a priority number lower than the rule (which opens port 80), so it takes precedence.
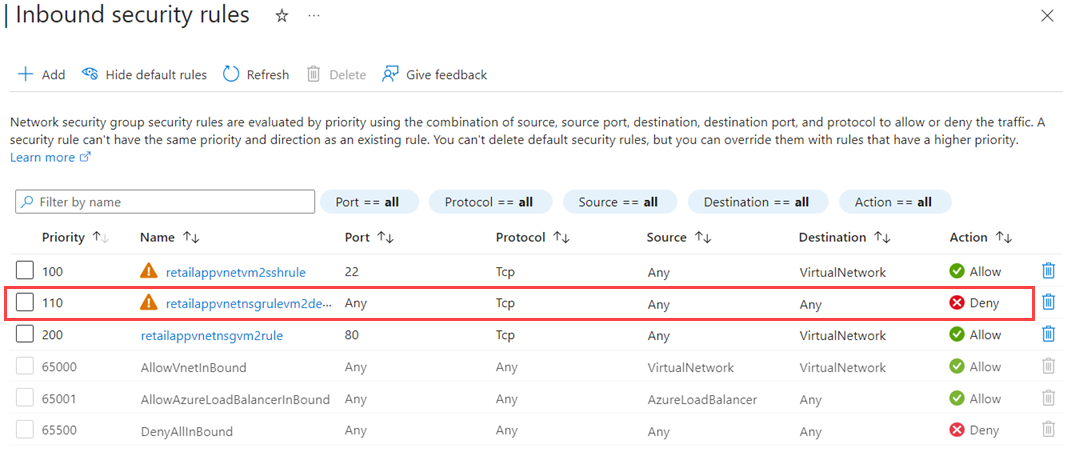
Select the retailappvnetnsgrulevm2denyall rule, change the priority to 300, and then select Save.
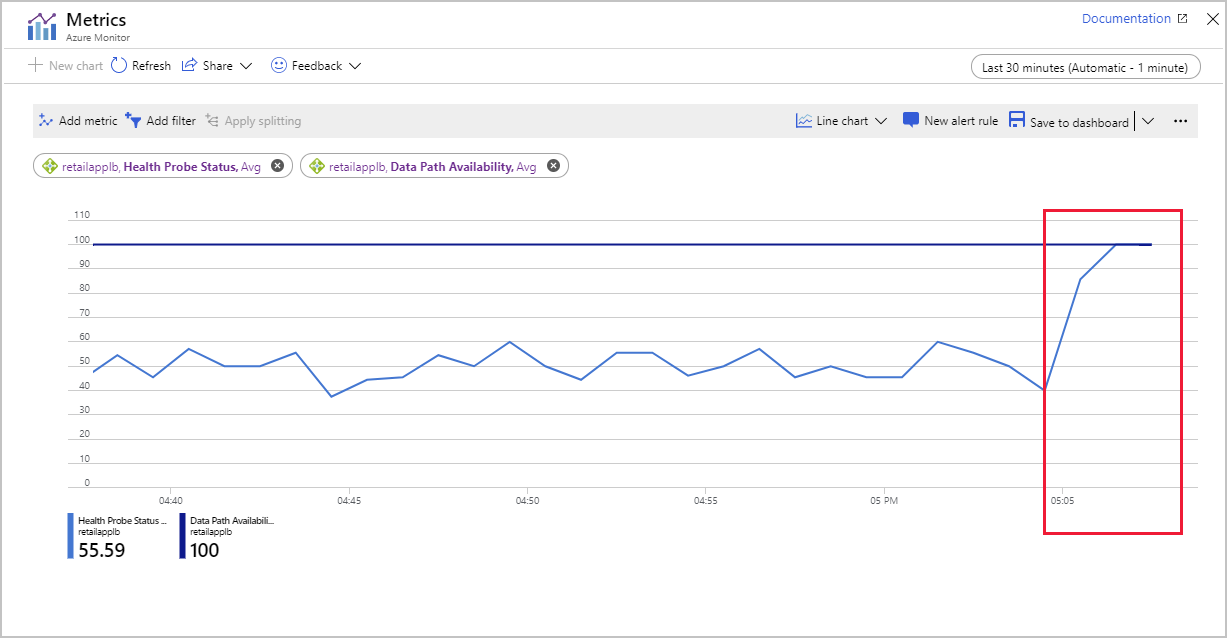
Wait two minutes, and then go to the Dashboard.
Select the chart that shows the Health Probe Status metric. The value of this metric should rise to 100. You might need to refresh the chart a few times.
Switch to Cloud Shell, and run the stresstest application again by using the load balancer's IP address.
cd ~/load-balancer/src/stresstest
dotnet run <ip address>
You should now see messages from retailappvm1 and retailappvm2. You have restored full connectivity to the system.
Press Enter to stop the application.
Summary
At the start of this exercise, you saw that the virtual machines weren't responding to health probe requests from the load balancer. You discovered and resolved a combination of probing and data path issues:
- On the load balancer rule retailapprule, the port used by the health probe was misconfigured to use 85 instead of 80. You updated the rule to use port 80.
- The network security group retailappnsg didn't have an inbound security rule that allowed traffic on port 80. So the network security group blocked the health probe. You added an inbound security rule to allow traffic on port 80.
- You checked the VM retailappvm2 and saw that it stopped. You restarted the VM.
- After you started the VM retailappvm2 and saw that the app was running, you couldn't connect to the app. The network security group had an inbound rule that blocked all network traffic for the TCP protocol. This "deny all" rule took precedence over the inbound security rule that allowed traffic to port 80. You changed the priority of the "deny all" rule so it was higher than the port 80 rule. This change allowed inbound network traffic on port 80 for TCP.
You returned the load-balanced HTTP service back to full operation.