Create customer, vendor and item approvals in Power Automate
Let's discuss three different types of approvals that you can do with Business Central.
New Customer approval
To start with customer approvals, first open the Customer Card in Business Central. To do this, click the search icon, enter Customers, and then select the related link. On the Customers page, click on any of the customers to open the Customer Card. Select the Request Approval on the menu and point to Create a Flow.

When you run this command, the system will open the Select an Existing Flow Template page where you will find a template for new customer approvals.

Once this template is selected, you can confirm the connections (if not confirmed automatically). All your connections connected with the Microsoft 365 account will typically be confirmed automatically.

If all the connectors on your page have a green checkmark, they are all valid and you just need to click Continue. Otherwise, click the Sign in button (+) to validate your credentials and then click Continue.
When you open the Power Automate designer, you need to fill in all necessary parameters (at the least all fields with red asterisks).

To finish the template configuration, follow the next steps:
In the first step, on the trigger When a customer approval is requested, select the Environment name you want to use. It can be PRODUCTION or SANDBOX. After that in the Company name field, select the company you want to use in this flow.
Next, you can add four specific conditions. For each condition you can enter two fields. The first field allows you to select the field for the condition. Enter the condition expression in the second field.
When a user, for example, creates a customer with a credit limit greater than 10,000, you want the system to trigger a workflow.
In field First condition, enter CreditLimitLcy.
In the field First condition is, enter >10,000 (in simple words, when a user creates customers with a credit limit greater than 10,000, the system triggers a workflow).
if you don't want to use more conditions, check other fields and delete values in all of them. But, if you want to use more conditions, repeat the previous steps for all of them, but selecting different conditions.
Continue with the first action Get record. Check the Environment name and select the one you used on the trigger. And in the Company name field, select the company you selected before. In the Table name field, check if there is a value workflowCustomers and in Row ID keep the value Row ID.
The next action to use is Start an approval. In the field Approval type, select one of the offered options. For our example we will keep Approve/Reject - First to respond. In the Title field, you can use the default text or change it. In the Assigned to field, you need to enter a valid email address for the person who needs to approve this workflow. The Details field provides a default message that you can change if needed.
The next step is the configuration of the Condition action. By default, this action is collapsed. Expand the condition to see the condition details (the system will check if Response is equal to Approve).
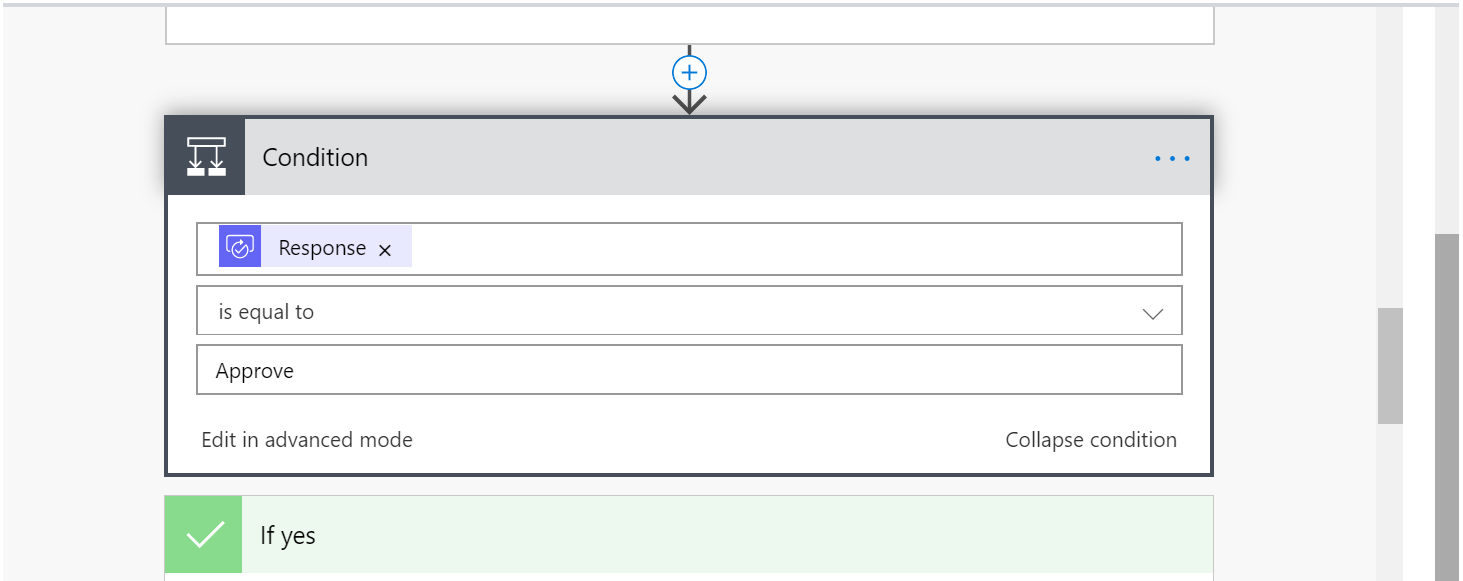
You also need to create actions for both the If yes and If no conditions. First, you should configure the If yes (green bar) action. This action defines what will happen if the Response is equal to Approve:
In the Environment name, choose the environment that you used on the trigger. Use the company that you selected in the trigger for the Company name.
Next, add the sender email in Condition 2 and make a condition with this.
Based on the positive answer in the next step If yes, you'll see the action Send an e-mail where the system will send a feedback email when the request is approved (all parameters are configured by default; you should only change them if needed).
In the next step If no, you don't need to add any action as in this case no feedback will be sent.
Now you need to continue with the If no result (red bar) of the first Condition (if Response is different from Approve).
Select the Environment name and the Company name, the same as you already used on the trigger.
After that, you'll see Condition 3 as a second level of condition in this response (the same as Condition 2 in the previous action). You don't need to change them, but if you want a different text in the email, you can configure it.
Finally, you just need to select the Save command in the bottom of template to save this flow.


If all fields are filled in, you can save this flow. If you want to verify that your flow is saved, open Power Automate, open My flows and locate your new flow in the list.

Now that your flow is saved, you can test the flow. Create a new customer in Business Central, and enter the value 250,000 in the Credit Limit field.

Check your email and verify if you received an approval email. In that email, you can approve or reject, and also add additional comments.

New Vendor approval
If you want to create a Vendor approval flow from Business Central, open a Vendor Card and execute the same steps as we did for the Customer approval flow.
You can also make these approval flows from Power Automate Studio. To do this, open Power Automate and sign in. Open Templates in the menu, type 'Business Central' in the Search templates field and click on the Request approval for Dynamics 365 Business Central vendor tile.

Start with validating your connections. Green signs for all connectors indicate that they are valid, and that you just need to click Continue. For those not marked in green, Sign in (+) to validate your credentials and then click Continue. Continue by filling in all necessary parameters.
Working in Power Automate designer provides a better overview of the entire flow compared with the view that Business Central provides. You will see a completely branched flow resulting in a better understanding of how the approval process works.

Save this flow and you are ready to use it similarly like the customer approval flow.
Note that standard workflows in Dynamics 365 Business Central are created and enabled at the same time. This also happened for both the approvals you made, regardless if the flow was created in Business Central or in Power Automate. Both will have the same status in Business Central.
To check these workflows, choose the search icon, enter Workflows, and then select the related link. On the Workflows page, you'll see a created Vendor Approval Workflow and Customer Approval Workflow.

New Item approval
The same approach can be used with the Request approval for Dynamics 365 Business Central item template. Watch the following demonstration on how to create an item approval flow from Business Central.