Prepare for Zero Touch Installation of Windows 10 with Configuration Manager
Applies to:
- Windows 10
This article walks you through the Zero Touch Installation (ZTI) process of Windows 10 OS deployment using Microsoft Configuration Manager integrated with Microsoft Deployment Toolkit (MDT).
Prerequisites
In this article, you'll use components of an existing Configuration Manager infrastructure to prepare for Windows 10 OSD. In addition to the base setup, the following configurations should be made in the Configuration Manager environment:
Configuration Manager current branch + all security and critical updates are installed.
Note
Procedures in this guide use Configuration Manager version 1910. For more information about the versions of Windows 10 supported by Configuration Manager, see Support for Windows 10.
The Active Directory Schema has been extended and System Management container created.
Active Directory Forest Discovery and Active Directory System Discovery are enabled.
IP range boundaries and a boundary group for content and site assignment have been created.
The Configuration Manager reporting services point role has been added and configured.
A file system folder structure and Configuration Manager console folder structure for packages has been created. Steps to verify or create this folder structure are provided below.
The Windows ADK version that is supported for the version of Configuration Manager that is installed, including the Windows PE add-on. USMT should be installed as part of the Windows ADK install.
MDT version 8456
DaRT 10 (part of MDOP 2015) are installed.
The CMTrace tool (cmtrace.exe) is installed on the distribution point.
Note
CMTrace is automatically installed with the current branch of Configuration Manager at
Program Files\Microsoft Configuration Manager\tools\cmtrace.exe.
For the purposes of this guide, we'll use three server computers: DC01, CM01 and HV01.
- DC01 is a domain controller and DNS server for the contoso.com domain. DHCP services are also available and optionally installed on DC01 or another server.
- CM01 is a domain member server and Configuration Manager software distribution point. In this guide, CM01 is a standalone primary site server.
- HV01 is a Hyper-V host computer that is used to build a Windows 10 reference image. This computer doesn't need to be a domain member.
All servers are running Windows Server 2019. However, an earlier, supported version of Windows Server can also be used.
All server and client computers referenced in this guide are on the same subnet. This interrelation isn't required, but each server and client computer must be able to connect to each other to share files, and to resolve all DNS names and Active Directory information for the contoso.com domain. Internet connectivity is also required to download OS and application updates.
Domain credentials
The following generic credentials are used in this guide. You should replace these credentials as they appear in each procedure with your credentials.
- Active Directory domain name:
contoso.com - Domain administrator username:
administrator - Domain administrator password:
pass@word1
Create the OU structure
Note
If you've already created the OU structure that was used in the OSD guide for MDT, the same structure is used here and you can skip this section.
On DC01:
To create the OU structure, you can use the Active Directory Users and Computers console (dsa.msc), or you can use Windows PowerShell. The procedure below uses Windows PowerShell.
To use Windows PowerShell, copy the following commands into a text file and save it as C:\Setup\Scripts\ou.ps1. Ensure that you're viewing file extensions and that you save the file with the .ps1 extension.
$oulist = Import-csv -Path c:\oulist.txt
ForEach($entry in $oulist){
    $ouname = $entry.ouname
    $oupath = $entry.oupath
    New-ADOrganizationalUnit -Name $ouname -Path $oupath -WhatIf
    Write-Host -ForegroundColor Green "OU $ouname is created in the location $oupath"
}
Next, copy the following list of OU names and paths into a text file and save it as C:\Setup\Scripts\oulist.txt
OUName,OUPath
Contoso,"DC=CONTOSO,DC=COM"
Accounts,"OU=Contoso,DC=CONTOSO,DC=COM"
Computers,"OU=Contoso,DC=CONTOSO,DC=COM"
Groups,"OU=Contoso,DC=CONTOSO,DC=COM"
Admins,"OU=Accounts,OU=Contoso,DC=CONTOSO,DC=COM"
Service Accounts,"OU=Accounts,OU=Contoso,DC=CONTOSO,DC=COM"
Users,"OU=Accounts,OU=Contoso,DC=CONTOSO,DC=COM"
Servers,"OU=Computers,OU=Contoso,DC=CONTOSO,DC=COM"
Workstations,"OU=Computers,OU=Contoso,DC=CONTOSO,DC=COM"
Security Groups,"OU=Groups,OU=Contoso,DC=CONTOSO,DC=COM"
Lastly, open an elevated Windows PowerShell prompt on DC01 and run the ou.ps1 script:
Set-ExecutionPolicy -ExecutionPolicy RemoteSigned -Force
Set-Location C:\Setup\Scripts
.\ou.ps1
Create the Configuration Manager service accounts
A role-based model is used to configure permissions for the service accounts needed for operating system deployment in Configuration Manager. Perform the following steps to create the Configuration Manager join domain and network access accounts:
On DC01:
In the Active Directory Users and Computers console, browse to contoso.com > Contoso > Service Accounts.
Select the Service Accounts OU and create the CM_JD account using the following settings:
- Name: CM_JD
- User sign-in name: CM_JD
- Password:
pass@word1 - User must change password at next logon: Clear
- User can't change password: Selected
- Password never expires: Selected
Repeat the step, but for the CM_NAA account.
After creating the accounts, assign the following descriptions:
- CM_JD: Configuration Manager Join Domain Account
- CM_NAA: Configuration Manager Network Access Account
Configure Active Directory permissions
In order for the Configuration Manager Join Domain Account (CM_JD) to join machines into the contoso.com domain, you need to configure permissions in Active Directory. These steps assume you've downloaded the sample Set-OUPermissions.ps1 script and copied it to C:\Setup\Scripts on DC01.
On DC01:
Sign in as contoso\administrator and enter the following commands at an elevated Windows PowerShell prompt:
Set-ExecutionPolicy -ExecutionPolicy RemoteSigned -Force
Set-Location C:\Setup\Scripts
.\Set-OUPermissions.ps1 -Account CM_JD -TargetOU "OU=Workstations,OU=Computers,OU=Contoso"
The Set-OUPermissions.ps1 script allows the CM_JD user account permissions to manage computer accounts in the Contoso / Computers / Workstations OU. The following list is that of permissions being granted:
- Scope: This object and all descendant objects
- Create Computer objects
- Delete Computer objects
- Scope: Descendant Computer objects
- Read All Properties
- Write All Properties
- Read Permissions
- Modify Permissions
- Change Password
- Reset Password
- Validated write to DNS host name
- Validated write to service principal name
Review the Sources folder structure
On CM01:
To support the packages you create in this article, the following folder structure should be created on the Configuration Manager primary site server (CM01):
- D:\Sources
- D:\Sources\OSD
- D:\Sources\OSD\Boot
- D:\Sources\OSD\DriverPackages
- D:\Sources\OSD\DriverSources
- D:\Sources\OSD\MDT
- D:\Sources\OSD\OS
- D:\Sources\OSD\Settings
- D:\Sources\OSD\Branding
- D:\Sources\Software
- D:\Sources\Software\Adobe
- D:\Sources\Software\Microsoft
- D:\Logs
Note
In most production environments, the packages are stored on a Distributed File System (DFS) share or a "normal" server share, but in a lab environment you can store them on the site server.
You can run the following commands from an elevated Windows PowerShell prompt to create this folder structure:
New-Item -ItemType Directory -Path "D:\Sources"
New-Item -ItemType Directory -Path "D:\Sources\OSD"
New-Item -ItemType Directory -Path "D:\Sources\OSD\Boot"
New-Item -ItemType Directory -Path "D:\Sources\OSD\DriverPackages"
New-Item -ItemType Directory -Path "D:\Sources\OSD\DriverSources"
New-Item -ItemType Directory -Path "D:\Sources\OSD\OS"
New-Item -ItemType Directory -Path "D:\Sources\OSD\Settings"
New-Item -ItemType Directory -Path "D:\Sources\OSD\Branding"
New-Item -ItemType Directory -Path "D:\Sources\OSD\MDT"
New-Item -ItemType Directory -Path "D:\Sources\Software"
New-Item -ItemType Directory -Path "D:\Sources\Software\Adobe"
New-Item -ItemType Directory -Path "D:\Sources\Software\Microsoft"
New-SmbShare -Name Sources$ -Path D:\Sources -FullAccess "NT AUTHORITY\INTERACTIVE", "BUILTIN\Administrators"
New-Item -ItemType Directory -Path "D:\Logs"
New-SmbShare -Name Logs$ -Path D:\Logs -ChangeAccess EVERYONE
Integrate Configuration Manager with MDT
To extend the Configuration Manager console with MDT wizards and templates, install MDT with the default settings and run the Configure ConfigManager Integration desktop app. In these steps, we assume you've already downloaded MDT and installed it with default settings.
On CM01:
Sign in as contoso\administrator.
Ensure the Configuration Manager Console is closed before continuing.
Select Start, type Configure ConfigManager Integration, and run the application with the following settings:
- Site Server Name: CM01.contoso.com
- Site code: PS1
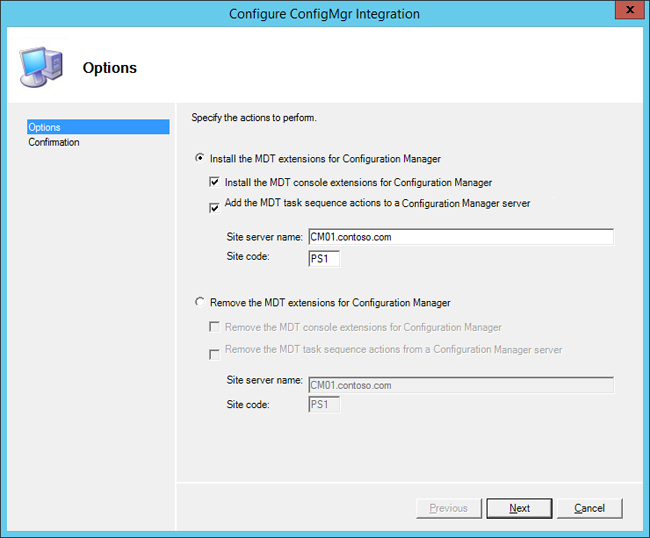
MDT integration with Configuration Manager.
Configure the client settings
Most organizations want to display their name during deployment. In this section, you configure the default Configuration Manager client settings with the Contoso organization name.
On CM01:
Open the Configuration Manager Console, select the Administration workspace, then select Client Settings.
In the right pane, right-click Default Client Settings and then select Properties.
In the Computer Agent node, in the Organization name displayed in Software Center text box, enter in Contoso and select OK.
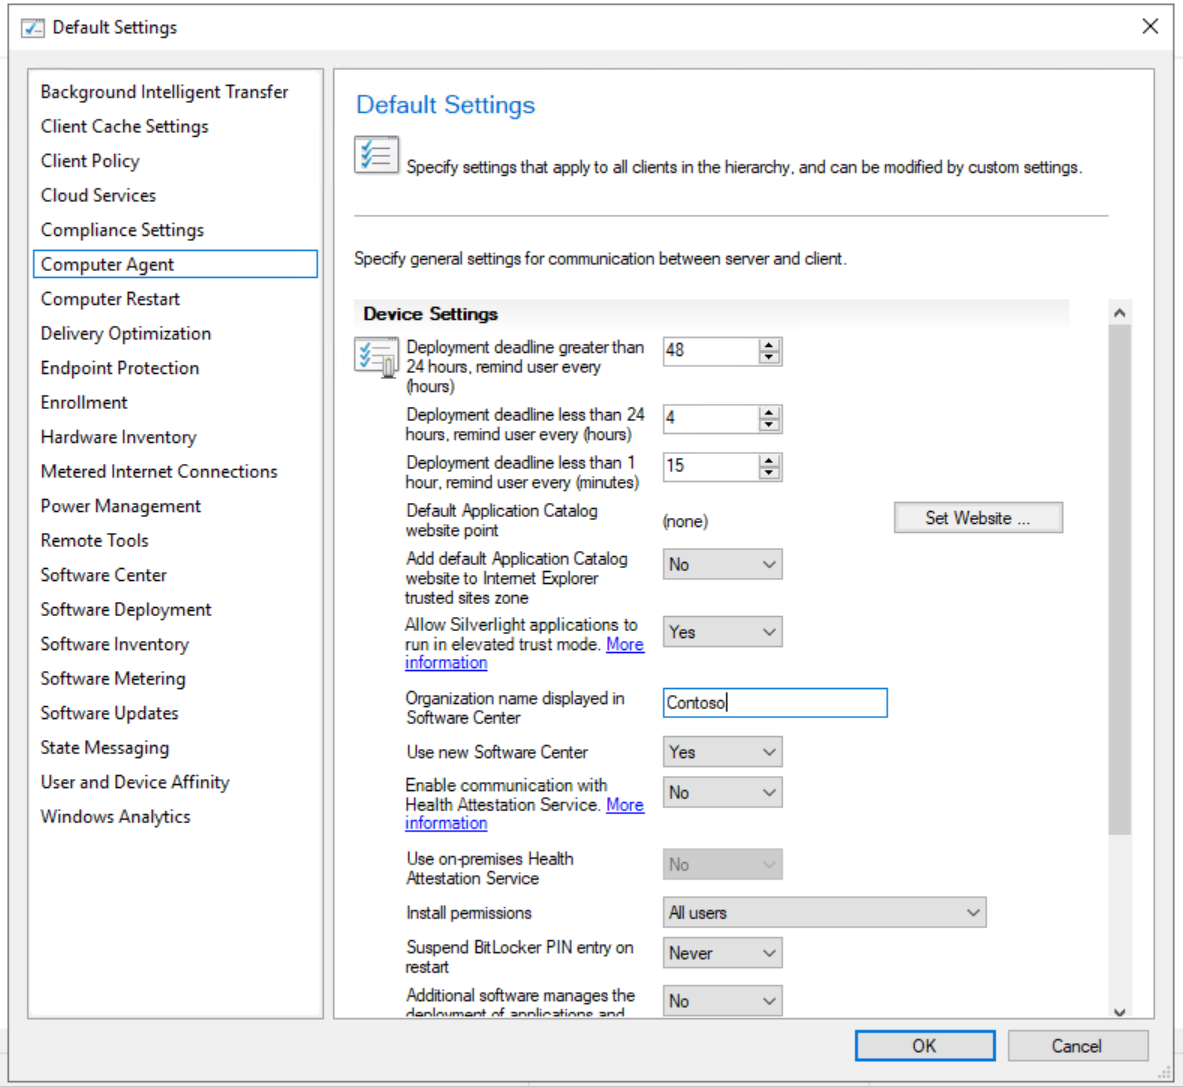
Configure the organization name in client settings.
The Contoso organization name displayed during deployment.
Configure the Network Access account
Configuration Manager uses the Network Access account during the Windows 10 deployment process to access content on the distribution points. In this section, you configure the Network Access account.
On CM01:
Using the Configuration Manager Console, in the Administration workspace, expand Site Configuration and select Sites.
Right-click PS1 - Primary Site 1, point to Configure Site Components, and then select Software Distribution.
On the Network Access Account tab, select Specify the account that accesses network locations and add the account CONTOSO\CM_NAA as the Network Access account (password: pass@word1). Use the new Verify option to verify that the account can connect to the
\\DC01\sysvolnetwork share.
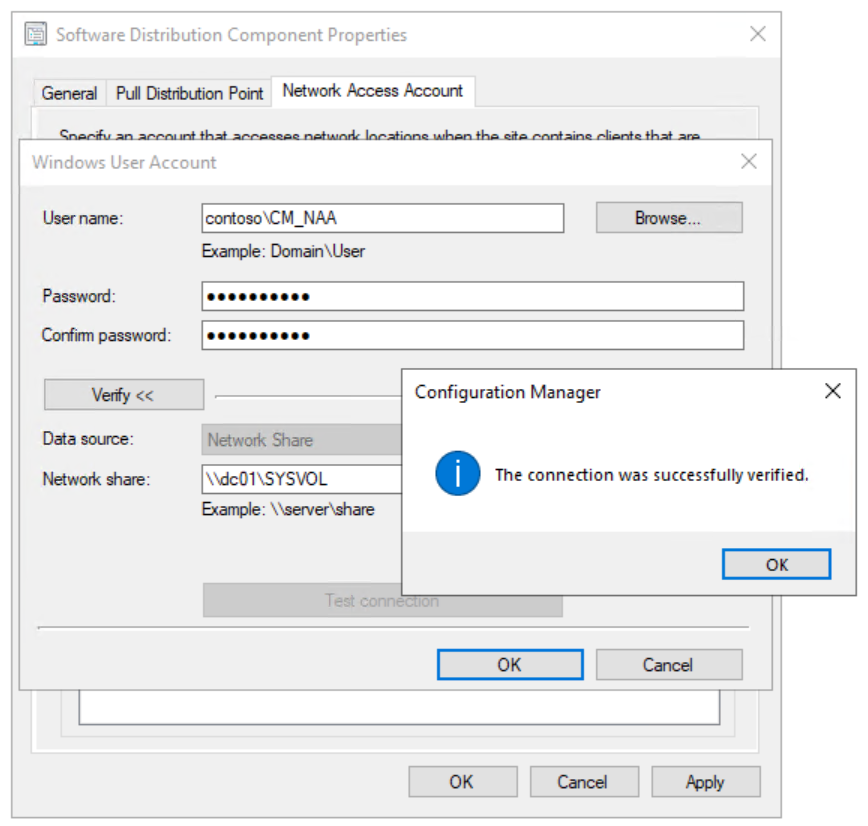
Test the connection for the Network Access account.
Enable PXE on the CM01 distribution point
Configuration Manager has many options for starting a deployment, but starting via PXE is certainly the most flexible in a large environment. In this section, you enable PXE on the CM01 distribution point.
On CM01:
In the Configuration Manager Console, in the Administration workspace, select Distribution Points.
Right-click the \\CM01.CONTOSO.COM distribution point and select Properties.
On the PXE tab, use the following settings:
- Enable PXE support for clients
- Allow this distribution point to respond to incoming PXE requests
- Enable unknown computer
- Require a password when computers use PXE
- Password and Confirm password: pass@word1
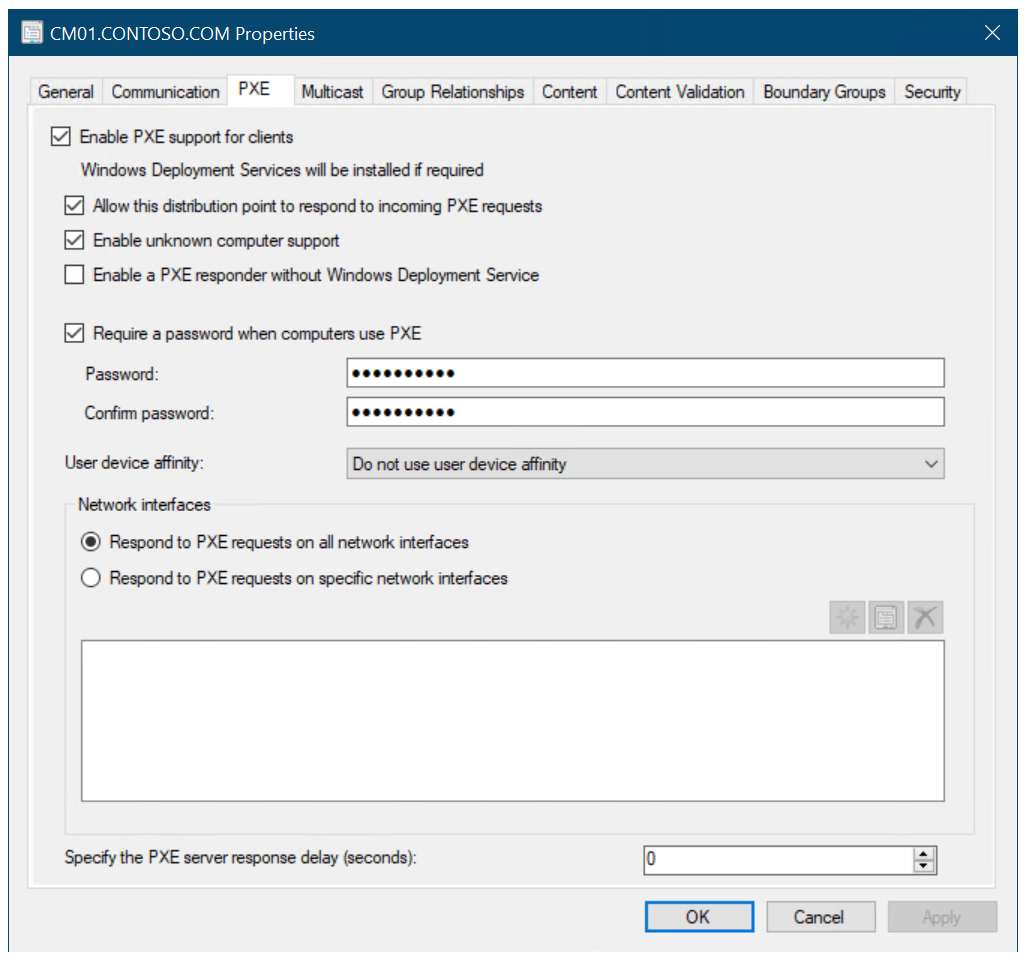
Configure the CM01 distribution point for PXE.
Note
If you select Enable a PXE responder without Windows Deployment Service, then WDS won't be installed, or if it's already installed it will be suspended, and the ConfigMgr PXE Responder Service (SccmPxe) will be used instead of WDS. The ConfigMgr PXE Responder doesn't support multicast. For more information, see Install and configure distribution points.
Using the CMTrace tool, review the
C:\Program Files\Microsoft Configuration Manager\Logs\distmgr.logfile. Look for the ConfigurePXE and CcmInstallPXE lines.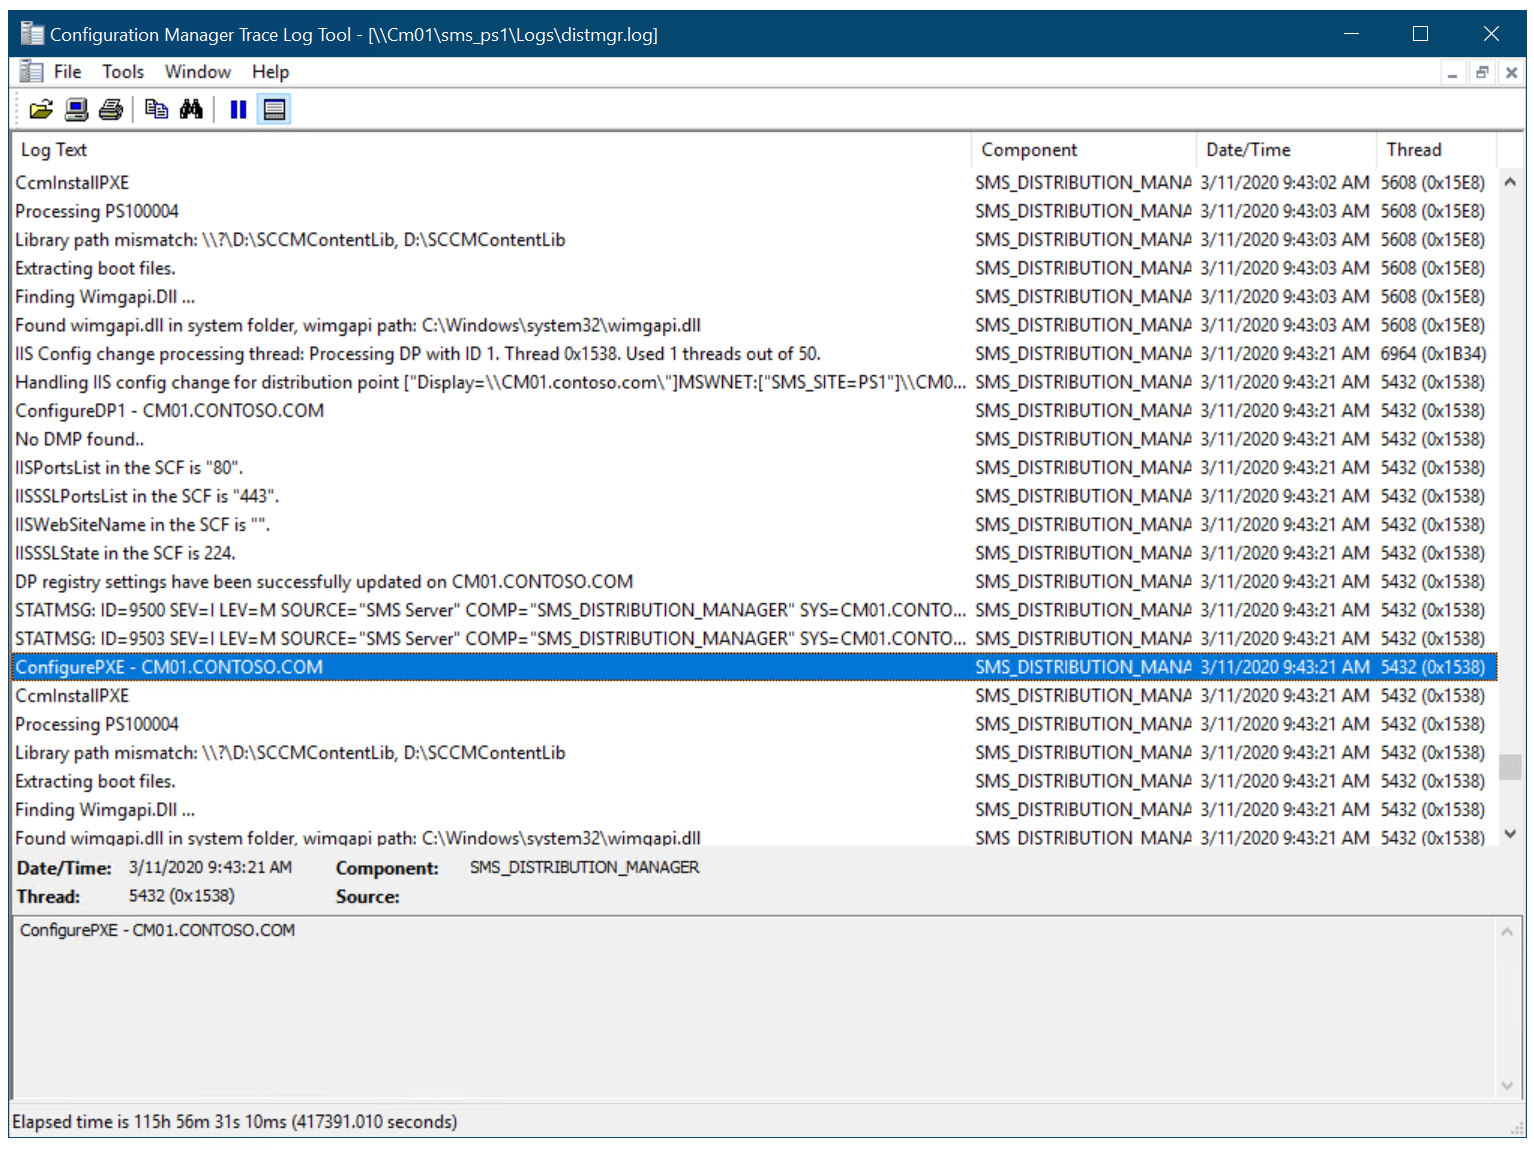
The
distmgr.logdisplays a successful configuration of PXE on the distribution point.Verify that you've seven files in each of the folders
D:\RemoteInstall\SMSBoot\x86andD:\RemoteInstall\SMSBoot\x64.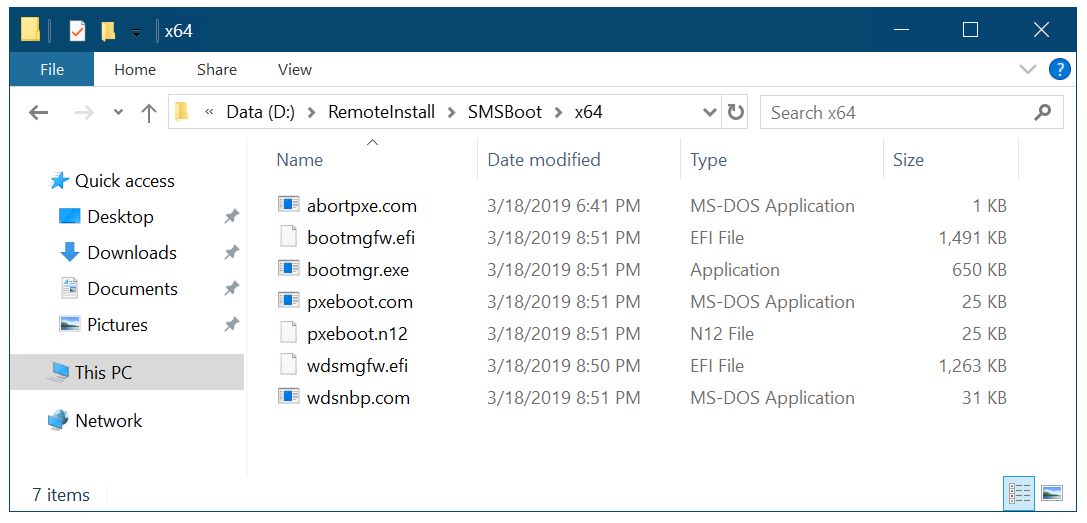
The contents of the D:\RemoteInstall\SMSBoot\x64 folder after you enable PXE.
Note
These files are used by WDS. They aren't used by the ConfigMgr PXE Responder. This article doesn't use the ConfigMgr PXE Responder.
Next, see Create a custom Windows PE boot image with Configuration Manager.
Components of Configuration Manager operating system deployment
Operating system deployment with Configuration Manager is part of the normal software distribution infrastructure, but there are more components. For example, operating system deployment in Configuration Manager may use the State Migration Point role, which isn't used by normal application deployment in Configuration Manager. This section describes the Configuration Manager components involved with the deployment of an operating system, such as Windows 10.
State migration point (SMP). The state migration point is used to store user state migration data during computer replace scenarios.
Distribution point (DP). The distribution point is used to store all packages in Configuration Manager, including the operating system deployment-related packages.
Software update point (SUP). The software update point, which is normally used to deploy updates to existing machines, also can be used to update an operating system as part of the deployment process. You also can use offline servicing to update the image directly on the Configuration Manager server.
Reporting services point. The reporting services point can be used to monitor the operating system deployment process.
Boot images. Boot images are the Windows Preinstallation Environment (Windows PE) images Configuration Manager uses to start the deployment.
Operating system images. The operating system image package contains only one file, the custom .wim image. This image is typically the production deployment image.
Operating system installers. The operating system installers were originally added to create reference images using Configuration Manager. Instead, we recommend that you use MDT Lite Touch to create your reference images. For more information on how to create a reference image, see Create a Windows 10 reference image.
Drivers. Like MDT Lite Touch, Configuration Manager also provides a repository (catalog) of managed device drivers.
Task sequences. The task sequences in Configuration Manager look and feel much like the sequences in MDT Lite Touch, and they're used for the same purpose. However, in Configuration Manager, the task sequence is delivered to the clients as a policy via the Management Point (MP). MDT provides more task sequence templates to Configuration Manager.
Note
The Windows Assessment and Deployment Kit (ADK) for Windows 10 is also required to support management and deployment of Windows 10.
Why integrate MDT with Configuration Manager
As noted above, MDT adds many enhancements to Configuration Manager. While these enhancements are called Zero Touch, that name doesn't reflect how deployment is conducted. The following sections provide a few samples of the 280 enhancements that MDT adds to Configuration Manager.
Note
MDT installation requires the following:
- The Windows ADK for Windows 10 (installed in the previous procedure)
- Windows PowerShell (version 5.1 is recommended; type $host to check)
- Microsoft .NET Framework
MDT enables dynamic deployment
When MDT is integrated with Configuration Manager, the task sequence processes more instructions from the MDT rules. In its most simple form, these settings are stored in a text file, the CustomSettings.ini file, but you can store the settings in Microsoft SQL Server databases, or have Microsoft Visual Basic Scripting Edition (VBScripts) or web services provide the settings used.
The task sequence uses instructions that allow you to reduce the number of task sequences in Configuration Manager and instead store settings outside the task sequence. Here are a few examples:
The following settings instruct the task sequence to install the HP Hotkeys package, but only if the hardware is an HP EliteBook 8570w. You don't have to add the package to the task sequence.
[Settings]
Priority=Model
[HP EliteBook 8570w]
Packages001=PS100010:Install HP Hotkeys
The following settings instruct the task sequence to put laptops and desktops in different organizational units (OUs) during deployment, assign different computer names, and finally have the task sequence install the Cisco VPN client, but only if the machine is a laptop.
[Settings]
Priority= ByLaptopType, ByDesktopType
[ByLaptopType]
Subsection=Laptop-%IsLaptop%
[ByDesktopType]
Subsection=Desktop-%IsDesktop%
[Laptop-True]
Packages001=PS100012:Install Cisco VPN Client
OSDComputerName=LT-%SerialNumber%
MachineObjectOU=ou=laptops,ou=Contoso,dc=contoso,dc=com
[Desktop-True]
OSDComputerName=DT-%SerialNumber%
MachineObjectOU=ou=desktops,ou=Contoso,dc=contoso,dc=com
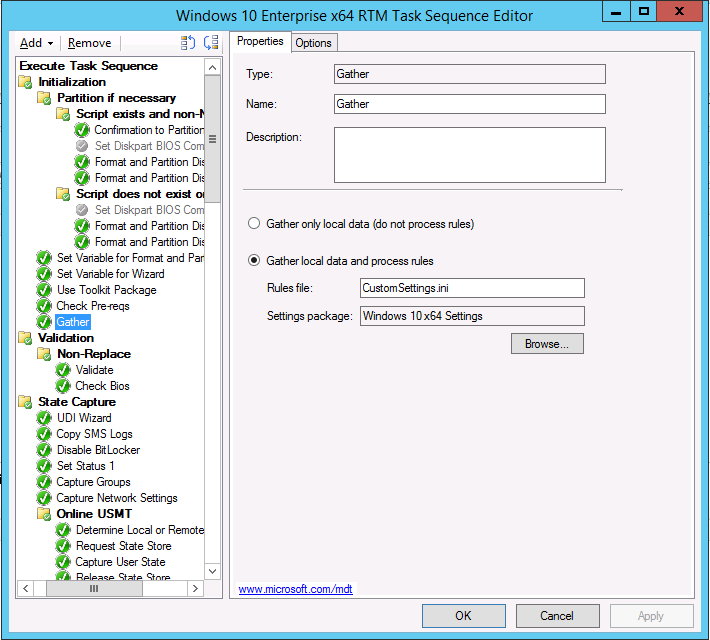
The Gather action in the task sequence is reading the rules.
MDT adds an operating system deployment simulation environment
When testing a deployment, it's important to be able to quickly test any changes you make to the deployment without needing to run through an entire deployment. MDT rules can be tested quickly, saving significant testing time in a deployment project. For more information, see Configure MDT settings.
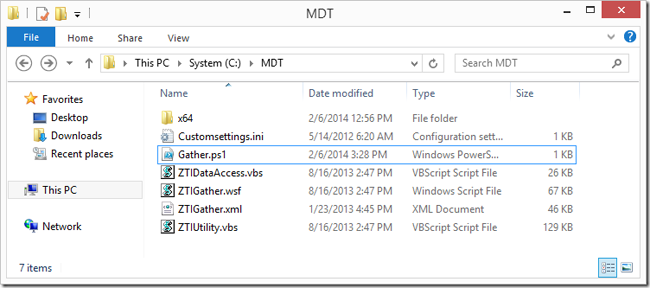
The folder that contains the rules, a few scripts from MDT, and a custom script (Gather.ps1).
MDT adds real-time monitoring
With MDT integration, you can follow your deployments in real time, and if you've access to Microsoft Diagnostics and Recovery Toolkit (DaRT), you can even remote into Windows Preinstallation Environment (Windows PE) during deployment. The real-time monitoring data can be viewed from within the MDT Deployment Workbench, via a web browser, Windows PowerShell, the Event Viewer, or Microsoft Excel 2013. In fact, any script or app that can read an Open Data (OData) feed can read the information.
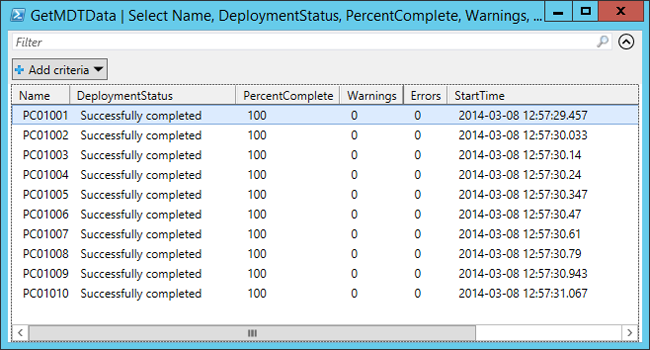
View the real-time monitoring data with PowerShell.
MDT adds an optional deployment wizard
For some deployment scenarios, you may need to prompt the user for information during deployment such as the computer name, the correct organizational unit (OU) for the computer, or which applications should be installed by the task sequence. With MDT integration, you can enable the User-Driven Installation (UDI) wizard to gather the required information, and customize the wizard using the UDI Wizard Designer.
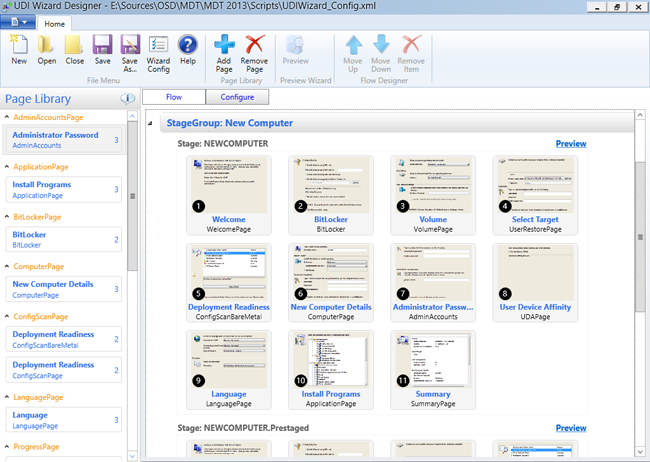
The optional UDI wizard opens in the UDI Wizard Designer.
MDT Zero Touch simply extends Configuration Manager with many useful built-in operating system deployment components. By providing well-established, supported solutions, MDT reduces the complexity of deployment in Configuration Manager.
Why use MDT Lite Touch to create reference images
You can create reference images for Configuration Manager in Configuration Manager, but in general it is recommended to create them in MDT Lite Touch for the following reasons:
You can use the same image for every type of operating system deployment - Microsoft Virtual Desktop Infrastructure (VDI), Microsoft System Center Virtual Machine Manager (VMM), MDT, Configuration Manager, Windows Deployment Services (WDS), and more.
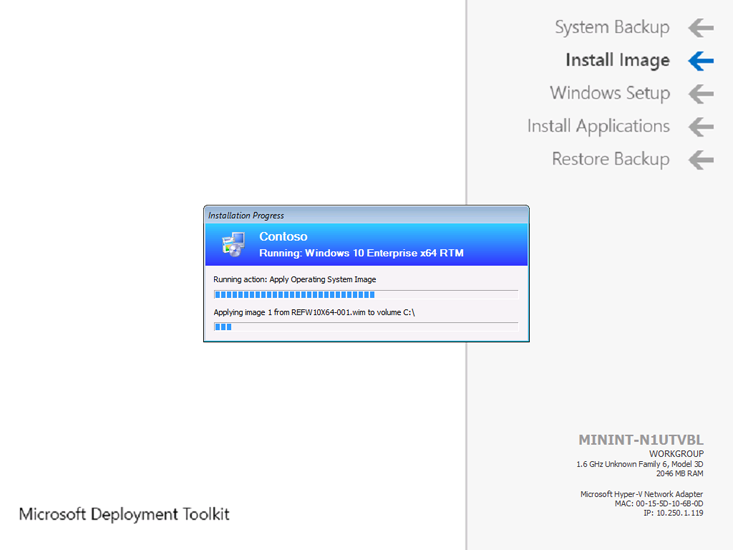
Configuration Manager performs deployment in the LocalSystem context, which means that you can't configure the Administrator account with all of the settings that you would like to be included in the image. MDT runs in the context of the Local Administrator, which means you can configure the look and feel of the configuration and then use the CopyProfile functionality to copy these changes to the default user during deployment.
The Configuration Manager task sequence suppresses user interface interaction.
MDT Lite Touch supports a Suspend action that allows for reboots, which is useful when you need to perform a manual installation or check the reference image before it's automatically captured.
MDT Lite Touch doesn't require any infrastructure and is easy to delegate.
Related articles
Create a custom Windows PE boot image with Configuration Manager
Add a Windows 10 operating system image using Configuration Manager
Create an application to deploy with Windows 10 using Configuration Manager
Add drivers to a Windows 10 deployment with Windows PE using Configuration Manager
Create a task sequence with Configuration Manager and MDT
Deploy Windows 10 using PXE and Configuration Manager
Refresh a Windows 7 SP1 client with Windows 10 using Configuration Manager
Replace a Windows 7 SP1 client with Windows 10 using Configuration Manager
Feedback
Coming soon: Throughout 2024 we will be phasing out GitHub Issues as the feedback mechanism for content and replacing it with a new feedback system. For more information see: https://aka.ms/ContentUserFeedback.
Submit and view feedback for