Note: Microsoft is providing this information as a convenience to you. These sites are not controlled by Microsoft, and Microsoft cannot make any representations regarding the quality, safety, or suitability of any software or information found there. Please ensure that you fully understand the risks before using any suggestions from the below link.
Hi @Mudassir Tariq
Thank you for posting your question in the Microsoft Q&A forum.
Please note that we have a dedicated forum for Power Automate related questions, this forum gathers expert in this field that can provide you a clearer instruction.
However, I will try my best to assist you. You can try out this flow.
First, make sure you have Power Automate License. In Zoho, you need to register a server-based app.
Register Your App | OAuth 2.0 - Zoho
Server-based Apps - Refresh Access Token | OAuth 2.0 - Zoho
Copy information like client_id, client_secret, refresh_token.
Create a form in your Zoho Creator app with at least these fields (field link names must match exactly what you use in the code):
- Sender_Email → Email field
- Recipient_Email → Single Line or Multi Line
- Email_Subject → Single Line
- Email_Body → Multi Line Text (or Rich Text if you want HTML Body)
Now go to Power Automate, create an automated cloud flow.
- Choose a trigger "When a new email arrives (V3)"
- Get access token from your app in Zoho.
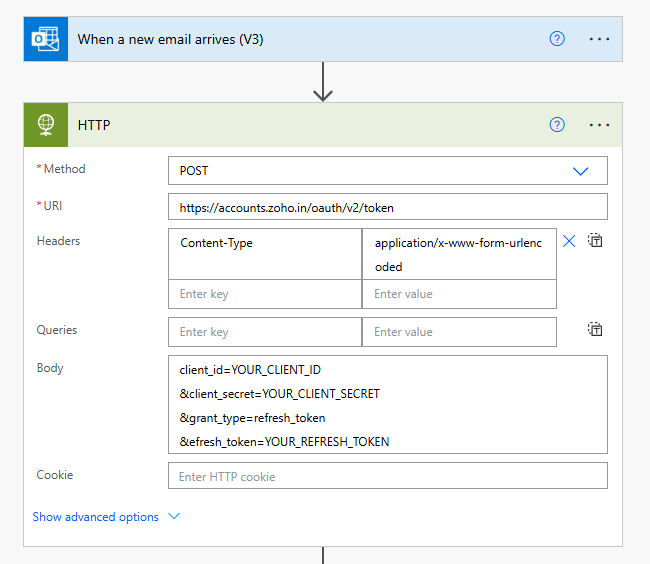
   client_id=YOUR_CLIENT_ID
   &client_secret=YOUR_CLIENT_SECRET
   &grant_type=refresh_token
   &efresh_token=YOUR_REFRESH_TOKEN
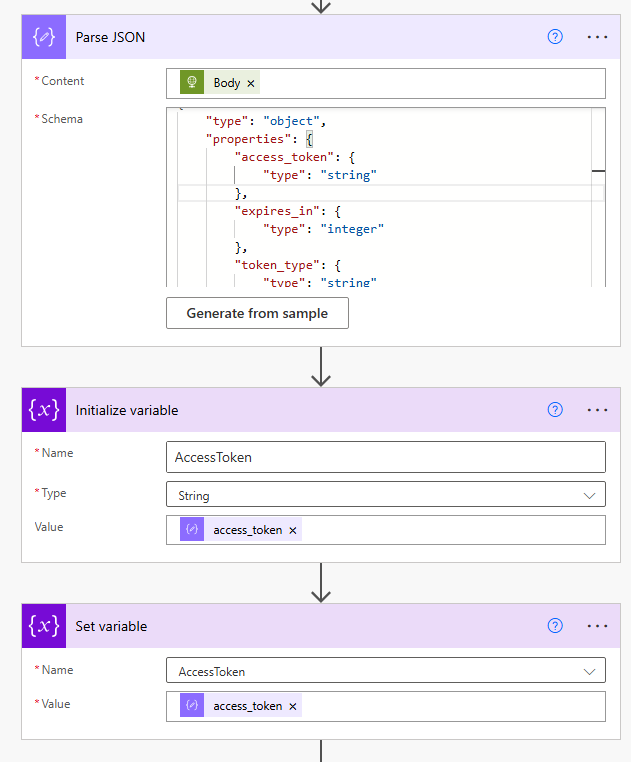
- Parse JSON, this one to take out the attributes we got from the steps 2. (I tried to post the code here, but it doesn't show up somehow, you can check via private message for the code)
- Initialize variable
access token
- Set variable
access token
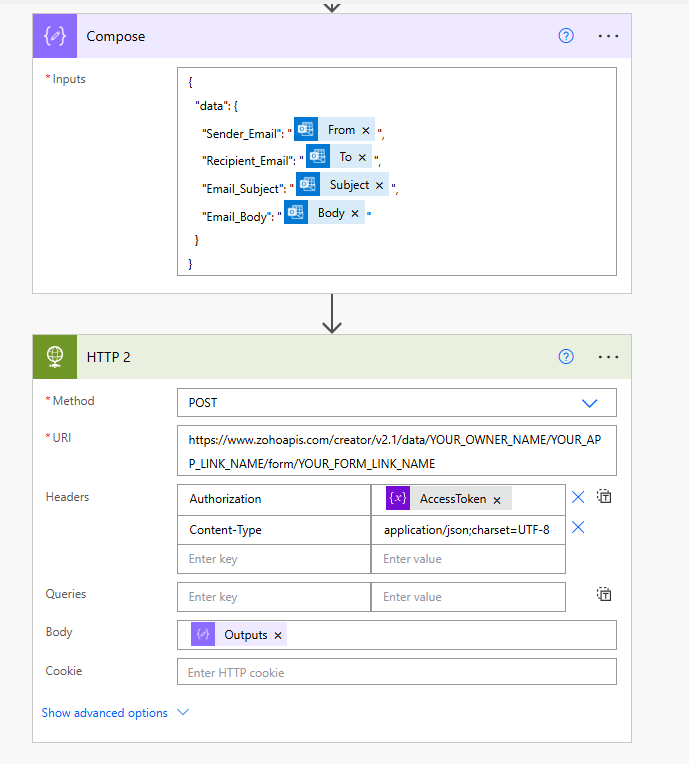
6.Use Compose to prepare data; we will use this to send data to the record.
7.Make a POST HTTP call to add data. Add Records - API v2.1 | Zoho Creator Help
If you have any trouble running the flow, you can post here, reach out to Power Automate platform or Zoho Creator platform to receive better support.
Thanks for your understanding.
If this answer helped you, please click "Confirm Answer" and give it positive feedback. If you have any questions about this answer, please click on "Comment".
Note: To receive email notifications related to this topic, please follow the instructions in the documentation to enable email notifications.
' cx='32' cy='32' r='32' /%3E%3Ctext x='50%25' y='55%25' dominant-baseline='middle' text-anchor='middle' fill='%23FFF' %3EMT%3C/text%3E%3C/svg%3E)

' cx='32' cy='32' r='32' /%3E%3Ctext x='50%25' y='55%25' dominant-baseline='middle' text-anchor='middle' fill='%23FFF' %3EJP%3C/text%3E%3C/svg%3E)