The familiar HTTP request/response model was designed to be easy to work with and scalable. However, nowadays end users demand a lot more from the web than it was originally designed for. The HTTP protocol requires users to initiate the request in order to receive a response. But developers need a way to send data from server to clients without them asking for it; in other words, they need to "push" data to clients, like pushing the latest bidding price of a product on an auction site or fast-moving stock prices in a financial application.
This quickstart guide demonstrates how to
subscribe to messages from an application server
push data from an application server to all connected clients
To subscribe to messages pushed from your application server, a client, be it a browser, a mobile app or an IoT device, needs to connect to your Web PubSub resource first, and listens for appropriate message event.
Create a project directory named subscriber and install required dependencies
mkdir subscriber
cd subscriber
npm init -y

# The client SDK is available as a module on NPM
npm install @azure/web-pubsub-client
Connect to your Web PubSub resource and register a listener for the server-message event
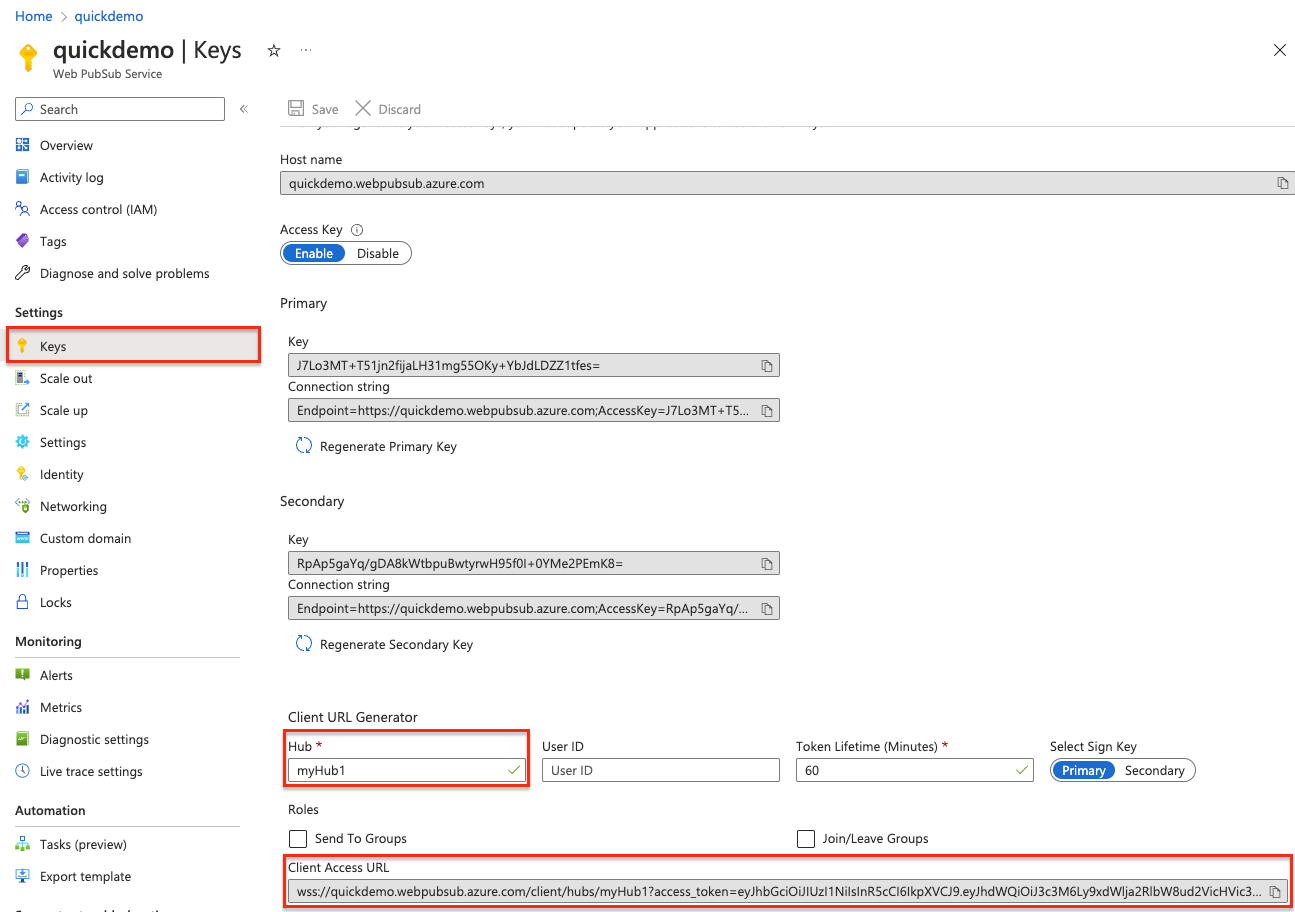
A client uses a Client Access URL to connect and authenticate with your resource.
This URL follows a pattern of wss://<service_name>.webpubsub.azure.com/client/hubs/<hub_name>?access_token=<token>. A client can have a few ways to obtain the Client Access URL. For this quick start, you can copy and paste one from Azure portal shown in the following diagram. It's best practice to not hard code the Client Access URL in your code. In the production world, we usually set up an app server to return this URL on demand. Generate Client Access URL describes the practice in detail.
As shown in the diagram above, the client joins the hub named myHub1.
In the subscriber project folder, create a file named subscribe.js with the following code
const { WebPubSubClient } = require("@azure/web-pubsub-client");

// Instantiates the client object
// <client-access-url> is copied from Azure portal mentioned above
const client = new WebPubSubClient("<client-access-url>")

// Registers a handler for the "server-message" event
client.on("server-message", (e) => {
    console.log(`Received message ${e.message.data}`)
});

// Before a client can receive a message,
// you must invoke start() on the client object.
client.start();
Run the program
node subscribe.js
Now this client establishes a connection with your Web PubSub resource and is ready to receive messages pushed from your application server.
Create a project directory named subscriber and install required dependencies
mkdir subscriber
cd subscriber
# Create a .net console app
dotnet new console

# Add the client SDK
dotnet add package Azure.Messaging.WebPubSub.Client --prerelease
Connect to your Web PubSub resource and register a listener for the ServerMessageReceived event
A client uses a Client Access URL to connect and authenticate with your resource.
This URL follows a pattern of wss://<service_name>.webpubsub.azure.com/client/hubs/<hub_name>?access_token=<token>. A client can have a few ways to obtain the Client Access URL. For this quick start, you can copy and paste one from Azure portal shown in the following diagram. It's best practice to not hard code the Client Access URL in your code. In the production world, we usually set up an app server to return this URL on demand. Generate Client Access URL describes the practice in detail.
As shown in the diagram above, the client joins the hub named myHub1.
Replace the code in the Program.cs with the following code
using Azure.Messaging.WebPubSub.Clients;

// Instantiates the client object
// <client-access-uri> is copied from Azure portal mentioned above
var client = new WebPubSubClient(new Uri("<client-access-uri>"));
client.ServerMessageReceived += eventArgs =>
{
    Console.WriteLine($"Receive message: {eventArgs.Message.Data}");
    return Task.CompletedTask;
};

client.Connected += eventArgs =>
{
    Console.WriteLine("Connected");
    return Task.CompletedTask;
};

await client.StartAsync();


// This keeps the subscriber active until the user closes the stream by pressing Ctrl+C
var streaming = Console.ReadLine();
while (streaming != null)
{
    if (!string.IsNullOrEmpty(streaming))
    {
        await client.SendToGroupAsync("stream", BinaryData.FromString(streaming + Environment.NewLine), WebPubSubDataType.Text);
    }

    streaming = Console.ReadLine();
}

await client.StopAsync();
Run the following command
dotnet run
Now this client establishes a connection with your Web PubSub resource and is ready to receive messages pushed from your application server.
Create a project directory named subscriber and install required dependencies:
Use the WebSocket API to connect to your Web PubSub resource. Create a subscribe.py file with the following code
import asyncio
import sys
import websockets

from azure.messaging.webpubsubservice import WebPubSubServiceClient


async def connect(url):
    async with websockets.connect(url) as ws:
        print('connected')
        while True:
            print('Received message: ' + await ws.recv())

if __name__ == '__main__':

    if len(sys.argv) != 3:
        print('Usage: python subscribe.py <connection-string> <hub-name>')
        exit(1)

    connection_string = sys.argv[1]
    hub_name = sys.argv[2]

    service = WebPubSubServiceClient.from_connection_string(connection_string, hub=hub_name)
    token = service.get_client_access_token()

    try:
        asyncio.get_event_loop().run_until_complete(connect(token['url']))
        except KeyboardInterrupt:
            pass
The code creates a WebSocket connection that is connected to a hub in Web PubSub. A hub is a logical unit in Web PubSub where you can publish messages to a group of clients. Key concepts contains the detailed explanation about the terms used in Web PubSub.
The Web PubSub service uses JSON Web Token (JWT) authentication. The sample code uses WebPubSubServiceClient.GetClientAccessUri() in Web PubSub SDK to generate a URL to the service that contains the full URL with a valid access token.
After the connection is established, your client will receive messages through the WebSocket connection. Use await ws.recv() to listen for incoming messages.
Run the following command
python subscribe.py $connection_string "myHub1"
Create a project directory named pubsub
mkdir pubsub
cd pubsub
Use Maven to create a new console app called webpubsub-quickstart-subscriber;
In Web PubSub, you can connect to the service and subscribe to messages through WebSocket connections. WebSocket is a full-duplex communication channel allowing the service to push messages to your client in real time. You can use any API or library that supports WebSocket. For this sample, we use package Java-WebSocket.
Go to the /src/main/java/com/webpubsub/quickstart directory.
Edit replace the contents of the App.java file with the following code:
package com.webpubsub.quickstart;

import com.azure.messaging.webpubsub.*;
import com.azure.messaging.webpubsub.models.*;

import org.java_websocket.client.WebSocketClient;
import org.java_websocket.handshake.ServerHandshake;

import java.io.IOException;
import java.net.URI;
import java.net.URISyntaxException;

/**
* Connect to Azure Web PubSub service using WebSocket protocol
*/
public class App
{
    public static void main( String[] args ) throws IOException, URISyntaxException
    {
        if (args.length != 2) {
            System.out.println("Expecting 2 arguments: <connection-string> <hub-name>");
            return;
        }

        WebPubSubServiceClient service = new WebPubSubServiceClientBuilder()
            .connectionString(args[0])
            .hub(args[1])
            .buildClient();

        WebPubSubClientAccessToken token = service.getClientAccessToken(new GetClientAccessTokenOptions());

        WebSocketClient webSocketClient = new WebSocketClient(new URI(token.getUrl())) {
            @Override
            public void onMessage(String message) {
                System.out.println(String.format("Message received: %s", message));
            }

            @Override
            public void onClose(int arg0, String arg1, boolean arg2) {
                // TODO Auto-generated method stub
            }

            @Override
            public void onError(Exception arg0) {
                // TODO Auto-generated method stub
            }

            @Override
            public void onOpen(ServerHandshake arg0) {
                // TODO Auto-generated method stub
            }

        };

        webSocketClient.connect();
        System.in.read();
    }
}
This code creates a WebSocket connection that is connected to a hub in Azure Web PubSub. A hub is a logical unit in Azure Web PubSub where you can publish messages to a group of clients. Key concepts contains the detailed explanation about the terms used in Azure Web PubSub.
The Web PubSub service uses JSON Web Token (JWT) authentication. The sample code uses WebPubSubServiceClient.GetClientAccessUri() in Web PubSub SDK to generate a URL to the service that contains the full URL with a valid access token.
After connection is established, your client will receive messages through the WebSocket connection. Use onMessage(String message) to listen for incoming messages.
Now that you have a client connected your Web PubSub resource, you can push messages from an application server at any time using the server SDK provided by Web PubSub.
Create a new project directory named publisher and install required dependencies
mkdir publisher
cd publisher

npm init

# This command installs the server SDK from NPM,
# which is different from the client SDK you used in subscribe.js
npm install --save @azure/web-pubsub
Create a publish.js file with the following code
const { WebPubSubServiceClient } = require('@azure/web-pubsub');

// This is the hub name we used on Azure portal when generating the Client Access URL.
// It ensures this server can push messages to clients in the hub named "myHub1".
const hub = "myHub1";

let server = new WebPubSubServiceClient(process.env.WebPubSubConnectionString, hub);

// By default, the content type is `application/json`.
// Specify contentType as `text/plain` for this demo.
server.sendToAll(process.argv[2], { contentType: "text/plain" });
The server.sendToAll() call sends a message to all connected clients in a hub.
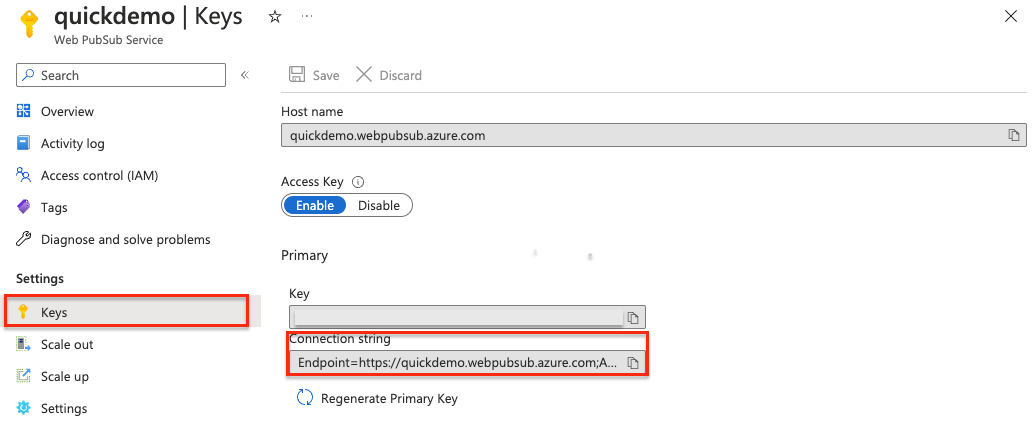
Get the connection string
Important
A connection string includes authorization information required for your application to access Web PubSub service. The access key inside the connection string is similar to a root password for your service.
For this quickstart guide, we'll get it from Azure portal as shown below.
Run the server program
Run the following commands in a new command shell.
# Set the environment variable for your connection string.
export WebPubSubConnectionString="<Put your connection string here>"
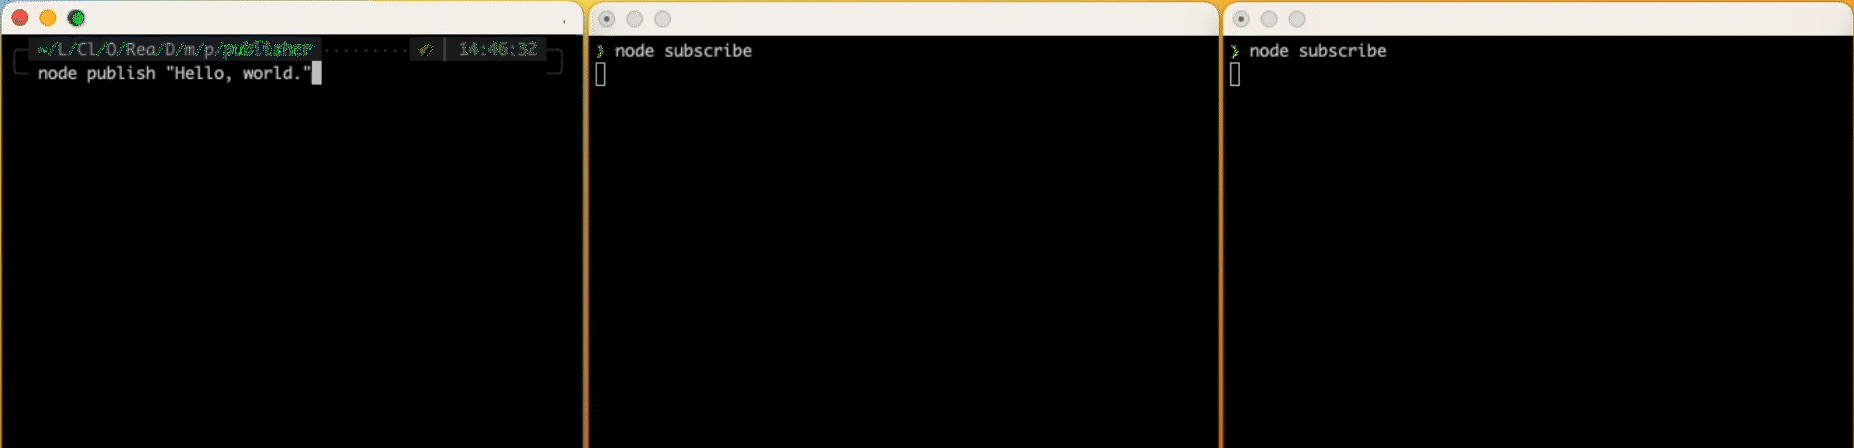
node publish.js "Hello World"
Observe the received messages on the client side
Try running the same "subscribe" program in multiple command shells to stimulate more than clients. As soon as the "publish" program is run, you should see messages being delivered in real-time to all these clients.
Create a project directory named publisher and install required dependencies:
mkdir publisher
cd publisher
dotnet new console
dotnet add package Azure.Messaging.WebPubSub
Replace the Program.cs file with the following code
using System;
using System.Threading.Tasks;
using Azure.Messaging.WebPubSub;

namespace publisher
{
    class Program
    {
        static async Task Main(string[] args)
        {
            if (args.Length != 3) {
                Console.WriteLine("Usage: publisher <connectionString> <hub> <message>");
                return;
            }
            var connectionString = args[0];
            var hub = args[1];
            var message = args[2];

            // Either generate the token or fetch it from server or fetch a temp one from the portal
            var serviceClient = new WebPubSubServiceClient(connectionString, hub);
            await serviceClient.SendToAllAsync(message);
        }
    }
}
The SendToAllAsync() call sends a message to all connected clients in the hub.
Run the server program to push messages to all connected clients
$connection_string="<connection-string>"
dotnet run $connection_string "myHub1" "Hello World"
Observe the received messages on the client side
# On the command shell used for running the "subscribe" program, you should see the received the messaged logged there.
# Try running the same "subscribe" program in multiple command shells, which simluates more than clients.
# Try running the "publish" program several times and you see messages being delivered in real-time to all these clients.
Message received: Hello World
First, create a project directory named publisher and install required dependencies:
mkdir publisher
cd publisher
# Create venv
python -m venv env
# Active venv
source ./env/bin/activate

pip install azure-messaging-webpubsubservice
Use the Azure Web PubSub SDK to publish a message to the service. Create a publish.py file with the below code:
import sys
from azure.messaging.webpubsubservice import WebPubSubServiceClient

if __name__ == '__main__':

    if len(sys.argv) != 4:
        print('Usage: python publish.py <connection-string> <hub-name> <message>')
        exit(1)

    connection_string = sys.argv[1]
    hub_name = sys.argv[2]
    message = sys.argv[3]

    service = WebPubSubServiceClient.from_connection_string(connection_string, hub=hub_name)
    res = service.send_to_all(message, content_type='text/plain')
    print(res)
The send_to_all() send the message to all connected clients in a hub.
Check the previous command shell to that the subscriber received the message:
Received message: Hello World
Go to the pubsub directory. Use Maven to create a publisher console app webpubsub-quickstart-publisher and go to the webpubsub-quickstart-publisher directory:
Use the Azure Web PubSub SDK to publish a message to the service. Go to the /src/main/java/com/webpubsub/quickstart directory, open the App.java file in your editor, and replace the contents with the following code:
package com.webpubsub.quickstart;

import com.azure.messaging.webpubsub.*;
import com.azure.messaging.webpubsub.models.*;

/**
* Publish messages using Azure Web PubSub service SDK
*
*/
public class App
{
    public static void main( String[] args )
    {
        if (args.length != 3) {
            System.out.println("Expecting 3 arguments: <connection-string> <hub-name> <message>");
            return;
        }

        WebPubSubServiceClient service = new WebPubSubServiceClientBuilder()
            .connectionString(args[0])
            .hub(args[1])
            .buildClient();
        service.sendToAll(args[2], WebPubSubContentType.TEXT_PLAIN);
    }
}
The sendToAll() call sends a message to all connected clients in a hub.
Go to the webpubsub-quickstart-publisher directory and run the project using the following command:
You can see that the previous subscriber received the message:
Message received: Hello World
Summary
This quickstart demonstrates how easy it's to push messages from an application server to all connected clients in a hub. Additionally, Web PubSub allows you to push messages to
a subset of the clients in a hub
a particular group in a hub
a subset of clients in a group
These APIs enable a wealth of use cases, allowing developers to focus on unique business logic while be assured that Web PubSub offers low latency (<100ms), high availability and massive scale (million+ simultaneous connections).
Next steps
In the next step, we'll explore how to work with the event system of Web PubSub, necessary to build complete web applications.
Coming soon: Throughout 2024 we will be phasing out GitHub Issues as the feedback mechanism for content and replacing it with a new feedback system. For more information see: https://aka.ms/ContentUserFeedback.