SMS and PSTN capabilities depend on the phone number you use and the country/region that you're operating within as determined by your Azure billing address. For more information, visit the Subscription eligibility documentation.
Important
For high-volume orders or in the event that your desired phone number is unavailable, please visit this page for further assistance.
To begin provisioning numbers, go to your Communication Services resource on the Azure portal.
Search for Available Phone Numbers
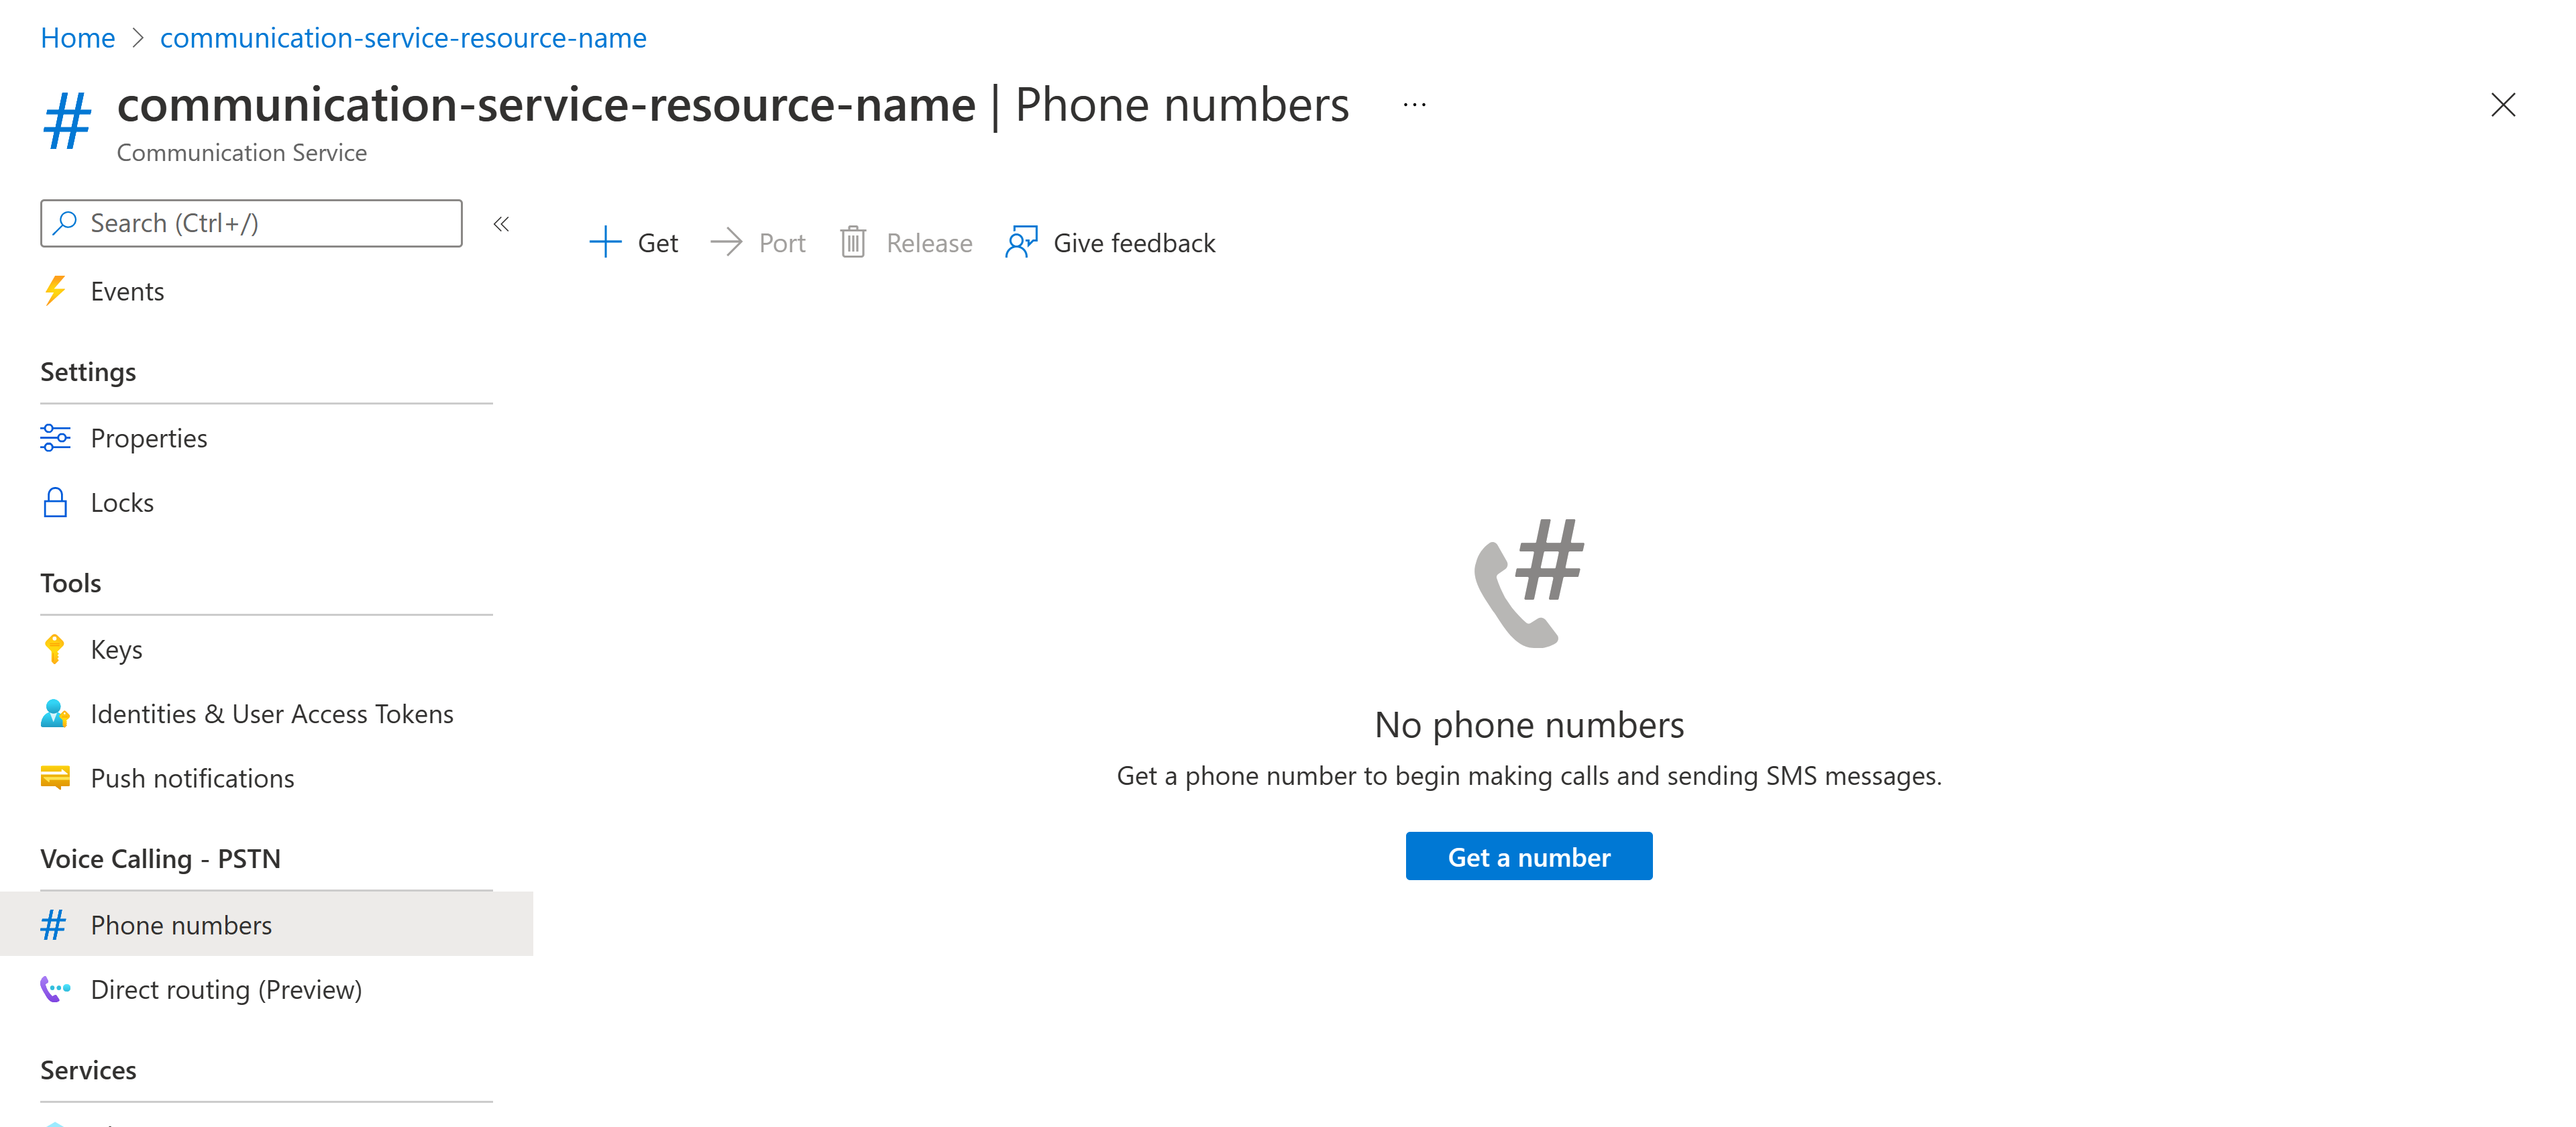
Navigate to the Phone Numbers blade in the resource menu.
Press the Get button to launch the wizard. The wizard on the Phone numbers blade will walk you through a series of questions that helps you choose the phone number that best fits your scenario.
You will first need to choose the Country/region where you would like to provision the phone number. After selecting the Country/region, you will then need to select the Use case which best suites your needs.
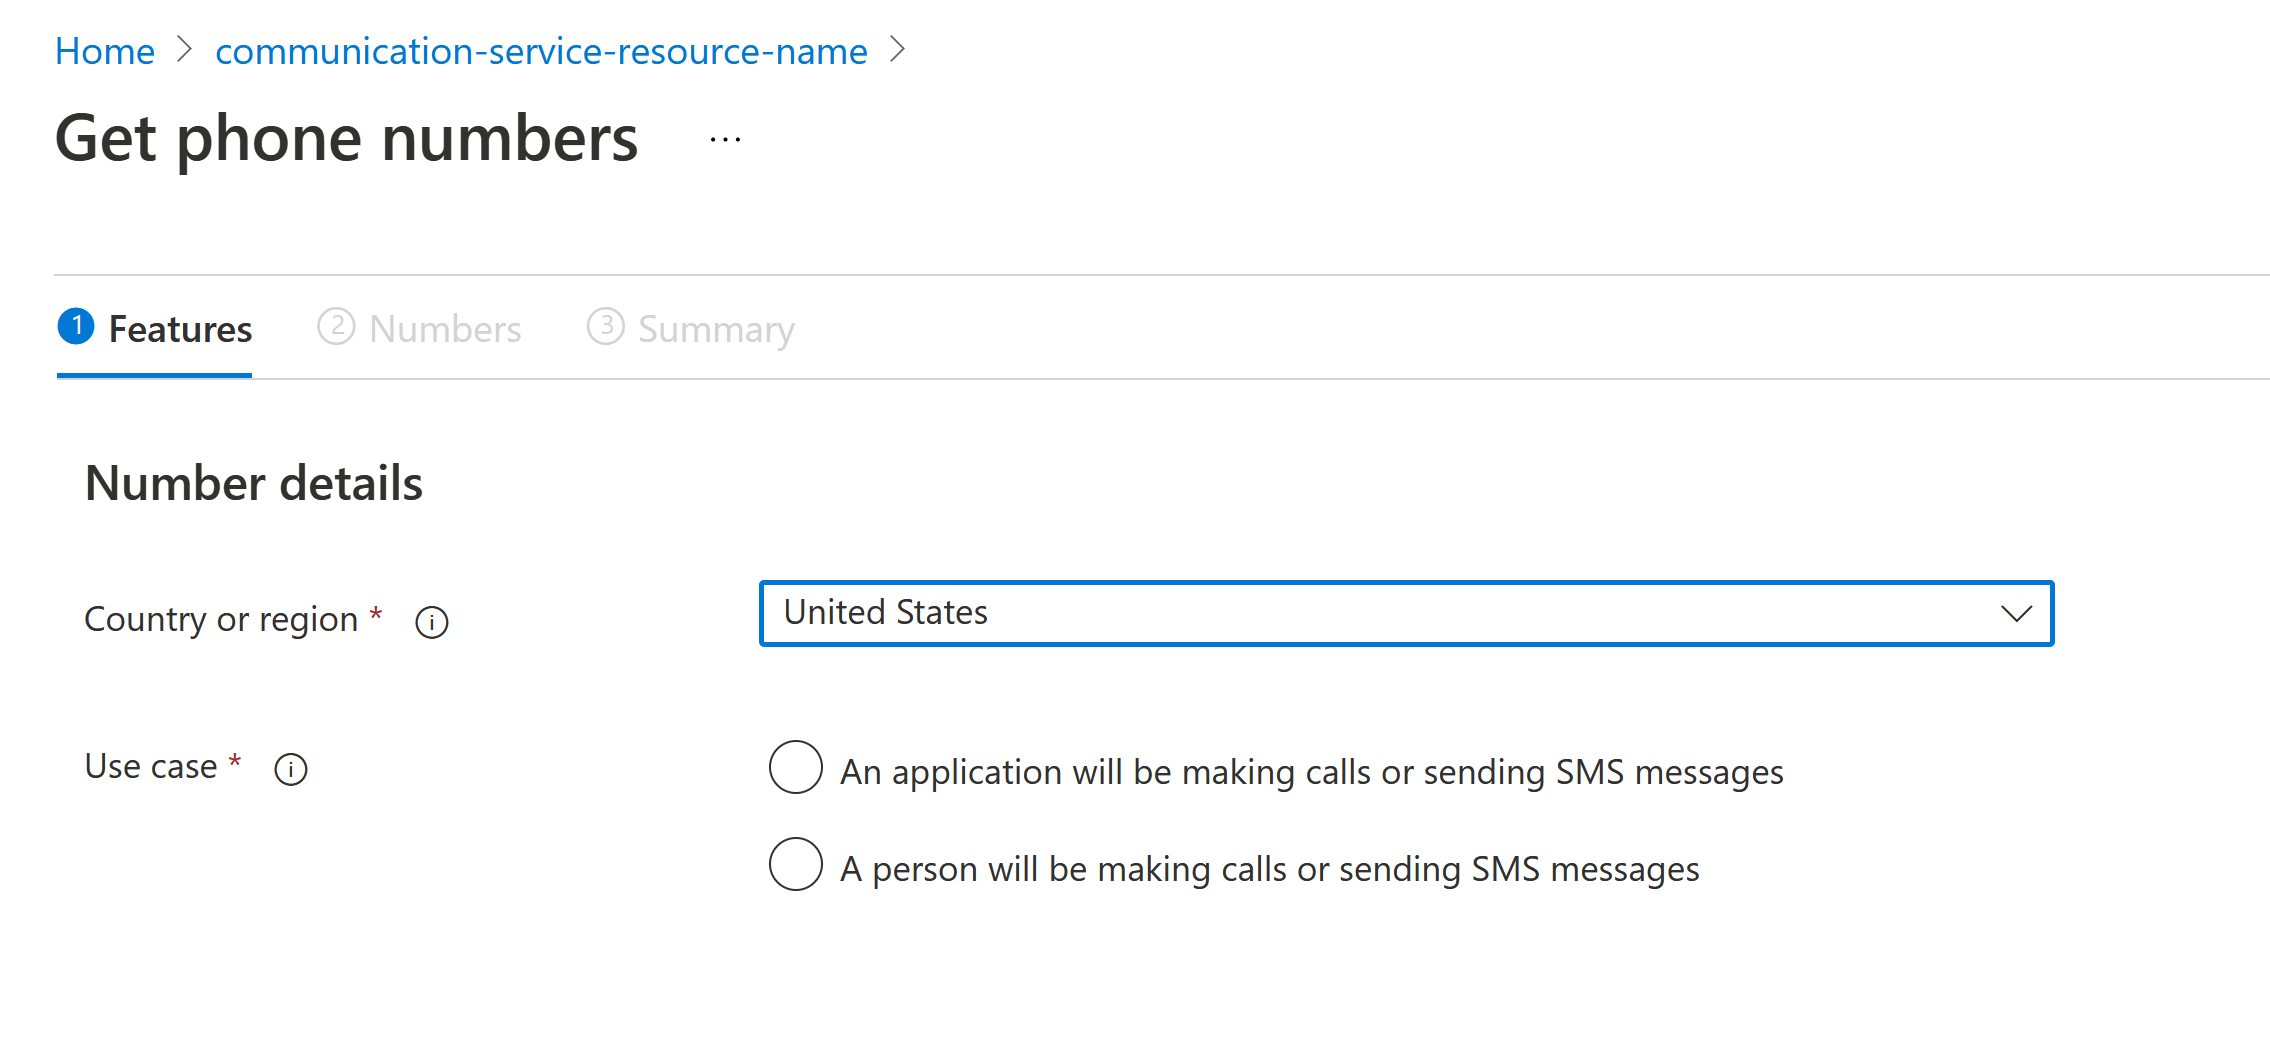
Select your phone number features
Configuring your phone number is broken down into two steps:
You can select from two phone number types: Local, and Toll-free. When you've selected a number type, you can then choose the feature.
In our example, we've selected a Toll-free number type with Make calls and Send and receive SMS features.
From here, click the Next: Numbers button at the bottom of the page to customize the phone number(s) you would like to provision.
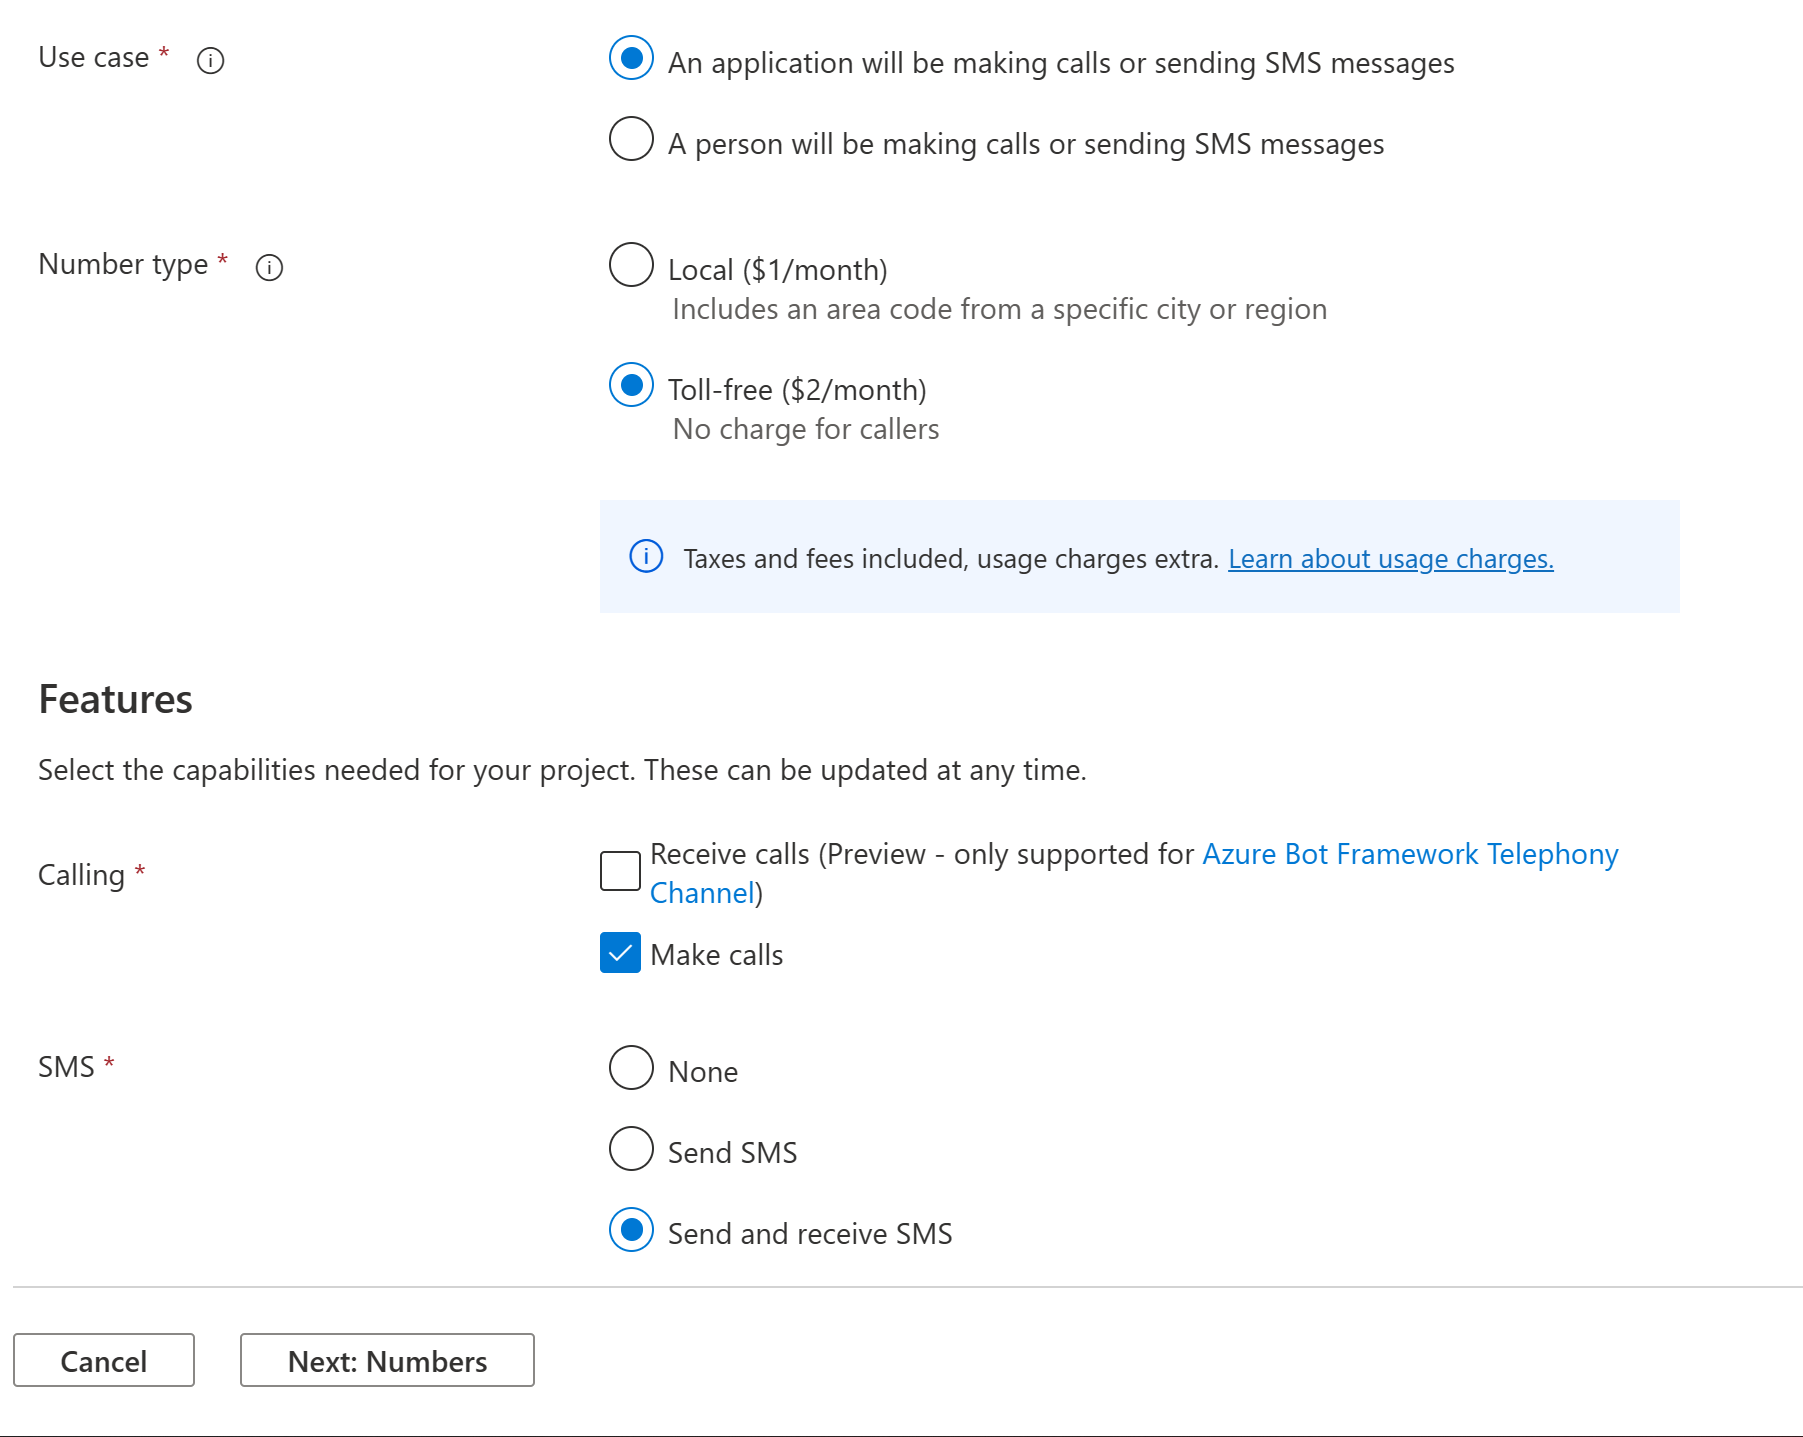
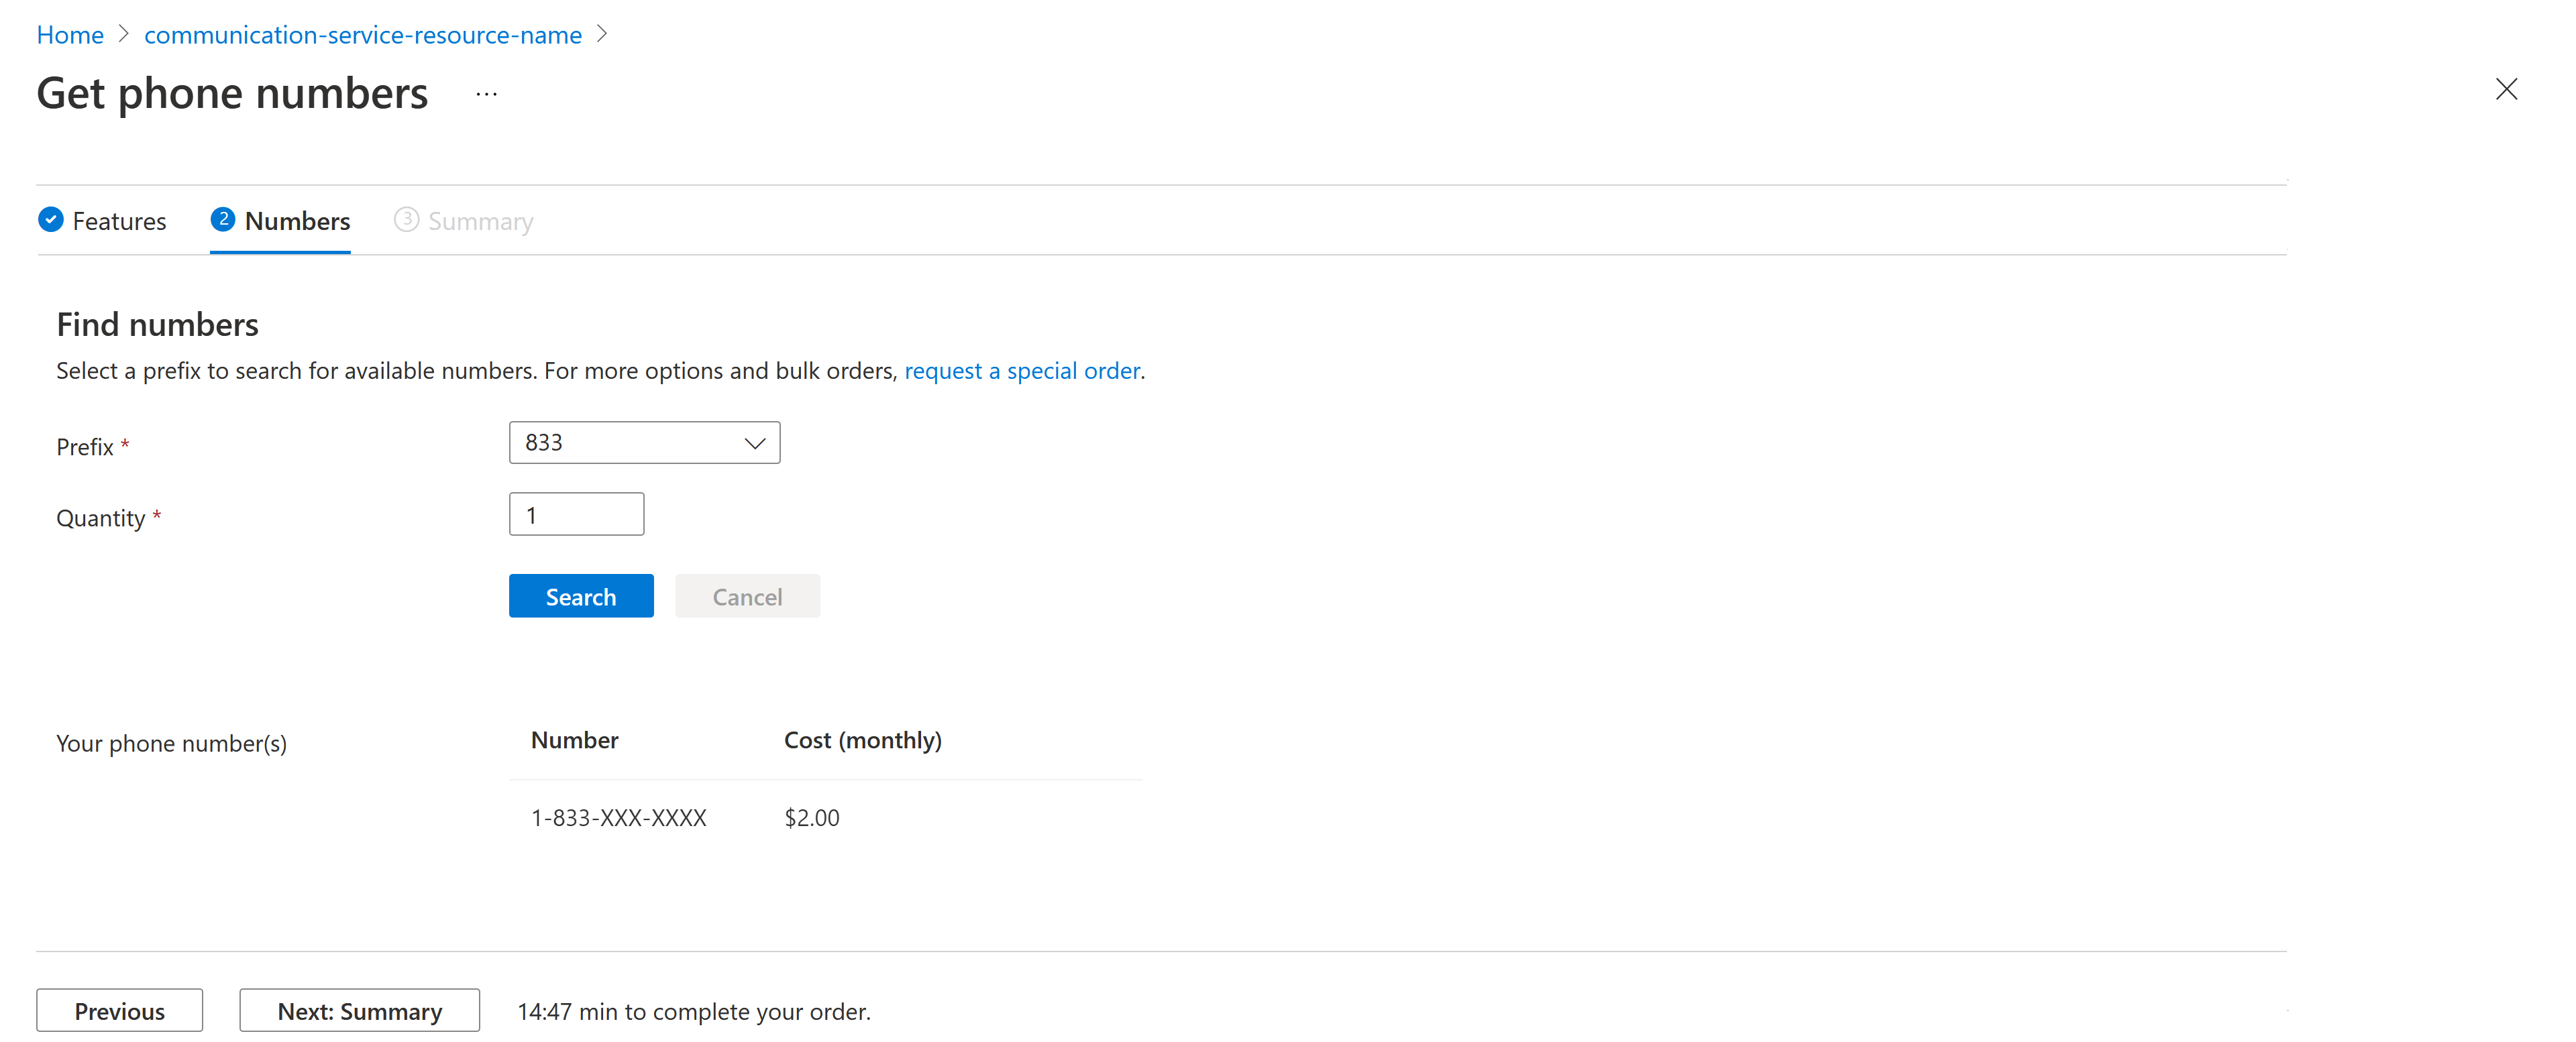
Customizing phone numbers
On the Numbers page, you will customize the phone number(s) which you'd like to provision.
Note
This quickstart is showing the Toll-free Number type customization flow. The experience may be slightly different if you have chosen the Local Number type, but the end-result will be the same.
Choose the Area code from the list of available Area codes and enter the quantity which you'd like to provision, then click Search to find numbers which meet your selected requirements. The phone numbers which meet your needs will be shown along with their monthly cost.
Note
Availability depends on the Number type, location, and the features that you have selected.
Numbers are reserved for a short time before the transaction expires. If the transaction expires, you will need to re-select the numbers.
To view the purchase summary and place your order, click the Next: Summary button at the bottom of the page.
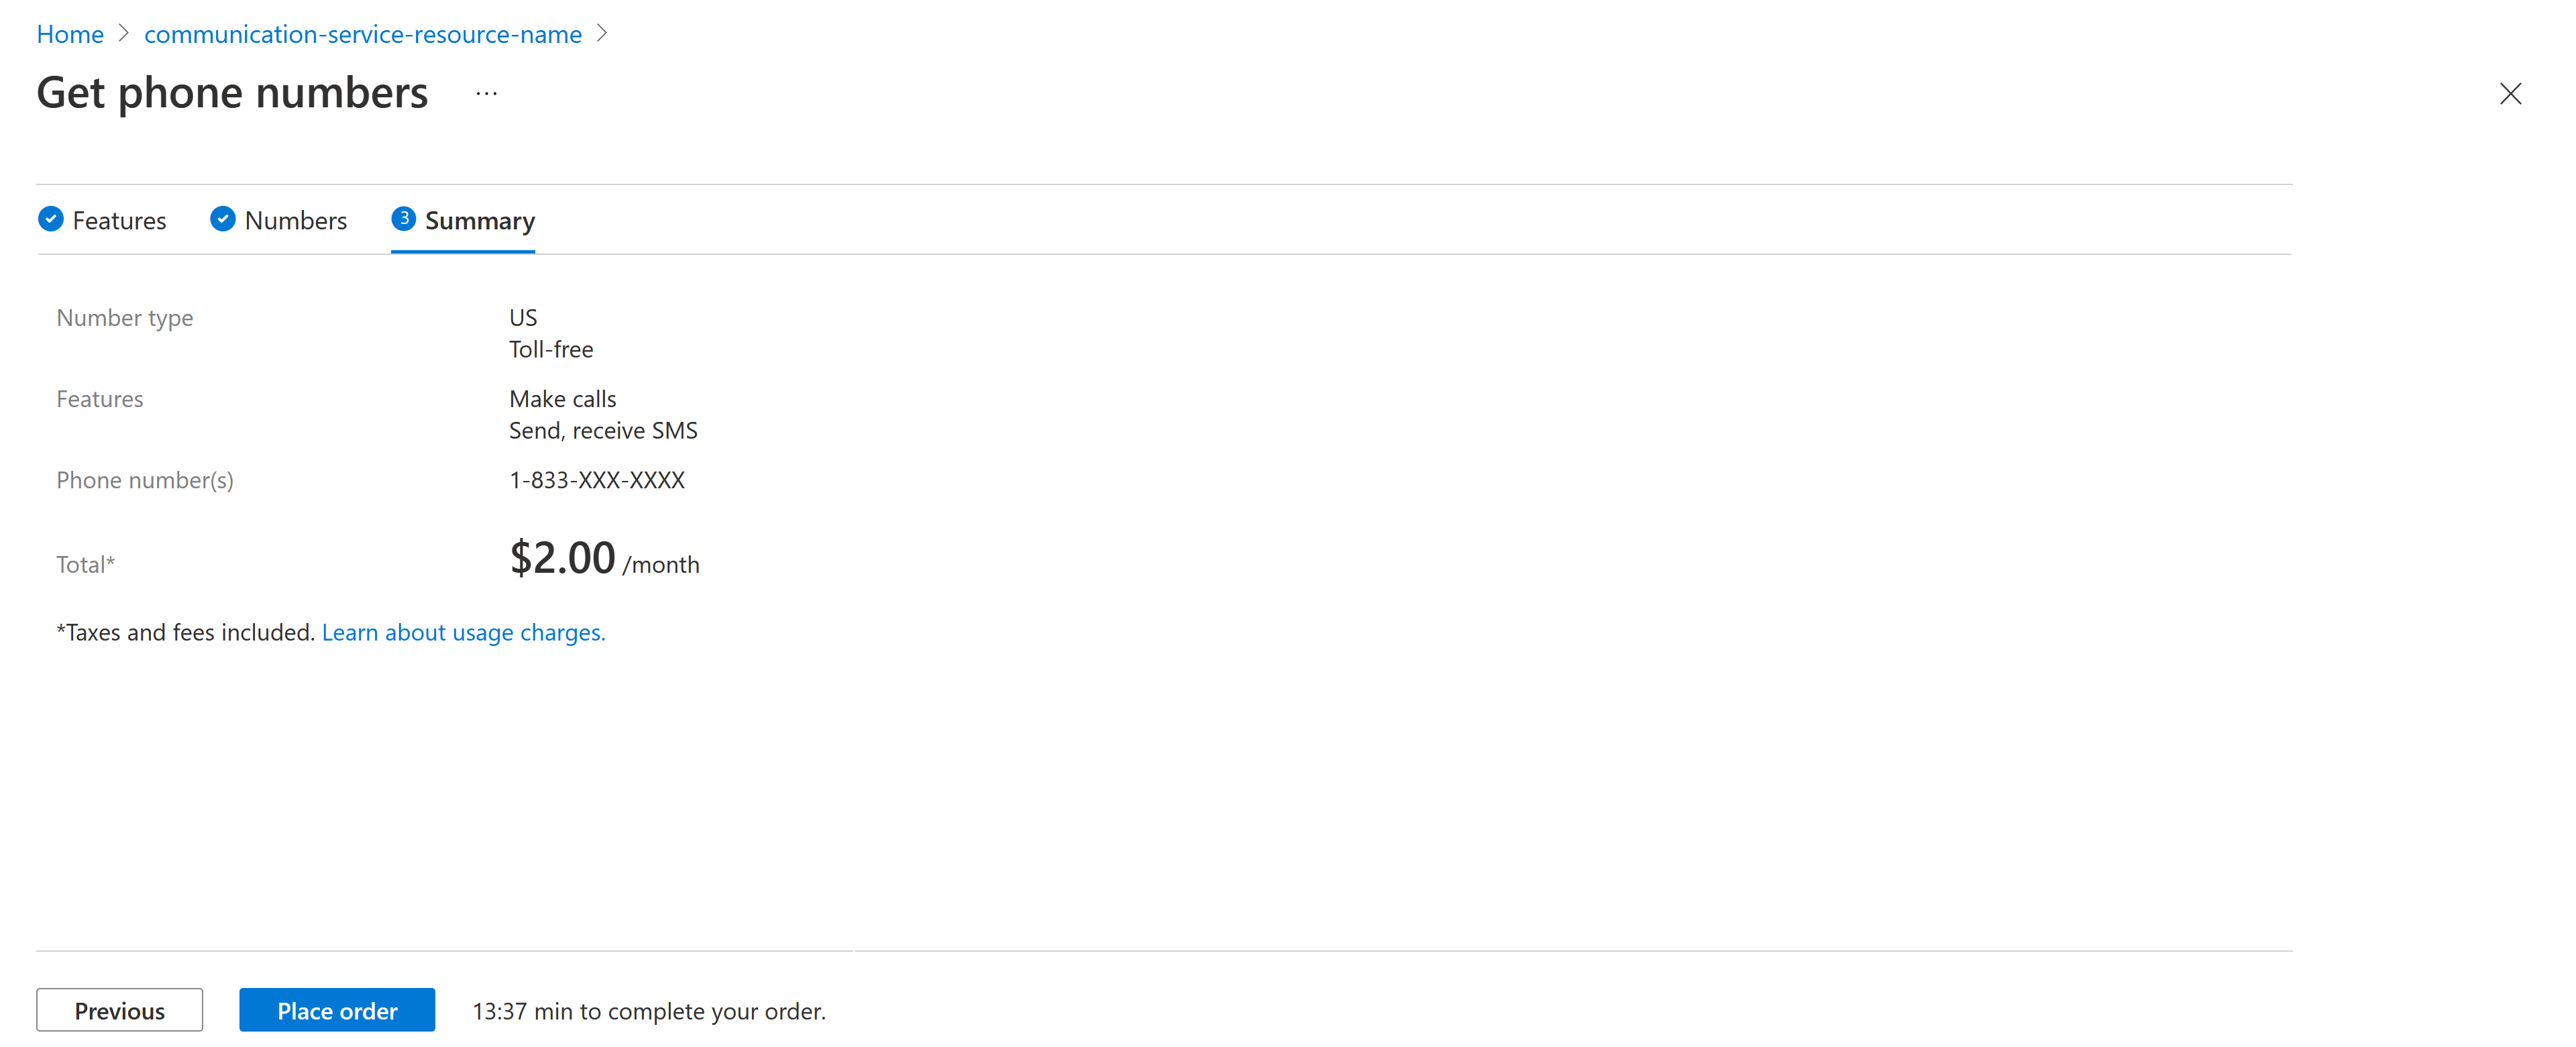
Purchase Phone Numbers
The summary page will review the Number type, Features, Phone Numbers, and Total monthly cost to provision the phone numbers.
Note
The prices shown are the monthly recurring charges which cover the cost of leasing the selected phone number to you. Not included in this view is the Pay-as-you-go costs which are incurred when you make or receive calls. The price lists are available here. These costs depend on number type and destinations called. For example, price-per-minute for a call from a Seattle regional number to a regional number in New York and a call from the same number to a UK mobile number may be different.
Finally, click Place order at the bottom of the page to confirm.
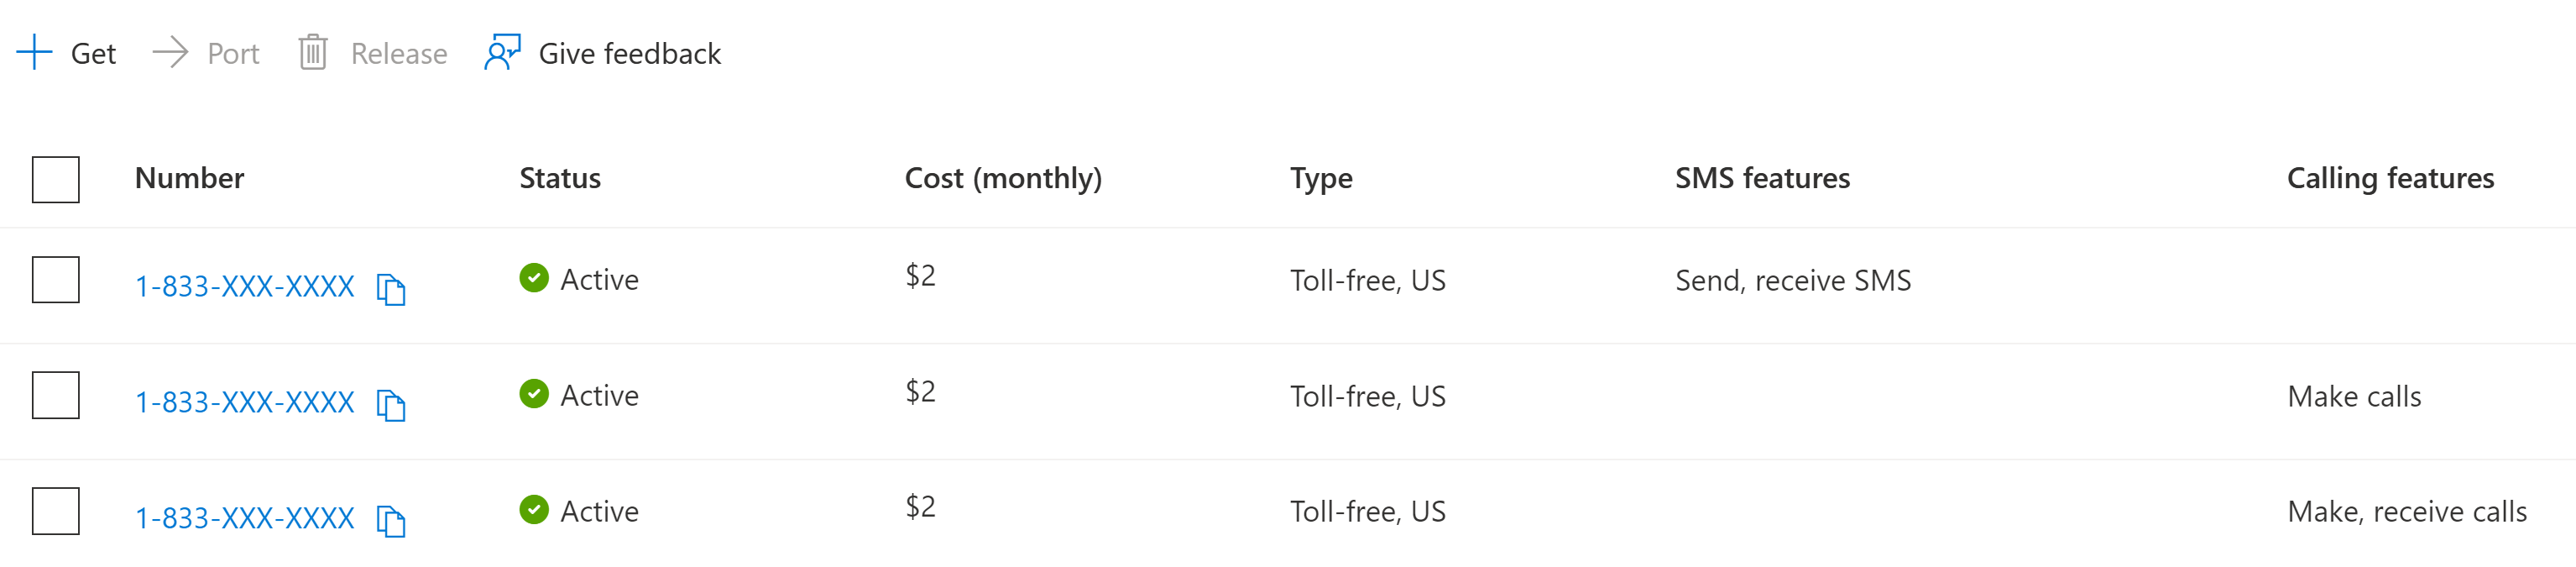
Find your phone numbers on the Azure portal
Navigate to your Azure Communication Services resource on the Azure portal:
Select the Phone Numbers blade in the menu to manage your phone numbers.
Note
It may take a few minutes for the provisioned numbers to be shown on this page.
Update Phone Number Capabilities
On the Phone Numbers page, you can select a phone number to configure it.
Select the features from the available options, then click Save to apply your selection.
Release Phone Number
On the Numbers page, you can release phone numbers.
Select the phone number that you want to release and then click on the Release button.
Important
This feature of Azure Communication Services is currently in preview.
Preview APIs and SDKs are provided without a service-level agreement. We recommend that you don't use them for production workloads. Some features might not be supported, or they might have constrained capabilities.
Azure Communication Services is introducing a new user experience for purchasing phone numbers. This experience is currently being flighted, and you might be introduced to this experience when purchasing a phone number in Azure portal. If you have feedback on this experience, don't hesitate to give it through the Give feedback button on Azure portal extension.
Navigate to your Communication Service resource in the Azure portal.
In the Communication Services resource overview, select on the "Phone numbers" option in the left-hand menu.
Select Get on the top left of the page to purchase your phone number. Selecting this launches our shopping wizard:
Choose the Country/region where you would like to provision the phone number. Country/region availability is based on the billing location for your Azure subscription. More information on what numbers are available for each country/region can be found here. Next you'll choose the number type. You can select from two phone number types: Local, and Toll-free.
Select Search to pull up numbers that meet your selected criteria. You have various filters to search for the number that fits your needs, including:
Use case: This is for whether you are using this number to call from an application (A2P) or from a human agent (P2P).
Calling: This is for determining the Calling capabilities you would like for your phone number: Making calls and/or receiving calls.
SMS: This is for determining the SMS capabilities you would like for your phone number: Sending and/or receiving SMS messages.
Custom: You can also add custom filters to get a certain prefix or set of digits in your phone number.
Once you find the phone number or numbers to your choosing, select Add to cart to hold the numbers in the Telephony cart. These numbers are held for 16 minutes before your cart is automatically cleared.
Note
The prices shown are the monthly recurring charges which cover the cost of leasing the selected phone number to you. Not included in this view is the Pay-as-you-go costs which are incurred when you make or receive calls. The price lists are available here. These costs depend on number type and destinations called. For example, price-per-minute for a call from a Seattle regional number to a regional number in New York and a call from the same number to a UK mobile number may be different.
Select Next to review your purchase. To complete your purchase, select Buy now.
You can find your purchased numbers back on the Phone numbers page. It might take a few minutes for the numbers to be provisioned.
Update Phone Number Capabilities
On the Phone Numbers page, you can select a phone number to configure it.
Select the features from the available options, then select Save to apply your selection.
Release Phone Number
On the Numbers page, you can release phone numbers.
Select the phone number that you want to release and then select on the Release button.
Add the Azure Communication Services extension for Azure CLI by using the az extension command.
az extension add --name communication
Sign in to Azure CLI
You'll need to sign in to Azure CLI. You can sign in running the az login command from the terminal and providing your credentials.
Operations
List purchased phone number(s)
Run the following command to retrieve all of the purchased phone numbers.
az communication phonenumber list --connection-string "<yourConnectionString>"
Make this replacement in the code:
Replace <yourConnectionString> with your connection string.
Get purchased phone number details
Run the following command to get the phone number details for a purchased phone number.
az communication phonenumber show --phonenumber <purchasedPhoneNumber> --connection-string "<yourConnectionString>"
Make these replacements in the code:
Replace <purchasedPhoneNumber> with a phone number that's associated with your Communication Services resource.
Replace <yourConnectionString> with your connection string.
Note
The Azure CLI option provides functionality only for listing and showing phone numbers. It does not support other operations such as searching, purchasing, editing or releasing phone numbers.
(Optional) Use Azure CLI phone numbers operations without passing in a connection string
You can configure the AZURE_COMMUNICATION_CONNECTION_STRING environment variable to use Azure CLI phone numbers operations without having to use --connection_string to pass in the connection string. To configure an environment variable, open a console window and select your operating system from the below tabs. Replace <yourConnectionString> with your actual connection string.
After you add the environment variable, you may need to restart any running programs that will need to read the environment variable, including the console window. For example, if you're using Visual Studio as your editor, restart Visual Studio before running the example.
Edit your .zshrc, and add the environment variable:
After you add the environment variable, run source ~/.zshrc from your console window to make the changes effective. If you created the environment variable with your IDE open, you may need to close and reopen the editor, IDE, or shell in order to access the variable.
Edit your .bash_profile, and add the environment variable:
After you add the environment variable, run source ~/.bash_profile from your console window to make the changes effective. If you created the environment variable with your IDE open, you may need to close and reopen the editor, IDE, or shell in order to access the variable.
Note
Find the finalized code for this quickstart on GitHub
In a terminal or command window, run the dotnet command to check that the .NET client library is installed.
Setting up
Create a new C# application
In a console window (such as cmd, PowerShell, or Bash), use the dotnet new command to create a new console app with the name PhoneNumbersQuickstart. This command creates a simple "Hello World" C# project with a single source file: Program.cs.
dotnet new console -o PhoneNumbersQuickstart
Change your directory to the newly created app folder and use the dotnet build command to compile your application.
cd PhoneNumbersQuickstart
dotnet build
Install the package
While still in the application directory, install the Azure Communication PhoneNumbers client library for .NET package by using the dotnet add package command.
Add a using directive to the top of Program.cs to include the namespaces.
using System;
using System.Linq;
using System.Threading.Tasks;
using Azure.Communication.PhoneNumbers;
Update Main function signature to be async.
static async Task Main(string[] args)
{
  ...
}
Authenticate the client
Phone Number clients can be authenticated using connection string acquired from an Azure Communication Services resources in the Azure portal.
// Get a connection string to our Azure Communication Services resource.
var connectionString = "<connection_string>";
var client = new PhoneNumbersClient(connectionString);
Phone Number clients also have the option to authenticate with Microsoft Entra authentication. With this option,
AZURE_CLIENT_SECRET, AZURE_CLIENT_ID and AZURE_TENANT_ID environment variables need to be set up for authentication.
// Get an endpoint to our Azure Communication Services resource.
var endpoint = new Uri("<endpoint_url>");
TokenCredential tokenCredential = new DefaultAzureCredential();
client = new PhoneNumbersClient(endpoint, tokenCredential);
Manage phone numbers
Search for available phone numbers
In order to purchase phone numbers, you must first search for available phone numbers. To search for phone numbers, provide the area code, assignment type, phone number capabilities, phone number type, and quantity. Note that for the toll-free phone number type, providing the area code is optional.
var capabilities = new PhoneNumberCapabilities(calling:PhoneNumberCapabilityType.None, sms:PhoneNumberCapabilityType.Outbound);
var searchOptions = new PhoneNumberSearchOptions { AreaCode = "833", Quantity = 1 };

var searchOperation = await client.StartSearchAvailablePhoneNumbersAsync("US", PhoneNumberType.TollFree, PhoneNumberAssignmentType.Application, capabilities, searchOptions);
await searchOperation.WaitForCompletionAsync();
Purchase phone numbers
The result of searching for phone numbers is a PhoneNumberSearchResult. This contains a SearchId which can be passed to the purchase numbers API to acquire the numbers in the search. Note that calling the purchase phone numbers API will result in a charge to your Azure Account.
var purchaseOperation = await client.StartPurchasePhoneNumbersAsync(searchOperation.Value.SearchId);
await purchaseOperation.WaitForCompletionResponseAsync();
Get phone number(s)
After a purchasing number, you can retrieve it from the client.
var getPhoneNumberResponse = await client.GetPurchasedPhoneNumberAsync("+14255550123");
Console.WriteLine($"Phone number: {getPhoneNumberResponse.Value.PhoneNumber}, country code: {getPhoneNumberResponse.Value.CountryCode}");
You can also retrieve all the purchased phone numbers.
var purchasedPhoneNumbers = client.GetPurchasedPhoneNumbersAsync();
await foreach (var purchasedPhoneNumber in purchasedPhoneNumbers)
{
    Console.WriteLine($"Phone number: {purchasedPhoneNumber.PhoneNumber}, country code: {purchasedPhoneNumber.CountryCode}");
}
Update phone number capabilities
With a purchased number, you can update the capabilities.
Open your terminal or command window. Navigate to the directory where you'd like to create your Java application. Run the command below to generate the Java project from the maven-archetype-quickstart template.
You'll notice that the 'generate' task created a directory with the same name as the artifactId. Under this directory, the src/main/java directory contains the project source code, the src/test/java directory contains the test source, and the pom.xml file is the project's Project Object Model, or POM.
Install the package
Open the pom.xml file in your text editor. Add the following dependency elements to the group of dependencies.
Navigate to the /src/main/java/com/communication/quickstart directory
Open the App.java file in your editor
Replace the System.out.println("Hello world!"); statement
Add import directives
Use the following code to begin:
import com.azure.communication.phonenumbers.*;
import com.azure.communication.phonenumbers.models.*;
import com.azure.core.http.rest.*;
import com.azure.core.util.Context;
import com.azure.core.util.polling.LongRunningOperationStatus;
import com.azure.core.util.polling.PollResponse;
import com.azure.core.util.polling.SyncPoller;
import com.azure.identity.*;
import java.io.*;

public class App
{
    public static void main( String[] args ) throws IOException
    {
        System.out.println("Azure Communication Services - Phone Numbers Quickstart");
        // Quickstart code goes here
    }
}
Authenticate the Phone Numbers Client
The PhoneNumberClientBuilder is enabled to use Microsoft Entra authentication
// You can find your endpoint and access key from your resource in the Azure portal
String endpoint = "https://<RESOURCE_NAME>.communication.azure.com";

PhoneNumbersClient phoneNumberClient = new PhoneNumbersClientBuilder()
    .endpoint(endpoint)
    .credential(new DefaultAzureCredentialBuilder().build())
    .buildClient();
Alternatively, using the endpoint and access key from the communication resource to authenticate is also possible.
// You can find your connection string from your resource in the Azure portal
String connectionString = "endpoint=https://<RESOURCE_NAME>.communication.azure.com/;accesskey=<ACCESS_KEY>";

PhoneNumbersClient phoneNumberClient = new PhoneNumbersClientBuilder()
    .connectionString(connectionString)
    .buildClient();
Manage Phone Numbers
Search for Available Phone Numbers
In order to purchase phone numbers, you must first search for available phone numbers. To search for phone numbers, provide the area code, assignment type, phone number capabilities, phone number type, and quantity. Note that for the toll-free phone number type, providing the area code is optional.
The result of searching for phone numbers is a PhoneNumberSearchResult. This contains a searchId which can be passed to the purchase numbers API to acquire the numbers in the search. Note that calling the purchase phone numbers API will result in a charge to your Azure Account.
The output of the app describes each action that is completed:
Azure Communication Services - Phone Numbers Quickstart

Searched phone numbers: [+18001234567]

Purchase phone numbers operation is: SUCCESSFULLY_COMPLETED

Phone Number Country Code: US

Phone Number Calling capabilities: inbound

Phone Number SMS capabilities: inbound

Release phone number operation is: SUCCESSFULLY_COMPLETED
Note
Find the finalized code for this quickstart on GitHub
Open your terminal or command window and create a new directory for your app, then navigate to it.
mkdir phone-numbers-quickstart && cd phone-numbers-quickstart
Use a text editor to create a file called phone_numbers_sample.py in the project root directory and add the following code. We'll be adding the remaining quickstart code in the following sections.
import os
from azure.communication.phonenumbers import PhoneNumbersClient

try:
   print('Azure Communication Services - Phone Numbers Quickstart')
   # Quickstart code goes here
except Exception as ex:
   print('Exception:')
   print(ex)
Install the package
While still in the application directory, install the Azure Communication Services Administration client library for Python package by using the pip install command.
pip install azure-communication-phonenumbers
Authenticate the Phone Numbers Client
The PhoneNumbersClient is enabled to use Microsoft Entra authentication. Using the DefaultAzureCredential object is the easiest way to get started with Microsoft Entra ID and you can install it using the pip install command.
pip install azure-identity
Creating a DefaultAzureCredential object requires you to have AZURE_CLIENT_ID, AZURE_CLIENT_SECRET, and AZURE_TENANT_ID already set as environment variables with their corresponding values from your registered Microsoft Entra application.
Once you have installed the azure-identity library, we can continue authenticating the client.
import os
from azure.communication.phonenumbers import PhoneNumbersClient
from azure.identity import DefaultAzureCredential

# You can find your endpoint from your resource in the Azure portal
endpoint = 'https://<RESOURCE_NAME>.communication.azure.com'
try:
    print('Azure Communication Services - Phone Numbers Quickstart')
    credential = DefaultAzureCredential()
    phone_numbers_client = PhoneNumbersClient(endpoint, credential)
except Exception as ex:
    print('Exception:')
    print(ex)
Alternatively, using the endpoint and access key from the communication resource to authenticate is also possible.
import os
from azure.communication.phonenumbers import PhoneNumbersClient

# You can find your connection string from your resource in the Azure portal
connection_string = 'https://<RESOURCE_NAME>.communication.azure.com/;accesskey=<YOUR_ACCESS_KEY>'
try:
    print('Azure Communication Services - Phone Numbers Quickstart')
    phone_numbers_client = PhoneNumbersClient.from_connection_string(connection_string)
except Exception as ex:
    print('Exception:')
    print(ex)
Functions
Once the PhoneNumbersClient has been authenticated, we can start working on the different functions it can do.
Search for Available Phone Numbers
In order to purchase phone numbers, you must first search for any available phone numbers. To search for phone numbers, provide the area code, assignment type, phone number capabilities, phone number type, and quantity (default quantity is set to 1). Note that for the toll-free phone number type, providing the area code is optional.
import os
from azure.communication.phonenumbers import PhoneNumbersClient, PhoneNumberCapabilityType, PhoneNumberAssignmentType, PhoneNumberType, PhoneNumberCapabilities
from azure.identity import DefaultAzureCredential

# You can find your endpoint from your resource in the Azure portal
endpoint = 'https://<RESOURCE_NAME>.communication.azure.com'
try:
    print('Azure Communication Services - Phone Numbers Quickstart')
    credential = DefaultAzureCredential()
    phone_numbers_client = PhoneNumbersClient(endpoint, credential)
    capabilities = PhoneNumberCapabilities(
        calling = PhoneNumberCapabilityType.INBOUND,
        sms = PhoneNumberCapabilityType.INBOUND_OUTBOUND
    )
    search_poller = phone_numbers_client.begin_search_available_phone_numbers(
        "US",
        PhoneNumberType.TOLL_FREE,
        PhoneNumberAssignmentType.APPLICATION,
        capabilities,
        polling = True
    )
    search_result = search_poller.result()
    print ('Search id: ' + search_result.search_id)
    phone_number_list = search_result.phone_numbers
    print('Reserved phone numbers:')
    for phone_number in phone_number_list:
        print(phone_number)

except Exception as ex:
    print('Exception:')
    print(ex)
Purchase Phone Numbers
The result of searching for phone numbers is a PhoneNumberSearchResult. This contains a searchId which can be passed to the purchase numbers API to acquire the numbers in the search. Note that calling the purchase phone numbers API will result in a charge to your Azure Account.
import os
from azure.communication.phonenumbers import (
    PhoneNumbersClient,
    PhoneNumberCapabilityType,
    PhoneNumberAssignmentType,
    PhoneNumberType,
    PhoneNumberCapabilities
)
from azure.identity import DefaultAzureCredential

# You can find your endpoint from your resource in the Azure portal
endpoint = 'https://<RESOURCE_NAME>.communication.azure.com'
try:
    print('Azure Communication Services - Phone Numbers Quickstart')
    credential = DefaultAzureCredential()
    phone_numbers_client = PhoneNumbersClient(endpoint, credential)
    capabilities = PhoneNumberCapabilities(
        calling = PhoneNumberCapabilityType.INBOUND,
        sms = PhoneNumberCapabilityType.INBOUND_OUTBOUND
    )
    search_poller = phone_numbers_client.begin_search_available_phone_numbers(
        "US",
        PhoneNumberType.TOLL_FREE,
        PhoneNumberAssignmentType.APPLICATION,
        capabilities,
        area_code="833",
        polling = True
    )
    search_result = poller.result()
    print ('Search id: ' + search_result.search_id)
    phone_number_list = search_result.phone_numbers
    print('Reserved phone numbers:')
    for phone_number in phone_number_list:
        print(phone_number)

    purchase_poller = phone_numbers_client.begin_purchase_phone_numbers(search_result.search_id, polling = True)
    purchase_poller.result()
    print("The status of the purchase operation was: " + purchase_poller.status())
except Exception as ex:
    print('Exception:')
    print(ex)
Get purchased phone number(s)
After a purchasing number, you can retrieve it from the client.
You can also retrieve all the purchased phone numbers.
purchased_phone_numbers = phone_numbers_client.list_purchased_phone_numbers()
print('Purchased phone numbers:')
for purchased_phone_number in purchased_phone_numbers:
    print(purchased_phone_number.phone_number)
Update Phone Number Capabilities
You can update the capabilities of a previously purchased phone number.
update_poller = phone_numbers_client.begin_update_phone_number_capabilities(
    "+18001234567",
    PhoneNumberCapabilityType.OUTBOUND,
    PhoneNumberCapabilityType.OUTBOUND,
    polling = True
)
update_poller.result()
print('Status of the operation: ' + update_poller.status())
Release Phone Number
You can release a purchased phone number.
release_poller = phone_numbers_client.begin_release_phone_number("+18001234567")
release_poller.result()
print('Status of the operation: ' + release_poller.status())
Run the code
From a console prompt, navigate to the directory containing the phone_numbers_sample.py file, then execute the following Python command to run the app.
python phone_numbers_sample.py
Note
Find the finalized code for this quickstart on GitHub
The --save option adds the library as a dependency in your package.json file.
Authenticate the client
Import the PhoneNumbersClient from the client library and instantiate it with your connection string. The code below retrieves the connection string for the resource from an environment variable named COMMUNICATION_SERVICES_CONNECTION_STRING. Learn how to manage your resource's connection string.
Add the following code to the top of phone-numbers-quickstart.js:
const { PhoneNumbersClient } = require('@azure/communication-phone-numbers');

// This code demonstrates how to fetch your connection string
// from an environment variable.
const connectionString = process.env['COMMUNICATION_SERVICES_CONNECTION_STRING'];

// Instantiate the phone numbers client
const phoneNumbersClient = new PhoneNumbersClient(connectionString);
Manage phone numbers
Search for available phone numbers
In order to purchase phone numbers, you must first search for available phone numbers. To search for phone numbers, provide the area code, assignment type, phone number capabilities, phone number type, and quantity. Note that for the toll-free phone number type, providing the area code is optional.
The result of searching for phone numbers is a PhoneNumberSearchResult. This contains a searchId which can be passed to the purchase numbers API to acquire the numbers in the search. Note that calling the purchase phone numbers API will result in a charge to your Azure Account.
Add the following snippet to your main function:
/**
 * Purchase Phone Number
 */

const purchasePoller = await phoneNumbersClient.beginPurchasePhoneNumbers(searchId);

// Purchase is underway.
await purchasePoller.pollUntilDone();
console.log(`Successfully purchased ${phoneNumber}`);
Update phone number capabilities
With a phone number now purchased, add the following code to update its capabilities:
/**
 * Update Phone Number Capabilities
 */

// Create update request.
// This will update phone number to send and receive sms, but only send calls.
const updateRequest = {
  sms: "inbound+outbound",
  calling: "outbound"
};

const updatePoller = await phoneNumbersClient.beginUpdatePhoneNumberCapabilities(
  phoneNumber,
  updateRequest
);

// Update is underway.
await updatePoller.pollUntilDone();
console.log("Phone number updated successfully.");
Get purchased phone number(s)
After a purchasing number, you can retrieve it from the client. Add the following code to your main function to get the phone number you just purchased:
/**
 * Get Purchased Phone Number
 */

const { capabilities } = await phoneNumbersClient.getPurchasedPhoneNumber(phoneNumber);
console.log("These capabilities:", capabilities, "should be the same as these:", updateRequest, ".");
You can also retrieve all the purchased phone numbers.
const purchasedPhoneNumbers = await phoneNumbersClient.listPurchasedPhoneNumbers();

for await (const purchasedPhoneNumber of purchasedPhoneNumbers) {
  console.log(`Phone number: ${purchasedPhoneNumber.phoneNumber}, country code: ${purchasedPhoneNumber.countryCode}.`);
}
Release phone number
You can now release the purchased phone number. Add the code snippet below to your main function:
Use the node command to run the code you added to the phone-numbers-quickstart.js file.
node phone-numbers-quickstart.js
Troubleshooting
Common Questions and Issues:
When a phone number is released, the phone number shows up in your ACS resource on Azure portal until the end of the billing cycle. It also can't be repurchased until the end of the billing cycle.
When a Communication Services resource is deleted, the phone numbers associated with that resource are automatically released at the same time.