Note
Access to this page requires authorization. You can try signing in or changing directories.
Access to this page requires authorization. You can try changing directories.
This article guides you through using Spring Cloud Functions to develop a Java function and publish it to Azure Functions. When you're done, your function code runs on the Consumption Plan in Azure and can be triggered using an HTTP request.
Prerequisites
- An Azure subscription. If you don't have an Azure subscription, create a free account before you begin.
To develop functions using Java, you must have the following installed:
- Java Developer Kit, version 11
- Apache Maven, version 3.0 or higher
- Azure CLI
- Azure Functions Core Tools version 4
Important
You must set the JAVA_HOME environment variable to the install location of the JDK to complete this quickstart.
Make sure your core tools version is at least 4.0.5455.
What we're going to build
We're going to build a classical "Hello, World" function that runs on Azure Functions and is configured with Spring Cloud Function.
The function receives a User JSON object, which contains a user name, and sends back a Greeting object, which contains the welcome message to that user.
The project is available in the Spring Cloud Function in Azure sample of the azure-function-java-worker repository on GitHub. You can use that sample directly if you want to see the final work described in this quickstart.
Create a new Maven project
We're going to create an empty Maven project, and configure it with Spring Cloud Function and Azure Functions.
In an empty folder, create a new pom.xml file and copy/paste the content from the sample project's pom.xml file.
Note
This file uses Maven dependencies from both Spring Boot and Spring Cloud Function, and it configures the Spring Boot and Azure Functions Maven plugins.
You need to customize a few properties for your application:
<functionAppName>is the name of your Azure Function<functionAppRegion>is the name of the Azure region where your Function is deployed<functionResourceGroup>is the name of the Azure resource group you're using
Change those properties directly near the top of the pom.xml file, as shown in the following example:
    <properties>
        <java.version>11</java.version>

        <!-- Spring Boot start class. WARNING: correct class must be set -->
        <start-class>com.example.DemoApplication</start-class>

        <!-- customize those properties. WARNING: the functionAppName should be unique across Azure -->
        <azure.functions.maven.plugin.version>1.36.0</azure.functions.maven.plugin.version>
        <functionResourceGroup>my-spring-function-resource-group</functionResourceGroup>
        <functionAppServicePlanName>my-spring-function-service-plan</functionAppServicePlanName>
        <functionAppName>my-spring-function</functionAppName>
        <functionPricingTier>Y1</functionPricingTier>
        <functionAppRegion>eastus</functionAppRegion>
    </properties>
Create Azure configuration files
Create a src/main/resources folder and add the following Azure Functions configuration files to it.
host.json:
{
  "version": "2.0",
  "extensionBundle": {
    "id": "Microsoft.Azure.Functions.ExtensionBundle",
    "version": "[4.*, 5.2.0)"
  },
  "functionTimeout": "00:10:00"
}
local.settings.json:
{
  "IsEncrypted": false,
  "Values": {
    "AzureWebJobsStorage": "",
    "FUNCTIONS_WORKER_RUNTIME": "java",
    "FUNCTIONS_EXTENSION_VERSION": "~4",
    "AzureWebJobsDashboard": ""
  }
}
Create domain objects
Azure Functions can receive and send objects in JSON format.
We're now going to create our User and Greeting objects, which represent our domain model.
You can create more complex objects, with more properties, if you want to customize this quickstart and make it more interesting for you.
Create a src/main/java/com/example/model folder and add the following two files:
User.java:
package com.example.model;

public class User {

    private String name;

    public User() {
    }

    public User(String name) {
        this.name = name;
    }

    public String getName() {
        return name;
    }

    public void setName(String name) {
        this.name = name;
    }
}
Greeting.java:
package com.example.model;

public class Greeting {

    private String message;

    public Greeting() {
    }

    public Greeting(String message) {
        this.message = message;
    }

    public String getMessage() {
        return message;
    }

    public void setMessage(String message) {
        this.message = message;
    }
}
Create the Spring Boot application
This application manages all business logic, and has access to the full Spring Boot ecosystem. This capability gives you two main benefits over a standard Azure Function:
- It doesn't rely on the Azure Functions APIs, so you can easily port it to other systems. For example, you can reuse it in a normal Spring Boot application.
- You can use all the
@Enableannotations from Spring Boot to add new features.
In the src/main/java/com/example folder, create the following file, which is a normal Spring Boot application:
DemoApplication.java:
package com.example;

import org.springframework.boot.SpringApplication;
import org.springframework.boot.autoconfigure.SpringBootApplication;

@SpringBootApplication
public class DemoApplication {
    public static void main(String[] args) throws Exception {
        SpringApplication.run(DemoApplication.class, args);
    }
}
Now create the following file in the src/main/java/com/example/hello folder. This code contains a Spring Boot component that represents the Function we want to run:
Hello.java:
package com.example.hello;

import com.example.model.*;
import org.springframework.stereotype.Component;
import java.util.function.Function;

@Component
public class Hello implements Function<User, Greeting> {

    @Override
    public Greeting apply(User user) {
        return new Greeting("Hello, " + user.getName() + "!\n");
    }
}
Note
The Hello function is quite specific:
- It is a
java.util.function.Function. It contains the business logic, and it uses a standard Java API to transform one object into another. - Because it has the
@Componentannotation, it's a Spring Bean, and by default its name is the same as the class, but starting with a lowercase character:hello. Following this naming convention is important if you want to create other functions in your application. The name must match the Azure Functions name we'll create in the next section.
Create the Azure Function
To benefit from the full Azure Functions API, we now code an Azure Function that delegates its execution to the Spring Cloud Function created in the previous step.
In the src/main/java/com/example/hello folder, create the following Azure Function class file:
HelloHandler.java:
package com.example.hello;

import com.microsoft.azure.functions.*;
import com.microsoft.azure.functions.annotation.AuthorizationLevel;
import com.microsoft.azure.functions.annotation.FunctionName;
import com.microsoft.azure.functions.annotation.HttpTrigger;
import com.example.model.*;
import org.springframework.beans.factory.annotation.Autowired;
import org.springframework.stereotype.Component;

import java.util.Optional;

@Component
public class HelloHandler {

    @Autowired
    private Hello hello;

    @FunctionName("hello")
    public HttpResponseMessage execute(
        @HttpTrigger(name = "request", methods = {HttpMethod.GET, HttpMethod.POST}, authLevel = AuthorizationLevel.ANONYMOUS) HttpRequestMessage<Optional<User>> request, ExecutionContext context) {
        User user = request.getBody()
                           .filter(u -> u.getName() != null)
                           .orElseGet(() -> new User(request.getQueryParameters().getOrDefault("name", "world")));
        context.getLogger().info("Greeting user name: " + user.getName());
        return request.createResponseBuilder(HttpStatus.OK)
                      .body(hello.apply(user))
                      .header("Content-Type", "application/json")
                      .build();
    }
}
This Java class is an Azure Function, with the following interesting features:
- The class has the
@Componentannotation, so it's a Spring Bean. - The name of the function, as defined by the
@FunctionName("hello")annotation, ishello. - The class implements a real Azure Function, so you can use the full Azure Functions API here.
Add unit tests
This step is optional but recommended to validate that the application works correctly.
Create a src/test/java/com/example folder and add the following JUnit tests:
HelloTest.java:
package com.example;

import com.example.hello.Hello;
import com.example.model.Greeting;
import com.example.model.User;
import org.junit.jupiter.api.Test;

import static org.assertj.core.api.Assertions.assertThat;

public class HelloTest {

    @Test
    public void test() {
        Greeting result = new Hello().apply(new User("foo"));
        assertThat(result.getMessage()).isEqualTo("Hello, foo!\n");
    }
}
You can now test your Azure Function using Maven:
mvn clean test
Run the Function locally
Before you deploy your application to Azure Function, let's first test it locally.
First you need to package your application into a Jar file:
mvn package
Now that the application is packaged, you can run it using the azure-functions Maven plugin:
mvn azure-functions:run
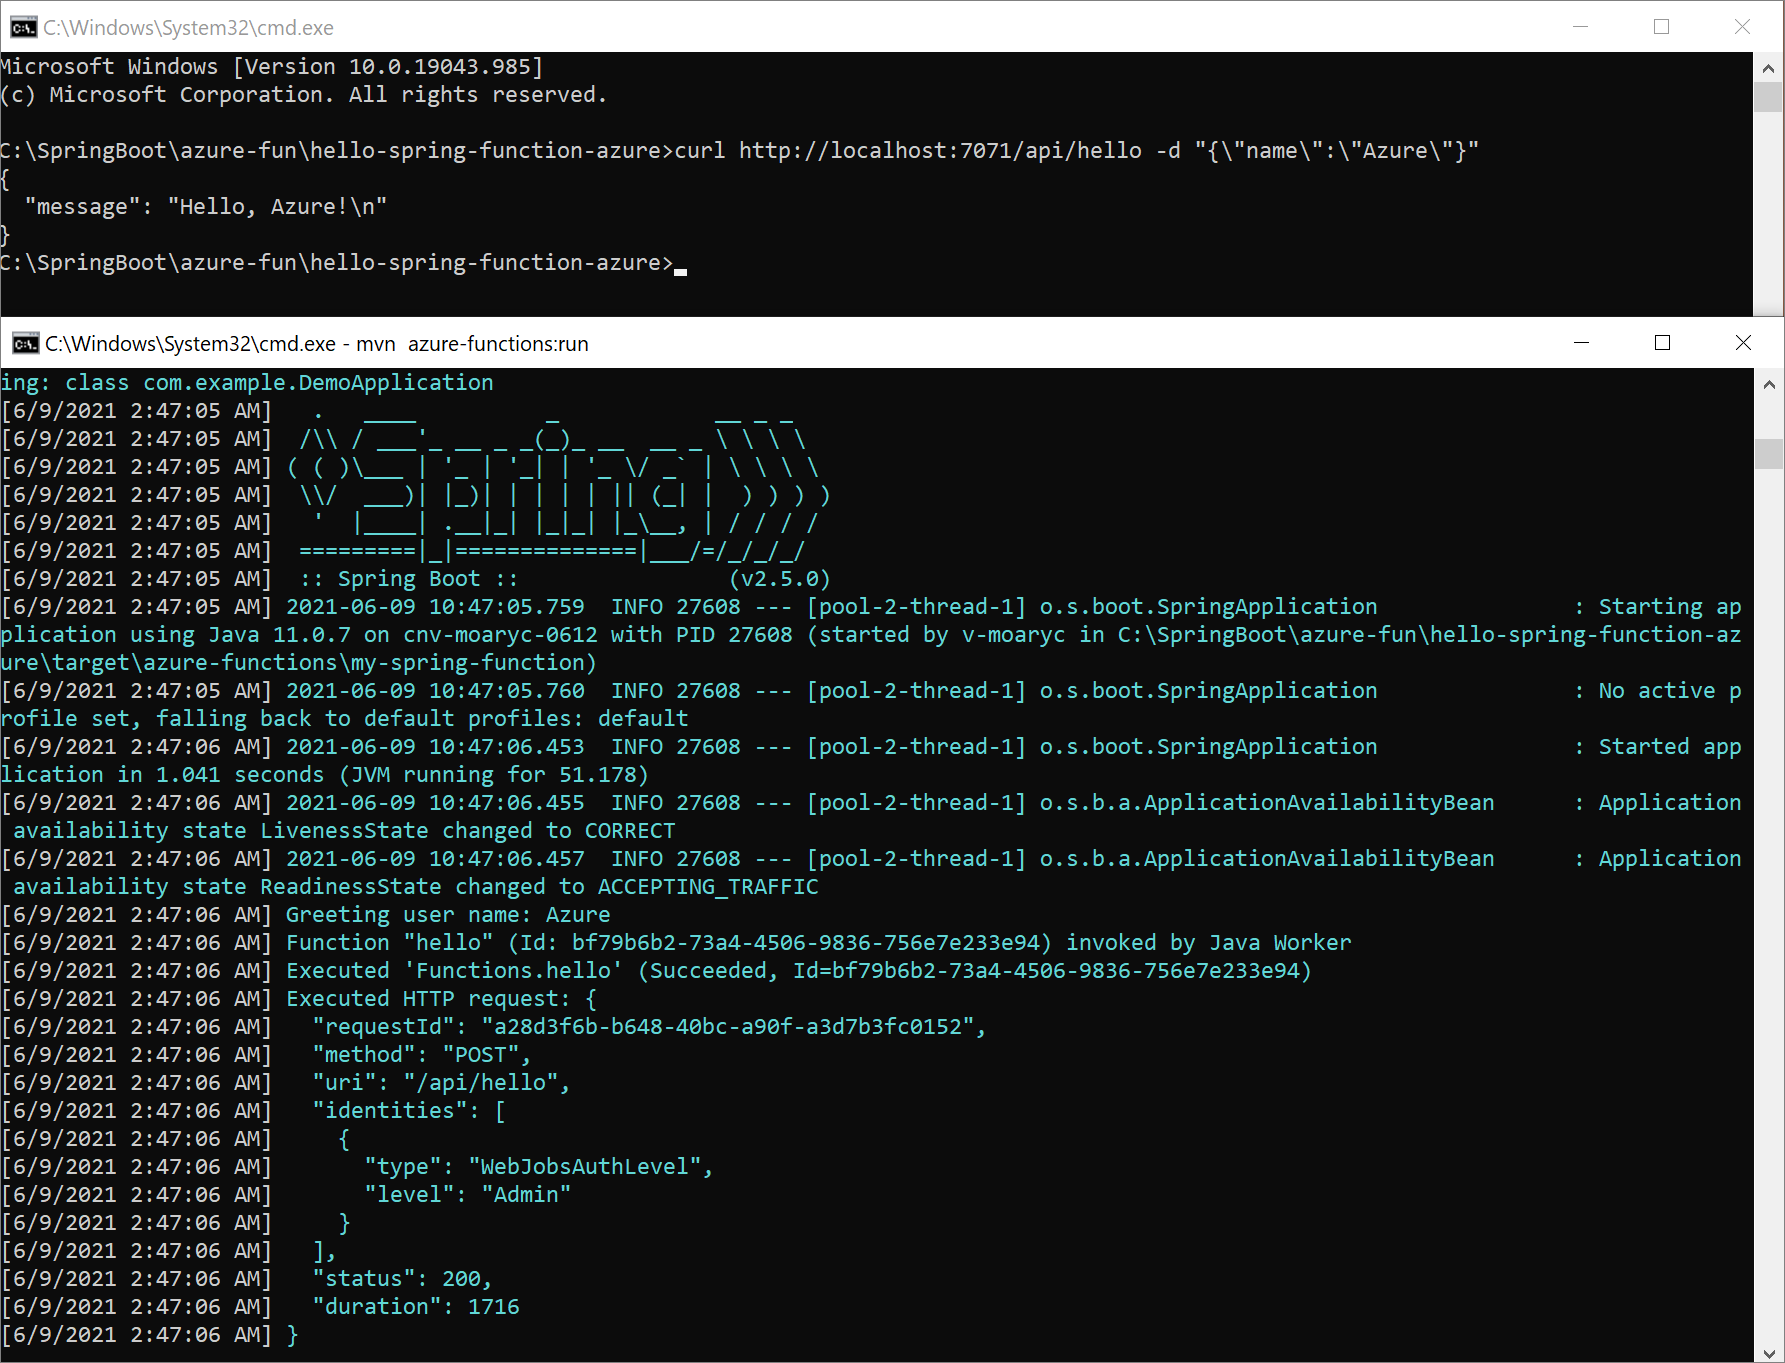
The Azure Function should now be available on your localhost, using port 7071. You can test the function by sending it a POST request, with a User object in JSON format. For example, using cURL:
curl -X POST http://localhost:7071/api/hello -d "{\"name\":\"Azure\"}"
The Function should answer you with a Greeting object, still in JSON format:
{
  "message": "Hello, Azure!\n"
}
Here's a screenshot of the cURL request on the top of the screen, and the local Azure Function at the bottom:
Debug the Function locally
The following sections describe how to debug the function.
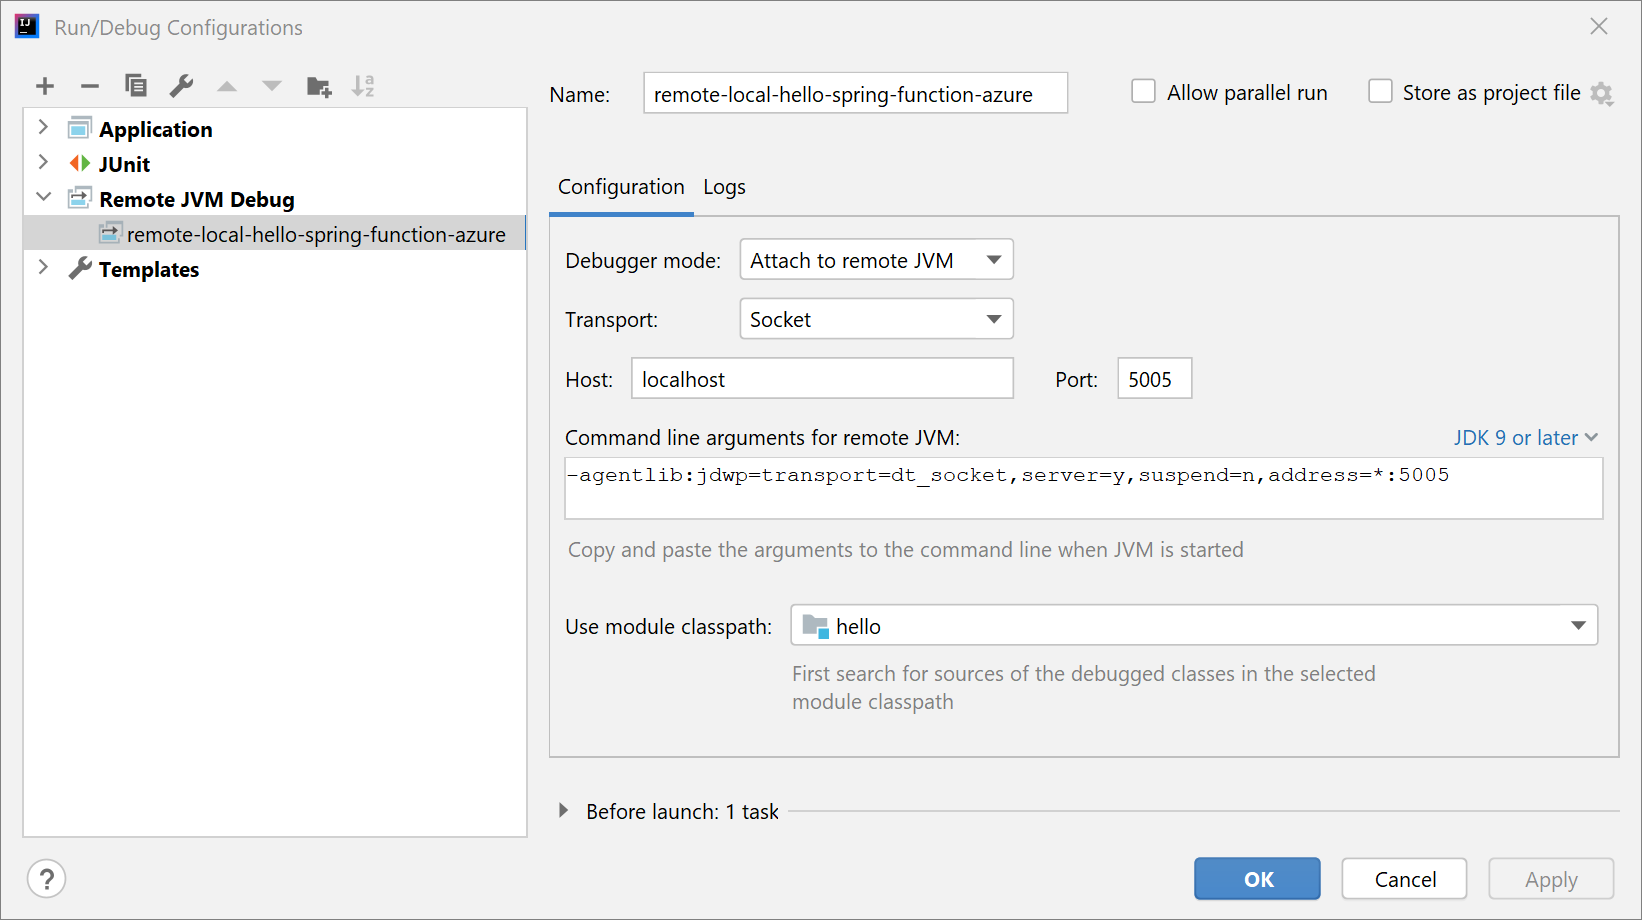
Debug using Intellij IDEA
Open the project in Intellij IDEA, then create a Remote JVM Debug run configuration to attach. For more information, see Tutorial: Remote debug.
Run the application with the following command:
mvn azure-functions:run -DenableDebug
When the application starts, you see the following output:
Worker process started and initialized.
Listening for transport dt_socket at address: 5005
Start project debugging in IntelliJ IDEA. You see the following output:
Connected to the target VM, address: 'localhost:5005', transport: 'socket'
Mark the breakpoints you want to debug. The Intellij IDEA will enter debugging mode after sending a request.
Debug using Visual Studio Code
Open the project in Visual Studio Code, then configure the following launch.json file content:
{
    "version": "0.2.0",
    "configurations": [
        {
            "type": "java",
            "name": "Attach to Remote Program",
            "request": "attach",
            "hostName": "127.0.0.1",
            "port": 5005
        }
    ]
}
Run the application with the following command:
mvn azure-functions:run -DenableDebug
When the application starts, you see the following output:
Worker process started and initialized.
Listening for transport dt_socket at address: 5005
Start project debugging in Visual Studio Code, then mark the breakpoints you want to debug. Visual Studio Code will enter debugging mode after sending a request. For more information, see Running and debugging Java.
Deploy the Function to Azure Functions
Now, you're going to publish the Azure Function to production. Remember that the <functionAppName>, <functionAppRegion>, and <functionResourceGroup> properties you've defined in your pom.xml file are used to configure your function.
Note
The Maven plugin needs to authenticate with Azure. If you have Azure CLI installed, use az login before continuing.
For more authentication options, see Authentication in the azure-maven-plugins repository.
Run Maven to deploy your function automatically:
mvn azure-functions:deploy
Now go to the Azure portal to find the Function App that has been created.
Select the function:
- In the function overview, note the function's URL.
- To check your running function, select Log streaming on the navigation menu.
Now, as you did in the previous section, use cURL to access the running function, as shown in the following example. Be sure to replace your-function-name by your real function name.
curl https://your-function-name.azurewebsites.net/api/hello -d "{\"name\":\"Azure\"}"
Like in the previous section, the Function should answer you with a Greeting object, still in JSON format:
{
  "message": "Hello, Azure!\n"
}
Congratulations, you have a Spring Cloud Function running on Azure Functions! For more information and samples of Spring Cloud functions, see the following resources:
Next steps
To learn more about Spring and Azure, continue to the Spring on Azure documentation center.