Ingest data from Event Hub into Azure Synapse Data Explorer
Azure Synapse Data Explorer is a fast and highly scalable data exploration service for log and telemetry data. Azure Synapse Data Explorer offers ingestion (data loading) from Event Hubs, IoT Hubs, and blobs written to blob containers.
Azure Synapse Data Explorer offers ingestion (data loading) from Event Hubs, a big data streaming platform and event ingestion service. Event Hubs can process millions of events per second in near real time. In this article, you create an Event Hub, connect to it from Azure Synapse Data Explorer and see data flow through the system.
Prerequisites
An Azure subscription. Create a free Azure account.
Create a Data Explorer pool using Synapse Studio or the Azure portal
Create a Data Explorer database.
In Synapse Studio, on the left-side pane, select Data.
Select + (Add new resource) > Data Explorer pool, and use the following information:
Setting Suggested value Description Pool name contosodataexplorer The name of the Data Explorer pool to use Name TestDatabase The database name must be unique within the cluster. Default retention period 365 The time span (in days) for which it's guaranteed that the data is kept available to query. The time span is measured from the time that data is ingested. Default cache period 31 The time span (in days) for which to keep frequently queried data available in SSD storage or RAM, rather than in longer-term storage. Select Create to create the database. Creation typically takes less than a minute.
Create a target table to which Event Hubs will send data
In Synapse Studio, on the left-side pane, select Develop.
Under KQL scripts, Select + (Add new resource) > KQL script. On the right-side pane, you can name your script.
In the Connect to menu, select contosodataexplorer.
In the Use database menu, select TestDatabase.
Paste in the following command, and select Run to create the table.
.create table TestTable (TimeStamp: datetime, Name: string, Metric: int, Source:string)Tip
Verify that the table was successfully created. On the left-side pane, select Data, select the contosodataexplorer more menu, and then select Refresh. Under contosodataexplorer, expand Tables and make sure that the TestTable table appears in the list.
Copy the following command into the window and select Run to map the incoming JSON data to the column names and data types of the table (TestTable).
.create table TestTable ingestion json mapping 'TestMapping' '[{"column":"TimeStamp", "Properties": {"Path": "$.timeStamp"}},{"column":"Name", "Properties": {"Path":"$.name"}} ,{"column":"Metric", "Properties": {"Path":"$.metric"}}, {"column":"Source", "Properties": {"Path":"$.source"}}]'
We recommend using a user assigned managed identity or system assigned managed identity for the data connection (optional).
A sample app that generates data and sends it to an Event Hub. Download the sample app to your system.
Visual Studio 2019 to run the sample app.
Sign in to the Azure portal
Sign in to the Azure portal.
Create an Event Hub
Create an Event Hub by using an Azure Resource Manager template in the Azure portal.
To create an Event Hub, use the following button to start the deployment. Right-click and select Open in new window, so you can follow the rest of the steps in this article.

The Deploy to Azure button takes you to the Azure portal.
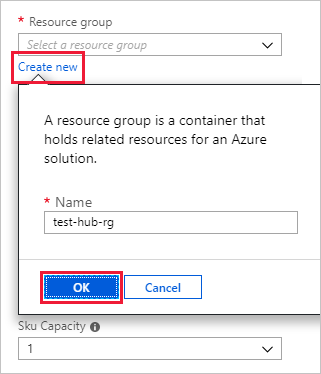
Select the subscription where you want to create the Event Hub, and create a resource group named test-hub-rg.
Fill out the form with the following information.
Use defaults for any settings not listed in the following table.
Setting Suggested value Field description Subscription Your subscription Select the Azure subscription that you want to use for your Event Hub. Resource group test-hub-rg Create a new resource group. Location West US Select West US for this article. For a production system, select the region that best meets your needs. Create the Event Hub namespace in the same Location as the Azure Synapse Data Explorer cluster for best performance (most important for Event Hub namespaces with high throughput). Namespace name A unique namespace name Choose a unique name that identifies your namespace. For example, mytestnamespace. The domain name servicebus.windows.net is appended to the name you provide. The name can contain only letters, numbers, and hyphens. The name must start with a letter, and it must end with a letter or number. The value must be between 6 and 50 characters long. Event Hub name test-hub The Event Hub sits under the namespace, which provides a unique scoping container. The Event Hub name must be unique within the namespace. Consumer group name test-group Consumer groups enable multiple consuming applications to each have a separate view of the event stream. Select Review + create.
Review the Summary of resources created. Select Create, which acknowledges that you're creating resources in your subscription.

Select Notifications on the toolbar to monitor the provisioning process. It might take several minutes for the deployment to succeed, but you can move on to the next step now.

Authentication considerations
Depending on the type of identity, you are using to authenticate with the Event Hub, you may need some additional configurations.
If you are authenticating with Event Hub using a user assigned managed identity, go to your Event Hub > Networking, and then under Allow access from, select All networks and save the changes.
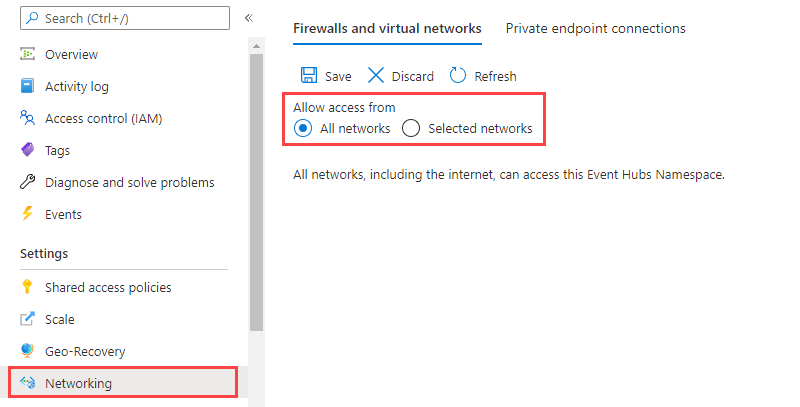
If you are authenticating with the Event Hub using a system assigned managed identity, go to your Event Hub > Networking, and then either allow access from all networks or under Allow access from, select Selected networks, select Allow trusted Microsoft services to bypass this firewall and save the changes.

Connect to the Event Hub
Now you connect to the Event Hub from Data Explorer pool. When this connection is in place, data that flows into the Event Hub streams to the test table you created earlier in this article.
Select Notifications on the toolbar to verify that the Event Hub deployment was successful.
Under the Data Explorer pool you created, select Databases > TestDatabase.

Select Data connections and Add data connection.
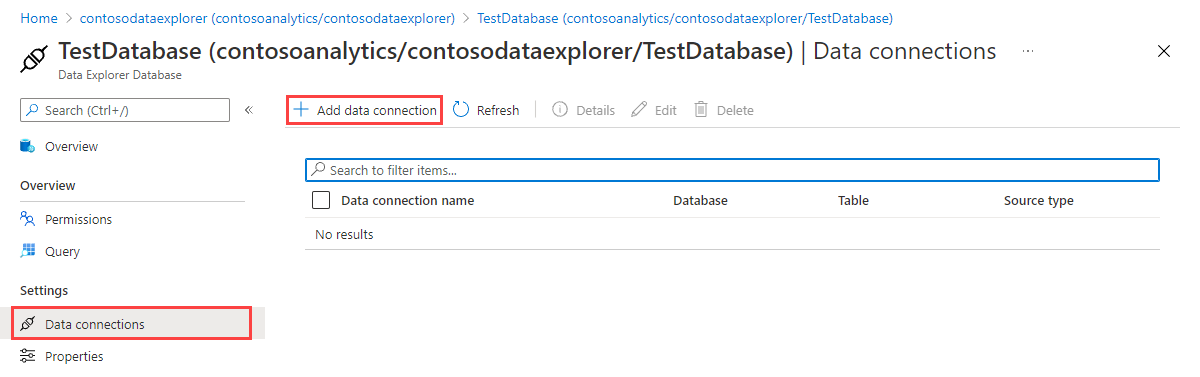
Create a data connection (Preview)
Fill out the form with the following information, and then select Create.

| Setting | Suggested value | Field description |
|---|---|---|
| Data connection name | test-hub-connection | The name of the connection you want to create in Azure Synapse Data Explorer. |
| Subscription | The subscription ID where the Event Hub resource is located. This field is autopopulated. | |
| Event Hub namespace | A unique namespace name | The name you chose earlier that identifies your namespace. |
| Event Hub | test-hub | The Event Hub you created. |
| Consumer group | test-group | The consumer group defined in the Event Hub you created. |
| Event system properties | Select relevant properties | The Event Hub system properties. If there are multiple records per event message, the system properties will be added to the first record. When adding system properties, create or update table schema and mapping to include the selected properties. |
| Compression | None | The compression type of the Event Hub messages payload. Supported compression types: None, Gzip. |
| Managed Identity | System-assigned | The managed identity used by the Data Explorer cluster for access to read from the Event Hub. Note: When the data connection is created: - System-assigned identities are automatically created if they don't exist - The managed identity is automatically assigned the Azure Event Hubs Data Receiver role and is added to your Data Explorer cluster. We recommend verifying that the role was assigned and that the identity was added to the cluster. |
Target table
There are two options for routing the ingested data: static and dynamic. For this article, you use static routing, where you specify the table name, data format, and mapping as default values. If the Event Hub message includes data routing information, this routing information will override the default settings.
Fill out the following routing settings:

Setting Suggested value Field description Table name TestTable The table you created in TestDatabase. Data format JSON Supported formats are Avro, CSV, JSON, MULTILINE JSON, ORC, PARQUET, PSV, SCSV, SOHSV, TSV, TXT, TSVE, APACHEAVRO, and W3CLOG. Mapping TestMapping The mapping you created in TestDatabase, which maps incoming data to the column names and data types of TestTable. Required for JSON, MULTILINE JSON and AVRO, and optional for other formats. Note
- You don't have to specify all Default routing settings. Partial settings are also accepted.
- Only events enqueued after you create the data connection are ingested.
Select Create.
Event system properties mapping
Note
- System properties are supported for
jsonand tabular formats (csv,tsvetc.) and aren't supported on compressed data. When using a non-supported format, the data will still be ingested, but the properties will be ignored. - For tabular data, system properties are supported only for single-record event messages.
- For JSON data, system properties are also supported for multiple-record event messages. In such cases, the system properties are added only to the first record of the event message.
- For
csvmapping, properties are added at the beginning of the record in the order listed in the System properties table. - For
jsonmapping, properties are added according to property names in the System properties table.
If you selected Event system properties in the Data Source section of the table, you must include system properties in the table schema and mapping.
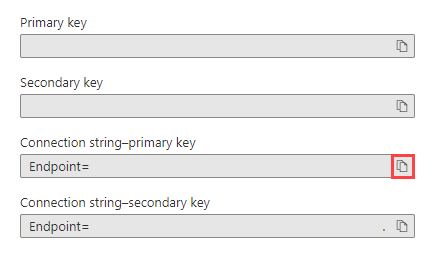
Copy the connection string
When you run the sample app listed in Prerequisites, you need the connection string for the Event Hub namespace.
Under the Event Hub namespace you created, select Shared access policies, then RootManageSharedAccessKey.
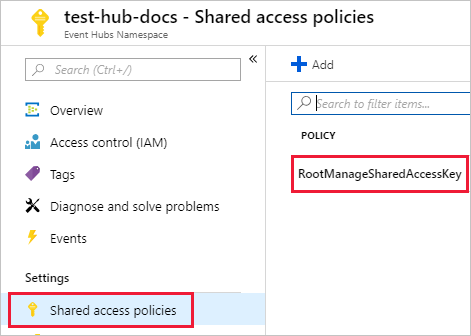
Copy Connection string - primary key. You paste it in the next section.
Generate sample data
Use the sample app you downloaded to generate data.
Open the sample app solution in Visual Studio.
In the program.cs file, update the
eventHubNameconstant to the name of your Event Hub and update theconnectionStringconstant to the connection string you copied from the Event Hub namespace.const string eventHubName = "test-hub"; // Copy the connection string ("Connection string-primary key") from your Event Hub namespace. const string connectionString = @"<YourConnectionString>";Build and run the app. The app sends messages to the Event Hub, and prints its status every 10 seconds.
After the app has sent a few messages, move on to the next step: reviewing the flow of data into your Event Hub and test table.
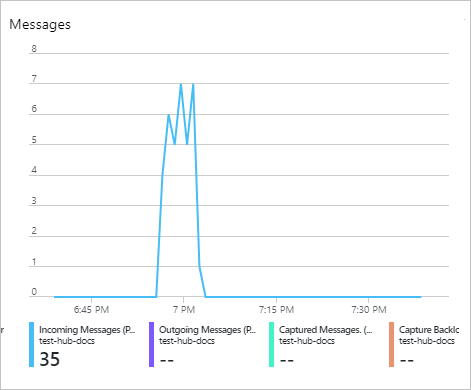
Review the data flow
With the app generating data, you can now see the flow of that data from the Event Hub to the table in your cluster.
In the Azure portal, under your Event Hub, you see the spike in activity while the app is running.
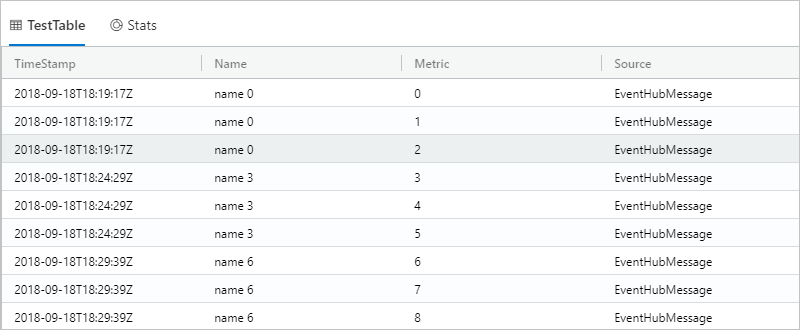
To check how many messages have made it to the database so far, run the following query in your test database.
TestTable
| count
To see the content of the messages, run the following query:
TestTableThe result set should look like the following image:
Note
- Azure Synapse Data Explorer has an aggregation (batching) policy for data ingestion, designed to optimize the ingestion process. The default batching policy is configured to seal a batch once one of the following conditions is true for the batch: a maximum delay time of 5 minutes, total size of 1G, or 1000 blobs. Therefore, you may experience a latency. For more information, see batching policy.
- Event Hub ingestion includes Event Hub response time of 10 seconds or 1 MB.
- To reduce response time lag, configure your table to support streaming. See streaming policy.
Clean up resources
If you don't plan to use your Event Hub again, clean up test-hub-rg, to avoid incurring costs.
In the Azure portal, select Resource groups on the far left, and then select the resource group you created.
If the left menu is collapsed, select
 to expand it.
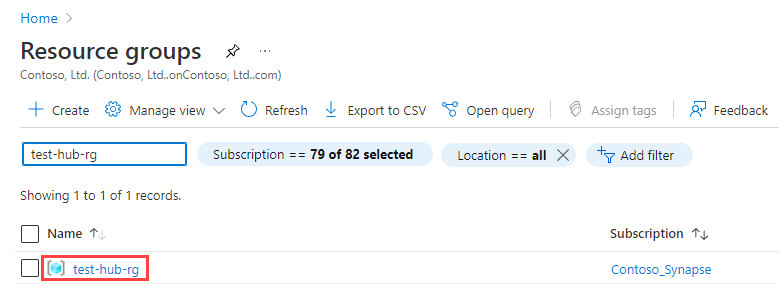
Under test-resource-group, select Delete resource group.
In the new window, type the name of the resource group to delete (test-hub-rg), and then select Delete.
Next steps
Feedback
Coming soon: Throughout 2024 we will be phasing out GitHub Issues as the feedback mechanism for content and replacing it with a new feedback system. For more information see: https://aka.ms/ContentUserFeedback.
Submit and view feedback for