Azure Data Explorer (Kusto)
Summary
| Item | Description |
|---|---|
| Release State | General Availability |
| Products | Excel Power BI (Semantic models) Power BI (Dataflows) Fabric (Dataflow Gen2) Power Apps (Dataflows) Dynamics 365 Customer Insights |
| Authentication Types Supported | Organizational Account |
| Function Reference Documentation | — |
Note
Some capabilities may be present in one product but not others due to deployment schedules and host-specific capabilities.
Prerequisites
An Azure subscription. Go to Get Azure free trial.
An organizational email account that is a member of Microsoft Entra ID. This article uses this account to connect to the Azure Data Explorer help cluster samples.
Capabilities supported
- Import
- DirectQuery (Power BI semantic models)
- Advanced options
- Limit query result record number
- Limit query result data size in Bytes
- Disable result-set truncation
- Additional set statements
Connect to Azure Data Explorer from Power Query Desktop
To connect to Azure Data Explorer from Power Query Desktop:
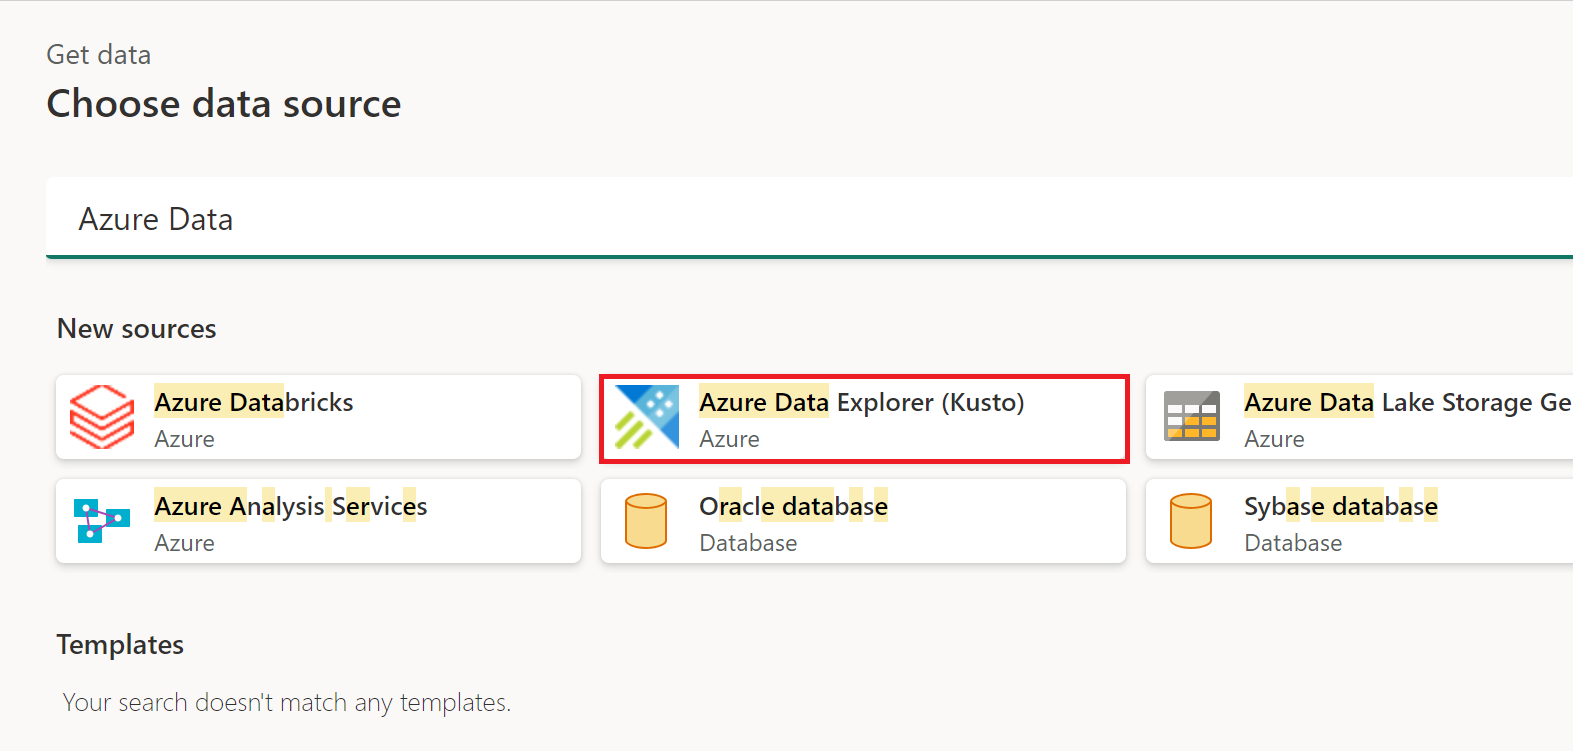
Select Azure Data Explorer (Kusto) in the get data experience. The get data experience in Power Query Desktop varies between apps. For more information about the Power Query Desktop get data experience for your app, go to Where to get data.
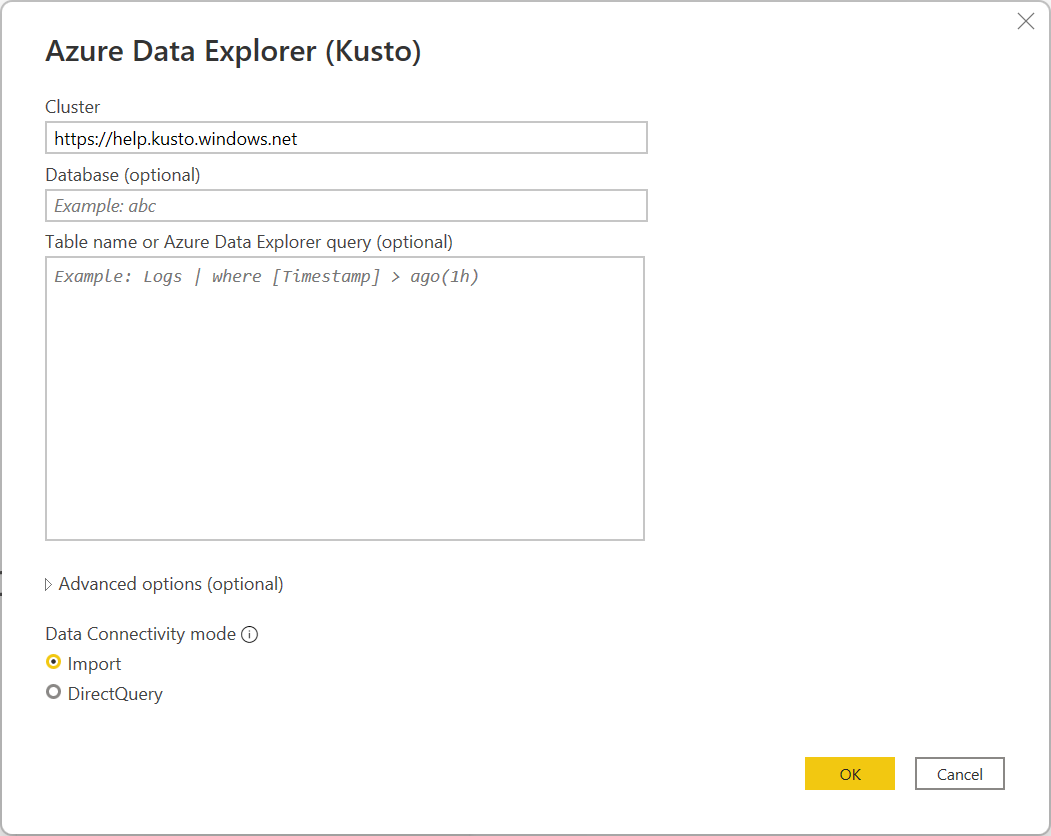
In Azure Data Explorer (Kusto), provide the name of your Azure Data Explorer cluster. For this example, use
https://help.kusto.windows.netto access the sample help cluster. For other clusters, the URL is in the form https://<ClusterName>.<Region>.kusto.windows.net.You can also select a database that's hosted on the cluster you're connecting to, and one of the tables in the database, or a query like
StormEvents | take 1000.If you want to use any advance options, select the option and enter the data to use with that option. More information: Connect using advanced options
Note
You might need to scroll down to display all of the advanced options and the data connectivity selection.
Select either the Import or DirectQuery data connectivity mode (Power BI Desktop only). More information: When to use Import or Direct Query mode
Select OK to continue.
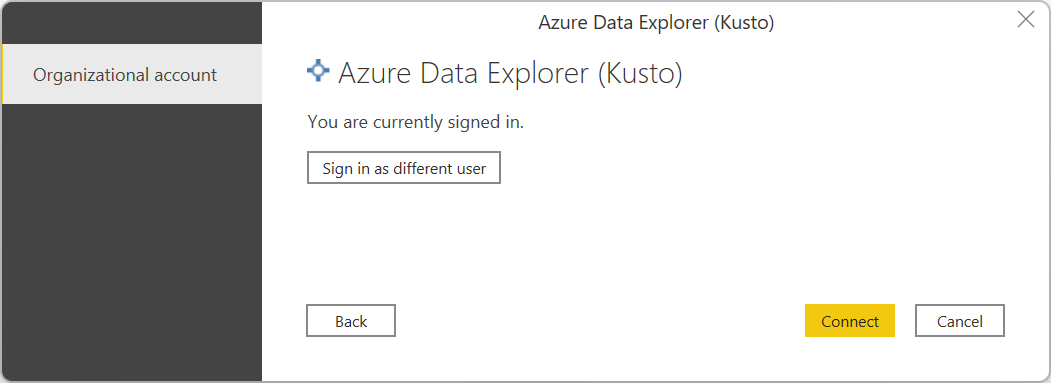
If you don't already have a connection to the cluster, select Sign in. Sign in with an organizational account, then select Connect.
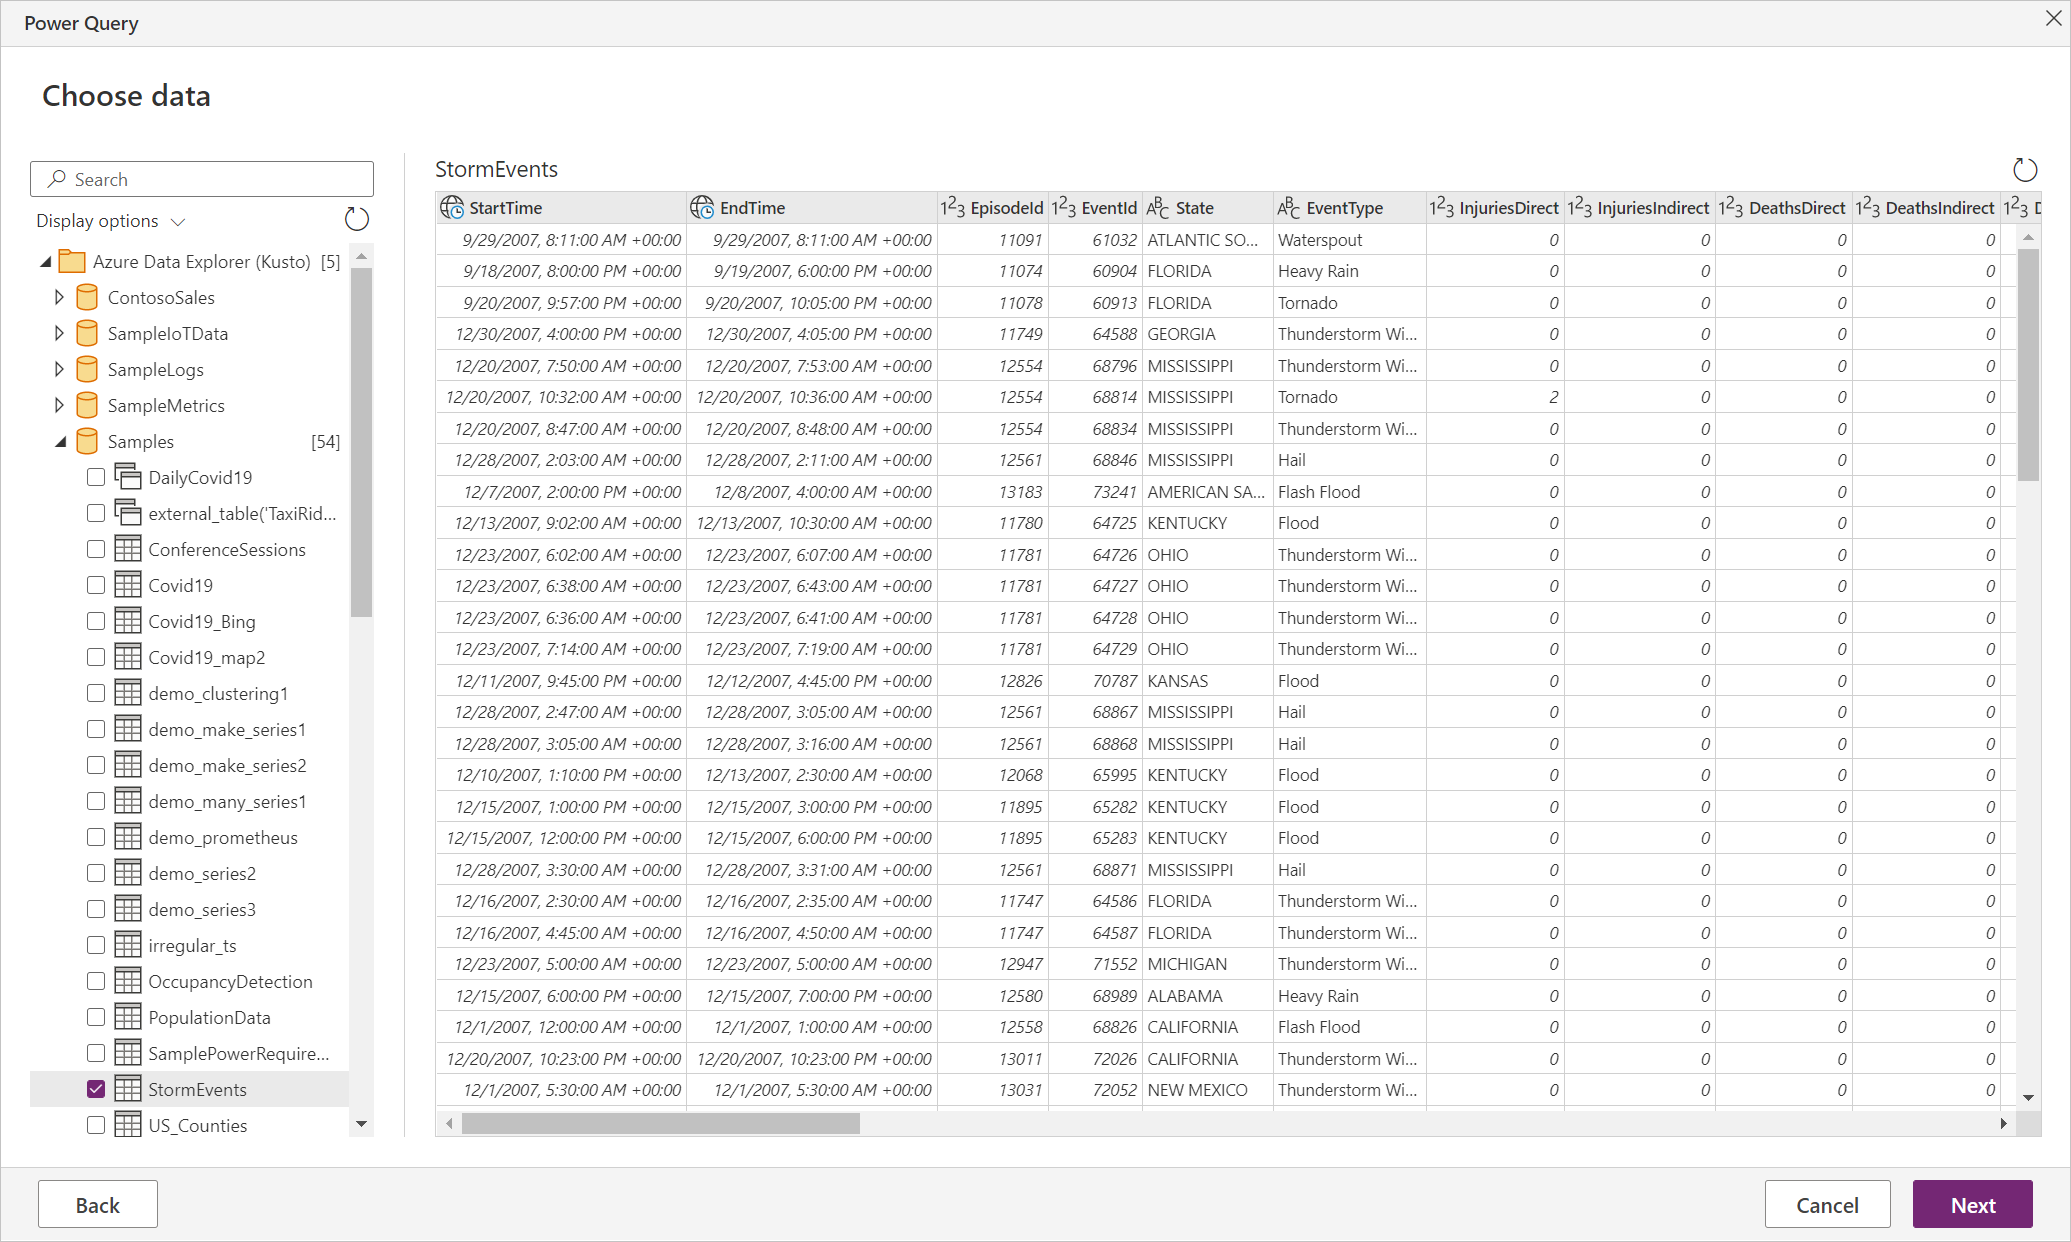
In Navigator, select the database information you want, then either select Load to load the data or Transform Data to continue transforming the data in the Power Query editor. In this example, StormEvents was selected in the Samples database.


Connect to Azure Data Explorer from Power Query Online
To connect to Azure Data Explorer from Power Query Online:
Select the Azure Data Explorer (Kusto) option in the get data experience. Different apps have different ways of getting to the Power Query Online get data experience. For more information about how to get to the Power Query Online get data experience from your app, go to Where to get data.
In Connect to data source, provide the name of your Azure Data Explorer cluster. For this example, use
https://help.kusto.windows.netto access the sample help cluster. For other clusters, the URL is in the form https://<ClusterName>.<Region>.kusto.windows.net.You can also select a database that's hosted on the cluster you're connecting to, and one of the tables in the database, or a query like
StormEvents | take 1000.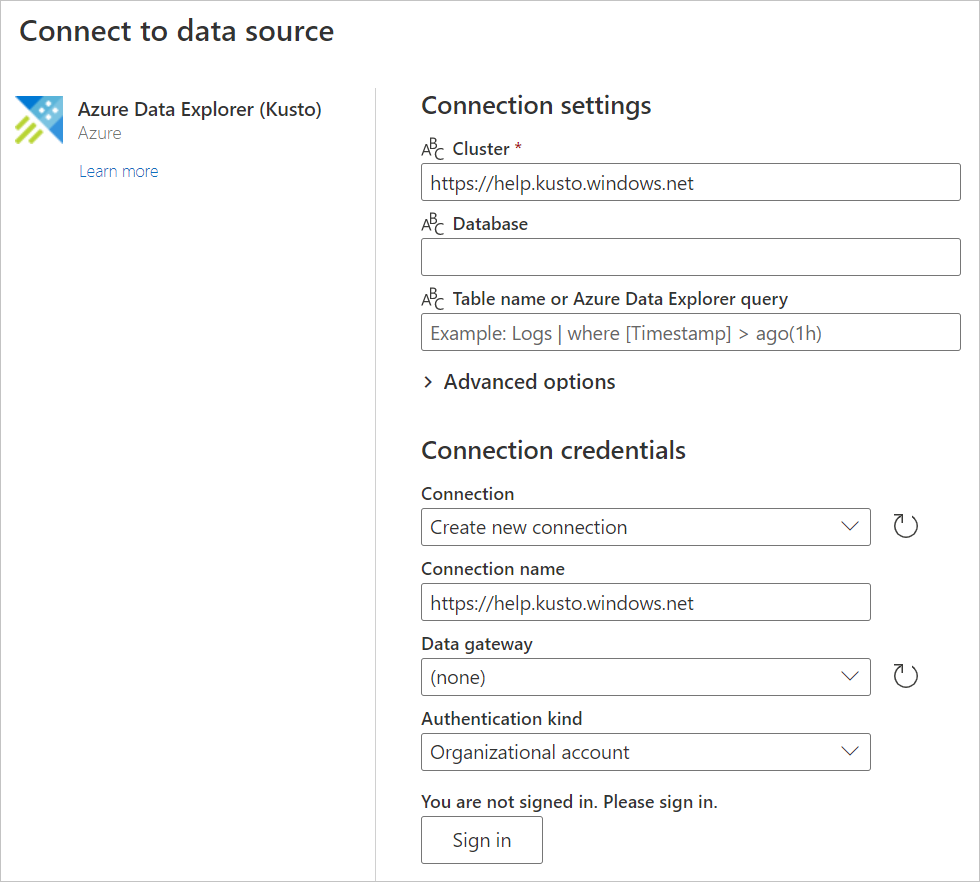
If you want to use any advance options, select the option and enter the data to use with that option. More information: Connect using advanced options
If needed, select the on-premises data gateway in Data gateway.
If you don't already have a connection to the cluster, select Sign in. Sign in with an organizational account.
After you've successfully signed in, select Next.
In the Choose data page, select the database information you want, then either select Transform Data or Next to continue transforming the data in the Power Query editor. In this example, StormEvents was selected in the Samples database.

Connect using advanced options
Both Power Query Desktop and Power Query Online provide a set of advanced options that you can add to your query if needed.
The following table lists all of the advanced options you can set in Power Query Desktop and Power Query Online.
| Advanced option | Description |
|---|---|
| Limit query result record number | The maximum number of records to return in the result. |
| Limit query result data size in Bytes | The maximum data size in bytes to return in the result. |
| Disable result-set truncation | Enable or disable result truncation by using the notruncation request option. |
| Additional Set Statements | Sets query options for the duration of the query. Query options control how a query executes and returns results. Multiple Set statements can be separated by semicolons. |
For information about additional advanced options not available in the Power Query UI, go to Configuring Azure Data Explorer connector options in an M Query.
When to use Import or Direct Query mode
In Import mode, data is moved to Power BI. In DirectQuery mode, data is queried directly from your cluster.
Use Import mode when:
- Your data set is small.
- You don't need near real-time data.
- Your data is already aggregated or you perform aggregation in Kusto.
Use DirectQuery mode when:
- Your data set is very large.
- You need near real-time data.
To learn more about using DirectQuery, go to About using DirectQuery in Power BI.
Tips for using the Azure Data Explorer connector to query data
The following sections include tips and tricks for using Kusto query language with Power Query.
Complex queries in Power BI
Complex queries are more easily expressed in Kusto than in Power Query. They should be implemented as Kusto functions, and invoked in Power BI. This method is required when using DirectQuery with let statements in your Kusto query. Because Power BI joins two queries, and let statements can't be used with the join operator, syntax errors might occur. Therefore, save each portion of the join as a Kusto function and allow Power BI to join these two functions together.
How to simulate a relative date-time operator
Power Query doesn't contain a relative date-time operator such as ago().
To simulate ago(), use a combination of DateTime.FixedLocalNow and #duration Power Query M functions.
Instead of this query using the ago() operator:
    StormEvents | where StartTime > (now()-5d)
    StormEvents | where StartTime > ago(5d)
Use the following equivalent query:
let
    Source = AzureDataExplorer.Contents("help", "Samples", "StormEvents", []),
    #"Filtered Rows" = Table.SelectRows(Source, each [StartTime] > (DateTime.FixedLocalNow()-#duration(5,0,0,0)))
in
    #"Filtered Rows"
Configuring Azure Data Explorer connector options in an M Query
You can configure the options of the Azure Data Explorer connector from the Power Query advanced editor in the M query language. Using these options, you can control the generated query that's being sent to your Azure Data Explorer cluster.
let
    Source = AzureDataExplorer.Contents("help", "Samples", "StormEvents", [<options>])
in
    Source
You can use any of the following options in your M query:
| Option | Sample | Description |
|---|---|---|
| MaxRows | [MaxRows=300000] |
Adds the truncationmaxrecords set statement to your query. Overrides the default maximum number of records a query can return to the caller (truncation). |
| MaxSize | [MaxSize=4194304] |
Adds the truncationmaxsize set statement to your query. Overrides the default maximum data size a query is allowed to return to the caller (truncation). |
| NoTruncate | [NoTruncate=true] |
Adds the notruncation set statement to your query. Enables suppressing truncation of the query results returned to the caller. |
| AdditionalSetStatements | [AdditionalSetStatements="set query_datascope=hotcache"] |
Adds the provided set statements to your query. These statements are used to set query options for the duration of the query. Query options control how a query executes and returns results. |
| CaseInsensitive | [CaseInsensitive=true] |
Makes the connector generate queries that are case insensitive—queries use the =~ operator instead of the == operator when comparing values. |
| ForceUseContains | [ForceUseContains=true] |
Makes the connector generate queries that use contains instead of the default has when working with text fields. While has is much more performant, it doesn't handle substrings. For more information about the difference between the two operators, go to string operators. |
| Timeout | [Timeout=#duration(0,10,0,0)] |
Configures both the client and server timeout of the query to the provided duration. |
| ClientRequestIdPrefix | [ClientRequestIdPrefix="MyReport"] |
Configures a ClientRequestId prefix for all queries sent by the connector. This allows the queries to be identifiable in the cluster as coming from a specific report and/or data source. |
Note
You can combine multiple options together to reach the required behavior: [NoTruncate=true, CaseInsensitive=true]
Reaching Kusto query limits
Kusto queries return, by default, up to 500,000 rows or 64 MB, as described in query limits. You can override these defaults by using Advanced options in the Azure Data Explorer (Kusto) connection window:

These options issue set statements with your query to change the default query limits:
- Limit query result record number generates a
set truncationmaxrecords - Limit query result data size in Bytes generates a
set truncationmaxsize - Disable result-set truncation generates a
set notruncation
Case sensitivity
By default, the connector generates queries that use the case sensitive == operator when comparing string values. If the data is case insensitive, this isn't the desired behavior. To change the generated query, use the CaseInsensitive connector option:
let
    Source = AzureDataExplorer.Contents("help", "Samples", "StormEvents", [CaseInsensitive=true]),
    #"Filtered Rows" = Table.SelectRows(Source, each [State] == "aLaBama")
in
    #"Filtered Rows"
Using query parameters
You can use query parameters to modify your query dynamically.
Use a query parameter in the query steps
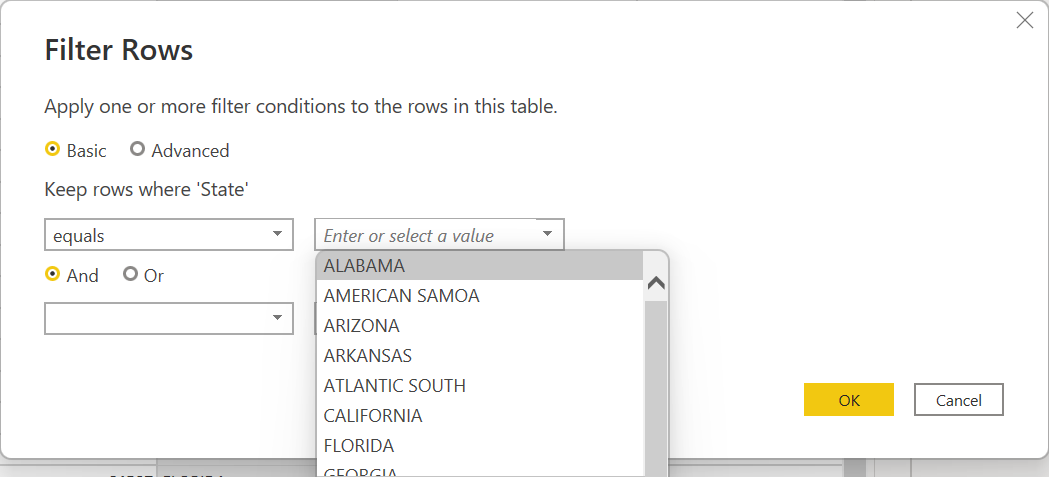
You can use a query parameter in any query step that supports it. For example, filter the results based on the value of a parameter. In this example, select the drop-down menu on the right side of the State column in the Power Query editor, select Text Filters > Equals, then select ALABAMA under Keep rows where 'State'.
Provide parameters to an Azure Data Explorer function
Kusto functions are a great way to maintain complex Kusto Query Language (KQL) queries. We recommend using functions instead of embedding KQL in Power Query. The main advantage of using function is that the logic is maintained once in an environment that is easy to create and test.
Functions can also receive parameters and so add a lot of flexibility to the Power BI user. Power BI has a lot of ways to slice the data. But all filters and slicers are added after the original KQL and in many cases you'll want to use filtering at an early stage of the query. Using functions and dynamic parameters is a very effective way to customize the final query.
Creating a function
You can create the following function in any Azure Data Explorer cluster that you have access to, including a free cluster. The function returns the table SalesTable from the help cluster, filtered for sales transactions greater than or smaller than a number provided by the report user.
.create-or-alter  function LargeOrSmallSales(Cutoff:long,Op:string=">")
{
    cluster("help").database("ContosoSales").SalesTable
    | where  (Op==">" and SalesAmount >= Cutoff) or (Op=="<"  and SalesAmount <= Cutoff)
}
After you create the function, you can test it using:
LargeOrSmallSales(2000,">")
| summarize Sales=tolong(sum(SalesAmount)) by Country
You can also test it using:
LargeOrSmallSales(20,"<")
| summarize Sales=tolong(sum(SalesAmount)) by Country
Using the function in Power BI
Connect to the cluster where you created the function.
In the Power Query navigator, select the function from the list of objects. The connector analyzes the parameters and presents them above the data on the right side of the navigator.
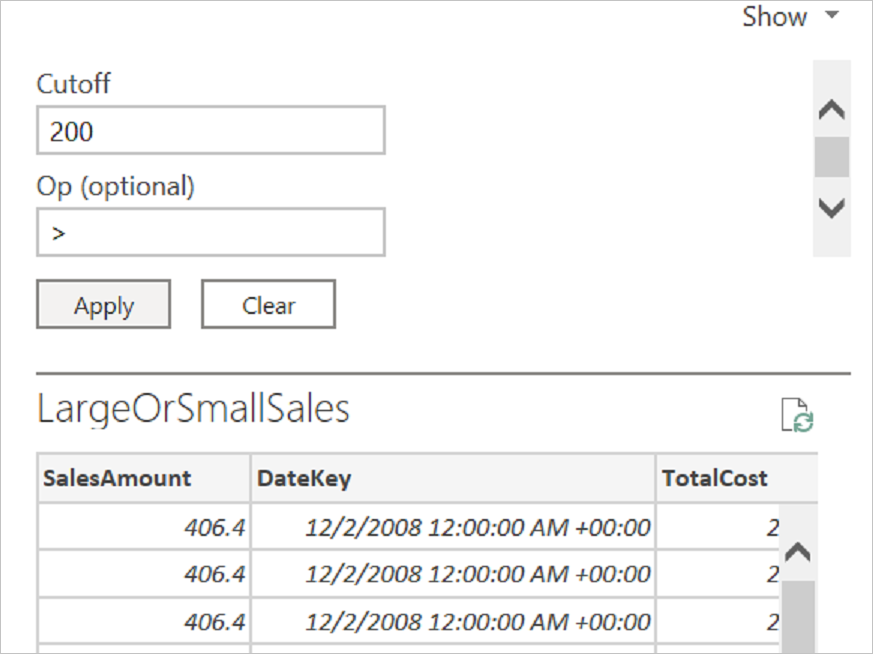
Add values to the parameters and then select Apply.
After the preview appears, select Transform Data.
Once in the Power Query editor, create two parameters, one for the cutoff value and one for the operator.
Go back to the
LargeOrSmallSalesquery and replace the values with the query parameters in the formula bar.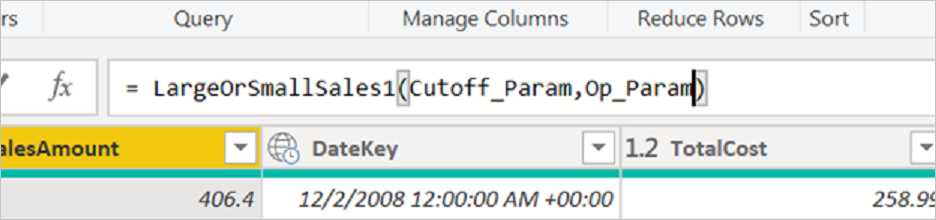
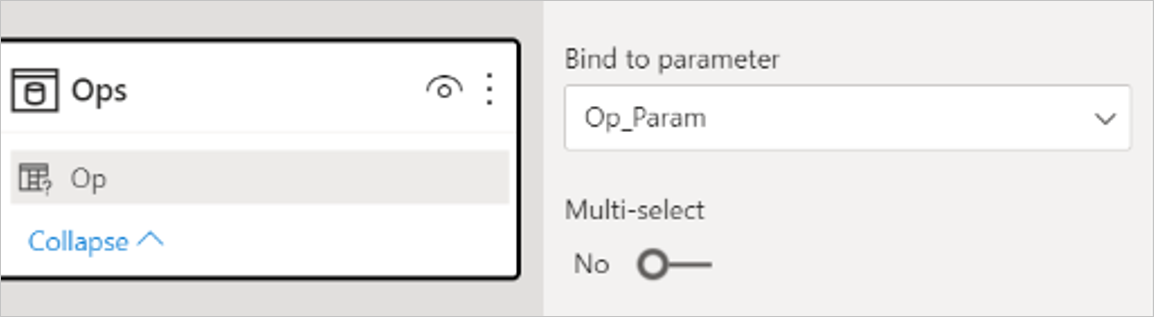
From the editor, create two static tables (Enter Data) to provide options for the two parameters. For the cutoff, you can create a table with values like 10, 50, 100, 200, 500, 1000, 2000. For the
Op, a table with two Text values<and>.The two columns in the tables need to be bound to the query parameters using the Bind to parameter selection.
The final report will include slicers for the two static tables and any visuals from the summary sales.
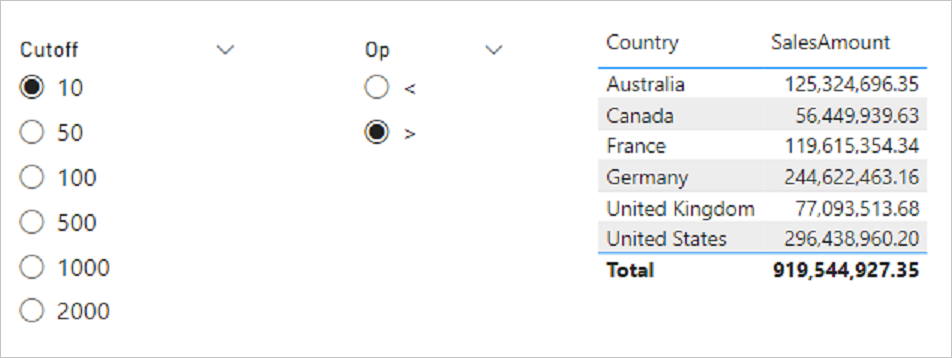
The base table is filtered first and then aggregated.
Using a query parameter in the connection details
Use a query parameter to filter information in the query and optimize query performance.
In Advanced Editor:
Find the following section of the query:
Source = AzureDataExplorer.Contents("<Cluster>", "<Database>", "<Query>", [])
For example:
Source = AzureDataExplorer.Contents("Help", "Samples", "StormEvents | where State == 'ALABAMA' | take 100", [])Insert a query parameter into the Kusto Query Language (KQL) query.
If you paste a KQL query directly in the connection dialog, the query will be part of the source step in Power Query. You can embed parameters as part of the query using the advanced editor or when editing the source statement in the formula bar. An example query could be
StormEvents | where State == ' " & State & " ' | take 100.Stateis a parameter and in run time the query will be:StormEvents | where State == 'ALABAMA' | take 100If your query contains quotation marks, encode them correctly. For example, the following query in KQL:
"StormEvents | where State == "ALABAMA" | take 100"will appear in the Advanced Editor as follows with two quotation marks:
"StormEvents | where State == ""ALABAMA"" | take 100"If you are using a parameter, such as
State, it should be replaced with the following query, which contains three quotation marks:"StormEvents | where State == """ & State & """ | take 100"
Use Value.NativeQuery for Azure Data Explorer features
To use an Azure Data Explorer feature that's not supported in Power Query, use the Value.NativeQuery method in Power Query M. This method inserts a Kusto Query Language fragment inside the generated query, and can also be used to give you more control over the executed query.
The following example shows how to use the percentiles function in Azure Data Explorer:
let
    StormEvents = AzureDataExplorer.Contents(DefaultCluster, DefaultDatabase){[Name = DefaultTable]}[Data],
    Percentiles = Value.NativeQuery(StormEvents, "| summarize percentiles(DamageProperty, 50, 90, 95) by State")
in
    Percentiles
Don't use Power BI data refresh scheduler to issue control commands to Kusto
Power BI includes a data refresh scheduler that can periodically issue queries against a data source. This mechanism shouldn't be used to schedule control commands to Kusto because Power BI assumes all queries are read-only.
Feedback
Coming soon: Throughout 2024 we will be phasing out GitHub Issues as the feedback mechanism for content and replacing it with a new feedback system. For more information see: https://aka.ms/ContentUserFeedback.
Submit and view feedback for