Configure Key Vault firewall and network settings
Role assignments and conditional access policies control who can perform operations on Key Vault. Network security controls which paths those operations arrive from. These two layers are independent—strong access control without network isolation still leaves your vault endpoint reachable from the internet.
Evaluate the default network posture
When you create a new Key Vault, the firewall is disabled and public network access is enabled. Any internet IP address can resolve your vault's public DNS name and send authentication requests to it. The Microsoft Entra token and role assignment requirements you configured in earlier units still apply—but that only means an attacker needs valid credentials, not that the endpoint is unreachable. Every request, legitimate or adversarial, arrives at your vault directly across the public internet.
For production vaults that hold encryption keys or application secrets—like those at Contoso Health—this posture isn't acceptable. The audit found vaults storing patient data encryption keys with no network-level restrictions in place.
Your objective is to limit which networks can reach the vault endpoint at all, independent of authentication.
Restrict access with firewall rules and IP allow lists
The first level of network hardening is enabling the Key Vault firewall and adding explicit allow rules. When the firewall is enabled without any configured rules, all traffic is blocked by default. You then add the specific IPv4 addresses or Classless Inter-Domain Routing (CIDR) ranges that should have access.
This model works well for defined use cases. A CI/CD pipeline running on build agents with static, known IP addresses is a good fit—you add the agents' CIDR range to the allow list, and the pipeline continues to reach Key Vault to read deployment secrets. On-premises systems connecting over site-to-site VPN with a known egress address are another valid scenario.
Configure the firewall in the Azure portal
The steps are the same whether the vault is new or already deployed. For a new vault, the Networking tab appears in the creation wizard. For an existing vault, navigate to the vault and select Networking in the left menu.
- Select the Firewalls and virtual networks tab.
- Under Allow access from, select Allow public access from specific virtual networks and IP addresses.
- Under Firewall, enter the IPv4 address or CIDR range to allow.
- Repeat for each address or range, then select Save.
To block all public access and allow only what you explicitly permit, you can instead select Disable public access - but only after your private endpoint or virtual network rules are in place, or you'll lock yourself out of the vault.
Important
Firewall rules apply only to data plane operations—reading secrets, keys, and certificates. Control plane operations (creating or configuring the vault via ARM template) aren't subject to firewall restrictions. Also, private IP address ranges (RFC 1918: 10.x, 172.16–31.x, 192.168.x) can't be used in IP allow list rules.
The limitations become apparent quickly in dynamic environments. IP allow lists require maintenance every time infrastructure changes, and they don't work for workloads with dynamic IPs. The vault endpoint also remains public—the firewall filters which IPs can connect, but the endpoint is still internet-facing. Use IP-based rules as a transitional hardening step or for specific bounded use cases, not as your primary production isolation model.
Route virtual network traffic over the Azure backbone using service endpoints
Virtual network service endpoints give workloads inside an Azure virtual network a more structured alternative to IP-based rules. When you enable the Microsoft.KeyVault service endpoint on a virtual network subnet and add that subnet to your Key Vault network rules, traffic from that subnet travels over the Azure backbone network rather than the public internet.
Service endpoints map naturally to workload boundaries. A subnet dedicated to your secret-consuming application services gets access; all other subnets are denied, even within the same virtual network. Configure endpoint access by selecting subnets in Key Vault networking settings, or by enabling the service endpoint on the subnet before adding it as a network rule.
Configure a service endpoint in the Azure portal
- Navigate to your virtual network and select Subnets.
- Select the subnet that hosts your workload, then under Service endpoints, add Microsoft.KeyVault.
- Navigate to your Key Vault and select Networking > Firewalls and virtual networks.
- Under Allow access from, select Allow public access from specific virtual networks and IP addresses.
- Select + Add existing virtual networks, choose the subscription, virtual network, and subnet, then select Add.
- Select Save.
Service endpoints are a meaningful improvement over IP-based rules for Azure-hosted workloads—traffic stays on the Azure backbone and never crosses the public internet. The key constraint is that Key Vault retains a public endpoint: its DNS name still resolves to a public IP. For workloads that require true network isolation, that residual exposure means service endpoints aren't sufficient on their own.
Fully isolate Key Vault with private endpoints
Azure Private Link eliminates the residual public exposure of service endpoints by assigning Key Vault a private IP address inside your virtual network. The vault is no longer reachable from the internet once you combine a private endpoint with disabling public network access. The only way to reach the vault is through your virtual network, or through connected networks—an on-premises environment connected via Azure ExpressRoute or a site-to-site VPN, for example.
Two components are required for private endpoint connectivity to work correctly.
The first is the private endpoint resource - a network interface in your virtual network subnet, bound to Key Vault via Azure Private Link, that receives a private IP address.
The second is a private DNS zone. Without DNS integration, clients resolve your vault's public IP regardless of the private endpoint. Configure the privatelink.vaultcore.azure.net zone and link it to the virtual network so that <vault-name>.vault.azure.net resolves to the private IP. The Azure portal offers automatic DNS integration during private endpoint creation.
Once the private endpoint is deployed and DNS is configured, disable public network access on the vault. That combination—private endpoint active, public access disabled—means the vault is fully isolated from the internet.
Note
Disabling public network access affects some Microsoft-managed services that need to reach Key Vault—including Azure Monitor and Azure Backup. Use the Allow trusted Microsoft services to bypass this firewall exception for services in this category, or ensure those services connect through a path in your private network. Review the trusted services list before enabling this bypass, as it covers only services that Microsoft fully controls.
Choose the right isolation model for your workload
Not every vault requires the same level of network isolation. Matching the model to the workload keeps the configuration maintainable and appropriate for the risk.
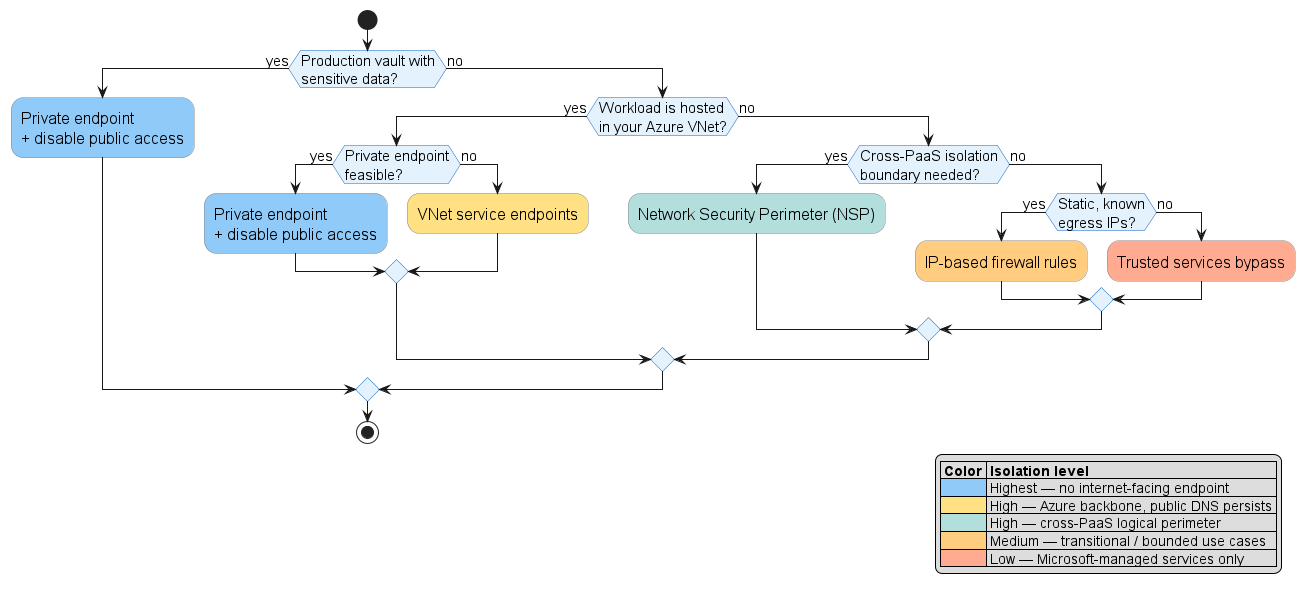
- Private endpoint with public access disabled - the recommended architecture for production workloads storing sensitive data. Provides complete network isolation with no internet-facing endpoint.
- VNet service endpoints - appropriate when private endpoints aren't feasible due to virtual network architecture constraints. Eliminates internet routing for controlled workloads, but the public endpoint persists.
- IP-based firewall rules - a valid transitional state for tightly bounded use cases such as CI/CD pipelines from build agents with static IPs. Not a long-term production architecture.
- Network Security Perimeter (NSP) - a GA option for organizations that need to define a logical isolation boundary across multiple PaaS resources (Key Vault, Storage, SQL Database) outside your virtual network perimeter. NSP uses
publicNetworkAccess: SecuredByPerimeterand supports inbound/outbound access rules. Note the setting overrides the trusted Microsoft services bypass—services relying on that bypass, such as Azure Monitor and Azure Backup, are blocked if NSP is active. - Trusted services bypass - needed when Microsoft-managed services like Azure Monitor, Azure Backup, or Azure Site Recovery require Key Vault access that can't be routed through your private network. Not applicable when NSP is in use.
Tip
For detailed configuration steps for each network model, see Configure network security for Azure Key Vault and Integrate Key Vault with Azure Private Link.
Evaluate network access options for AI agents
The network model you choose has direct implications for AI agents that need to access Key Vault. Agents running on Azure compute you control—Azure AI Foundry, Container Apps, AKS, or Azure Functions with virtual network integration—behave like any other workload. Add the subnet via service endpoints or private endpoints using the same steps covered in this unit.
For agents built with Microsoft Copilot Studio, two supported access patterns are available. The first uses Power Platform Virtual Network support in a Managed Environment: when virtual network support is enabled, the agent calls Key Vault directly over a private link using an HTTP Request node, with all traffic staying on your private network. The second uses environment variable secret references: Copilot Studio Service is granted to the Key Vault Secrets User role on the vault, and the agent accesses secrets through Power Platform environment variables—no direct network path to Key Vault is required from the agent itself. Review these patterns before deciding whether IP allow lists or public access are appropriate for agents in your design.