Note
Access to this page requires authorization. You can try signing in or changing directories.
Access to this page requires authorization. You can try changing directories.
This tutorial shows you how to handle events in a storage account that has a hierarchical namespace.
You build a small solution that lets you populate a Databricks Delta table by uploading a comma-separated values (CSV) file that describes a sales order. You build this solution by connecting an Event Grid subscription, an Azure Function, and a Job in Azure Databricks.
In this tutorial, you:
- Create an Event Grid subscription that calls an Azure Function.
- Create an Azure Function that receives a notification from an event, and then runs the job in Azure Databricks.
- Create a Databricks job that inserts a customer order into a Databricks Delta table that is located in the storage account.
You build this solution in reverse order, starting with the Azure Databricks workspace.
Prerequisites
Create a storage account that has a hierarchical namespace (Azure Data Lake Storage). This tutorial uses a storage account named
contosoorders.See Create a storage account to use with Azure Data Lake Storage.
Make sure that your user account has the Storage Blob Data Contributor role assigned to it.
Create a service principal, create a client secret, and then grant the service principal access to the storage account.
See Tutorial: Connect to Azure Data Lake Storage (Steps 1 through 3). After you complete these steps, be sure to paste the tenant ID, app ID, and client secret values into a text file. You need those values soon.
If you don't have an Azure subscription, create a free account before you begin.
Create a sales order
First, create a CSV file that describes a sales order, and then upload that file to the storage account. Later, you use the data from this file to populate the first row in your Databricks Delta table.
Go to your new storage account in the Azure portal.
Select Storage browser > Blob containers > Add container and create a new container named data.
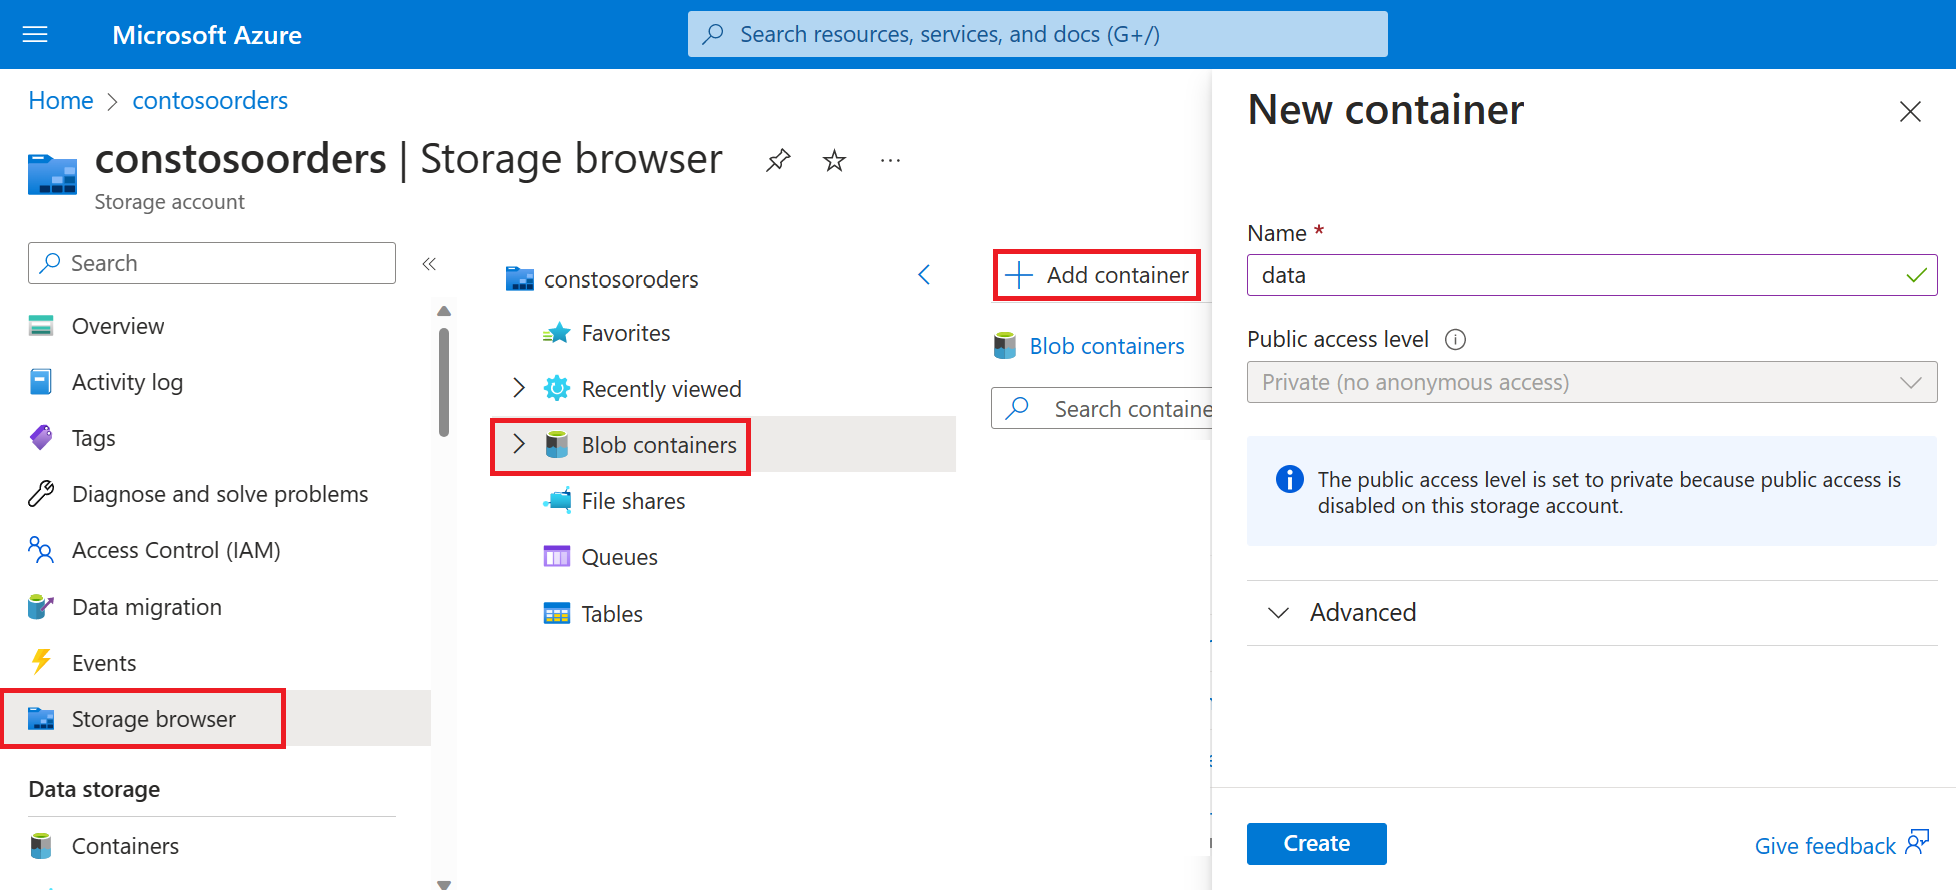
In the data container, create a directory named input.
Paste the following text into a text editor.
InvoiceNo,StockCode,Description,Quantity,InvoiceDate,UnitPrice,CustomerID,Country
536365,85123A,WHITE HANGING HEART T-LIGHT HOLDER,6,12/1/2010 8:26,2.55,17850,United Kingdom
Save this file to your local computer and name it data.csv.
In Storage browser, upload this file to the input folder.
Create a job in Azure Databricks
In this section, you perform these tasks:
- Create an Azure Databricks workspace.
- Create a notebook.
- Create and populate a Databricks Delta table.
- Add code that inserts rows into the Databricks Delta table.
- Create a job.
Create an Azure Databricks workspace
In this section, you create an Azure Databricks workspace by using the Azure portal.
Create an Azure Databricks workspace. Name the workspace
contoso-orders. See Create an Azure Databricks workspace.Create a cluster. Name the cluster
customer-order-cluster. See Create a cluster.Create a notebook. Name the notebook
configure-customer-tableand choose Python as the default language of the notebook. See Create a notebook.
Create and populate a Databricks Delta table
In the notebook that you created, copy and paste the following code block into the first cell, but don't run this code yet.
Replace the
appId,password, andtenantplaceholder values in this code block with the values that you collected while completing the prerequisites of this tutorial.dbutils.widgets.text('source_file', "", "Source File") spark.conf.set("fs.azure.account.auth.type", "OAuth") spark.conf.set("fs.azure.account.oauth.provider.type", "org.apache.hadoop.fs.azurebfs.oauth2.ClientCredsTokenProvider") spark.conf.set("fs.azure.account.oauth2.client.id", "<appId>") spark.conf.set("fs.azure.account.oauth2.client.secret", "<password>") spark.conf.set("fs.azure.account.oauth2.client.endpoint", "https://login.microsoftonline.com/<tenant>/oauth2/token") adlsPath = 'abfss://data@contosoorders.dfs.core.windows.net/' inputPath = adlsPath + dbutils.widgets.get('source_file') customerTablePath = adlsPath + 'delta-tables/customers'This code creates a widget named source_file. Later, you'll create an Azure Function that calls this code and passes a file path to that widget. This code also authenticates your service principal with the storage account, and creates some variables that you use in other cells.
Note
In a production setting, consider storing your authentication key in Azure Databricks. Then, add a lookup key to your code block instead of the authentication key.
For example, instead of using this line of code:spark.conf.set("fs.azure.account.oauth2.client.secret", "<password>"), use the following line of code:spark.conf.set("fs.azure.account.oauth2.client.secret", dbutils.secrets.get(scope = "<scope-name>", key = "<key-name-for-service-credential>")).
After you complete this tutorial, see the Azure Data Lake Storage article on the Azure Databricks website to see examples of this approach.Press SHIFT + ENTER to run the code in this block.
Copy and paste the following code block into a different cell, and then press SHIFT + ENTER to run the code in this block.
from pyspark.sql.types import StructType, StructField, DoubleType, IntegerType, StringType

inputSchema = StructType([
StructField("InvoiceNo", IntegerType(), True),
StructField("StockCode", StringType(), True),
StructField("Description", StringType(), True),
StructField("Quantity", IntegerType(), True),
StructField("InvoiceDate", StringType(), True),
StructField("UnitPrice", DoubleType(), True),
StructField("CustomerID", IntegerType(), True),
StructField("Country", StringType(), True)
])

rawDataDF = (spark.read
 .option("header", "true")
 .schema(inputSchema)
 .csv(adlsPath + 'input')
)

(rawDataDF.write
  .mode("overwrite")
  .format("delta")
  .saveAsTable("customer_data", path=customerTablePath))
This code creates the Databricks Delta table in your storage account, and then loads some initial data from the CSV file that you uploaded earlier.
After this code block runs successfully, remove this code block from your notebook.
Add code that inserts rows into the Databricks Delta table
Copy and paste the following code block into a different cell, but don't run this cell.
upsertDataDF = (spark
  .read
  .option("header", "true")
  .csv(inputPath)
)
upsertDataDF.createOrReplaceTempView("customer_data_to_upsert")
This code inserts data into a temporary table view by using data from a CSV file. The path to that CSV file comes from the input widget that you created in an earlier step.
Copy and paste the following code block into a different cell. This code merges the contents of the temporary table view with the Databricks Delta table.
%sql
MERGE INTO customer_data cd
USING customer_data_to_upsert cu
ON cd.CustomerID = cu.CustomerID
WHEN MATCHED THEN
  UPDATE SET
    cd.StockCode = cu.StockCode,
    cd.Description = cu.Description,
    cd.InvoiceNo = cu.InvoiceNo,
    cd.Quantity = cu.Quantity,
    cd.InvoiceDate = cu.InvoiceDate,
    cd.UnitPrice = cu.UnitPrice,
    cd.Country = cu.Country
WHEN NOT MATCHED
  THEN INSERT (InvoiceNo, StockCode, Description, Quantity, InvoiceDate, UnitPrice, CustomerID, Country)
  VALUES (
    cu.InvoiceNo,
    cu.StockCode,
    cu.Description,
    cu.Quantity,
    cu.InvoiceDate,
    cu.UnitPrice,
    cu.CustomerID,
    cu.Country)
Create a job
Create a job that runs the notebook that you created earlier. Later, you create an Azure Function that runs this job when an event is raised.
Select New > Job.
Give the job a name, choose the notebook that you created, and select a cluster. Then, select Create to create the job.
The new job appears in the Jobs list with the notebook and cluster that you selected.
Create an Azure Function
Create an Azure Function that runs the job.
In your Azure Databricks workspace, select your Azure Databricks username in the top bar. From the dropdown list, select User Settings.
On the Access tokens tab, select Generate new token.
Copy the token that appears, and then select Done.
In the upper corner of the Databricks workspace, choose the people icon, and then choose User settings.
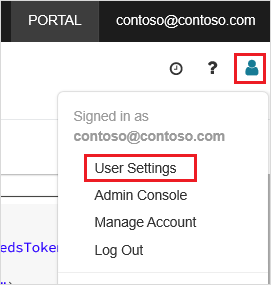
Select the Generate new token button, and then select the Generate button.
Make sure to copy the token to a safe place. Your Azure Function needs this token to authenticate with Databricks so that it can run the job.
From the Azure portal menu or the Home page, select Create a resource.
In the New page, select Compute > Function App.
In the Basics tab of the Create Function App page, choose a resource group, and then change or verify the following settings:
Setting Value Function App name contosoorder Runtime stack .NET Publish Code Operating System Windows Plan type Consumption (Serverless) Select Review + create, and then select Create.
When the deployment is complete, select Go to resource to open the overview page of the Function App.
In the Settings group, select Configuration.
In the Application Settings page, choose the New application setting button to add each setting.
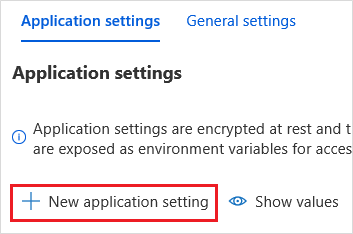
Add the following settings:
Setting name Value DBX_INSTANCE The region of your databricks workspace. For example: westus2.azuredatabricks.netDBX_PAT The personal access token that you generated earlier. DBX_JOB_ID The identifier of the running job. Select Save to commit these settings.
In the Functions group, select Functions, and then select Create.
Choose Azure Event Grid Trigger.
Install the Microsoft.Azure.WebJobs.Extensions.EventGrid extension if you're prompted to do so. If you need to install it, select Azure Event Grid Trigger again to create the function.
The New Function pane appears.
In New Function, enter
UpsertOrderfor the function name, and then select Create.Replace the contents of the code file with the following code, and then select Save:
  #r "Azure.Messaging.EventGrid"
  #r "System.Memory.Data"
  #r "Newtonsoft.Json"
  #r "System.Text.Json"
  using Azure.Messaging.EventGrid;
  using Azure.Messaging.EventGrid.SystemEvents;
  using Newtonsoft.Json;
  using Newtonsoft.Json.Linq;

  private static HttpClient httpClient = new HttpClient();

  public static async Task Run(EventGridEvent eventGridEvent, ILogger log)
  {
     log.LogInformation("Event Subject: " + eventGridEvent.Subject);
     log.LogInformation("Event Topic: " + eventGridEvent.Topic);
     log.LogInformation("Event Type: " + eventGridEvent.EventType);
     log.LogInformation(eventGridEvent.Data.ToString());

     if (eventGridEvent.EventType == "Microsoft.Storage.BlobCreated" || eventGridEvent.EventType == "Microsoft.Storage.FileRenamed") {
        StorageBlobCreatedEventData fileData = eventGridEvent.Data.ToObjectFromJson<StorageBlobCreatedEventData>();
        if (fileData.Api == "FlushWithClose") {
              log.LogInformation("Triggering Databricks Job for file: " + fileData.Url);
              var fileUrl = new Uri(fileData.Url);
              var httpRequestMessage = new HttpRequestMessage {
                 Method = HttpMethod.Post,
                 RequestUri = new Uri(String.Format("https://{0}/api/2.0/jobs/run-now", System.Environment.GetEnvironmentVariable("DBX_INSTANCE", EnvironmentVariableTarget.Process))),
                 Headers = {
                    { System.Net.HttpRequestHeader.Authorization.ToString(), "Bearer " + System.Environment.GetEnvironmentVariable("DBX_PAT", EnvironmentVariableTarget.Process)},
                    { System.Net.HttpRequestHeader.ContentType.ToString(), "application/json" }
                 },
                 Content = new StringContent(JsonConvert.SerializeObject(new {
                    job_id = System.Environment.GetEnvironmentVariable("DBX_JOB_ID", EnvironmentVariableTarget.Process),
                    notebook_params = new {
                          source_file = String.Join("", fileUrl.Segments.Skip(2))
                    }
                 }))
              };
              var response = await httpClient.SendAsync(httpRequestMessage);
              response.EnsureSuccessStatusCode();
        }
     }
  }
This code parses information about the storage event that was raised, and then creates a request message with the URL of the file that triggered the event. As part of the message, the function passes a value to the source_file widget that you created earlier. The function code sends the message to the Databricks job and uses the token that you obtained earlier as authentication.
Create an Event Grid subscription
In this section, you create an Event Grid subscription that calls the Azure Function when files are uploaded to the storage account.
Select Integration. In the Integration page, select Event Grid Trigger.
In the Edit Trigger pane, name the event
eventGridEvent, and then select Create Event subscription.Note
The name
eventGridEventmatches the parameter name that the Azure Function receives.In the Basics tab of the Create Event Subscription page, change or verify the following settings:
Setting Value Name contoso-order-event-subscription Topic type Storage account Source Resource contosoorders System topic name <create any name>Filter to Event Types Blob Created, and Blob Deleted Select Create.
Test the Event Grid subscription
Create a file named
customer-order.csv, paste the following information into that file, and save it to your local computer.InvoiceNo,StockCode,Description,Quantity,InvoiceDate,UnitPrice,CustomerID,Country 536371,99999,EverGlow Single,228,1/1/2018 9:01,33.85,20993,Sierra LeoneIn Storage browser, upload this file to the input folder of your storage account.
When you upload a file, it raises the Microsoft.Storage.BlobCreated event. Event Grid notifies all subscribers to that event. In this case, the Azure Function is the only subscriber. The Azure Function parses the event parameters to determine which event occurred. It then passes the URL of the file to the Databricks job. The Databricks job reads the file, and adds a row to the Databricks Delta table that is located in your storage account.
To check whether the job succeeded, view the runs for your job. You see a completion status. For more information about how to view runs for a job, see View runs for a job.
In a new workbook cell, run this query to see the updated delta table.
%sql select * from customer_dataThe returned table shows the latest record.
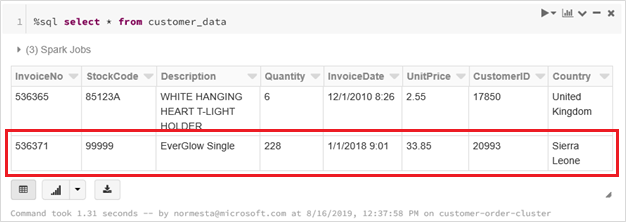
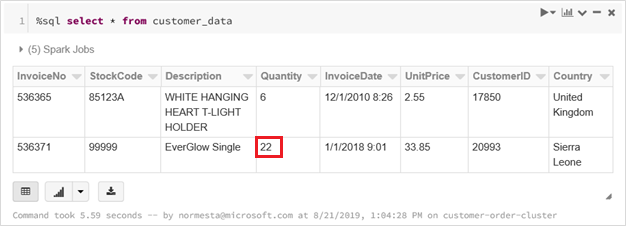
To update this record, create a file named
customer-order-update.csv, paste the following information into that file, and save it to your local computer.InvoiceNo,StockCode,Description,Quantity,InvoiceDate,UnitPrice,CustomerID,Country 536371,99999,EverGlow Single,22,1/1/2018 9:01,33.85,20993,Sierra LeoneThis CSV file is almost identical to the previous one except the quantity of the order is changed from
228to22.In Storage browser, upload this file to the input folder of your storage account.
Run the
selectquery again to see the updated delta table.%sql select * from customer_dataThe returned table shows the updated record.
Clean up resources
When you no longer need the resources, delete the resource group and all related resources. To delete the resource group, select the resource group for the storage account and select Delete.