Configure your App Service or Azure Functions app to sign in using a Sign in with Apple provider (Preview)
This article shows you how to configure Azure App Service or Azure Functions to use Sign in with Apple as an authentication provider.
To complete the procedure in this article, you must have enrolled in the Apple developer program. To enroll in the Apple developer program, go to developer.apple.com/programs/enroll.
Caution
Enabling Sign in with Apple will disable management of the App Service Authentication / Authorization feature for your application through some clients, such as the Azure portal, Azure CLI, and Azure PowerShell. The feature relies on a new API surface which, during preview, is not yet accounted for in all management experiences.
Create an application in the Apple Developer portal
You'll need to create an App ID and a service ID in the Apple Developer portal.
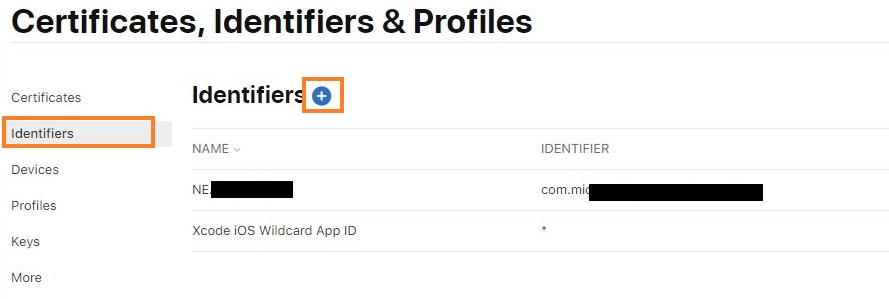
- On the Apple Developer portal, go to Certificates, Identifiers, & Profiles.
- On the Identifiers tab, select the (+) button.
- On the Register a New Identifier page, choose App IDs and select Continue. (App IDs include one or more Service IDs.)

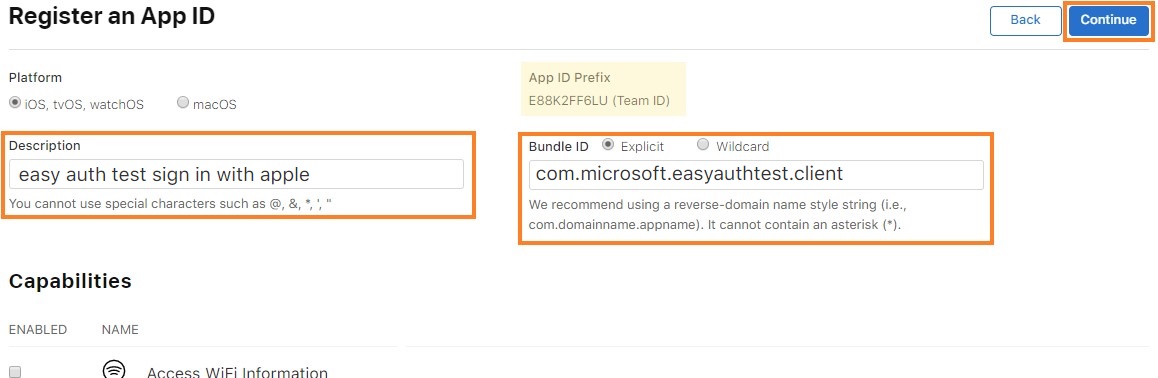
- On the Register an App ID page, provide a description and a bundle ID, and select Sign in with Apple from the capabilities list. Then select Continue. Take note of your App ID Prefix (Team ID) from this step, you'll need it later.
- Review the app registration information and select Register.
- Again, on the Identifiers tab, select the (+) button.
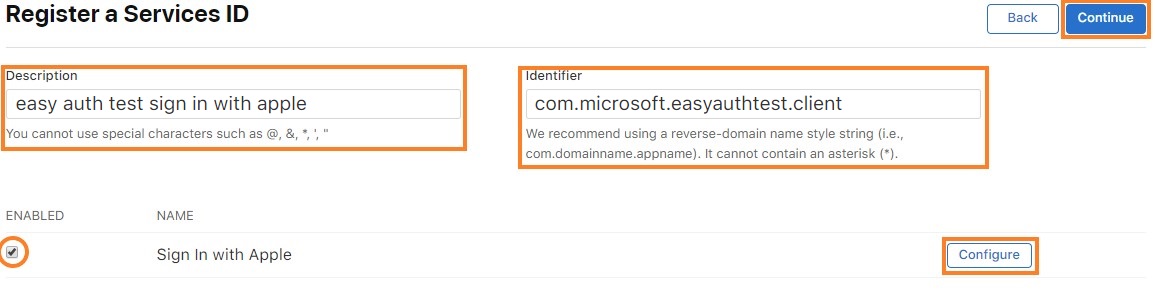
- On the Register a New Identifier page, choose Services IDs and select Continue.

- On the Register a Services ID page, provide a description and an identifier. The description is what will be shown to the user on the consent screen. The identifier will be your client ID used in configuring the Apple provider with your app service. Then select Configure.
- On the pop-up window, set the Primary App ID to the App ID you created earlier. Specify your application's domain in the domain section. For the return URL, use the URL
<app-url>/.auth/login/apple/callback. For example,https://contoso.azurewebsites.net/.auth/login/apple/callback. Then select Add and Save.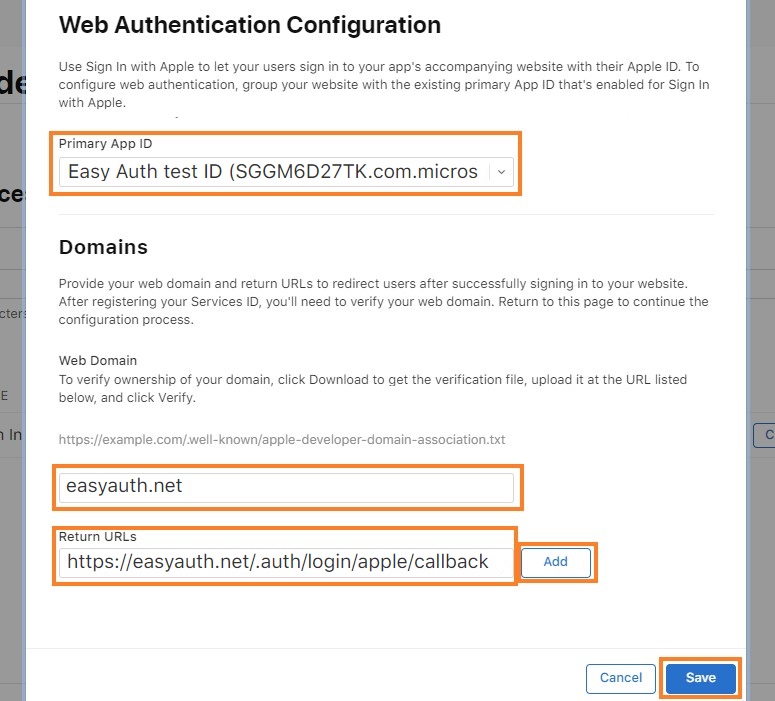
- Review the service registration information and select Save.
Generate the client secret
Apple requires app developers to create and sign a JWT token as the client secret value. To generate this secret, first generate and download an elliptic curve private key from the Apple Developer portal. Then, use that key to sign a JWT with a specific payload.
Create and download the private key
- On the Keys tab in the Apple Developer portal, choose Create a key or select the (+) button.
- On the Register a New Key page give the key a name, check the box next to Sign in with Apple and select Configure.
- On the Configure Key page, link the key to the primary app ID you created previously and select Save.
- Finish creating the key by confirming the information and selecting Continue and then reviewing the information and selecting Register.
- On the Download Your Key page, download the key. It will download as a
.p8(PKCS#8) file - you'll use the file contents to sign your client secret JWT.
Structure the client secret JWT
Apple requires the client secret be the base64-encoding of a JWT token. The decoded JWT token should have a payload structured like this example:
{
  "alg": "ES256",
  "kid": "URKEYID001",
}.{
  "sub": "com.yourcompany.app1",
  "nbf": 1560203207,
  "exp": 1560289607,
  "iss": "ABC123DEFG",
  "aud": "https://appleid.apple.com"
}.[Signature]
- sub: The Apple Client ID (also the service ID)
- iss: Your Apple Developer Team ID
- aud: Apple is receiving the token, so they're the audience
- exp: No more than six months after nbf
The base64-encoded version of the above payload looks like this:
eyJhbGciOiJFUzI1NiIsImtpZCI6IlVSS0VZSUQwMDEifQ.eyJzdWIiOiJjb20ueW91cmNvbXBhbnkuYXBwMSIsIm5iZiI6MTU2MDIwMzIwNywiZXhwIjoxNTYwMjg5NjA3LCJpc3MiOiJBQkMxMjNERUZHIiwiYXVkIjoiaHR0cHM6Ly9hcHBsZWlkLmFwcGxlLmNvbSJ9.ABSXELWuTbgqfrIUz7bLi6nXvkXAz5O8vt0jB2dSHTQTib1x1DSP4__4UrlKI-pdzNg1sgeocolPNTmDKazO8-BHAZCsdeeTNlgFEzBytIpMKFfVEQbEtGRkam5IeclUK7S9oOva4EK4jV4VmgDrr-LGWWO3TaAxAvy3_ZoKohvFFkVG
Note: Apple doesn't accept client secret JWTs with an expiration date more than six months after the creation (or nbf) date. That means you'll need to rotate your client secret, at minimum, every six months.
More information about generating and validating tokens can be found in Apple's developer documentation.
Sign the client secret JWT
You'll use the .p8 file you downloaded previously to sign the client secret JWT. This file is a PCKS#8 file that contains the private signing key in PEM format. There are many libraries that can create and sign the JWT for you.
There are different kinds of open-source libraries available online for creating and signing JWT tokens. For more information about generating JWT tokens, see JSON Web Token (JWT). For example, one way of generating the client secret is by importing the Microsoft.IdentityModel.Tokens NuGet package and running a small amount of C# code shown below.
using Microsoft.IdentityModel.Tokens;

public static string GetAppleClientSecret(string teamId, string clientId, string keyId, string p8key)
{
    string audience = "https://appleid.apple.com";

    string issuer = teamId;
    string subject = clientId;
    string kid = keyId;

    IList<Claim> claims = new List<Claim> {
        new Claim ("sub", subject)
    };

    CngKey cngKey = CngKey.Import(Convert.FromBase64String(p8key), CngKeyBlobFormat.Pkcs8PrivateBlob);

    SigningCredentials signingCred = new SigningCredentials(
        new ECDsaSecurityKey(new ECDsaCng(cngKey)),
        SecurityAlgorithms.EcdsaSha256
    );

    JwtSecurityToken token = new JwtSecurityToken(
        issuer,
        audience,
        claims,
        DateTime.Now,
        DateTime.Now.AddDays(180),
        signingCred
    );
    token.Header.Add("kid", kid);
    token.Header.Remove("typ");

    JwtSecurityTokenHandler tokenHandler = new JwtSecurityTokenHandler();

    return tokenHandler.WriteToken(token);
}
- teamId: Your Apple Developer Team ID
- clientId: The Apple Client ID (also the service ID)
- p8key: The PEM format key - you can obtain the key by opening the
.p8file in a text editor, and copying everything between-----BEGIN PRIVATE KEY-----and-----END PRIVATE KEY-----without line breaks - keyId: The ID of the downloaded key
This token returned is the client secret value you'll use to configure the Apple provider.
Important
The client secret is an important security credential. Do not share this secret with anyone or distribute it within a client application.
Add the client secret as an application setting for the app, using a setting name of your choice. Make note of this name for later.
Add provider information to your application
Note
The required configuration is in a new API format, currently only supported by file-based configuration (preview). You will need to follow the below steps using such a file.
This section will walk you through updating the configuration to include your new IDP. An example configuration follows.
Within the
identityProvidersobject, add anappleobject if one doesn't already exist.Assign an object to that key with a
registrationobject within it, and optionally aloginobject:"apple" : { "registration" : { "clientId": "<client ID>", "clientSecretSettingName": "APP_SETTING_CONTAINING_APPLE_CLIENT_SECRET" }, "login": { "scopes": [] } }a. Within the
registrationobject, set theclientIdto the client ID you collected.b. Within the
registrationobject, setclientSecretSettingNameto the name of the application setting where you stored the client secret.c. Within the
loginobject, you may choose to set thescopesarray to include a list of scopes used when authenticating with Apple, such as "name" and "email". If scopes are configured, they'll be explicitly requested on the consent screen when users sign in for the first time.
Once this configuration has been set, you're ready to use your Apple provider for authentication in your app.
A complete configuration might look like the following example (where the APPLE_GENERATED_CLIENT_SECRET setting points to an application setting containing a generated JWT):
{
    "platform": {
        "enabled": true
    },
    "globalValidation": {
        "redirectToProvider": "apple",
        "unauthenticatedClientAction": "RedirectToLoginPage"
    },
    "identityProviders": {
        "apple": {
            "registration": {
                "clientId": "com.contoso.example.client",
                "clientSecretSettingName": "APPLE_GENERATED_CLIENT_SECRET"
            },
            "login": {
                "scopes": []
            }
        }
    },
    "login": {
        "tokenStore": {
            "enabled": true
        }
    }
}