.NET MAUI
A Microsoft open-source framework for building native device applications spanning mobile, tablet, and desktop.
3,116 questions
This browser is no longer supported.
Upgrade to Microsoft Edge to take advantage of the latest features, security updates, and technical support.
' cx='32' cy='32' r='32' /%3E%3Ctext x='50%25' y='55%25' dominant-baseline='middle' text-anchor='middle' fill='%23FFF' %3ED%3C/text%3E%3C/svg%3E)
Hi,
How do i publish my app in mac ?
In windows i did:
dotnet publish -f net8.0-windows10.0.19041.0 -c Release -p:WindowsPackageType=None -p:WindowsAppSDKSelfContained=true /p:PackageCertificateThumbprint="c01ba45666762f3615cf6813aeb4dc4b1919541d" -p:RuntimeIdentifierOverride=win10-x64
' cx='32' cy='32' r='32' /%3E%3Ctext x='50%25' y='55%25' dominant-baseline='middle' text-anchor='middle' fill='%23FFF' %3ELL%3C/text%3E%3C/svg%3E)
Do you want to publish an unsigned .NET MAUI Mac Catalyst app with command line?
Which type of file that you want to publish? .app or .pkg file*?*
What mean unsigned .NET MAUI Mac Catalyst app?
I want with command line.
Regarding the type what you recomanded?
Waiting for your answer.
Hello,
What mean unsigned .NET MAUI Mac Catalyst app?
Publish application without certificate, you cannot upload your application to Mac App Store.
Regarding the type what you recomanded?
You can Publish a Mac Catalyst app for Mac App Store distribution with a certificate, you can use command line as well.
Best Regards,
Leon Lu
If the answer is the right solution, please click "Accept Answer" and kindly upvote it. If you have extra questions about this answer, please click "Comment".
Note: Please follow the steps in our documentation to enable e-mail notifications if you want to receive the related email notification for this thread.
How I publish with certificate and cli in macos?
Please use -p:PackageSigningKey when you publish application in command line.
The package signing key to use when signing the package. Set to the name of your installer certificate, as displayed in Keychain Access.
Here is simple command line from Publish using the command line
dotnet publish -f net8.0-maccatalyst -c Release -p:MtouchLink=SdkOnly -p:CreatePackage=true -p:EnableCodeSigning=true -p:EnablePackageSigning=true -p:CodesignKey="Apple Distribution: John Smith (AY2GDE9QM7)" -p:CodesignProvision="MyMauiApp" -p:CodesignEntitlements="Platforms\MacCatalyst\Entitlements.plist" -p:PackageSigningKey="3rd Party Mac Developer Installer: John Smith (AY2GDE9QM7)"
Dani_S May I know if you have got any chance to check my answer? I am glad to help if you have any other questions.
Hi,
p:CodesignKey="Apple Distribution: John Smith (AY2GDE9QM7)" => what to write here?
p:CodesignProvision="MyMauiApp" => what to write here?
p:PackageSigningKey="c01ba45666762f3615cf6813aeb4dc4b1919541d"=> to use what i have in windows.
dotnet publish -f net8.0-maccatalyst -c Release -p:MtouchLink=SdkOnly -p:CreatePackage=true -p:EnableCodeSigning=true -p:EnablePackageSigning=true -p:CodesignKey="Apple Distribution: John Smith (AY2GDE9QM7)" -p:CodesignProvision="MyMauiApp" -p:CodesignEntitlements="Platforms\MacCatalyst\Entitlements.plist" -p:PackageSigningKey="3rd Party Mac Developer Installer: John Smith (AY2GDE9QM7)"
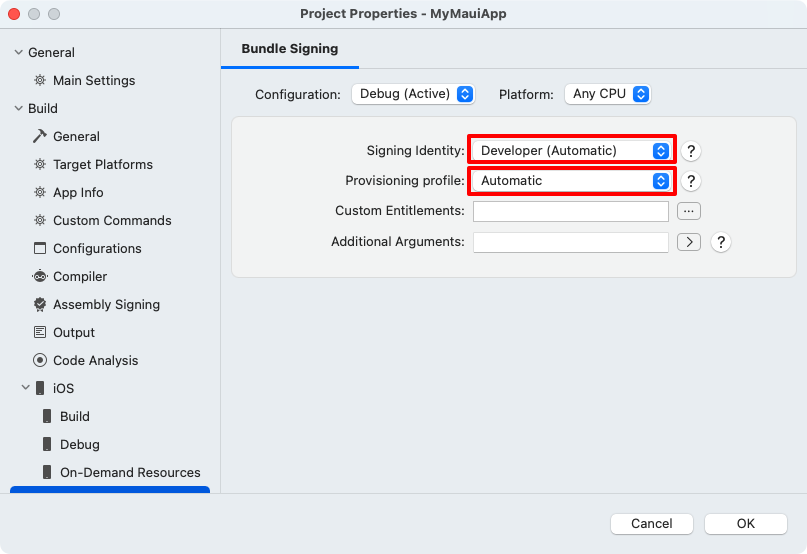
Firstly, did you select correct the bundle-signing in VS for mac?
If you have set, please open your .csproj file and find following key-value like following format. Copy the value to you publish command line.
<CodesignKey>Mac Developer: msdn test</CodesignKey>
<PackageSigningKey>3rd Party Mac Developer Installer</PackageSigningKey>
<CodesignProvision>TheSecondmacicloudIDProfile</CodesignProvision>
By the way, here is a document about Enable manual provisioning, if you did not set bundle signing, you can refer it.
im working with vs code.
i do not have this lines in csproj:
<CodesignKey>Mac Developer: msdn test</CodesignKey> <PackageSigningKey>3rd Party Mac Developer Installer</PackageSigningKey> <CodesignProvision>TheSecondmacicloudIDProfile</CodesignProvision>
im working with vs code.
Please open your project with VS for MAC, then select correct the bundle-signing in VS for mac
where i got vs for MAC? no option with VS code?
You can download VS for MAC installer, then open this VS for MAC installer and choose MAUI component to install. In the end, open your project by VS for mac.
i tried to download vs for mac and download me vs for windows exe why?
i need proffesinal addition.
' cx='32' cy='32' r='32' /%3E%3Ctext x='50%25' y='55%25' dominant-baseline='middle' text-anchor='middle' fill='%23FFF' %3EBS%3C/text%3E%3C/svg%3E)
there is only one edition of VS for Mac, and support ends 8/31/2024.
the dotnet cli docs
https://learn.microsoft.com/en-us/dotnet/maui/ios/deployment/publish-cli?view=net-maui-8.0
to sign your app, you need to join the apple developers program.
https://developer.apple.com/programs/enroll/
then on on the dev website you can create a certificate and use Xcode to create the profile. (visual studio would call Xcode to do this, so you will have to manually.)
see:
i tried to install vs code for mac and got this error:
Initial task was failed
Message: Arg_NullReferenceException
System.NullReferenceException
at MacInstaller.Core.InstallationState.ParseManifest()
at MacInstaller.Core.InstallationState.IsSupported()
at MacInstaller.Core.TasksManager.<>c__DisplayClass9_0.<<StartAsync>b__0>d.MoveNext()
--- End of stack trace from previous location ---
at MacInstaller.Core.TasksManager.StartAsync()
I succeeded to download installer for vs for Mac. Does the installer can hurt the vs code installation that I have in my Mac computer.
Please answer?
while VS for Mac and VS Code are separate applications, they are both installing the same dotnet Maui workloads. the Maui workload install has been buggy, but is pretty stable now.
note: apple is gearing up for the fall releases of its O/S's. These require Xcode 16, so Xcode 15 should be pretty stable. Maui support of these versions should come shortly after the formal release of Xcode 16 and the sdks this fall.
So to install vs for Mac to publish my app?
sure. It is a separate app from vs code. the only issue is that it may reinstall the dot maui workload. if you have any issues google for cleanup instructions note: I have installed and run both VS Mac & VS Code. But have since removed the Maui workload, as I no longer use it.
i decided for that moment to publish my app in that way Publish application without certificate, you cannot upload your application to Mac App Store.
I did this in command line:
dotnet publish -f net8.0-maccatalyst -c Release -p:CreatePackage=false
and got this :
Screenshot 2024-06-25 at 10.29.38.png
where the exe and which files i need to my customer.
when i press on application file out side architecture folders the app open but it can not use my internal custom certificate located in resources/raw folder need help.
when i run the app inside my arcitecture it also not use my internal custom certificate located in resources/raw folder
@Leon Lu (Shanghai Wicresoft Co,.Ltd.)
Need your help please.
Your quick answer will be great.
Your quick answer will be great.
Your quick answer will be appreciated.
when i press on application file out side architecture folders the app open but it can not use my internal custom certificate located in resources/raw folder need help.
when i run the app inside my arcitecture it also not use my internal custom certificate located in resources/raw folder
The app inside your architecture folder is correct. Did you choose the certificate when you release your application? If you choose it, your csproj file will have this certificate.
The app don't succeded to read this certificate.
This certificate is for internal use of my app.
is it a bug with publish with resorces files?
By the way, please restart your Mac as well. After that, re-run this dotnet publish command line.
Again. I restarted my Mac.
when i press on application file out side architecture folders the app open but it can not use my internal custom certificate located in resources/raw folder.
when i run the app inside my arcitecture it also not working at all, the app not opening.
What to do ?
Your answer will be appreciated.

You can publish your .NET app on macOS by running the dotnet publish command in the Terminal with different parameters. Here is a step-by-step guide to walk you through the process.
Step-by-Step Guide
Install .NET SDK:
Make sure that the .NET SDK is installed on your macOS; you may download it from the official website of .NET.
Open Terminal:
Open the Terminal application on your Mac.
Go to Your Project Directory:
Change to the directory that contains.NET Core project with the cd command.
sh
Copy code
cd /path/to/your/project
Publish Your App:
Run the following command to publish your app with dotnet publish and pass the framework, runtime identifier (RID), and configuration. For macOS, RID is typically osx-x64 or osx-arm64 based on your Mac architecture.
sh
Copy code
dotnet publish -f net8.0 -r osx-x64 -c Release --self-contained
This command tells dotnet publish to:
-f net8.0: target .NET Framework 8.0.
-r osx-x64: This is the runtime identifier for macOS. Use osx-arm64 for Apple Silicon Macs.
-c Release: This sets the configuration to Release.
--self-contained: With this flag, a self-contained application is created, including the .NET runtime.
Finding Published Fils:
Once it has finished publishing your app, you can find it in the bin/Release/net8.0/osx-x64/publish directory. If you specified osx-arm64 as the RID when publishing, then your app shall be located in osx-arm64.
sh
Copy code
cd bin/Release/net8.0/osx-x64/publish
Distribute Your App:
The generated folder will contain all the files necessary to run your app on macOS. You can package the contents of that folder into a zip file for distribution, or you can use something like pkgbuild to create an installer package.
Example Commands
Here is an example of a complete set of commands you might run in Terminal:
sh
Copy code
cd /path/to/your/project
dotnet publish -f net8.0 -r osx-x64 -c Release --self-contained
cd bin/Release/net8.0/osx-x64/publish
More Tips
Apple Silicon Macs: This runtime identifier is osx-arm64 when targeting Apple Silicon Macs; otherwise, it is osx-x64.
sh
Copy code
dotnet publish -f net8.0 -r osx-arm64 -c Release --self-contained
Application Bundle: You might need to bundle your macOS-based applications under an application bundle (.app). You could do that by hand or with additional tools/Scripts.
Signing and Notarization: Besides macOS distribution, specially for distribution outside the App Store, you should consider signing and notarizing your app to prevent security warnings.
These steps should give you a reasonable chance of successfully publishing and distributing your .NET application for macOS.