How to configure Route-maps (Preview)
This article helps you create or edit a route-map in an Azure Virtual WAN hub using the Azure portal. For more information about Virtual WAN Route-maps, see About Route-maps.
Prerequisites
Important
Route-maps is currently in Public Preview and is provided without a service-level agreement. Route-maps shouldn't be used for production workloads. Certain features might not be supported, might have constrained capabilities, or might not be available in all Azure locations. See the Supplemental Terms of Use for Microsoft Azure Previews for legal terms that apply to Azure features that are in beta, preview, or otherwise not yet released into general availability.
Verify that you've met the following criteria before beginning your configuration:
- You have virtual WAN (VWAN) with a connection (S2S, P2S, or ExpressRoute) already configured.
- For steps to create a VWAN with a S2S connection, see Tutorial - Create a S2S connection with Virtual WAN.
- For steps to create a virtual WAN with a P2S User VPN connection, see Tutorial - Create a User VPN P2S connection with Virtual WAN.
- Be sure to view About Route-maps for considerations and limitations before proceeding with configuration steps.
Configuration workflow
Create a virtual WAN.
Create all Virtual WAN virtual hubs needed for testing.
Deploy any site-to-site VPN, point-to-site VPN, ExpressRoute gateways, and NVAs needed for testing.
Verify that incoming and outgoing routes are working as expected.
Configure a route-map and route-map rules, then save. For more information about route-map rules, see About Route-maps.
Once a route-map is configured, the virtual hub router and gateways begin an upgrade needed to support the Route-maps feature.
- The upgrade process takes around 30 minutes.
- The upgrade process only happens the first time a route-map is created on a hub.
- If the route-map is deleted, the virtual hub router remains on the new version of software.
- Using Route-maps incurs an additional charge. For more information, see the Pricing page.
The process is complete when the Provisioning state is Succeeded. Open a support case if the process failed.
The route-map can now be applied to connections (ER, S2S VPN, P2S VPN, VNet).
Once the route-map is applied in the correct direction, use the Route-map dashboard to verify that the route-map is working as expected.
Create a route-map
Note
Route-maps is currently in Public Preview and is provided without a service-level agreement. Route-maps shouldn't be used for production workloads. Certain features might not be supported, might have constrained capabilities, or might not be available in all Azure locations. See the Supplemental Terms of Use for Microsoft Azure Previews for legal terms that apply to Azure features that are in beta, preview, or otherwise not yet released into general availability.
The following steps walk you through how to configure a route-map.
In the Azure portal, go to your Virtual WAN resource. Select Hubs to view the list of hubs.

Select the hub that you want to configure to open the Virtual Hub page.
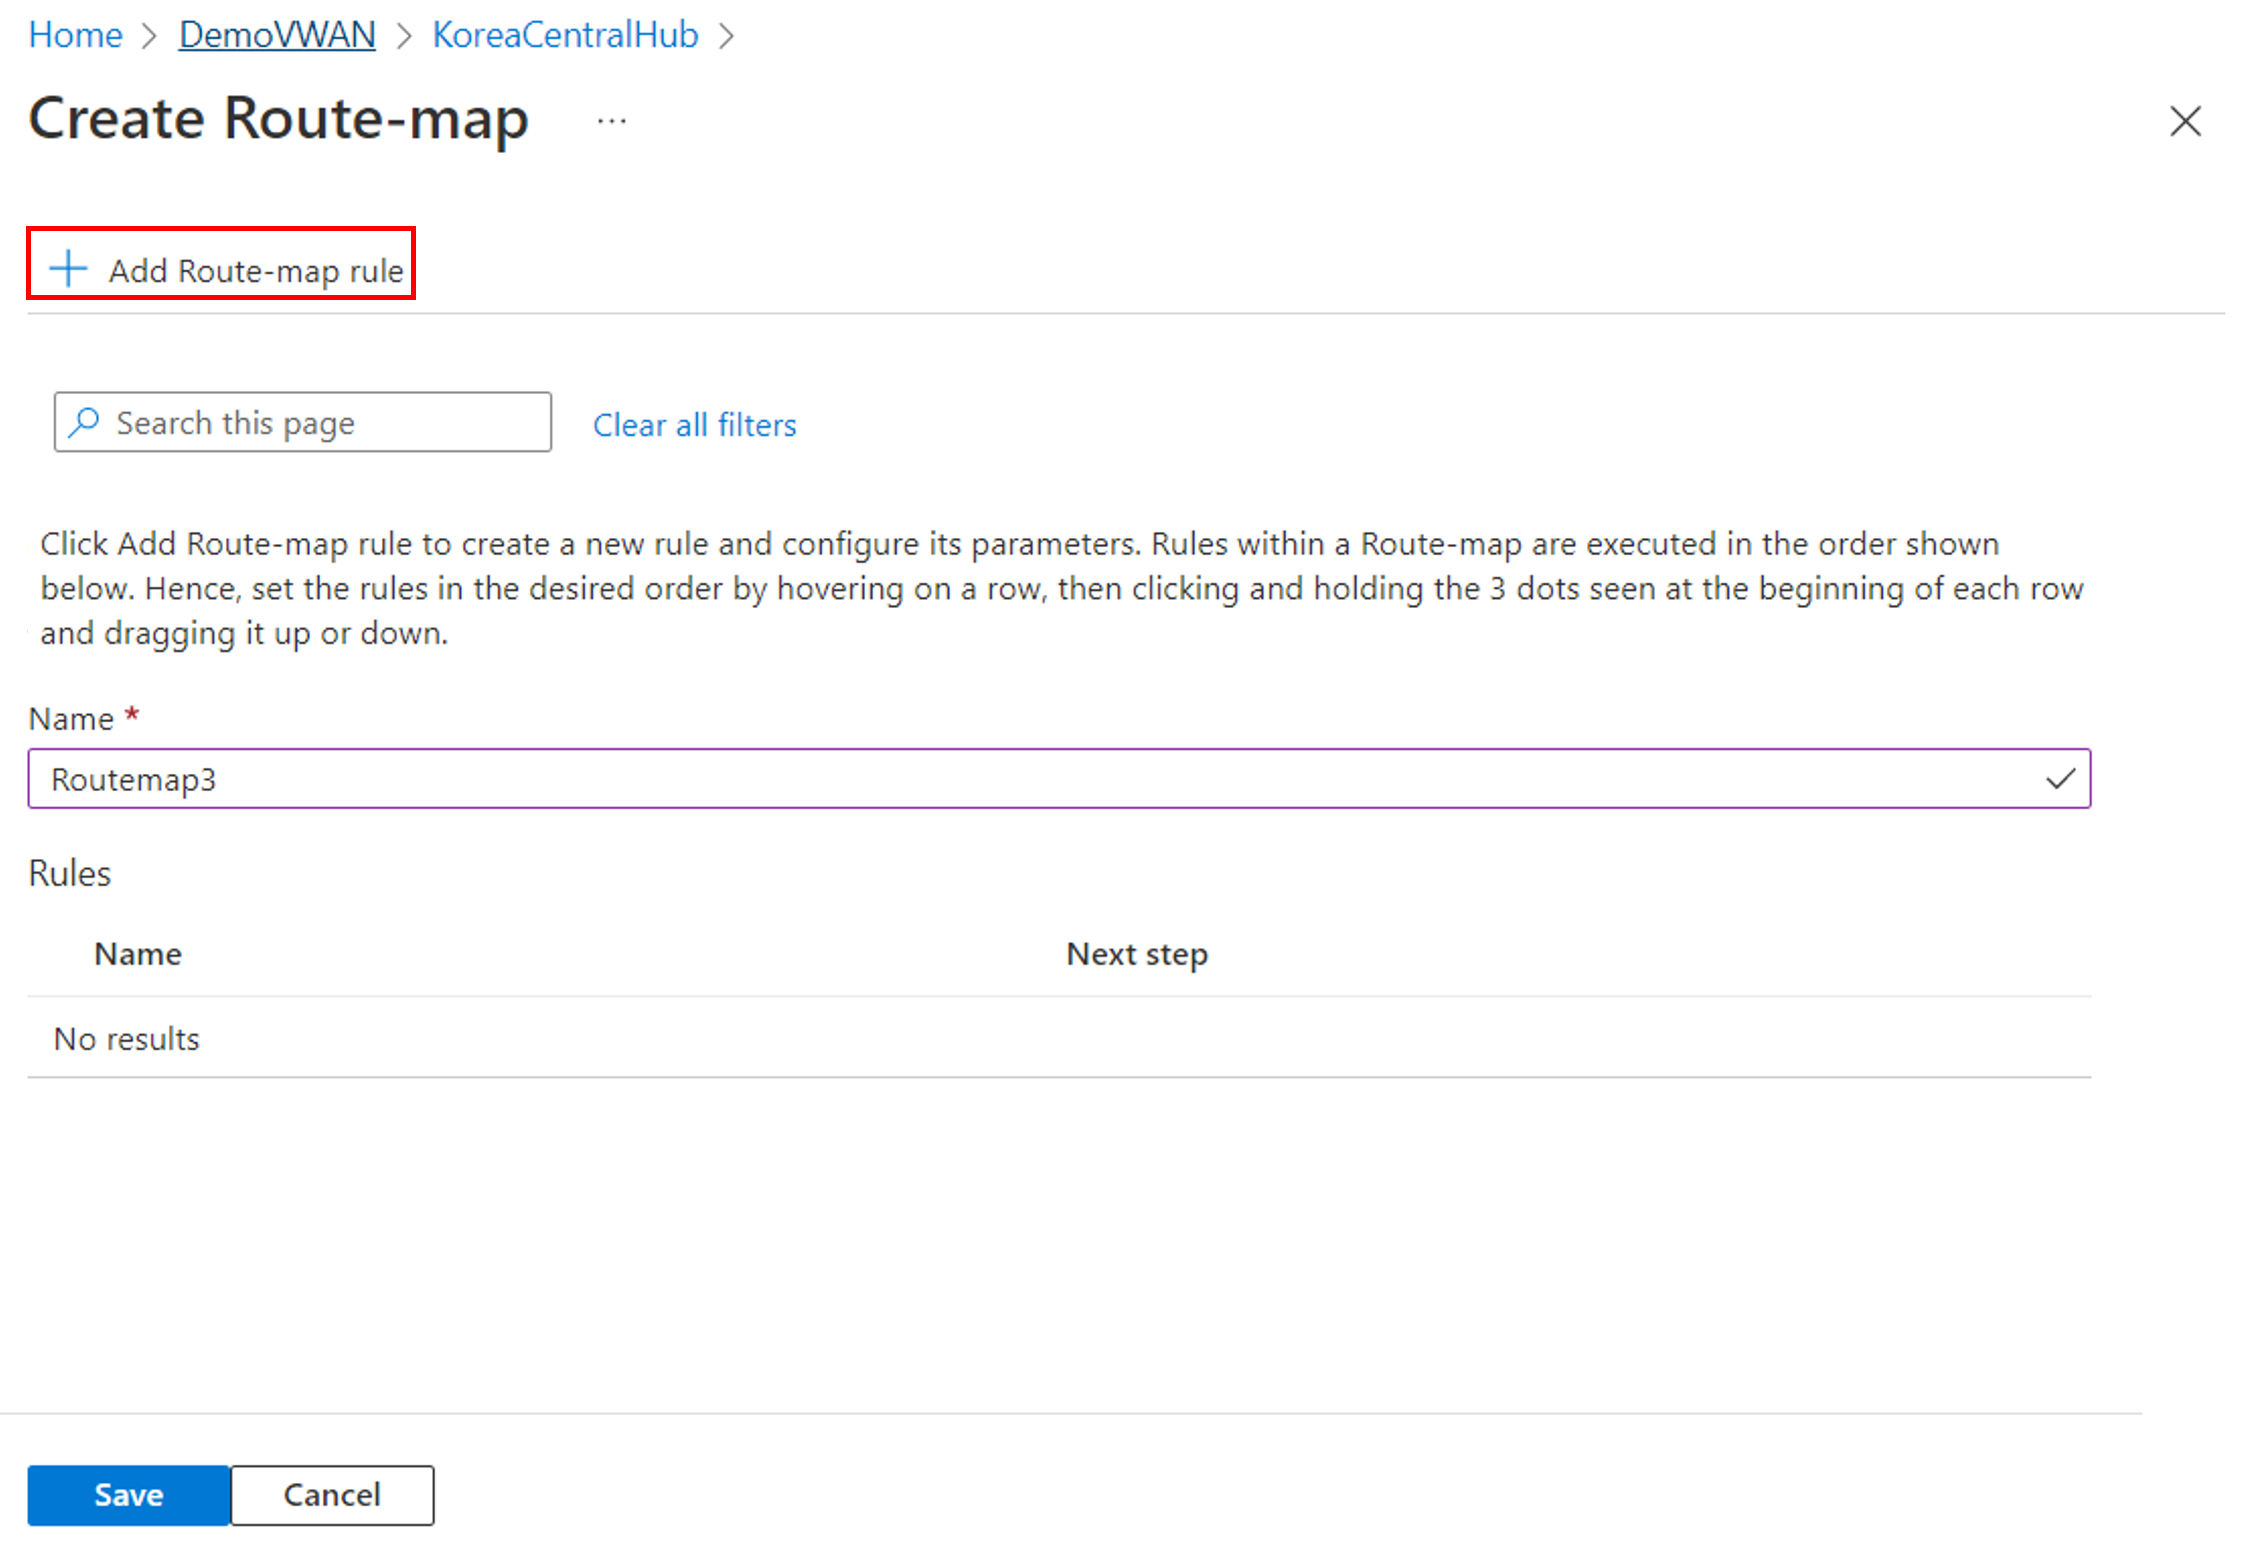
On the Virtual Hub page, in the Routing section, select Route-maps to open the Route-maps page. On the Route-maps page, select + Add Route-map to create a new route-map.

On the Create Route-map page, provide a Name for the route-map.
Then, select + Add Route-map to create rules in the route-map.
On the Create Route-map rule page, complete the necessary configuration.
Name – Provide a name for the route-map rule.
Next step – From the dropdown, select Continue if routes matching this rule must be processed by subsequent rules in the route-map. If not, select Terminate.
Match conditions – Each Match Condition requires a Property, Criterion, and a Value. There can be 0 or more match conditions.
- To add a new match condition, select the empty row in the table.
- To delete a row, select delete icon at the end of the row.
- To add multiple values under Value, use comma (,) as the delimiter. Refer to About Route-maps for list of supported match conditions.
Actions > Action on match routes – Select Drop to deny the matched routes, or Modify to permit and modify the matched routes.
Actions > Route modifications – Each Action statement requires a Property, an Action, and a Value. There can be 0 or more route modification statements.
- To add a new statement, select the empty row in the table.
- To delete a row, select delete icon at the end of the row.
- To add multiple values under Value, use comma (,) as the delimiter. Refer to About Route-maps for list of supported actions.
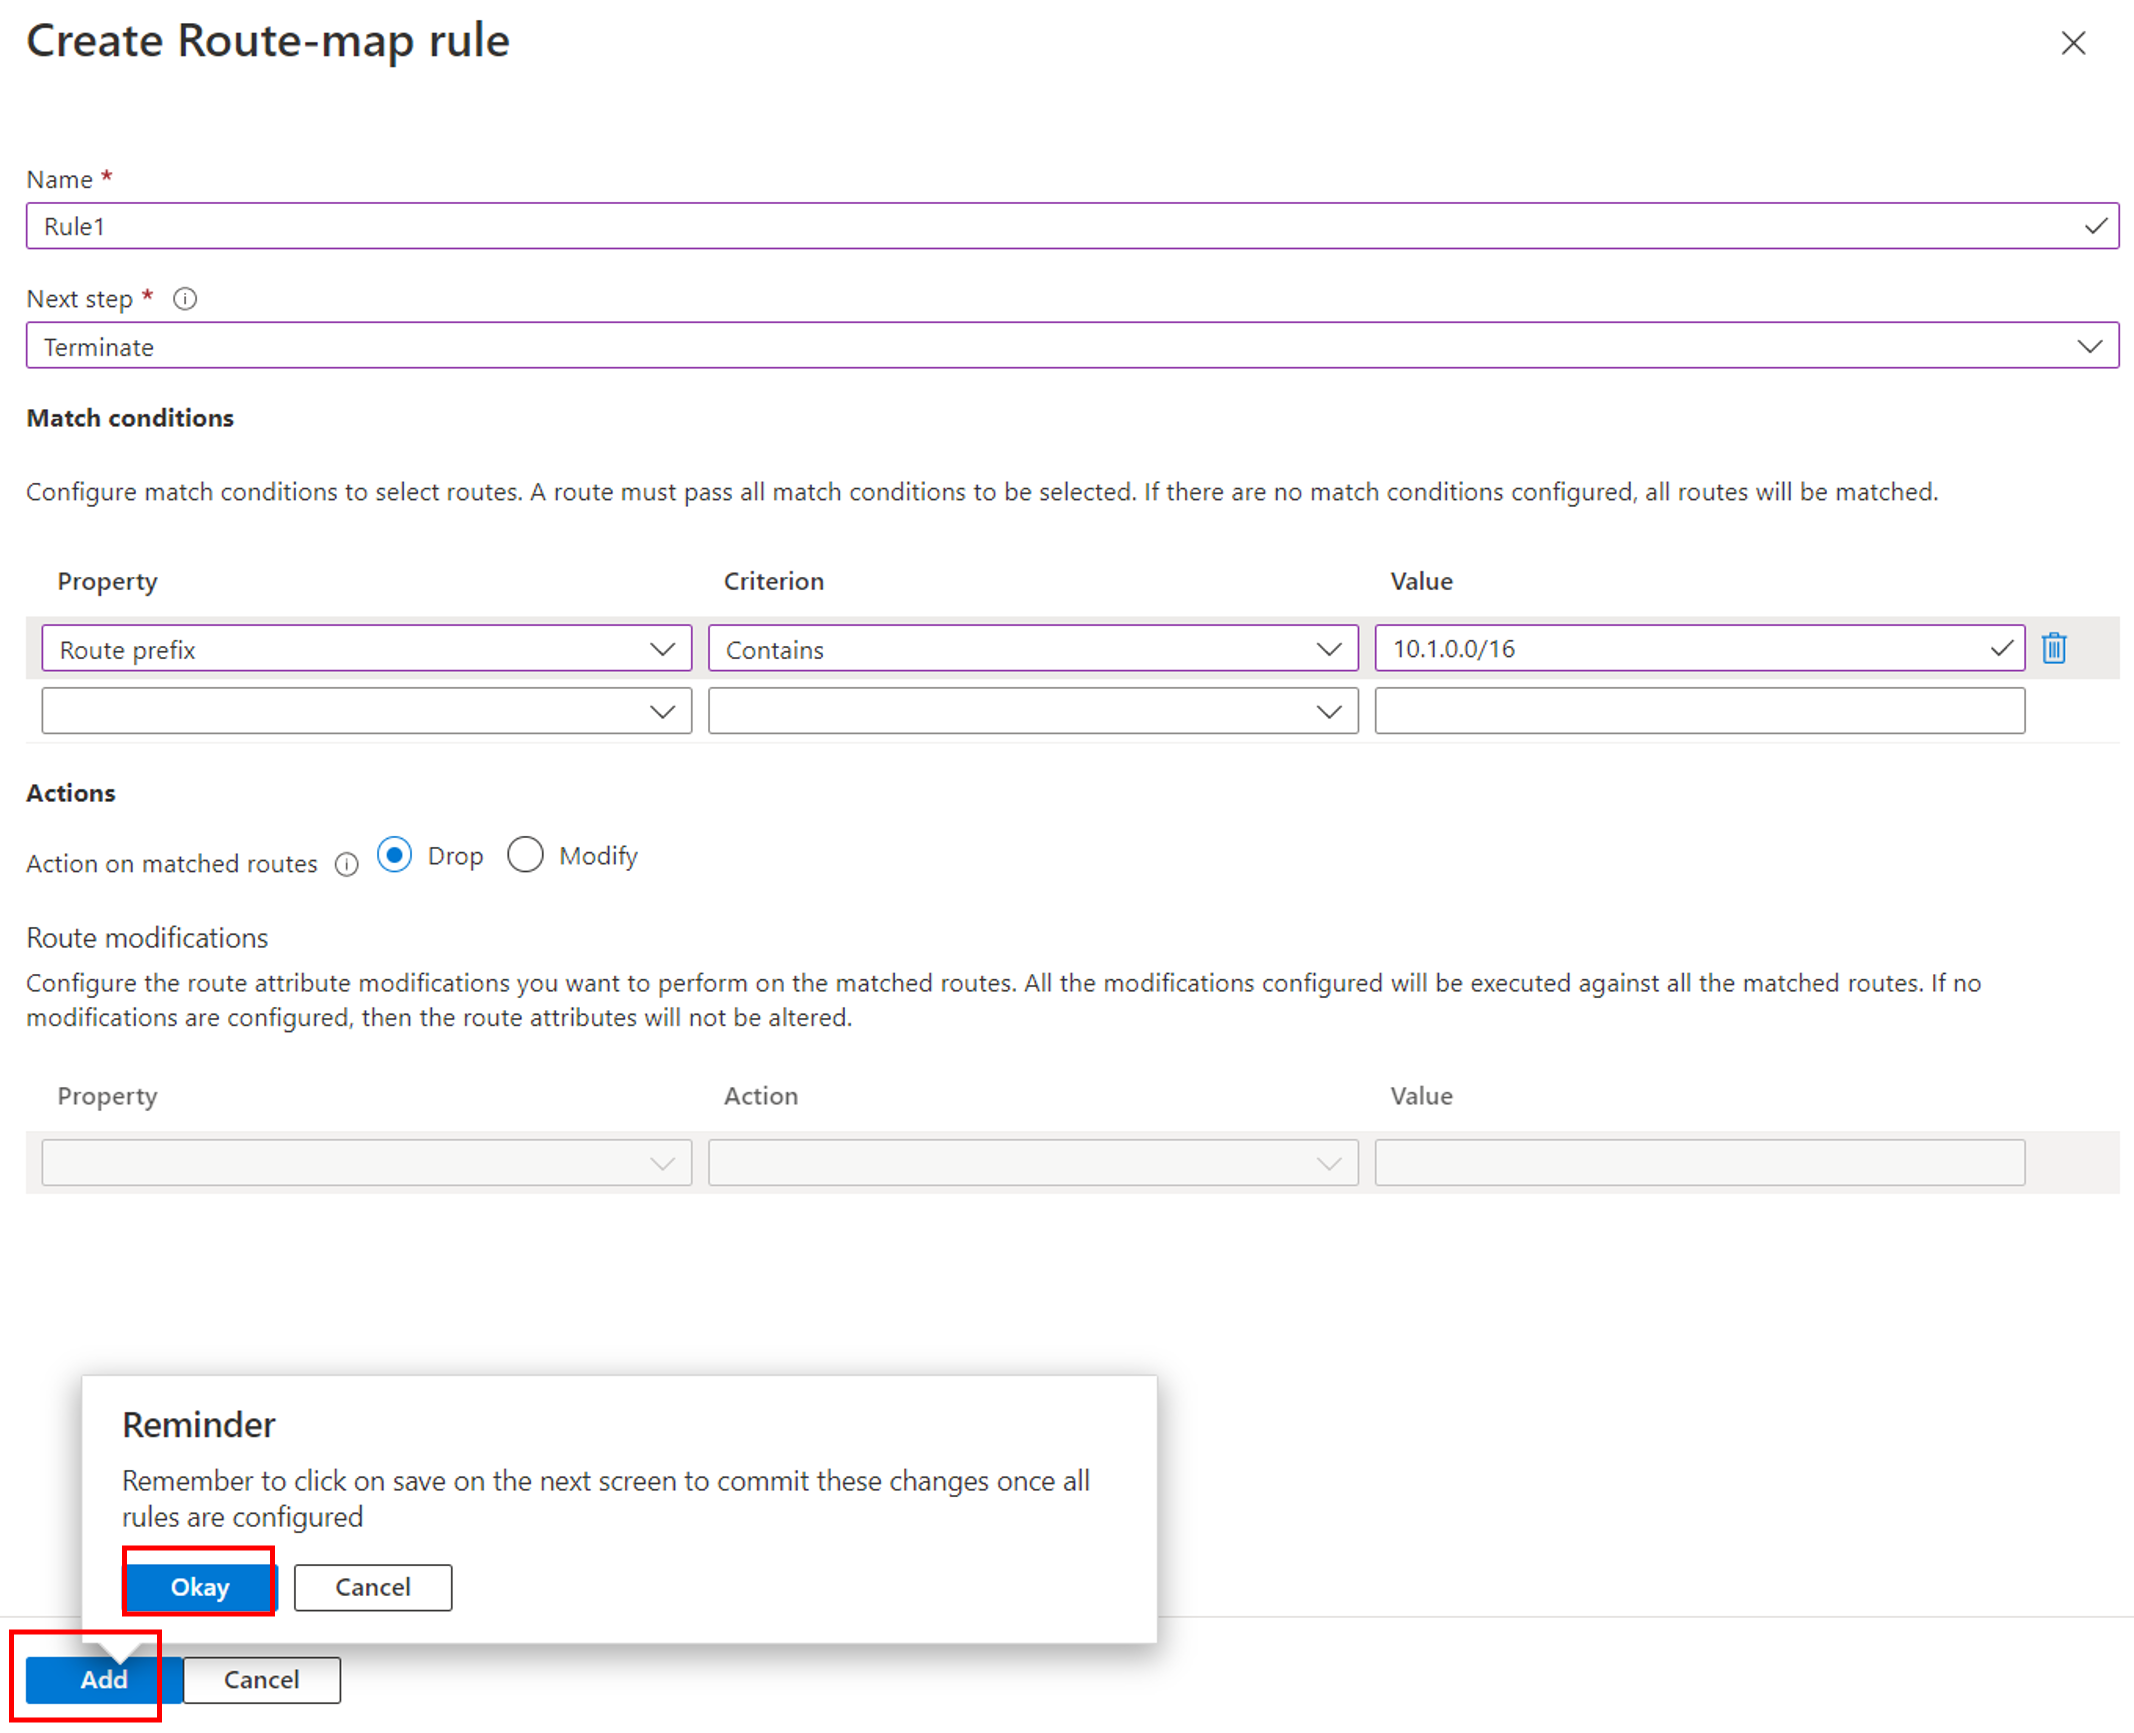
Select Add to complete rule configuration. When you select Add, this stores the rule temporarily on the Azure portal, but isn't saved to the route-map yet. Select Okay on the Reminder dialog box to acknowledge that the rule isn't completely saved yet and proceed to the next-step.
Repeat steps 6 and 7 to add additional rules, if necessary.
On the Create Route-map page, after all the rules are added, ensure that the order of the rules is as desired. Adjust the rules as necessary by hovering your mouse on a row, then clicking and holding the 3 dots and dragging the row up or down. When you finish adjusting the rule order, select Save to save all the rules to the route-map.
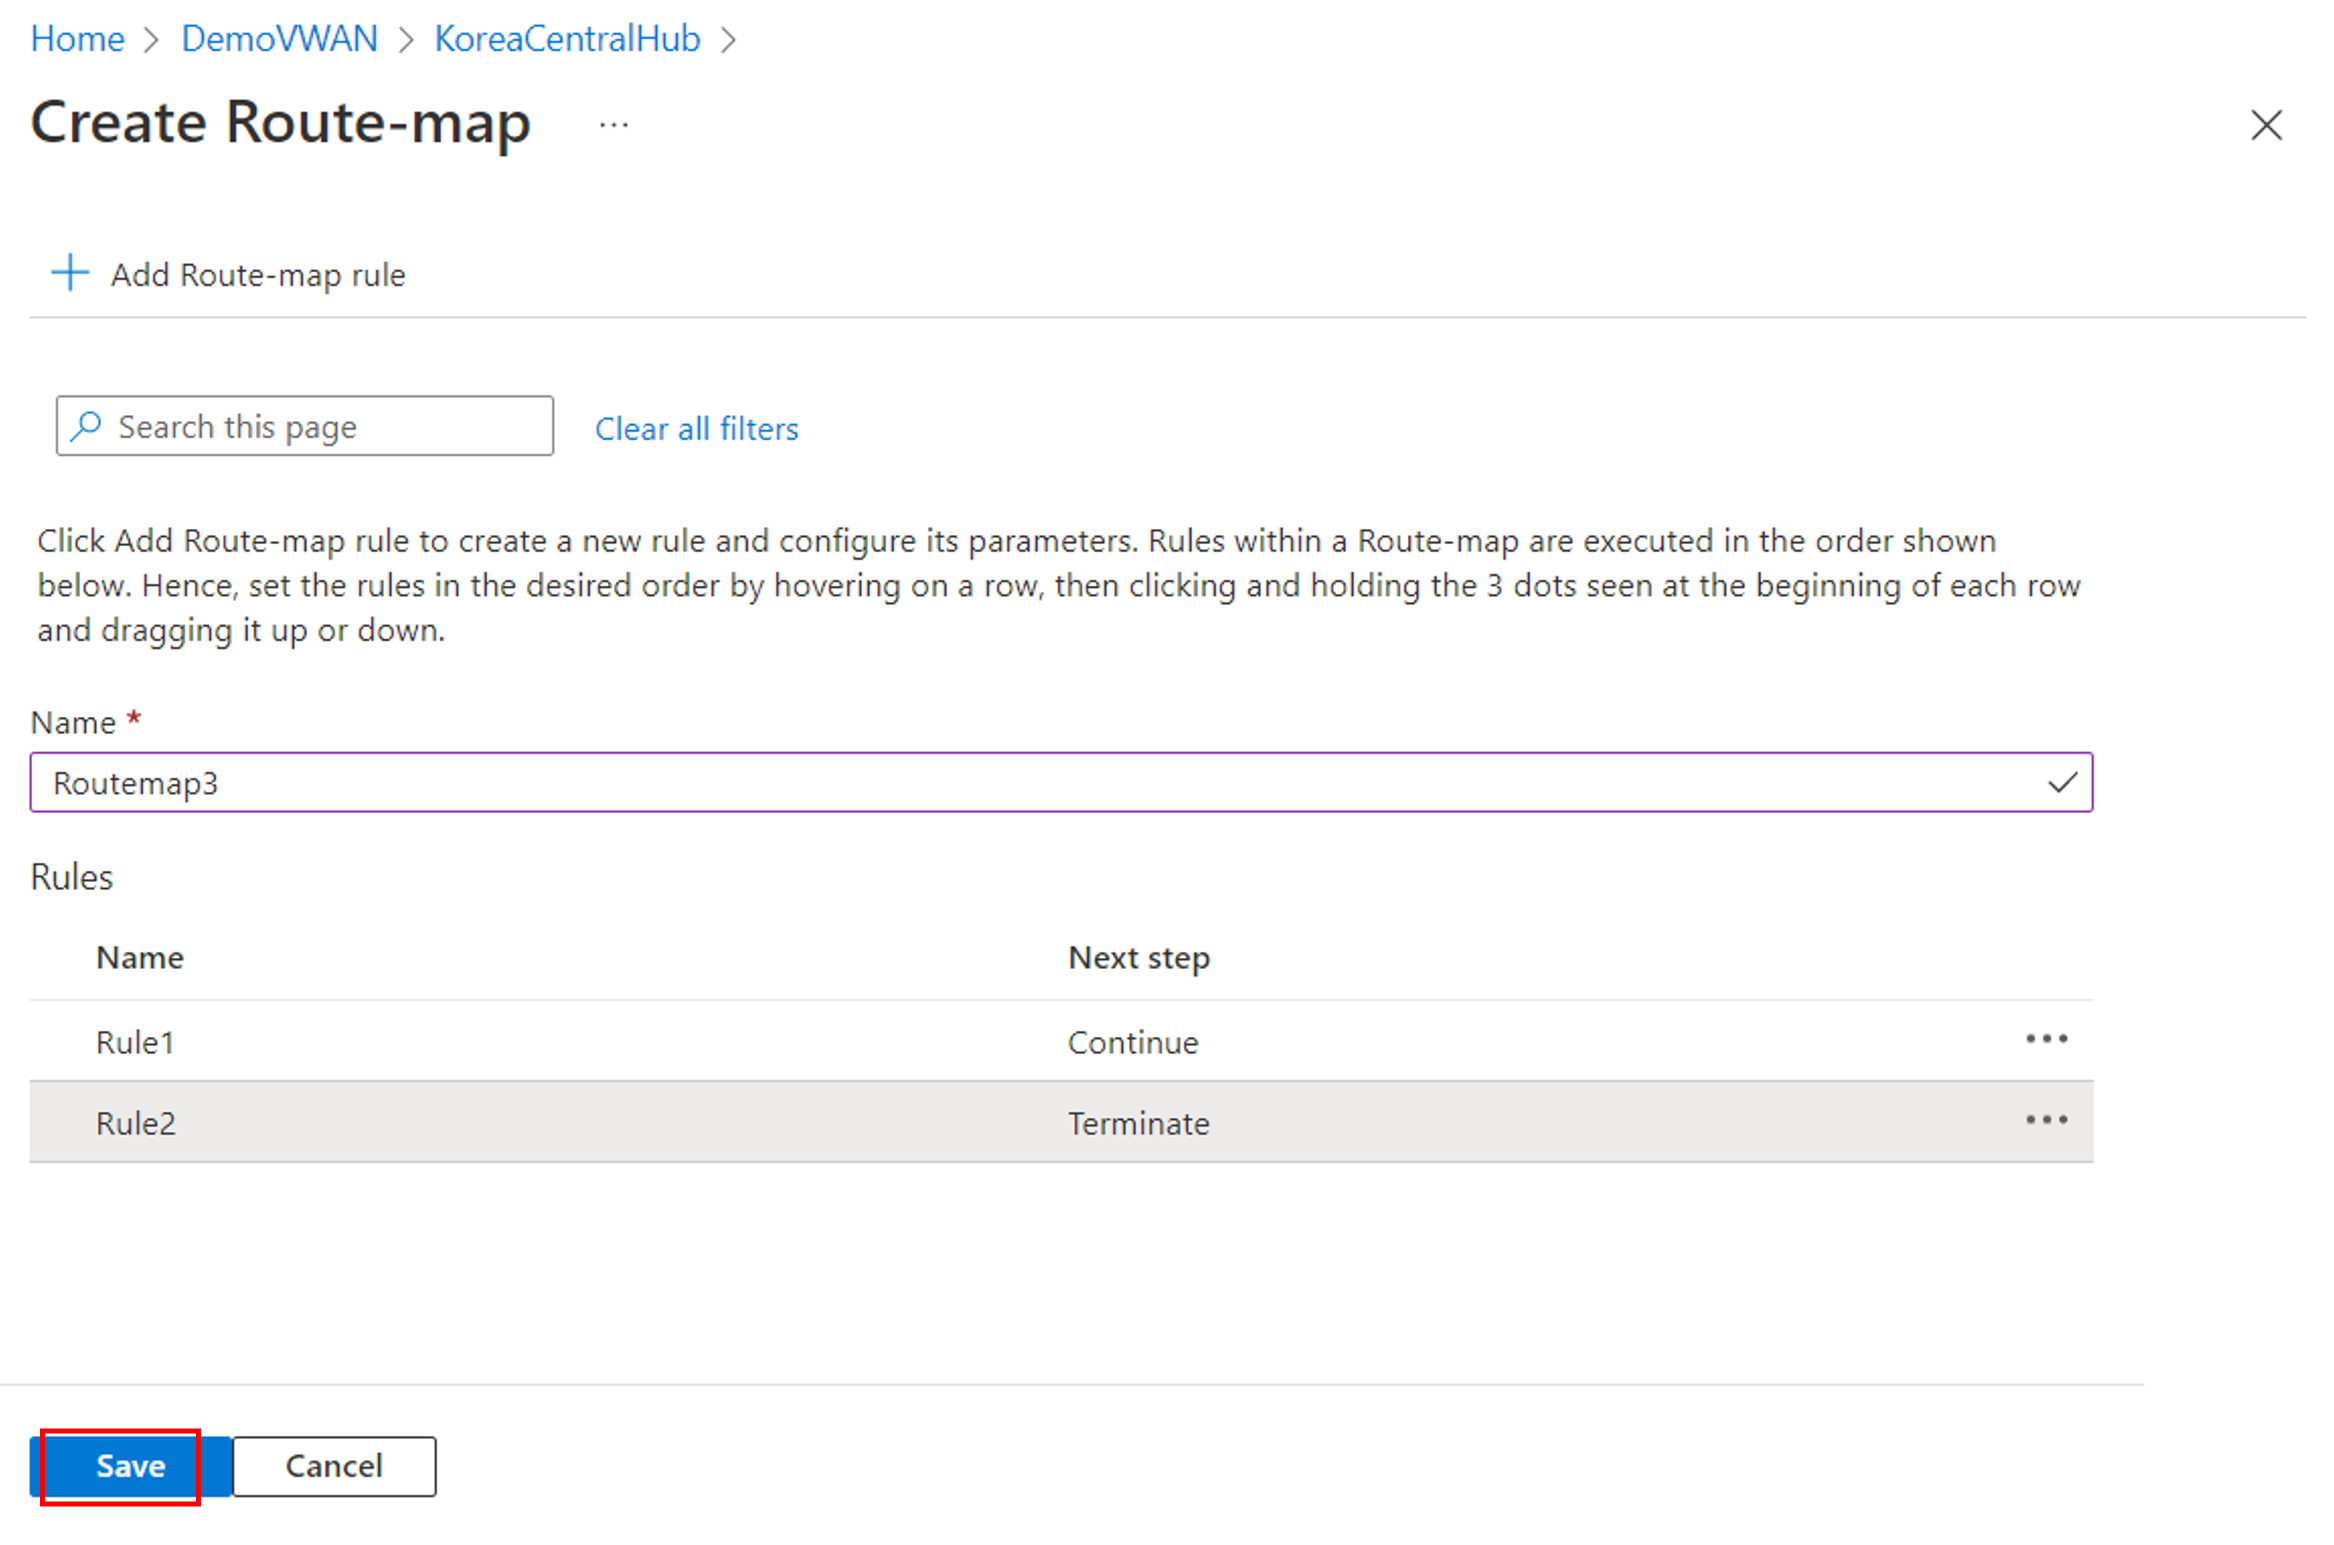
It takes a few minutes to save the route-map and the route-map rules. Once saved, the Provisioning state shows Succeeded.


Apply a route-map to connections
Once the route-map is saved, you can apply the route-map to the desired connections in the virtual hub.
On the Route-maps page, select Apply Route-maps to connections.

On the Apply Route-maps to connections page, configure the following settings.
- Select the drop-down box under Inbound Route-map and select the route-map you want to apply in the ingress direction.
- Select the drop-down box under Outbound Route-map and select the route-map you want to apply in the egress direction.
- The table at the bottom lists all the connections to the virtual hub. Select one or more connections you want to apply the route-maps to.

When you finish configuring these settings, select Save.
Verify the changes by opening Apply Route-maps to connections again from the Route-maps page.

Once the route-map is applied in the correct direction, use the Route-map dashboard to verify that the route-map is working as expected.


Modify or remove a route-map or route-map rules
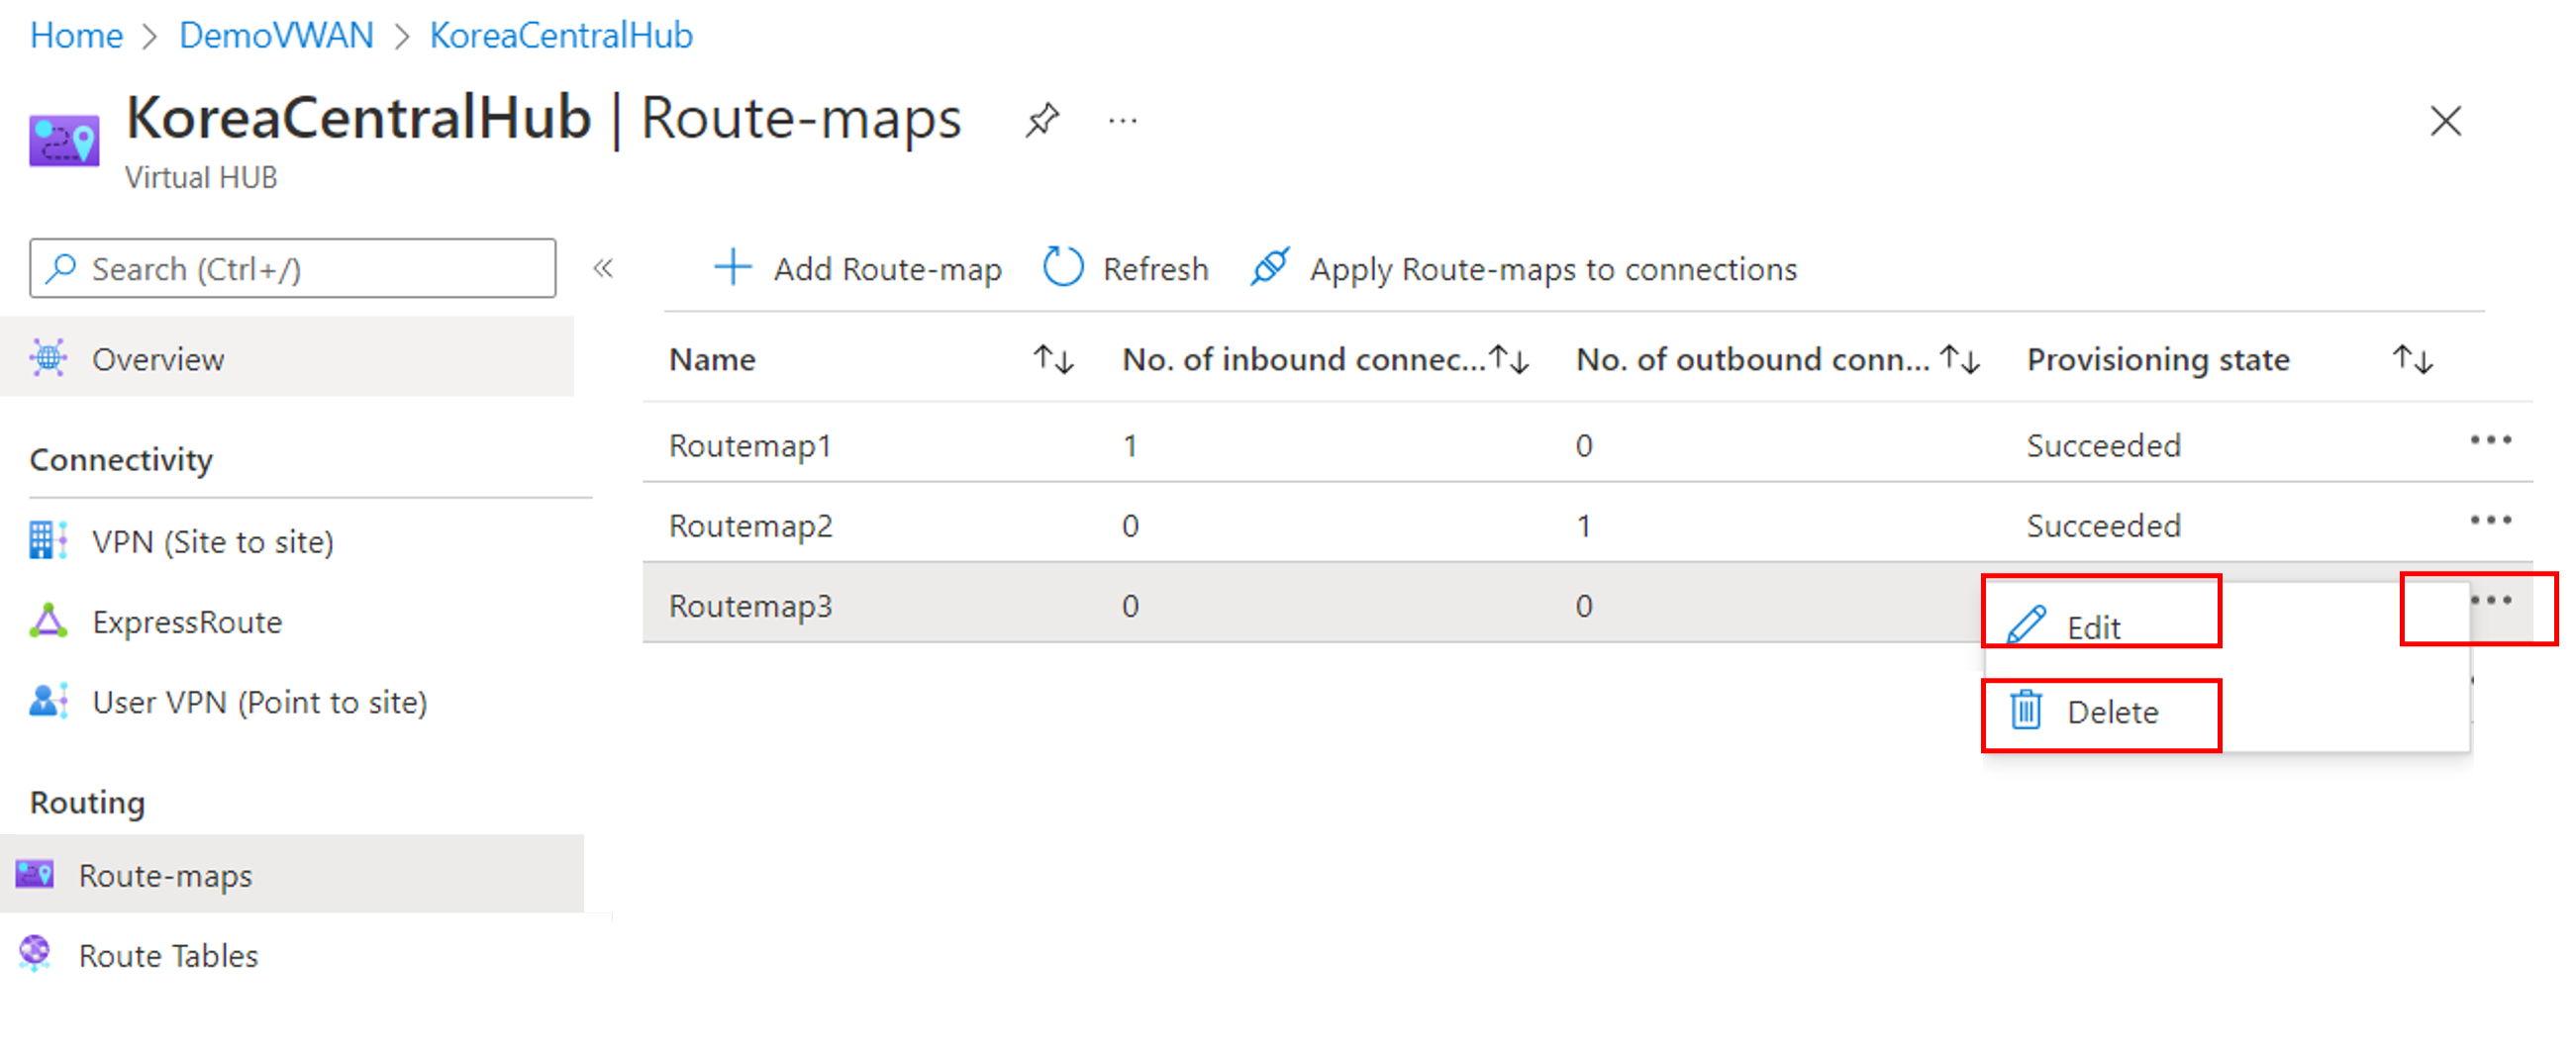
To modify or remove an existing Route-map, go to the Route-maps page.
On the line for the route-map that you want to work with, select … > Edit or … > Delete, respectively.

Modify or remove a route-map from a connection
To modify or remove an existing Route-map rule, use the following steps.
On the Route-maps page, on the line for the route-map that you want to edit, select … > Edit.
On Edit Route-map page, select … > Edit to edit the route-map rule.
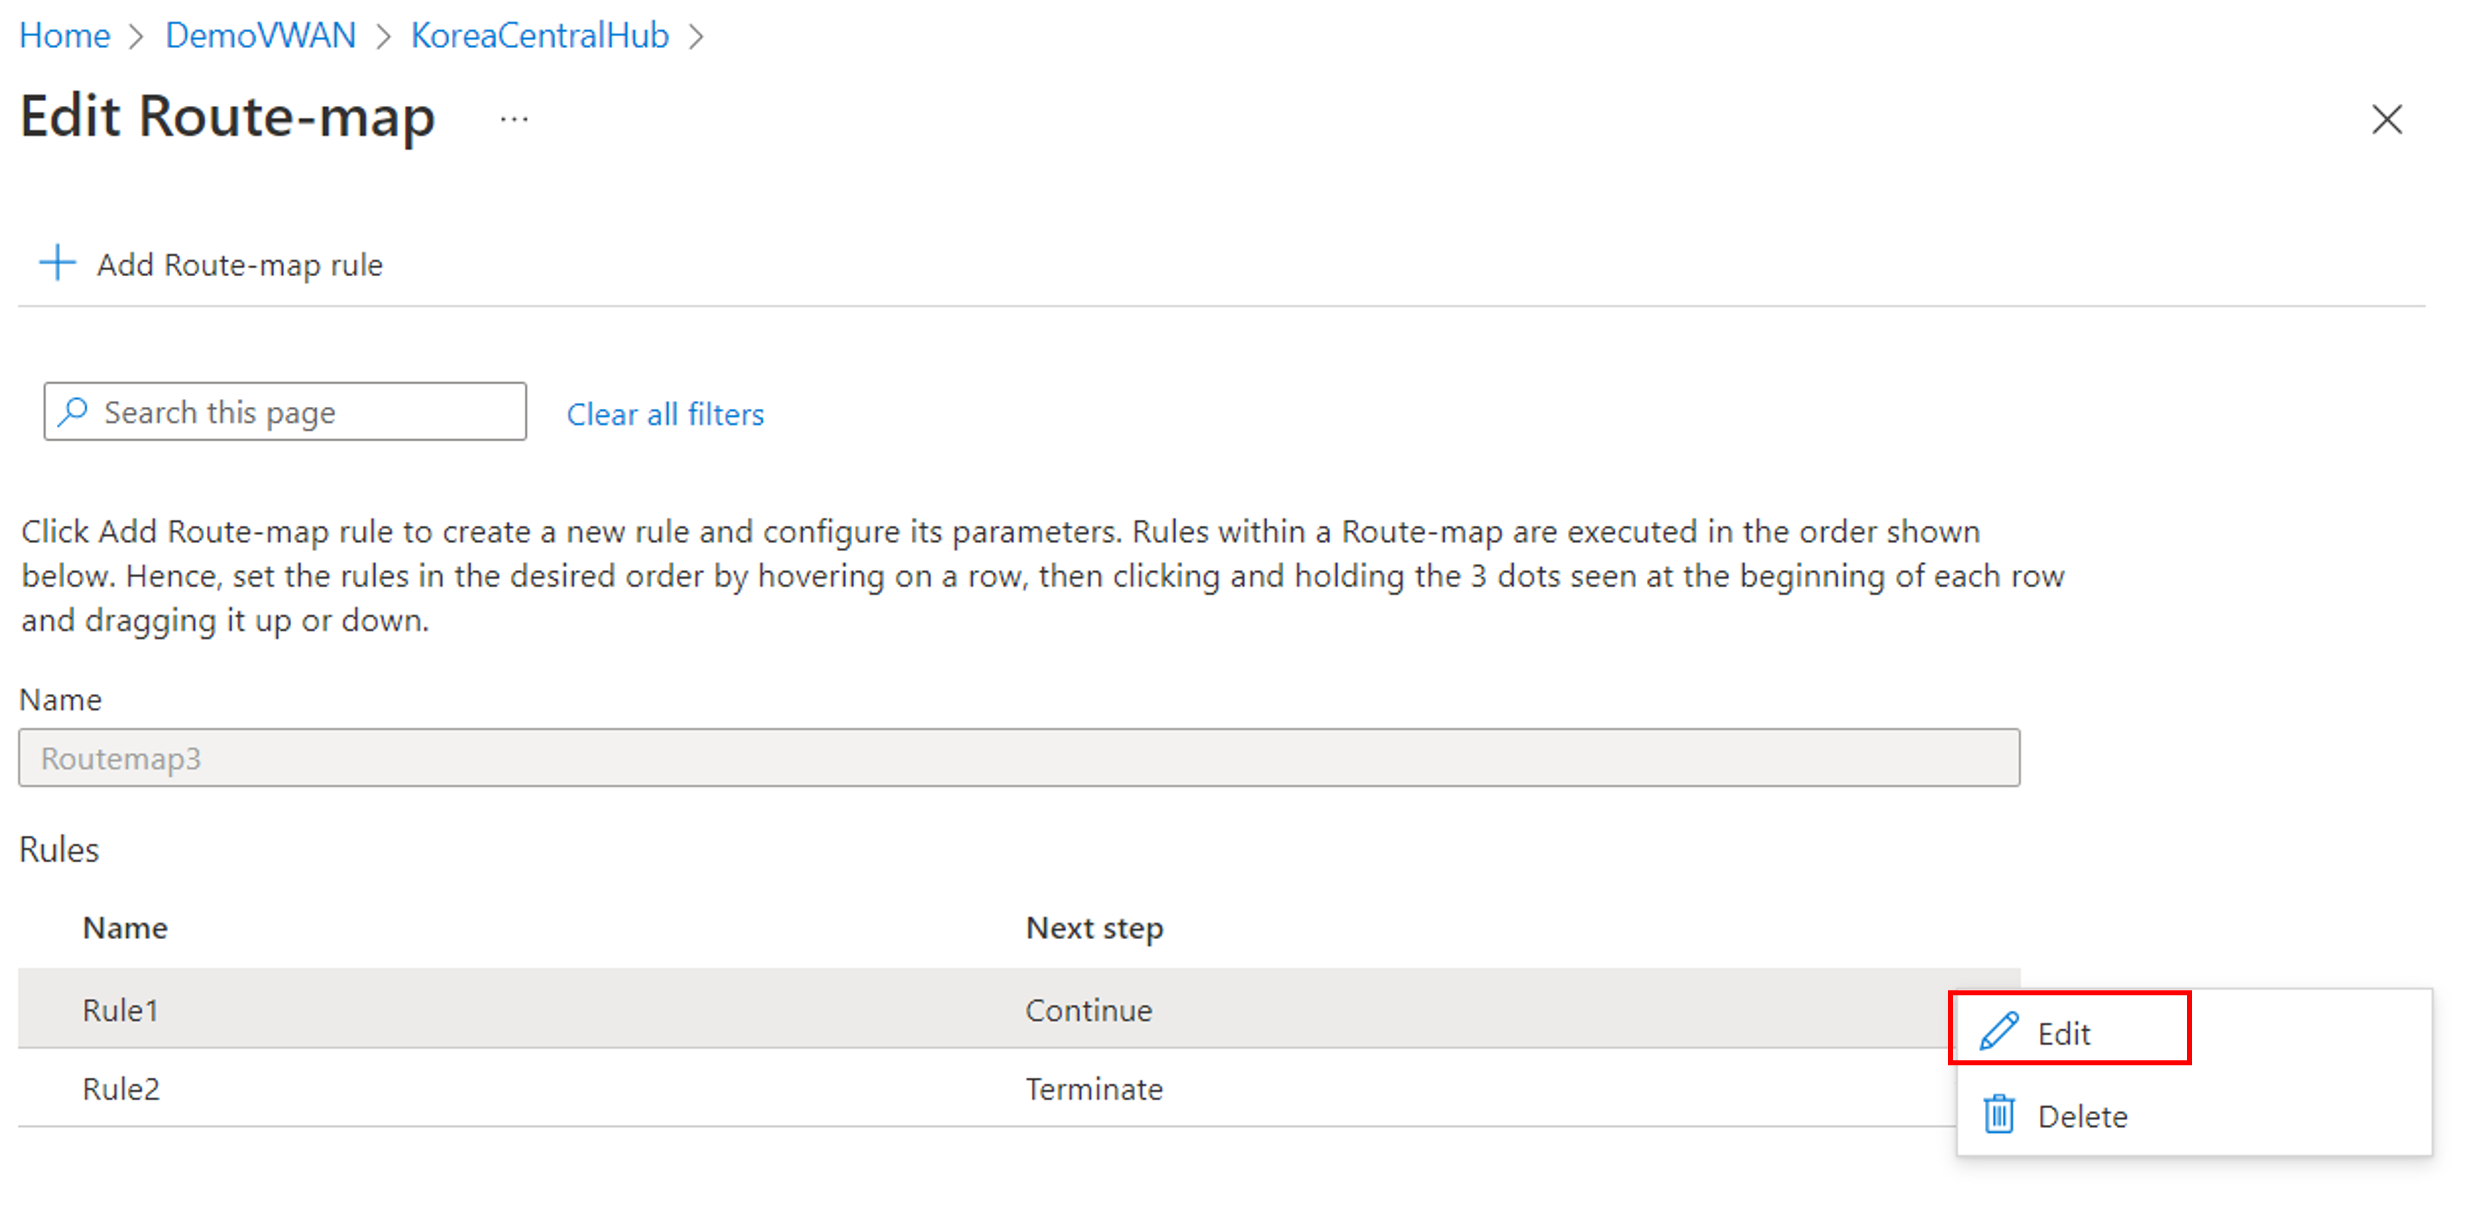
Modify the rule as required. On the Edit Route-map rule page, select Add, and on Reminder dialog box, select Okay to store the rule changes temporarily and proceed to next step.

On the Edit Route-map page, select Save.


Troubleshooting
The following section describes common issues encountered when you configure Route-maps on your Virtual WAN hub.
Route map has entered the failed state
Reach out to the preview alias to troubleshoot: 'preview-route-maps@microsoft.com'
Summary routes aren't showing up as expected
Remove the route map, then view the current routes on the connection. Verify that the routes are the routes you expect to see BEFORE a route map is applied.
Verify the match condition is set correctly. The match condition is used to select the routes you want to modify.
- If you are matching all routes instead of just the ones you selected: Remember, if a route map is created without a match condition, all routes from the applied connection will be matched.
- If you have match conditions and you are still not selecting the routes you would like: Check the match criterion to ensure it's set correctly. Remember, equal matches the exact prefix and contains matches prefixes within the route. (e.g 10.2.30.0/24 would be included in a contains for 10.2.0.0/16)
- If you are using the "contains" match criteria: Verify that your subnetting is correct.
Verify the action is set correctly. Summarizing routes requires the Replace action.
Make sure the Next step setting is configured correctly. If you have multiple route maps rules and you aren't seeing the desired output, make sure the last rule has the Next step setting is set to Terminate. This ensures that no other rules are processed.
After making changes, apply the route map to the connection. Then, use the route maps dashboard to verify the changes had the desired effect.
AS-PATH isn't showing up as expected
If you're summarizing a set of routes, remember the hub router strips the AS-PATH attributes from those routes. You can add the AS-PATH back in the action section.
Remove the route map, then view the current routes on the connection. Verify current routes are the routes you expect to see BEFORE a route map is applied.
Verify the match condition is set correctly. The match condition is used to select the routes you want to modify.
- If you're matching all routes, instead of just the ones you selected: Remember, if a route map is created without match conditions, all routes from the applied connection will be matched.
- If you have match conditions and you're still not selecting the routes you would like: Check the match Criterion to ensure it's set correctly. Remember, equal matches the exact prefix and contains matches prefixes within the route. (e.g 10.2.30.0/24 would be included in a contains for 10.2.0.0/16)
- If you're using the "contains" match criteria: Verify that your subnetting is correct.
Verify the action is set correctly. Make sure the replace or prepend setting is set as desired.
When you're adding ASNs to the AS-PATH, verify you aren't using an ASN reserved by Azure.
Make sure the Next step setting is configured correctly. If you have multiple route maps rules and you aren't seeing the desired output, make sure the last rule has the Next step setting set to Terminate. This ensures no other rules are processed.
After making changes, apply the route map to the connection. Then, use the route maps dashboard to verify the changes had the desired effect.
Next steps
- Use the Route-maps dashboard to monitor routes, AS Path, and BGP communities.
- To learn more about Route-maps, see About Route-maps.
Feedback
Coming soon: Throughout 2024 we will be phasing out GitHub Issues as the feedback mechanism for content and replacing it with a new feedback system. For more information see: https://aka.ms/ContentUserFeedback.
Submit and view feedback for