Note
Access to this page requires authorization. You can try signing in or changing directories.
Access to this page requires authorization. You can try changing directories.
Defender for Storage supports different ways to handle malicious files. Select the remediation option that fits your scenario:
- Built-in remediation capabilities
- Automated workflows to move or remove malicious files
- Automated workflows to move or ingest clean files to another destination
By using malware scanning, you can build your automated remediation by using these scan result options:
- Defender for Cloud security alerts
- Event Grid events
- Blob index tags
Tip
To explore malware scanning in Defender for Storage, try the hands-on lab. The Ninja training module gives step-by-step instructions to:
- Set up malware scanning
- Test the feature end to end
- Set up remediation responses
This lab is part of the Microsoft Defender for Cloud training series and gives practical experience with security features.
Remediation options for malware detection
Built-in automated malware remediation for malicious blobs
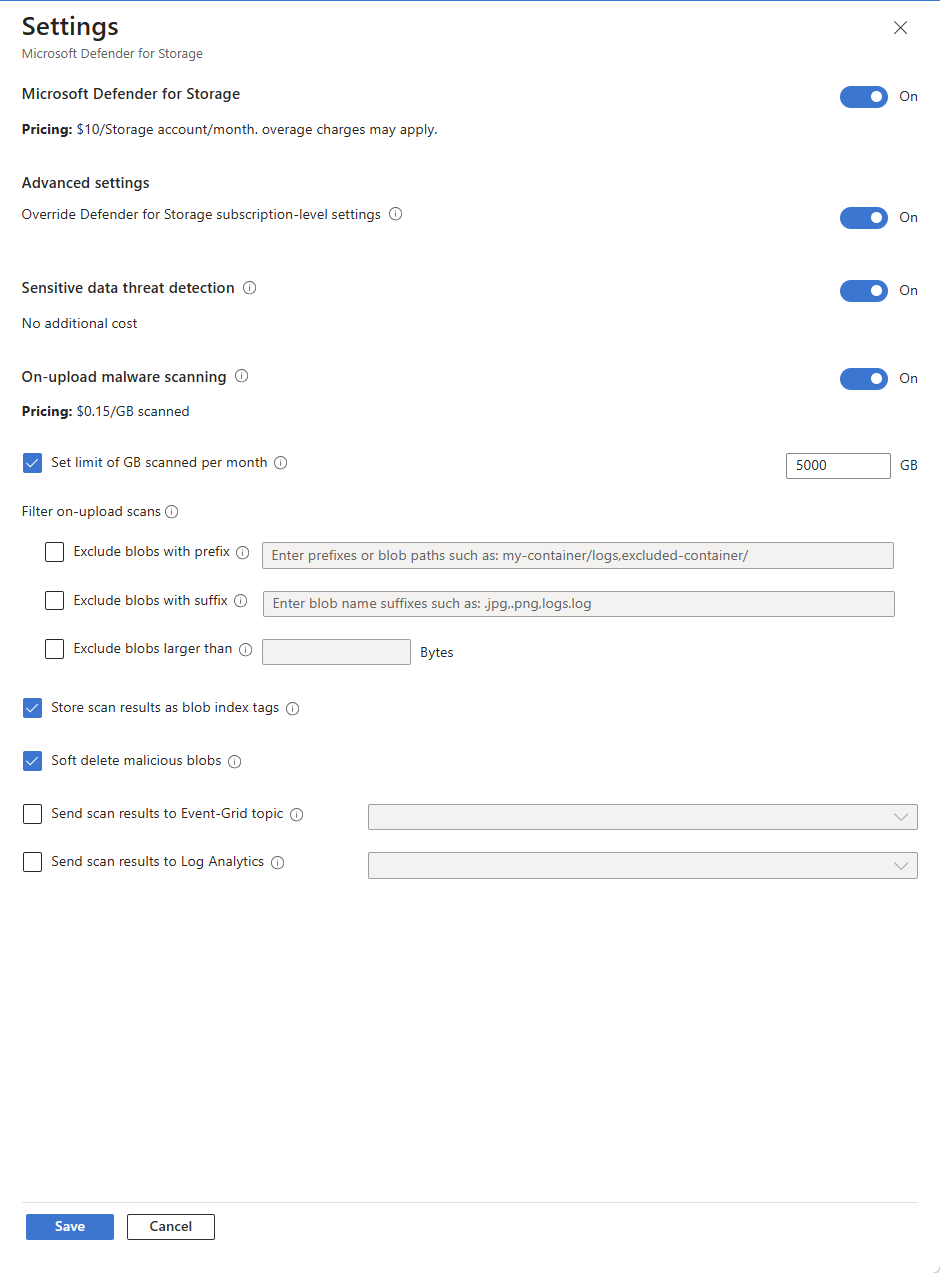
Defender for Storage Malware Protection has a built-in capability that simplifies and automates the remediation process for malicious blobs, so you reduce the risk of malware distribution. When Defender for Storage detects a malicious blob during on-upload or on-demand malware scanning, it automatically starts a soft delete to safely quarantine the blob and keep it recoverable for further analysis.
If you haven't enabled soft delete for blobs on the storage account, Defender for Storage enables it when you turn on the soft delete malicious blobs feature. This feature reduces setup steps and improves security response immediately.
Use cases
Automatically remediate malware distribution by:
- Soft deleting the blob to prevent access
- Retaining the blob for investigation and recovery
- Removing the need for external automation or manual steps
Let security admins or SOC analysts keep storage clean with minimal manual effort
Let organizations quickly fix threats without complex workflows
Feature notes
Soft delete malicious blobs works only for malicious blobs. It's off by default.
You can turn on soft delete malicious blobs at the subscription or storage account level.
When you soft delete a blob, it stays in the same blob container. You can restore the blob within the retention period. For more information, see Soft delete for blobs.
If you turn on Versioning for Blobs on your storage account, see Manage and restore soft delete for blobs to learn how to restore a soft deleted blob.
Blobs that are detected as malicious and soft deleted will always be marked with index tags. If you have selected to not store scan results in index tags, these tags will be removed upon restoring of the soft deleted blob.
The retention period defaults to seven days if you turn on the soft delete malicious blobs feature, but you can change it (range: 1–365 days). You can change the default retention period in your storage account settings.
If you turn off the soft delete property setting on the storage account after turning it on, malicious blobs aren't deleted. In this case, Defender for Storage doesn't turn soft delete back on, and it creates an alert.
Deletion can fail because of misconfiguration or missing permissions. The alert shows the reason for the failure.
Storing the soft deleted blob during the retention period costs the same as active data. For more information, see Soft delete for blobs.
If you restore a blob, Azure counts it as a write transaction. For more information, see Map each REST operation to a price.
Setting up custom remediation for malicious blobs
Use these options to automate your remediation:
Block access to unscanned or malicious files by using ABAC (attribute-based access control)
By using Microsoft Entra Attribute-based access control (ABAC) authorization, you can block access to malicious and unscanned files. You can set conditional access to blobs based on the scanning results, and allow applications and users to access only scanned files that are clean.
To set it up, follow the instructions in the following video.
Delete or move a malicious blob
Use code or workflow automation to delete or move malicious files to quarantine.
Prepare your environment for delete or move
Delete the malicious file - Before setting up automated deletion, enable soft delete on the storage account. It allows you to "undelete" files if there are false positives or in cases where security professionals want to investigate the malicious files.
Move the malicious file to quarantine - Move files to a dedicated storage container or storage account that are considered as "quarantine". You might want only certain users, such as a security admin or a SOC analyst, to have permission to access this dedicated container or storage account.
- Using Microsoft Entra ID to control access to blob storage is a best practice. To control access to the dedicated quarantine storage container, you can use container-level role assignments using Microsoft Entra role-based access control (RBAC). Users with storage account-level permissions might still be able to access the "quarantine" container. You can either edit their permissions to be container-level or choose a different approach and move the malicious file to a dedicated storage account.
- If you must use other methods, such as SAS (shared access signatures) tokens on the protected storage account, move malicious files to another storage account (quarantine). Then, grant Microsoft Entra permission to access the quarantined storage account.
Set up automation
Option 1: Logic App based on Microsoft Defender for Cloud security alerts
Logic App based responses are a simple, no-code approach to setting up response. However, the response time is slower than the event-driven code-based approach.
Deploy the DeleteBlobLogicApp Azure Resource Manager (ARM) template by using the Azure portal.
Select the Logic App you deployed.
To allow the Logic App to delete blobs from your storage account, add a role assignment:
Go to Identity in the side menu and select Azure role assignments.
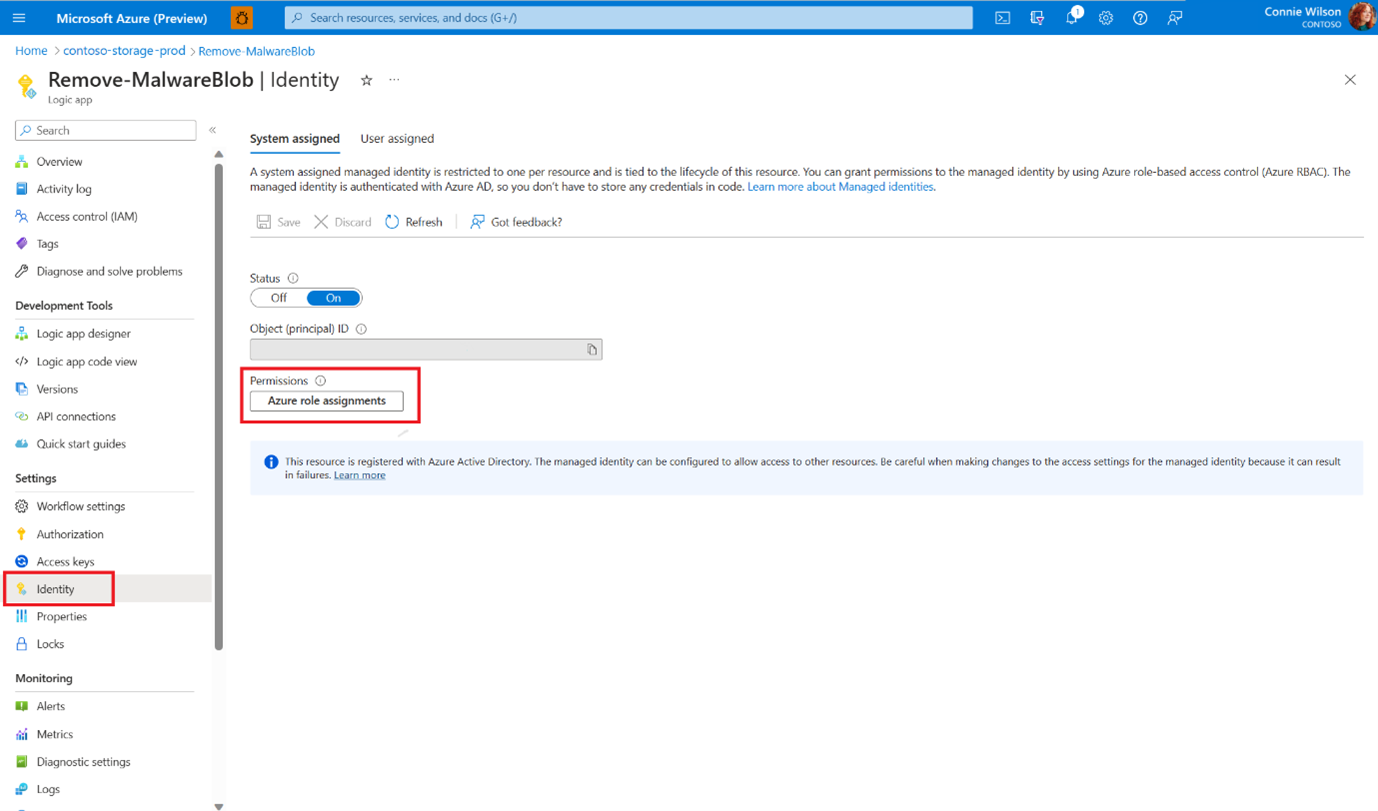
Add a role assignment at the subscription level with the Storage Blob Data Contributor role.
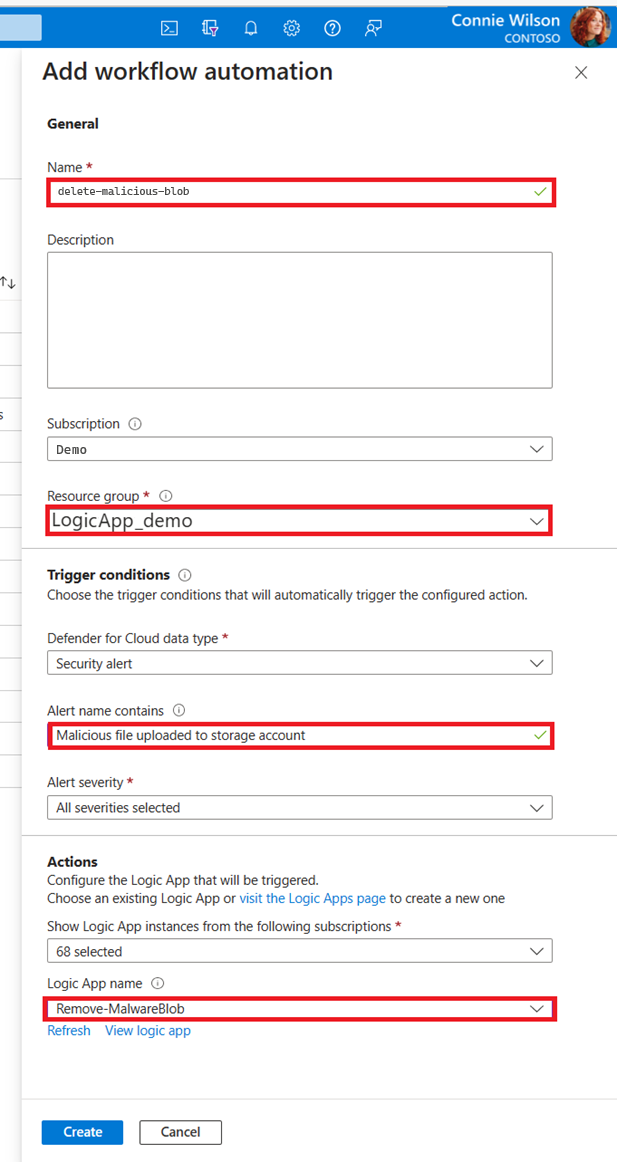
Create workflow automation for Microsoft Defender for Cloud alerts:
- Go to Microsoft Defender for Cloud in the Azure portal.
- Go to Workflow automation in the side menu.
- Add a new workflow: In the Alert name contains field, fill in Malicious file uploaded to storage account and choose your Logic app in the Actions section.
- Select Create.
Option 2: Function App based on Event Grid events
A Function App provides high performance with a low latency response time.
Step 1: Create an Event Grid custom topic
Before connecting a Function App, set up an Event Grid custom topic to receive scan results.
- In the Azure portal, search for Event Grid Topics and select Create.
- Set the Region to the same region as your storage account. Cross-region delivery isn't supported for malware scan events.
- Select Event Grid Schema as the schema type.
- Under Networking, allow access from public IP addresses. Private endpoint-only topics can't receive events from Defender for Storage.
- After creating the topic, copy the Topic Endpoint and access key — you need these to configure Defender for Storage.
To configure Defender for Storage to send scan results to your custom topic, see Set up Event Grid for malware scanning.
Step 2: Create and configure the Function App
Create a Function App in the same resource group as your protected storage account.
Add a role assignment for the Function App identity.
- Go to Identity in the side menu, make sure the System assigned identity status is On, and select Azure role assignments.
- Add a role assignment at the subscription or storage account level with the Storage Blob Data Contributor role.
In the Event Grid topic, select + Event Subscription, set the endpoint type to Azure Function, and select your Function App as the endpoint.
Step 3: Choose a Function App template
Select the template that matches your remediation goal:
| Goal | Template |
|---|---|
| Move malicious blobs to quarantine | MoveMaliciousBlobEventTrigger |
| Auto-delete malicious blobs | Use the move template as a base; replace the copy+delete logic with a direct Delete Blob call after checking scanResultType == "Malicious". Enable soft delete first to allow recovery if there are false positives. |
| Send an alert or notification | Add an HTTP call to your alerting endpoint (for example, Teams webhook, PagerDuty, or ServiceNow) when scanResultType == "Malicious". See the Azure Functions HTTP output binding for details. |
Alternatively, write your own code to copy the blob elsewhere, then delete it from the source.
For each scan result, an event is sent according to the following schema.
Event message structure
The event message is a JSON object that contains key-value pairs that provide detailed information about a malware scanning result. Here's a breakdown of each key in the event message:
id: A unique identifier for the event.
subject: A string that describes the resource path of the scanned blob (file) in the storage account.
data: A JSON object that contains additional information about the event:
correlationId: A unique identifier that you can use to correlate multiple events related to the same scan.
blobUri: The URI of the scanned blob (file) in the storage account.
eTag: The ETag of the scanned blob (file).
scanFinishedTimeUtc: The UTC timestamp when the scan completed.
scanResultType: The result of the scan, such as Malicious or No threats found.
scanResultDetails: A JSON object containing details about the scan result:
malwareNamesFound: An array of malware names found in the scanned file.
sha256: The SHA-256 hash of the scanned file.
eventType: A string that indicates the type of event, in this case, Microsoft.Security.MalwareScanningResult.
dataVersion: The version number of the data schema.
metadataVersion: The version number of the metadata schema.
eventTime: The UTC timestamp when the event was generated.
topic: The resource path of the Event Grid topic that the event belongs to.
Here's an example of an event message:
{
  "id": "aaaa0000-bb11-2222-33cc-444444dddddd",
  "subject": "storageAccounts/<storage_account_name>/containers/app-logs-storage/blobs/EICAR - simulating malware.txt",
  "data": {
    "correlationId": "aaaa0000-bb11-2222-33cc-444444dddddd",
    "blobUri": "https://<storage_account_name>.blob.core.windows.net/app-logs-storage/EICAR - simulating malware.txt",
    "eTag": "0x000000000000000",
    "scanFinishedTimeUtc": "2023-05-04T11:31:54.0481279Z",
    "scanResultType": "Malicious",
    "scanResultDetails": {
      "malwareNamesFound": [
        "DOS/EICAR_Test_File"
      ],
      "sha256": "AA11BB22CC33DD44EE55FF66AA77BB88CC99DD00"
    }
  },
  "eventType": "Microsoft.Security.MalwareScanningResult",
  "dataVersion": "1.0",
  "metadataVersion": "1",
  "eventTime": "2023-05-04T11:31:54.048375Z",
  "topic": "/subscriptions/<subscription_id>/resourceGroups/<resource_group_name>/providers/Microsoft.EventGrid/topics/<event_grid_topic_name>"
}
By understanding the structure of the event message, you can extract relevant information about the malware scanning result and process it accordingly.
Sample payloads for testing
Use these sample payloads to test your event handler logic before connecting to live scan results.
No threats found:
{
  "id": "bbbb1111-cc22-3333-44dd-555555eeeeee",
  "subject": "storageAccounts/<storage_account_name>/containers/uploads/blobs/clean-document.pdf",
  "data": {
    "correlationId": "bbbb1111-cc22-3333-44dd-555555eeeeee",
    "blobUri": "https://<storage_account_name>.blob.core.windows.net/uploads/clean-document.pdf",
    "eTag": "0x111111111111111",
    "scanFinishedTimeUtc": "2023-05-04T11:32:00.0000000Z",
    "scanResultType": "No threats found",
    "scanResultDetails": {
      "malwareNamesFound": [],
      "sha256": "BB22CC33DD44EE55FF66AA77BB88CC99DD00EE11"
    }
  },
  "eventType": "Microsoft.Security.MalwareScanningResult",
  "dataVersion": "1.0",
  "metadataVersion": "1",
  "eventTime": "2023-05-04T11:32:00.0000000Z",
  "topic": "/subscriptions/<subscription_id>/resourceGroups/<resource_group_name>/providers/Microsoft.EventGrid/topics/<event_grid_topic_name>"
}
Not scanned (oversized blob):
{
  "id": "cccc2222-dd33-4444-55ee-666666ffffff",
  "subject": "storageAccounts/<storage_account_name>/containers/uploads/blobs/large-archive.zip",
  "data": {
    "correlationId": "cccc2222-dd33-4444-55ee-666666ffffff",
    "blobUri": "https://<storage_account_name>.blob.core.windows.net/uploads/large-archive.zip",
    "eTag": "0x222222222222222",
    "scanFinishedTimeUtc": "2023-05-04T11:32:10.0000000Z",
    "scanResultType": "Not Scanned",
    "scanResultDetails": {
      "notScannedReason": "SAM259206: Not scanned - blob exceeded the maximum allowed size of 50 GB."
    }
  },
  "eventType": "Microsoft.Security.MalwareScanningResult",
  "dataVersion": "1.0",
  "metadataVersion": "1",
  "eventTime": "2023-05-04T11:32:10.0000000Z",
  "topic": "/subscriptions/<subscription_id>/resourceGroups/<resource_group_name>/providers/Microsoft.EventGrid/topics/<event_grid_topic_name>"
}
Reading SAM error codes from Event Grid messages
When Event Grid can't scan a blob, it uses the Not Scanned result type and includes a SAM error code in the notScannedReason field.
If scanResultType is set to Not Scanned, the SAM error code appears as part of the data.scanResultDetails.notScannedReason value. The error code is the prefix before the colon (:).
For example:
"scanResultType": "Not Scanned",
"scanResultDetails": {
  "notScannedReason": "SAM259206: Not scanned - blob exceeded the maximum allowed size of 50 GB."
}
Make your applications and data flows aware of malware scanning results
Malware scanning runs in near real time, and there's usually a short time window between uploading a file and scanning it. Because storage isn't compute, malicious files can't run in your storage. The risk is that users or applications use malicious files and spread them throughout the organization.
You can make your applications and data flows aware of malware scanning results. These methods make sure files aren't used or processed until:
- Scanning finishes
- Scan results are available
- You take appropriate actions based on the results
Applications ingest data based on the scan result
Option 1: Apps checking "Index tag" before processing
Update all applications that use the storage account. Each application checks the scan result for each file, and if the blob Index tag scan result is no threats found, the application reads the blob.
Option 2: Connect your application to a Webhook in Event Grid events
Connect your application to a Webhook in Event Grid events and use those events to trigger relevant processes for files with no threats found scan results. Learn more about using Webhook event delivery and validating your endpoint.
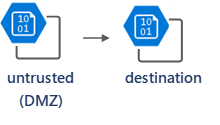
Use an intermediary storage account as a DMZ
Set up an intermediary storage account for untrusted content (DMZ) and direct upload traffic to the DMZ. On the untrusted storage account, enable malware scanning and connect Event Grid and Function App to move only blobs scanned with the no threat found result to the destination storage account.
Troubleshoot event delivery
If scan result events aren't arriving at your endpoint, use the following checks to identify and resolve the issue.
Events aren't delivered to the Function App or webhook
| Symptom | Possible cause | Resolution |
|---|---|---|
| No events received after a file upload | Event Grid topic not configured on the storage account | Verify the Event Grid custom topic is set under the storage account's Microsoft Defender for Cloud settings. See Set up Event Grid for malware scanning. |
| No events received after a file upload | Event subscription not created | Check that an event subscription exists on the custom topic with your Function App or webhook as the endpoint. |
| Events are delivered but the Function App doesn't trigger | Event subscription endpoint validation pending | Event Grid sends a validation event when you create a subscription. If your endpoint doesn't respond with the validation code, delivery is suspended. See Webhook event delivery. |
| Events stop being delivered | Endpoint returning HTTP 4xx or 5xx errors | Event Grid retries delivery with exponential backoff for up to 24 hours. Check your Function App logs in Application Insights or the Monitor tab for error details. |
Permission errors
- Event Grid can't publish to the custom topic: Verify that the Microsoft Defender for Storage service principal has the EventGrid Data Sender role on your Event Grid topic, or that the topic allows anonymous publishing. Defender for Storage uses its own service identity to publish events.
- Function App can't delete or move blobs: Confirm the Function App's system-assigned managed identity has the Storage Blob Data Contributor role on the source storage account (and destination account, if quarantining). Check for deny assignments that might block the identity.
Network and firewall issues
- Event Grid topic behind a private endpoint: Defender for Storage can't deliver to Event Grid topics that only accept private endpoint connections. The custom topic must allow access from public IP addresses.
- Function App in a virtual network: If the Function App runs in a virtual network with outbound restrictions, make sure the Function App can reach the storage account and any other services it needs to call (such as a notification endpoint).
Subscription validation
When you create or update an event subscription that uses a webhook endpoint, Event Grid sends a subscription validation event. Your endpoint must respond with the validationCode from the request body. Common reasons validation fails:
- The endpoint isn't yet deployed or isn't listening when the subscription is created.
- The endpoint returns a non-200 HTTP status code.
- The endpoint doesn't echo back the
validationCodein the response body.
To re-trigger validation, delete and recreate the event subscription, or use the Revalidate option in the Azure portal.
Verify event delivery in the Azure portal
- Go to your Event Grid custom topic.
- Select Metrics and review Published Events, Matched Events, and Delivery Failed counts.
- Select Event Subscriptions and check the subscription health status.
- For failed deliveries, select Dead Letter (if configured) to inspect undelivered events.