Chapter 7: Adding functionality to the app
Kiana and Maria are excited to show the inventory management app to Caleb, the field technician. Caleb likes it, but suggests adding some extra user interface functionality to make it easier to use. Specifically, Caleb would like to be able to:
Add a photograph of the work done on a boiler or air conditioning unit, and add it to the appointment details on the Edit Appointment screen. This image could prove useful as documentary evidence of repairs performed. The Edit Appointment screen currently enables the user to add an image to the appointment, but the image isn't saved as this feature hasn't been fully implemented yet. The reason for this omission is that Kiana and Preeti need to determine the best place to store image data. Caleb would like this functionality added as soon as possible.
View a complete appointment history for a customer, to track repairs that were requested and monitor any ongoing issues that might require technicians to be repeatedly called out.
Order parts from the Part Details screen.
Additionally, the image control on the Part Details screen displays the images stored at a specified URL. Currently the URLs in the data are simply placeholders. Like the photographs for the appointment screen, Kiana and Preeti need to determine the best place to store images so they're available to the app.
Adding a photograph to an appointment
Photographs need to be stored somewhere accessible by the app. For performance and security reasons, Preeti doesn't want photographs to be saved in OneDrive or in Azure SQL Database. Instead, they decide to use Azure Blob Storage. Blob Storage is optimized for holding large binary objects, and is robust, with built-in security. Power Apps has a connector that allows access to Blob Storage. Maria suggests adding a new picture-taking screen, improving the user experience for Caleb.
More information: Azure Blob Storage
Preeti creates the Blob Storage account from the Azure portal by following these steps:
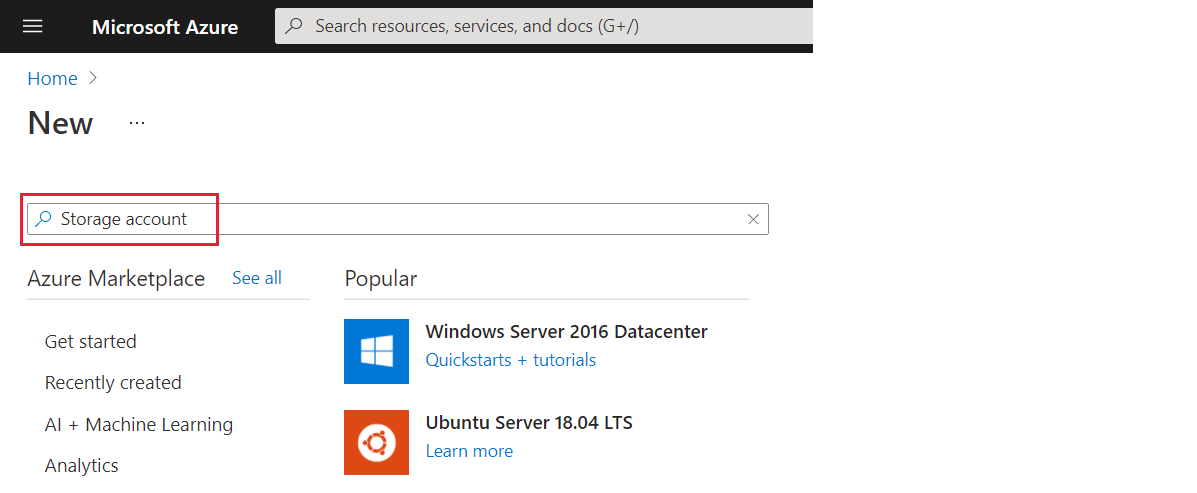
In the Azure portal, on the Home page, select + Create a resource. In the Search the Marketplace box, enter Storage account, and then select Enter.
On the Storage account page, select Create.
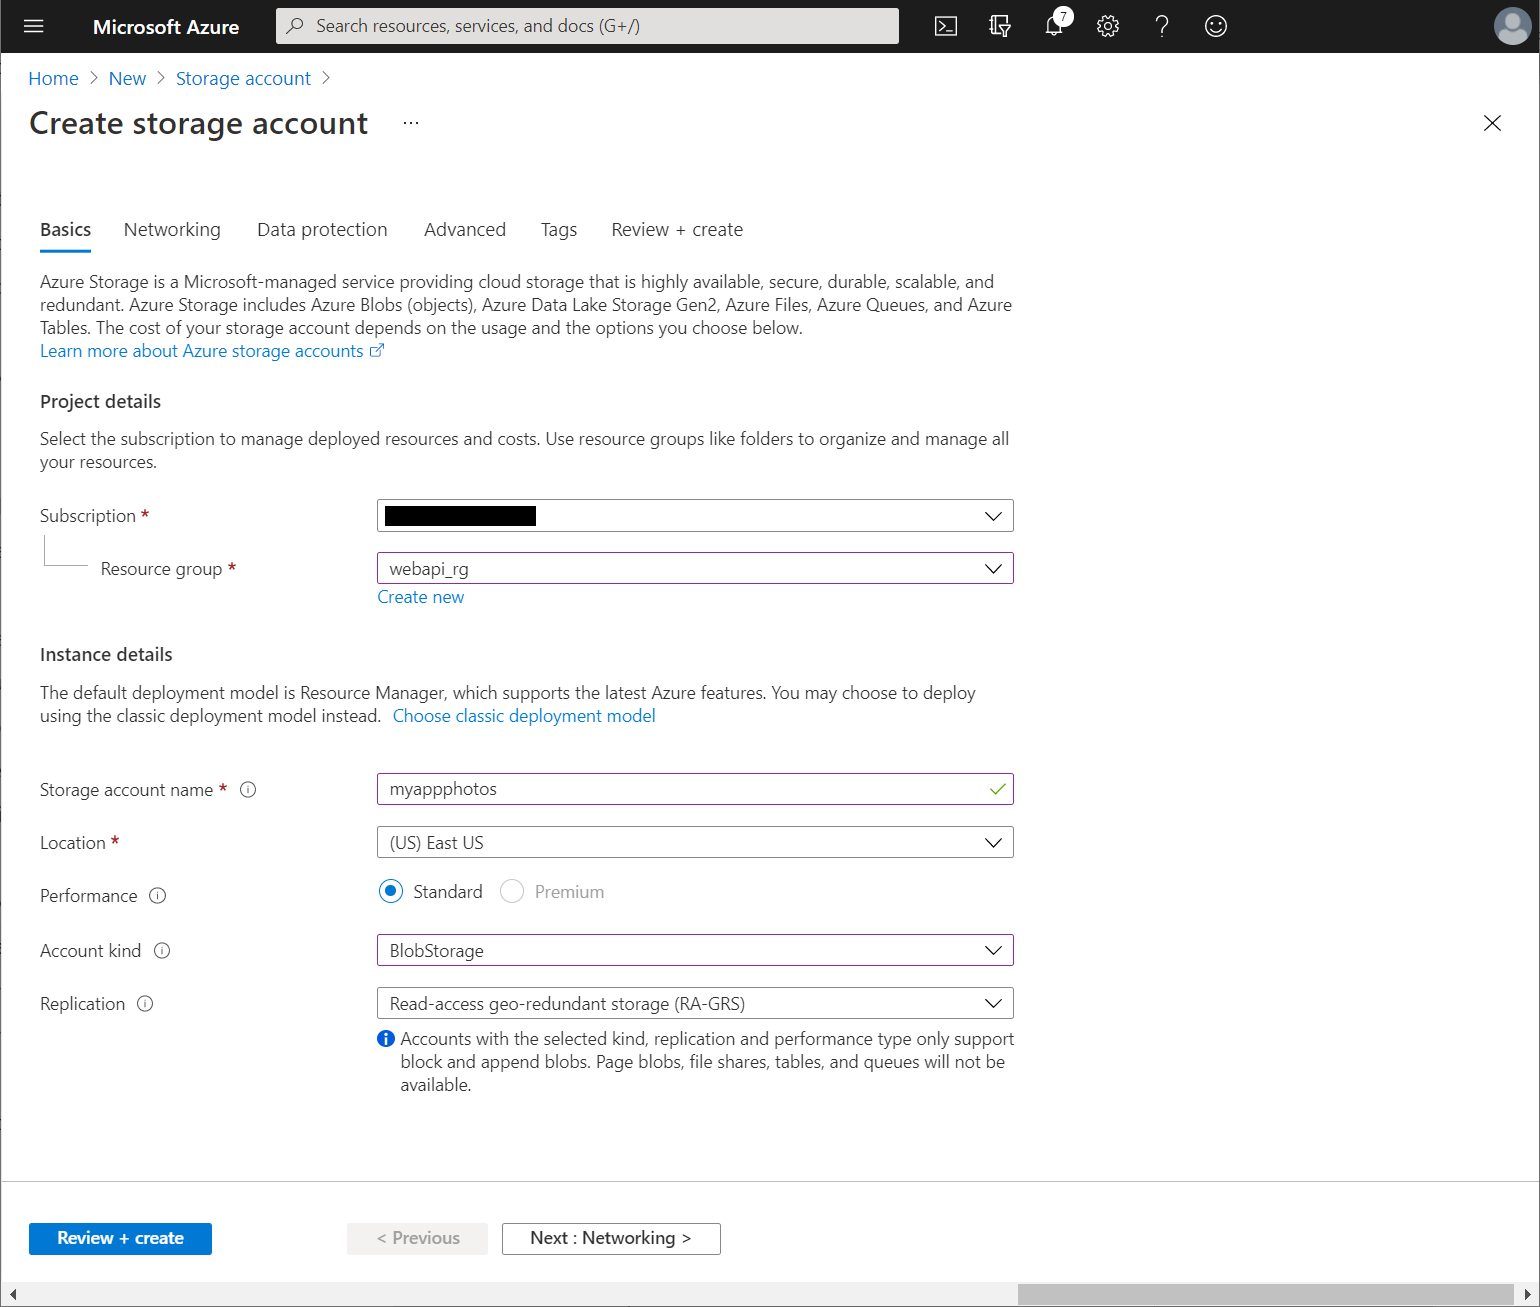
On the Create storage account page, enter the following details, and then select Review + create:
- Subscription: Select your subscription
- Resource group: webapi_rg
- Storage account name: Provide a globally unique name and make a note of it for later
- Location: Select your nearest location
- Performance: Standard
- Account kind: BlobStorage
- Replication: RA-GRS
On the validation page, select Create and wait for the storage account to be provisioned.
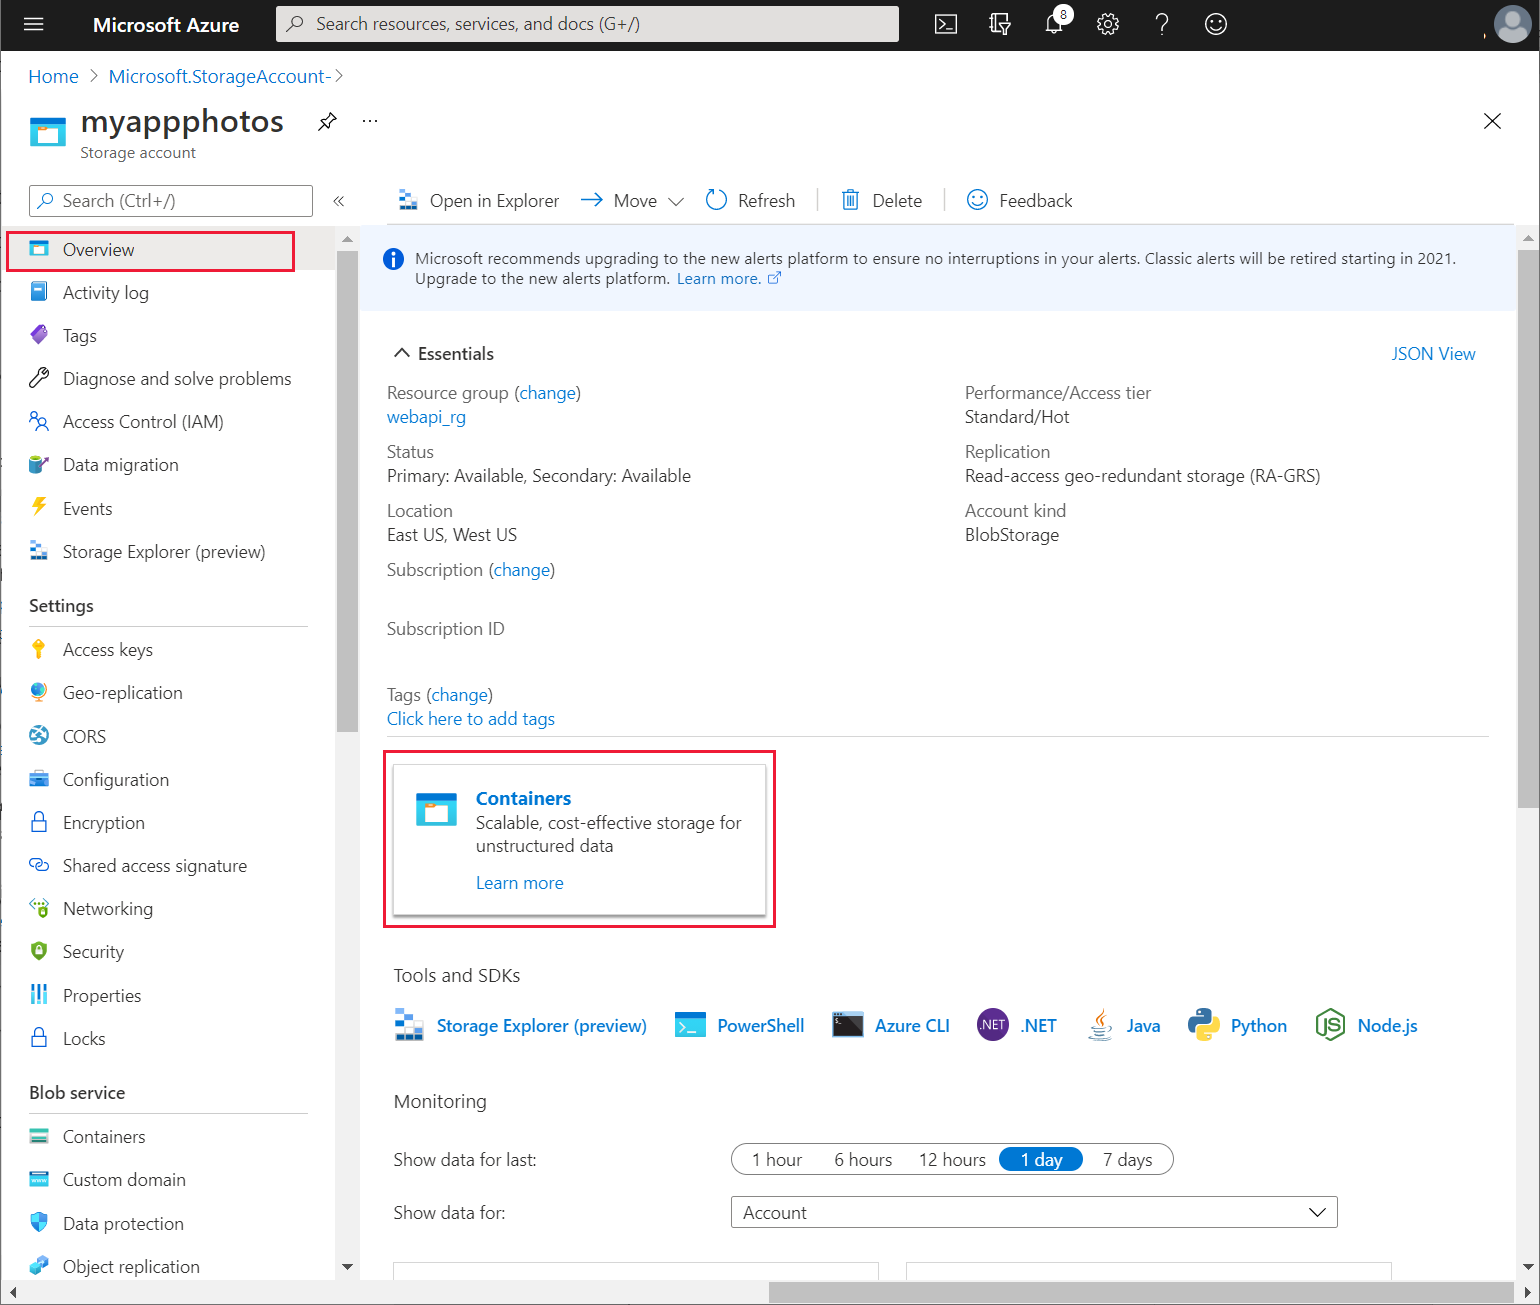
Go to the page for the new storage account.
On the Overview page, select Containers.
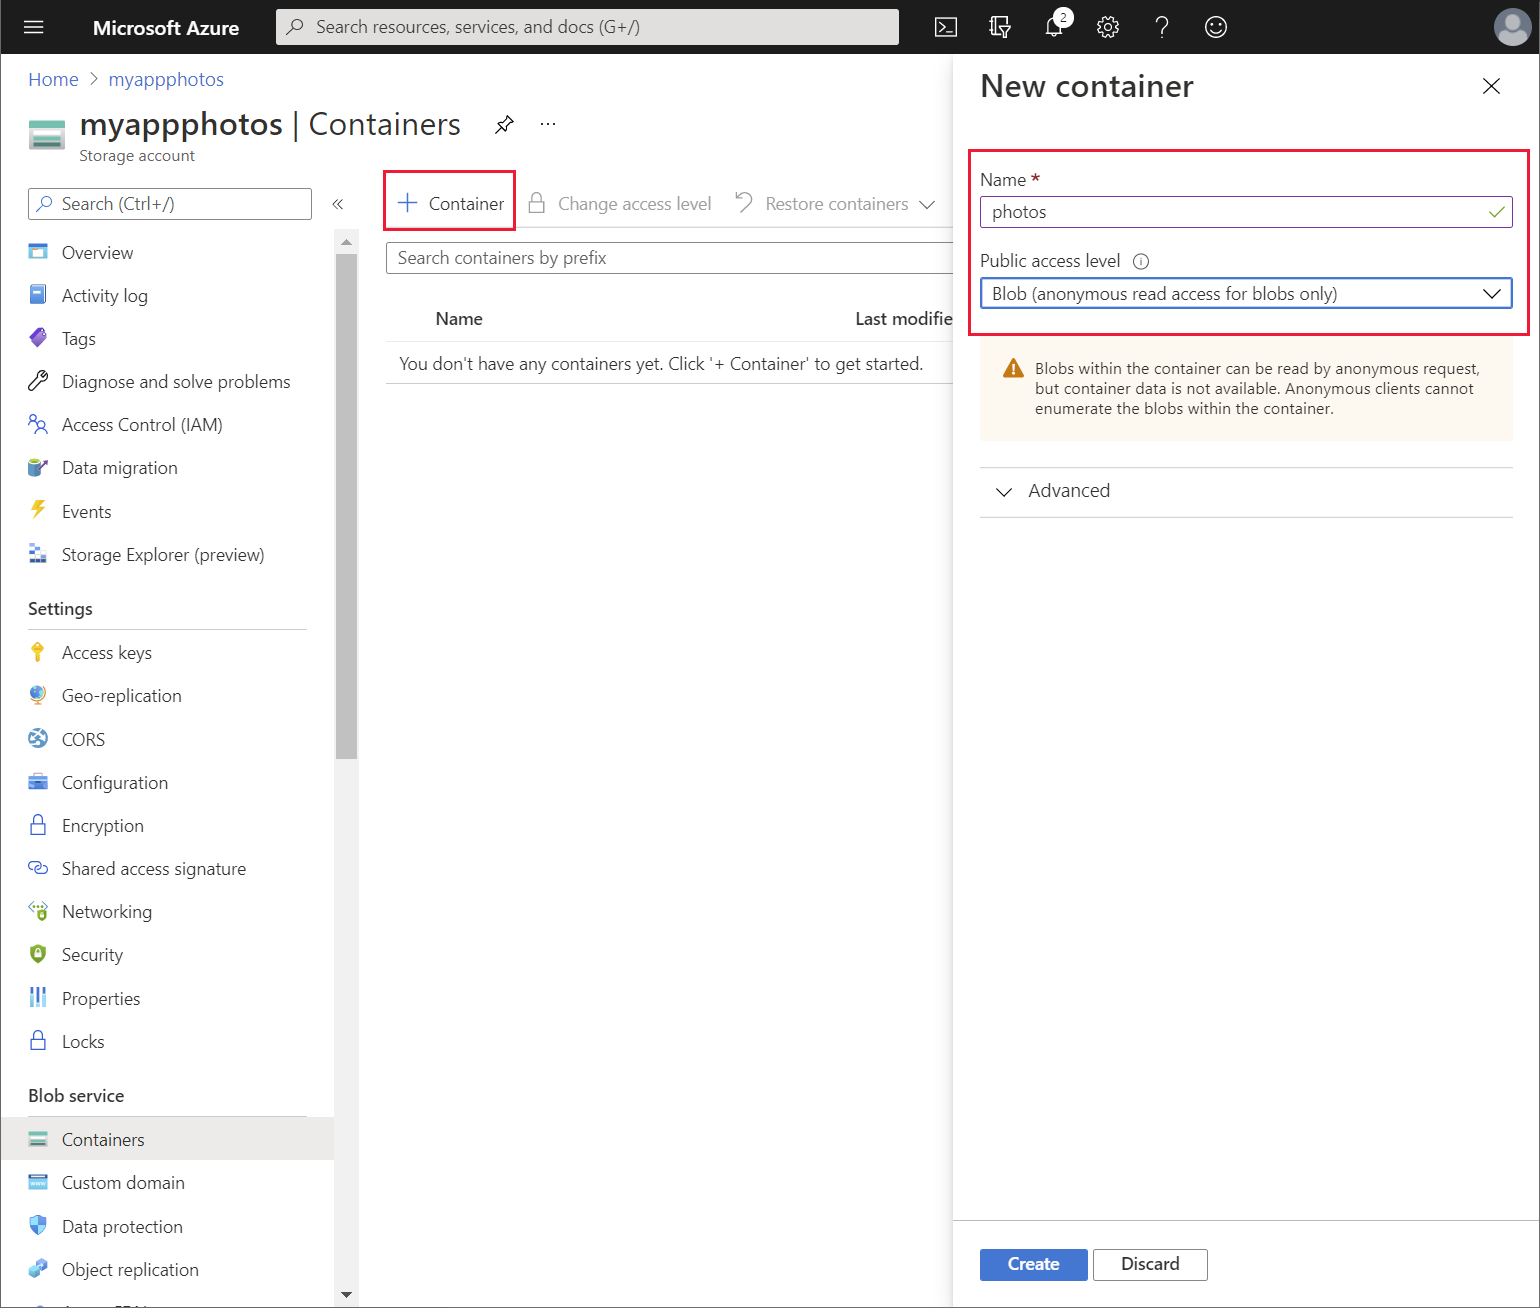
On the Containers page, select + Container. Create a new container named photos, and then select Create. Change Public access level to Blob.
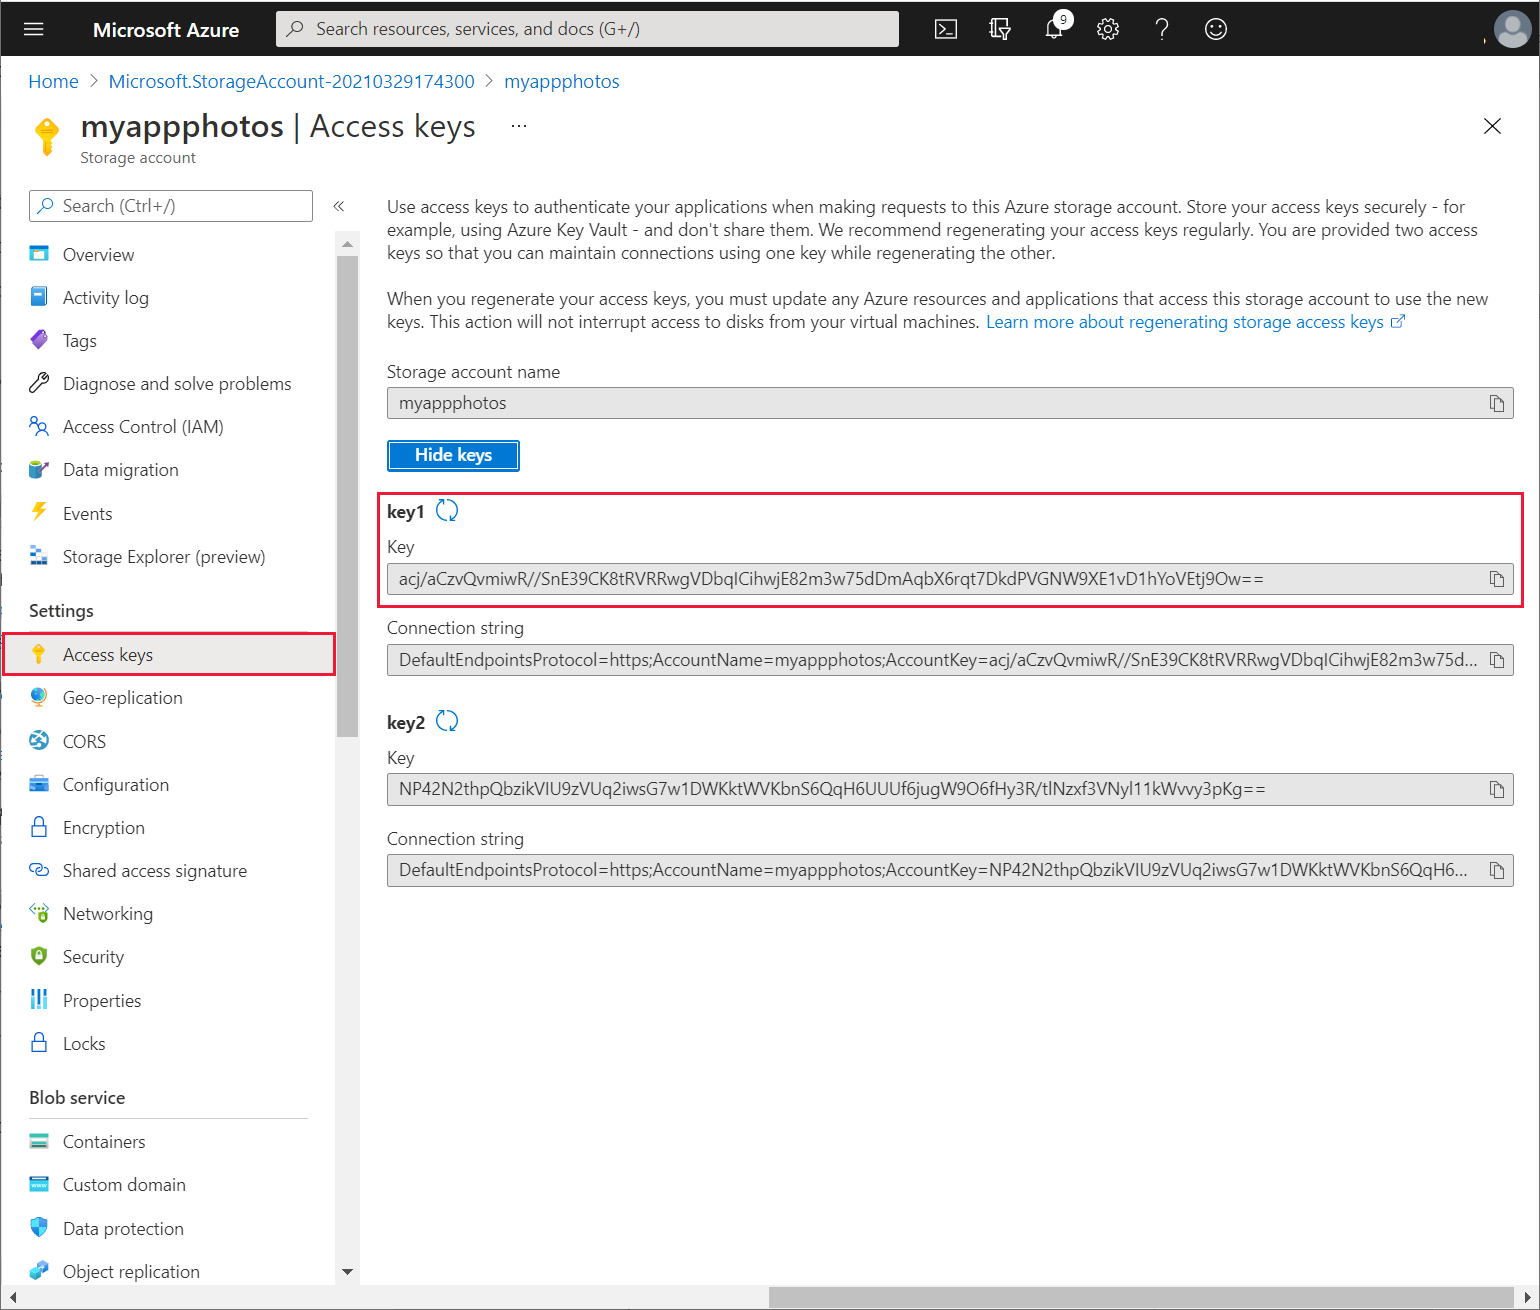
Back on the Overview page for the storage account, under settings, select Access keys. On the Access keys page, select Show keys. Make a note of the value of the key for key1.
Preeti gives the storage account name and key to Kiana, who uses this information to create a custom connector for the app by following these steps:
Sign in to Power Apps.
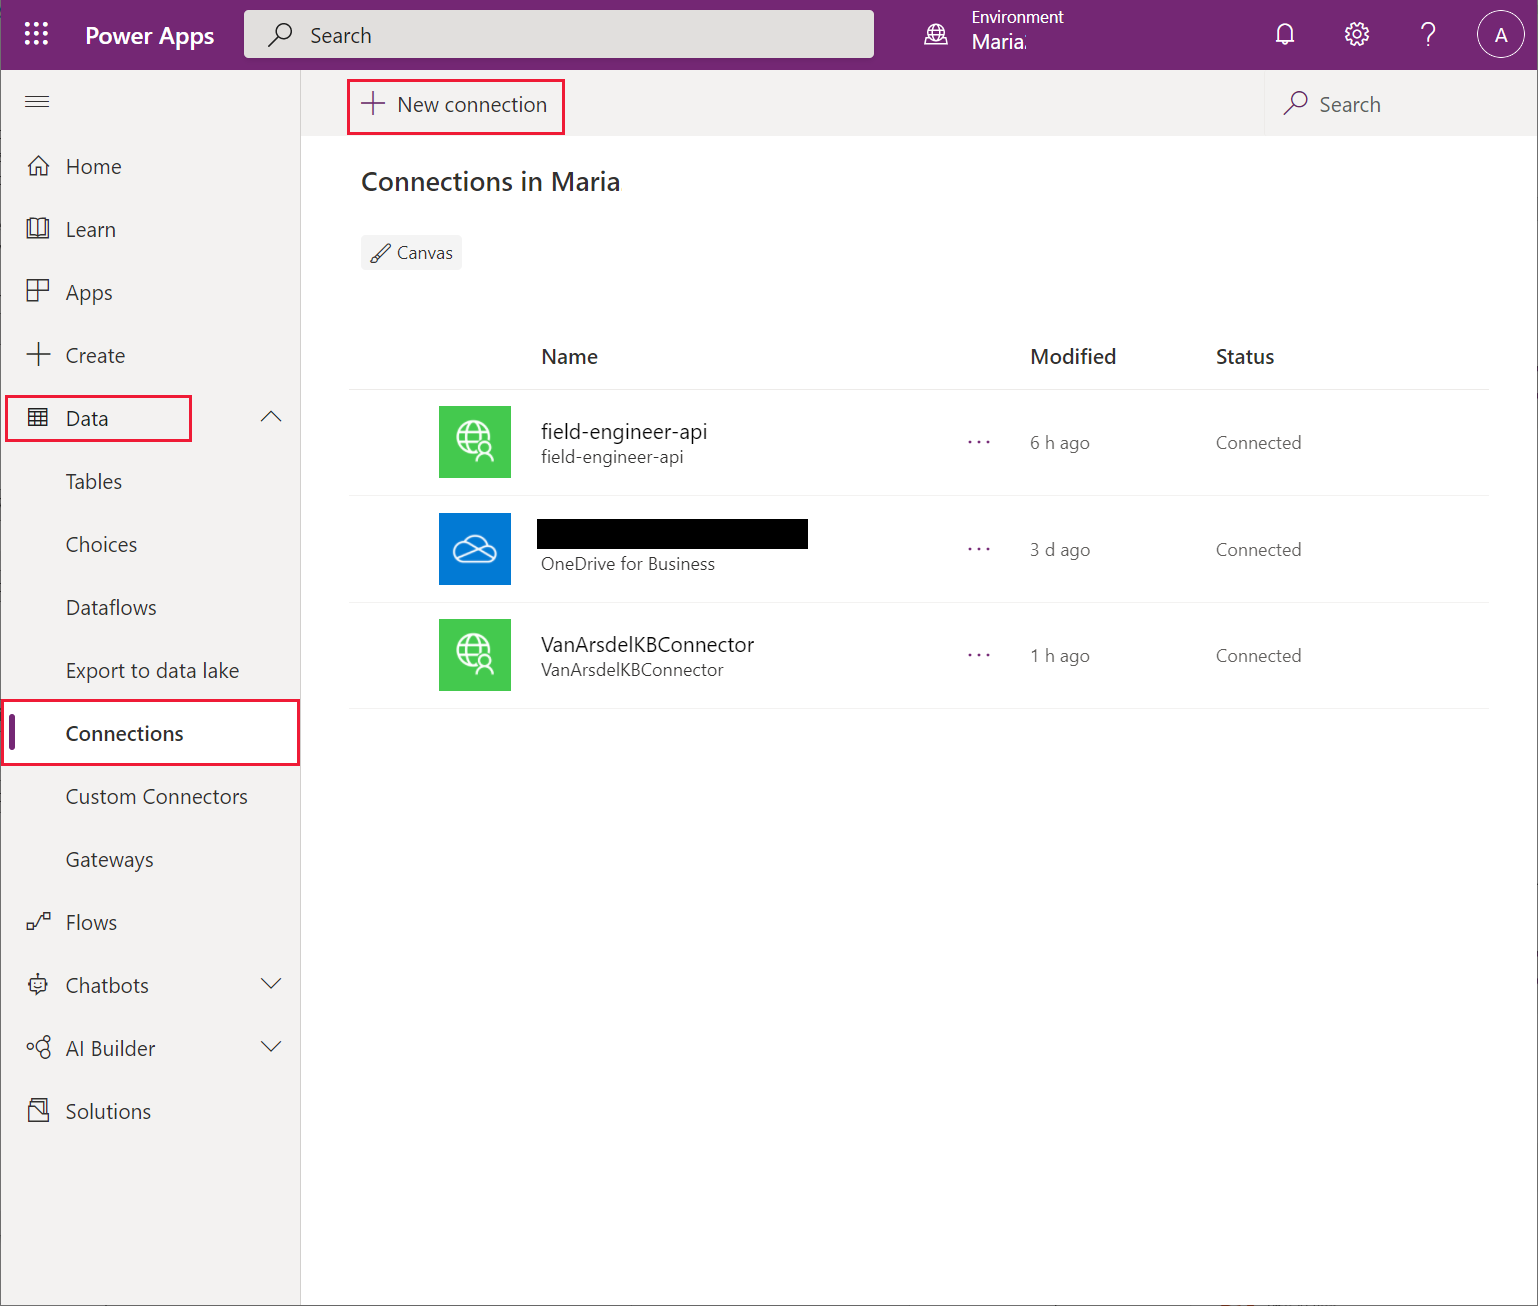
On the left pane, expand Data, and select Connections. The existing connections used by the app should be listed. Select + New connection.
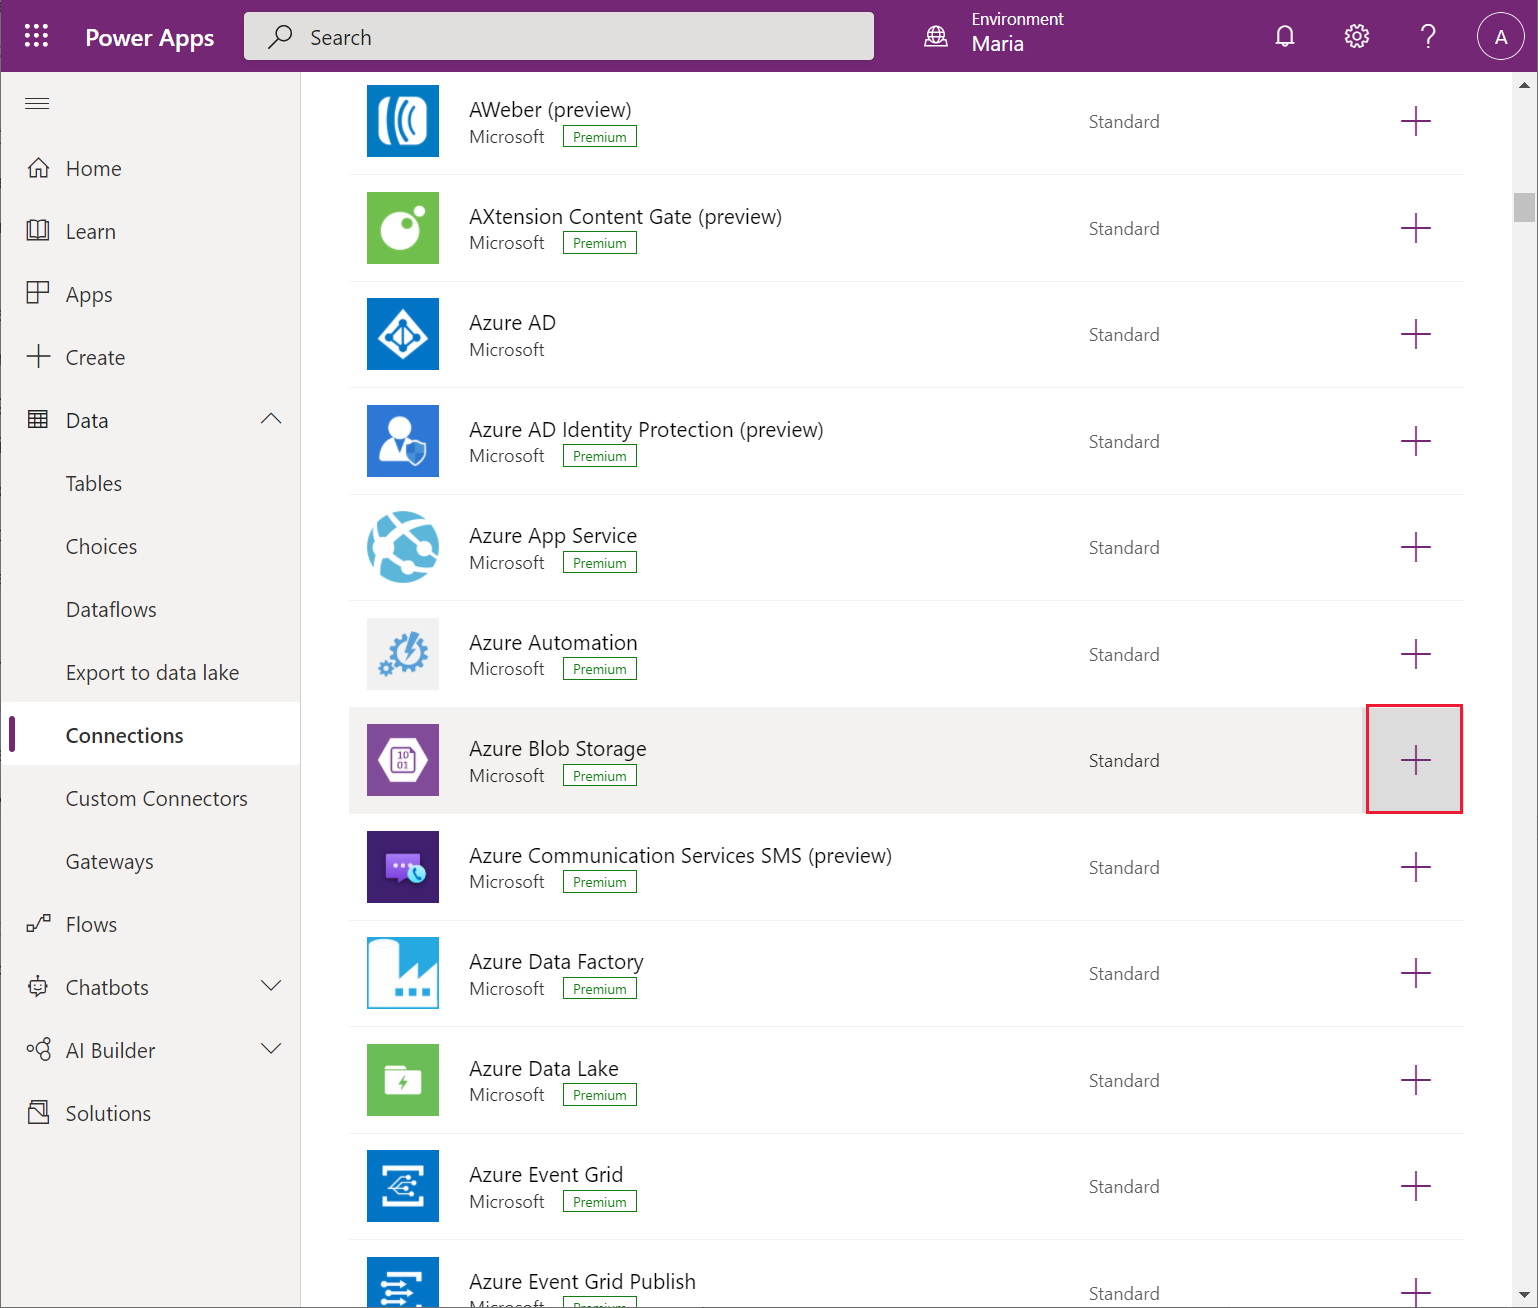
On the New connection page, scroll down, select Connections, select Azure Blob Storage, and then select Create.
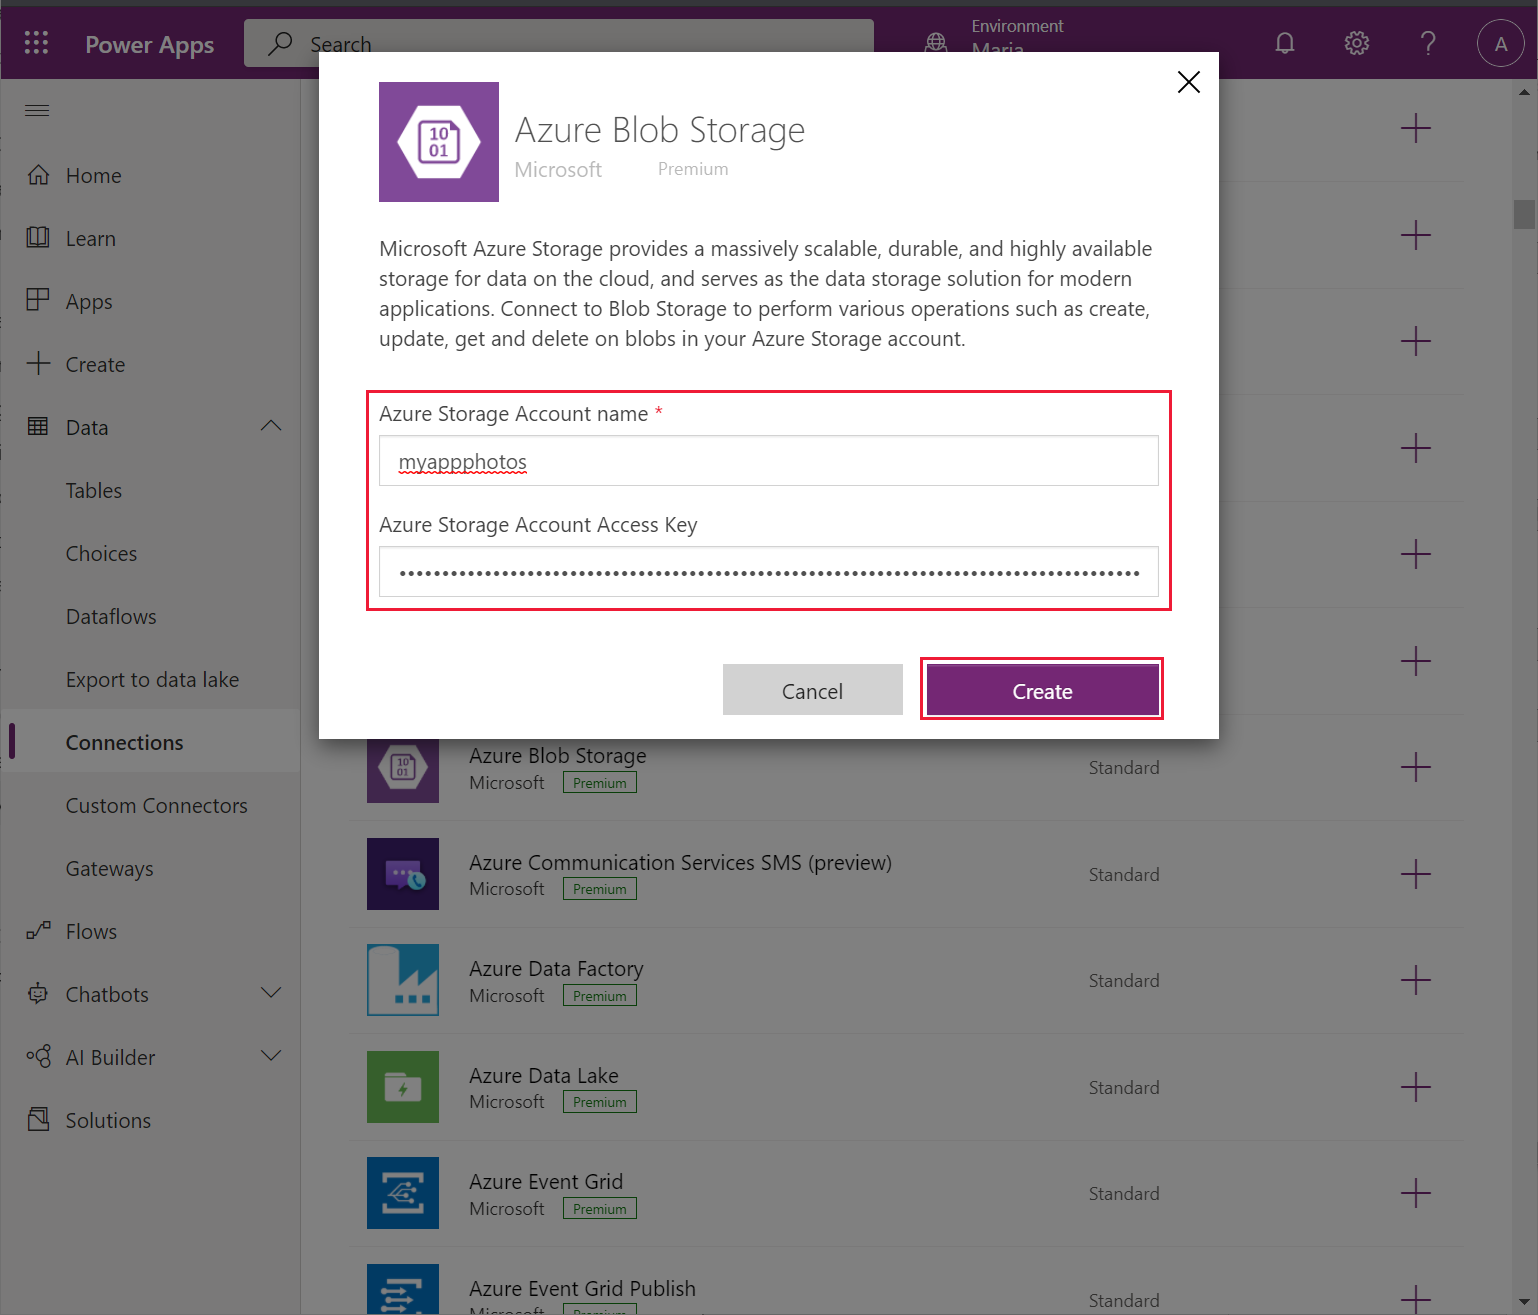
In the Azure Blob Storage dialog, enter the storage account name and access key that Preeti provided, and then select Create.
Wait while the new connection is created. It should appear on the list of connections.
Maria can use this connection to Blob Storage in the app to save and retrieve photographic images. Maria's first task is to add the connection to the app by following these steps:
Open the VanArsdelApp app for editing in Power Apps Studio.
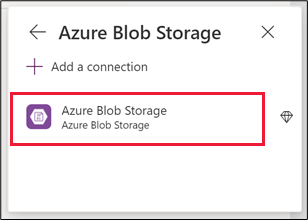
On the Data pane, select Add data, search for the Azure Blob Storage connector, and then select the connector.
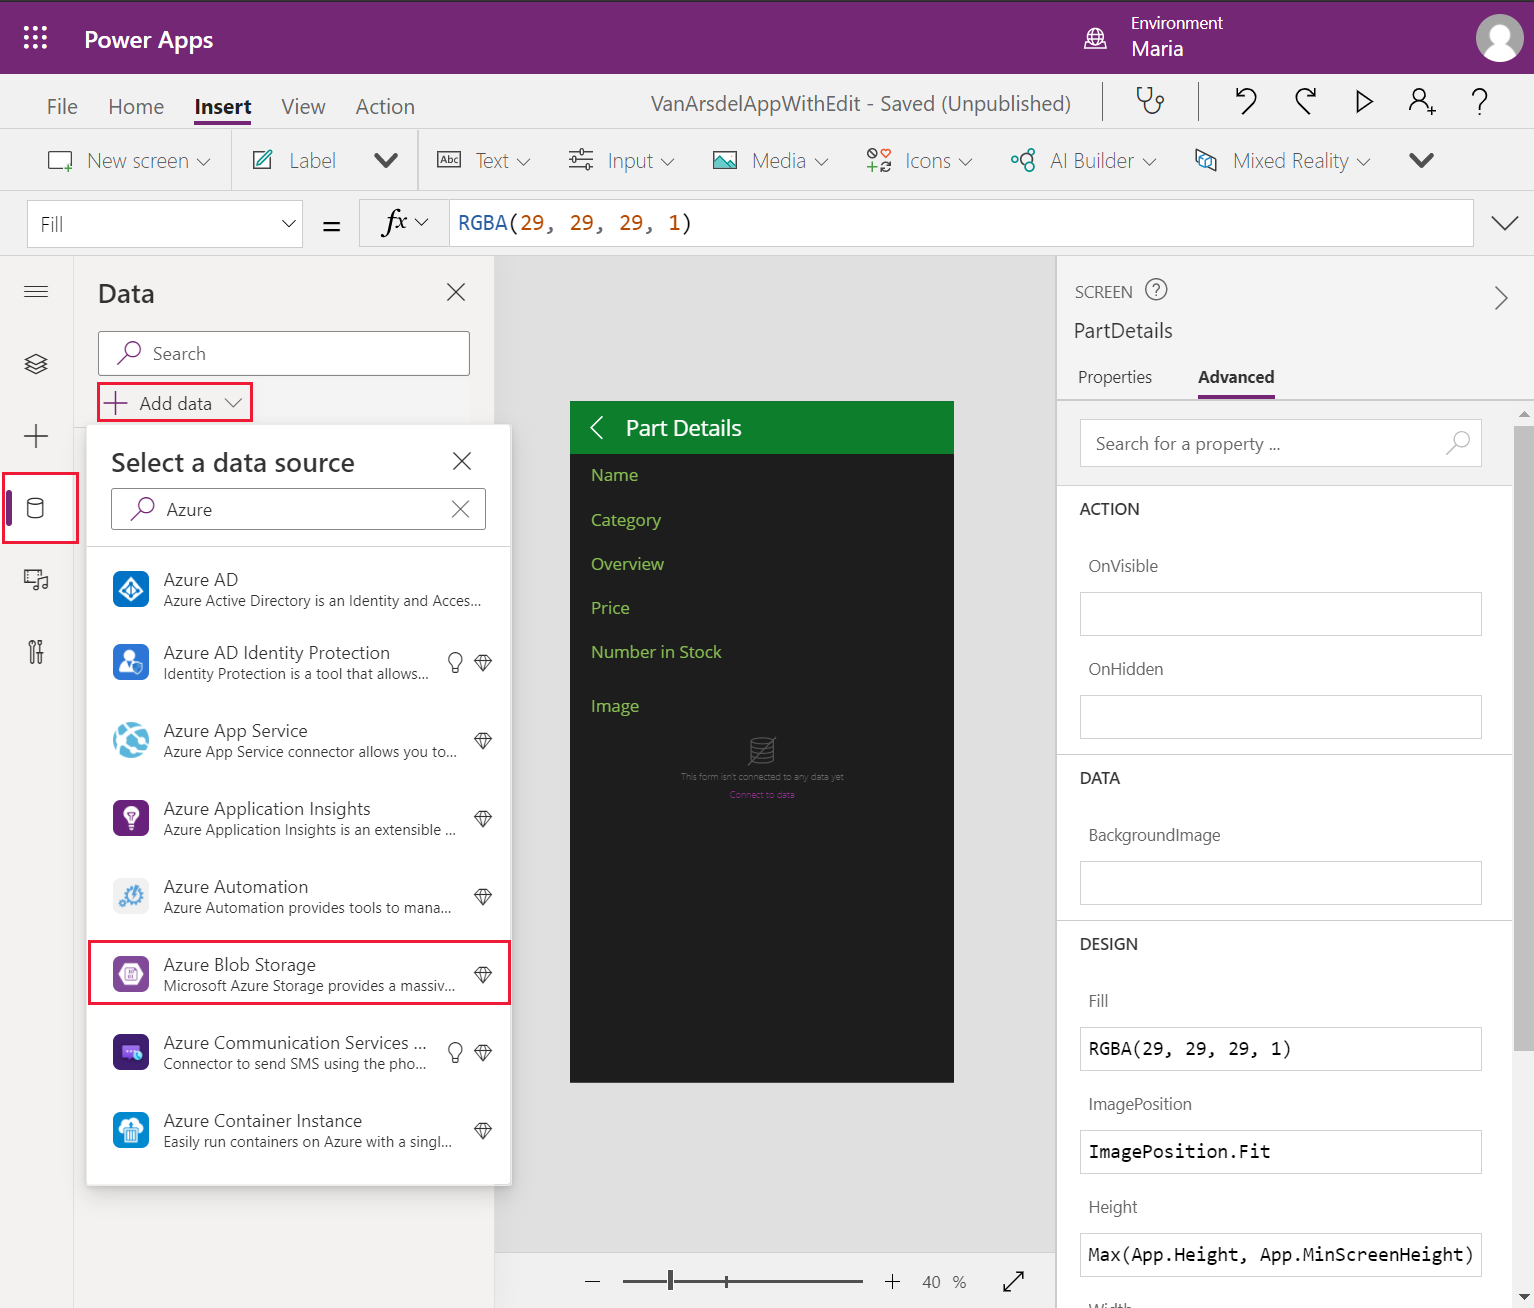
In the Azure Blob Storage dialog, select the Azure Blob Storage connector to add it to your app.
Maria's next task is to add a screen that enables a technician or engineer to save a photograph. Maria decides to add a new screen with a Picture control. When the app is run on a mobile device, this control can integrate with the camera to enable the technician to take a photograph. On other devices, this control prompts the user to upload an image file instead. Maria adds a link to this new screen from the EditAppointment screen by following these steps:
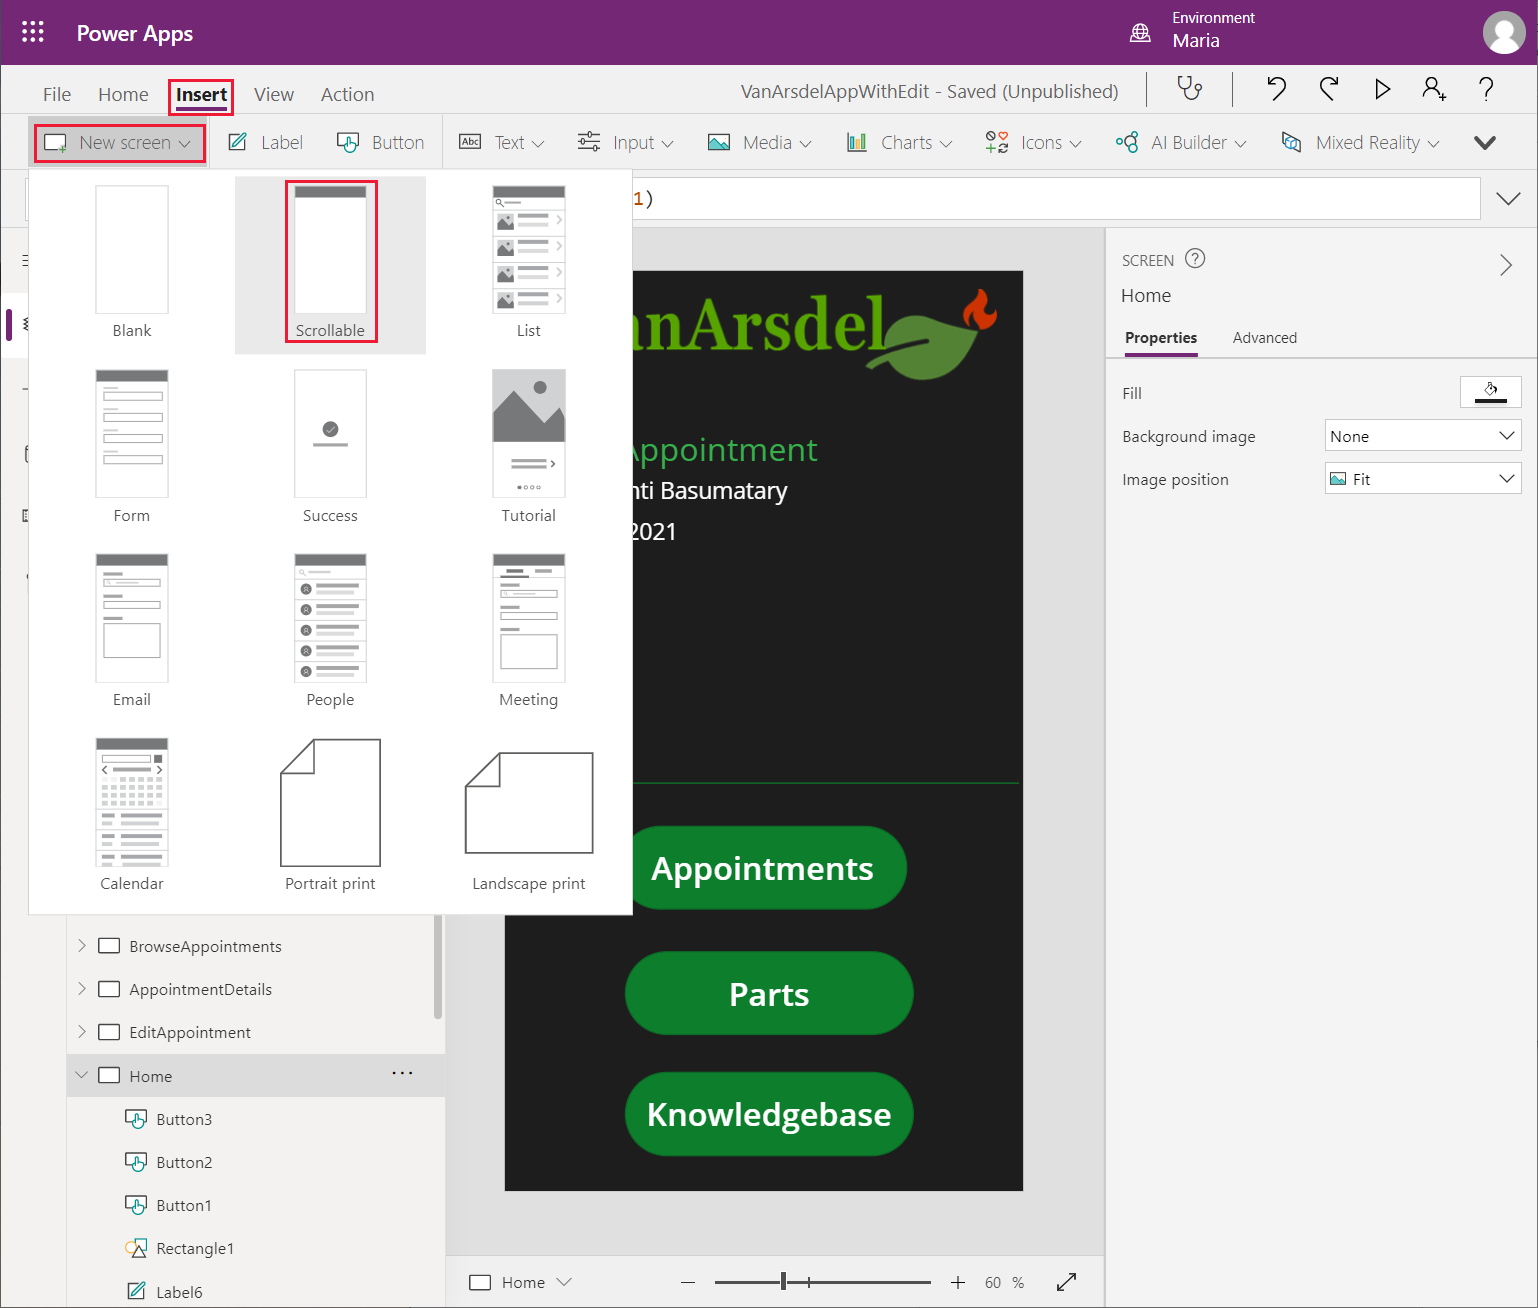
On the Insert menu, select New screen, and then select the Scrollable template.
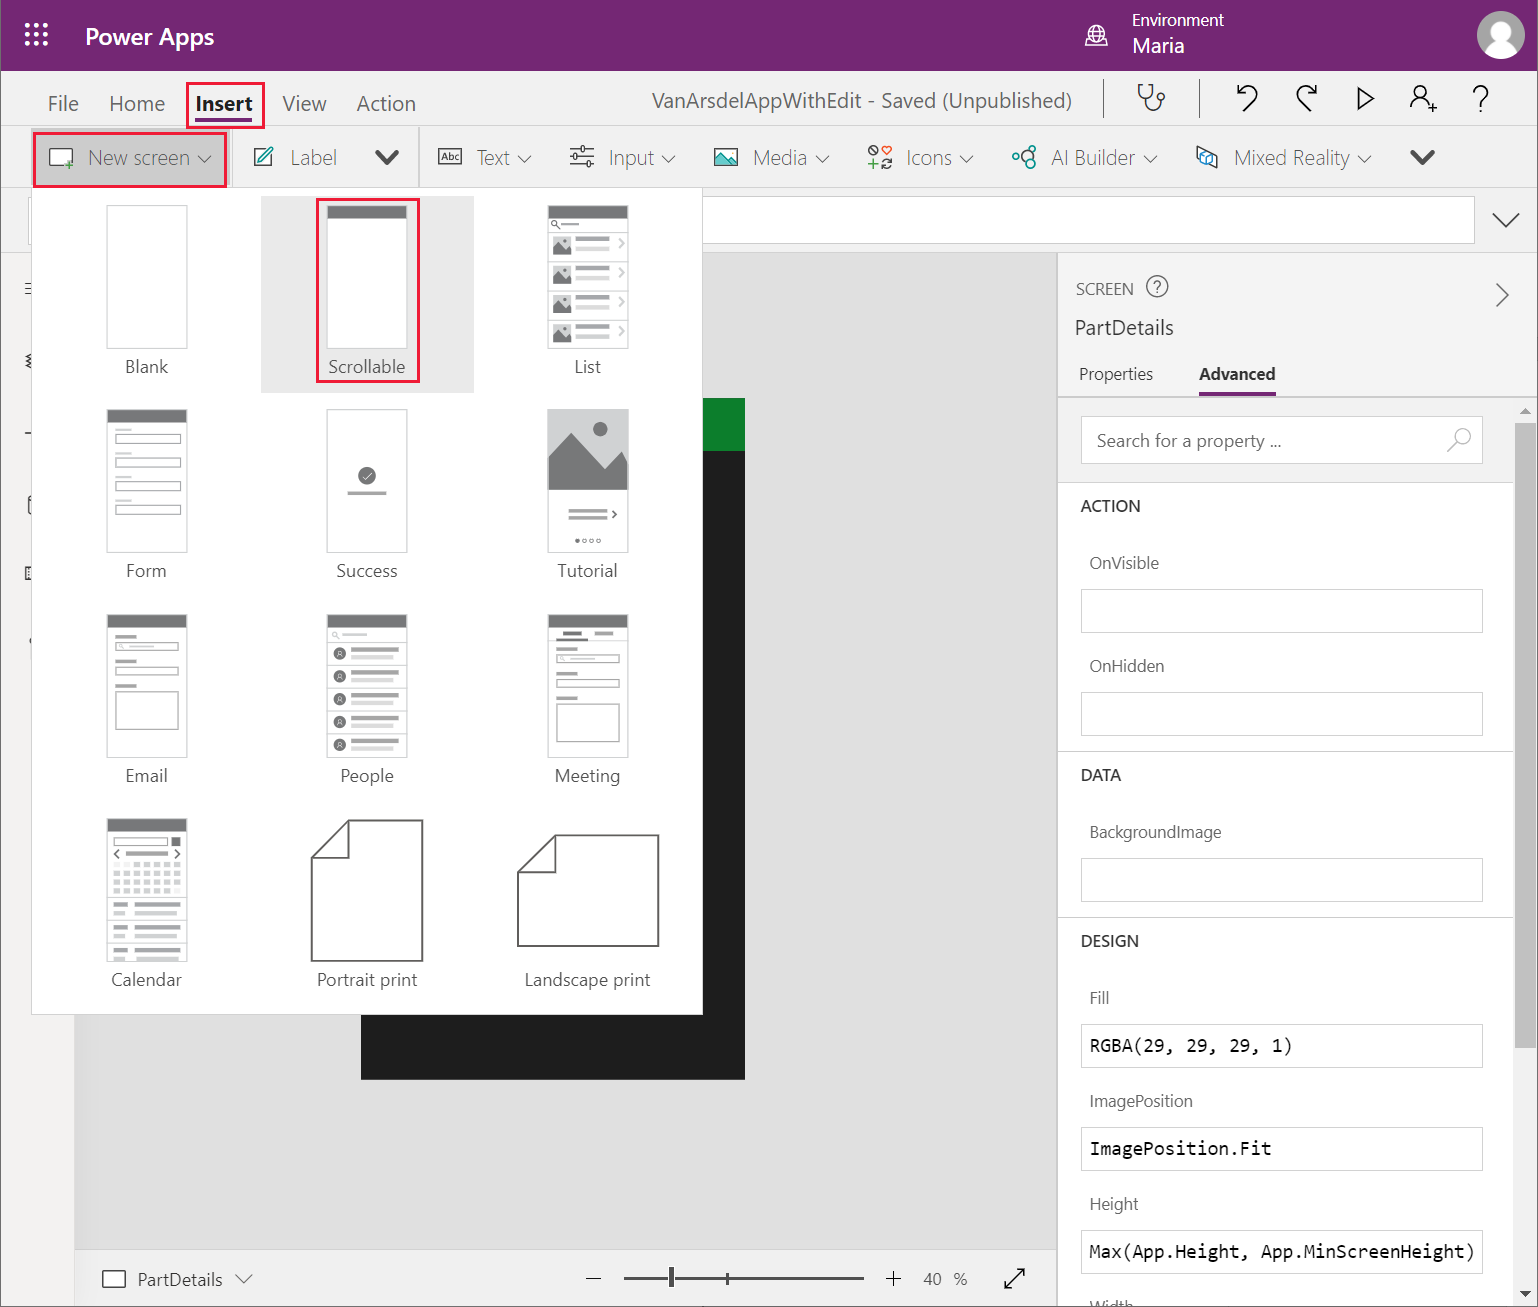
On the Tree view pane, select the new screen and rename it as TakePhoto.
Change the Text property of the LblAppNameX control on this screen to Take a photograph.
Delete the CanvasX control from the screen.
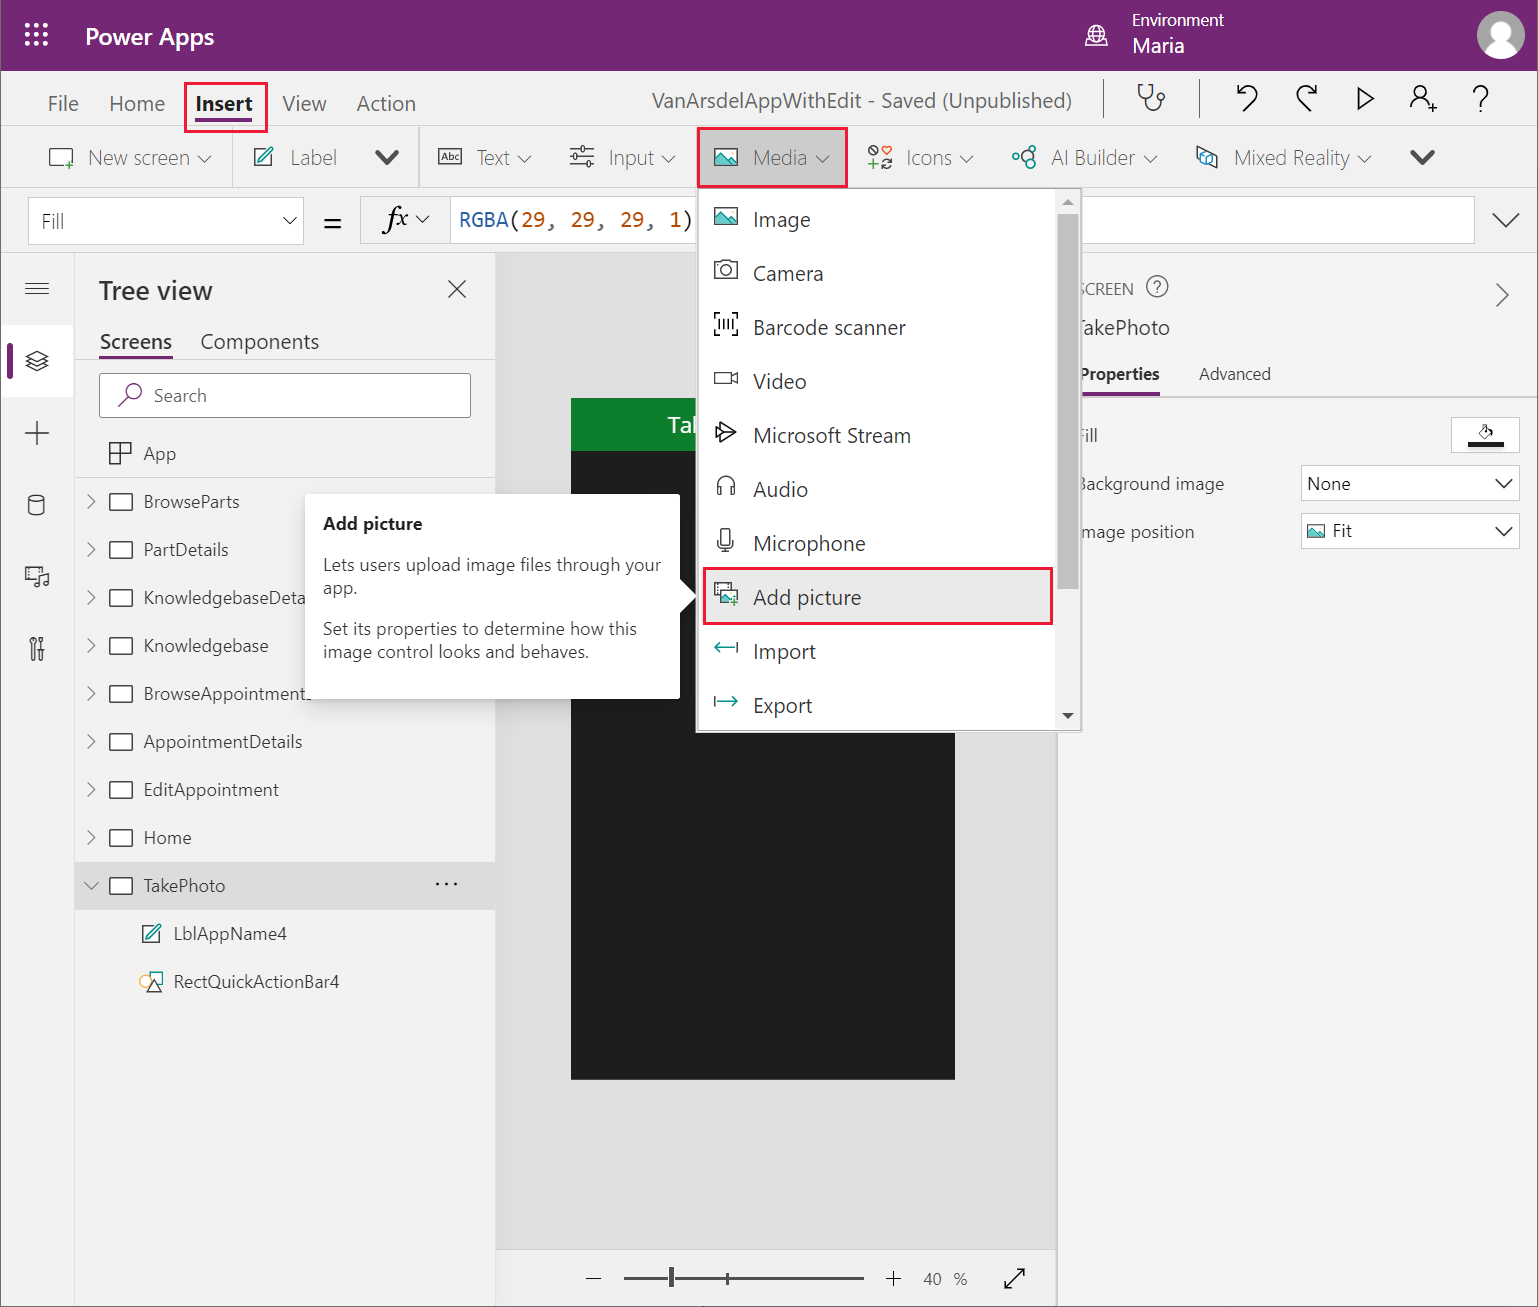
In the Insert menu, from the Media dropdown list, select Add picture to create a new picture control.
Note
The picture control is actually a composite custom component that enables the user to add a picture to the screen and display the results.
Resize and reposition the picture control to occupy the body of the screen.
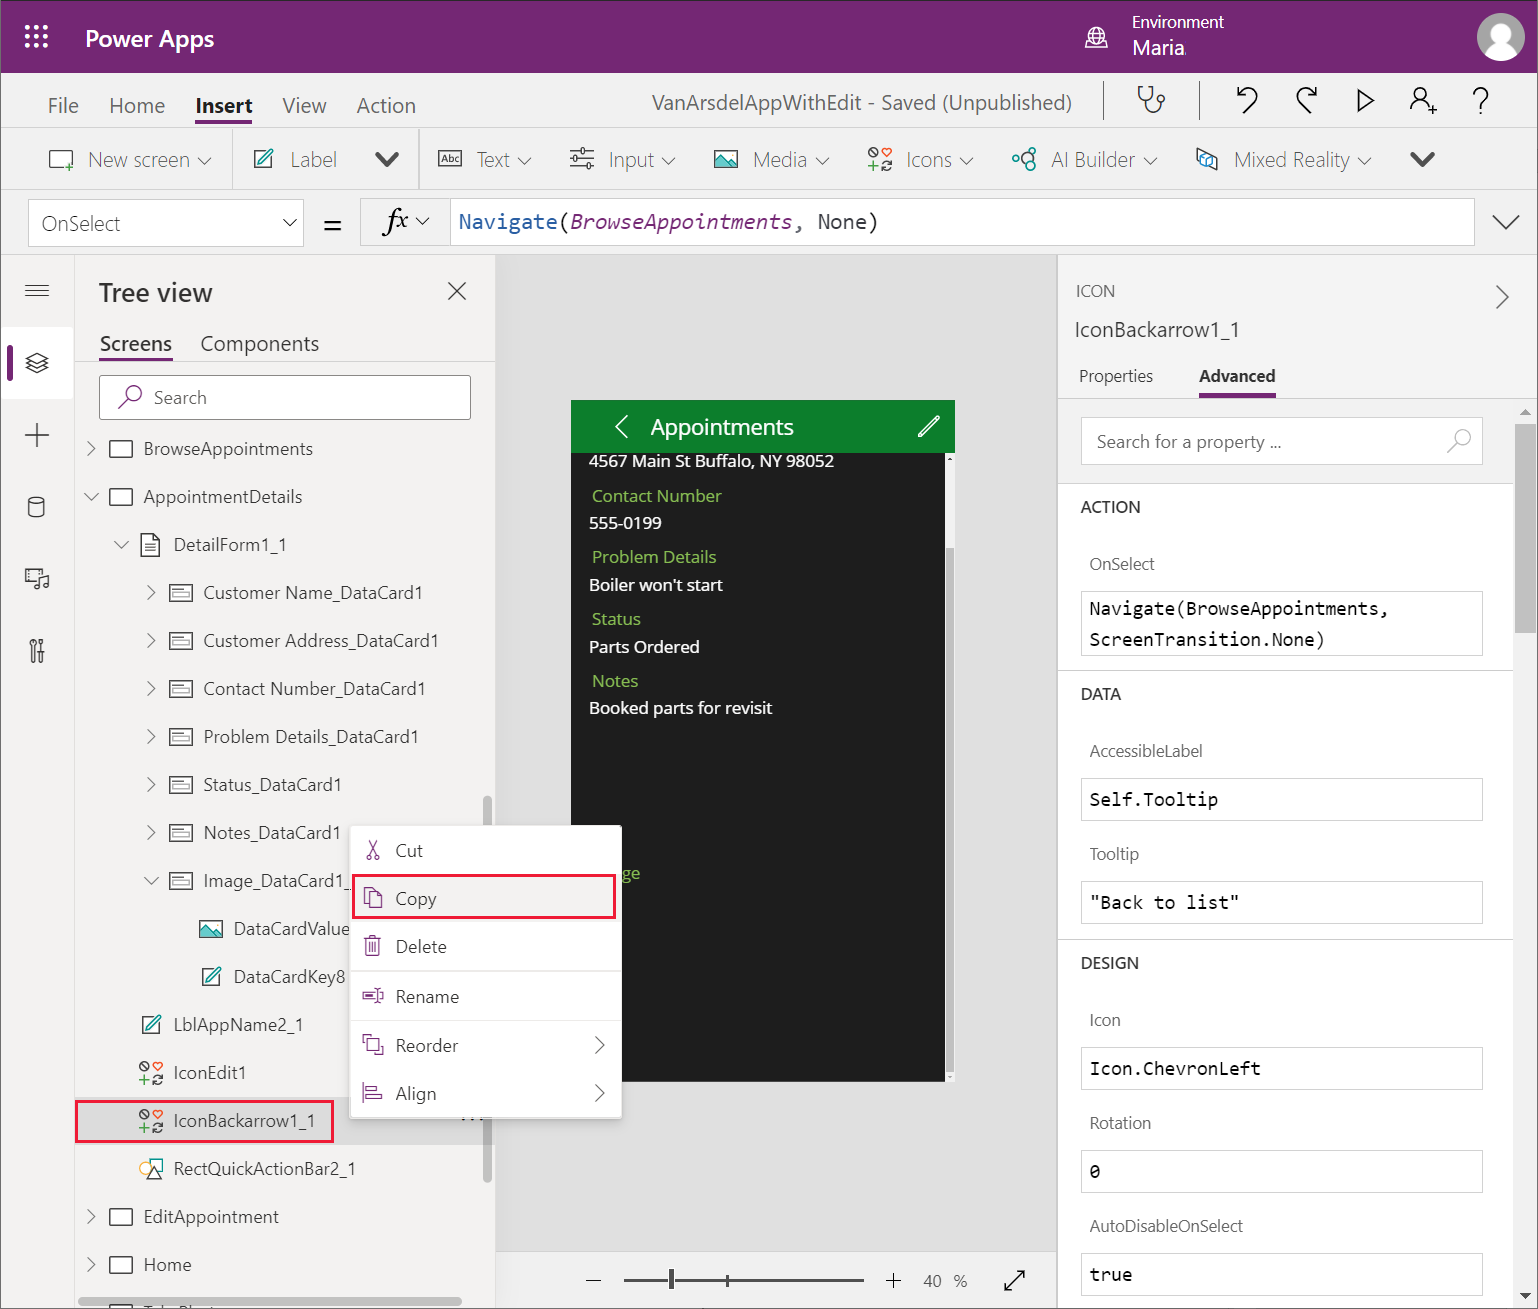
On the Tree view pane, select the IconBackarrowX control on the AppointmentDetails screen, and then select Copy.
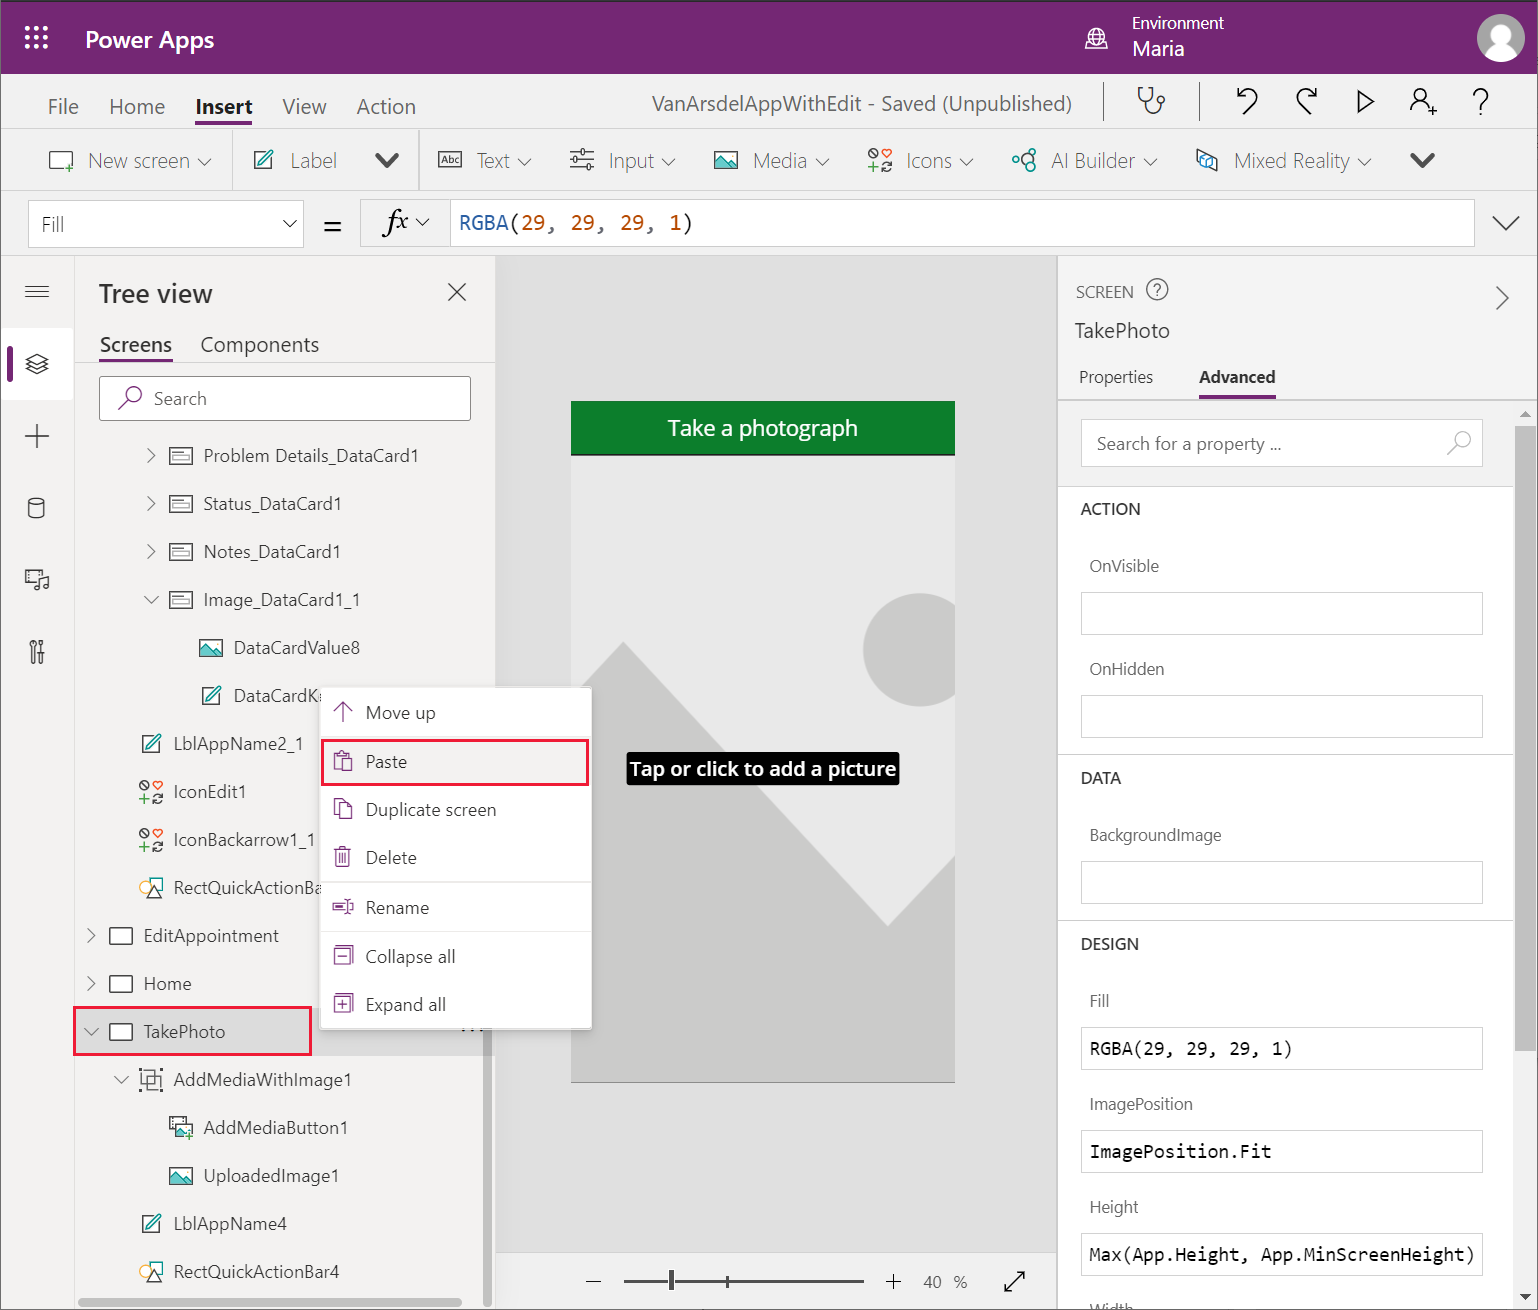
On the Tree view menu, right-click the TakePhoto screen, and then select Paste. The IconBackArrowX control will be added to the screen.
Move the IconBackArrowX control to the upper left of the header bar.
On the Tree view pane, select the IconBackArrowX control on the TakePhoto screen. On the right pane, on the Advanced tab, modify the OnSelect action property to Navigate(EditAppointment, ScreenTransition.None).
Add a new Save icon control to the upper right of the header bar. Set the Visible property of this control to If(IsBlank(AddMediaButton1.Media), false, true).
This setting makes the Save icon invisible if the user hasn't selected an image.
Change the formula in the OnSelect action property of the Save icon control to the following.
Set(ImageID, GUID() & ".jpg");

AzureBlobStorage.CreateFile("photos", ImageID, AddMediaButton1.Media);

Patch(appointmentsCollection, LookUp(appointmentsCollection,id=BrowseAppointmentsGallery.Selected.id), {imageUrl:"https://myappphotos.blob.core.windows.net/photos/" & ImageID});

Navigate(EditAppointment,ScreenTransition.Cover);
Replace <storage account name> with the name of the Azure storage account that Preeti created.
This code uploads the image to the photos container in Blob Storage. Each image is given a unique filename. The Patch function updates the imageUrl property in the appointments record with the URL of the image in Blob Storage.
On the Tree view pane, expand the AddMediaWithImageX control. Modify the Image property of the UploadedImageX control, and set it to AppointmentImage.
AppointmentImage is a variable that will be populated with an image either uploaded by the user, or as the result of taking a photograph. You'll initialize this variable in the EditAppointment screen later.
On the Tree view pane, select the AddMediaButtonX control. Set the UseMobileCamera property of this control to true. Set the OnChange action property of the control to the following.
Set(AppointmentImage, AddMediaButton1.Media)This formula changes the AppointmentImage variable to reference the new image. The UploadedImageX control will display this image.
On the Tree view pane, select the EditAppointment screen.
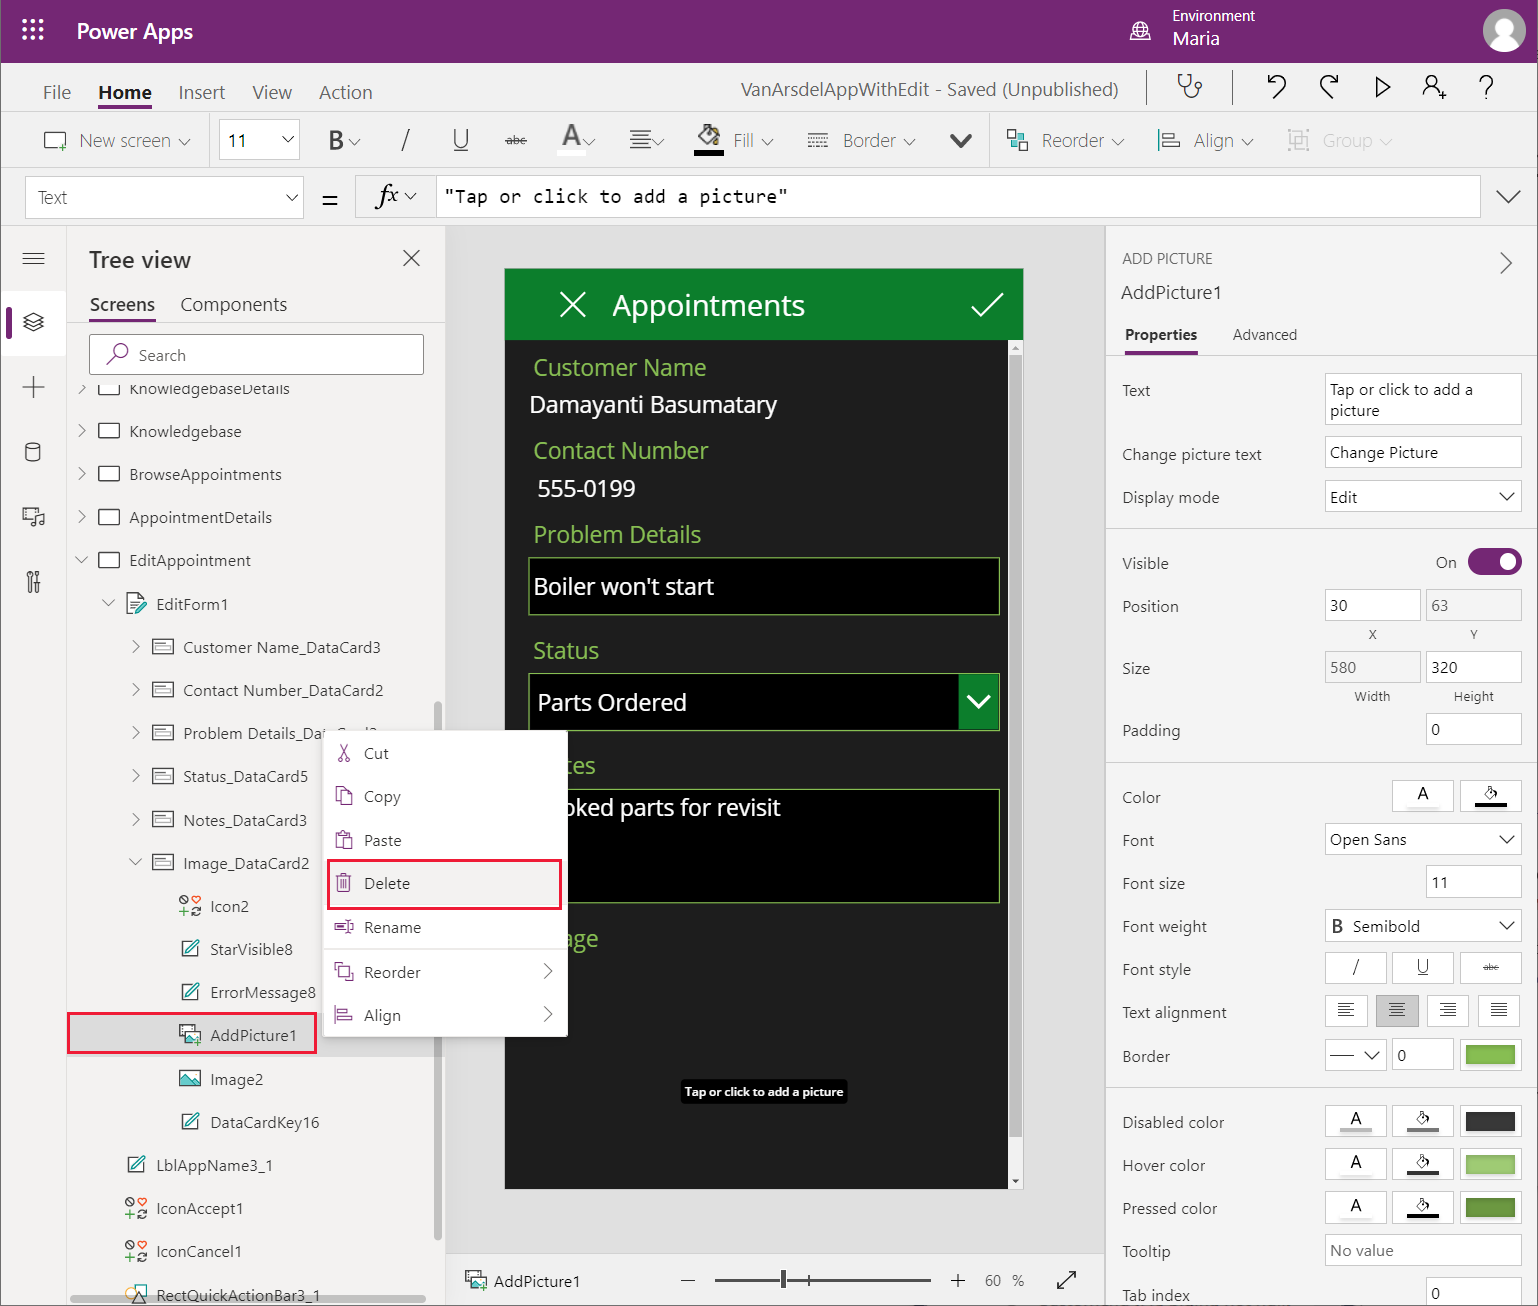
Expand the EditFormX control. Under the Image_DataCardX control, remove the AddPictureX control.
Select the ImageX control. Change the following properties:
- Image: Parent.Default
- X: 30
- Y: DataCardKeyX.Y + DataCardKeyX.Height + 150 (where DataCardKeyX is the data card containing the ImageX control)
- Width: Parent.Width - 60
- Height: 400
Note
The image control will drop down below the bottom of the screen, but a scroll bar will be added automatically to enable the image to be viewed.
Add a Camera icon to the data card then position it between the Image label and the ImageX control. Change the name of the control to CameraIcon.
Note
Make sure you select the Camera Icon control, not the Camera Media control.
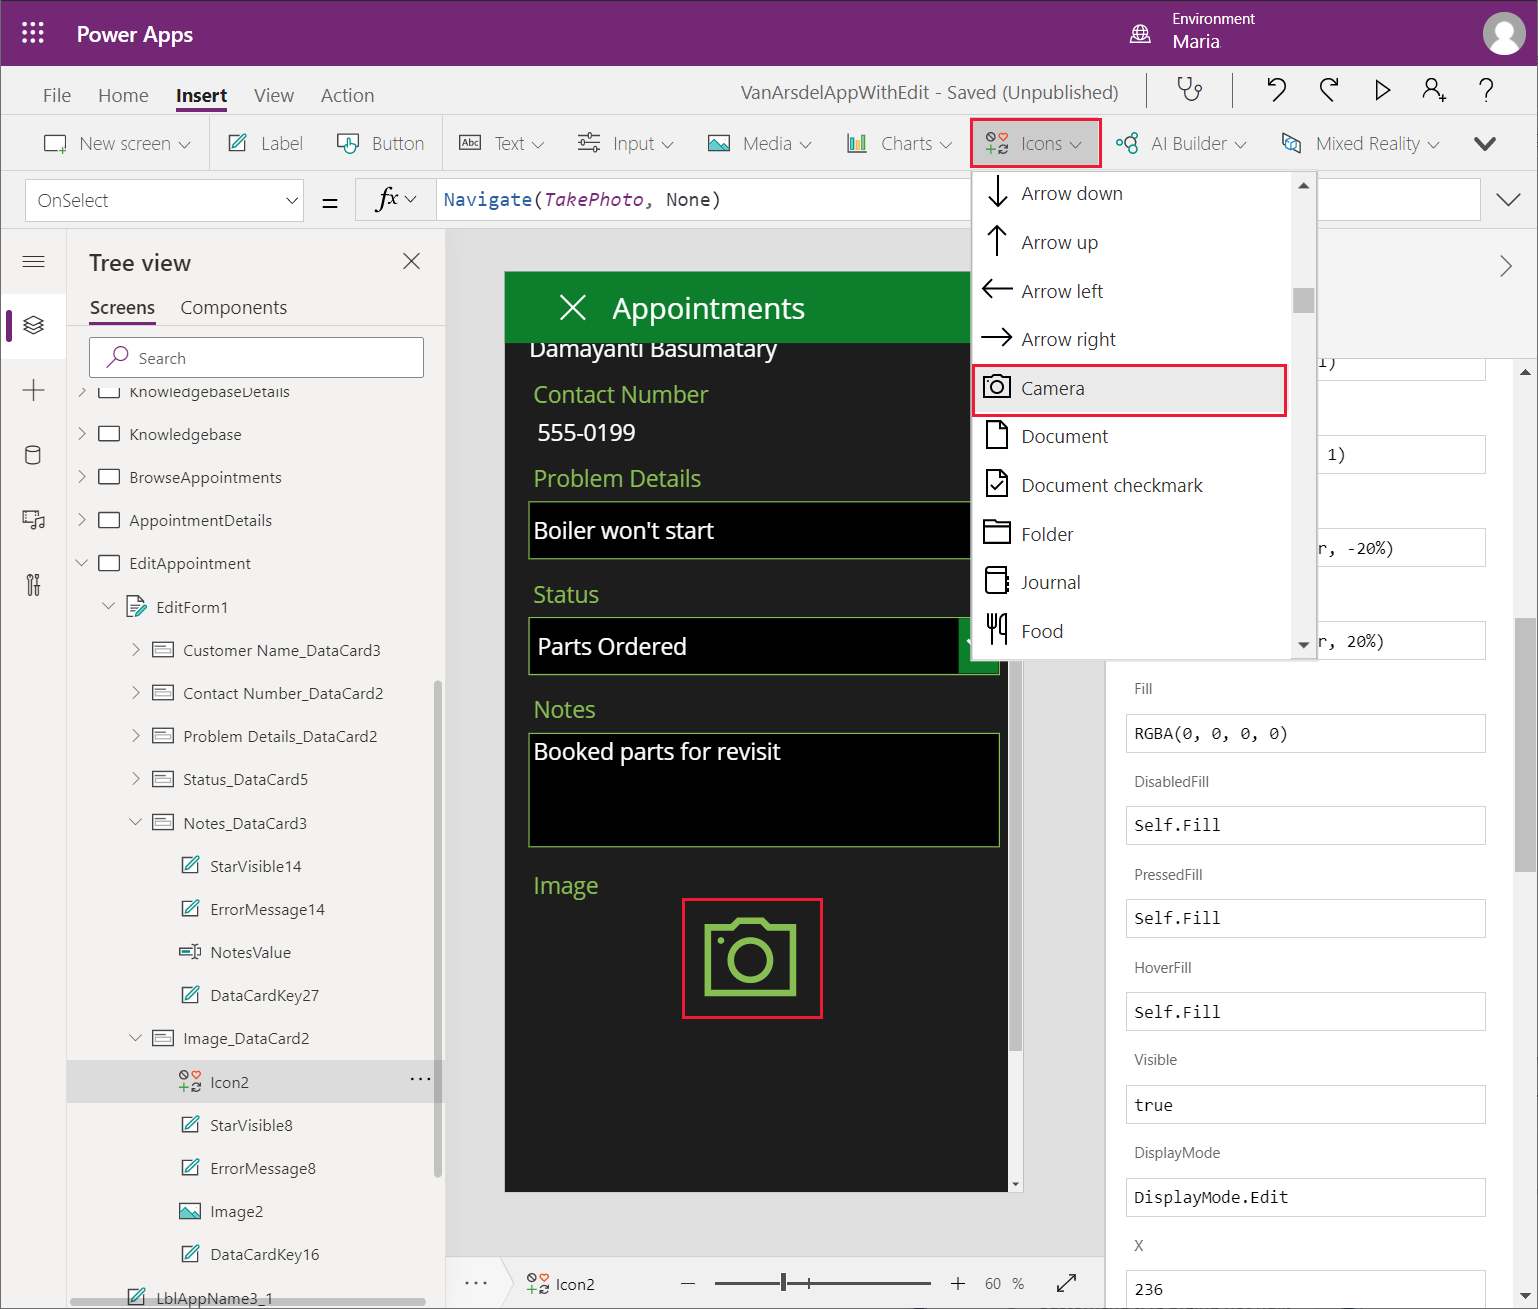
Set the OnSelect action property of the CameraIcon control to the following.
Set(AppointmentImage, SampleImage);

Navigate(TakePhoto, ScreenTransition.None);
When the user selects this icon, they'll go to the TakePhoto screen, where they can take a photo or upload an image. The initial image displayed will be the default sample image.
To test the app, do the following:
On the Tree view pane, select the Home screen.
Select F5 to preview the app.
On the Home screen, select Appointments.
In the browse screen, select any appointment.
On the details screen for the appointment, select the edit icon in the screen header.
On the edit screen, select the Camera icon for the image.
Verify that the Take a photograph screen appears.
Select Change Picture and upload a picture of your choice (or take a photograph, if you're running the app on a mobile device).
Select Save. Verify that the image appears on the details page, and then select the tick icon to save the changes back to the database.
Close the preview window and return to Power Apps Studio.
Displaying images of parts
Having determined that Blob Storage is an ideal location for saving pictures associated with appointments, Preeti and Kiana decide that they should use the same approach for storing the images of parts. A key advantage of this approach is that it doesn't require any modifications to the app. The app reuses the same storage account and the same connection. As a separate migration exercise, they can do the following:
Create a new Blob Storage container.
Upload the part images to this container.
Change the ImageUrl references in the Parts table in the InventoryDB database to the URL of each image.
The app will pick up the new URL for each part image automatically, and the Image control on the PartDetails screen will display the image.
Tracking appointment history for a customer
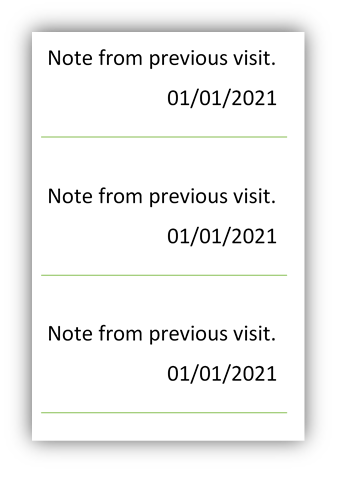
Maria thinks that being able to quickly view all the history from a customer's previous technician's visits could be added to the app by creating a custom component. Working with Caleb on what information they want to see, Maria sketches out a simple design comprising the notes and the date of each visit.
Looking at the data, Maria believes that a gallery control is the best way to display the table data on a screen.
Maria creates the custom component as follows:
Using Power Apps Studio, on the Tree view pane, select Components, and then select + New component.
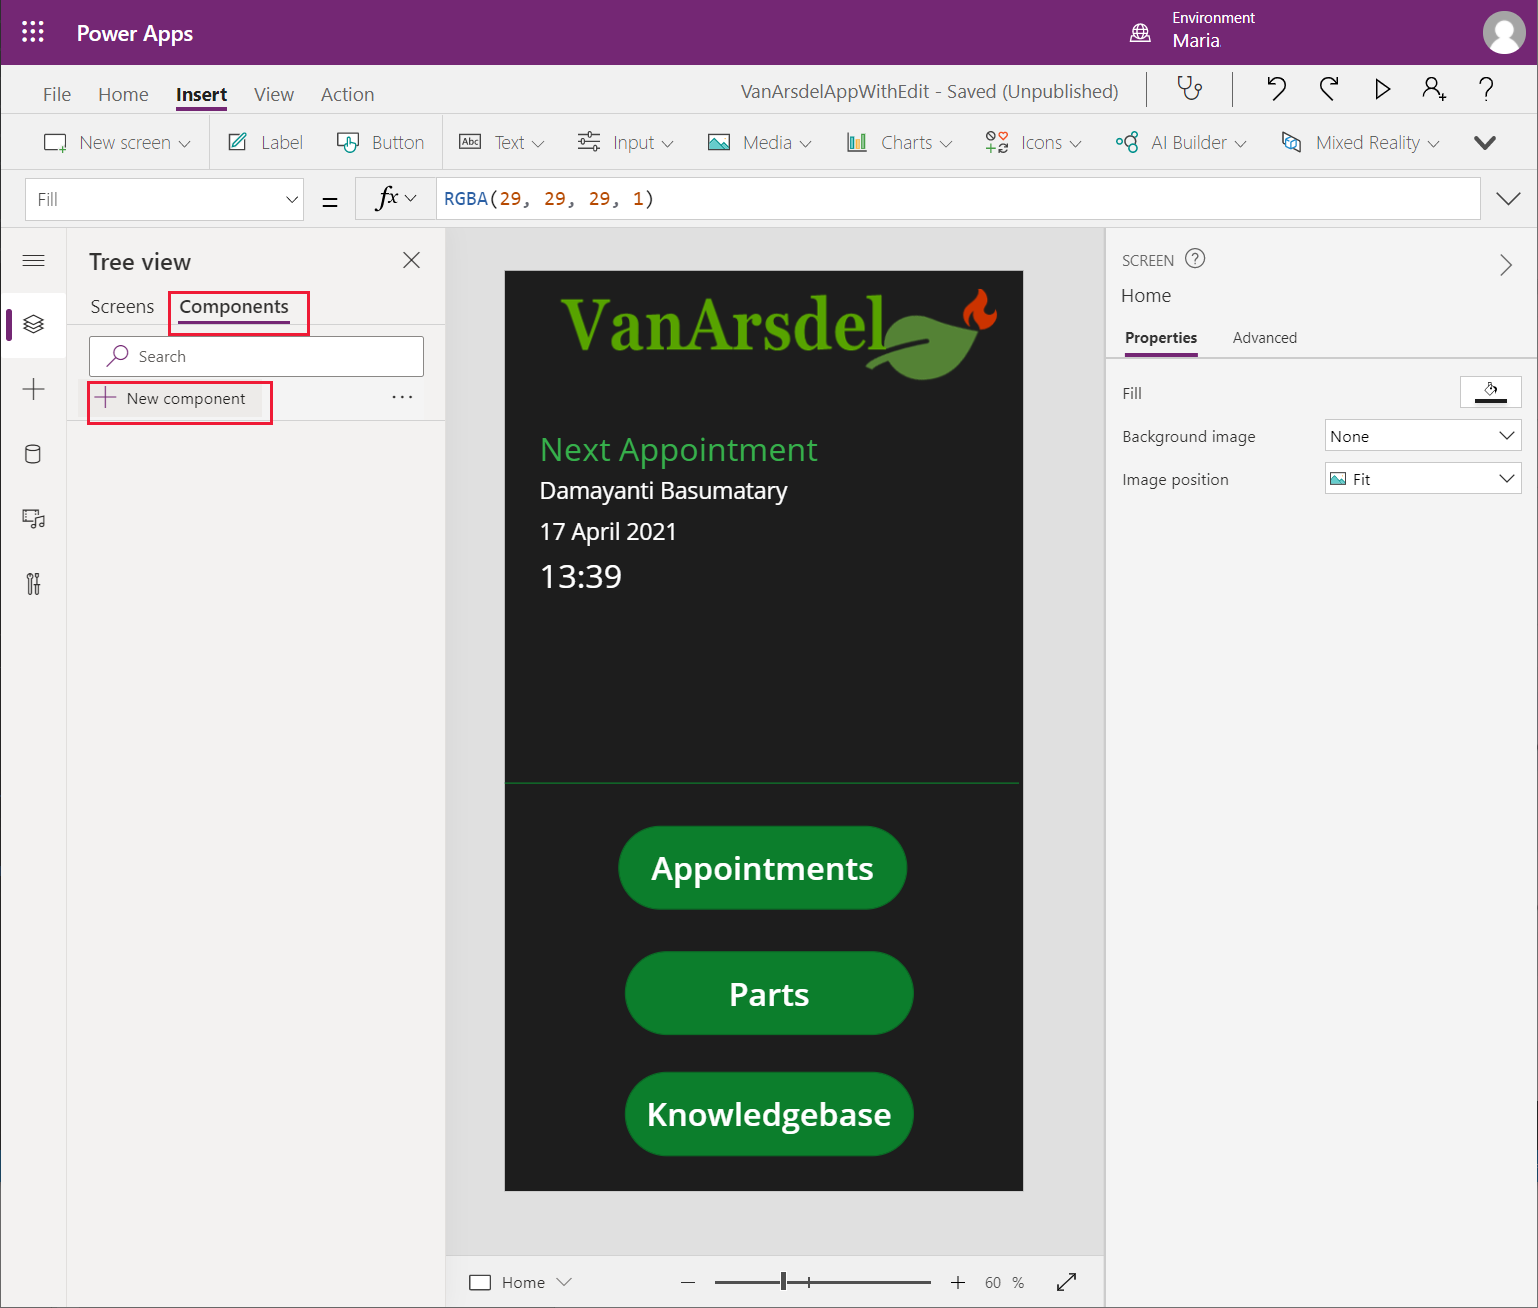
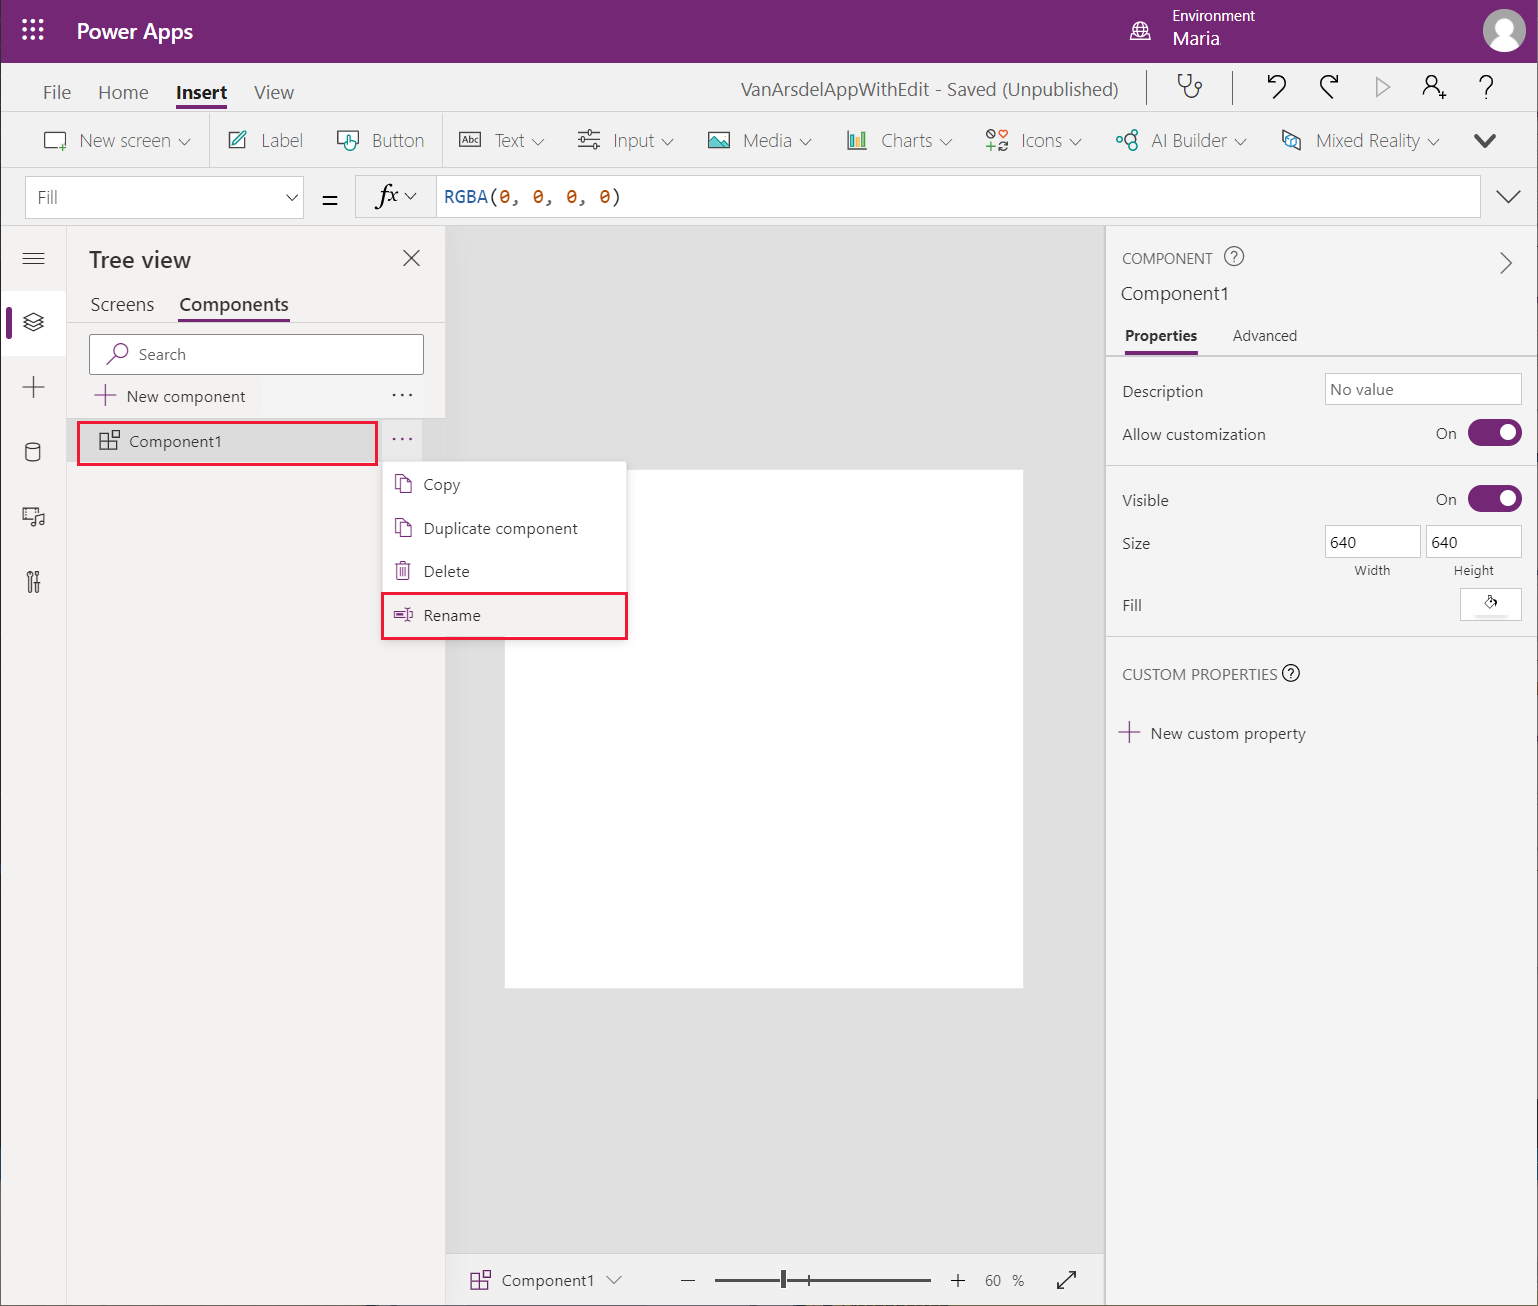
A new blank component named Component1 is created. Rename the component as DateHistoryComponent.
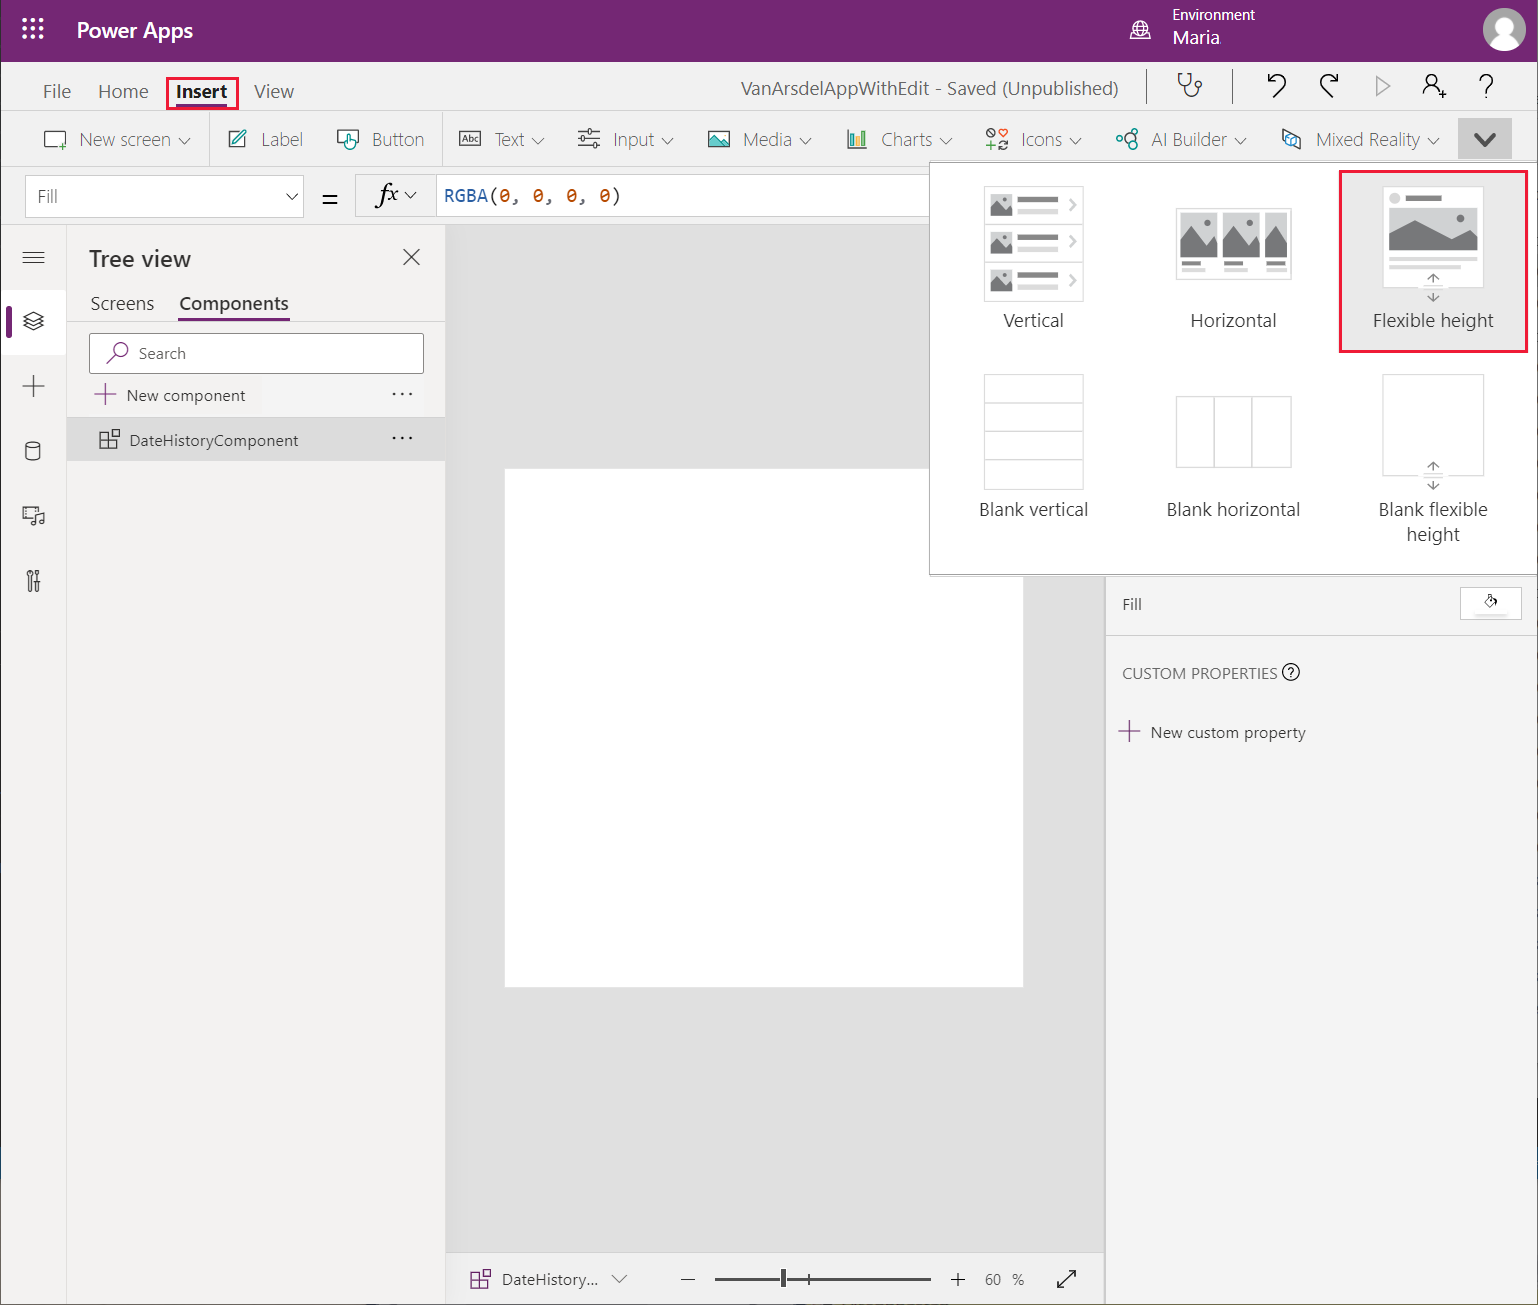
On the Insert menu, select Gallery, and then choose the Blank flexible height gallery template.
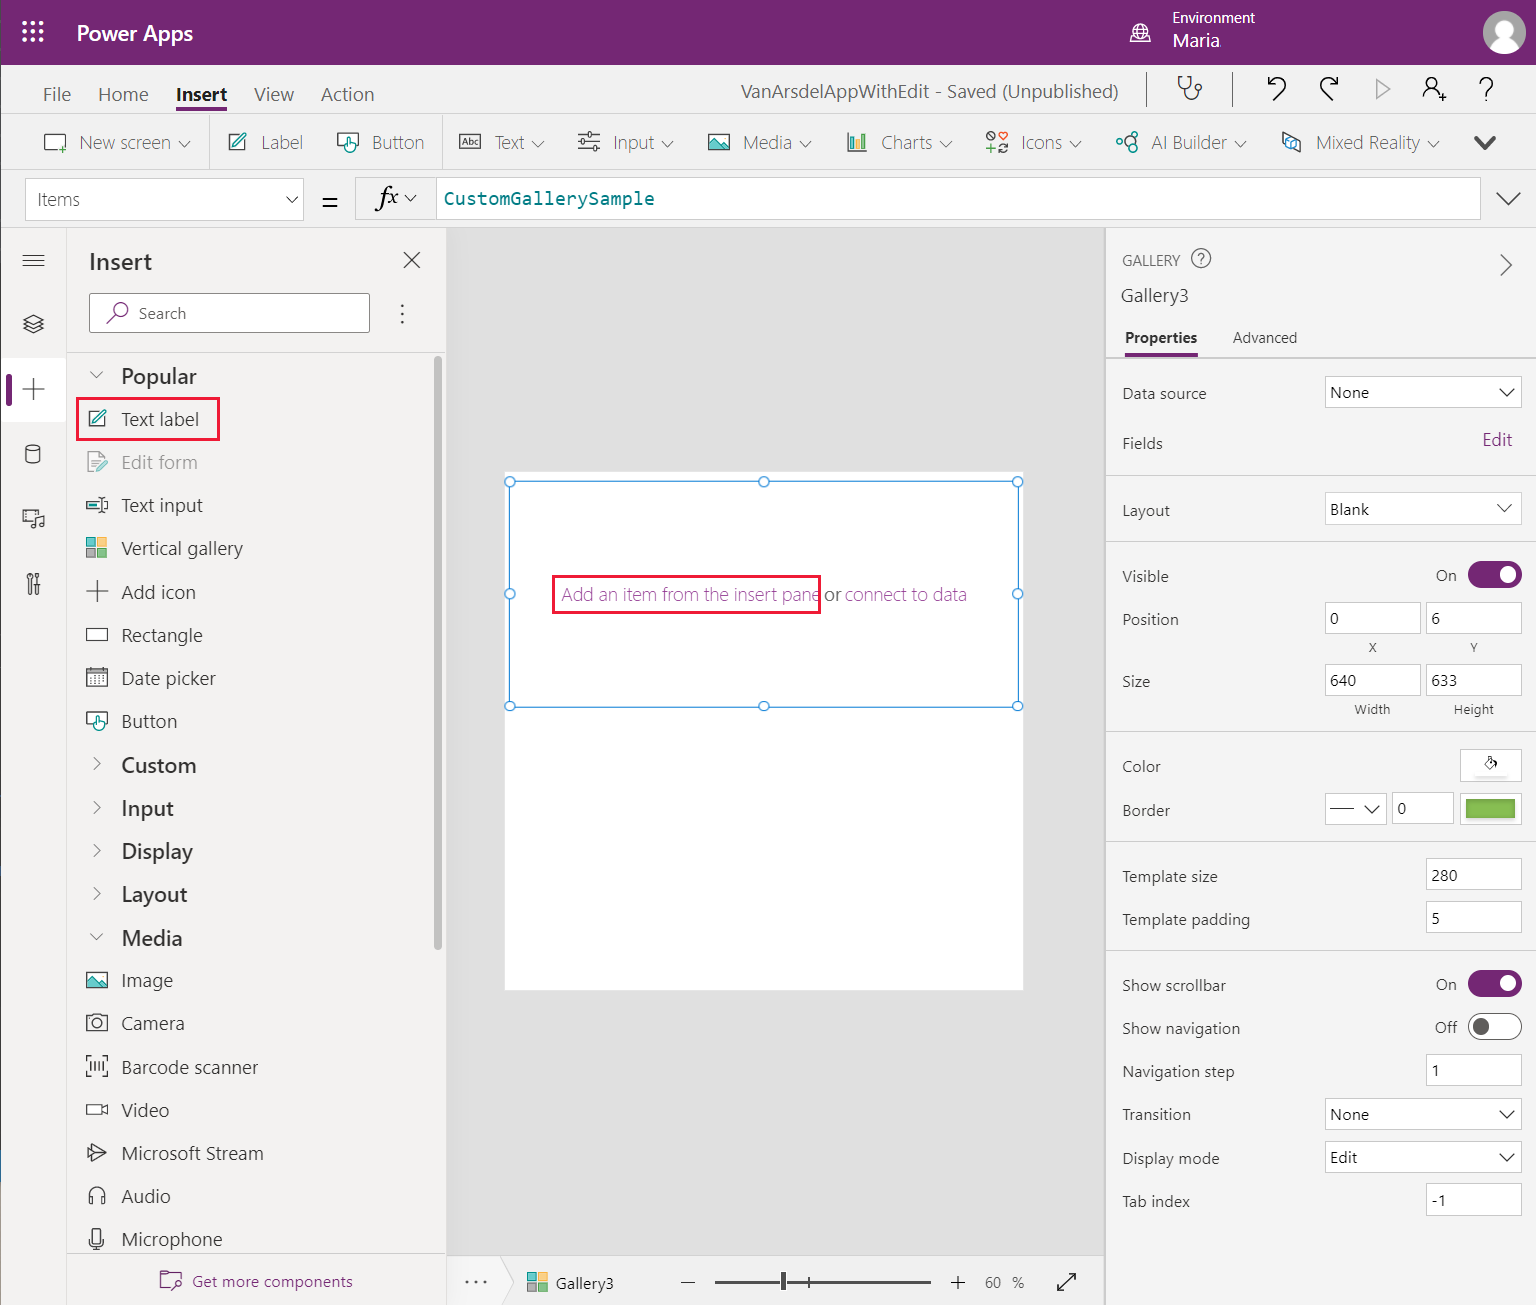
Move the gallery control and resize it to fill the custom component.
Select the Add an item from the insert pane, then select Text label.
On the Tree view pane, rename the label control as NotesLabel. Set the Overflow property to Overflow.Scroll. This setting enables the control to display several lines of text and allow the user to scroll through it. Set the following properties so you can position and size the control:
- LineHeight: 2
- X: 28
- Y: 18
- Width: 574
- Height: 140
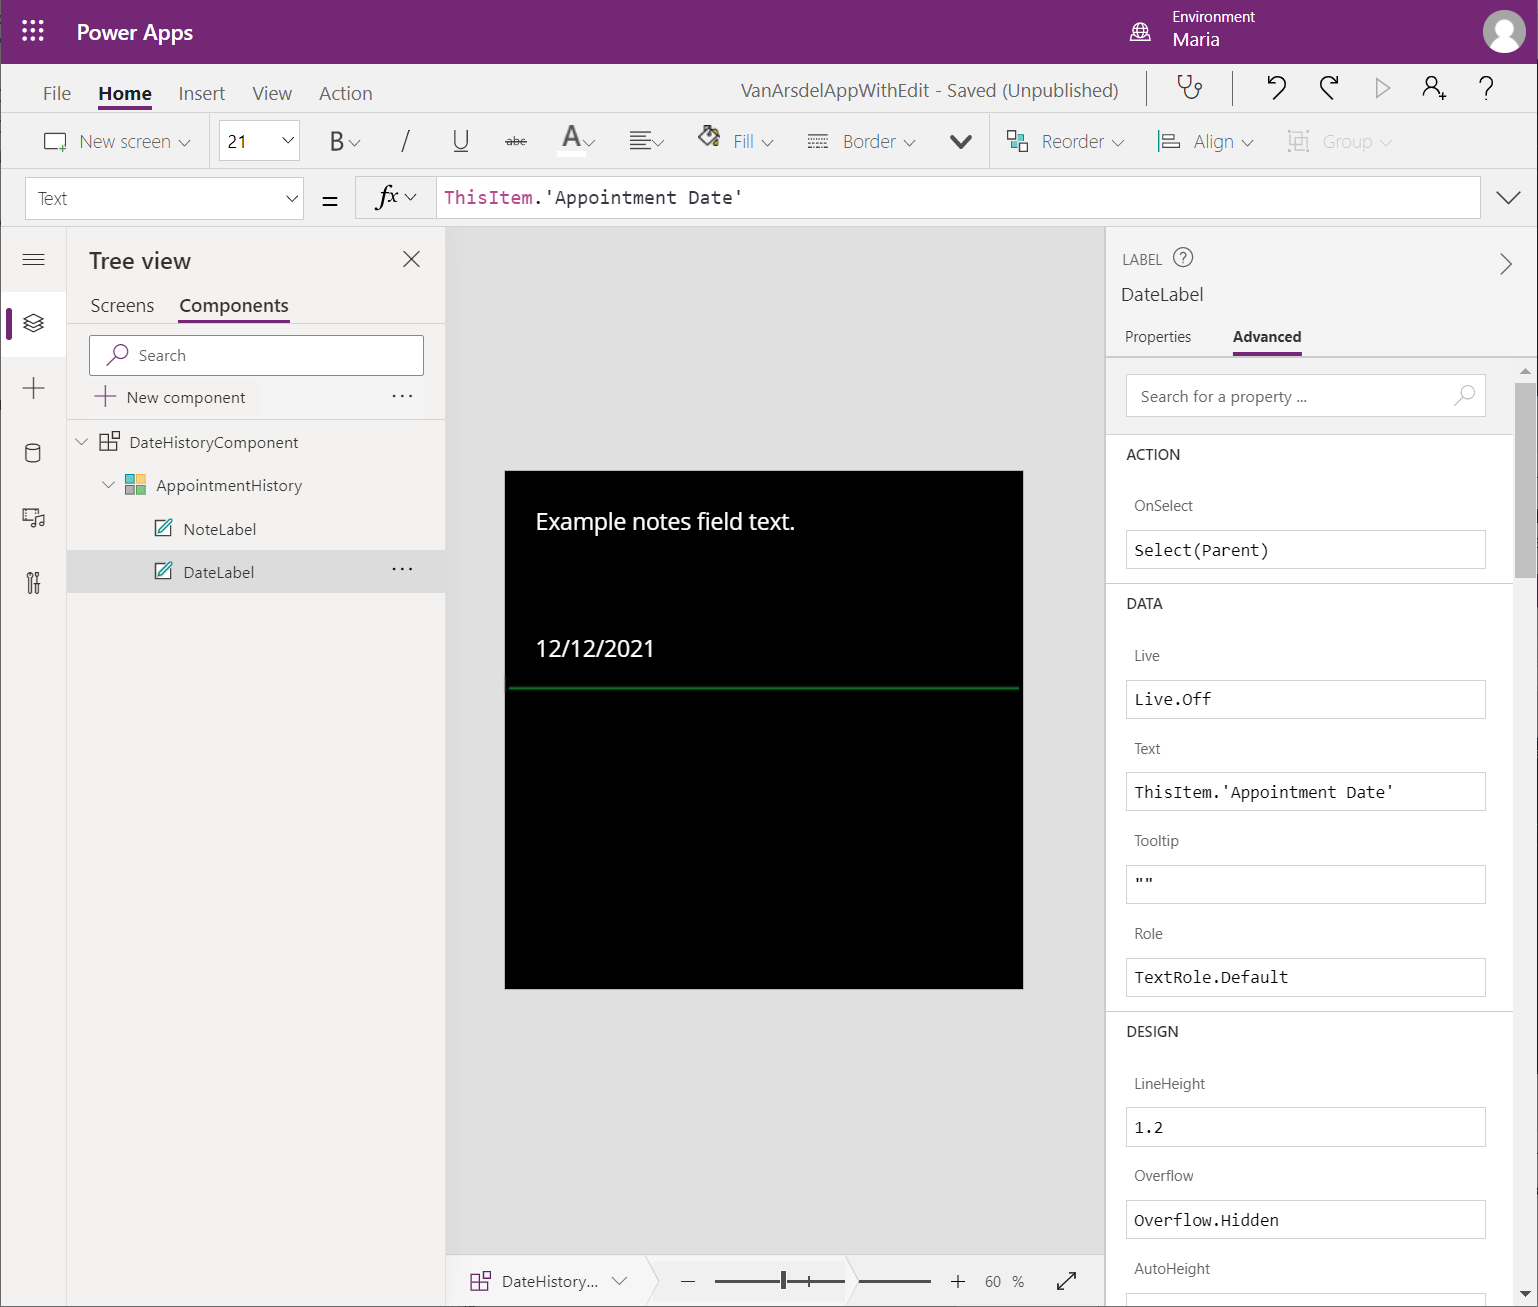
Add a second text label to the control. Rename this control as DateLabel, and set the following properties:
- LineHeight: 2
- X: 28
- Y: 174
- Width: 574
- Height: 70
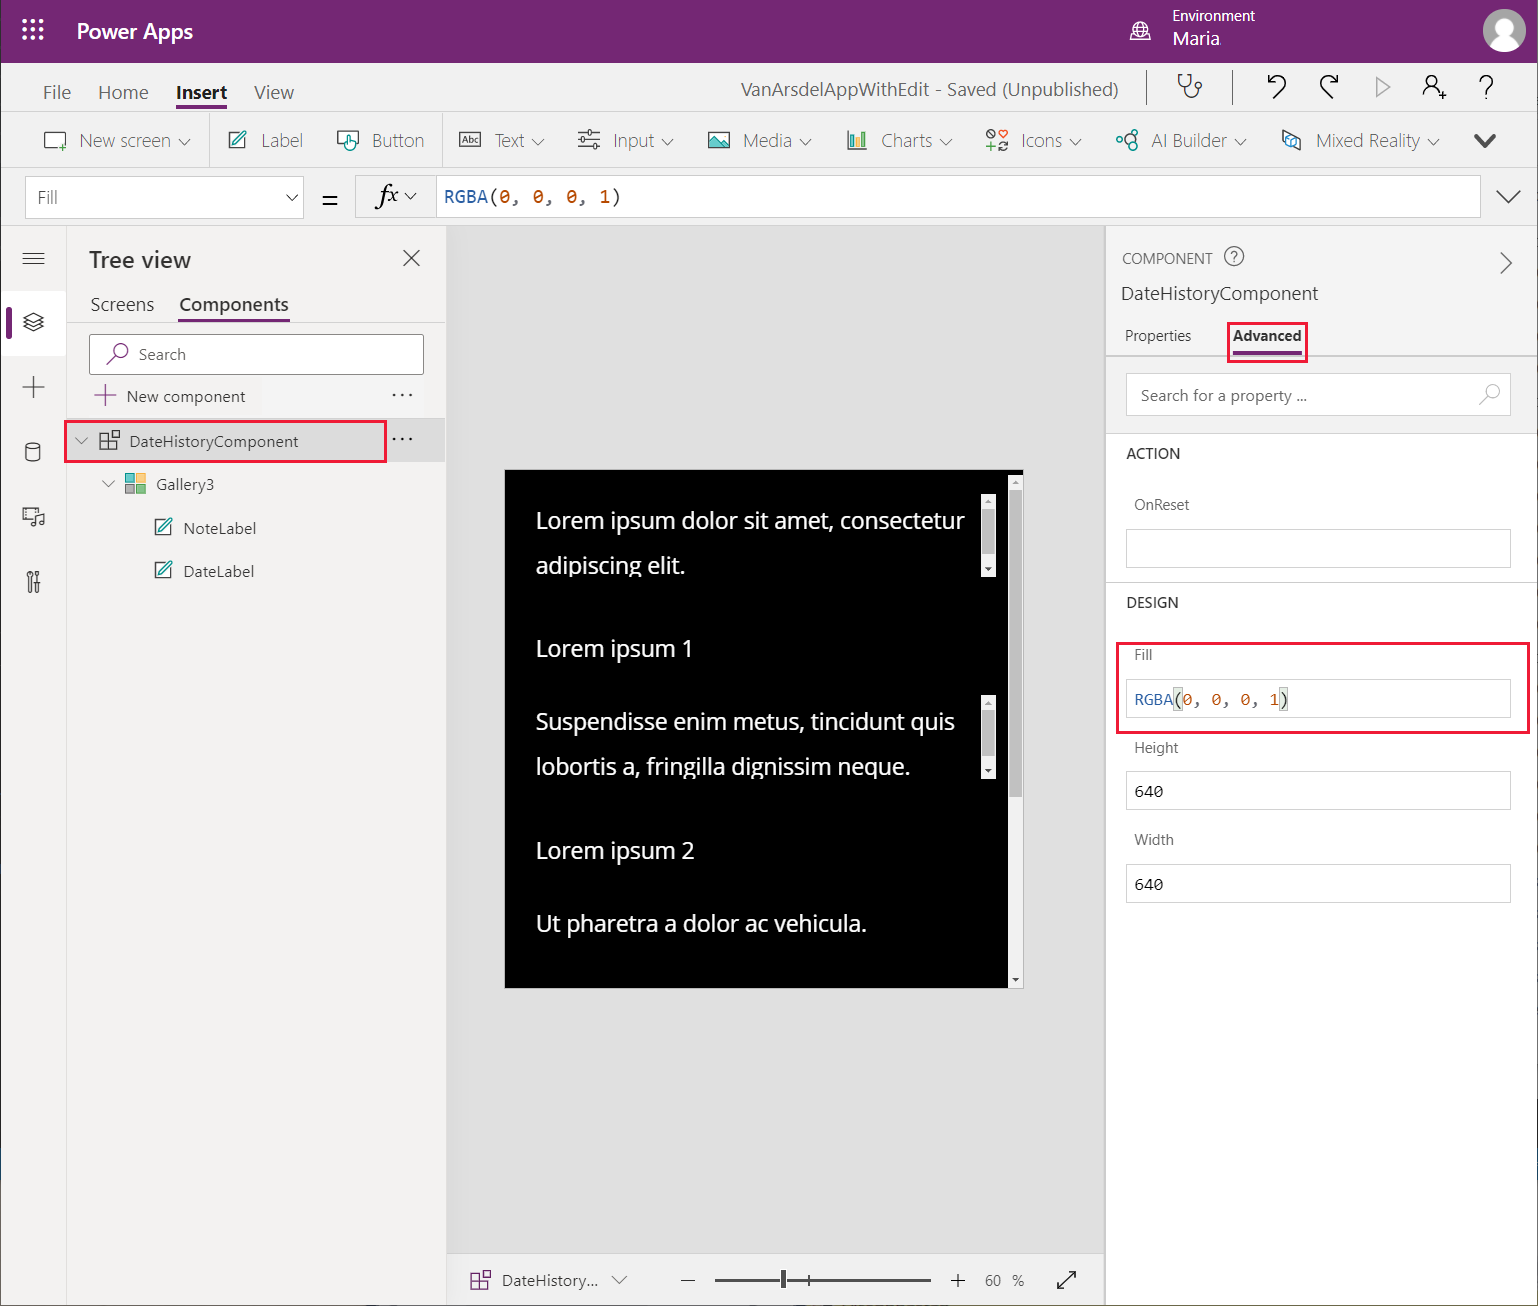
To see how the control will look when inserted into the app and displayed with its theme, on the Tree view pane, select DateHistoryComponent. On the right pane, on the Advanced tab, select the Fill field and change the color to RGBA(0, 0, 0, 1).
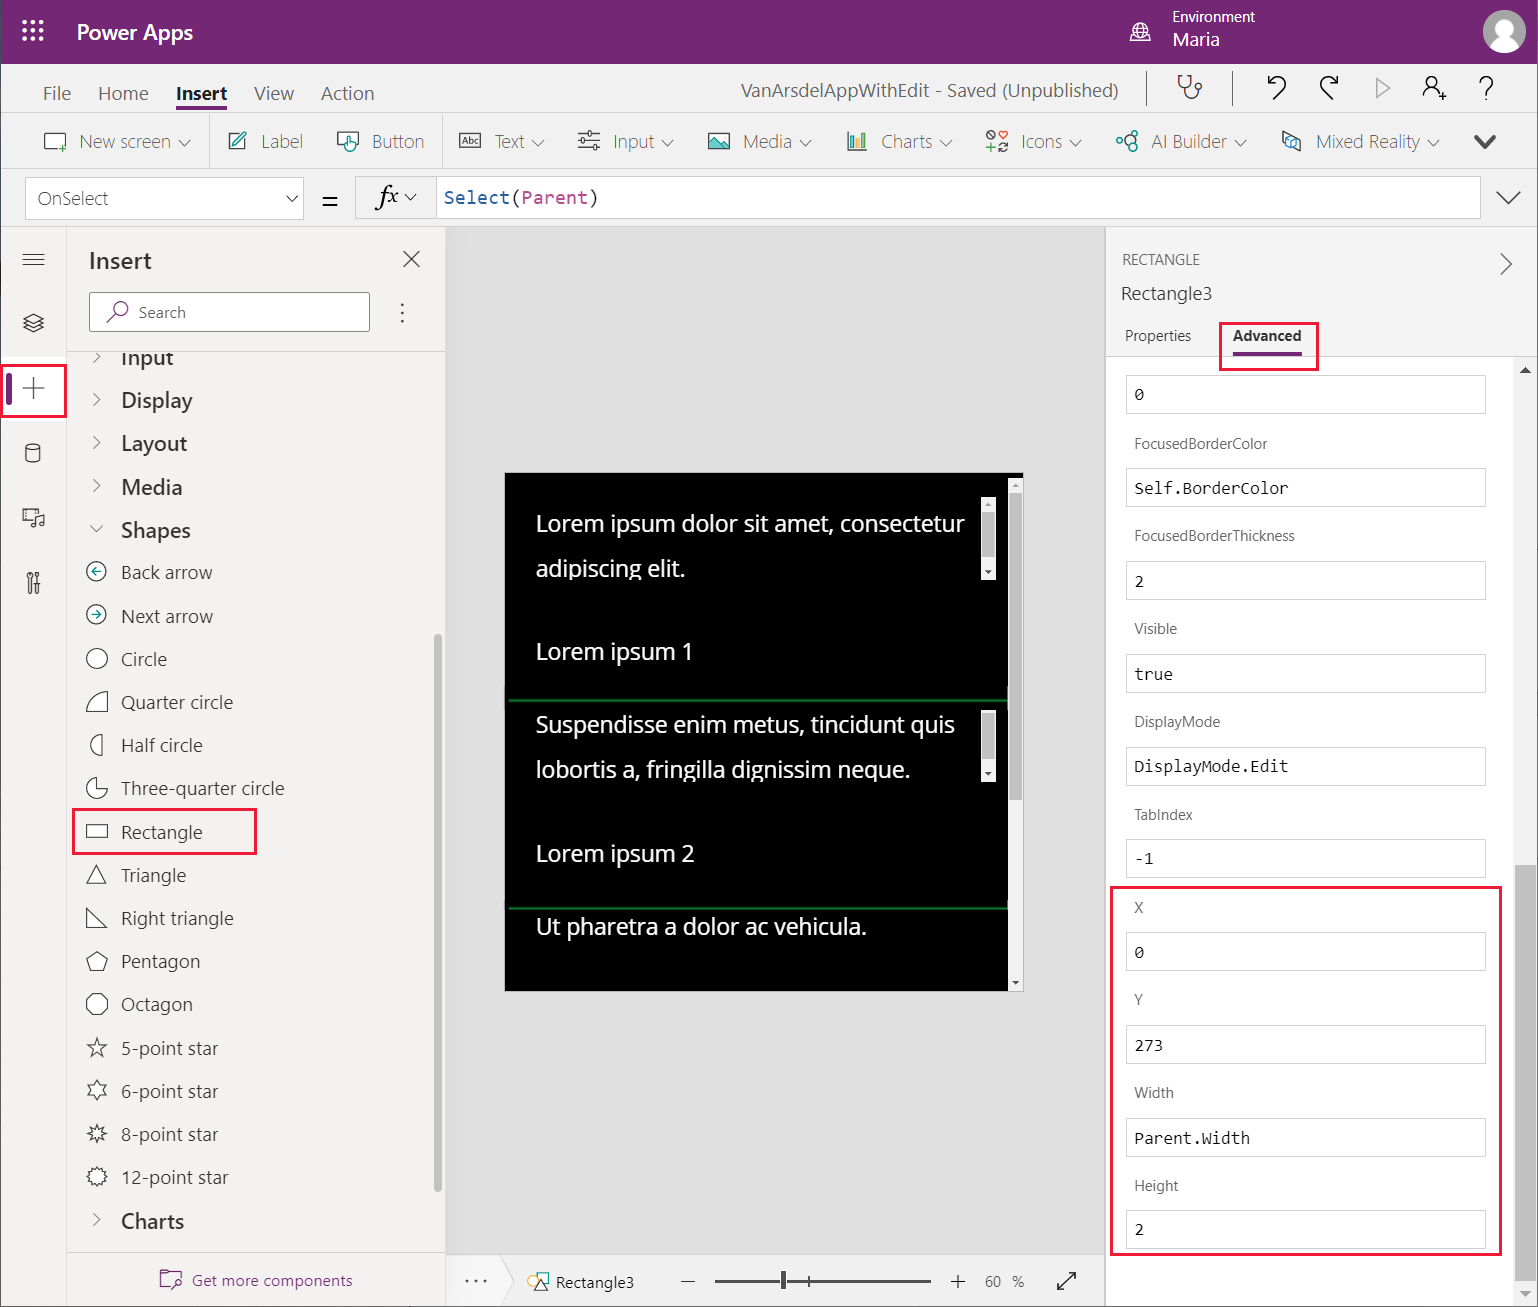
On the Insert pane, expand Shapes, and add a Rectangle control to the custom component. Set the following properties for this control:
- X: 0
- Y: 273
- Width: Parent.Width
- Height: 2
This control acts as a separator between the records displayed in the gallery.
Maria is familiar with adding controls to screens and building apps with Power Apps. However, reusable components don't work in quite the same way. Kiana described to Maria that to be able to use data in a custom component, some additional custom input properties must be added. Kiana also explained that Maria needs to provide example data for these properties to reference the data fields in the controls in the component, as follows:
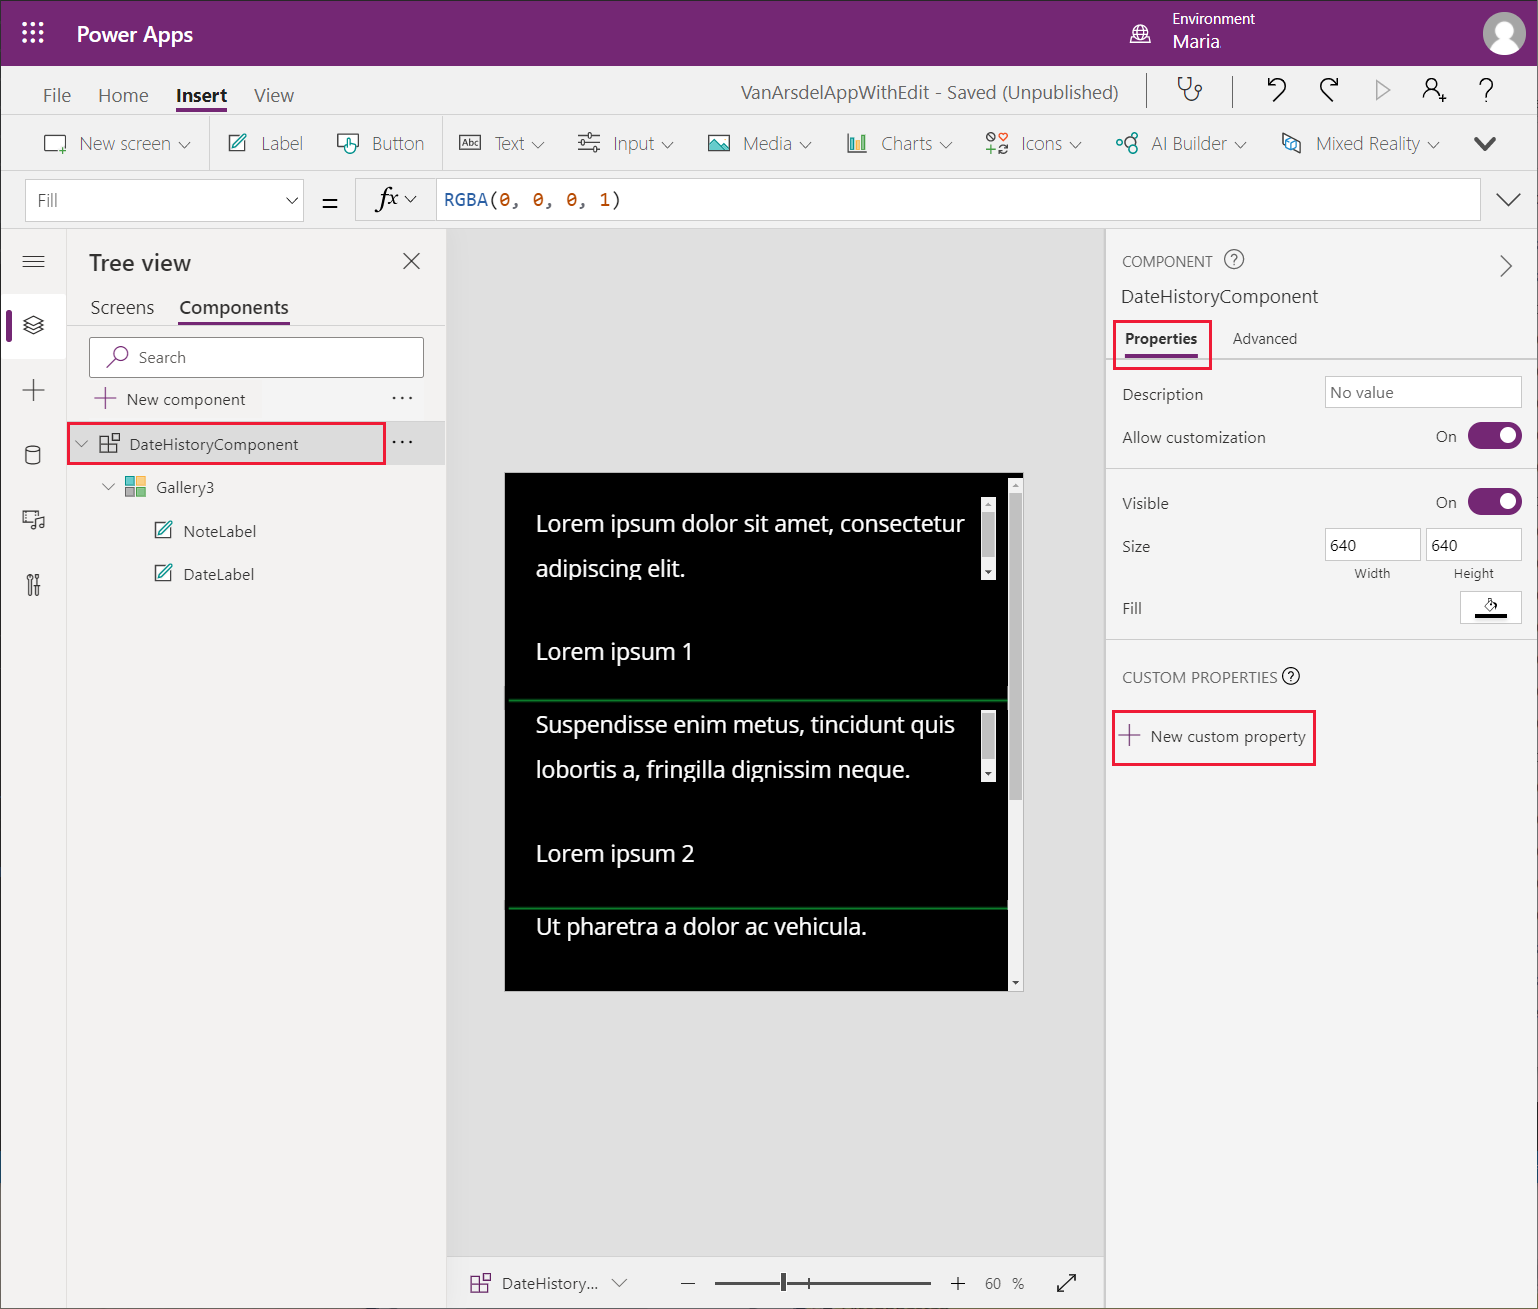
On the Tree view pane, select DateHistoryComponent. On the right pane, on the Properties tab, select New custom property.
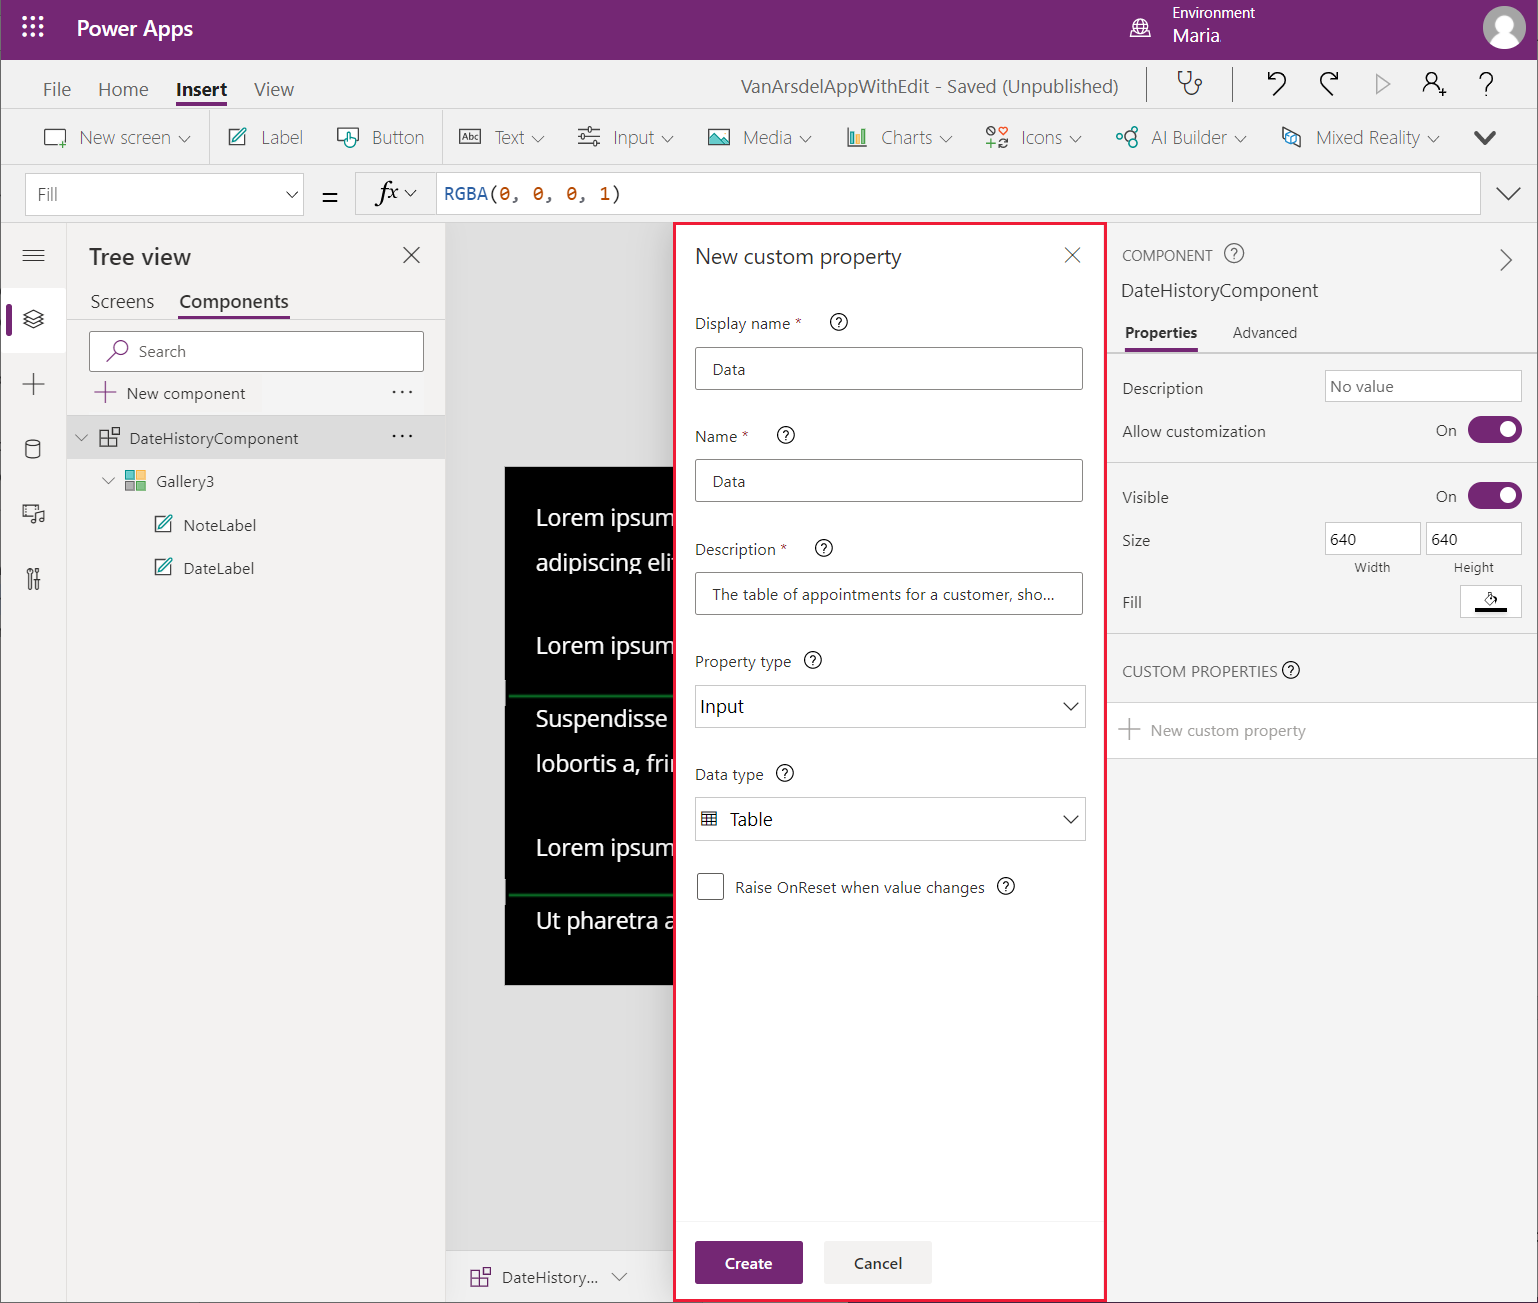
In the New custom property dialog, specify the following values, and then select Create:
- Display name: Data
- Name: Data
- Description: The table of appointments for a customer, showing the notes and dates
- Property type: Input
- Data type: Table
- Raise OnReset when value changes: Leave blank
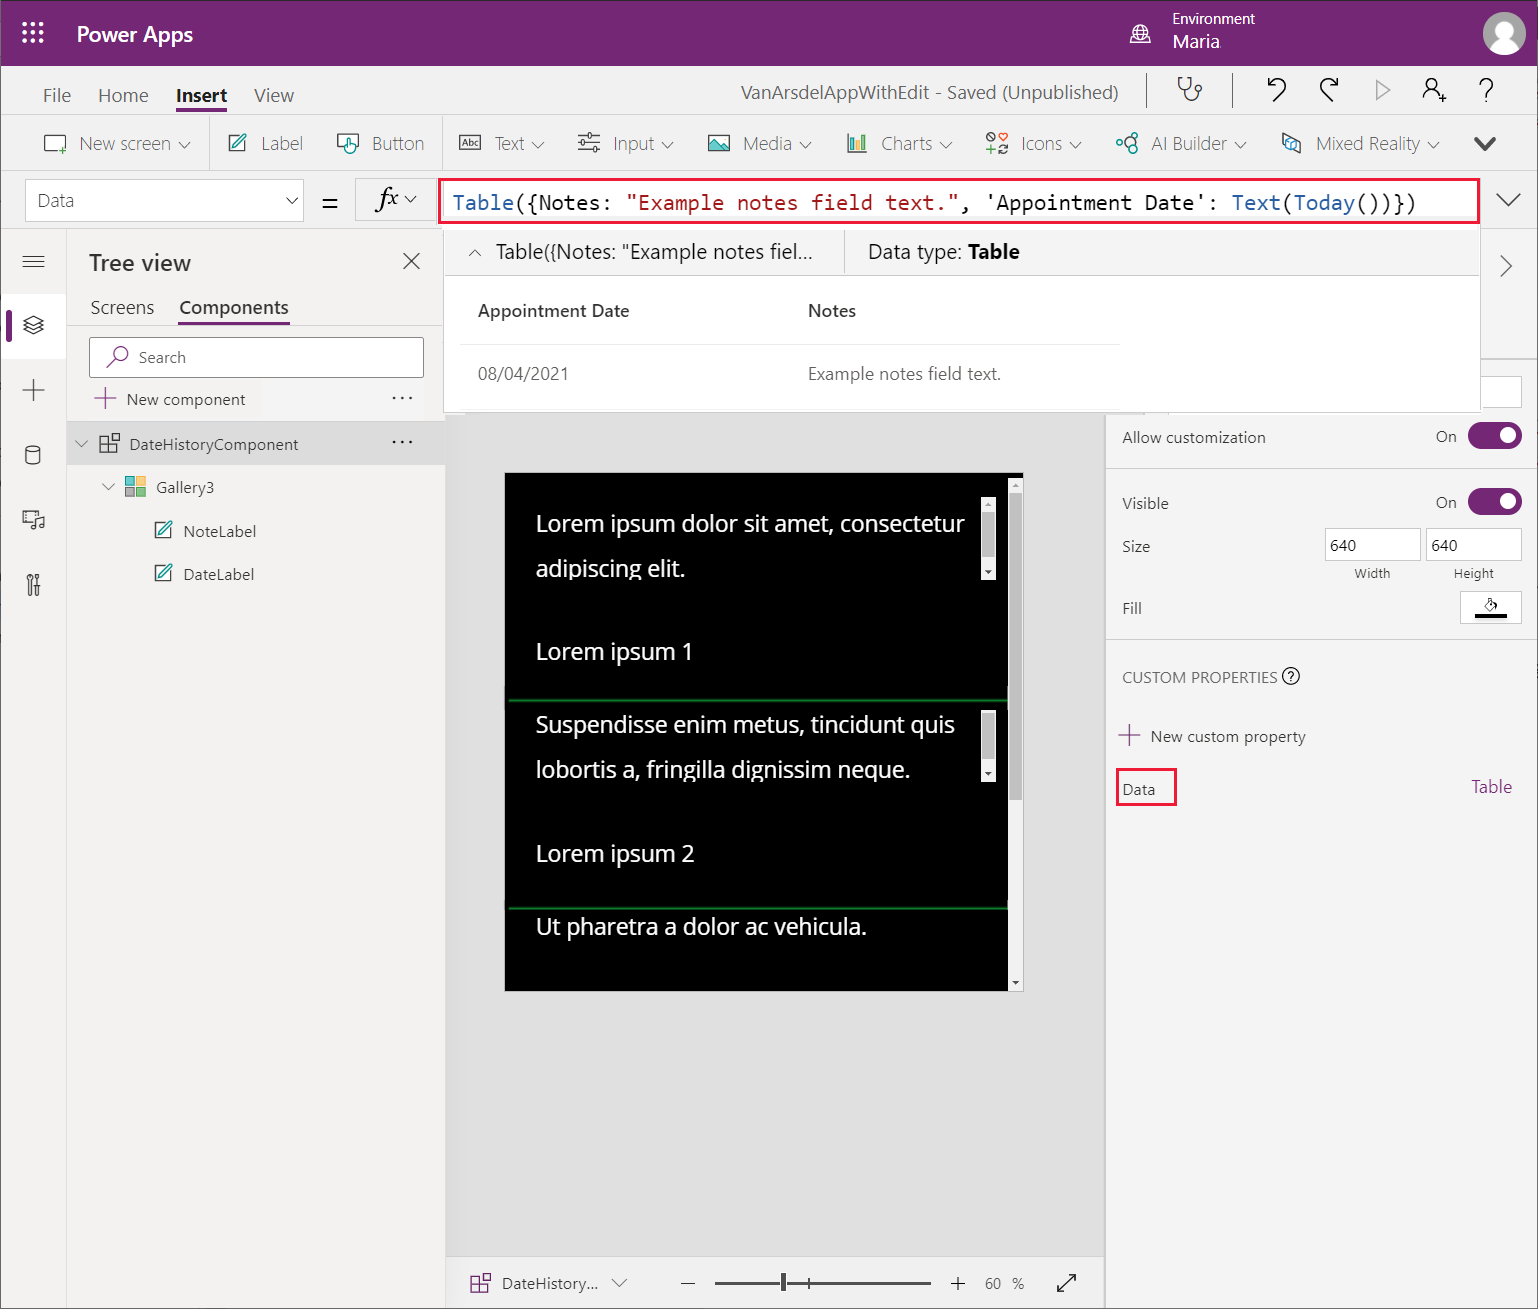
To change the sample data displayed by the control, select the new Data custom property. In the formula field, enter Table({Notes: "Example notes field text.", 'Appointment Date': Text(Today())}).
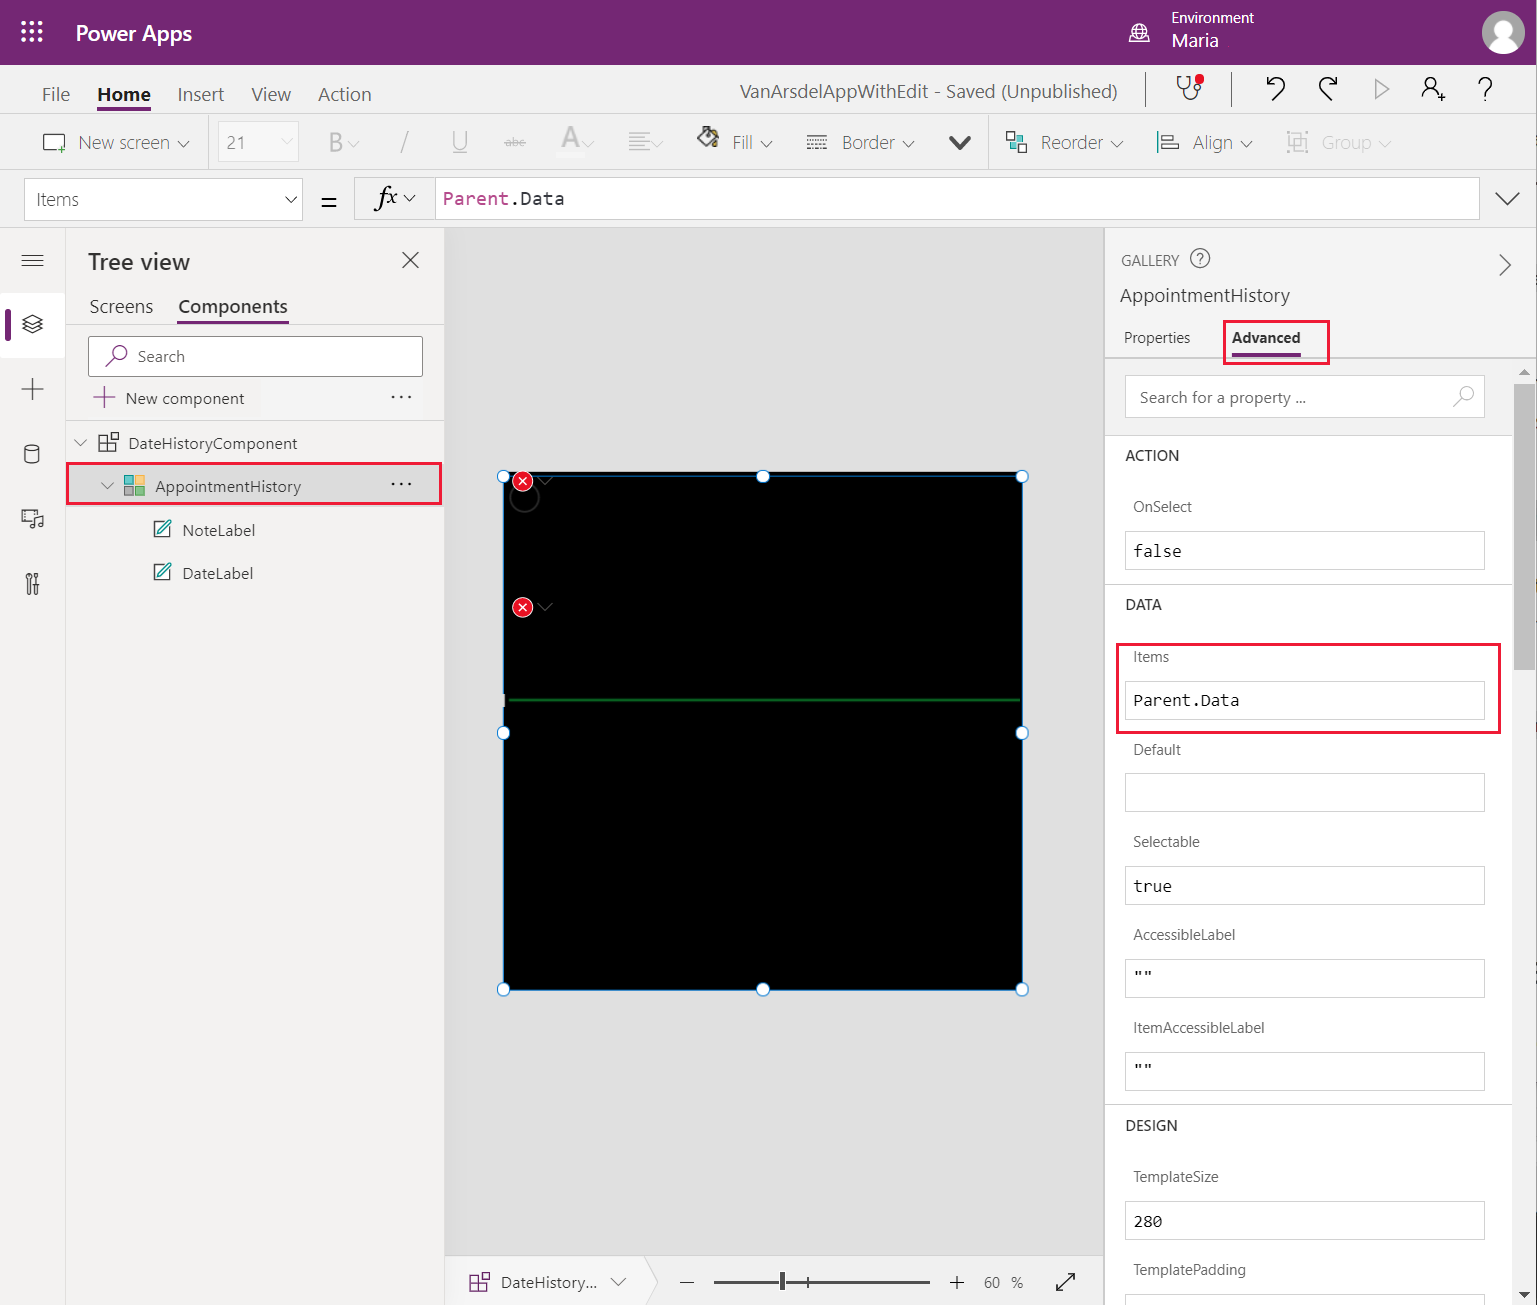
On the Tree view pane, select the GalleryX control in DateHistoryComponent, and rename it as AppointmentHistory.
On the right pane, on the Advanced tab, set the Items property of the AppointmentHistory gallery control to Parents.Data.
Select the NotesLabel control. On the right pane on the Advanced tab, change the Text property to ThisItem.Notes, and change the Size property to 20.
Note
The Size property specifies the font size for the text displayed by the control.
Select the DateLabel control to change the Text property to ThisItem.'Appointment Date' and change the Size property to 20. The fields in the custom component should display the sample data.
The custom component is complete. Maria creates a new screen to display the appointments history for a customer by using this component, as follows:
On the Tree view pane, select the Screens tab.
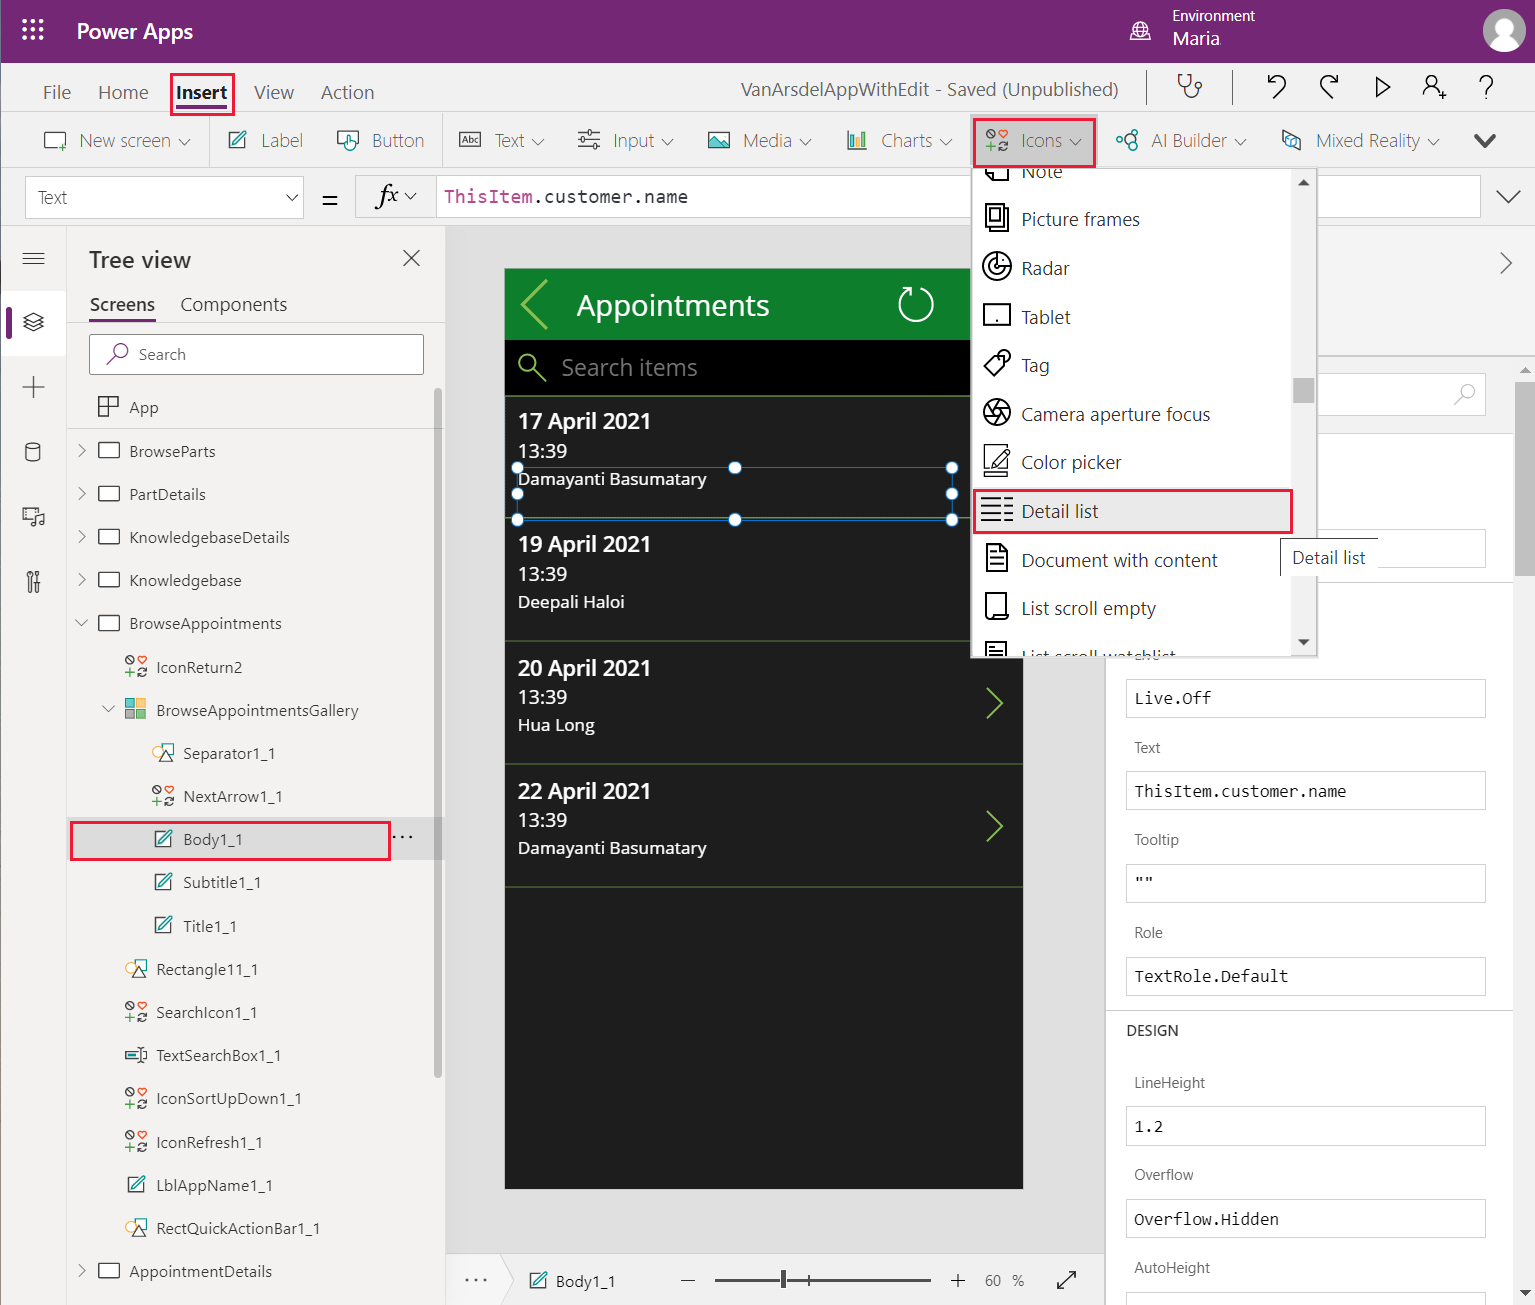
Expand the BrowseAppointments screen, expand the BrowseAppointmentsGallery control, and select the Body1_1 control. On the Insert menu, select Icons, and then select the Detail list icon.
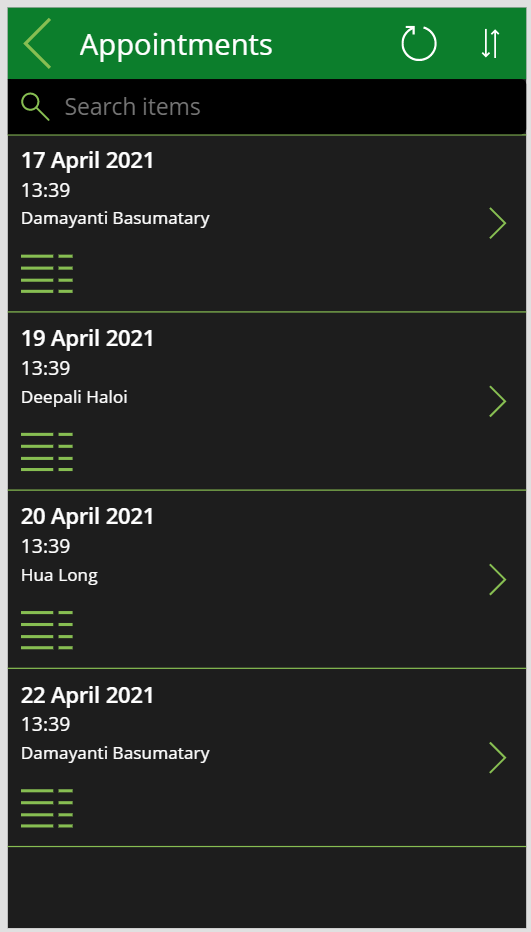
Change the name of the icon control to ViewAppointments.
On the Tree view menu, select the BrowseAppointmentsGallery control. On the right pane, on the Advanced tab, change the TemplateSize property to 220. Increasing this property expands the space available in the gallery.
Move the ViewAppointments icon into the empty space below the customer name.
Select the ViewAppointments icon control. Set the OnSelect action property to the following formula.
ClearCollect(customerAppointmentsCollection, FieldEngineerAPI.getapicustomeridappointments(ThisItem.customerId));

Navigate(AppointmentsHistoryScreen, ScreenTransition.Fade)
This formula populates a collection named customerAppointmentsCollection with the appointments for the selected customer, and then moves to the AppointmentHistoryScreen to display them. You'll create this screen in the following steps.
On the Insert menu, select New screen, and then select the Scrollable template.
Change the name of the new screen to AppointmentHistoryScreen.
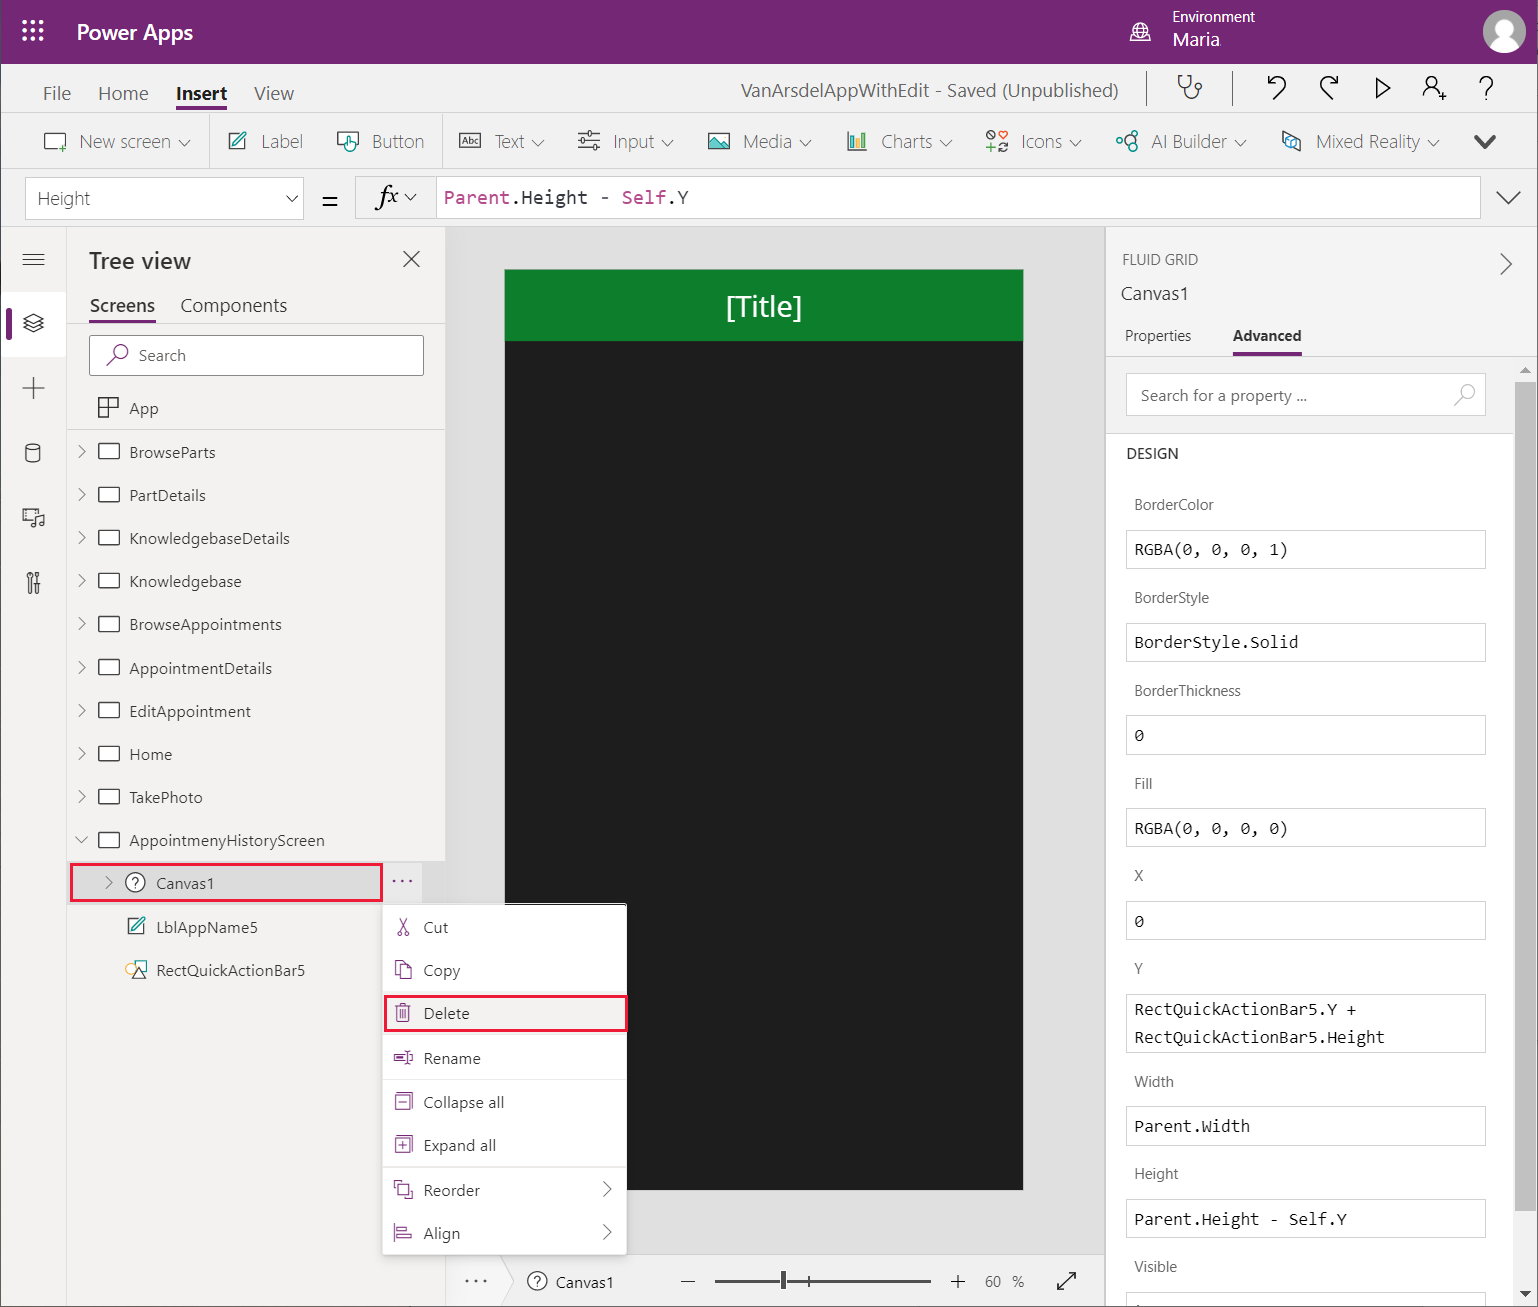
Delete the CanvasX control that was added to this screen.
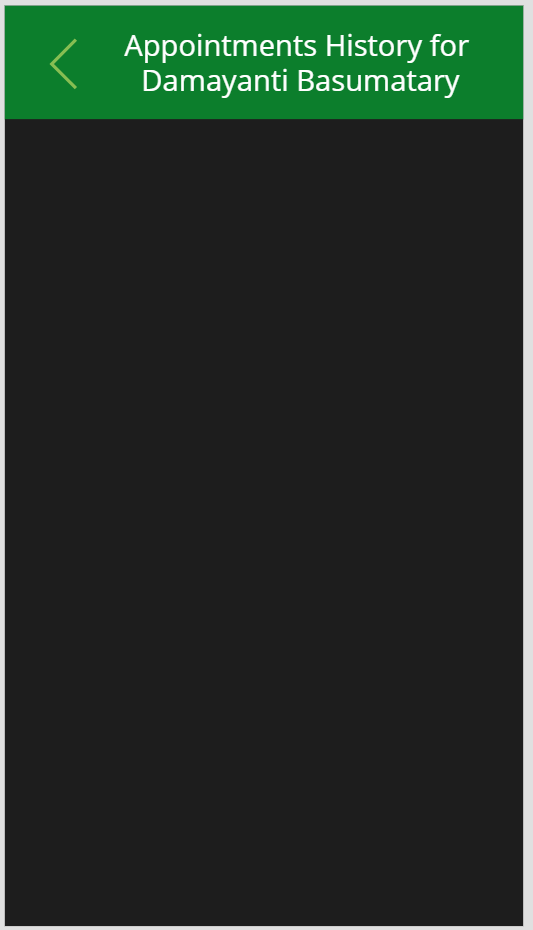
Select the LblAppNameX control on this screen. On the right pane, on the Advanced tab, change the Text property to the following.
"Appointments History for " & BrowseAppointmentsGallery.Selected.customer.nameSet the following properties for the LblAppNameX control to adjust the position and size:
- X: 90
- Y: 0
- Width: 550
- Height: 140
Select the RectQuickActionBarX control, and set the Height property to 140.
Add a Left icon control to the screen header, to the left of the title. Set the OnSelect action property for this control to Navigate(BrowseAppointments, Transition.None).
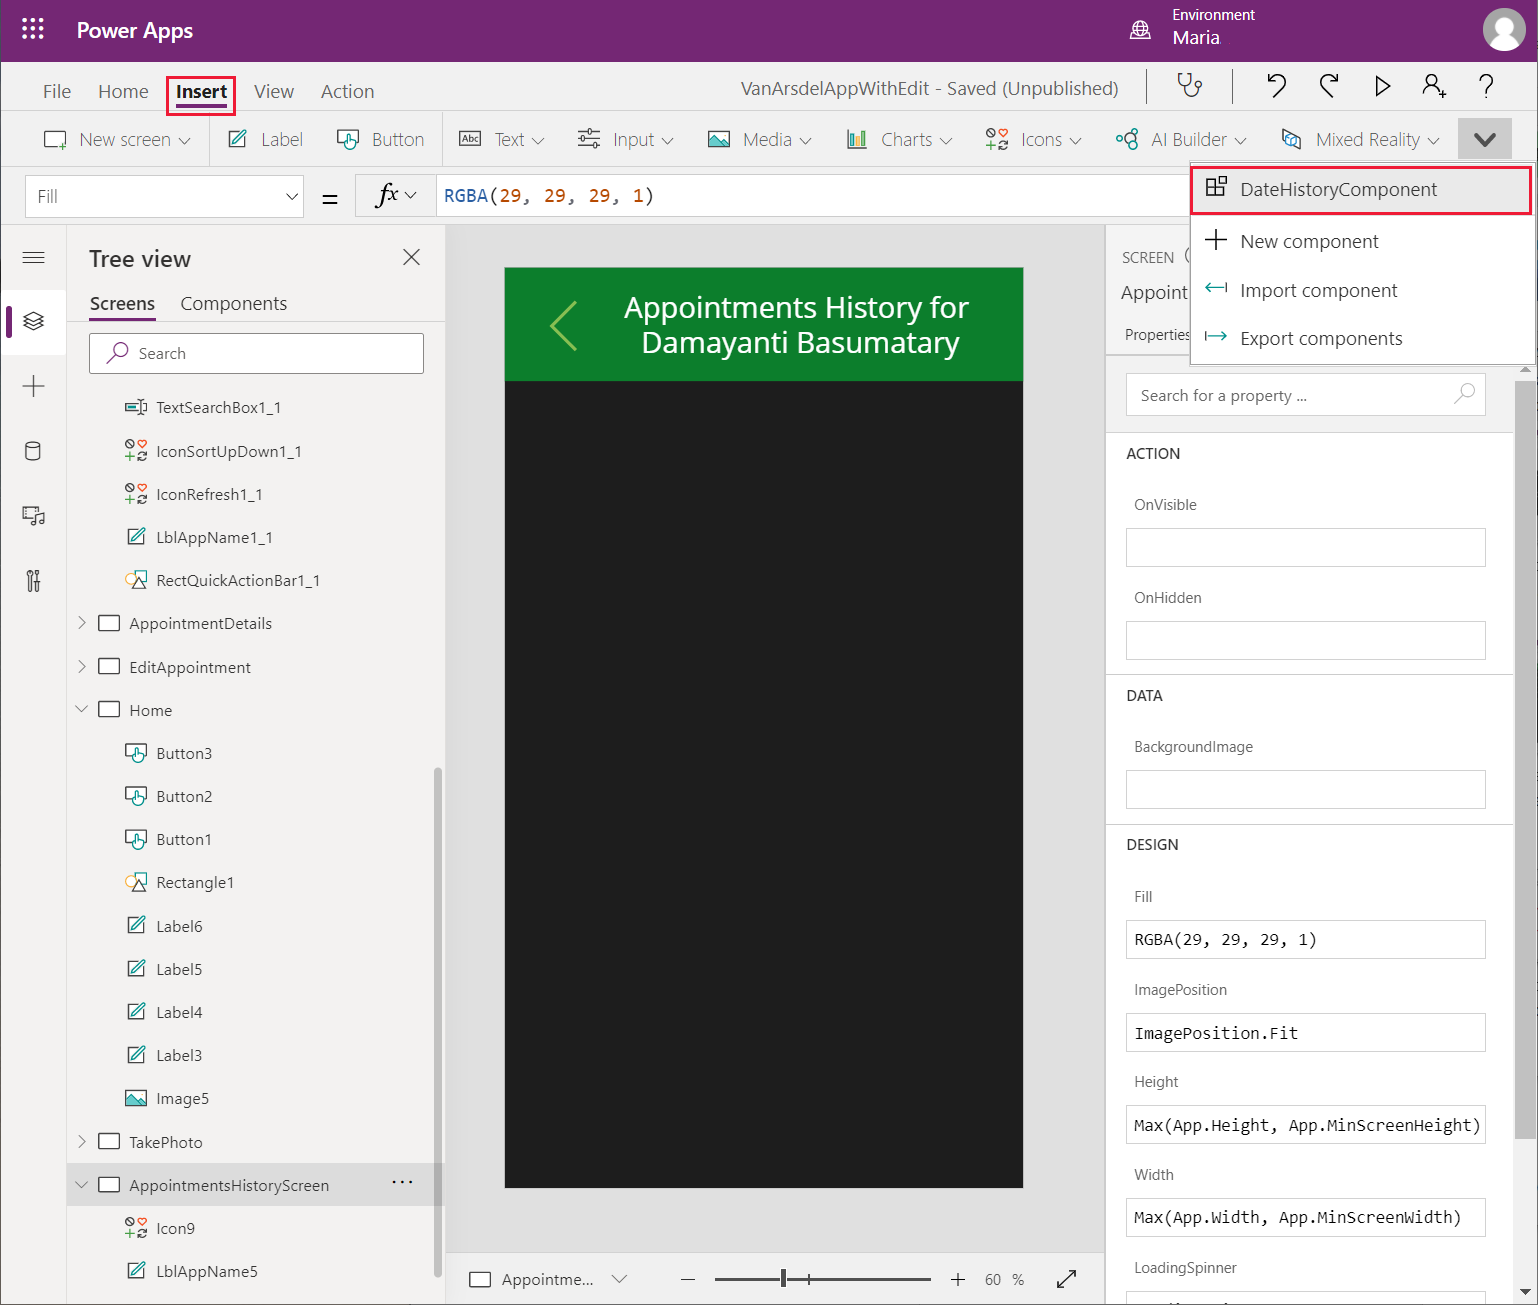
On the Insert menu, select Custom, and then select the DateHistoryComponent.
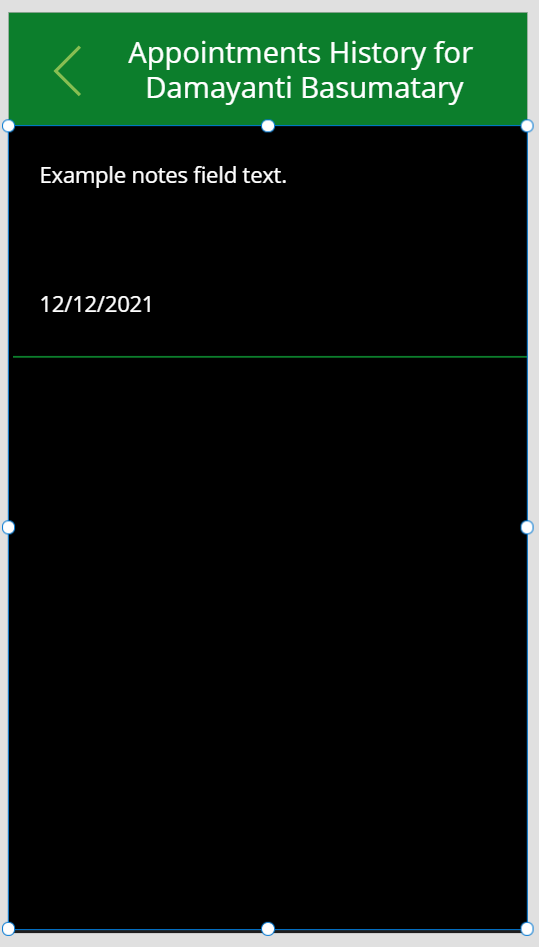
Move and resize the component so that it occupies the body of the screen, below the heading.
Set the following properties for this component:
- Data: customerAppointmentsCollection
- Appointment Date: startDateTime
- Notes: notes
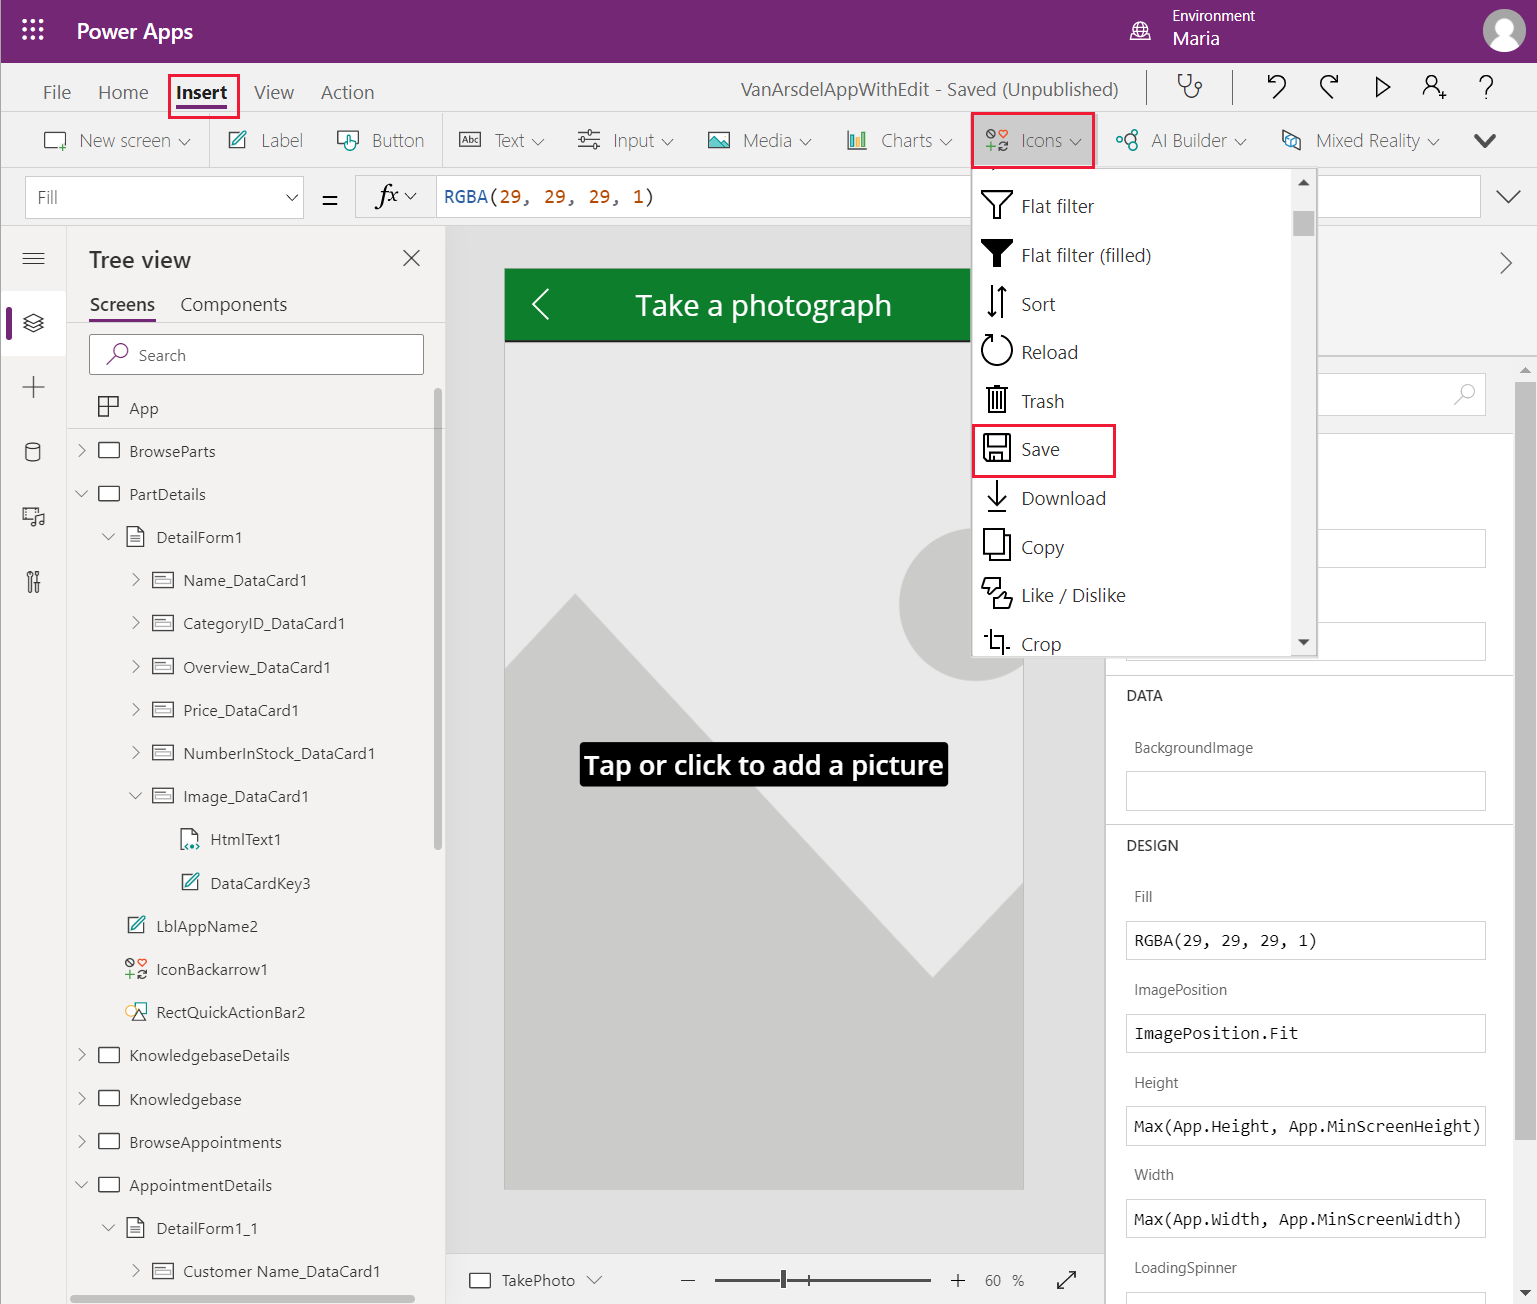
Save the app.
To test the app, do the following:
On the Tree view pane, select the Home screen.
Select F5 to preview app.
On the Home screen, select Appointments.
In the browse screen, select the Detail list icon for any appointment.
Verify that the Appointments History screen for the selected customer appears.
Close the preview window and return to Power Apps Studio.
Ordering parts
A key requirement of the system is to enable a technician to order any parts required while visiting a customer. If the parts are in stock, it should be possible to schedule another visit to complete the repair at the next convenient date for the customer. If the parts are currently out of stock and have to be ordered, the technician can tell the customer. Malik can then arrange an appointment with the customer when Maria receives notice that the parts have arrived in the warehouse.
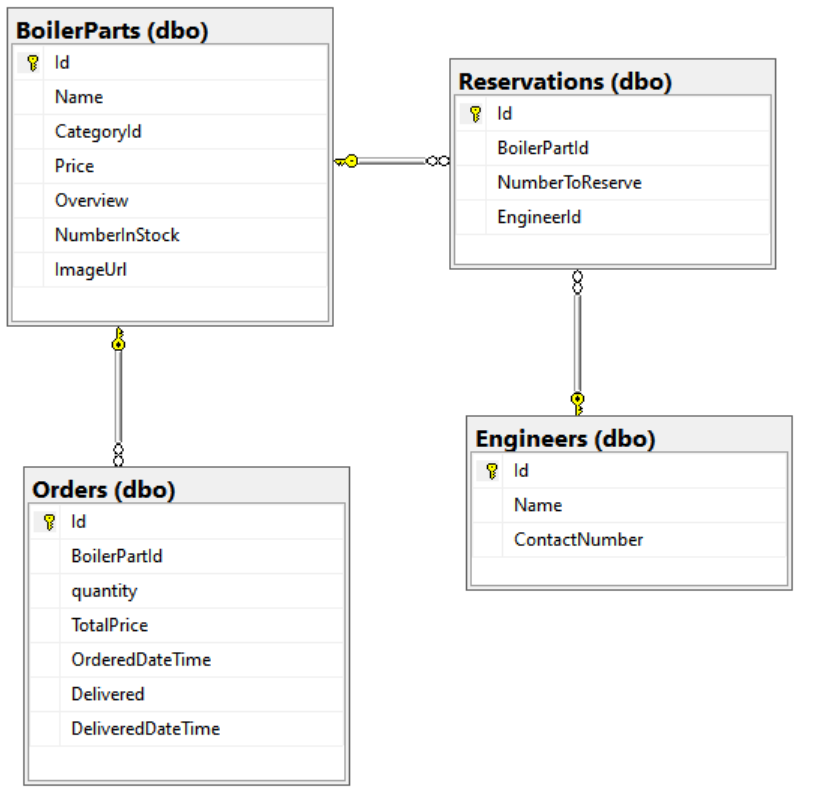
The reservations part of the app uses the tables in the InventoryDB database shown in the following image. The Orders table holds information about orders placed for parts. The Reservations table lists the reservation requests that technicians and engineers have made for parts. The Engineers table provides the name and contact number for the engineer who made the reservation, which makes it easy for Maria the inventory manager to query if necessary.
To support this feature, Kiana has to update the Web API with a method that fetches the number of reserved items for a specified part, as follows:
Open the FieldEngineerApi Web API project in Visual Studio Code.
Add a file named Order.cs to the Models folder. Add the following code to this file. The Orders class tracks the details of orders placed for parts.
using System;
using System.ComponentModel.DataAnnotations;
using System.ComponentModel.DataAnnotations.Schema;

namespace FieldEngineerApi.Models
{
    public class Order
    {
        [Key]
        public long Id { get; set; }

        public long BoilerPartId { get; set; }

        public BoilerPart BoilerPart { get; set; }

        public long Quantity { get; set; }

        [Column(TypeName = "money")]
        public decimal TotalPrice { get; set; }

        [Display(Name = "OrderedDate")]
        [DataType(DataType.DateTime)]
        [DisplayFormat(DataFormatString = "{0:MM/dd/yyyy}")]
        public DateTime OrderedDateTime { get; set; }

        public bool Delivered { get; set; }

        [Display(Name = "DeliveredDate")]
        [DataType(DataType.DateTime)]
        [DisplayFormat(DataFormatString = "{0:MM/dd/yyyy}")]
        public DateTime? DeliveredDateTime { get; set; }
    }
}
Add another new file named Reservation.cs to the Models folder and add the following code to this file. The Reservation class contains information about the number of items for a given part that are currently reserved for other customers.
using System;
using System.ComponentModel.DataAnnotations;

namespace FieldEngineerApi.Models
{
    public class Reservation
    {
        [Key]
        public long Id { get; set; }

        public long BoilerPartId { get; set; }

        public BoilerPart BoilerPart { get; set; }

        public int NumberToReserve { get; set; }

        public string EngineerId { get; set; }

        public InventoryEngineer Engineer { get; set; }
    }
}
Add one more file, named InventoryEngineer.cs, to the Models folder, with the following code. The InventoryEngineer class records which engineers have made which reservations.
using System.ComponentModel.DataAnnotations;
using System.Collections.Generic;

namespace FieldEngineerApi.Models
{
    public class InventoryEngineer
    {
        [Key]
        public string Id { get; set; }

        [Required]
        public string Name { get; set; }

        public string ContactNumber { get; set; }

        public List<Reservation> Reservations { get; set; }
    }
}
Open the InventoryContext.cs file in the Models folder, and add the following statements to the InventoryContext class.
public class InventoryContext : DbContext
{
    public InventoryContext(DbContextOptions\<InventoryContext\> options)
        : base(options)
    {

    }

    public DbSet<BoilerPart> BoilerParts { get; set; }
    public DbSet<InventoryEngineer> Engineers { get; set; }
    public DbSet<Order> Orders { get; set; }
    public DbSet<Reservation> Reservations { get; set; }
}
In the Terminal window in Visual Studio Code, run the following commands to build controllers for handling orders and reservations.
dotnet aspnet-codegenerator controller ^
    -name OrdersController -async -api ^
    -m Order ^
    -dc InventoryContext -outDir Controllers

dotnet aspnet-codegenerator controller ^
    -name ReservationsController -async -api ^
    -m Reservation ^
    -dc InventoryContext -outDir Controllers
Open the BoilerPartController.cs file in the Controllers folder, and add the following GetTotalReservations method to the BoilerPartsController class.
public class BoilerPartsController : ControllerBase
{
    private readonly InventoryContext _context;

    public BoilerPartsController(InventoryContext context)
    {
        _context = context;
    }

    ...

    // GET: api/BoilerParts/5/Reserved
    [HttpGet("{id}/Reserved")]
    public async Task<ActionResult<object>> GetTotalReservations(long id)
    {
        var reservations = await _context
            .Reservations
            .Where(r => r.BoilerPartId == id)
            .ToListAsync();

        int totalReservations = 0;

        foreach(Reservation reservation in reservations)
        {
            totalReservations += reservation.NumberToReserve;
        }

        return new {id, totalReservations};
    }
    ...
}
Edit the OrdersController.cs file, and modify the PostOrder method in the OrdersController class as shown by the following.
[HttpPost]
public async Task<ActionResult<Order>> PostOrder(long boilerPartId, int quantity)
{
    var part = await _context.BoilerParts.FindAsync(boilerPartId);

    Order order = new Order
    {
        BoilerPartId = boilerPartId,
        Quantity = quantity,
        OrderedDateTime = DateTime.Now,
        TotalPrice = quantity * part.Price
    };

    _context.Orders.Add(order);
    await _context.SaveChangesAsync();

    return CreatedAtAction("GetOrder", new { id = order.Id }, order);
}
Edit the ReservationsController.cs file. Modify the PostReservation method in the ReservationsController class, as follows.
[HttpPost]
public async Task<ActionResult<Reservation>> PostReservation(long boilerPartId, string engineerId, int quantityToReserve)
{
    Reservation reservation = new Reservation
    {
        BoilerPartId = boilerPartId,
        EngineerId = engineerId,
        NumberToReserve = quantityToReserve
    };

    _context.Reservations.Add(reservation);
    await _context.SaveChangesAsync();

    return CreatedAtAction("GetReservation", new { id = reservation.Id }, reservation);
}
In the Terminal window, run the following commands to build and publish the Web API ready for deployment.
dotnet build
dotnet publish -c Release -o ./publish
In Visual Studio Code, right-click the publish folder, and then select Deploy to Web App.
Preeti can now update the API Management service used by the VanArsdel app to reflect the updated Web API. This is a non-breaking change; existing operations will continue to work, the difference being the new controllers and operations to make reservations and place orders. Preeti performs the following tasks:
Note
Preeti could have chosen to delete the existing Field Engineer API and replace it with a new version, but that approach risks breaking any existing applications that might be currently using the API. It's better practice to leave the existing API in place and add the modifications as a revision.
In the Azure portal, go to the API Management service.
On the API Management service page, on the left pane under APIs, select APIs.
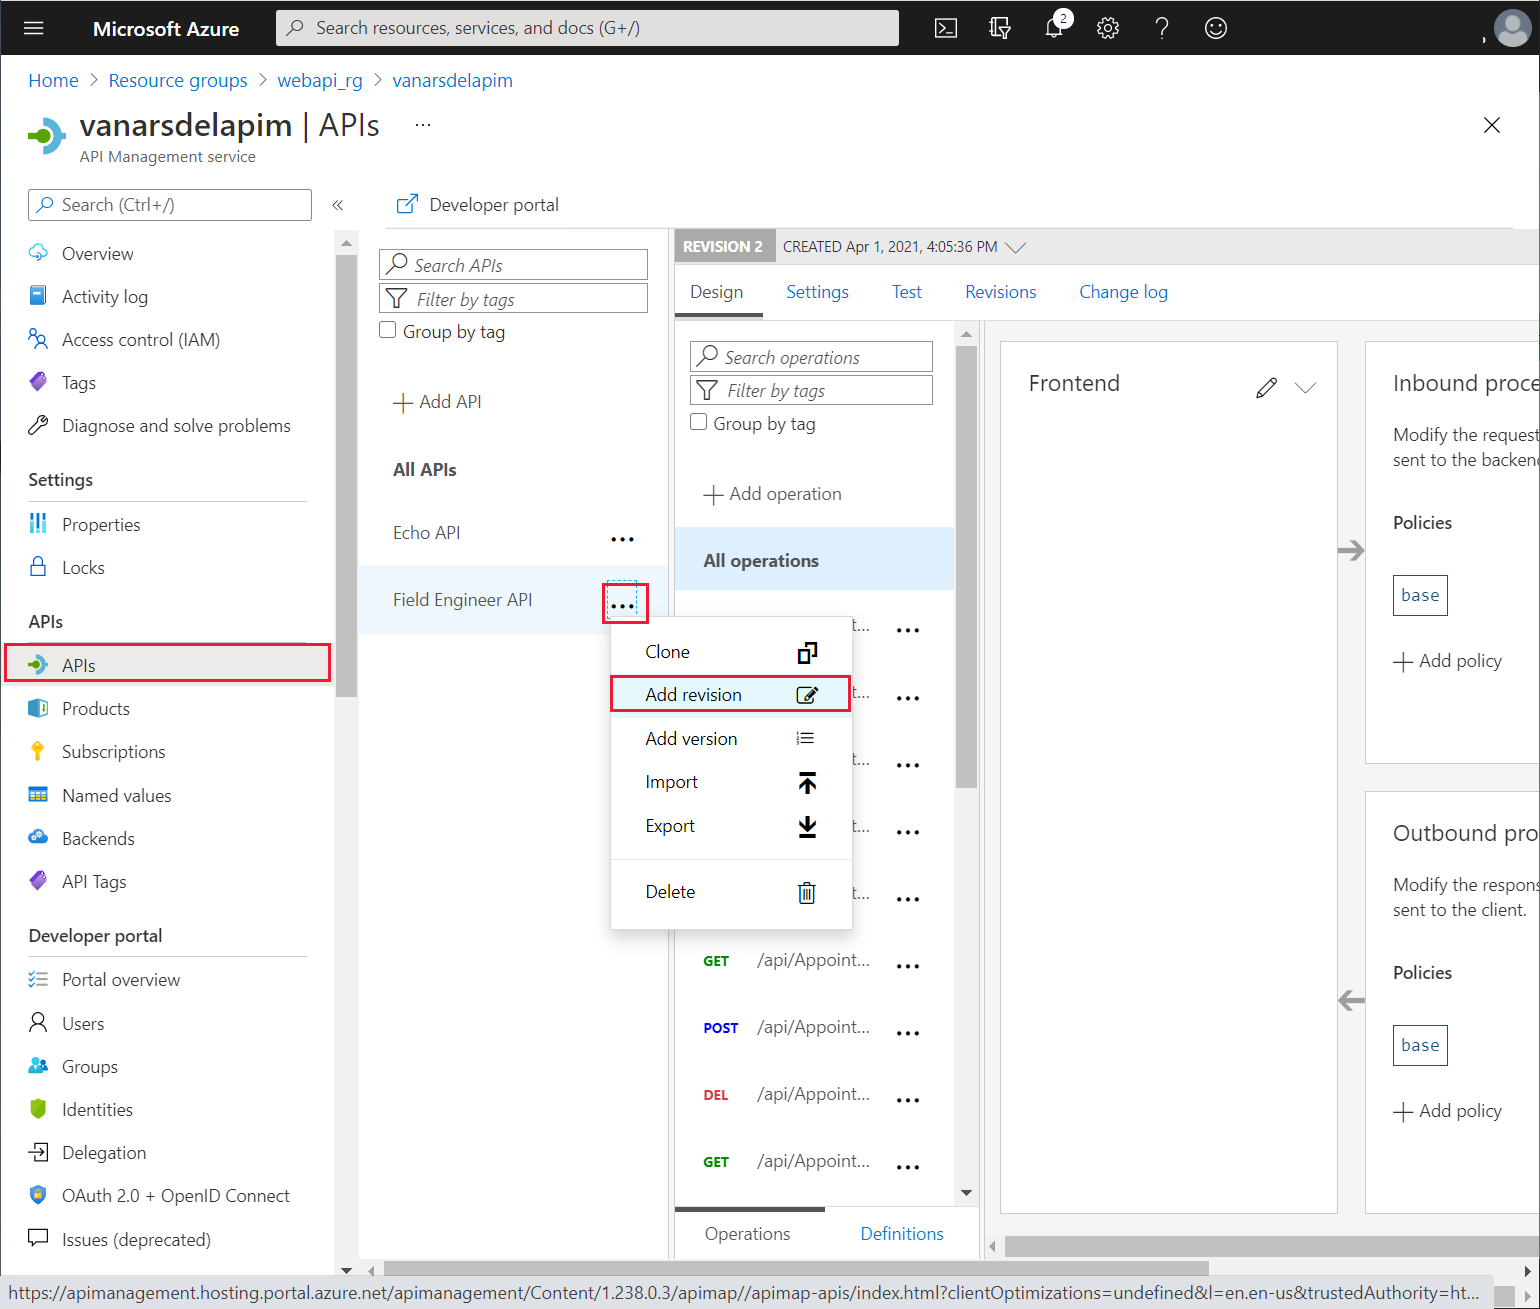
Select the Field Engineer API, select the ellipsis menu, and then select Add revision.
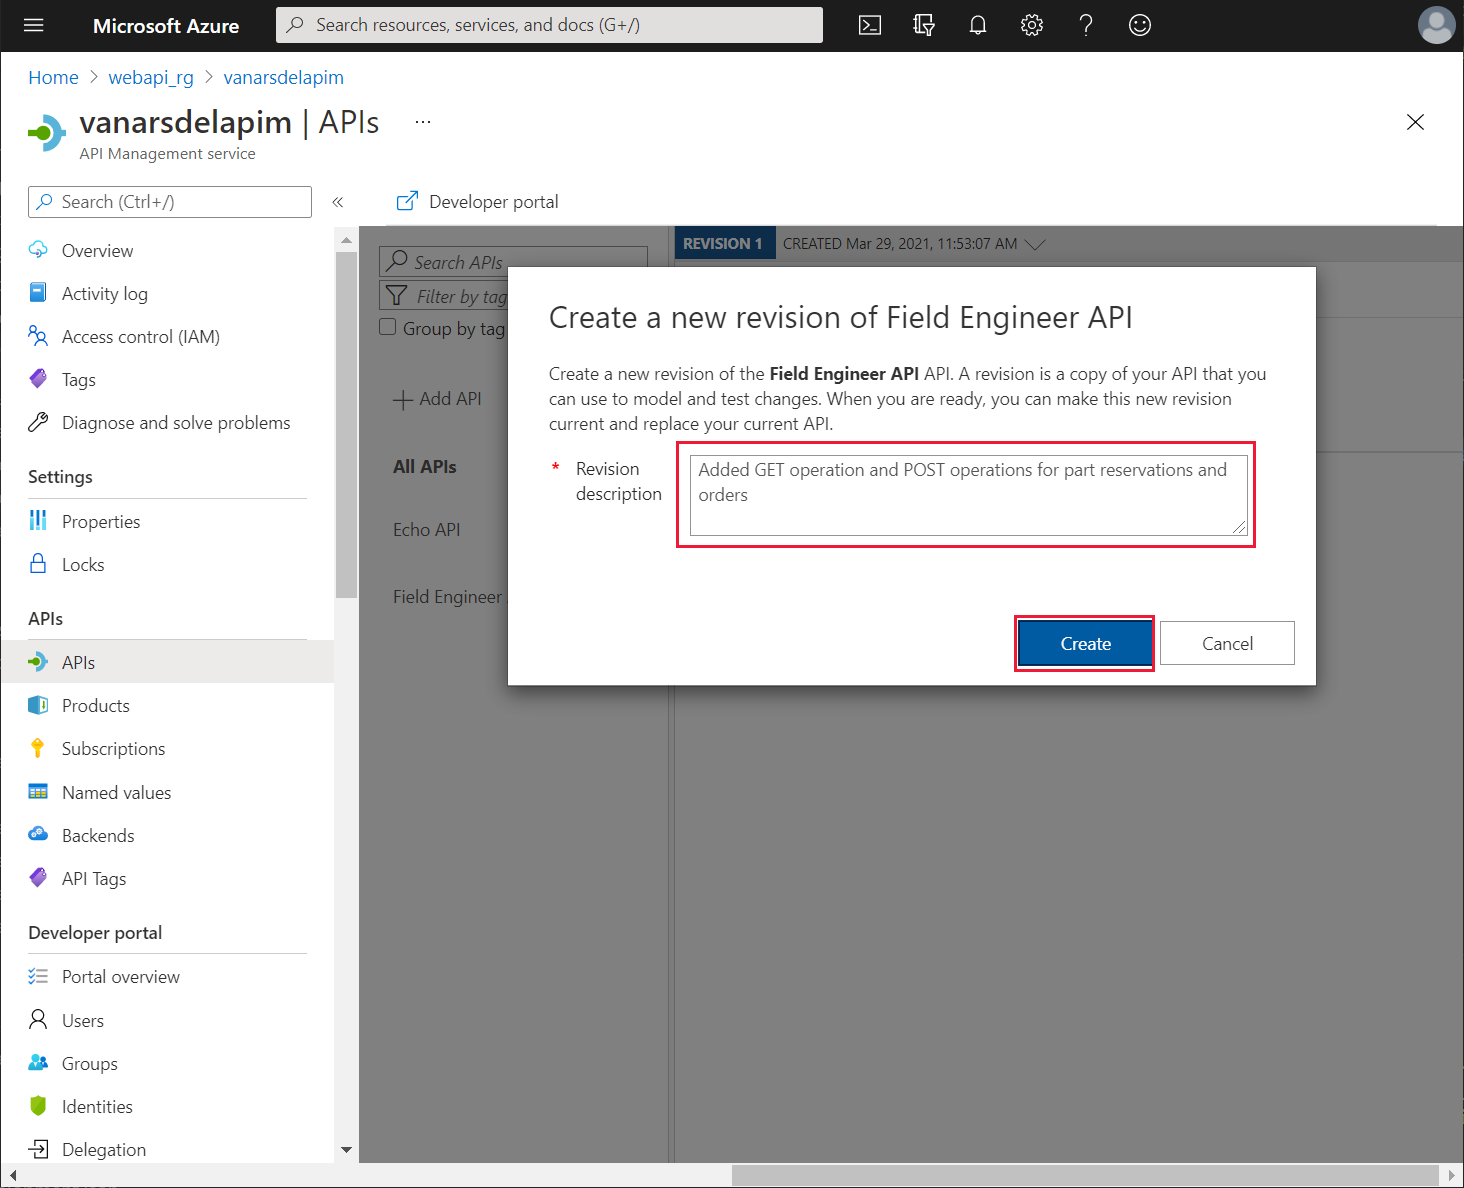
In the Create a new revision of the Field Engineer API dialog, enter the description Added GET operation and POST operations for part reservations and orders, and then select Create.
On the REVISION 2 page, select Design.

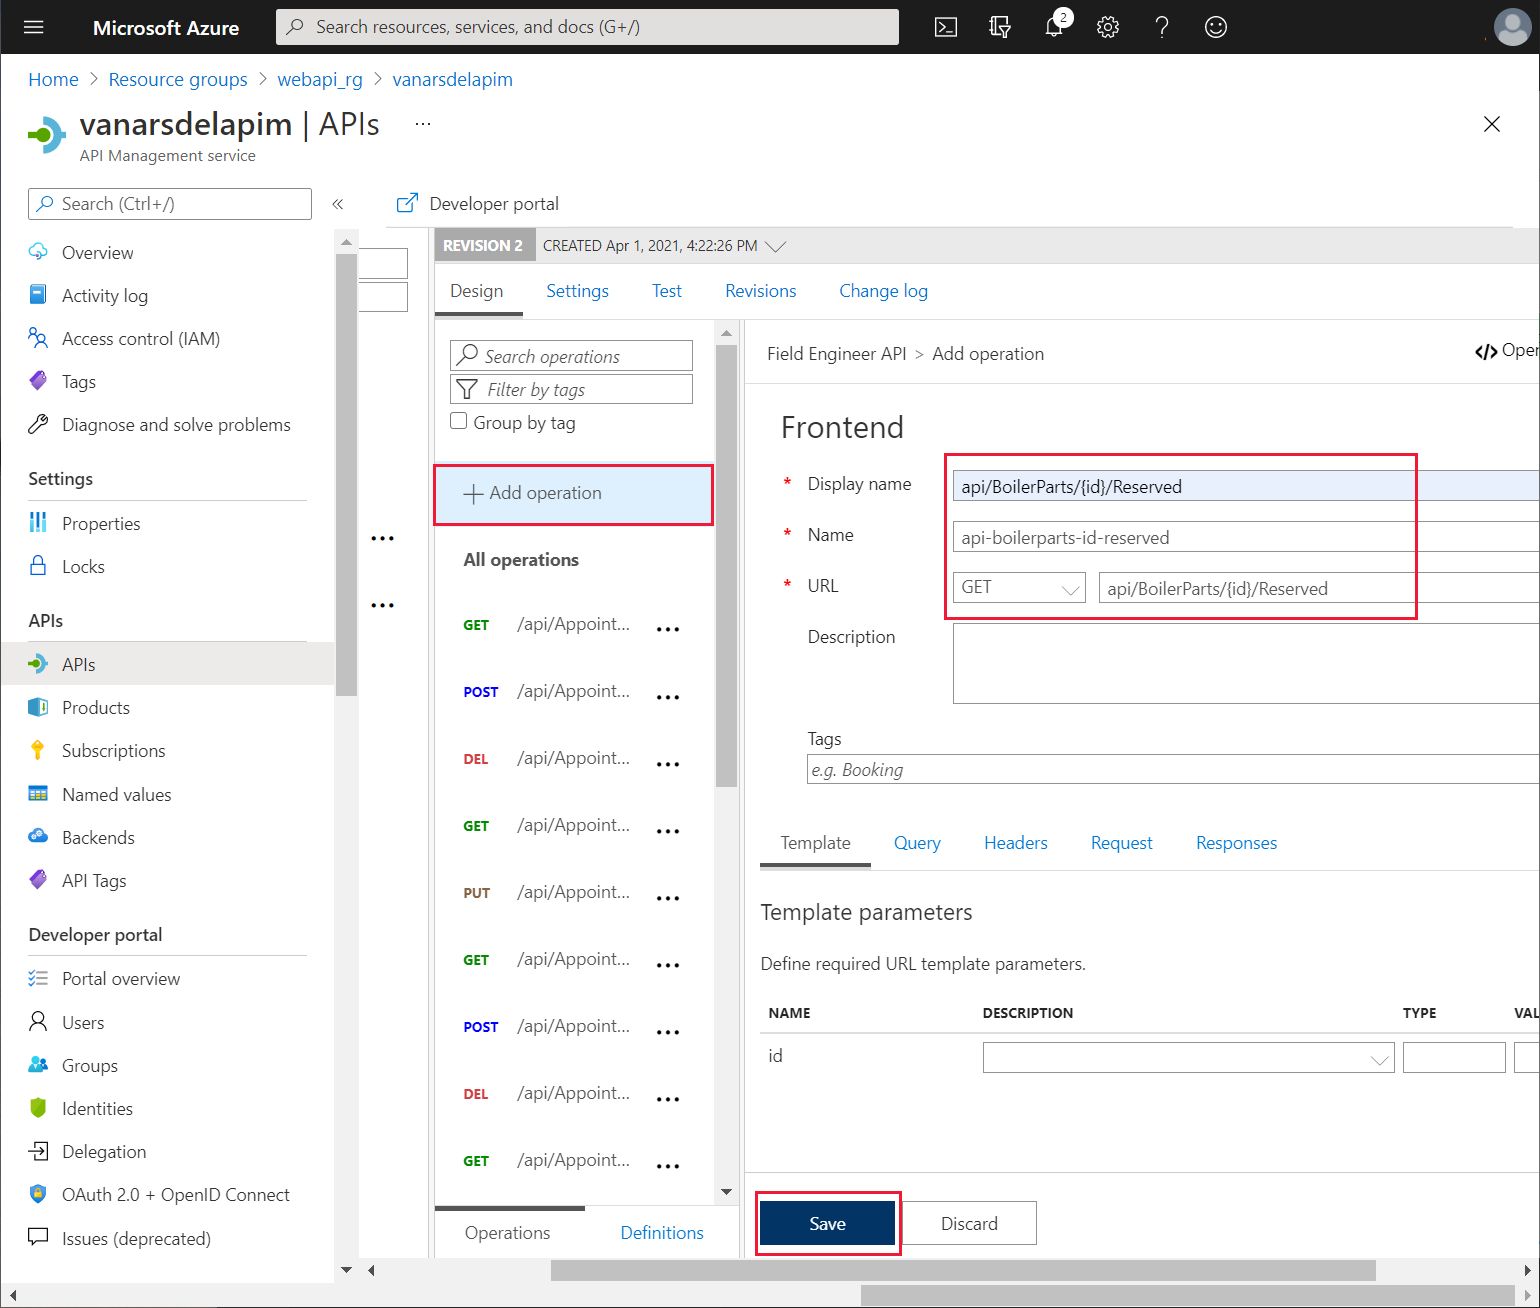
On the Design page, select Add operation. On the FrontEnd pane, set the following properties, and then select Save. This operation is used for retrieving the number of items reserved for a given boiler part:
- Display name: api/BoilerParts/{id}/Reserved
- Name: api-boilerparts-id-reserved
- URL: GET api/BoilerParts/{id}/Reserved
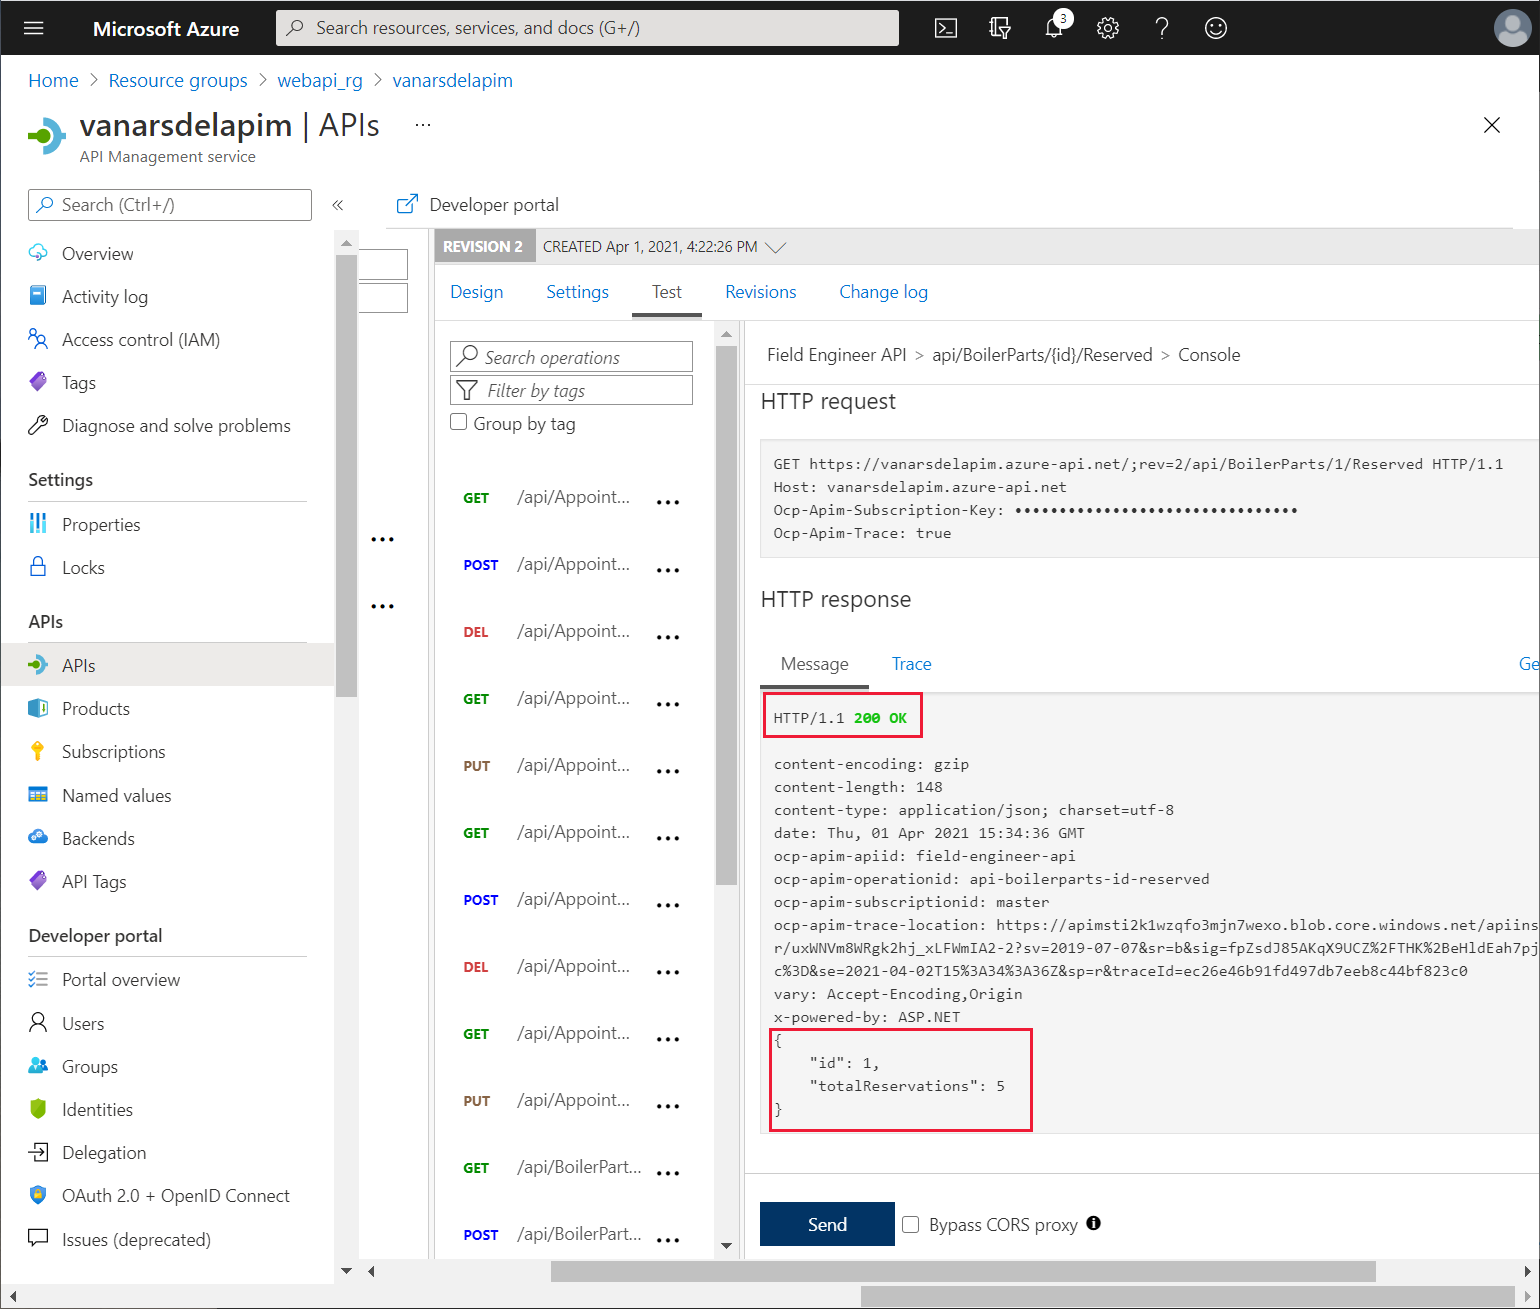
On the Test tab for the new operation, set the id parameter to a valid part number (the example in the image uses part 1), and then select Send.
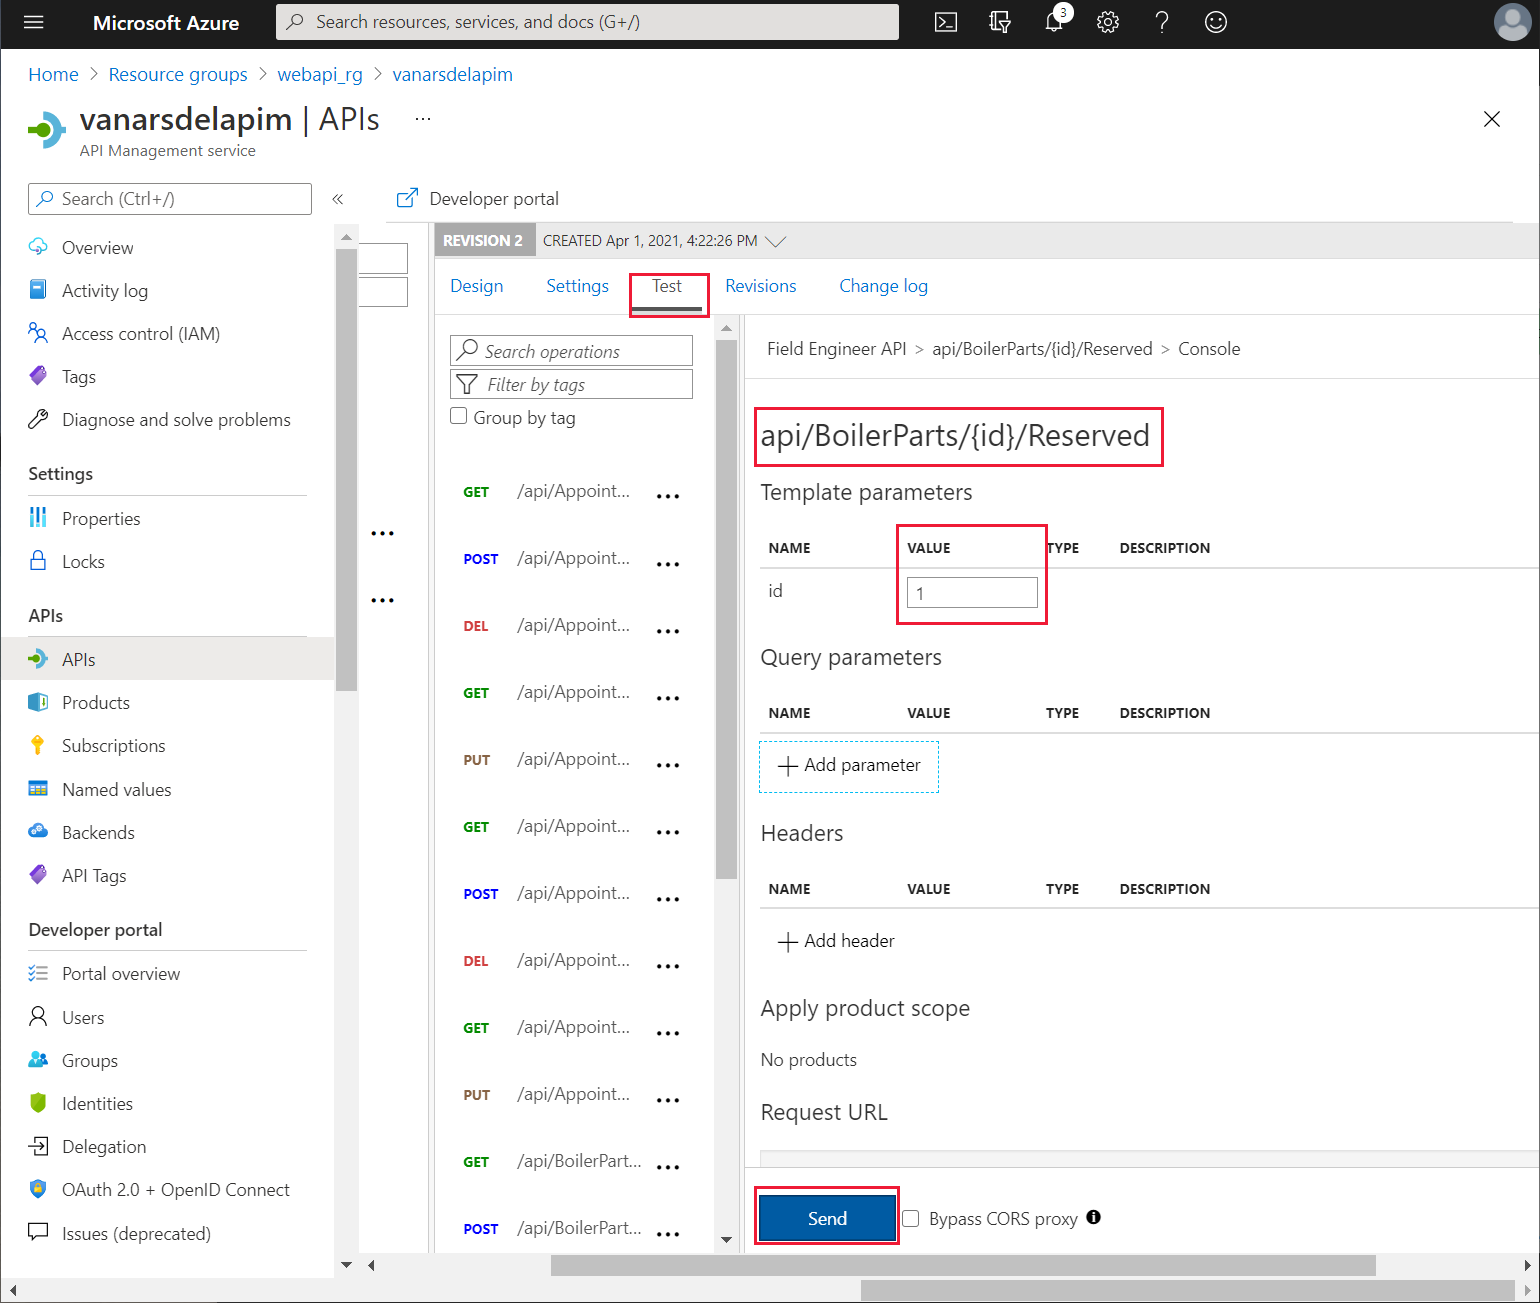
Verify that the test is successful. The operation should complete with an HTTP 200 response, and a body that shows the number of reservations for the product.
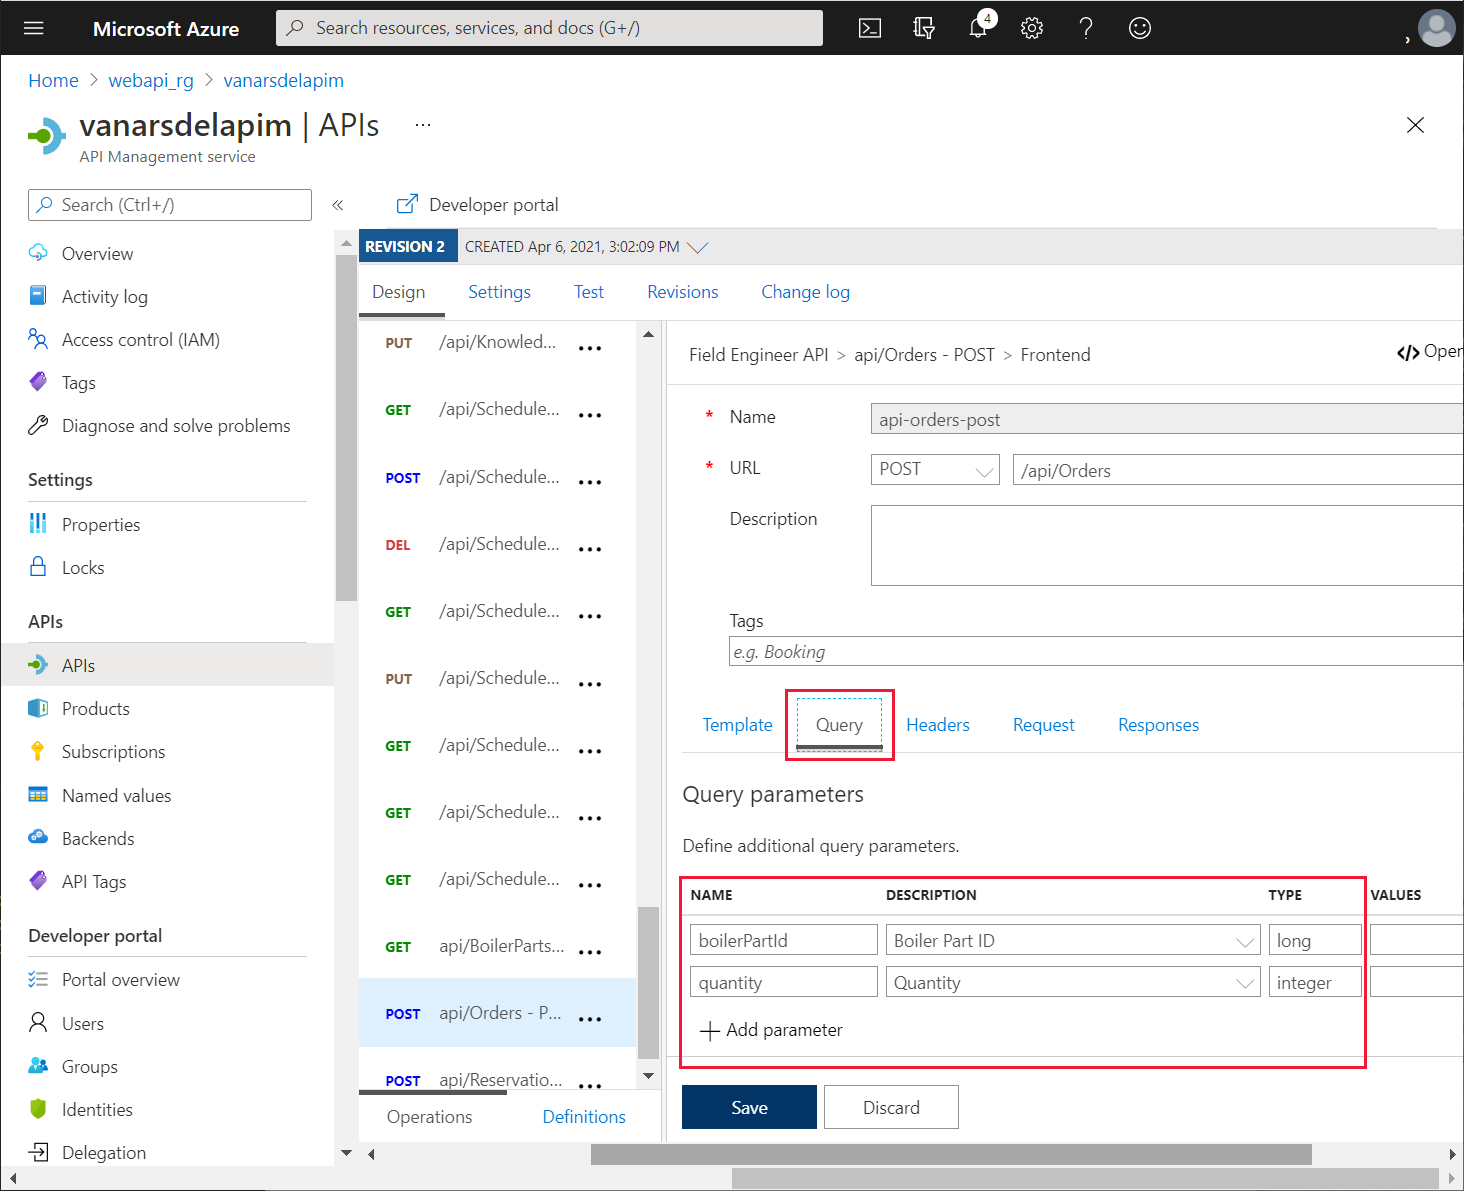
On the Design page, select Add operation. On the FrontEnd pane, set the following properties (this operation defines POST requests for creating new orders):
- Display name: api/Orders - POST
- Name: api-orders-post
- URL: POST api/Orders
On the Query tab, select + Add parameter, add the following parameters, and then select Save:
- Name: boilerPartId, Description**: Boiler Part ID**, Type: long
- Name: quantity, Description**: Quantity**, Type: integer
Select Add operation again on the FrontEnd pane, and set the following properties (this operation defines POST requests for creating new reservations):
- Display name: api/Reservations - POST
- Name: api-reservations-post
- URL: POST api/Reservations
On the Query tab, add the following parameters, and then select Save:
- Name: boilerPartId, Description: Boiler Part ID, Type: long
- Name: engineerId, Description: Engineer ID, Type: string
- Name: quantityToReserve, Description: Quantity to reserve, Type: integer
On the Revisions tab, select the new version. On the ellipsis menu for this version, select Make current.
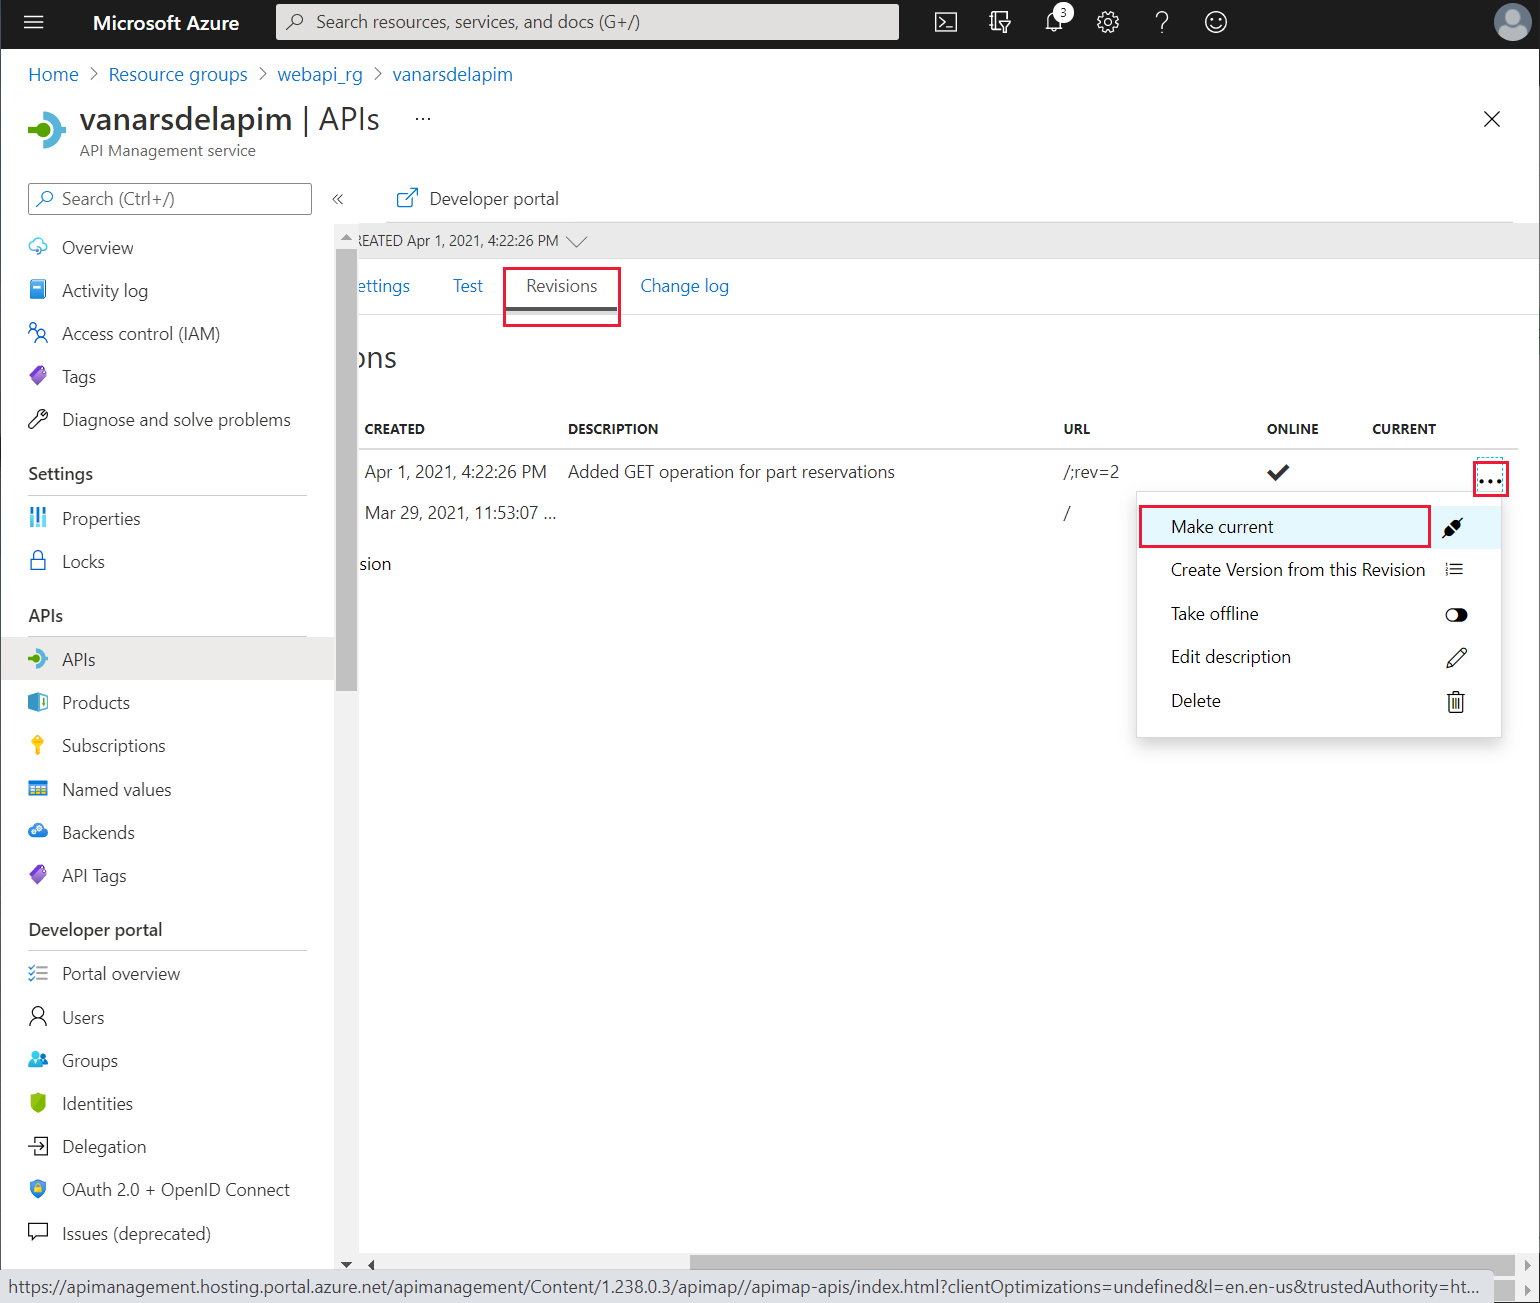
In the Make revision current dialog, select Save.
Open another page in your web browser and go to the URL https://<APIM name>.azure-api.net/api/boilerparts/1/reserved where <APIM name> is the name of your API service. Verify that you get a response similar to the following.
{"id":1,"totalReservations":5}
The updated Web API is now available. In theory, Kiana could create a new custom connector for the updated Web API and add it to the app. The app could then implement its own logic to determine how many items of the specified product are currently in stock, how many are reserved, compare the results to the number of items required, place an order for more stock if necessary, or reserve items from the existing stock. However, this kind of logic is better implemented in an Azure logic app. Power Apps can call the logic app through a custom connector when a technician wishes to reserve or order a part.
To create the logic app, Kiana uses the following steps:
Note
To keep things simple, the logic app created in this example is non-transactional. It's possible that between checking the availability of a part and making a reservation, a concurrent user might make a conflicting reservation. You could implement transactional semantics by replacing some of the logic in this logic app with a stored procedure in the InventoryDB database.
In the Azure portal, on the Home page, select + Create a resource.
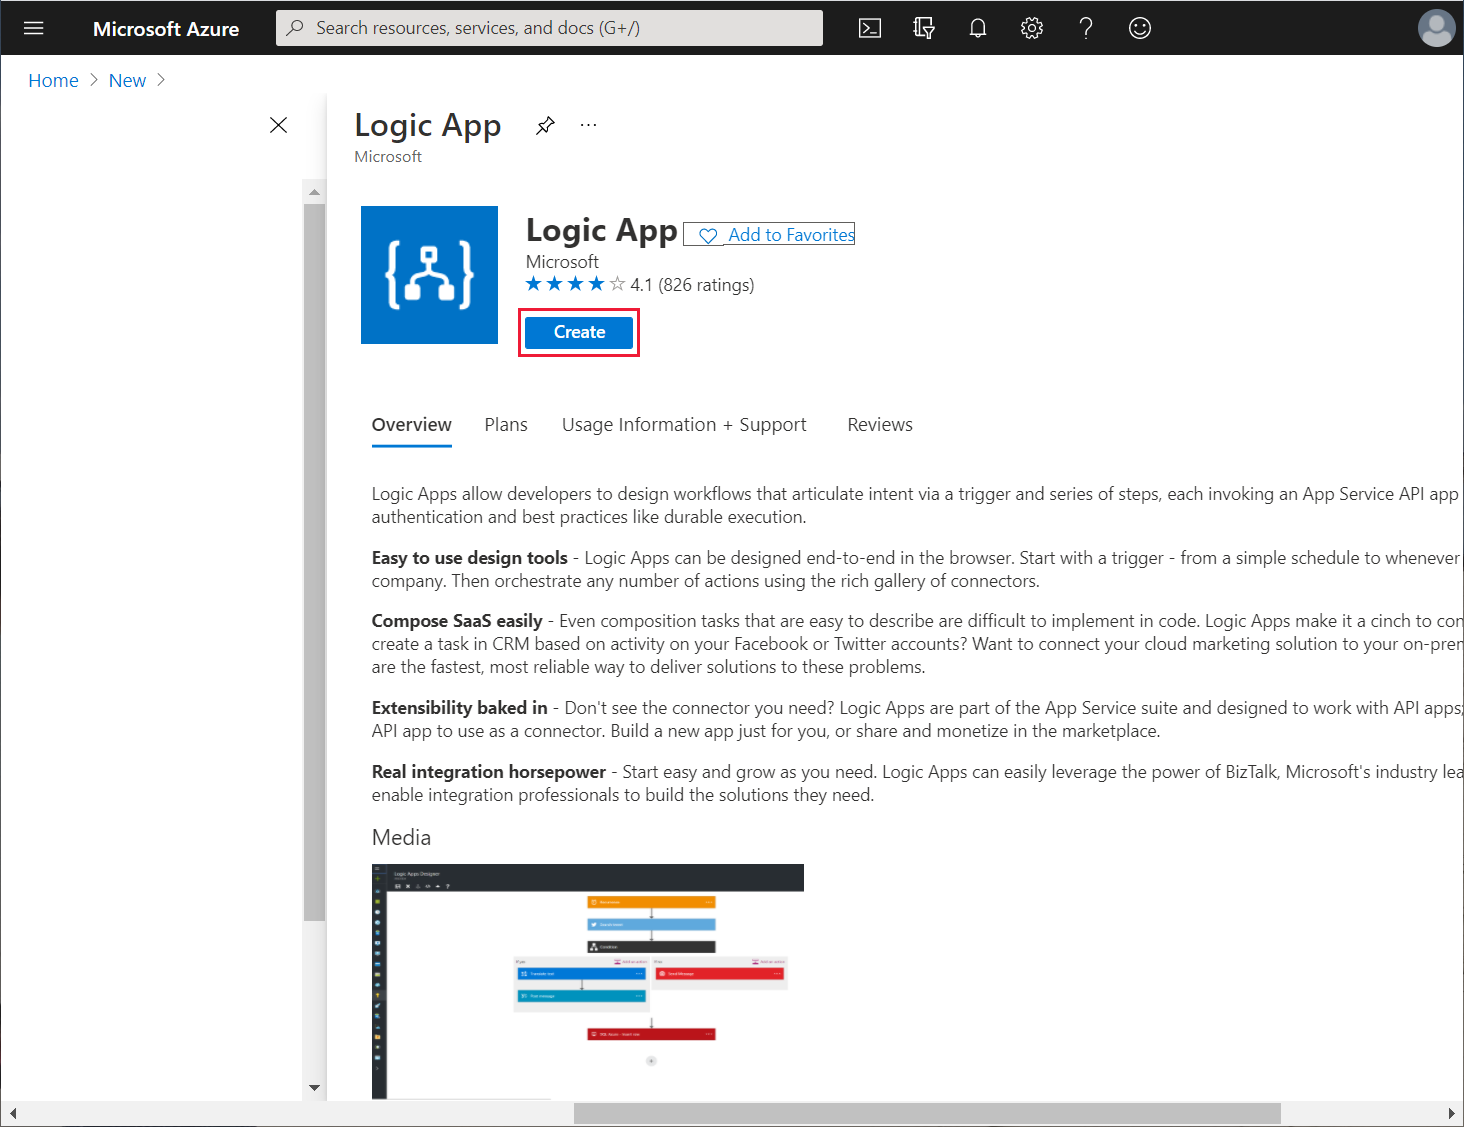
In the Search the marketplace box, enter Logic App, and then select Enter.
On the Logic App page, select Create.
On the Create a logic app page, enter the following values, and then select Review + create:
- Subscription: Select your Azure subscription
- Resource group: webapi_rg
- Logic App name: FieldEngineerPartsOrdering
- Region: Select the same location you used for the Web API
- Associate with integration service environment: Leave blank
- Enable log analytics: Leave blank
On the verification page, select Create, and wait while the logic app is deployed.
When the deployment is complete, select Go to resource.
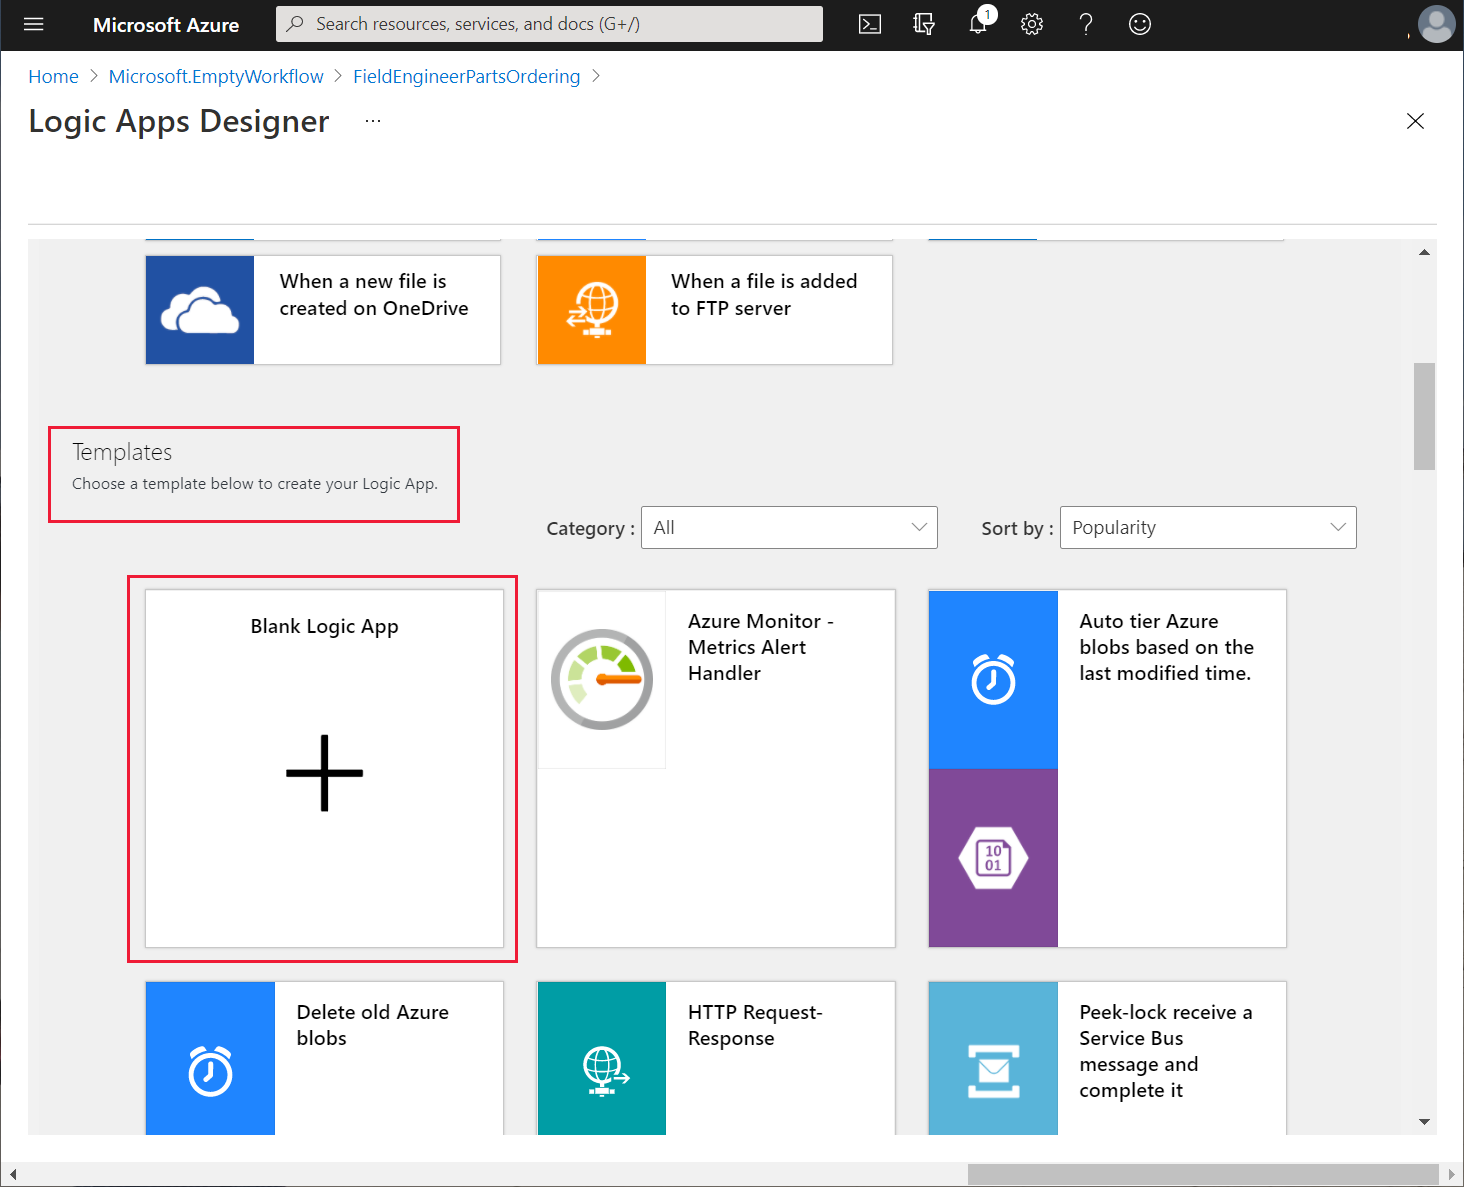
On the Logic Apps Designer page, scroll down to the Templates section, and then select Blank Logic App.
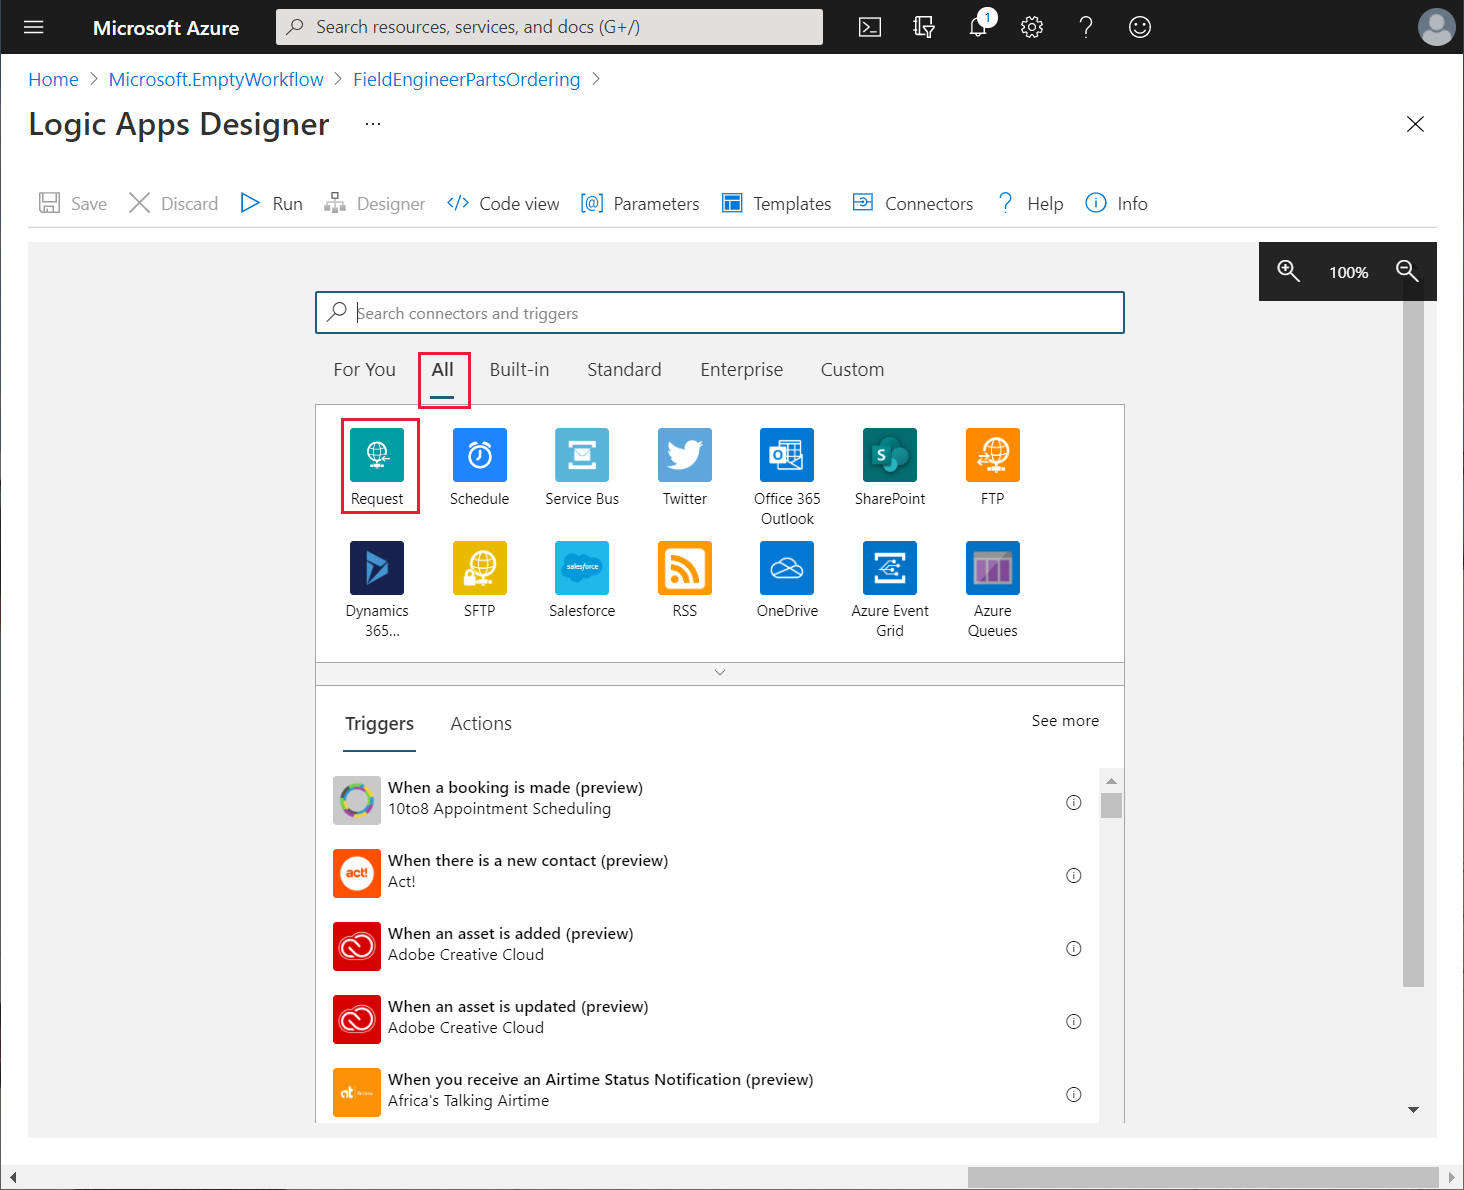
On the All tab, in the Search connectors and triggers text box, select Request.
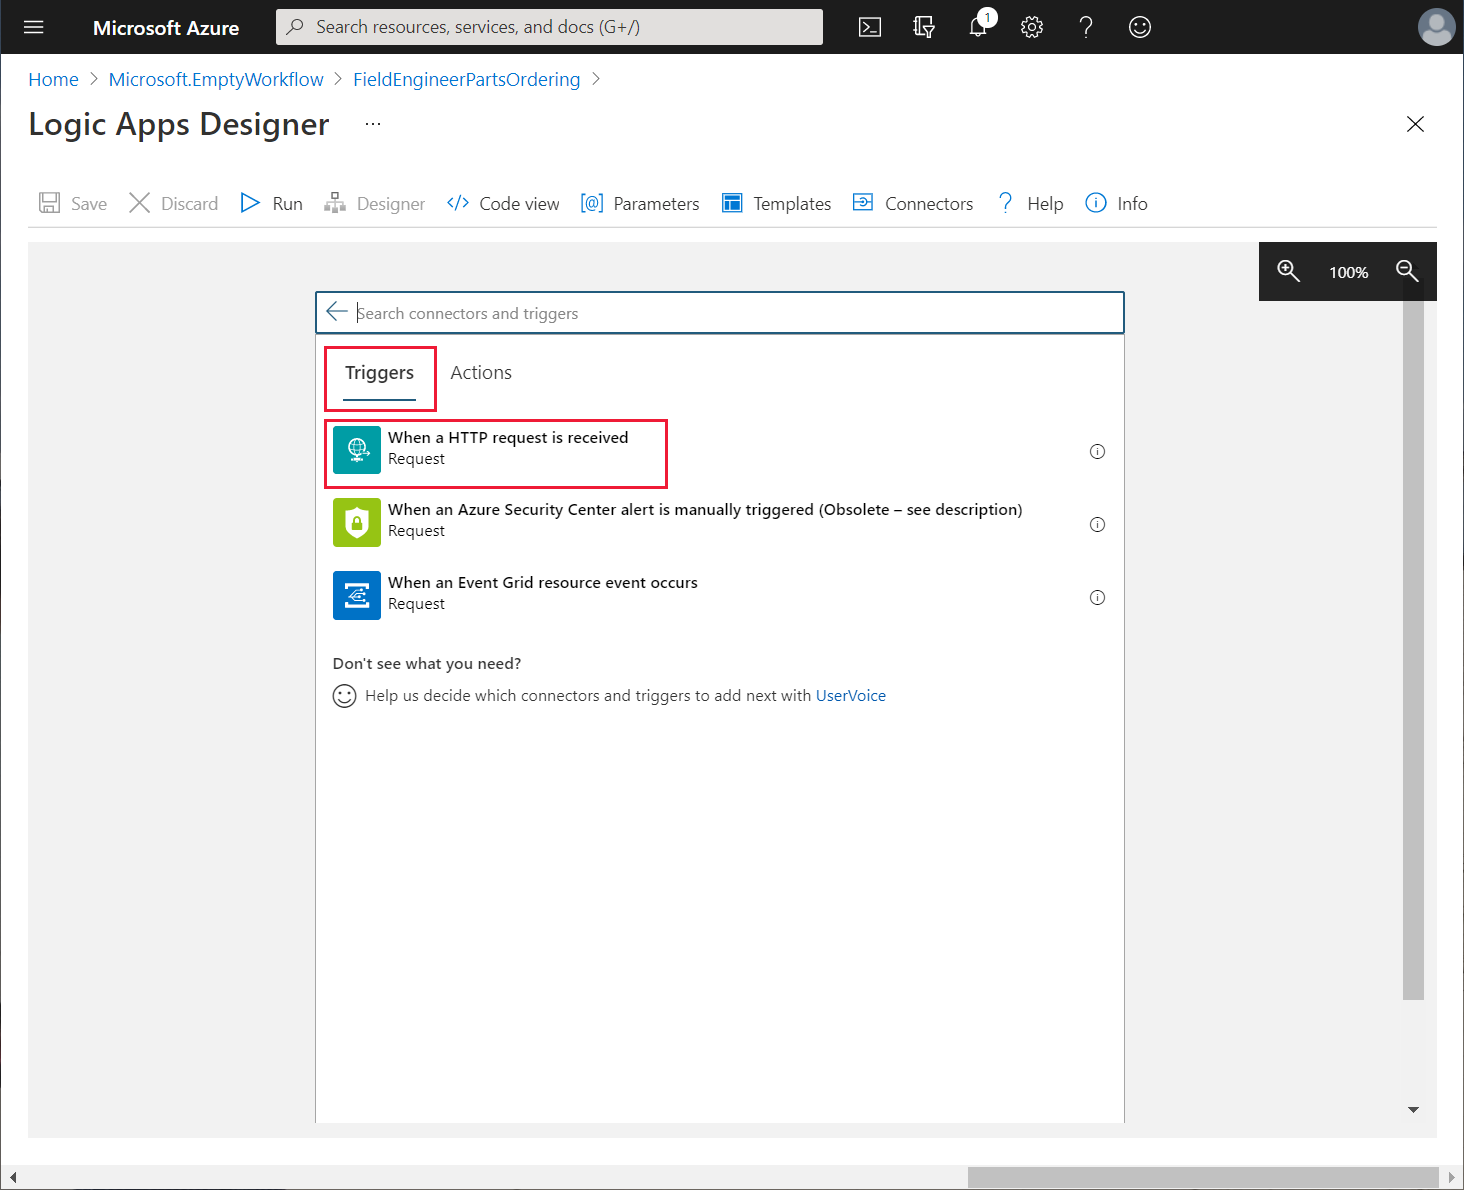
On the Triggers tab, select When a HTTP request is received.
In the Request Body JSON Schema box, enter the following schema, and then select + New step.
{
    "type": "object",
    "properties": {
        "boilerPartId": {
            "type": "integer"
        },
        "numberToReserve": {
            "type": "integer"
        },
        "engineerId": {
            "type": "string"
        }
    }
}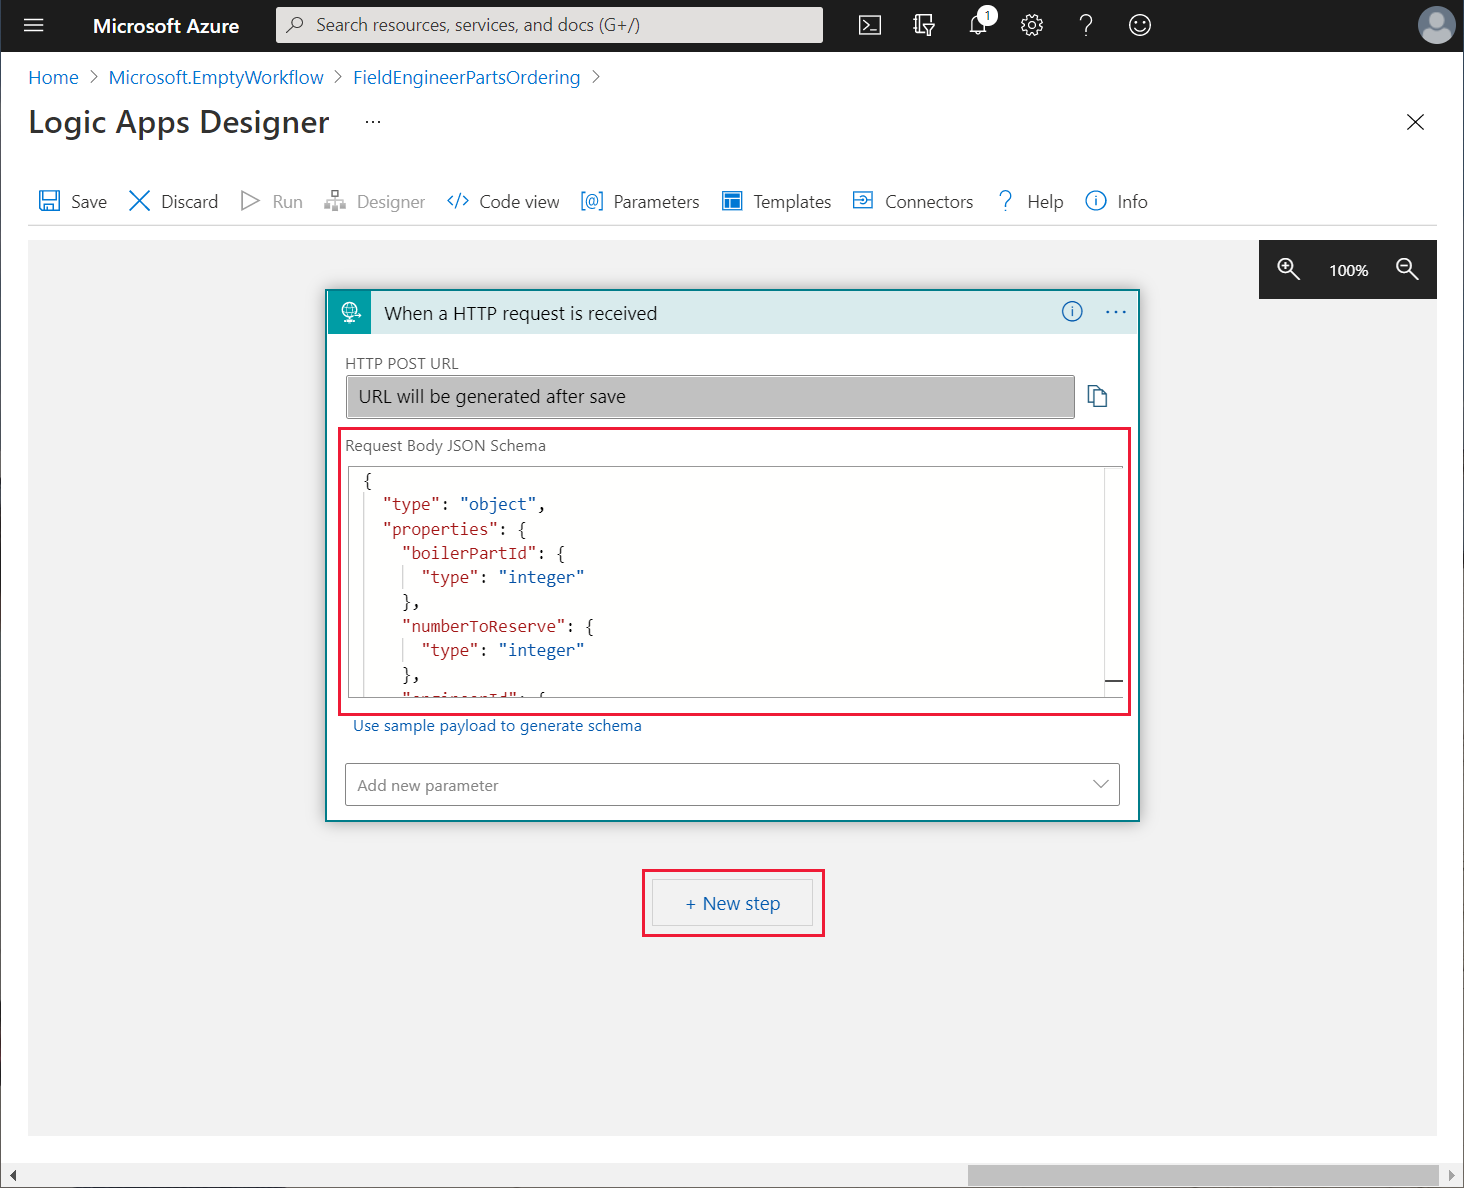
This schema defines the content of the HTTP request that the logic app is expecting. The request body comprises the ID of a boiler part, the number of items to reserve, and the ID of the engineer making the request. The app will send this request when an engineer wants to reserve a part.
In the Choose an operation box, select All, and then select HTTP.
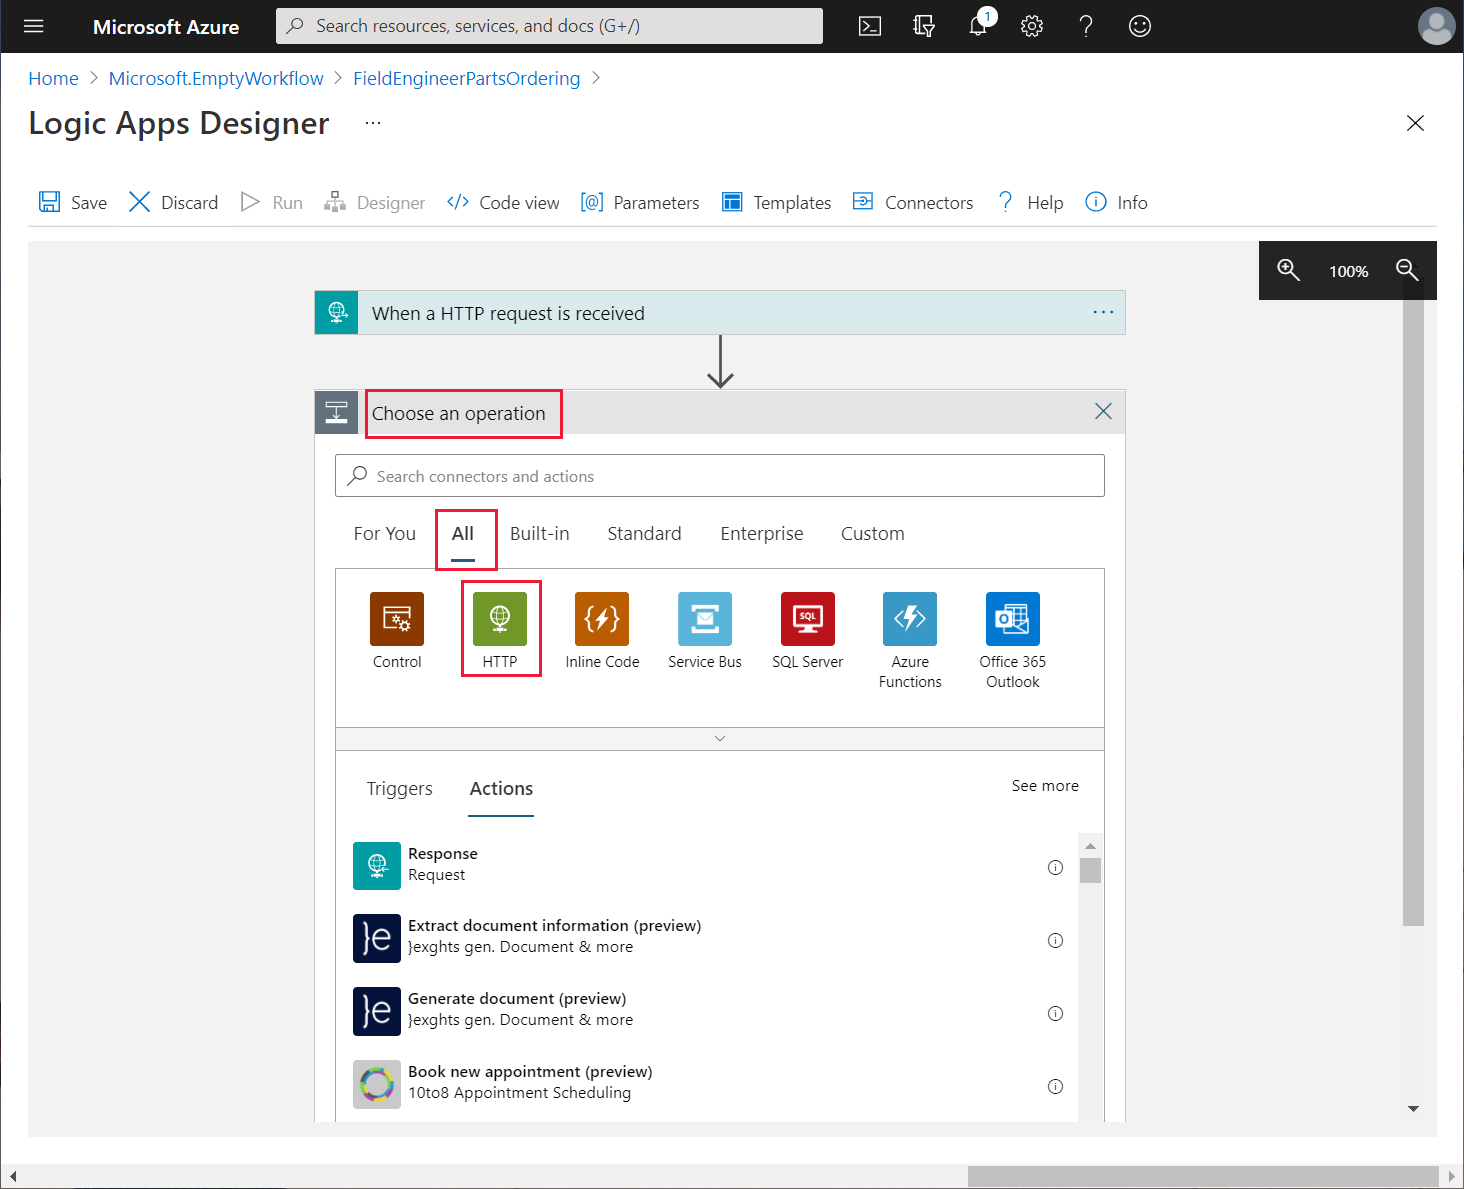
The logic app will call the BoilerParts{id} operation of the Web API to retrieve information about the boiler part provided by the request from the app.
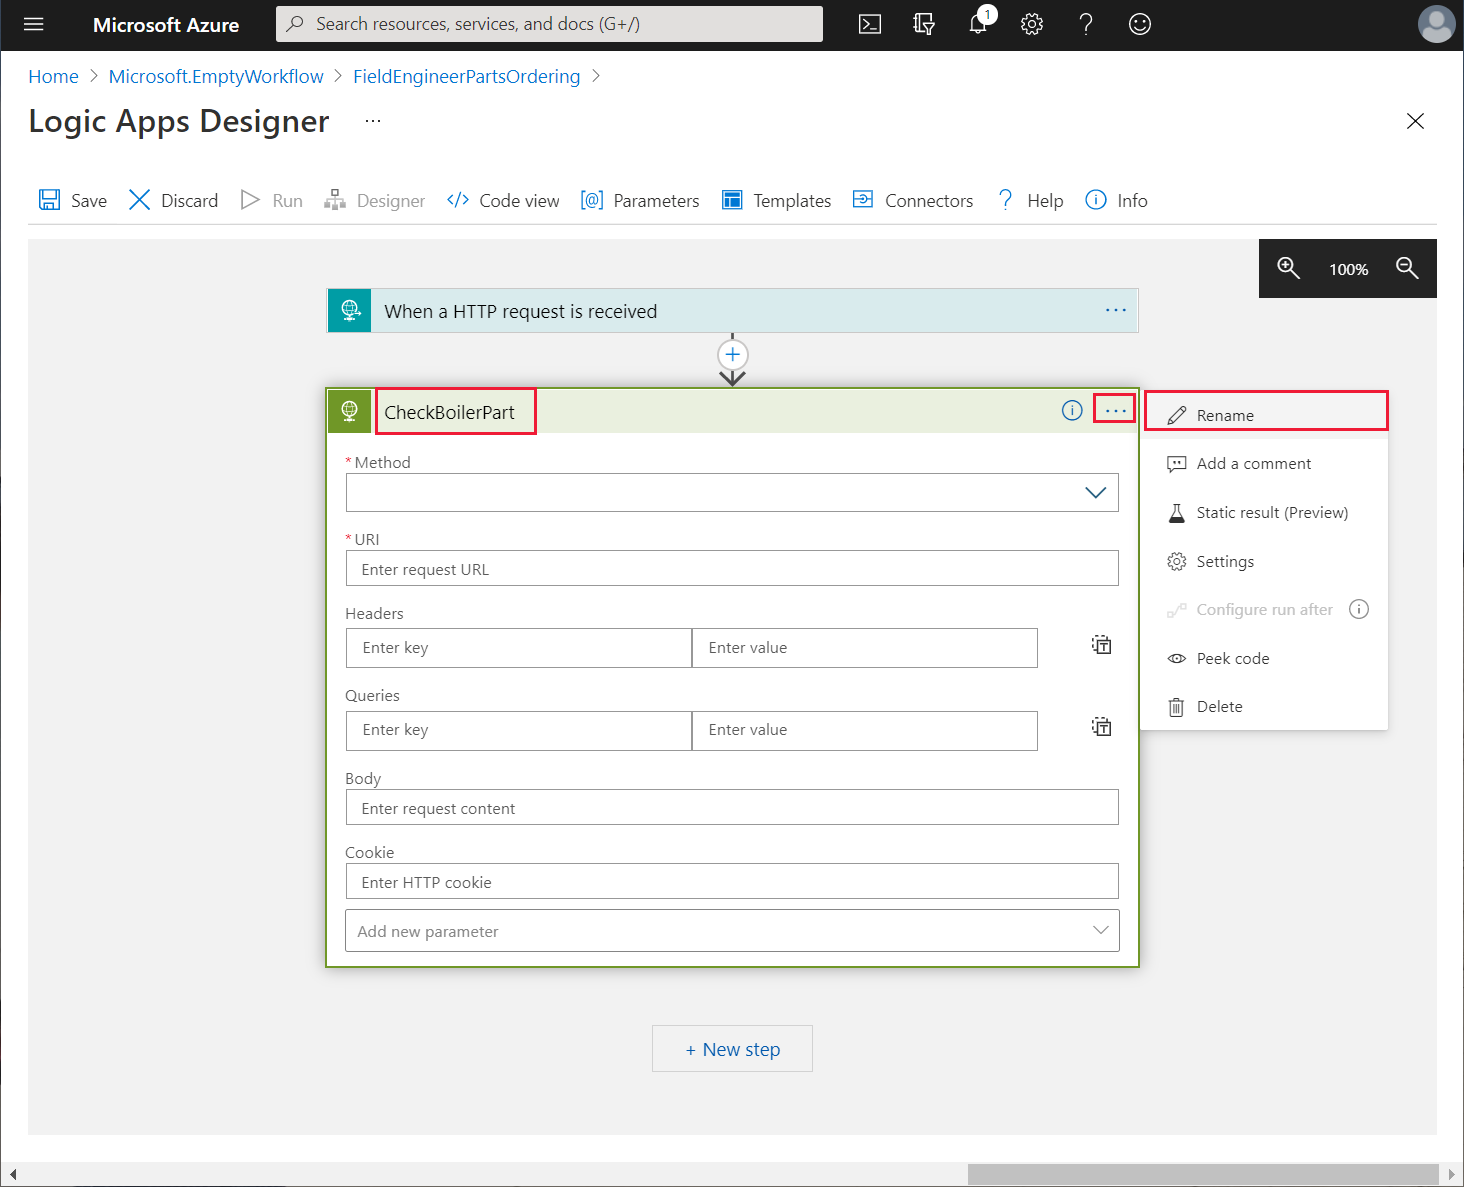
On the Actions pane, select the HTTP action.

In the HTTP action box, on the ellipsis menu, select Rename, and change the name of the action to CheckBoilerPart.
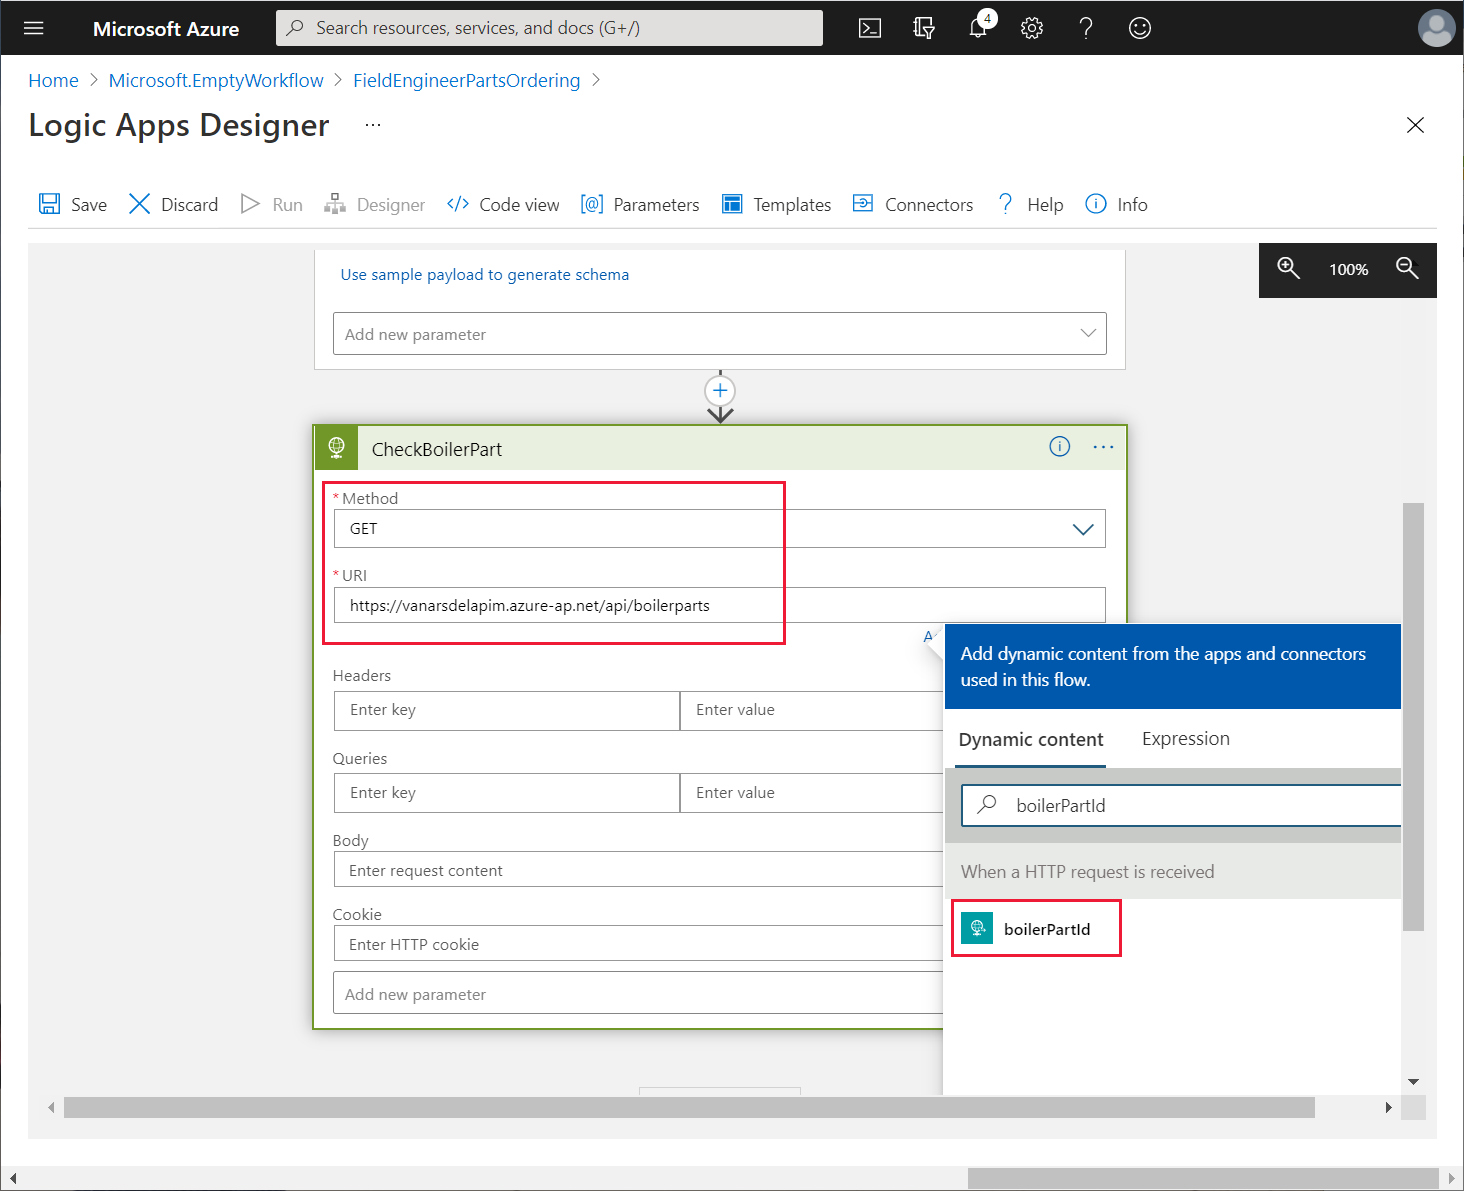
Set the properties of the HTTP action as follows, and then select + New Step:
- Method: GET
- URI: https://<APIM name>.azure-api.net/api/boilerparts/, where <APIM name> is the name of your API Management service. In the Dynamic content box for this URI, on the Dynamic content tab, select boilerPartId
In the Choose an operation box, in the Search connectors and actions box, enter Parse JSON, and then select the Parse JSON action.
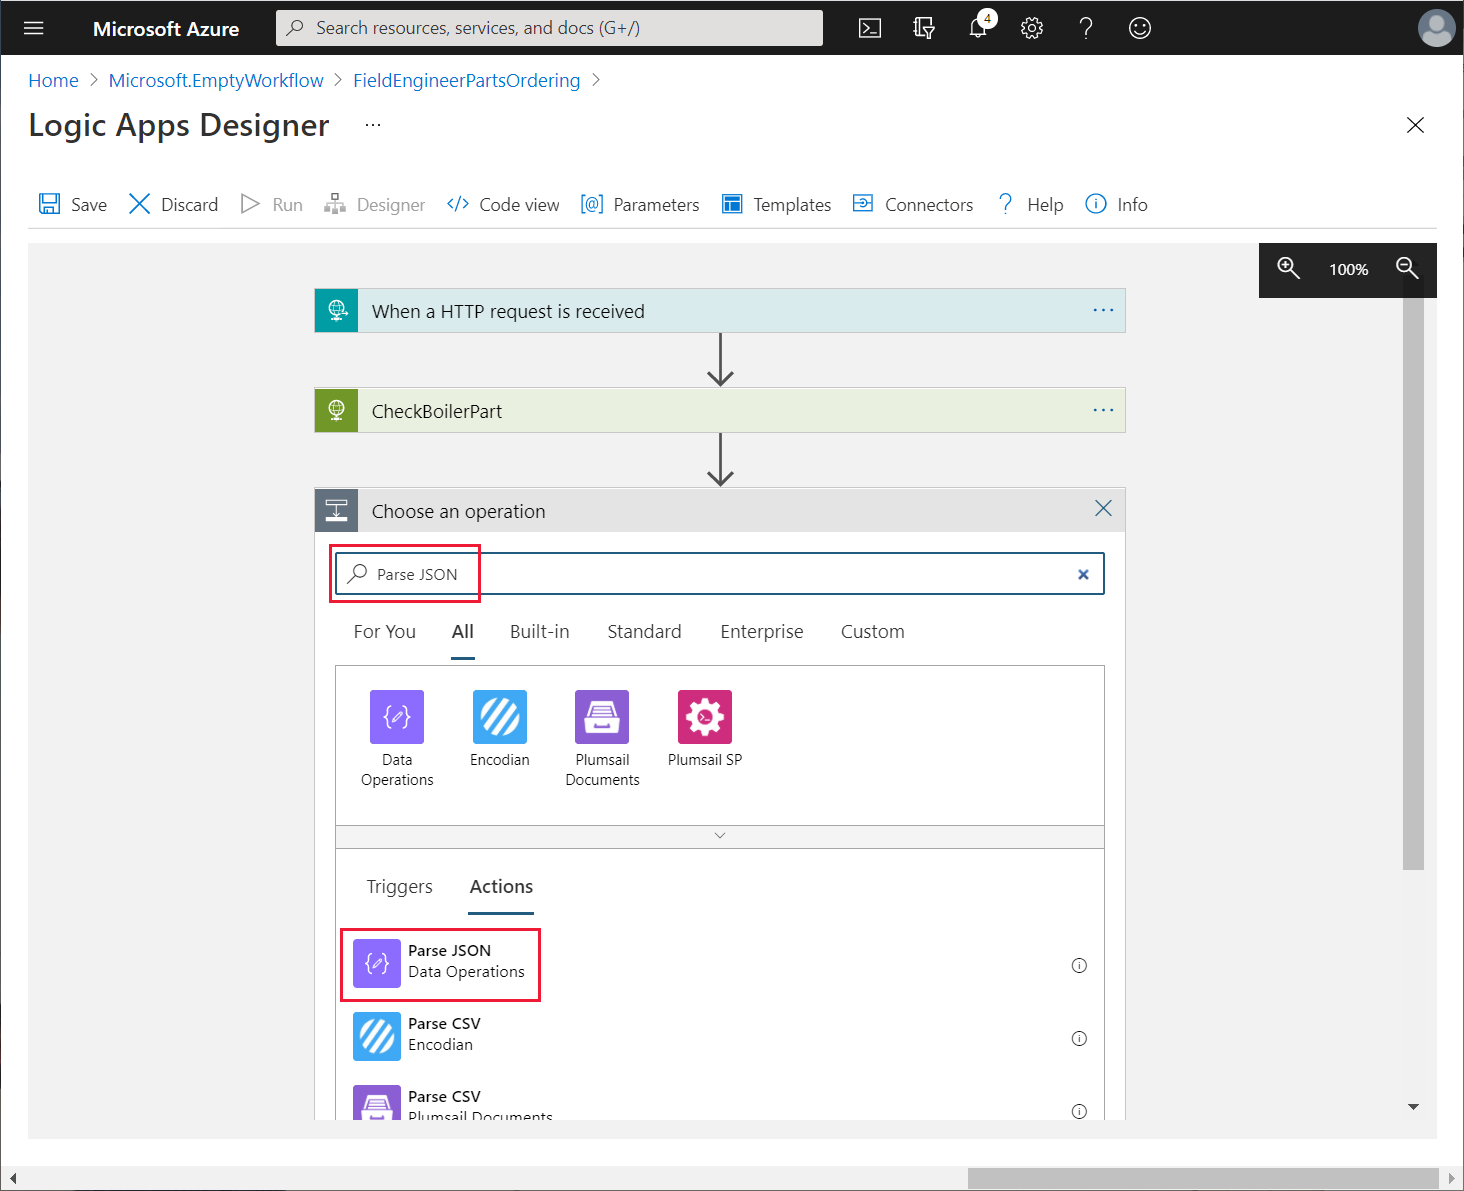
Using the ellipsis menu for the Parse JSON action, rename the action as ParseBoilerPart.
In the Content box for the ParseBoilerPart action, in the Dynamic Content box, select Body. In the Schema box, enter the following JSON schema, and then select + New step.
{
    "type": "object",
    "properties": {
        "id": {
            "type": "integer"
        },
        "name": {
            "type": "string"
        },
        "categoryId": {
            "type": "string"
        },
        "price": {
            "type": "number"
        },
        "overview": {
            "type": "string"
        },
        "numberInStock": {
            "type": "integer"
        },
        "imageUrl": {
            "type": "string"
        },
    }
}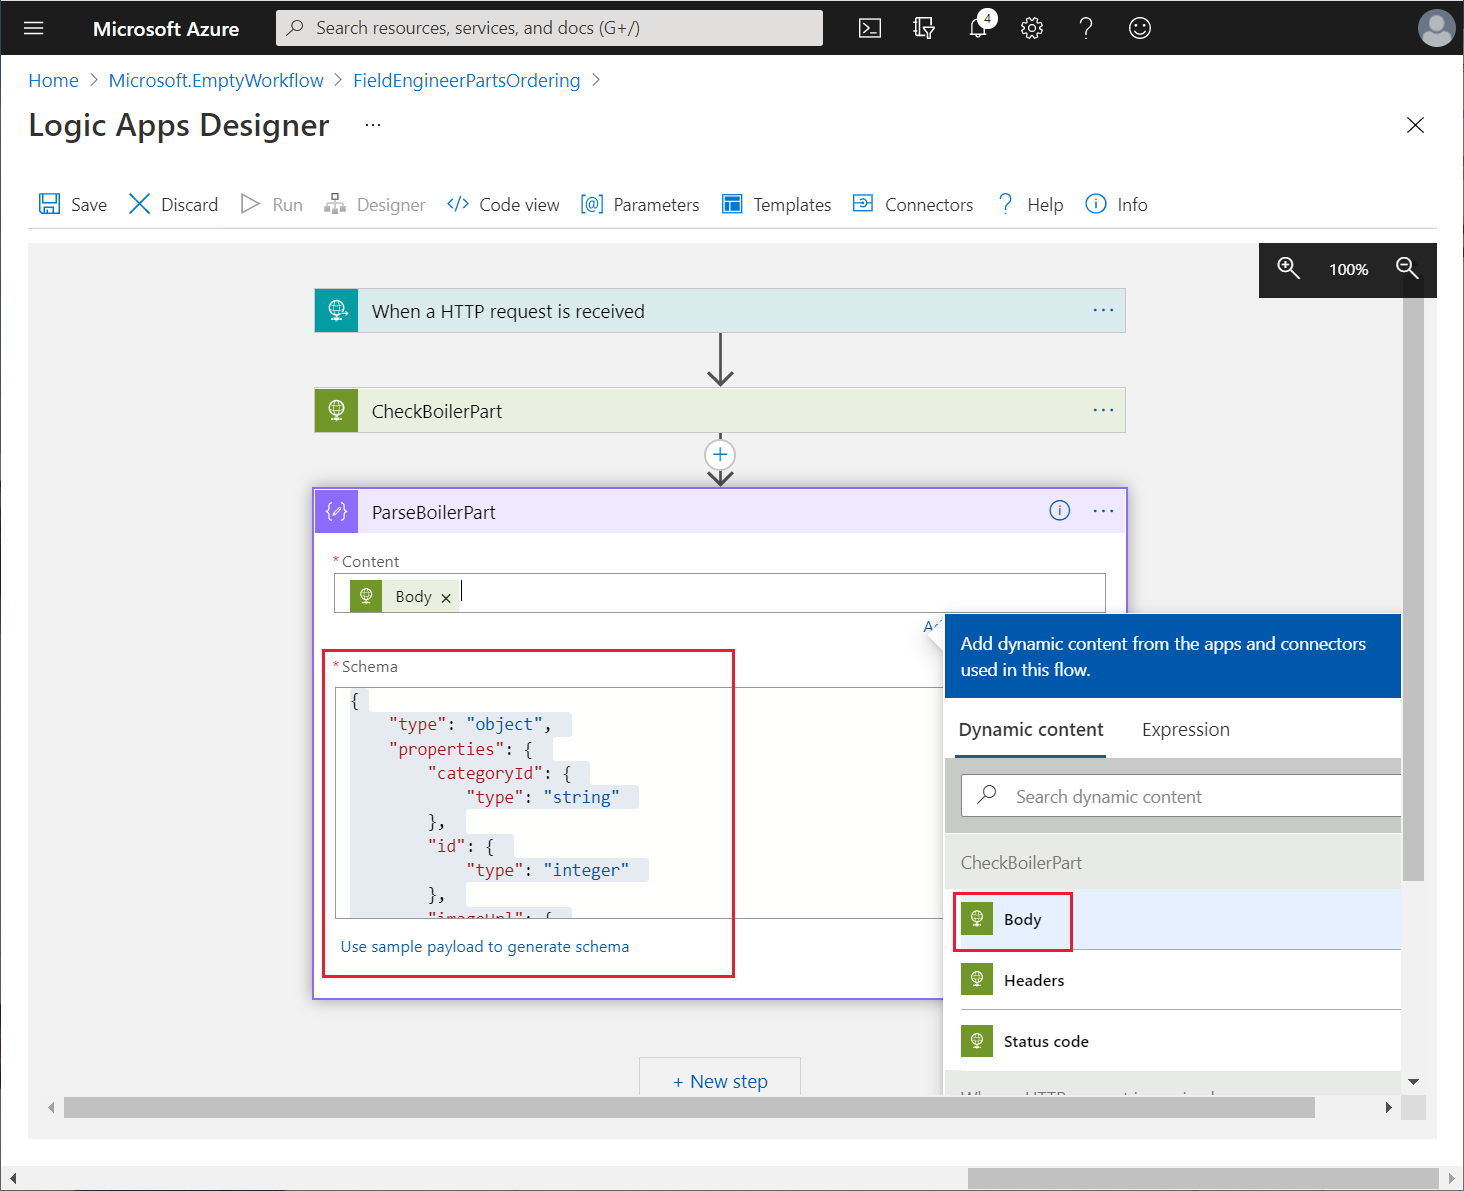
This action parses the response message returned by the getBoilerParts/{id} request. The response contains the details of the boiler part, including the number currently in stock.
In the Choose an operation box for the new step, select the HTTP connector.
On the Actions tab, select the HTTP action.
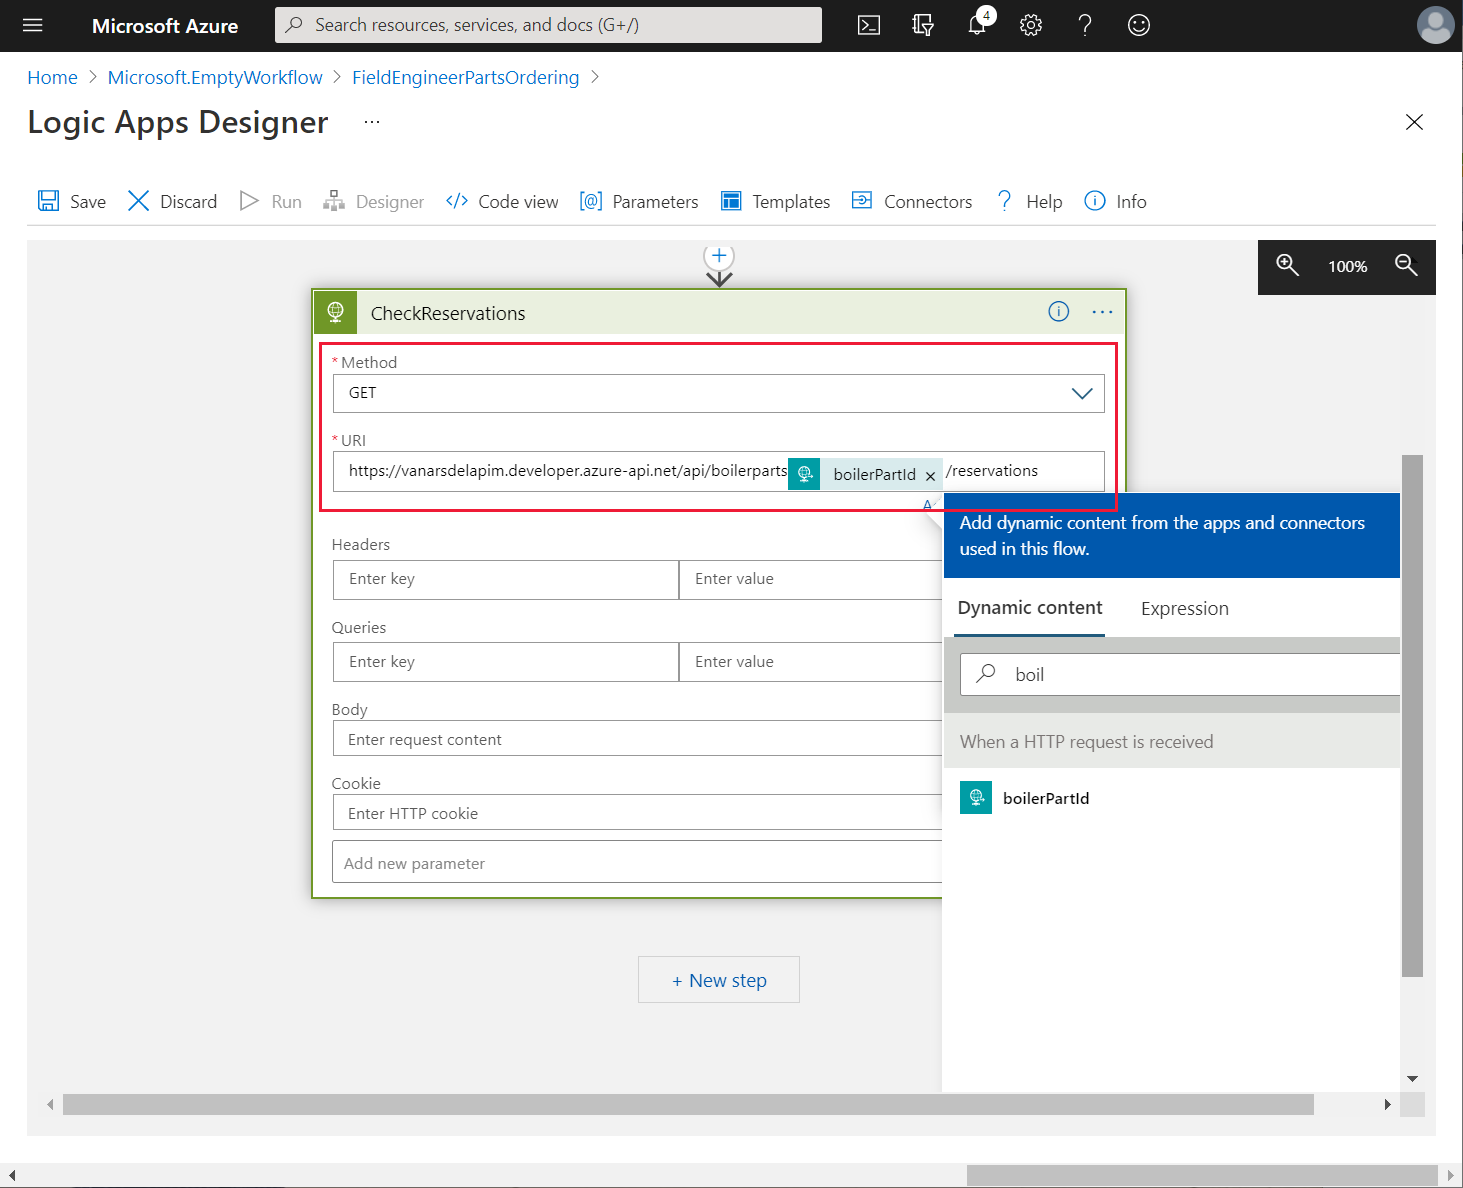
Using the ellipsis menu for the operation, rename the operation as CheckReservations.
Set the following properties for this operation, and then select + New step:
- Method: GET
- URI: https://<APIM name>.azure-api.net/api/boilerparts/. As before, in the Dynamic content box for this URI, on the Dynamic content tab, select boilerPartId. In the URI field, append the text /reserved after the boilerPartId placeholder
In the Choose an operation box for the new action, in the Search connectors and actions box, enter Parse JSON, and then select the Parse JSON action.
Rename the operation as ParseReservations.
Set the Content property to Body.
Enter the following schema, and then select + New step.
{
    "type": "object",
    "properties": {
        "id": {
                "type": "integer"
        },
        "totalReservations": {
                "type": "integer"
        }
    }
}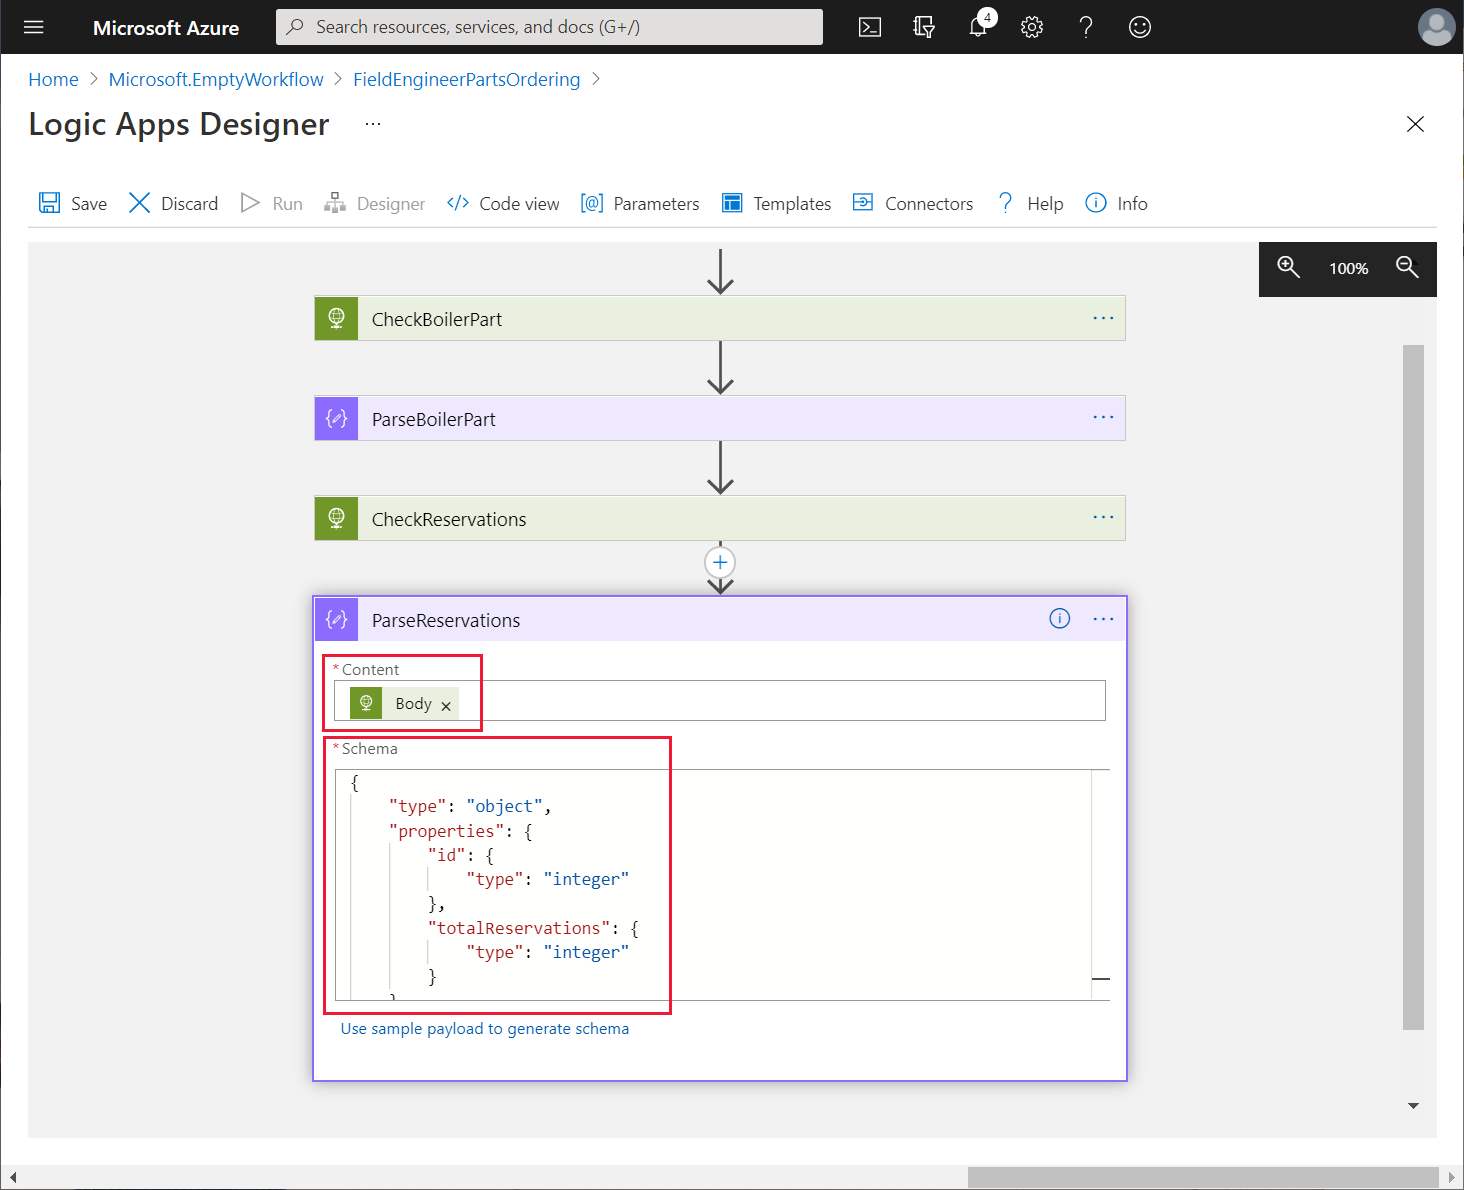
In the Choose an operation box for the new action, in the Search connectors and actions box, enter Condition, and then select the Condition Control action.

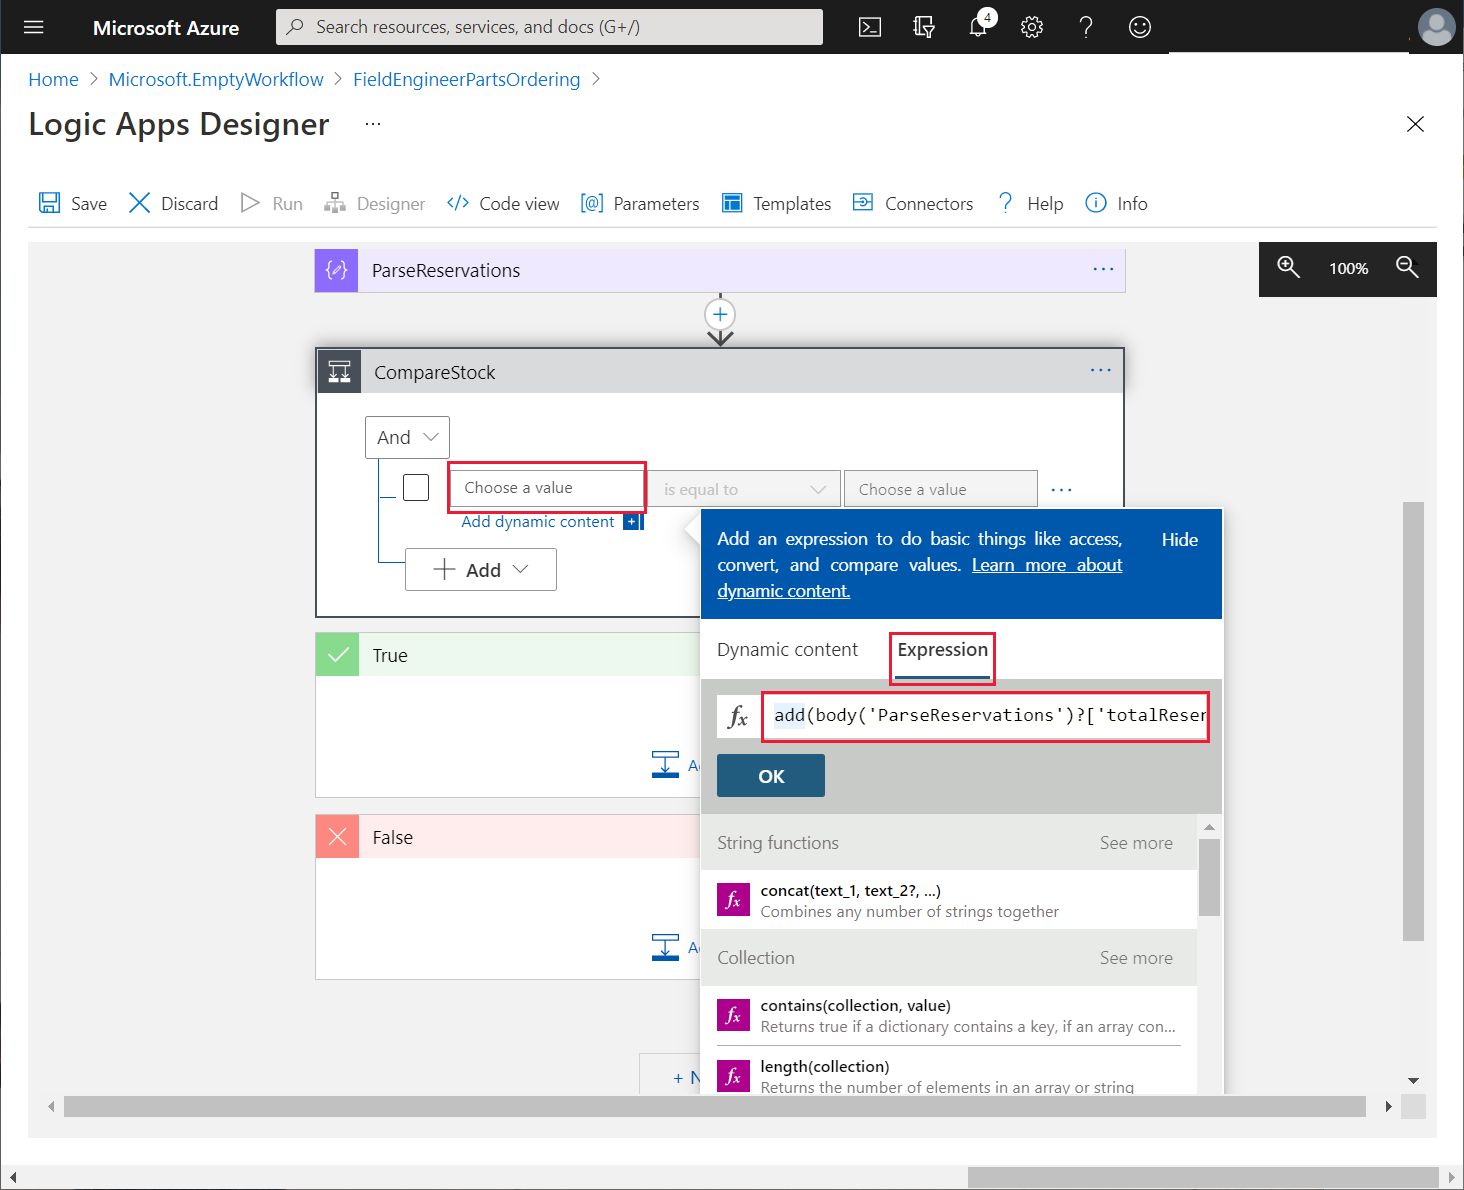
Rename the operation as CompareStock.
Select the Choose a value box. In the Add dynamic content box, on the Expression tab, enter the following expression, and then select OK.
add(body('ParseReservations')?['totalReservations'], triggerBody()?['numberToReserve'])This expression calculates the sum of the number of items of the specified boiler part that are currently reserved, and the number requested by the engineer.
In the condition dropdown list box, select is greater than.
In the remaining Choose a value box, in the Dynamic content box, on the Dynamic content tab, under ParseBoilerPart, select numberInStock.
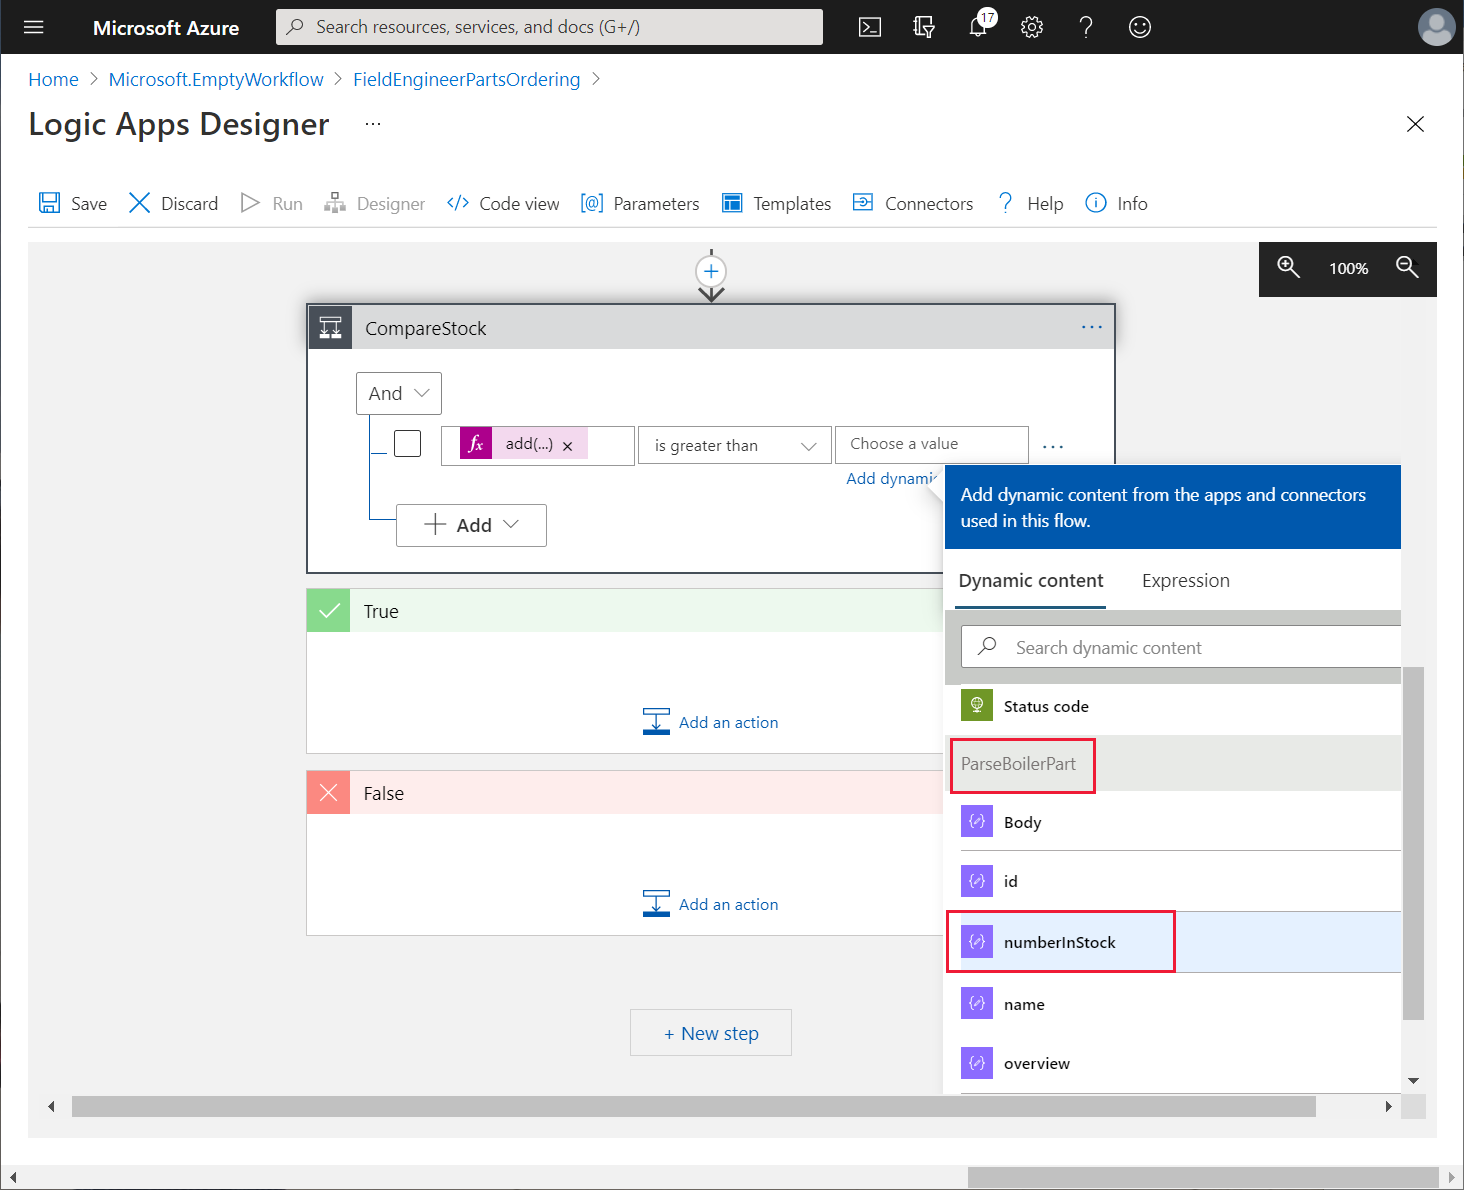
If the number of items required plus the number reserved is greater than the number in stock, the app needs to place an order to replenish the inventory. In the True branch of the CompareStock action, select Add an action.
On the All tab for the new operation, select HTTP, and then select the HTTP action.
Rename the operation as PostOrder.
Set the following properties for the PostOrder operation:
- Method: POST
- URI: https://<APIM name>.azure-api.net/api/orders
- In the Queries table, in the first row, enter the key boilerPartId. For the value in the Add dynamic content box, on the Dynamic content tab, select **boilerPartId **
- In the second row of the Queries table, enter the key quantity. In the value field, enter 50.
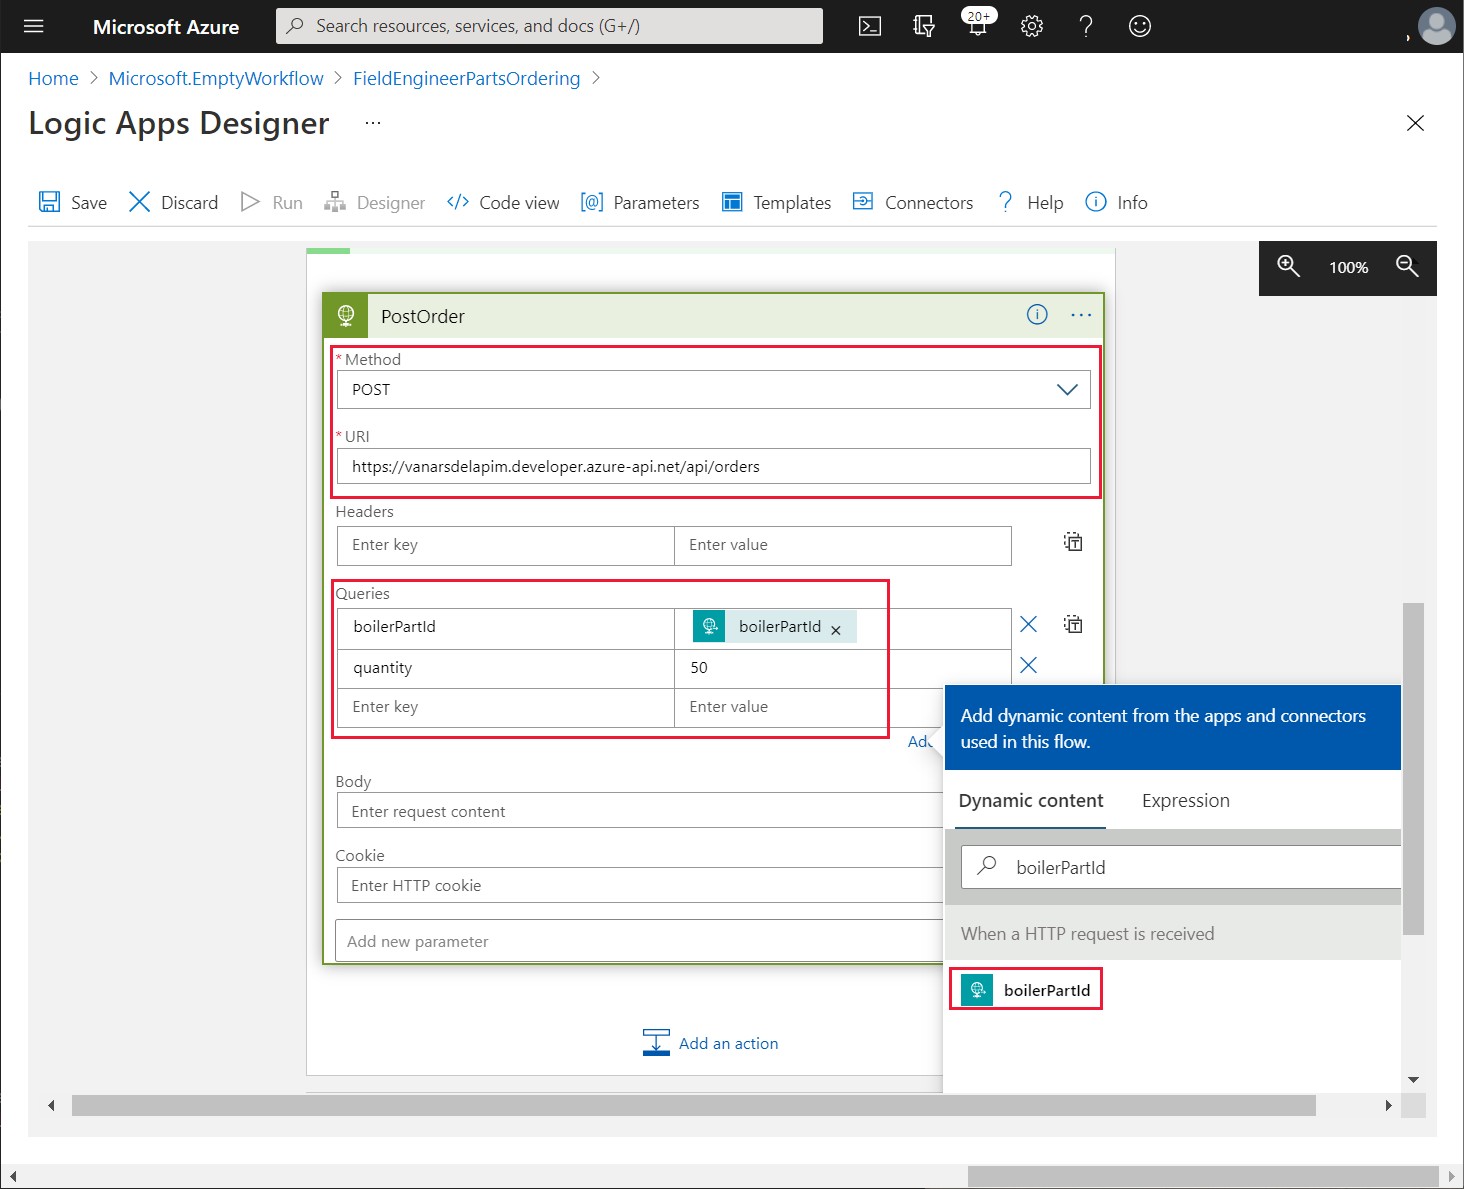
The logic app will automatically order 50 items of the specified part when stock is running low.
Note
The logic app assumes that the engineer won't actually attempt to reserve more than 50 items of a specified part in a single request!
Leave the False branch of the CompareStock action empty.
Below the CompareStock action, select + New step.
On the All tab for the new operation, select HTTP, and then select the HTTP action.
Rename the operation as PostReservation.
Set the following properties for the PostReservation operation:
- Method: POST
- URI: https://<APIM name>.azure-api.net/api/reservations
- In the Queries table, in the first row, enter the key boilerPartId. For the value in the Add dynamic content box, on the Dynamic content tab, select boilerPartId.
- In the second row, enter the key engineerId. For the value in the Add dynamic content box, on the Dynamic content tab, select engineerId
- In the third row, enter the key quantityToReserve. For the value in the Add dynamic content box, on the Dynamic content tab, select numberToReserve
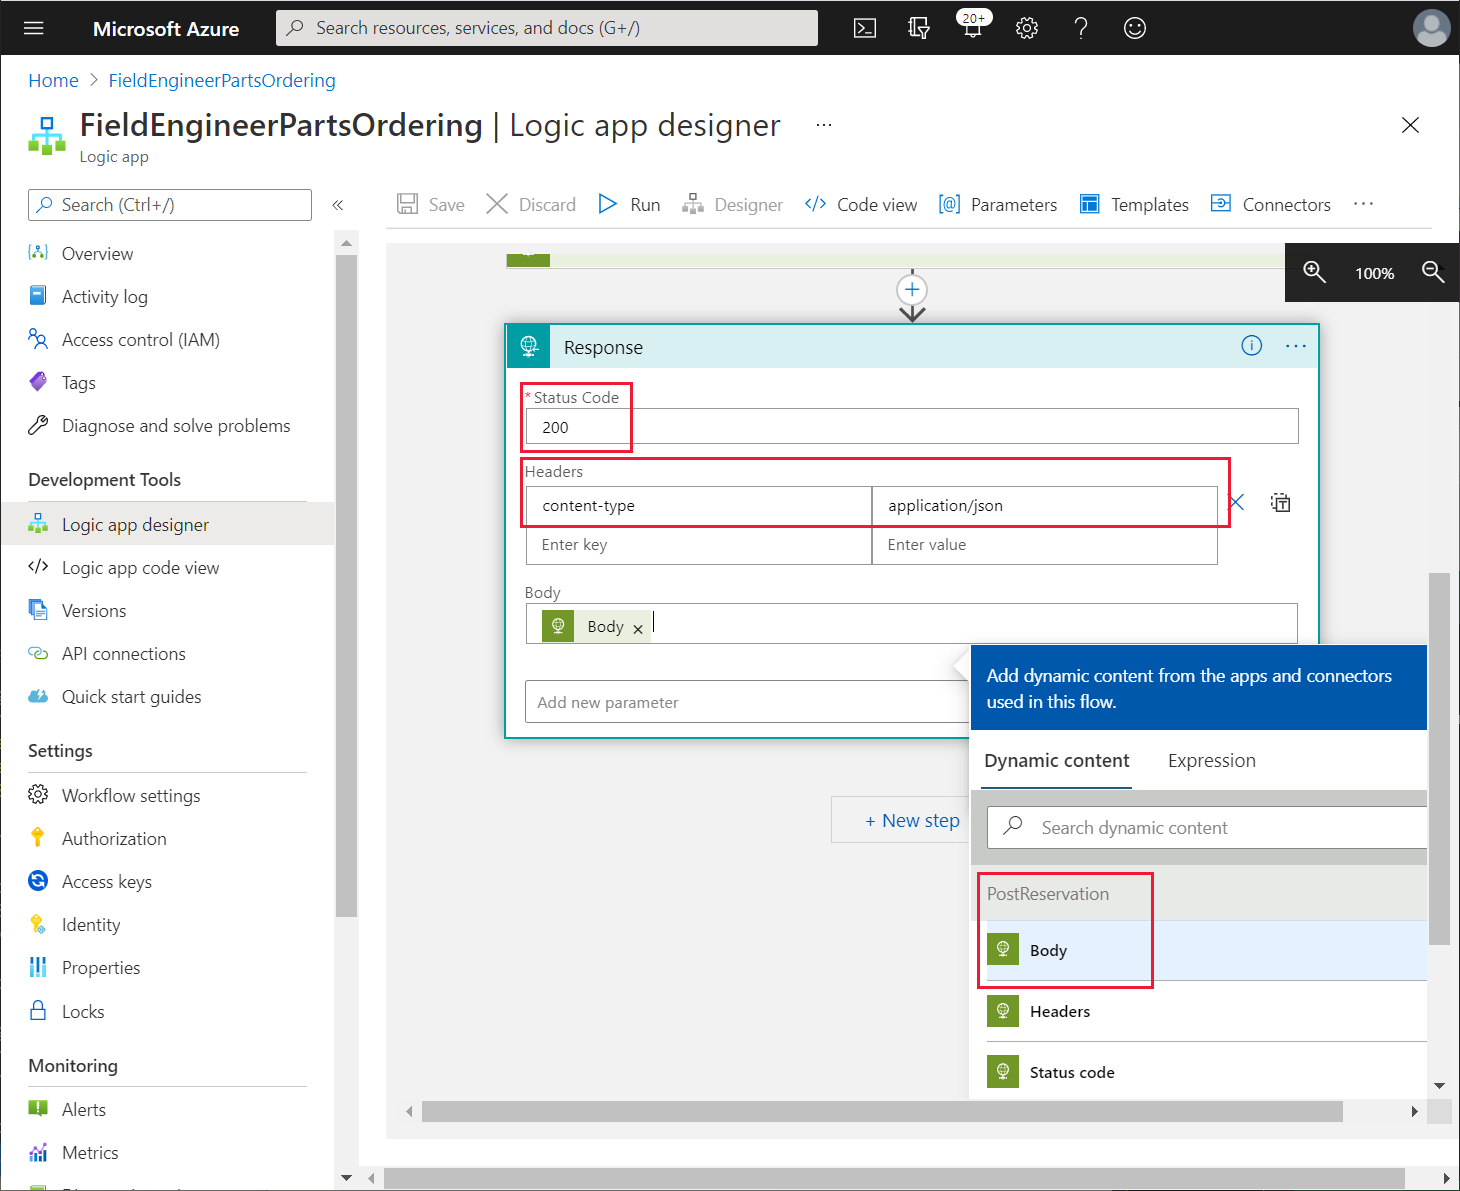
Select + New Step. In the Choose an operation box, search for and select the Response action.
Set the following properties for the Response action:
- Status Code: 200
- Headers: Key - content-type, Value - application/json
- Body: In the Dynamic content box, select the Body element from the PostReservation request. This is the body returned when the reservation is made.
In the upper left of the Logic Apps Designer page, select Save. Verify that the logic app can be saved without any errors.
To create the custom connector that Power Apps can use to trigger the logic app, Kiana performs the following steps while still in the Azure portal:
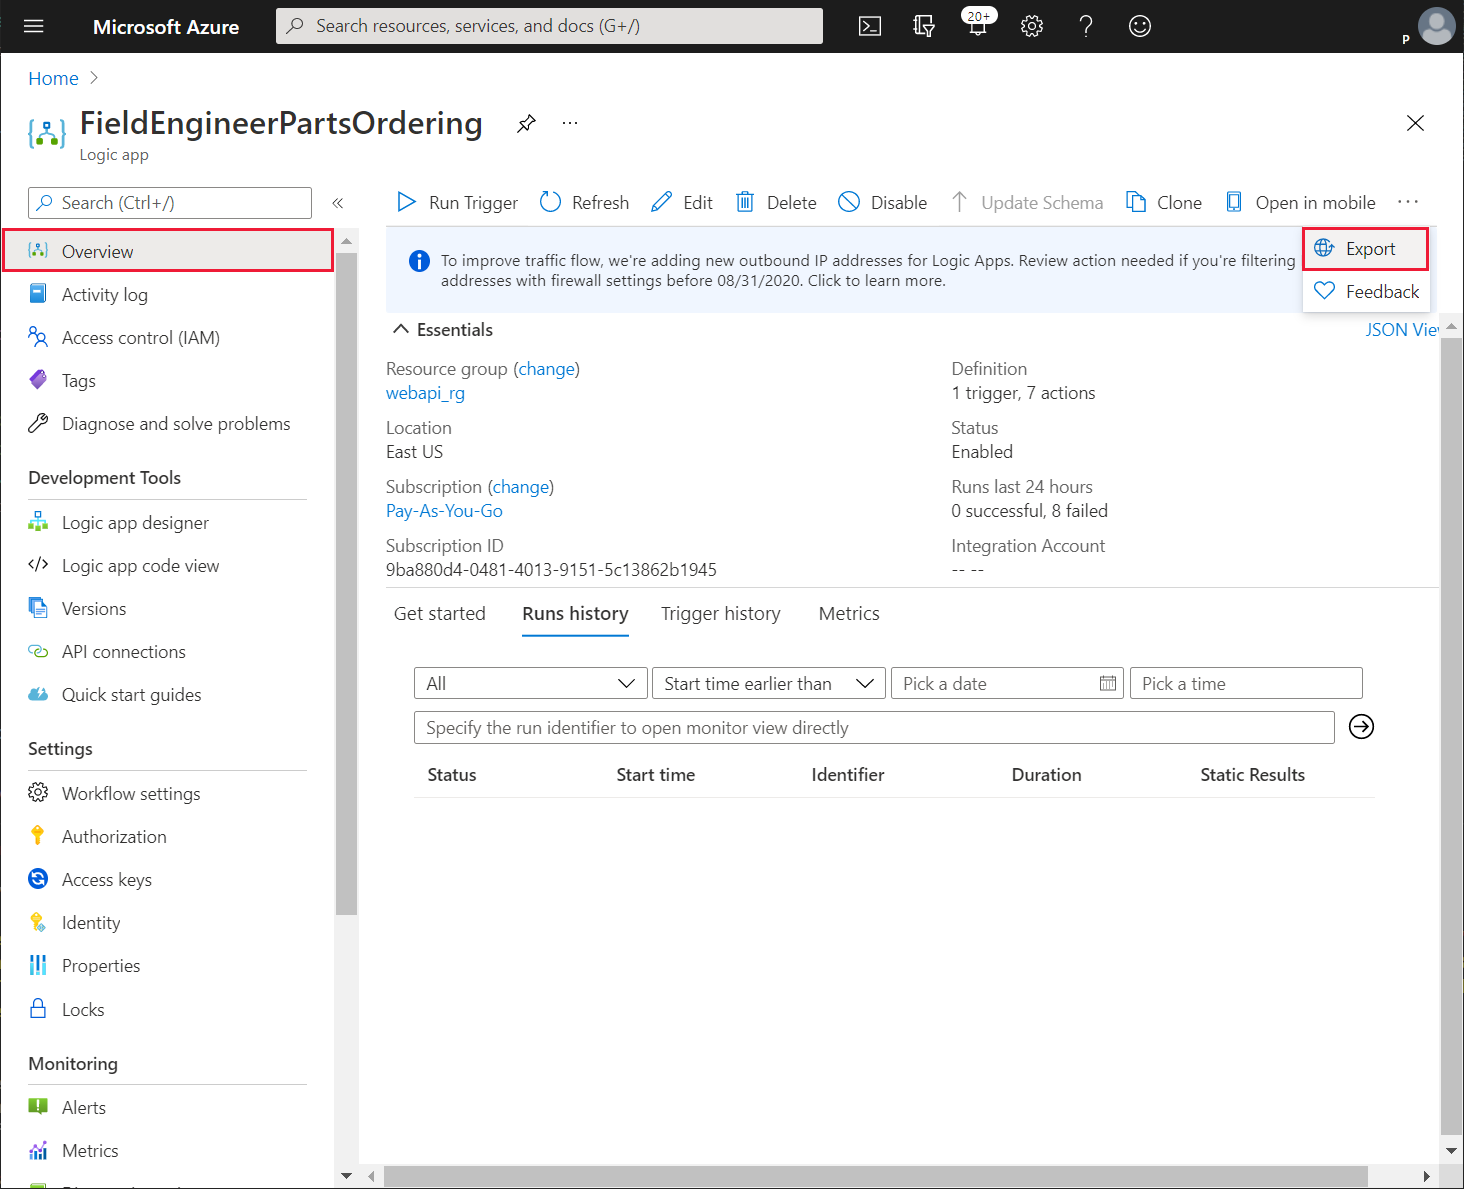
On the Overview page for the logic app, select Export.
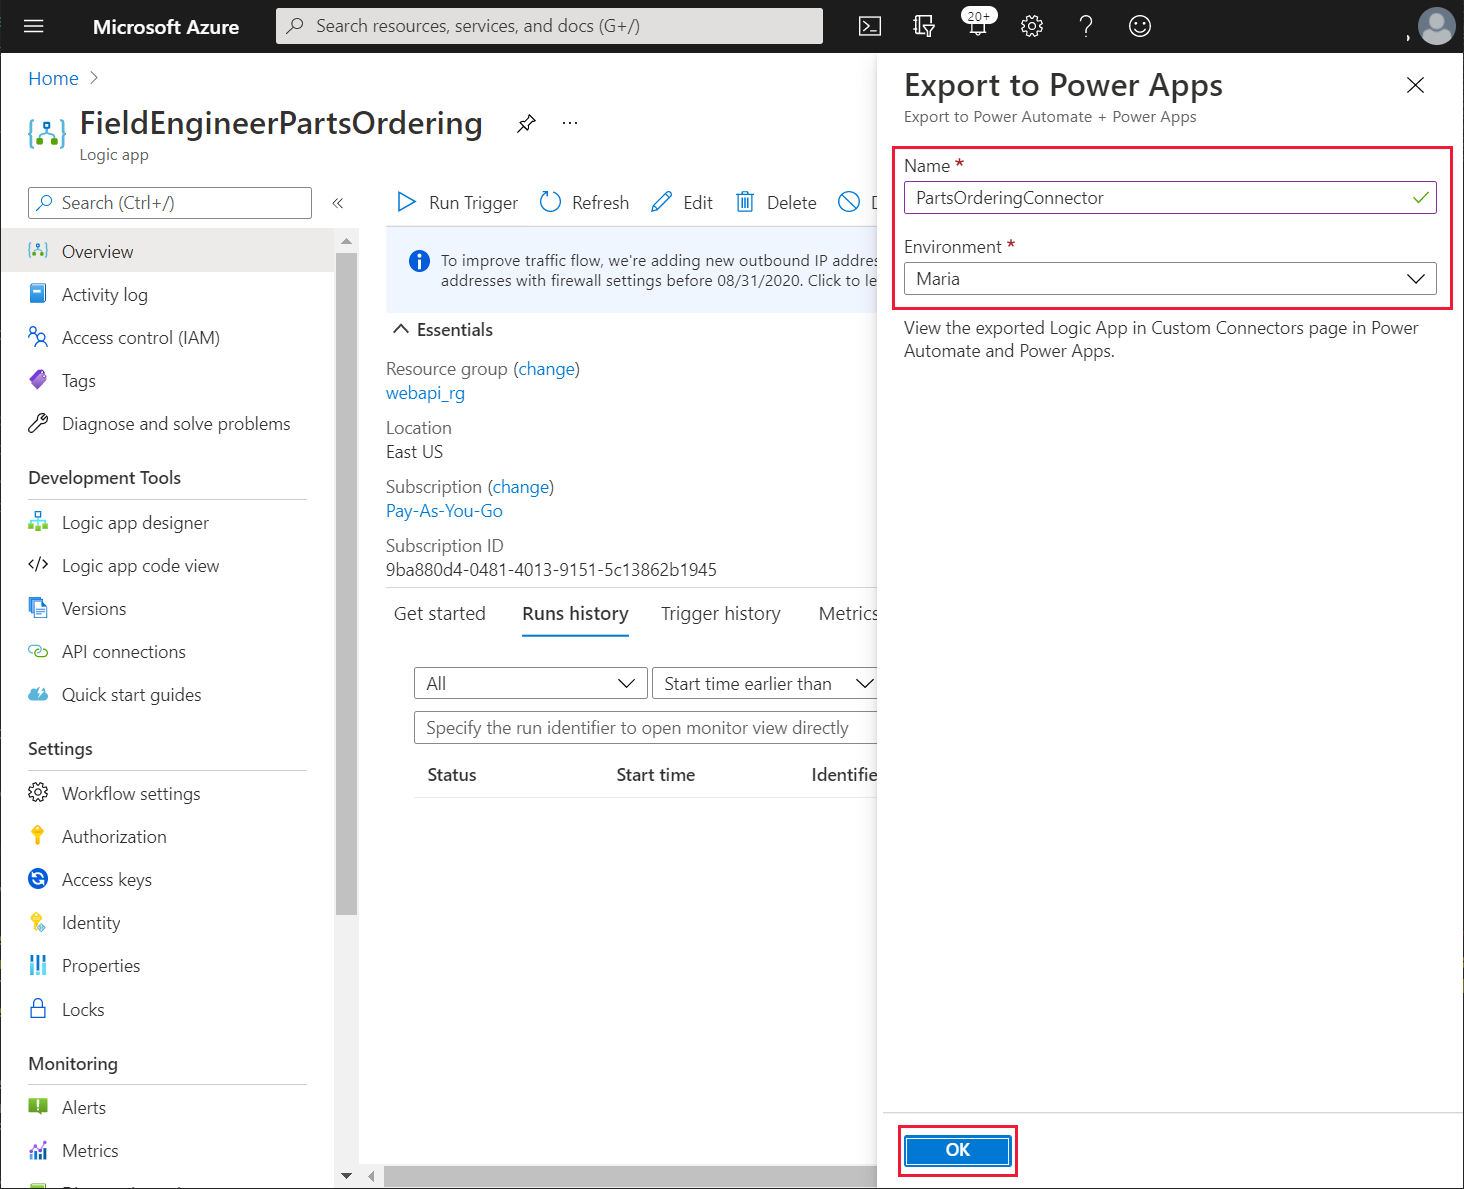
In the Export to Power Apps pane, name the connector PartsOrderingConnector, select your Power Apps environment, and then select OK.
Sign in to Power Apps.
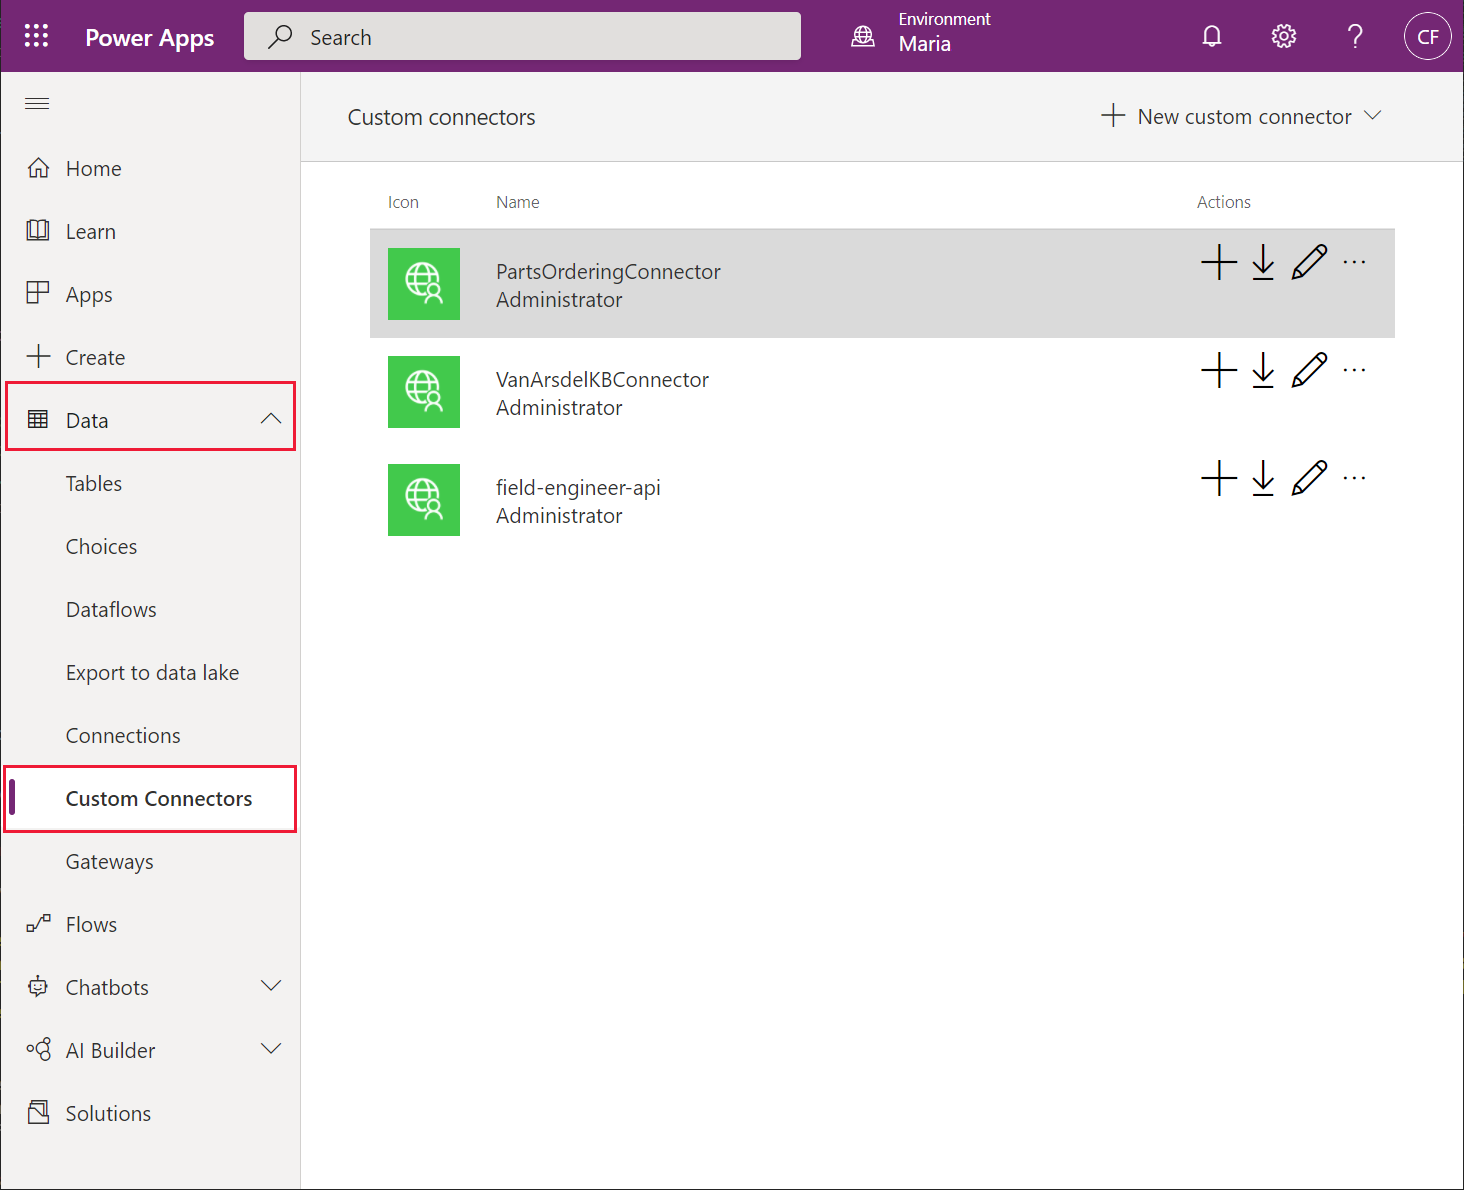
In your environment, under Data, select Custom Connectors and verify that the PartsOrderingConnector is listed.
Maria can now modify the VanArsdel app to enable a technician to order parts while attending a customer site. Maria adds an Order button to the PartDetails screen, as follows:
Sign in to Power Apps (if not already signed in).
Under Apps, select the VanArsdelApp app. On the ellipsis menu for the app, select Edit.
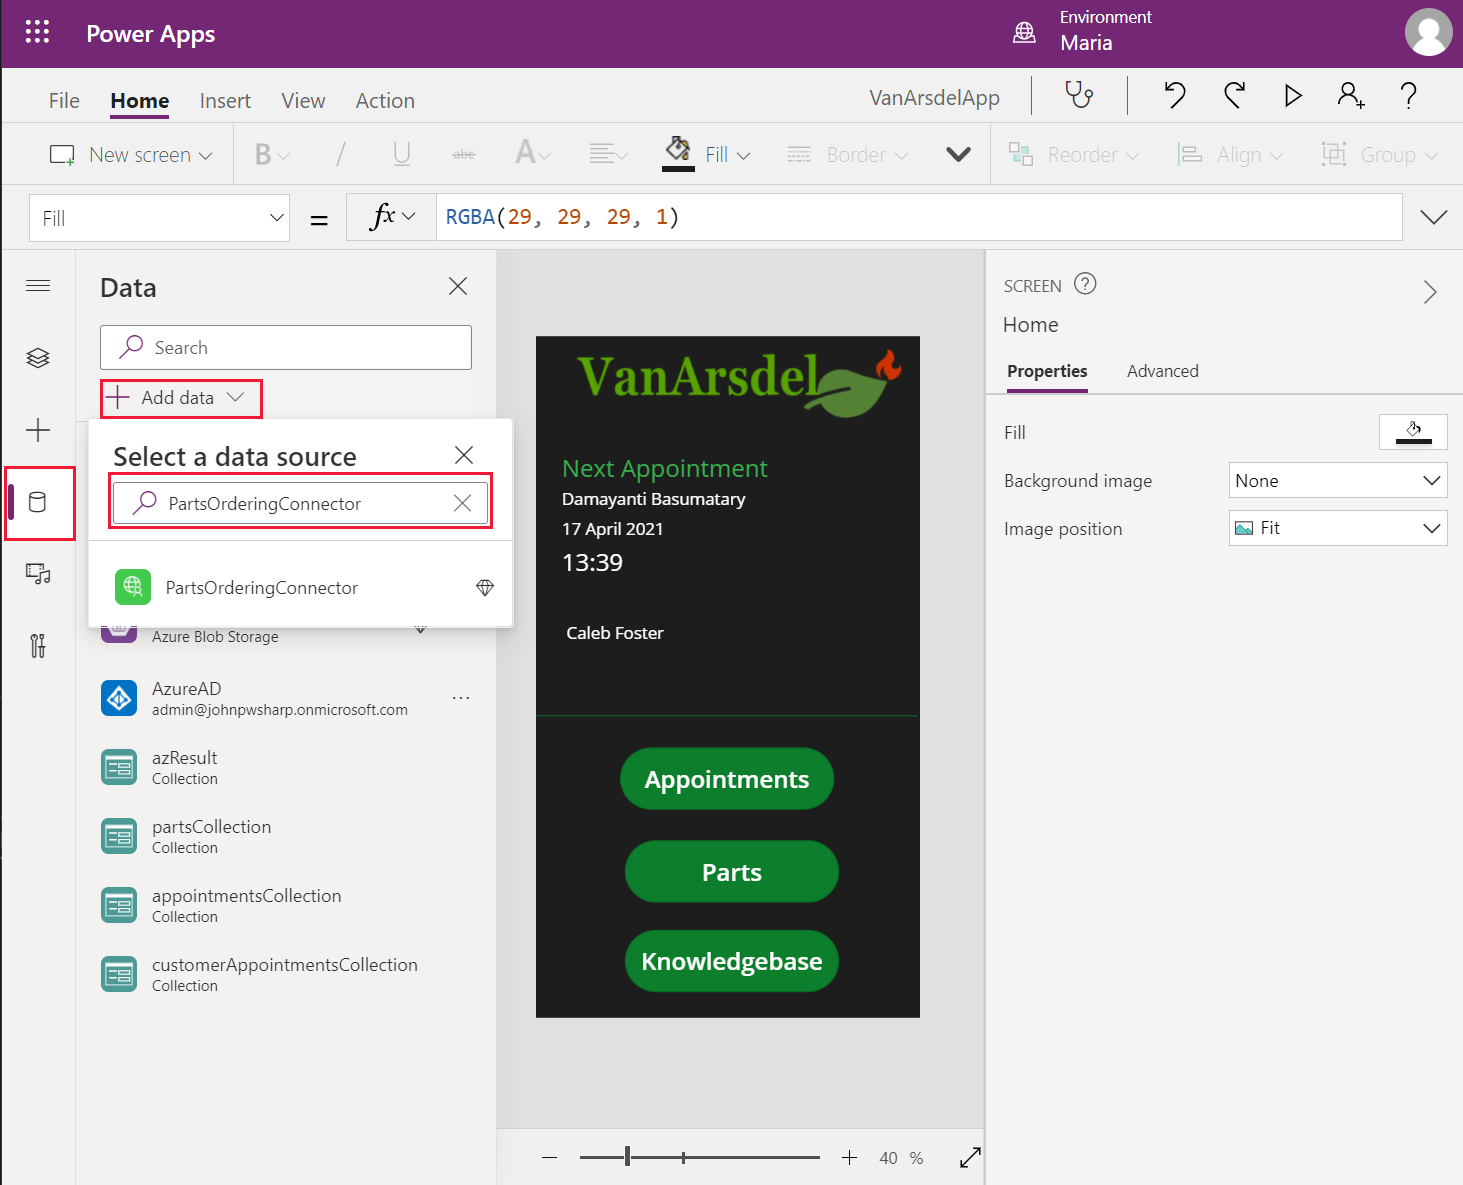
On the Data pane, select Add data, search for the PartsOrderingConnector connector, and add a new connection using that connector.
On the Tree view pane, expand the PartDetails screen, and then expand the DetailForm1 form.
On the Properties pane on the right, select Edit fields. On the Fields pane, on the ellipsis menu, select Add a custom card.
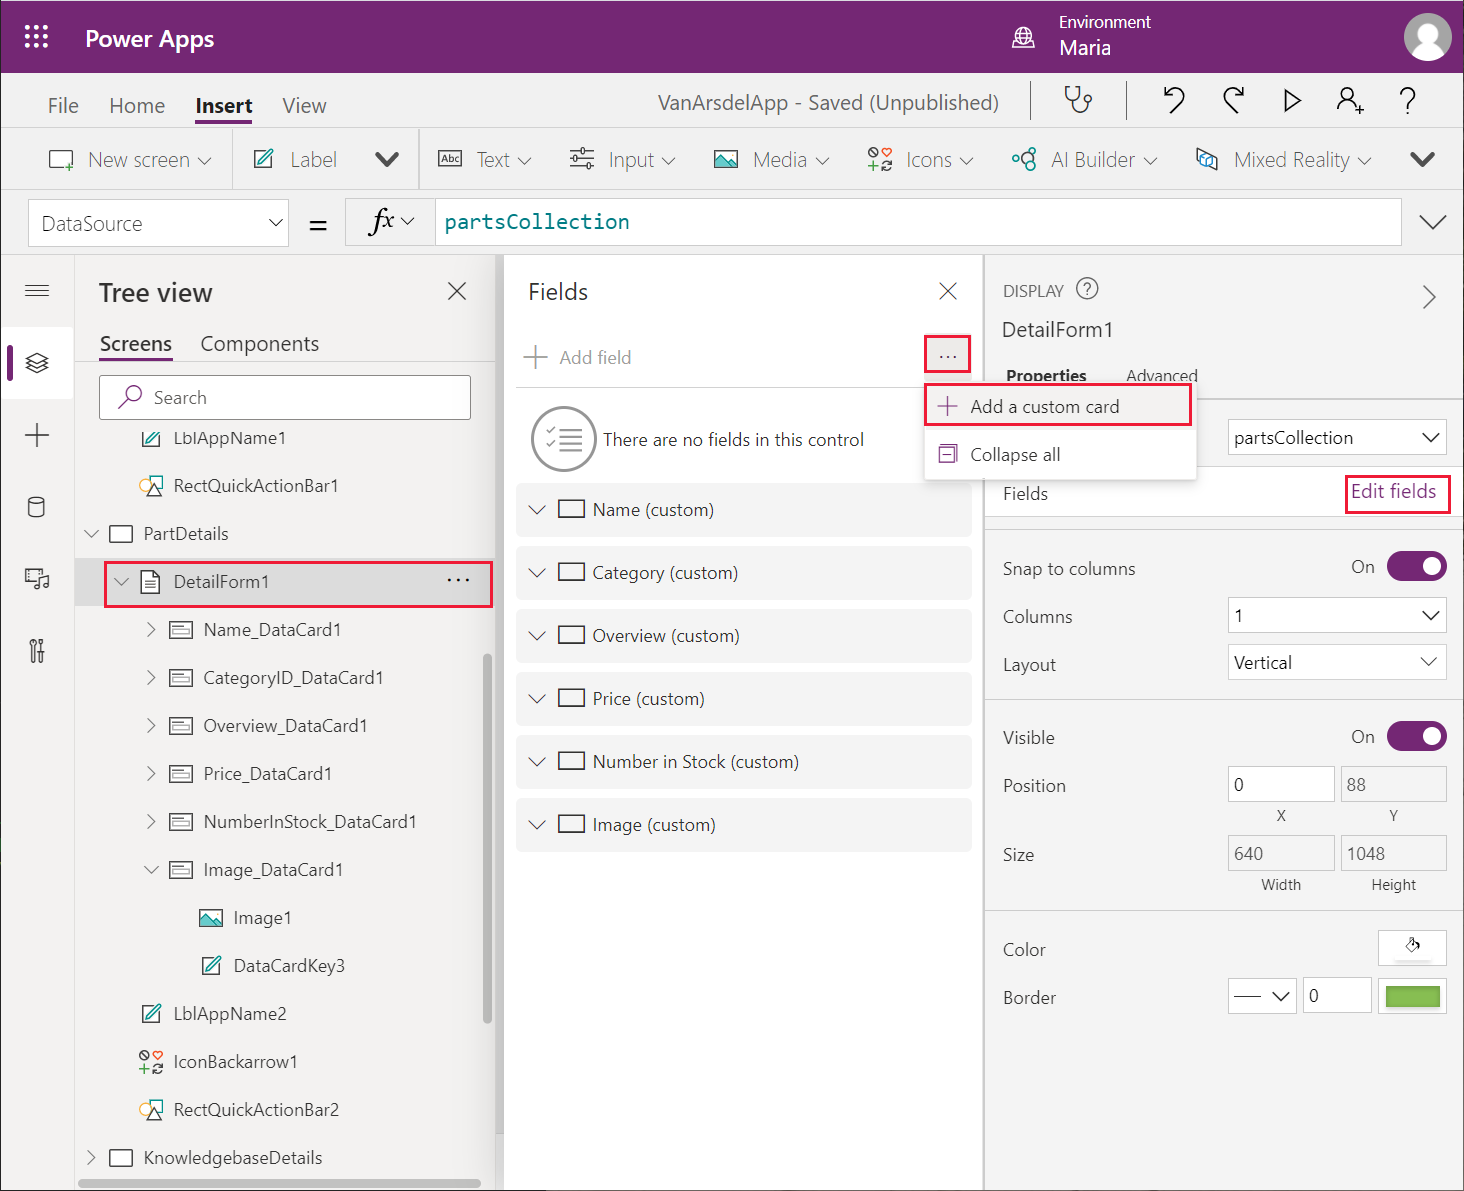
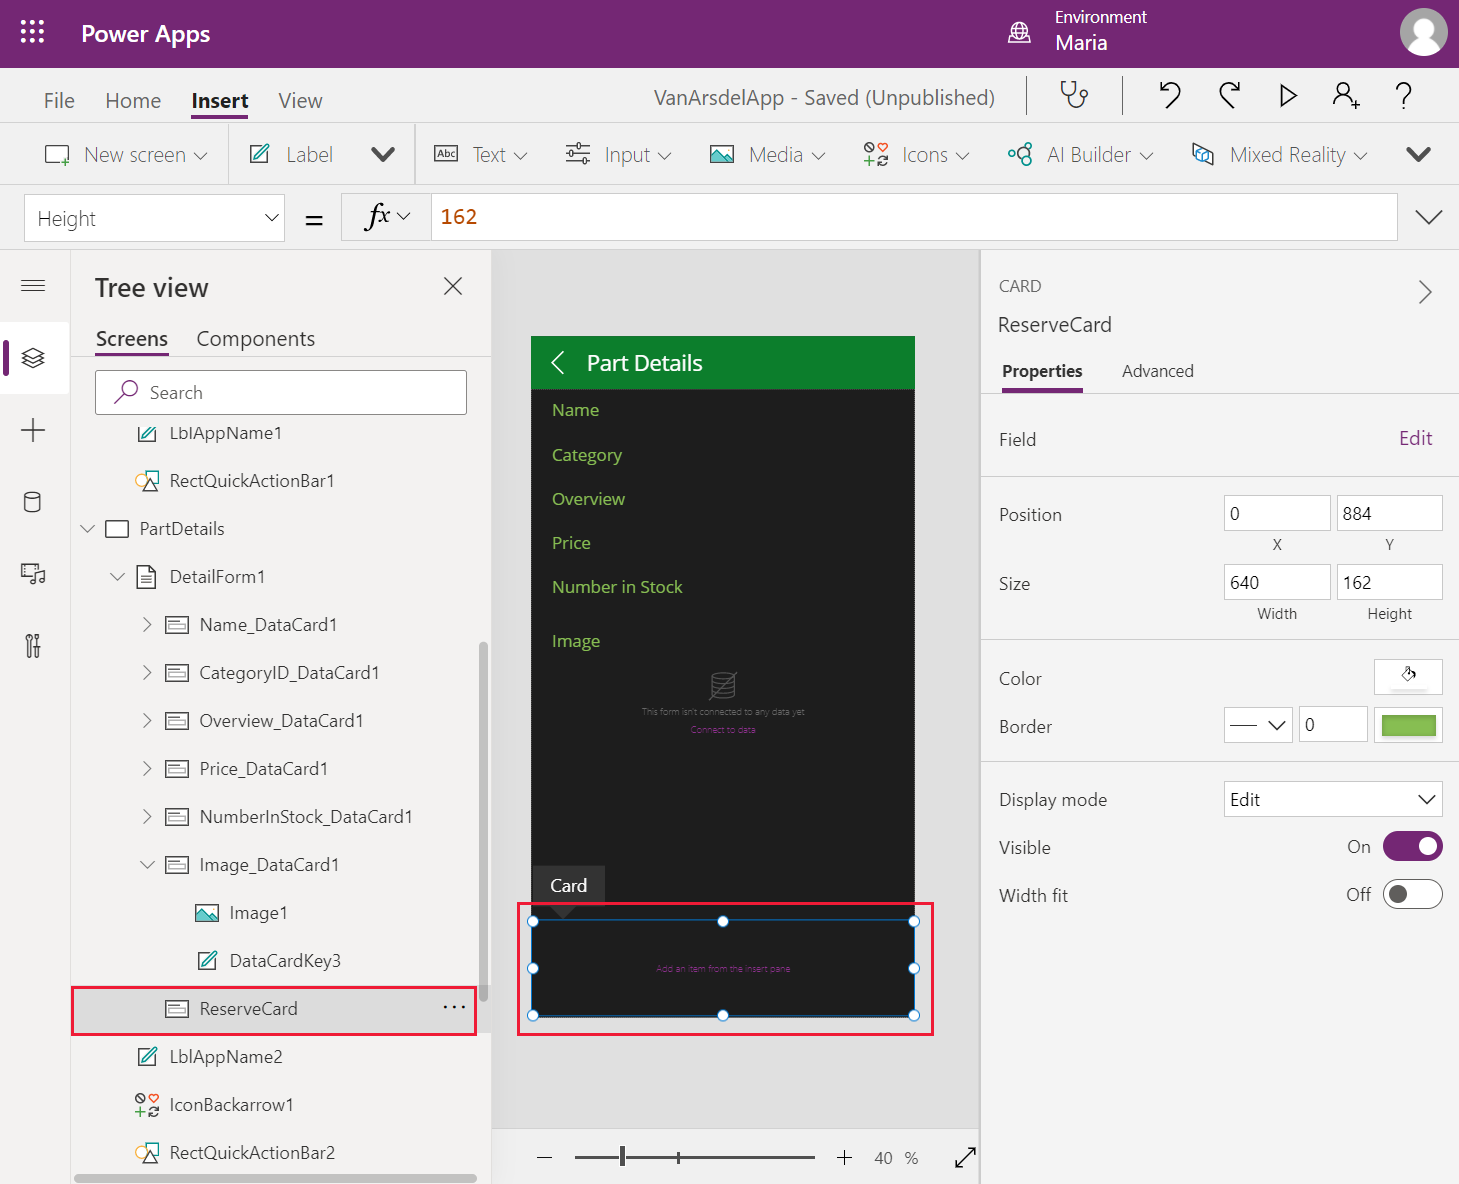
On the Tree view pane, rename the new card from DataCard1 to ReserveCard. In the Design view window, resize the card so that it occupies the lower part of the screen, below the Image_DataCard1 control.
On the Insert menu, from the Input sub menu, add a Text Input control, a Button control, and a Label control to the ReserveCard control.
Resize and position the controls so that they're adjacent, with the Button control to the right of the Text Input control, and the Label underneath the Button control.
On the Properties pane for the Text Input control, clear the Default property.
On the Properties pane for the Button control, set the Text property to Reserve.
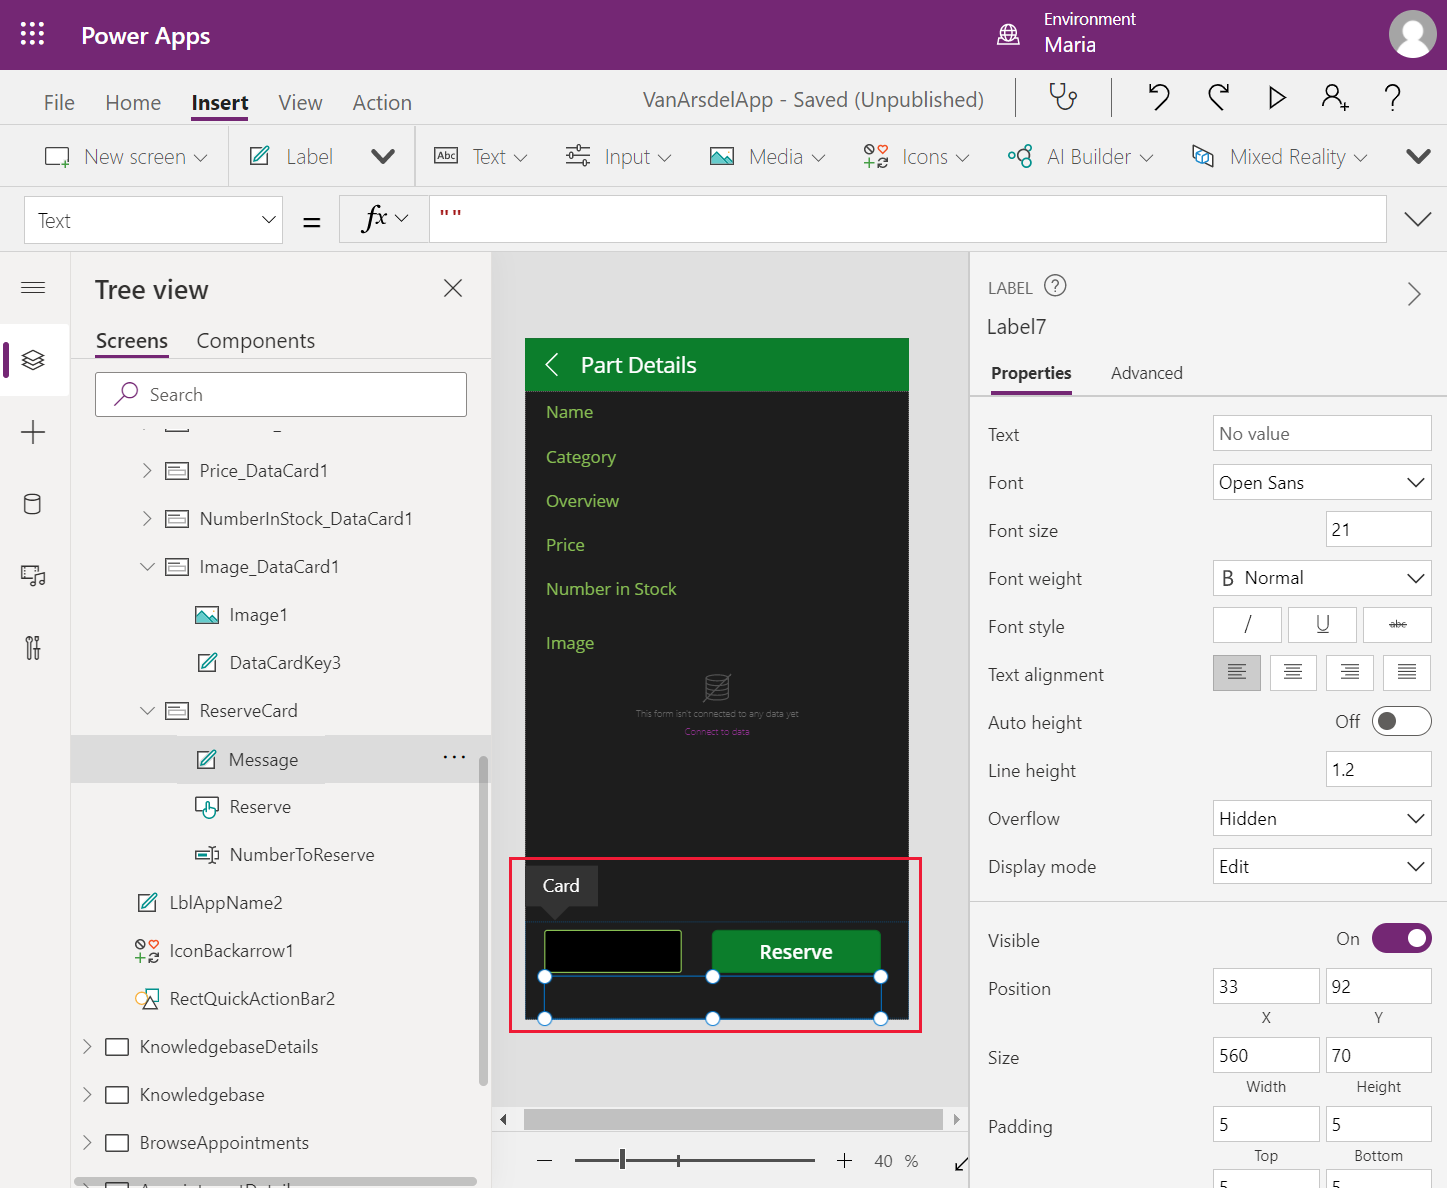
Rename the Text Input control as NumberToReserve, rename the Button control as Reserve, and rename the Label control as Message.
On the Properties pane for the Message control, set the Text property to Parts Reserved, and set the Visible property to MessageIsVisible.
Note
MessageIsVisible is a variable that you'll initialize to false when the screen is displayed, but it will be changed to true if the user selects the Reserve button.
Set the OnSelect property for the Reserve button control to the following formula.
FieldEngineerPartsOrdering.manualinvoke({boilerPartId:ThisItem.id, engineerId:"ab9f4790-05f2-4cc3-9f01-8dfa7d848179", numberToReserve:NumberToReserve.Text});

Set(MessageIsVisible, true);
Note
This formula uses a hard-coded engineer ID to represent the technician currently running the app. Chapter 8 describes how to retrieve the ID for the signed-on user.
Additionally, the app performs no error checking; it assumes that the request to reserve parts always succeeds. For more information about error handling, go to Errors function in Power Apps.
Set the OnVisible property for the PartDetails screen to Set(MessageIsVisible, false).
To test the app, do the following:
On the Tree view pane, select the Home screen.
Select F5 to preview the app.
On the Home screen, select Parts.
In the browse screen, select any part.
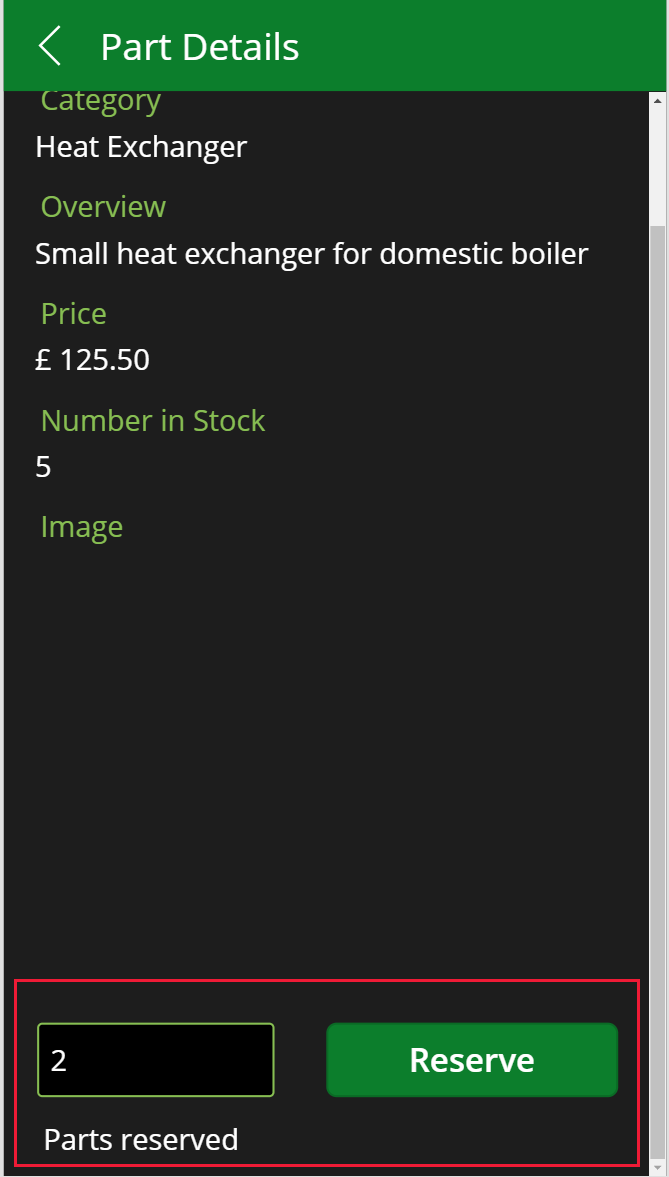
On the Part Details screen, scroll down to the reservations section, enter a positive integer value, and then select Reserve. Verify that the Parts reserved message appears.
Close the preview window and return to Power Apps Studio.
In the Azure portal, go to the page for the InventoryDB SQL Database.
Select the Query editor, and sign in as sqladmin with your password.
In the Query 1 pane, enter the following query, and then select Run. Verify that the reservation you made in the VanArsdel app appears.
SELECT * FROM [dbo].[Reservations]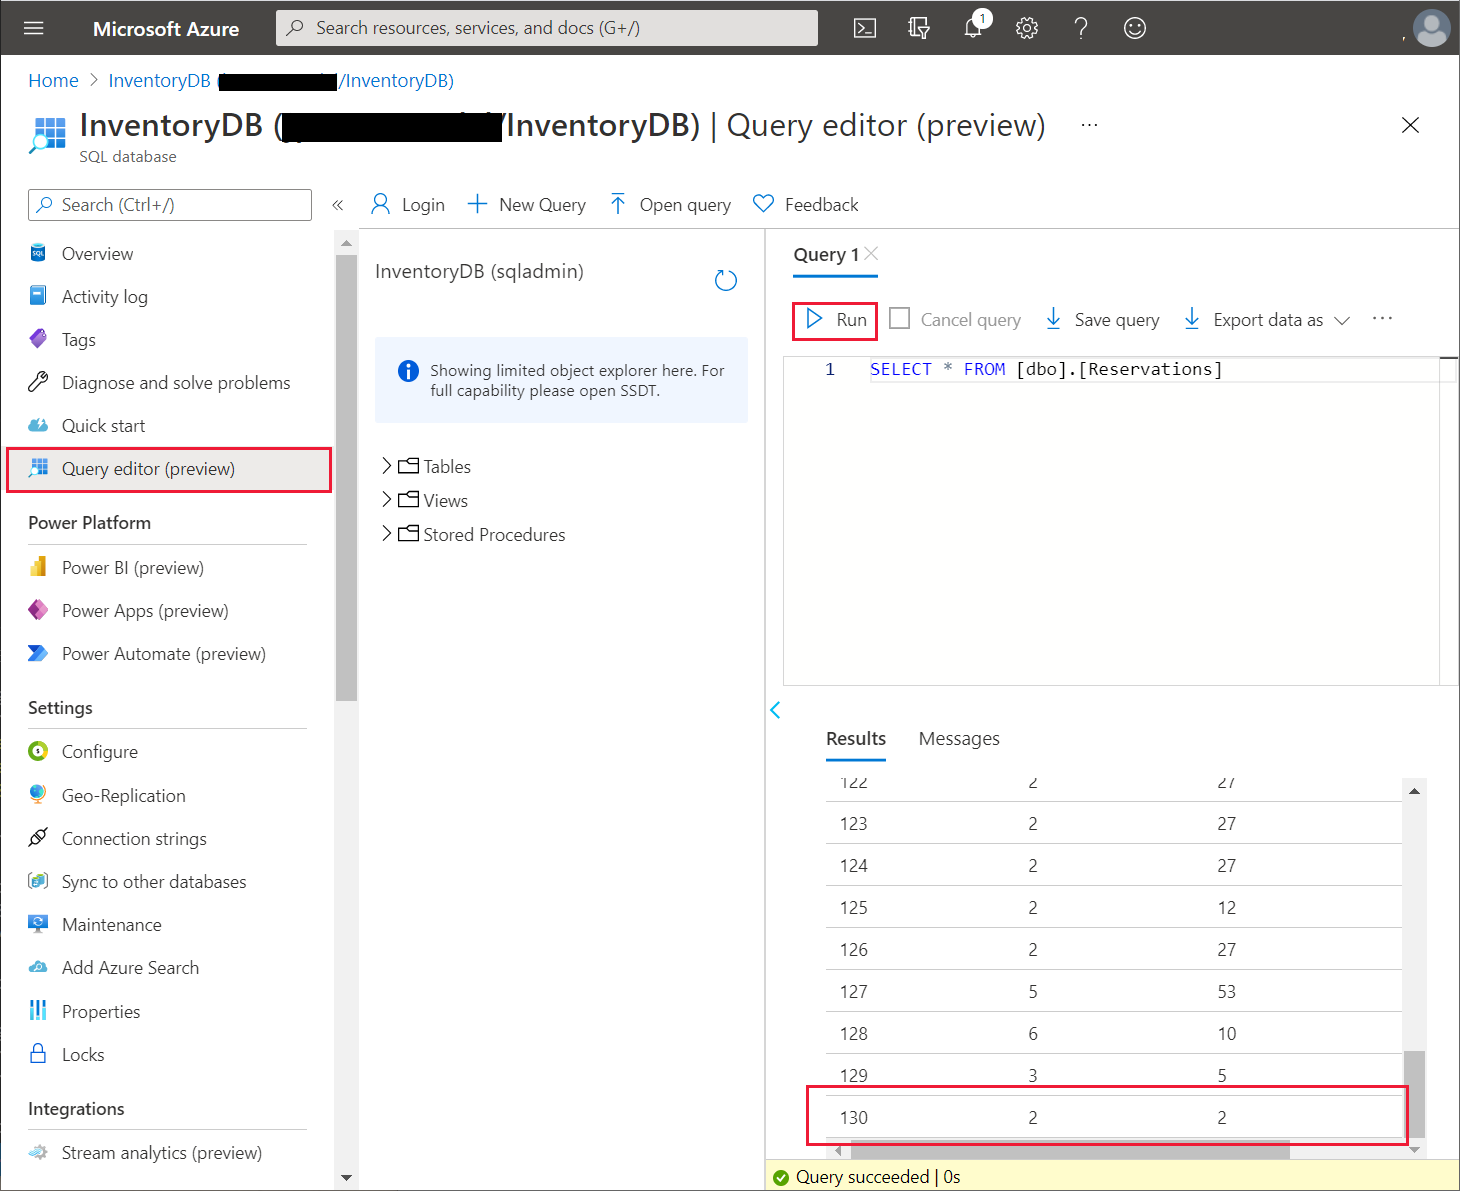
Feedback
Coming soon: Throughout 2024 we will be phasing out GitHub Issues as the feedback mechanism for content and replacing it with a new feedback system. For more information see: https://aka.ms/ContentUserFeedback.
Submit and view feedback for