Chapter 6: Using the Web API in the app
Maria and Kiana are ready to combine the app with the Web API. However, before proceeding, they decide to consult with Preeti, the IT Operations Manager.
Understanding the IT operations management requirements for the Web API
Preeti is concerned that the app and the Web API must be secure because they provide access to sensitive data stored in the various databases. Preeti wants assurances that the authentication and authorization will be included to prevent unwarranted access to information. Preeti is also aware that the company is rapidly expanding, and the volume of data involved in managing customers, appointments, parts, and the knowledge base is likely to increase exponentially in the near term. Consequently, the solution needs to be scalable.
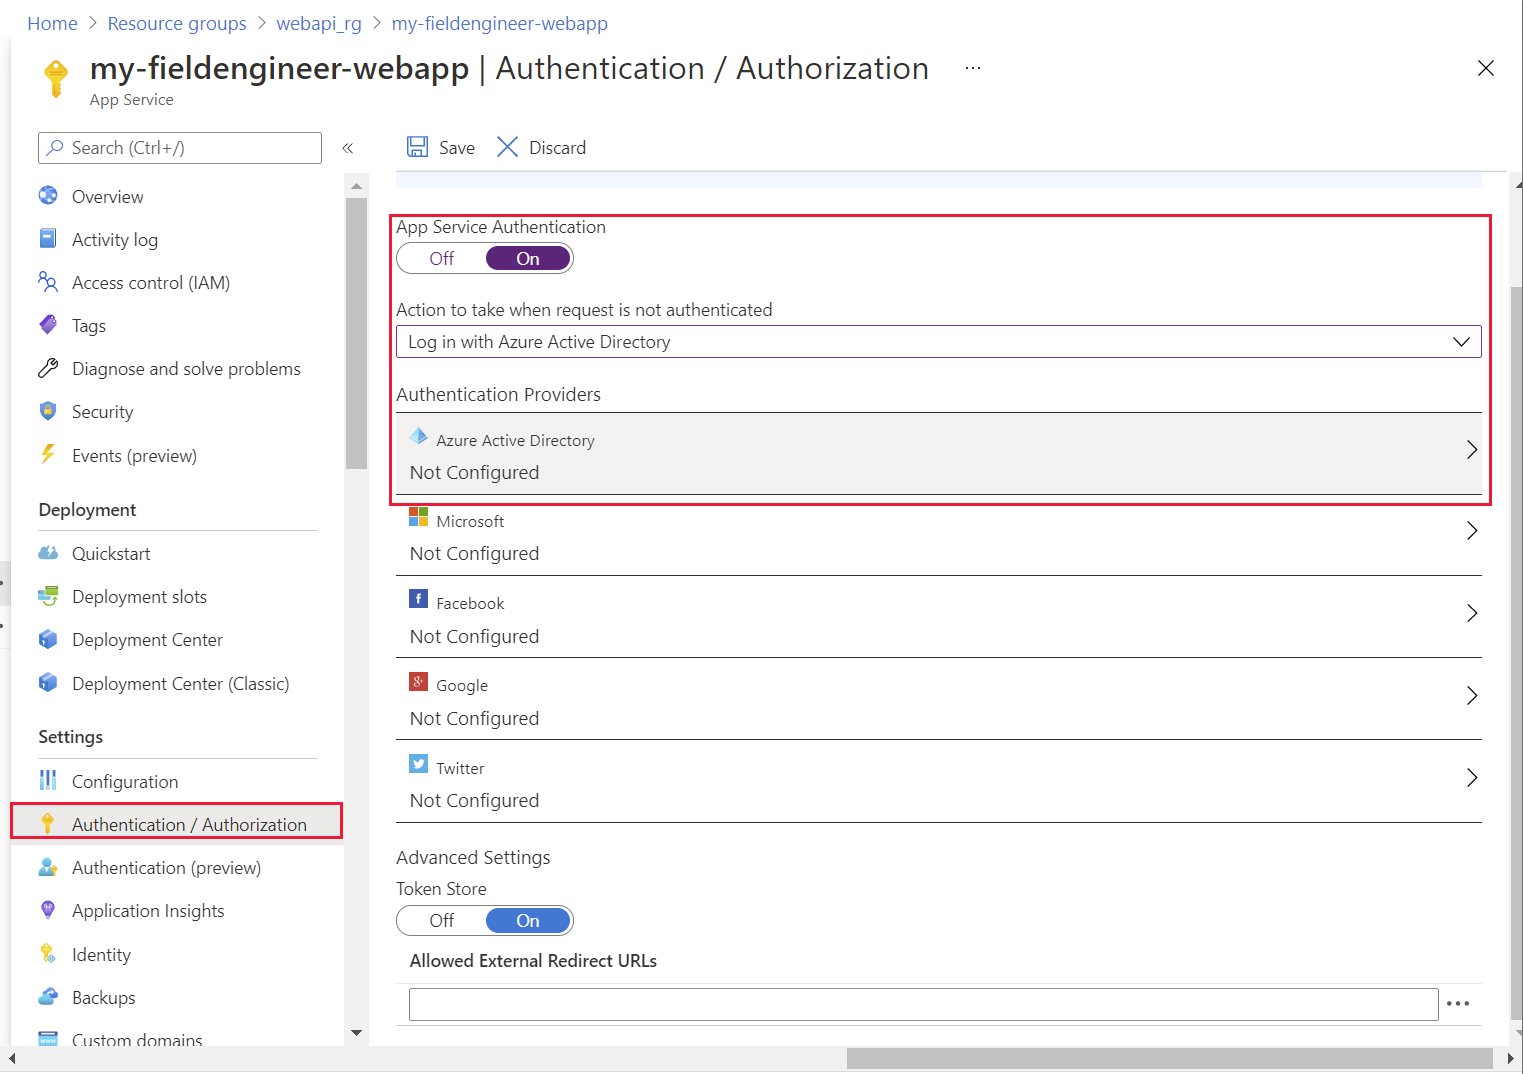
Kiana explains to Preeti that the Web API is currently implemented with Azure App Service. This service supports a number of authentication providers, which Preeti can configure using the Azure portal. Preeti is especially interested in Microsoft Entra ID because VanArsdel are looking to roll out this form of authentication to many of their other corporate systems in the near future.
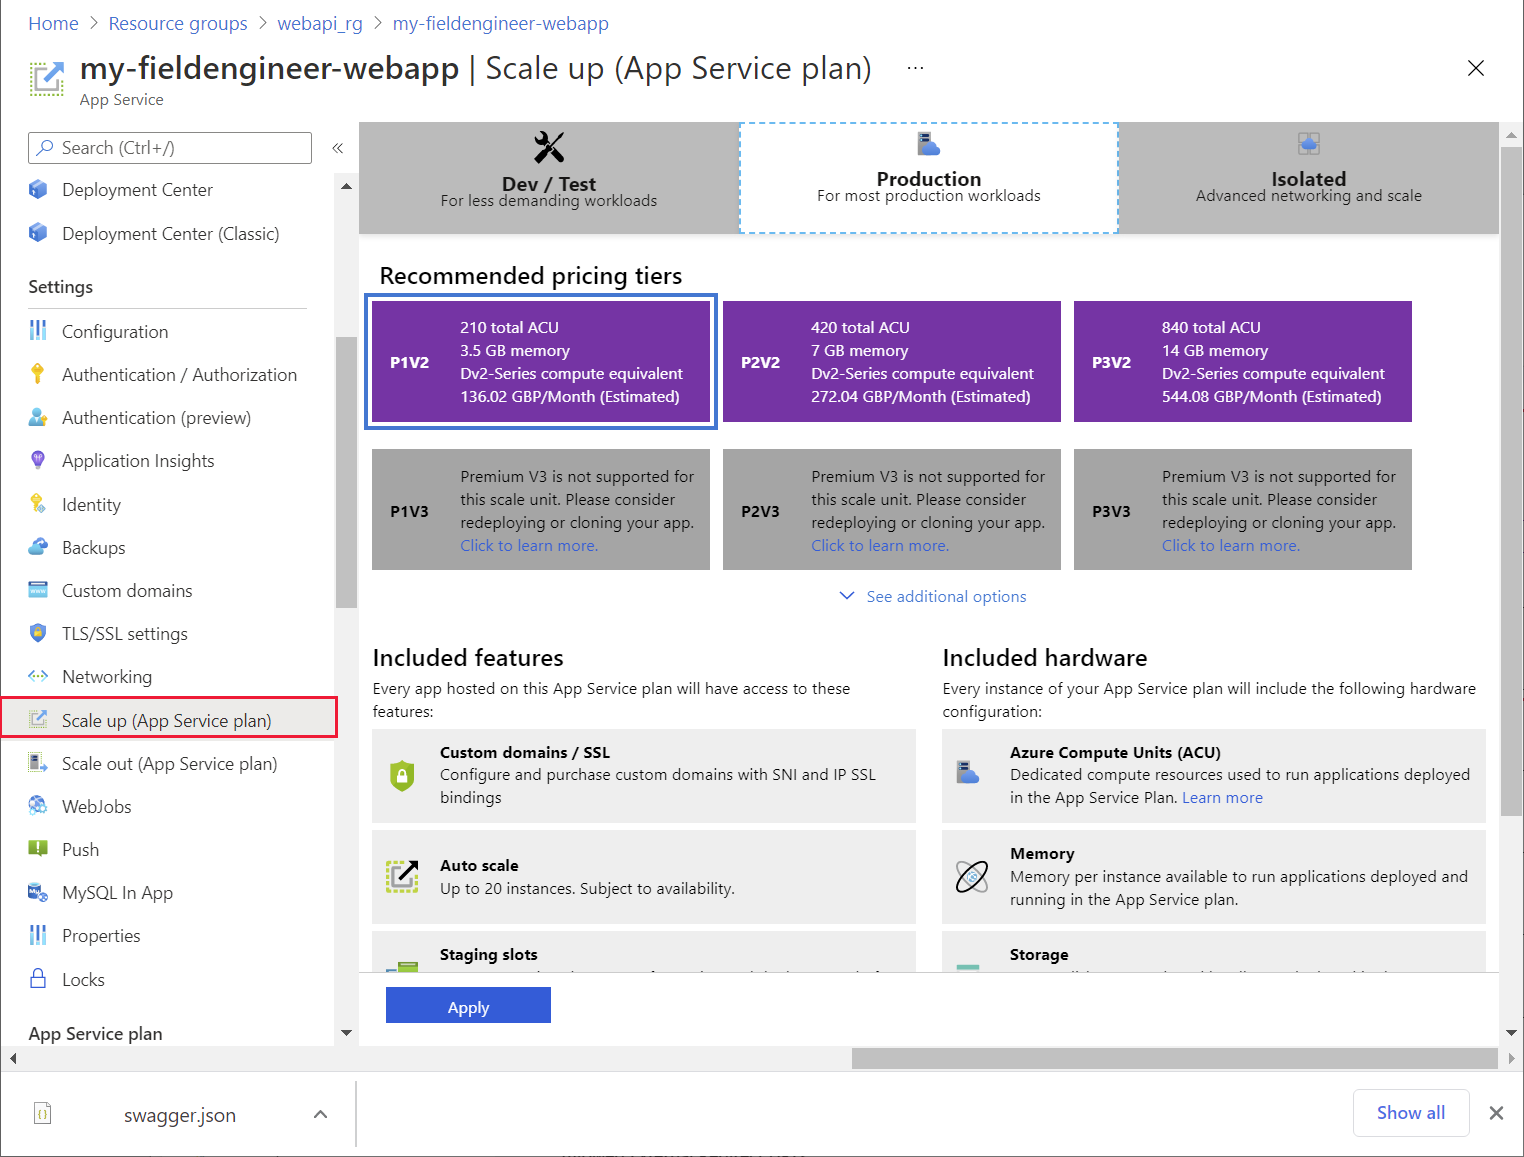
App Service also provides horizontal and vertical scalability. If needed, Preeti can scale up the resources available to the Web API by upgrading the App Service plan for the web app:
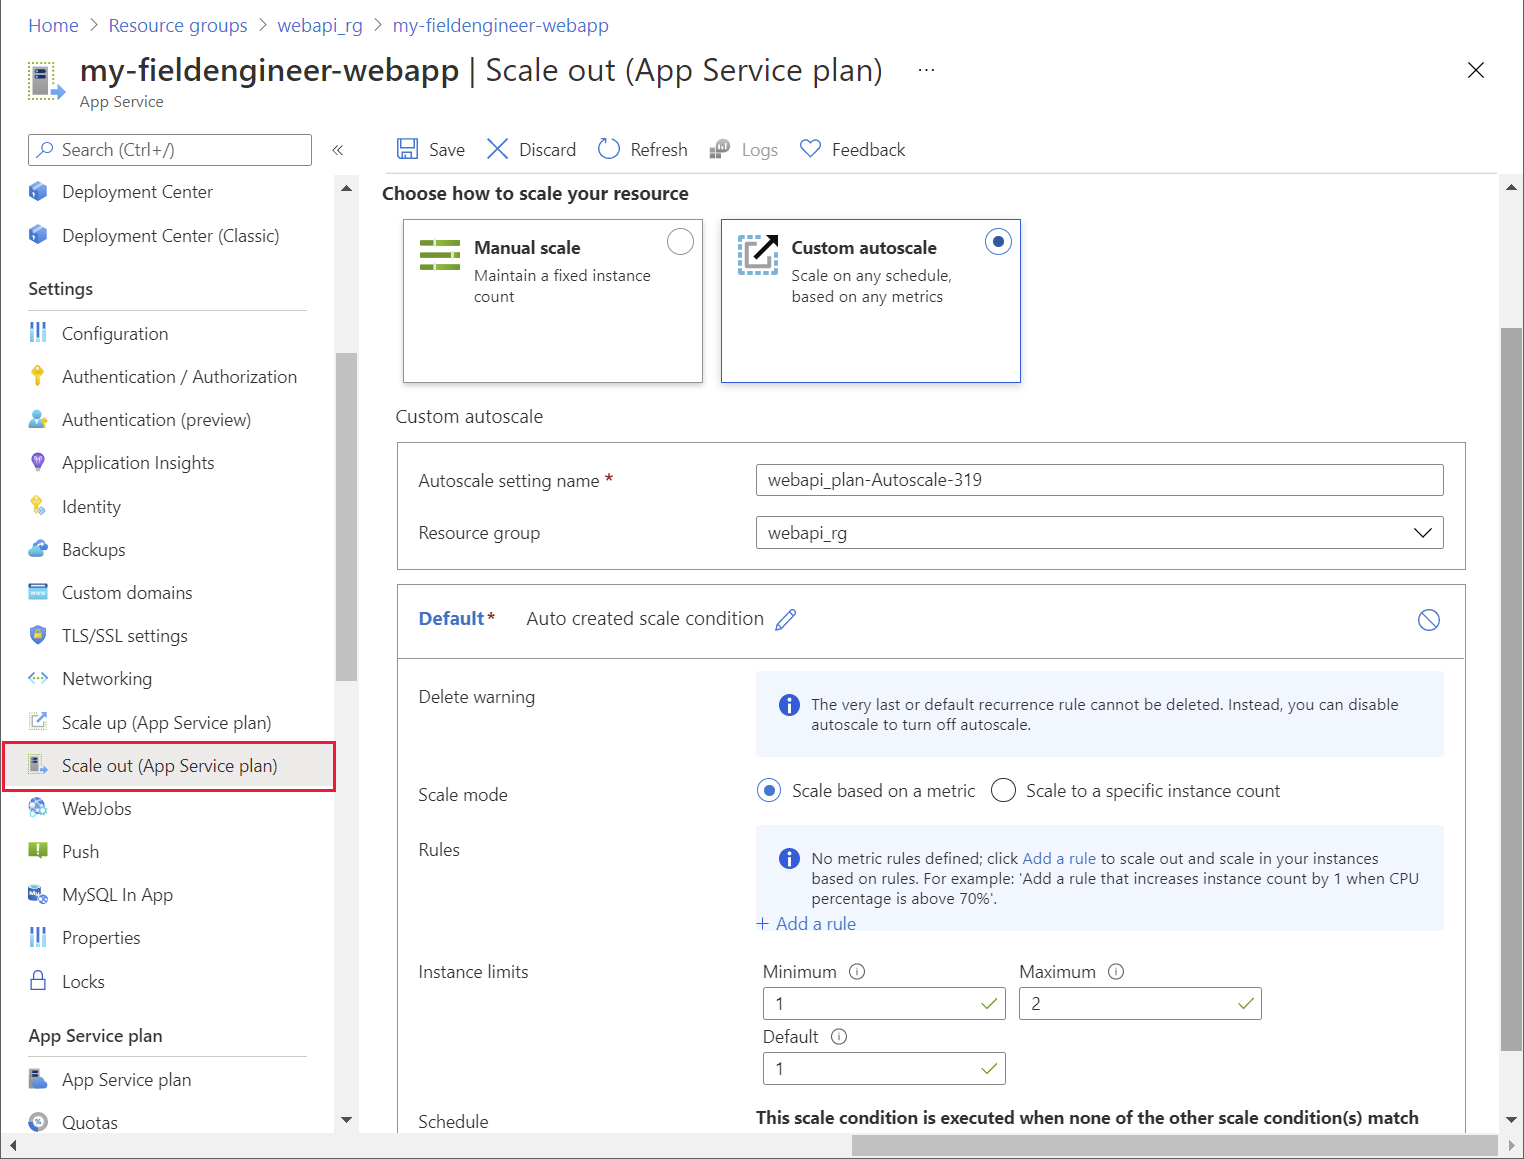
Preeti can also arrange for the system to scale out by configuring autoscaling. App Service enables an operations manager to define autoscale rules that determine the conditions under which the system should scale out across more instances when the load increases, or back in again as demand drops. Preeti can also configure pre-emptive autoscaling to occur according to a schedule:
A key part of the role of an IT Operations Manager is to have an eye for how systems might evolve, and to ensure that the underlying support structures will handle future expansion and changes. Preeti knows that the Web API developed by Kiana might be extended, and reused by other VanArsdel systems in the future. Preeti needs to be able to manage and control the way in which developers request use of the Web API, protect it as a valuable resource, and monitor its use. Therefore Preeti decides to protect the Web API behind the Azure API Management service.
API Management provides an extra layer of security to a Web API, as well as enabling detailed monitoring and control over which clients can access which operations. Using API Management, Preeti can manage resource utilization, and throttle the performance of low priority clients to ensure that critical higher priority apps are serviced more quickly.
For information about the services that API Management provides, go to About API Management.
Creating an API Management service
Preeti created the API Management service through the Azure portal, using the following steps:
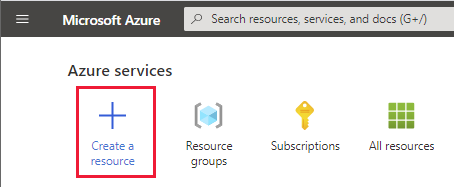
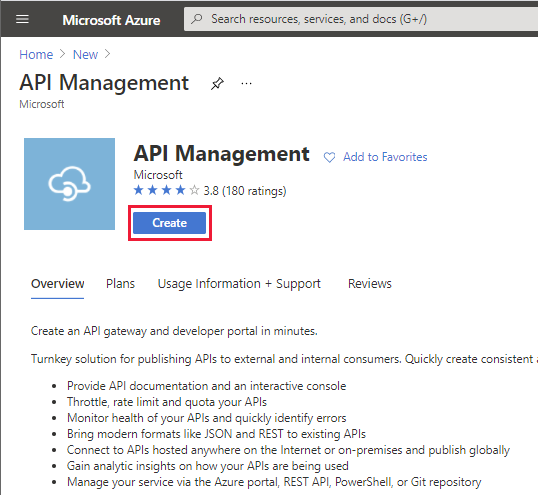
Sign in to the Azure portal and, on the Home page, select Create a resource.
In the Search the MarketPlace text box, enter API Management, and then select Enter.
On the API Management page, select Create.
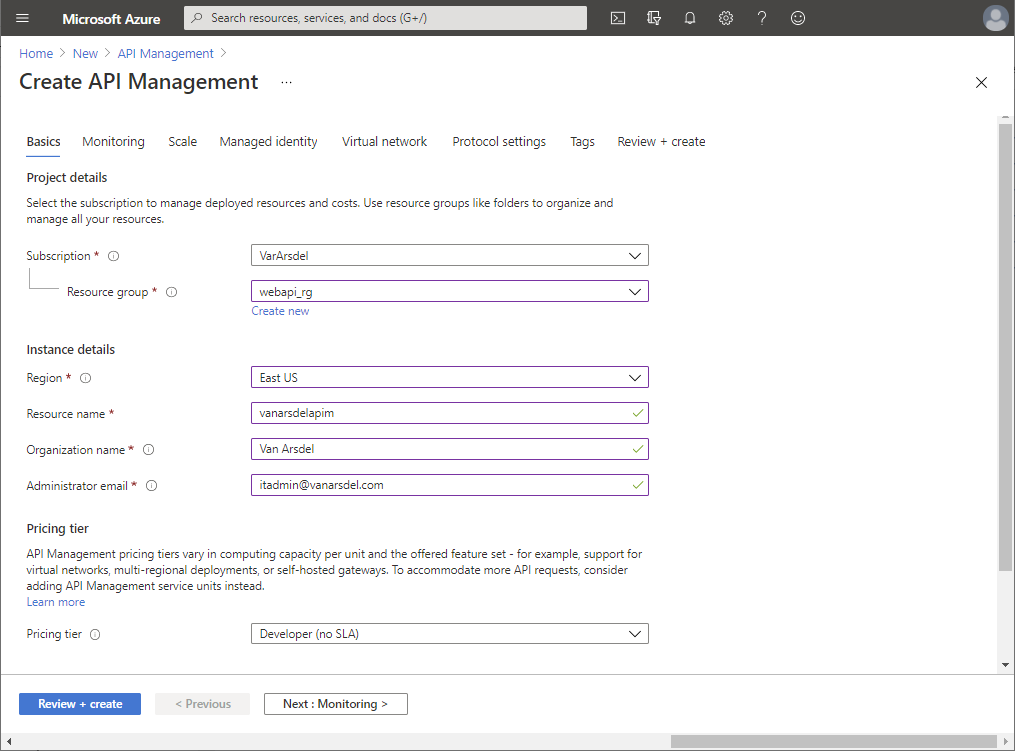
On the Create API Management page, enter the following values, and then select Review + create:
- Subscription: Select your subscription
- Resource group: webapi_rg (this is the same resource group that you created for the App Service)
- Region: Select your nearest region
- Resource name: Enter a unique name for the service
- Organization name: VanArsdel
- Administrator email: itadmin@vanarsdel.com
- Pricing tier: Developer (no SLA)
Note
Don't use the Developer pricing tier for a production system.
On the validation page, select Create, and wait while the API Management service is created.
Note
It can take 30 minutes or more for the API Management service to be provisioned; be patient.
Publishing the Web API through API Management
After the API Management service was created, Preeti published the Web API to make it accessible to other services and applications using the following steps:
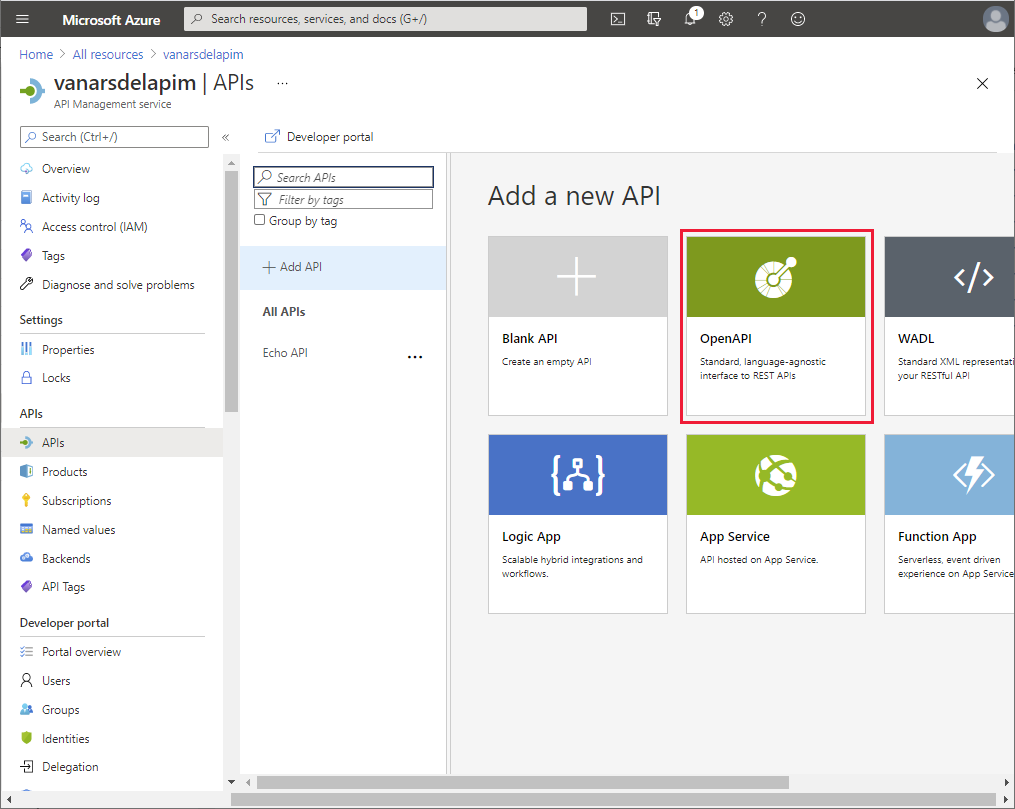
In the Azure portal, go to the API Management service.
On the API Management service page, on the left pane under APIs, select APIs:

In the Add a new API pane, select OpenAPI:
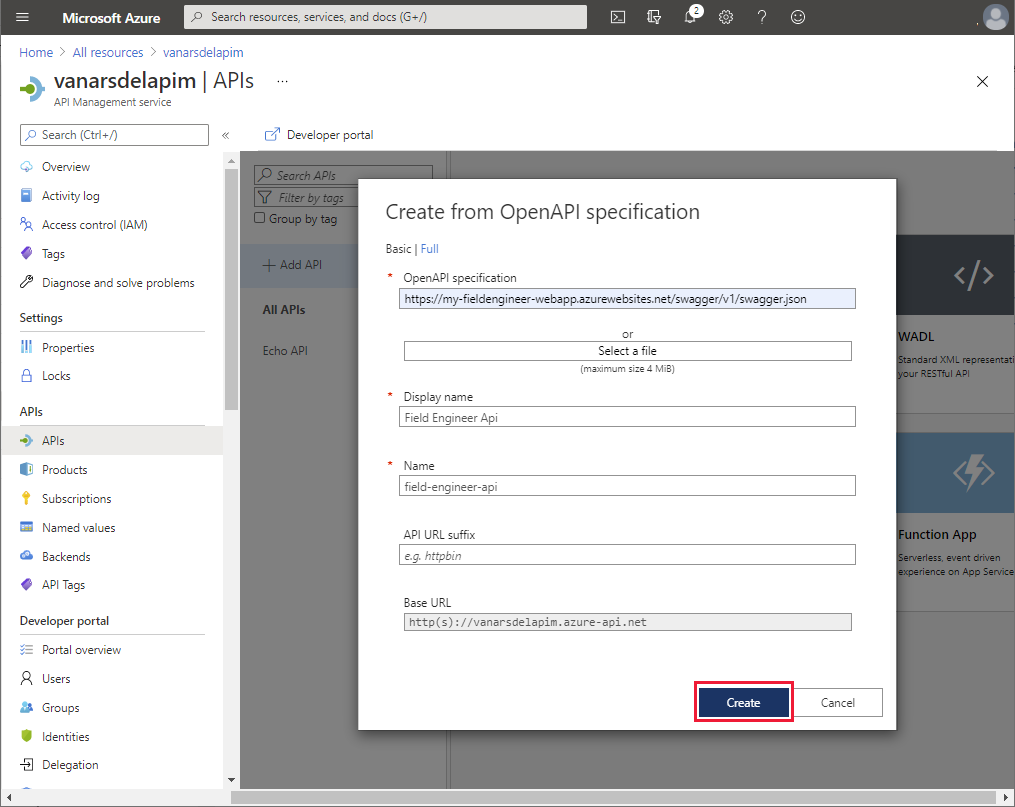
In the Create from OpenAPI specification dialog, enter the following values, and then select Create:
- OpenAPI specification: https://<webapp name>.azurewebsites.net/swagger/v1/swagger.json, where <webapp name> is the name of the App Service hosting your Web API
- Display name: Field Engineer API
- Name: field-engineer-api
- API URL suffix: Leave empty
- Base URL: Use the default URL
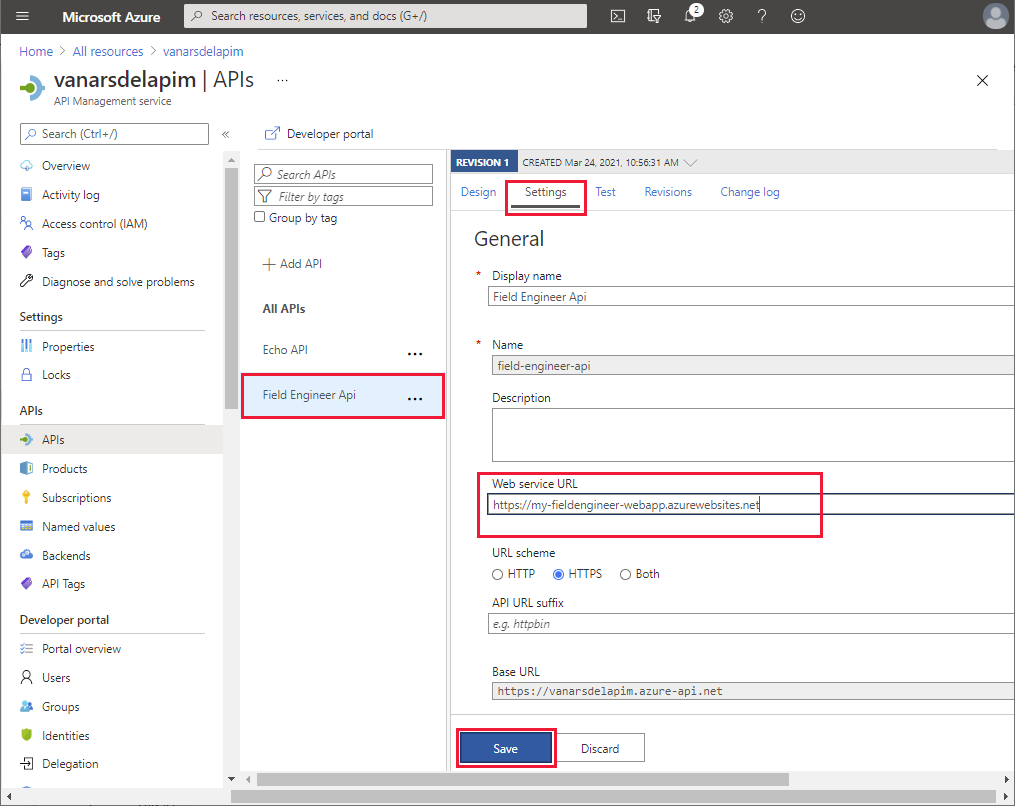
When the Field Engineer API has been created, select the Settings tab for the API, set the Web Service URL to https://<webapp name>.azurewebsites.net, and then select Save:
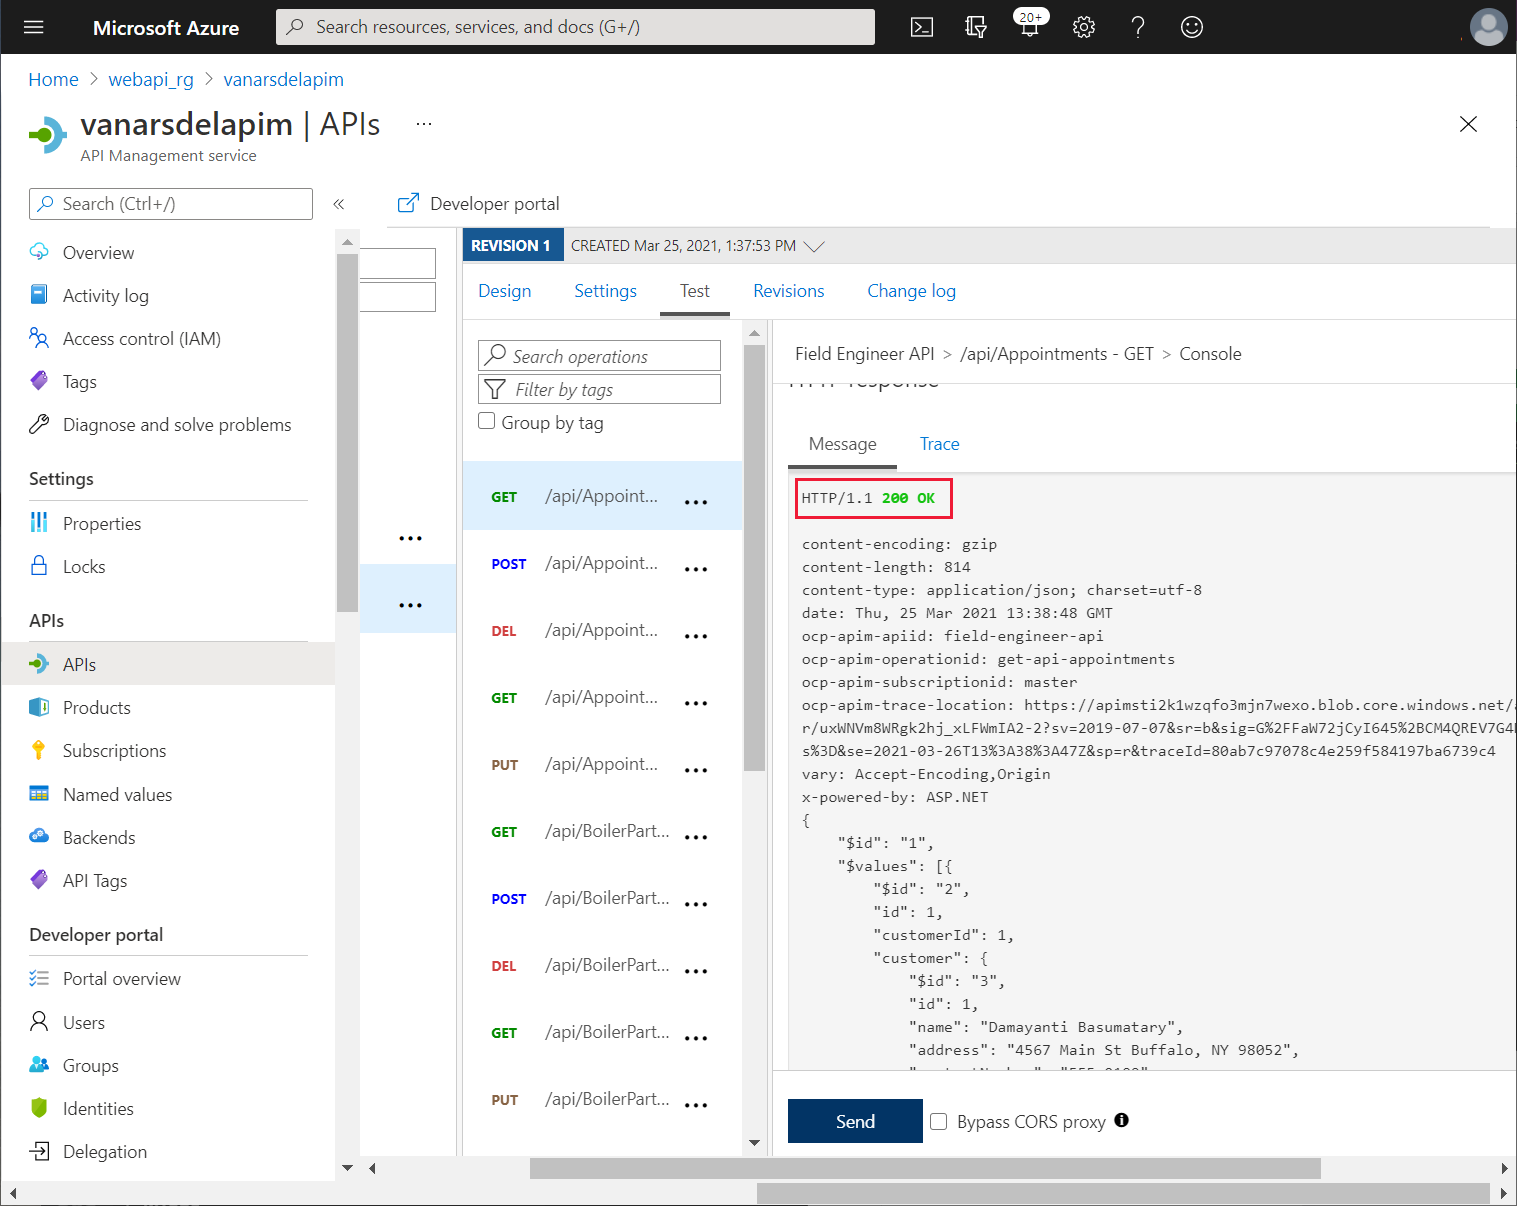
On the Test tab, select the GET api/Appointments URI, and then select Send:
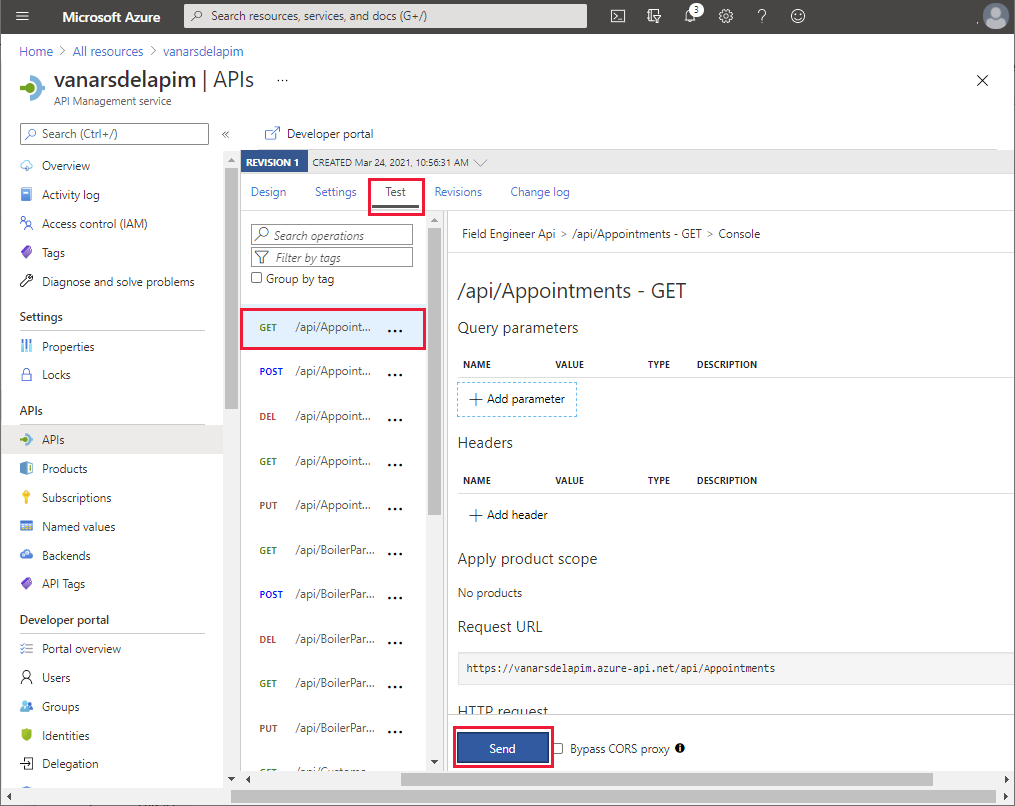
Verify that the request is successful (the HTTP return code is 200 OK), and that it returns a result containing a list of appointments in the response body:
Connecting to API Management from the app
Kiana and Maria can now work together to connect the app built using Power Apps to the Web API through the API Management service.
The first task is to create a custom connector that's used by the app to communicate with API Management. This involves exporting the API to the Power Apps environment used to create the app, which Kiana does as follows:
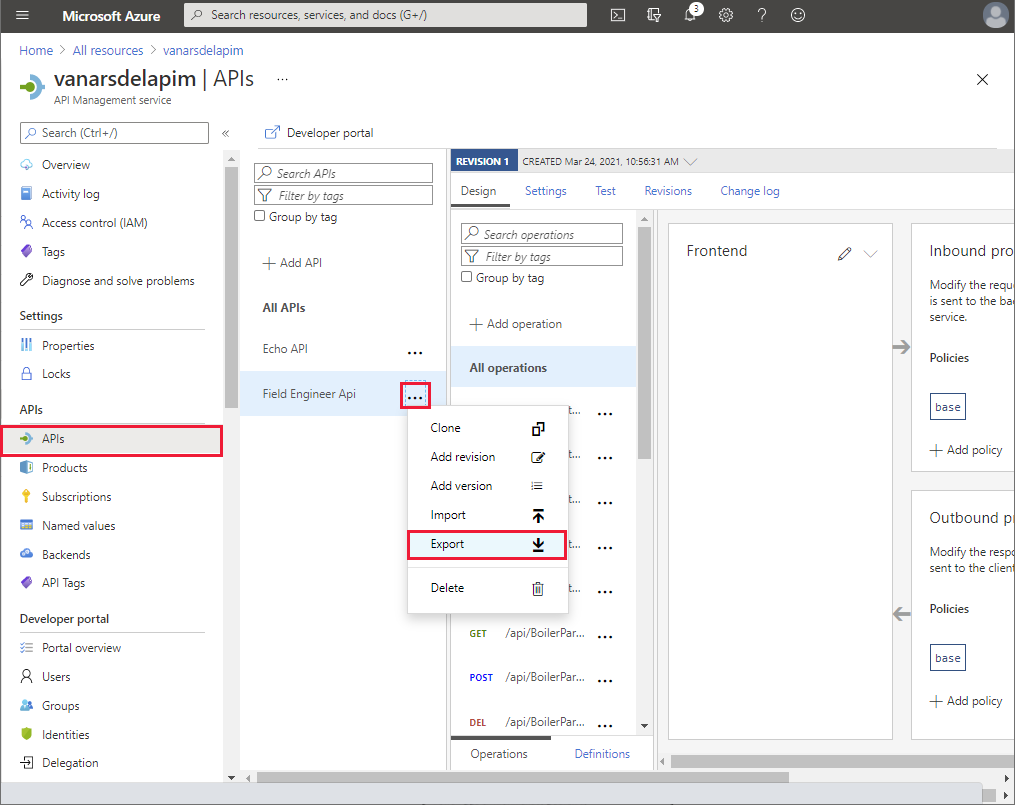
In the Azure portal, go to the page for the API Management service that Preeti created.
On the left pane under APIs, select APIs.
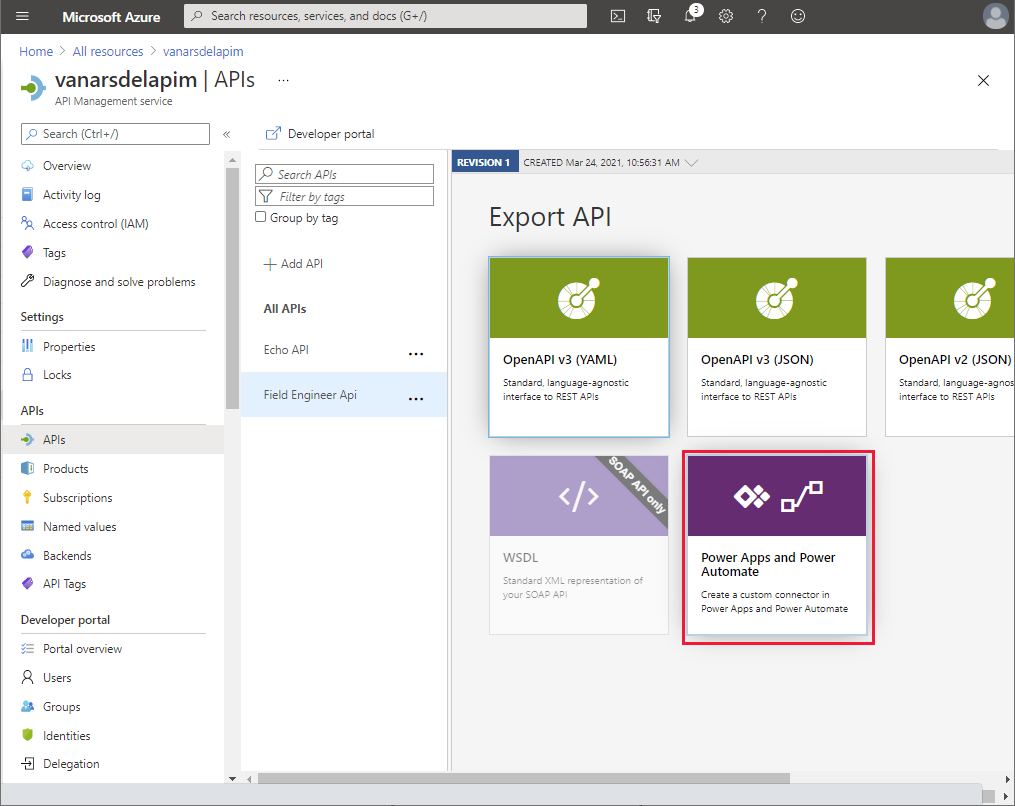
Select the ellipsis button for the Field Engineer Api, and then select Export.
On the Export API pane, select Power Apps and Power Automate:
On the Export API to PowerApps pane, select the Power Apps environment in which you created the prototype app (Maria in the following image), and then select Export.

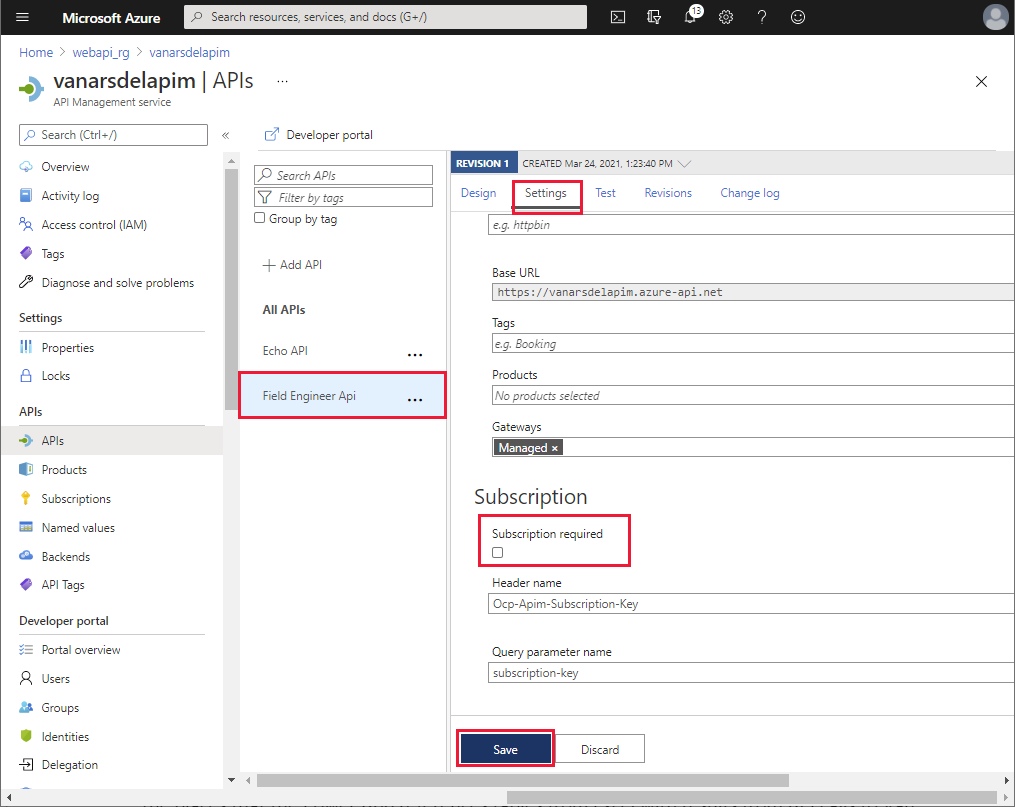
After the API has been exported, select the Field Engineer API. On the Settings page, scroll down to the Subscriptions section, clear Subscription required, and then select Save.
The prototype app used Excel workbooks for the data sources. Now that the custom connector for the Web API is available, Maria performs the following steps to add the connector to the app:
Sign in to Power Apps.
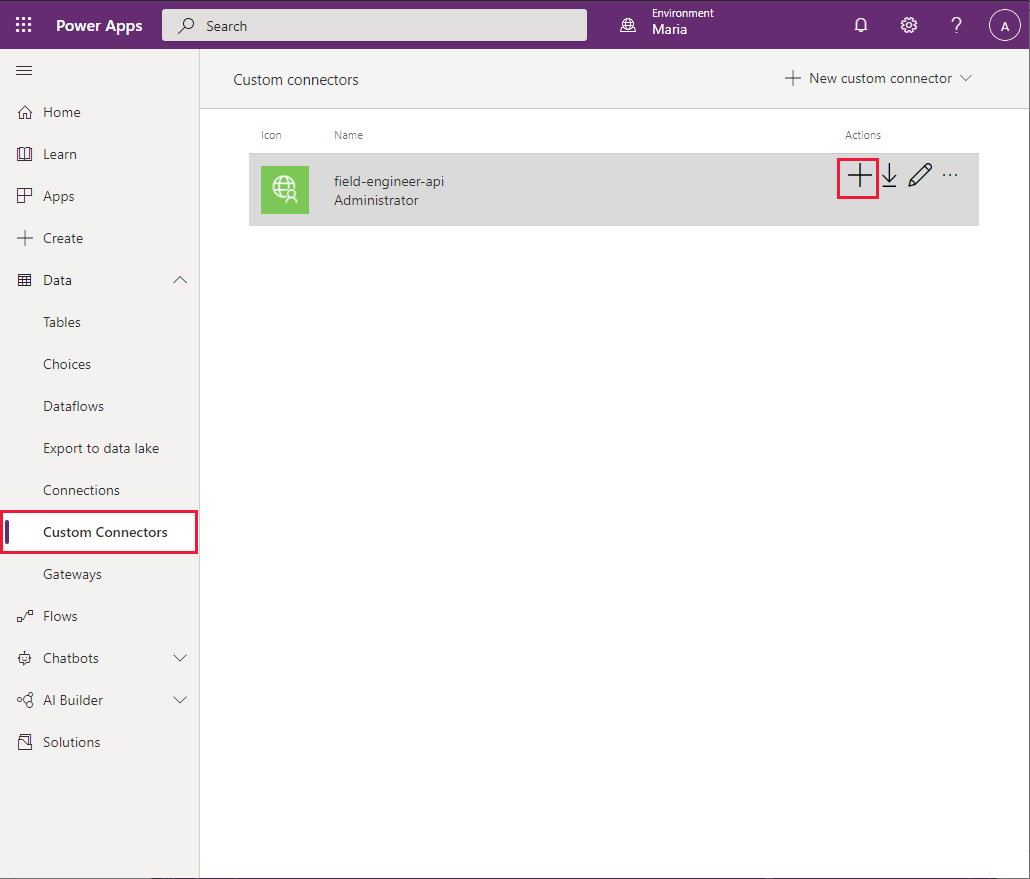
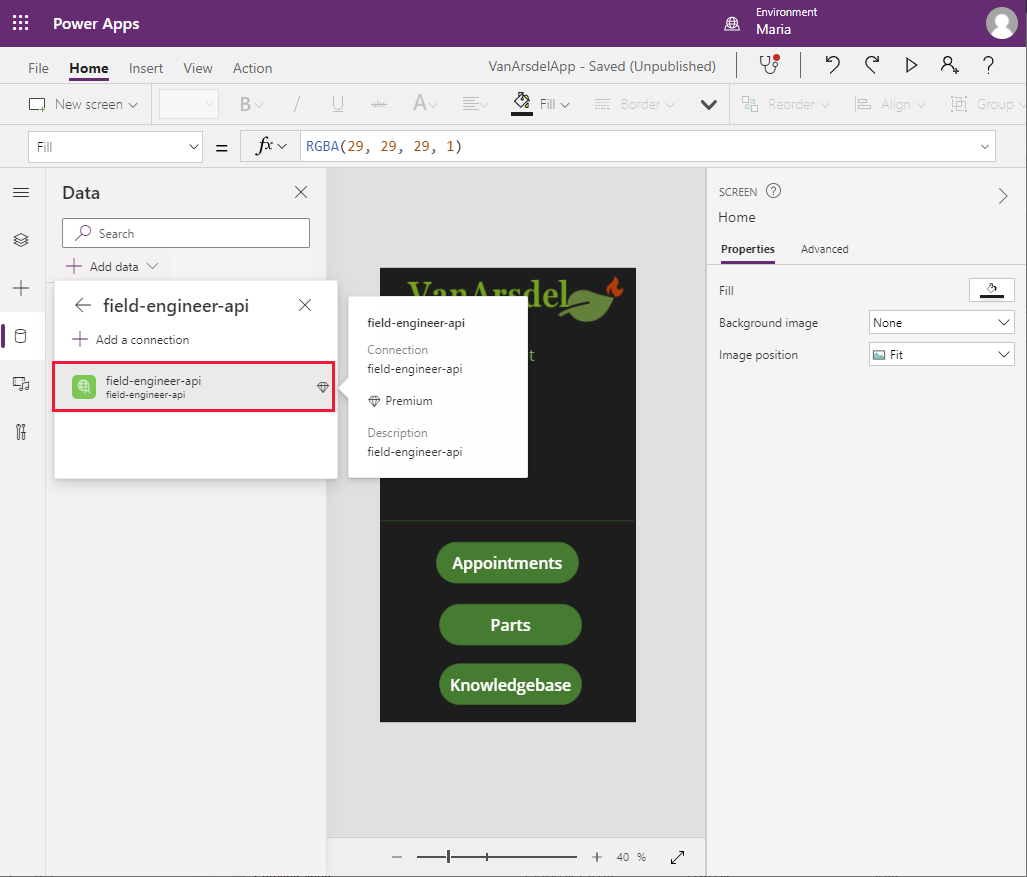
On the left pane, expand Data, and select Custom Connectors. The field-engineer-api custom connector should be listed. Select Create connection.
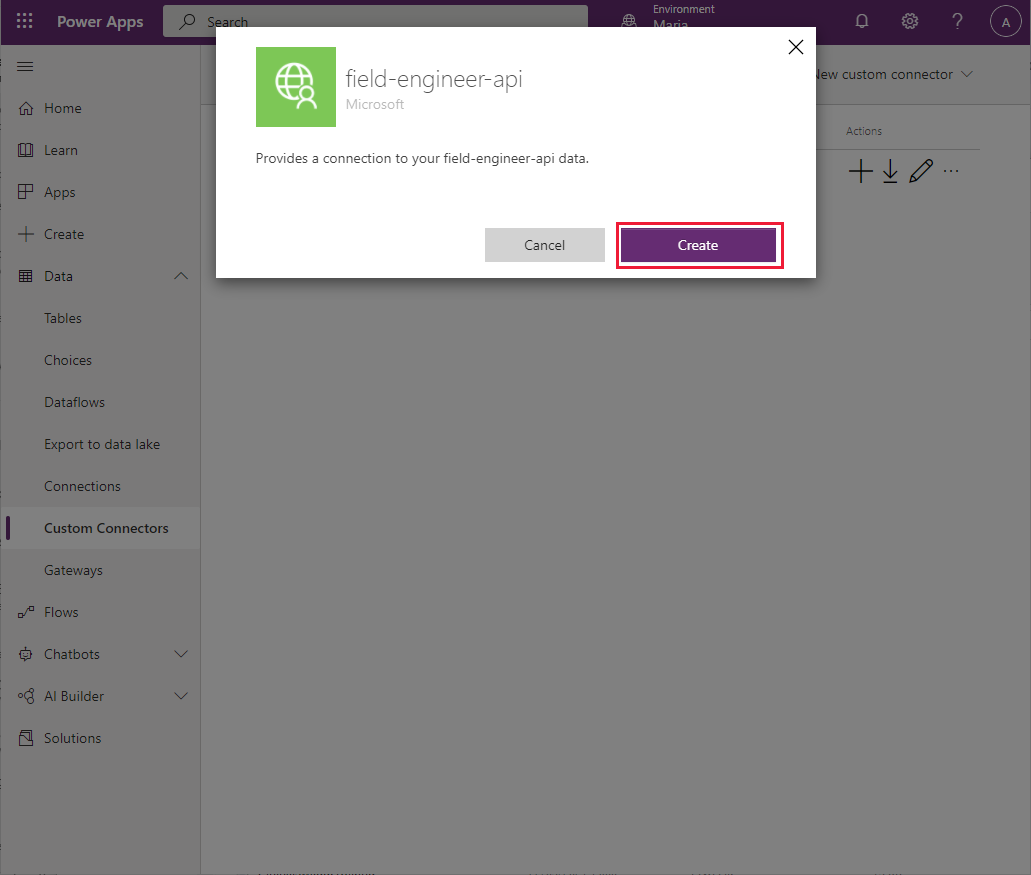
In the field-engineer-api dialog, select Create.
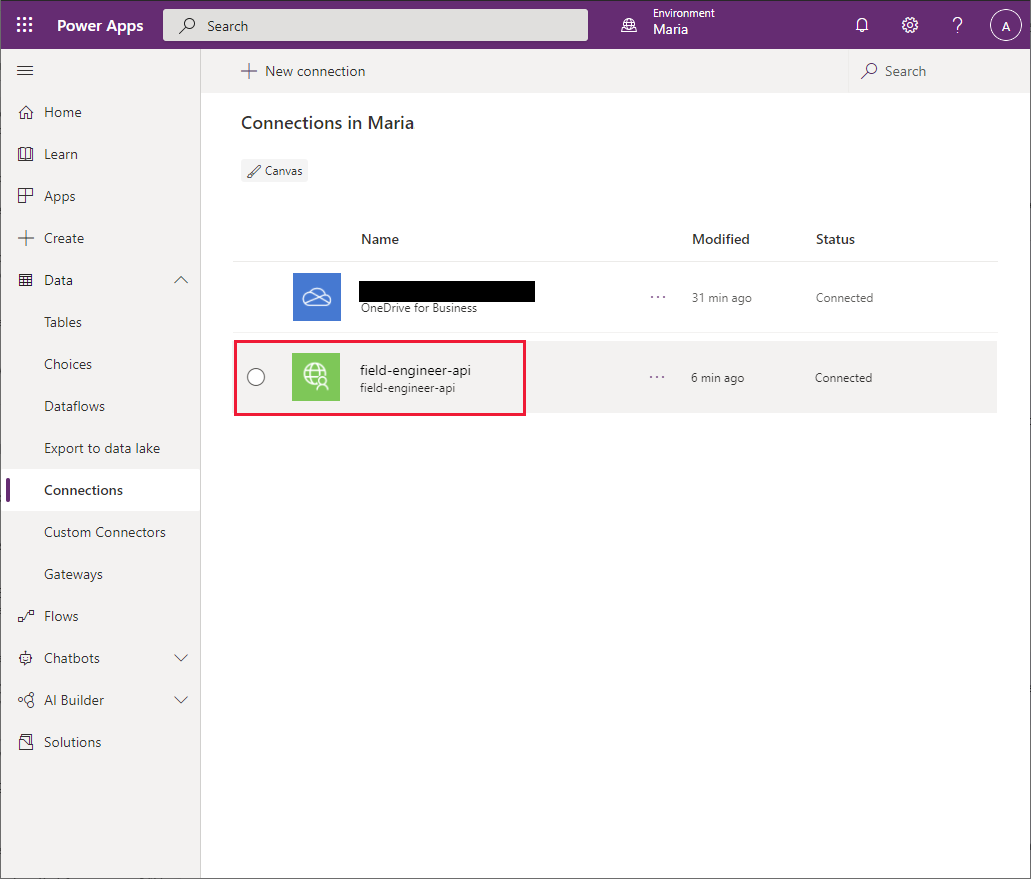
When the connection has been created, verify that it appears in the list of available connections.
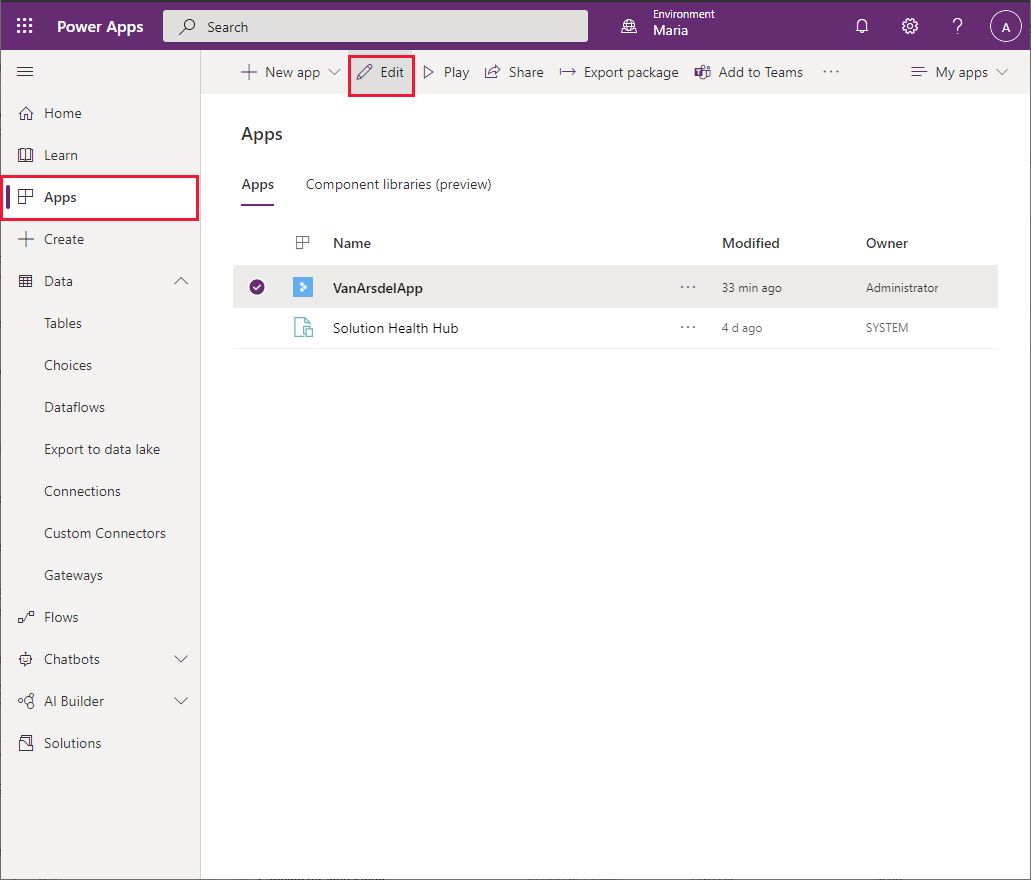
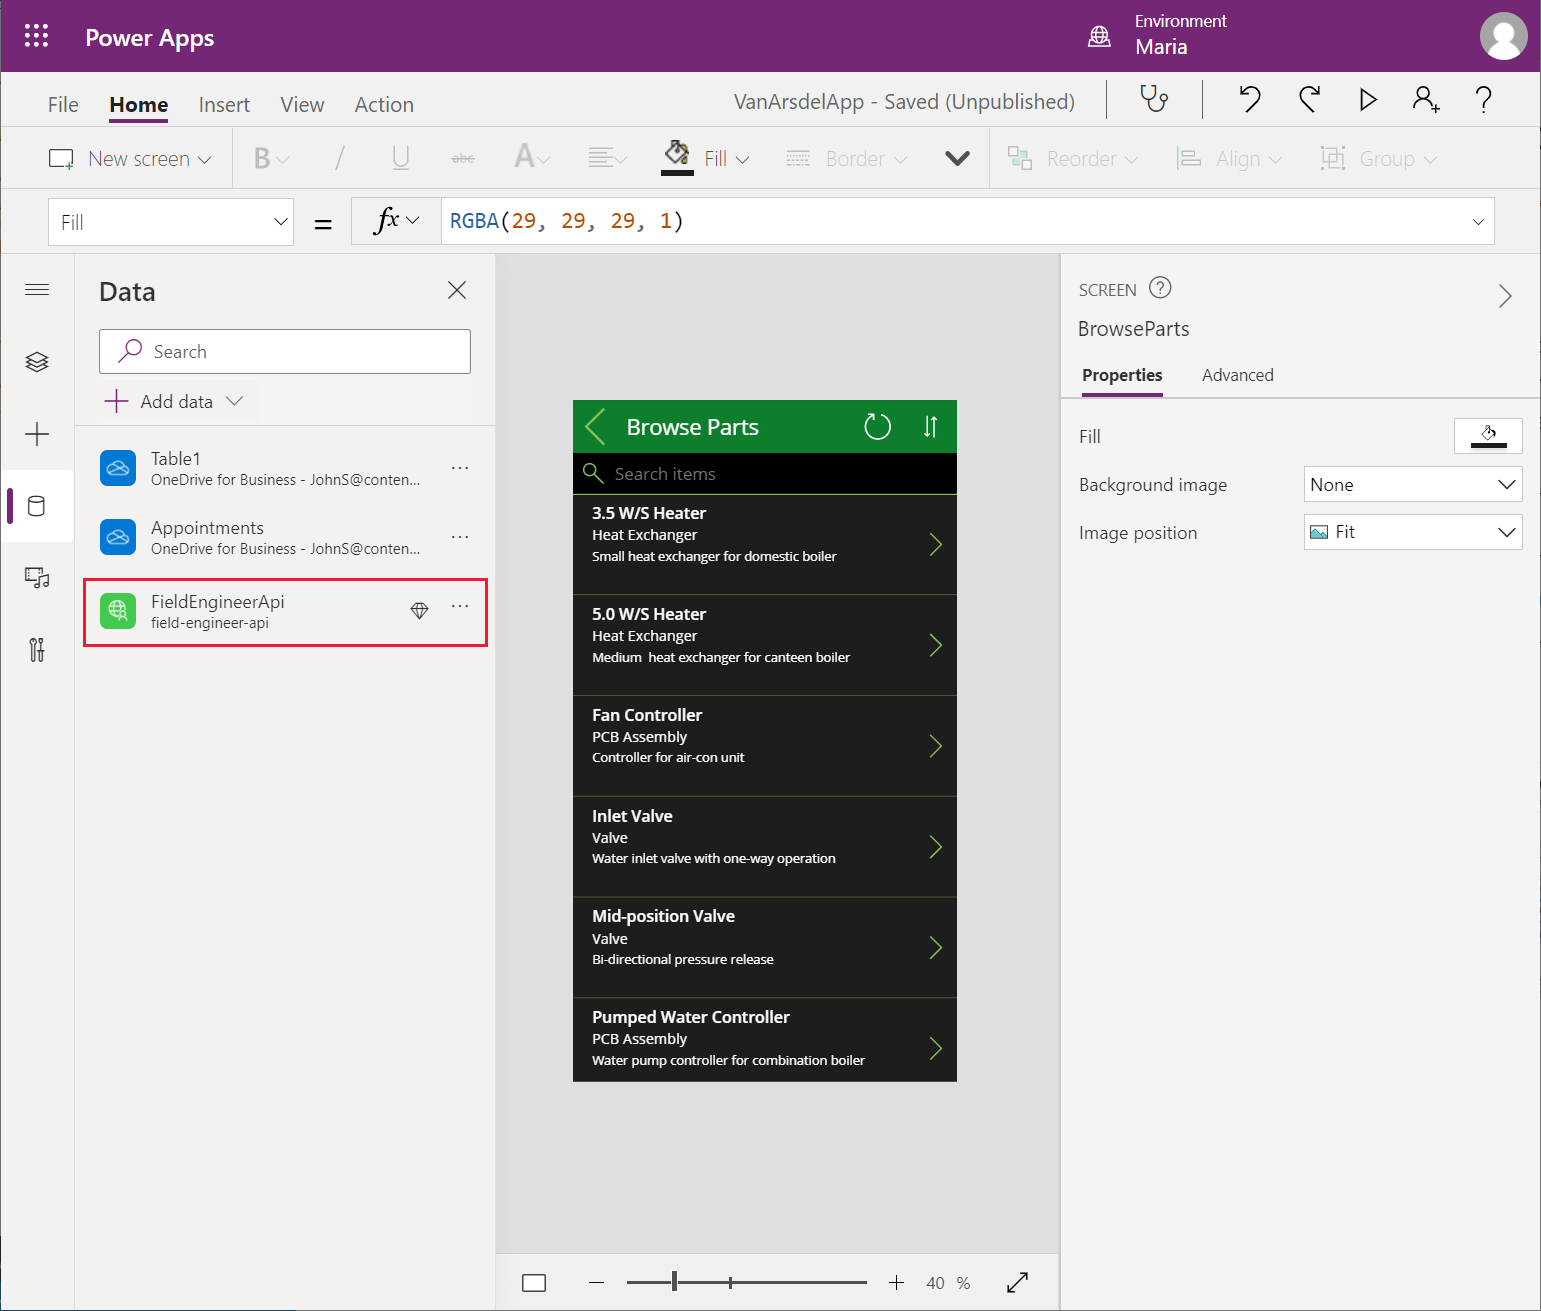
On the left pane, select Apps, select VanArsdelApp, and then select Edit.
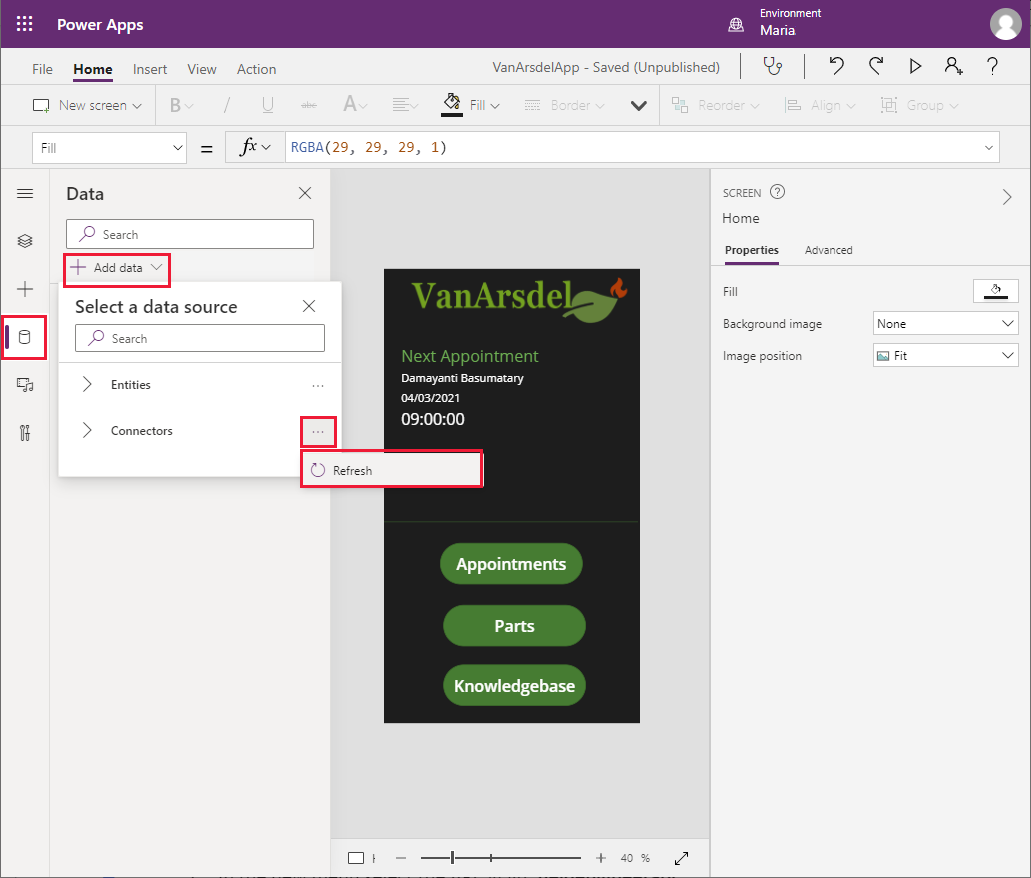
On the left pane, select the Data tab. Select Add data, select the ellipsis button for Connectors, and then select Refresh.
In the list of connectors, select the field-engineer-api connector.
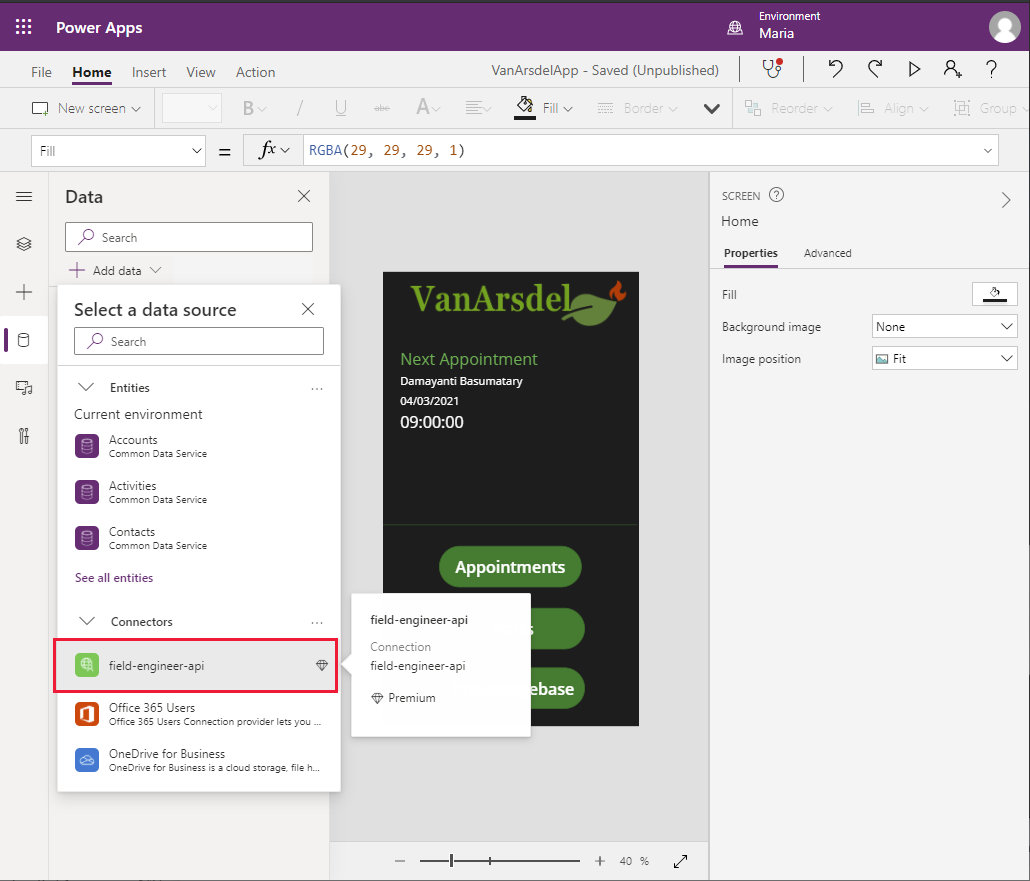
In the field-engineer-api dialog, select the field-engineer-api connector.
On the Data pane, verify that the FieldEngineerApi connector is listed.
Updating the app to use the connector: Field inventory management
Now that the connection has been added to the app, Maria can modify the screens to use it to replace the Excel workbooks. This involves working through each screen methodically and changing the data source. No other changes should be necessary. Maria starts with the BrowseParts and PartDetails screens, as follows:
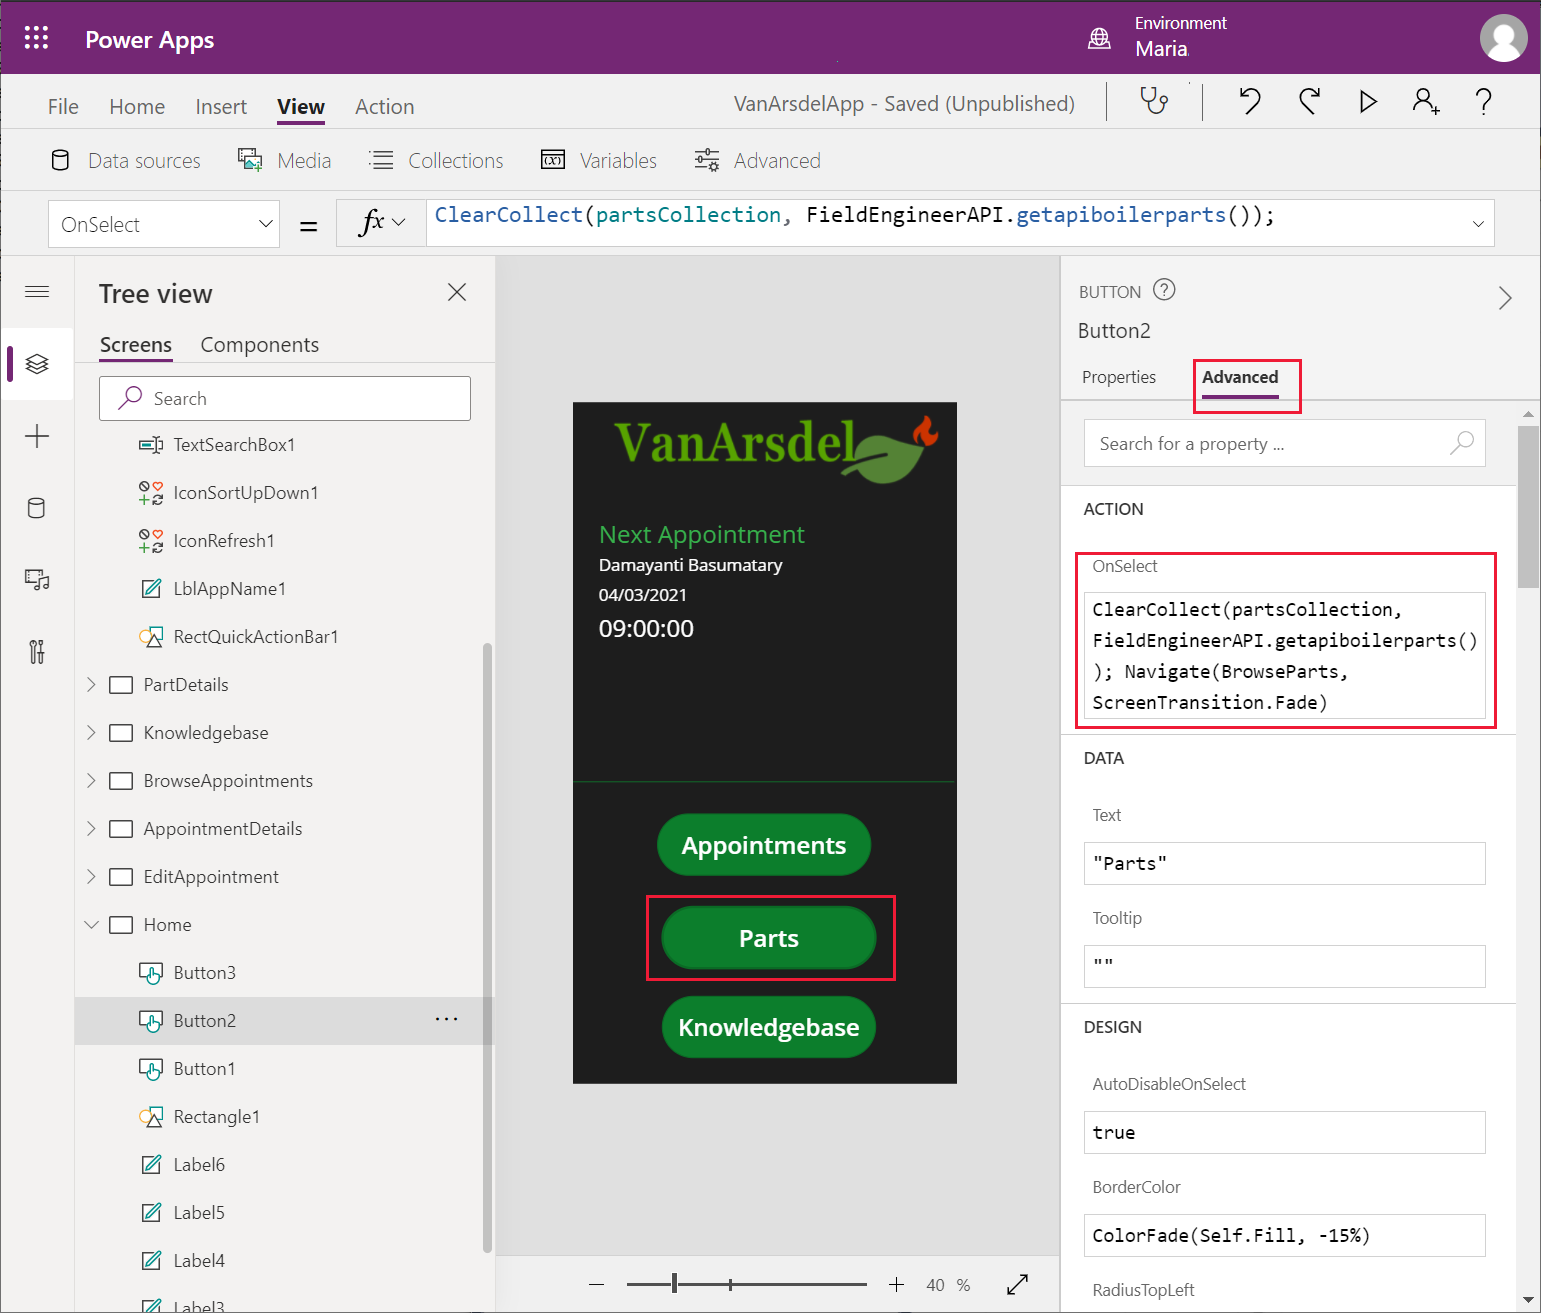
On the Home screen of the app, select the Parts button. Set the OnSelect action property to the following formula.
ClearCollect(partsCollection, FieldEngineerAPI.getapiboilerparts());

Navigate(BrowseParts, ScreenTransition.Fade)
The ClearCollect function creates a new collection named partsCollection, and populates it with the data that results from calling the getboilerparts operation in the FieldEngineerAPI connection.
Note
It's good practice to retrieve the data into a collection and reference that collection from any screens that need the information. This approach can save different screens from repeatedly running the same query and fetching the same data.
Select F5 to preview the app.
On the Home screen, select Parts. This action will create the partsCollection collection. Close the preview window and return to Power Apps Studio.
Note
The purpose of this step is to enable you to see the data while you edit the BrowseParts screen in the following steps.
Select the BrowseGallery1 control in the BrowseParts screen. In the formula for the Items property, replace the reference to the [@Table1] data source to partsCollection.
This change will result in some errors. This is because the field names in the original Excel workbook used capitalization (Name, CategoryID, and Overview), whereas the properties returned in the body of the Web API response are named in lowercase. Change these references to use lowercase. The formula should look like the following.
SortByColumns(Search(FieldEngineerApi.getapiboilerparts(), TextSearchBox1.Text, "name", "categoryId", "overview"), "name", If(SortDescending1, Descending, Ascending))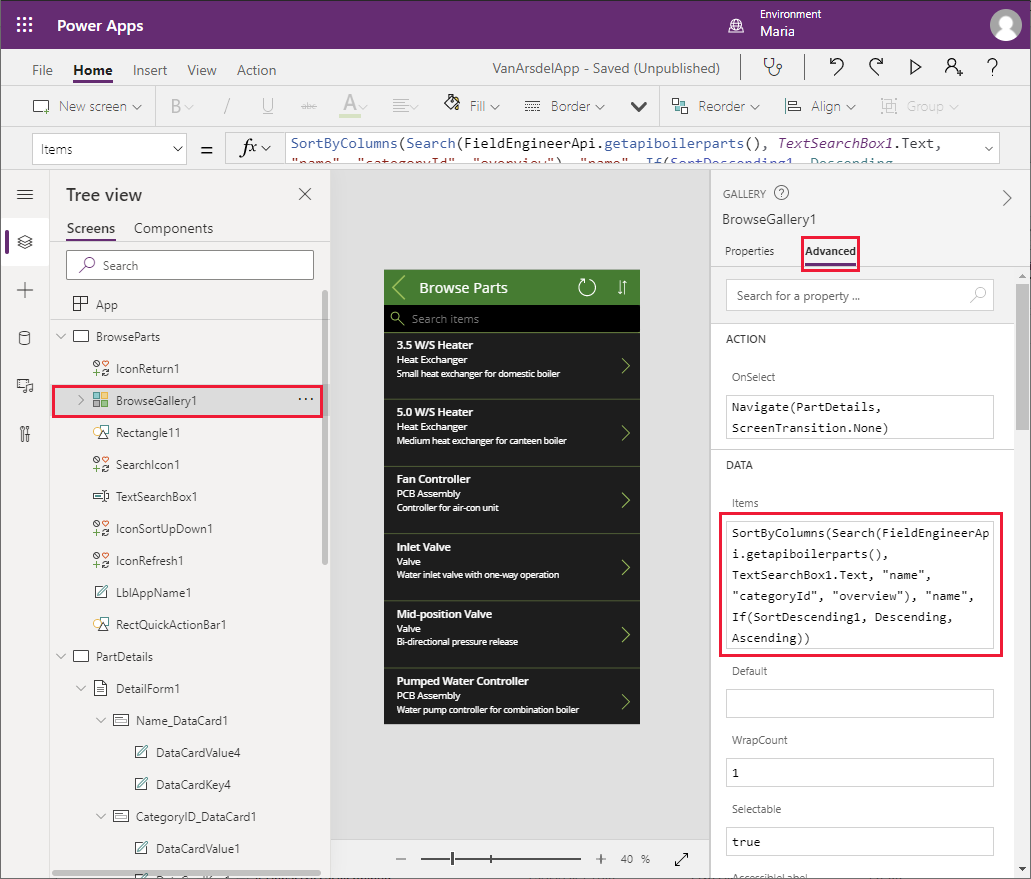
On the Tree view pane, select the IconRefresh1 control. Change the OnSelect action to the formula ClearCollect(partsCollection, FieldEngineerAPI.getapiboilerparts()).
Note
The original formula for this action calls the Refresh function to repopulate the data by using the connection to the original data source. You can't use Refresh with a connection that runs a function to retrieve the data, so it won't work with FieldEngineerApi.getapiboilerparts(). The solution in this step repopulates the partsCollection collection with the latest data.
On the Tree view pane, expand the BrowseGallery1 control, and select the Body1 control. Change the Text property to ThisItem.overview.
On the Tree view pane, select the Subtitle1 control. Change the Text property to ThisItem.categoryId.
On the Tree view pane, select the Title control. Change the Text property to ThisItem.name.
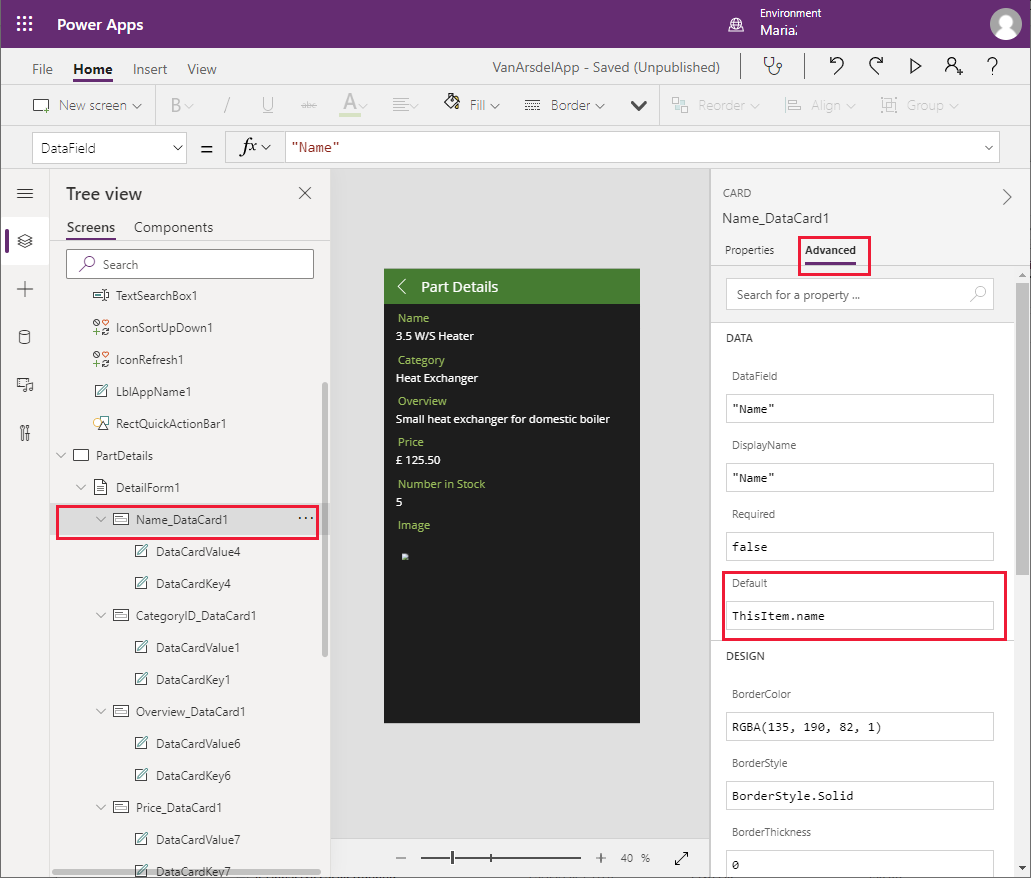
On the Tree view pane, select the DetailForm1 control in the PartDetails screen. Change the DataSource property from [@Table1] to partsCollection.
On the Tree view pane, select the Name_DataCard1 control under DetailForm1. Change the Default property to ThisItem.name.
Change the Default property of the CategoryID_DataCard1 control to ThisItem.categoryId.
Change the Default property of the Overview_DataCard1 control to ThisItem.overview.
Change the Default property of the Price_DataCard1 control to ThisItem.price.
Change the Default property of the NumberInStock_DataCard1 control to ThisItem.numberInStock.
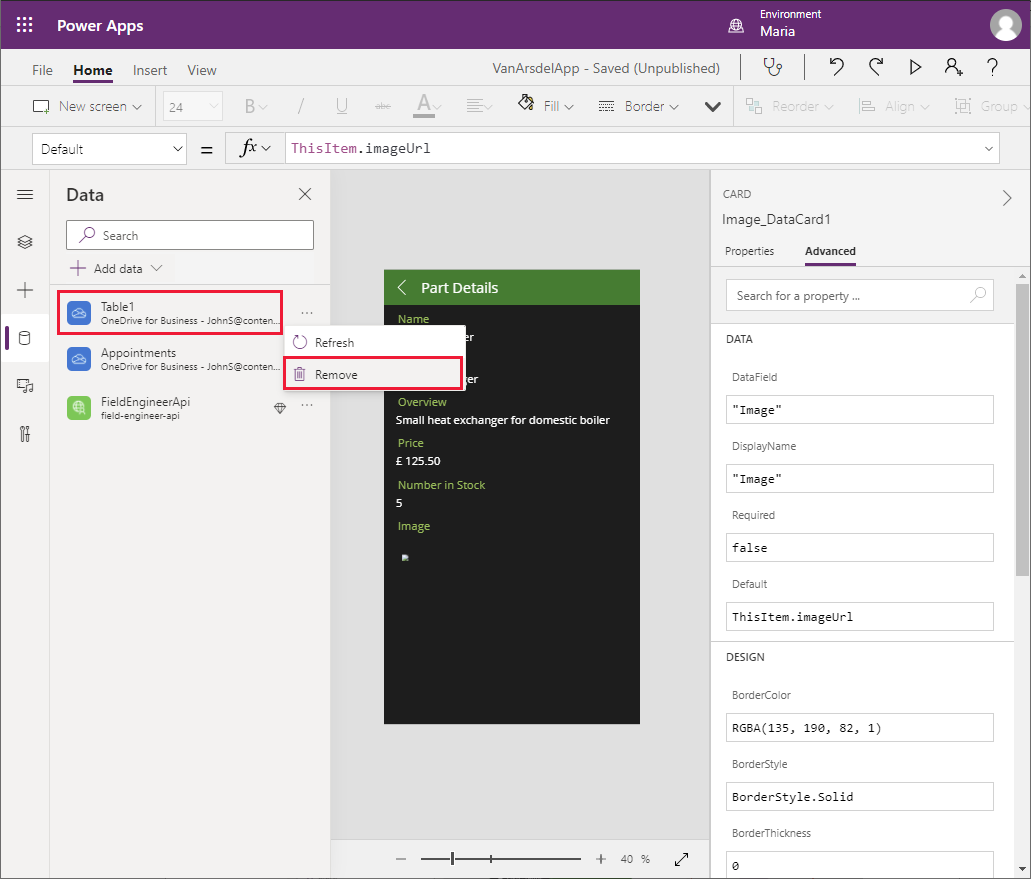
Change the Default property of the Image_DataCard1 control to ThisItem.imageUrl.
On the left pane on the Data tab, right-click the Table1 data connection, and then select Remove to delete it from the app. This connection is no longer required.
Save the app.
Note
You can quickly save the app without using the File menu by selecting Ctrl+S.
Select F5 to preview the app. The Browse Parts and Part Details screens should operate exactly as before, except this time they're retrieving data from the InventoryDB Azure SQL database through the Web API, rather than from a local Excel file.
Close the preview window and return to Power Apps Studio.
Updating the App to use the Connector: Field Scheduling and Notes
Maria continues with the BrowseAppointments, AppointmentDetails, and EditAppointment screens. The data presented by these screens currently originates from the Appointments table in another Excel workbook.
On the Home screen of the app, set the OnVisible action to the following formula.
ClearCollect(appointmentsCollection, Sort(Filter(FieldEngineerAPI.getapiappointments(), DateDiff(Today(), startDateTime) >= 0), startDateTime))This formula retrieves appointments data into the appointmentsCollection collection. The appointments are filtered to retrieve visits scheduled on or after the current date.
Select the label control that displays the time of the next appointment. Set the Text property to Text(First(appointmentsCollection).startDateTime, ShortTime24).
Select the label control that displays the date for the next appointment. Set the Text property to Text(First(appointmentsCollection).startDateTime, LongDate).
Select the label control that displays the customer name for the next appointment. Set the Text property to First(appointmentsCollection).customer.name.
Select F5 to preview the app. On the Home screen, select Appointments. This action will create the appointmentsCollection collection. Close the preview window and return to Power Apps Studio.
On the Tree view pane, select the BrowseAppointmentsGallery control in the BrowseAppointments screen. Change the formula in the Items property to the following formula.
Sort(Filter(appointmentsCollection, StartsWith(customer.name, TextSearchBox1\_1.Text)), startDateTime)This formula filters the data displayed on the screen by customer name, enabling the user to enter the name of a customer. The appointments are displayed in date and time order.
On the Tree view pane, expand the BrowseAppointmentsGallery control, and select the Title1_1 control. Change the Text property to the following.
Text(ThisItem.startDateTime, LongDate)This formula displays the date part of the startDateTime field for the appointment.
On the Tree view pane, expand the BrowseAppointmentsGallery control, and select the Subtitle1_1 control. Change the Text property to the following.
Text(ThisItem.startDateTime, ShortTime24)
This formula displays the time element of the startDateTime field.
On the Tree view pane, expand the BrowseAppointmentsGallery control, and select the Body1_1 control. Change the Text property to the following.
ThisItem.customer.nameOn the Tree view pane, select the IconRefresh1_1 control on the BrowseAppointments screen. Set the OnSelect action to the following formula.
ClearCollect(appointmentsCollection, Sort(Filter(FieldEngineerAPI.getapiappointments(), DateDiff(Today(), startDateTime) >= 0), startDateTime));On the Tree view pane, expand the AppointmentDetails screen, and select the DetailForm1_1 control. Set the DataSource property to appointmentsCollection.
On the Tree view pane, select the IconEdit1 control. Modify the formula in the DisplayMode property to test the appoinmentsCollection collection.
If(DataSourceInfo(**appointmentsCollection**, DataSourceInfo.EditPermission), DisplayMode.Edit, DisplayMode.Disabled)On the Tree view pane, expand the DetailForm1_1 screen, and select the Customer Name_DataCard1 control. Change the Default property to ThisItem.customer.name.
Change the Default properties of the remaining data cards as follows:
- Customer Address_DataCard1: ThisItem.customer.address
- Contact Number_DataCard1: ThisItem.customer.contactNumber
- Problem Details_DataCard1: ThisItem.problemDetails
- Status_DataCard1: ThisItem.appointmentStatus.statusName
- Notes_DataCard1: ThisItem.notes
- Image_DataCard1_1: ThisItem.imageUrl
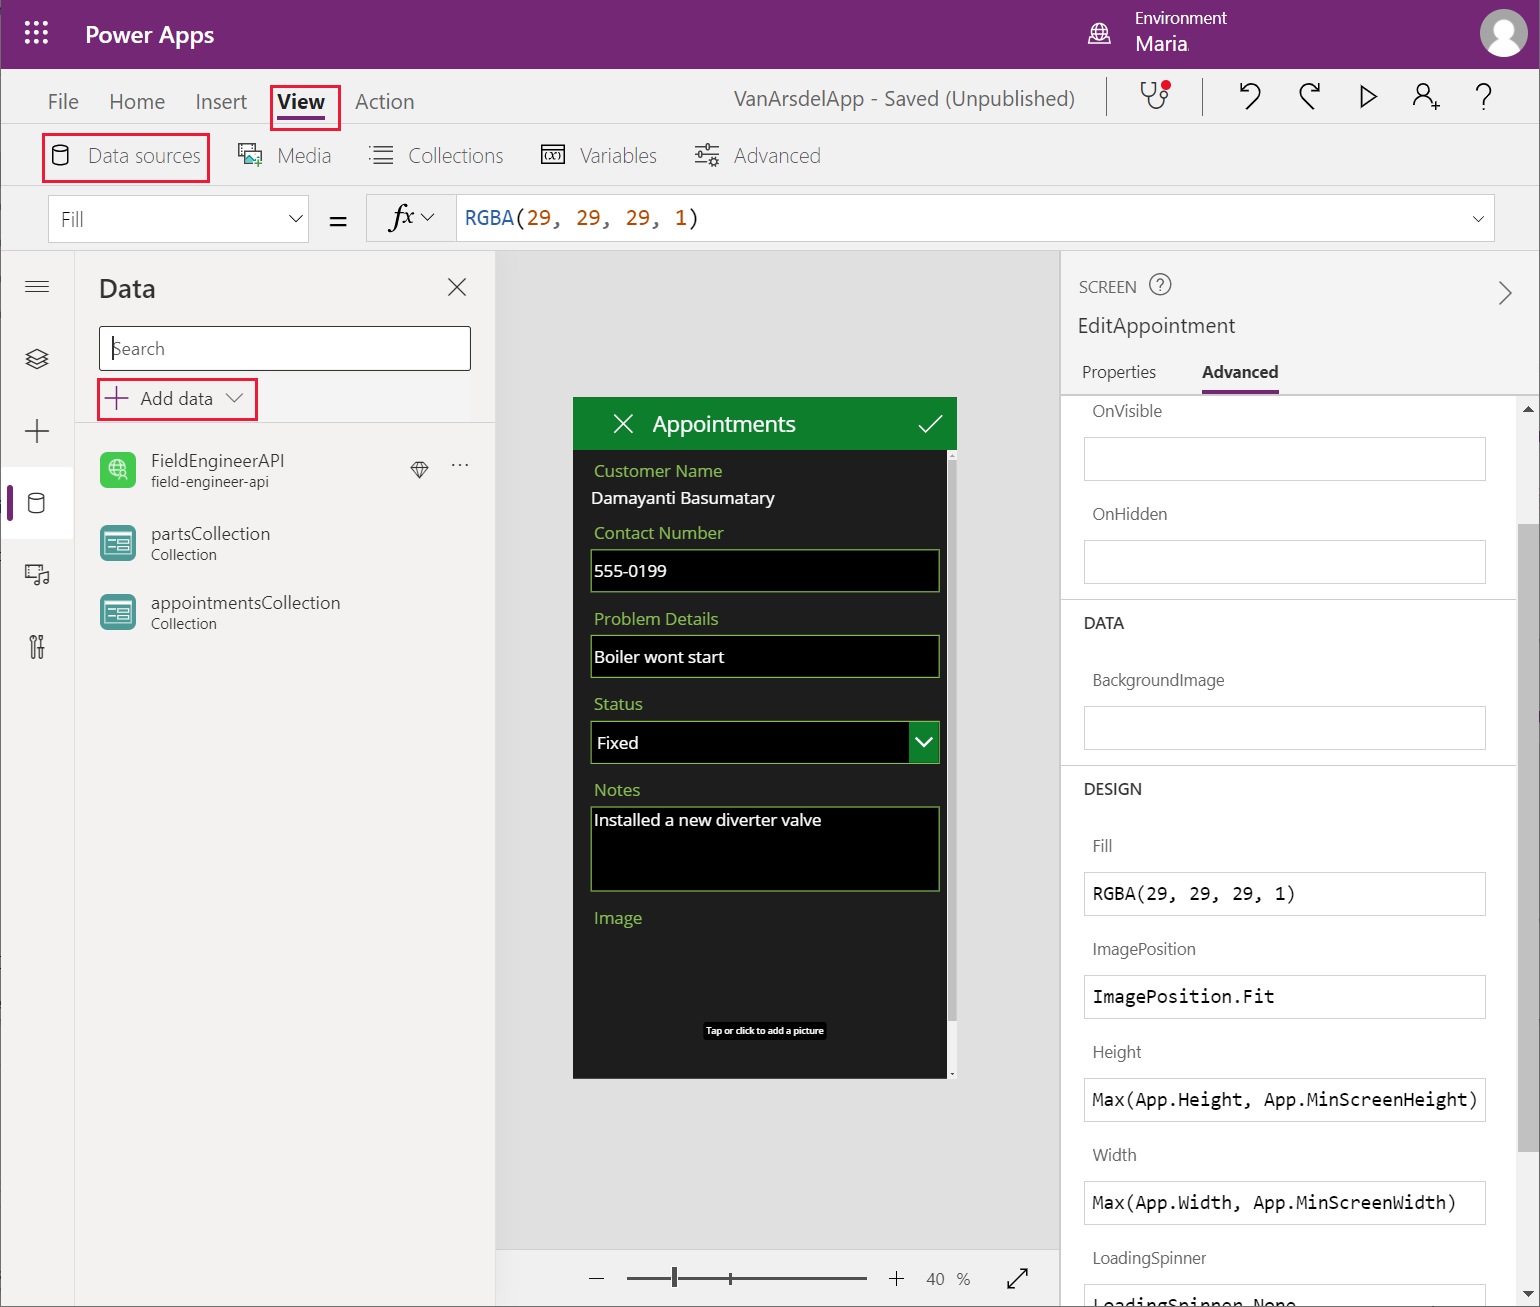
On the Tree view pane, expand the EditAppointment screen, and select the EditForm1 control. Set the DataSource property to appointmentsCollection.
On the Tree view pane, expand the EditForm1 control, and select the Customer Name_DataCard3 control. Change the Default property to ThisItem.customer.name.
Change the Default properties of the remaining data cards as follows:
- Contact Number_DataCard2: ThisItem.customer.contactNumber; additionally, change the MaxLength property to 20
- Problem Details_DataCard2: ThisItem.problemDetails
- Status_DataCard5: ThisItem.appointmentStatus.statusName
- Notes_DataCard3: ThisItem.notes
- Image_DataCard2: ThisItem.imageUrl
On the Tree view pane, expand the Problem Details_Card2 control. Rename the DataCardValueX (X will be a number) field under this control to ProblemDetailsValue. Repeat this process for the DataCardValueX controls in the following data cards:
- Status_DataCard5: StatusValue
- Notes_DataCard3: NotesValue
Note
The Image control will be addressed in the next chapter.
Select the ProblemDetailsValue, and set the MaxLength property to 100.
On the Tree view pane, select the IconAccept1 control on the EditAppointment screen. Set the OnSelect action property to the following formula.
FieldEngineerAPI.putapiappointmentsid(BrowseAppointmentsGallery.Selected.id, {problemDetails:ProblemDetailsValue.Text, statusName:StatusValue.Selected.Value, notes:NotesValue.Text, imageUrl:""});

Remove(appointmentsCollection, First(Filter(appointmentsCollection, id=BrowseAppointmentsGallery.Selected.id)));

Set(appointmentRec, FieldEngineerAPI.getapiappointmentsid(BrowseAppointmentsGallery.Selected.id));

Collect(appointmentsCollection, appointmentRec);

Navigate(AppointmentDetails, ScreenTransition.None);
This formula calls the PUT operation for the Appointments controller in the Web API. It passes the appointment ID for the current appointment as the first parameter, followed by the details that the user might have modified on the screen. The details are passed as a JSON object. The Remove, Set, and Collect statements update the appointmentsCollection collection with the data saved to the database.
Note
Don't use the ClearCollect function to delete and refresh the entire collection in situations such as this, because it would be wasteful if—for example—only one record has changed.
On the Tree view pane, select the IconAccept1 control on the EditAppointment screen. Set the OnSelect action property to the following.
ResetForm(EditForm1);

Navigate(AppointmentDetails, ScreenTransition.None);
On the left pane on the Data tab, right-click the Appointments data connection, and then select Remove to delete it from the app.
Save the app.
Select F5 to preview the app. From the Home screen, go to the Appointments screen, select and edit an appointment, and then save the changes. Verify that the appointment has been updated.
Close the preview window and return to Power Apps Studio.
Creating the Azure Cognitive Search service for the Field Knowledgebase
The Knowledgebase screen in the app isn't currently attached to any data source. The Web API includes operations for querying and updating the Tips, BoilerParts, and Engineers tables in the KnowledgeDB database. However, the purpose of the Query screen in the app is to support searches through all of these tables. The volume of data in these tables is likely to increase quickly, so Maria, Kiana, and Preeti decide to deploy Azure Cognitive Search to support this feature. An app can submit queries and receive results from Azure Cognitive Search through a custom connector.
Azure Cognitive Search works best if the data to be searched is contained in a single database entity. Kiana creates a view in the KnowledgeDB database that presents a unified view of the Tips, BoilerParts, and Engineers tables, as follows:
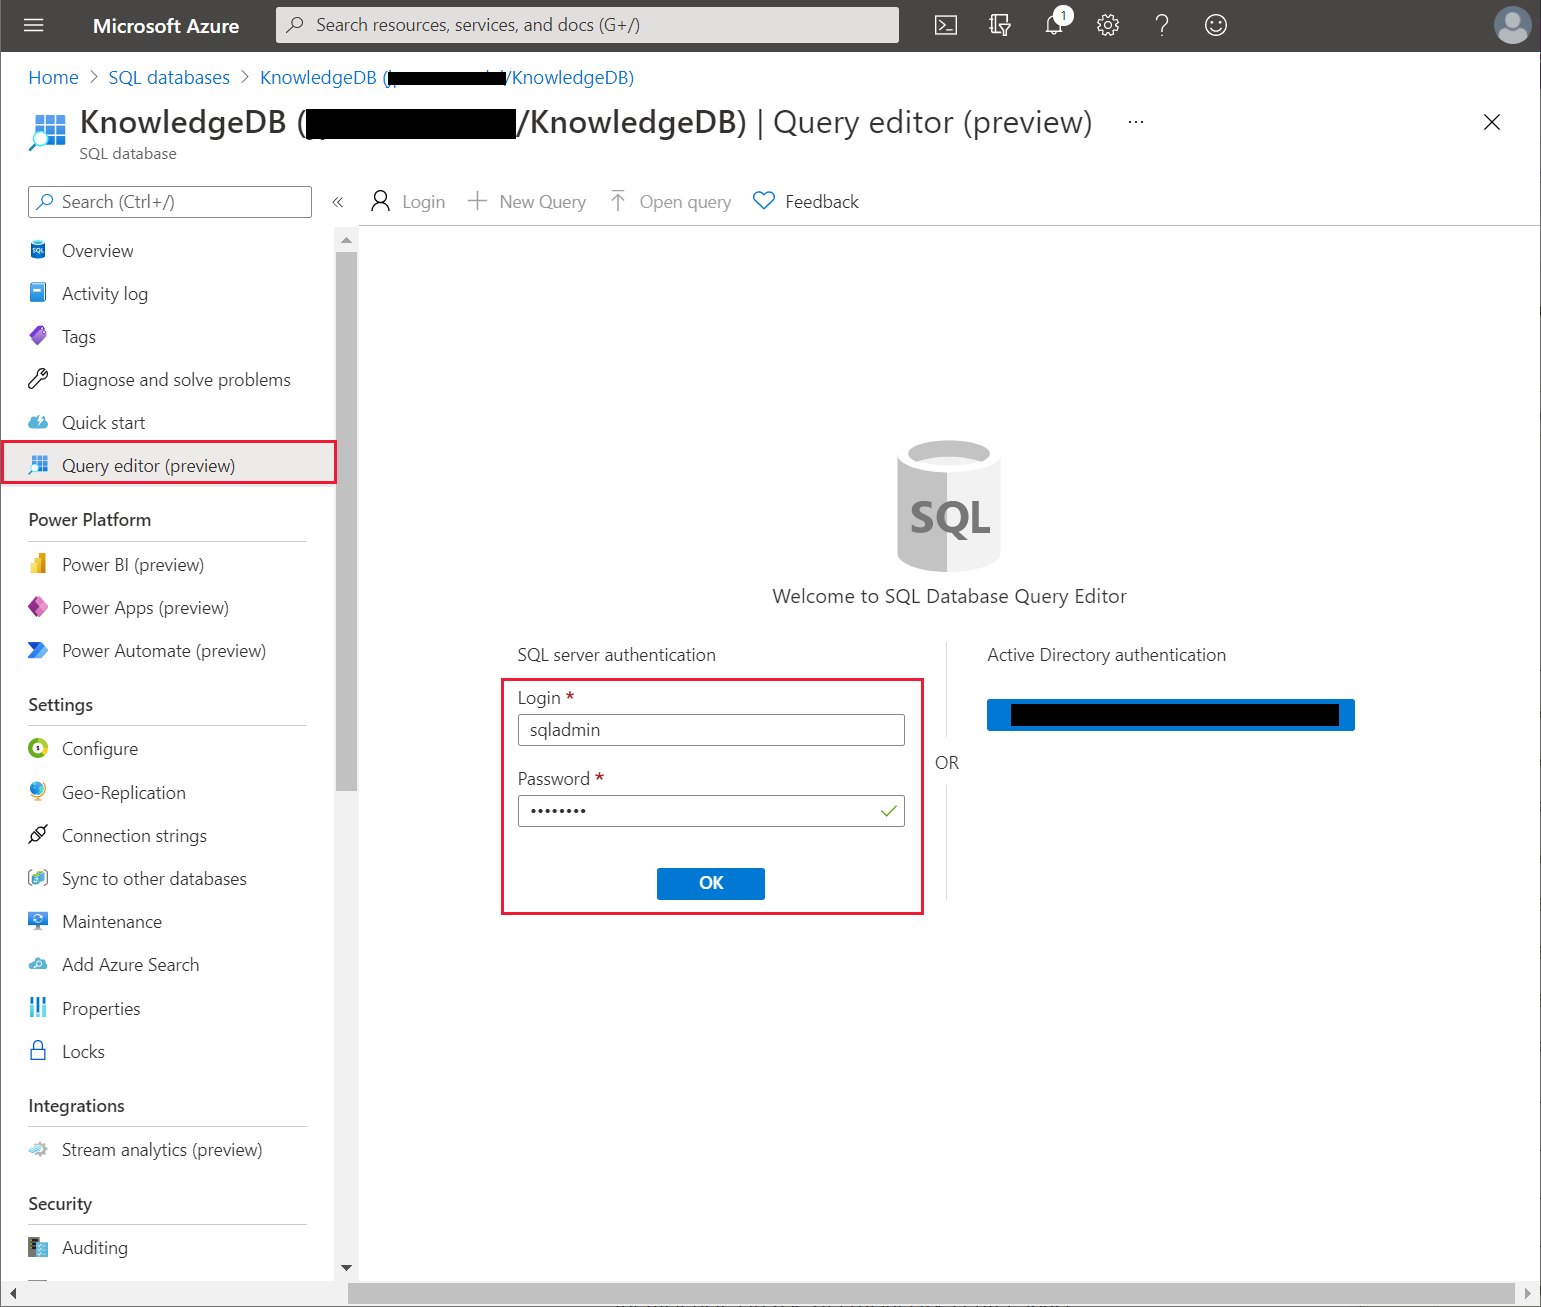
In the Azure portal, go to the KnowledgeDB SQL Database page.
On the left pane, select Query Editor and sign in to the database as sqladmin, using the password Pa55w.rd.
In the query window, enter the following statement, and then select Run.
CREATE OR ALTER VIEW [dbo].[Knowledge] AS
SELECT T.Id, T.Subject, T.Body, B.Name, B.Overview
FROM [dbo].[Tips] T INNER JOIN [dbo].[BoilerParts] B
ON B.Id=T.KnowledgeBaseBoilerPartId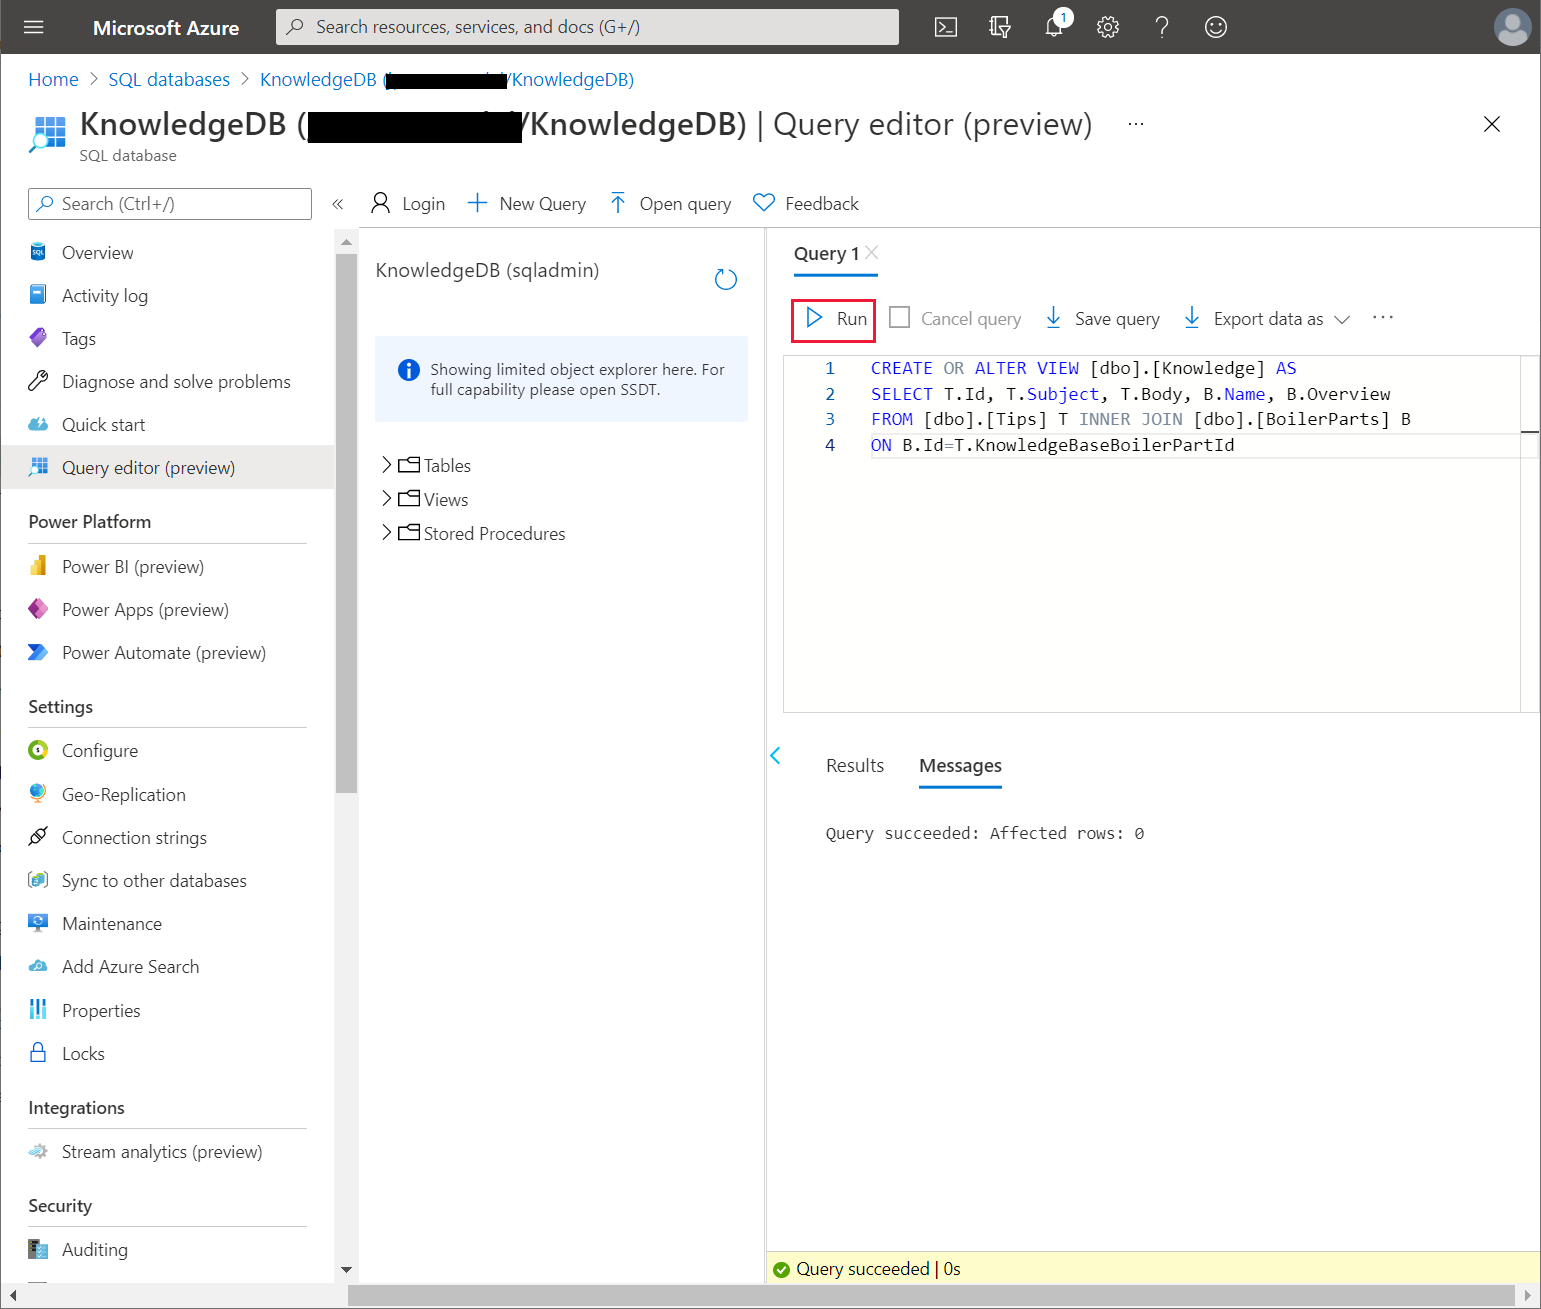
Verify that the view, Knowledge, has been created successfully.
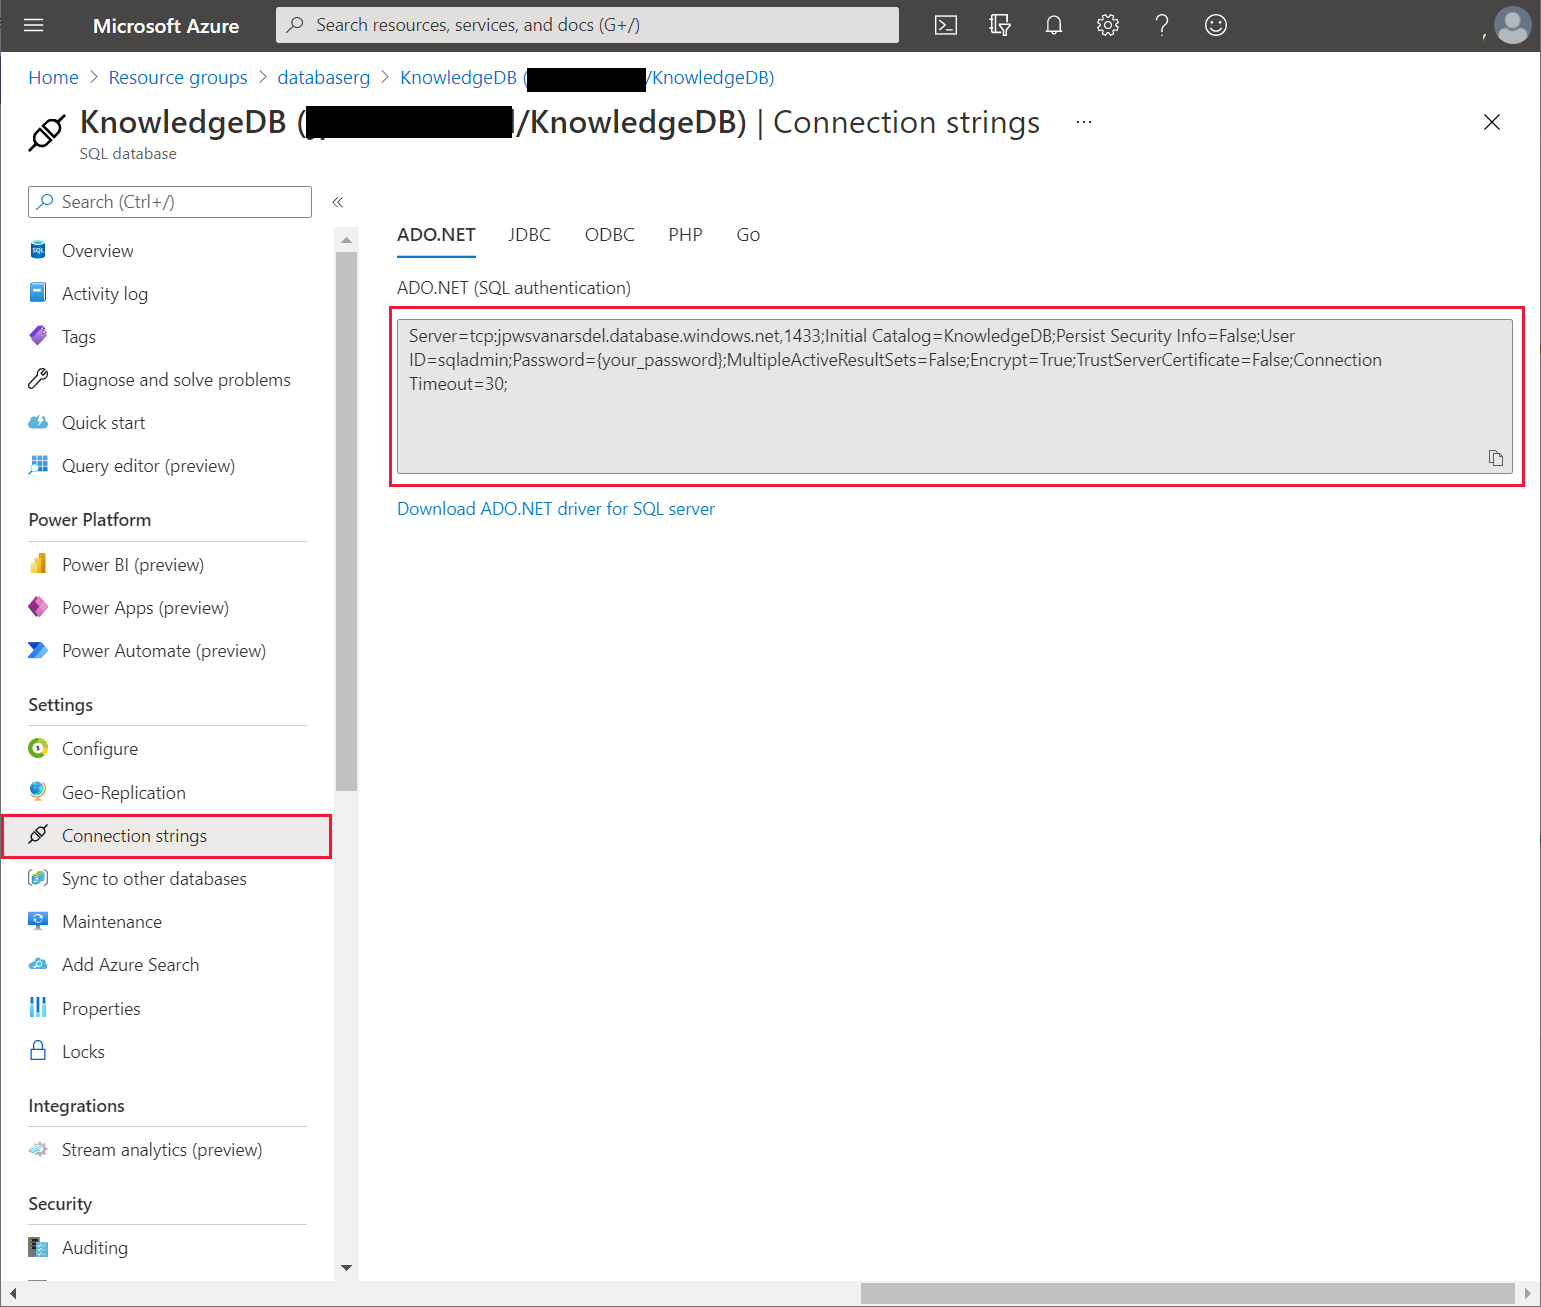
On the left pane, select Connection strings. Make a note of the ADO.NET connection string; you'll need it when you configure Azure Cognitive Search.
Working with Kiana, Preeti configures a new instance of the Azure Cognitive Search service to perform searches on rows in the Knowledge view, as follows:
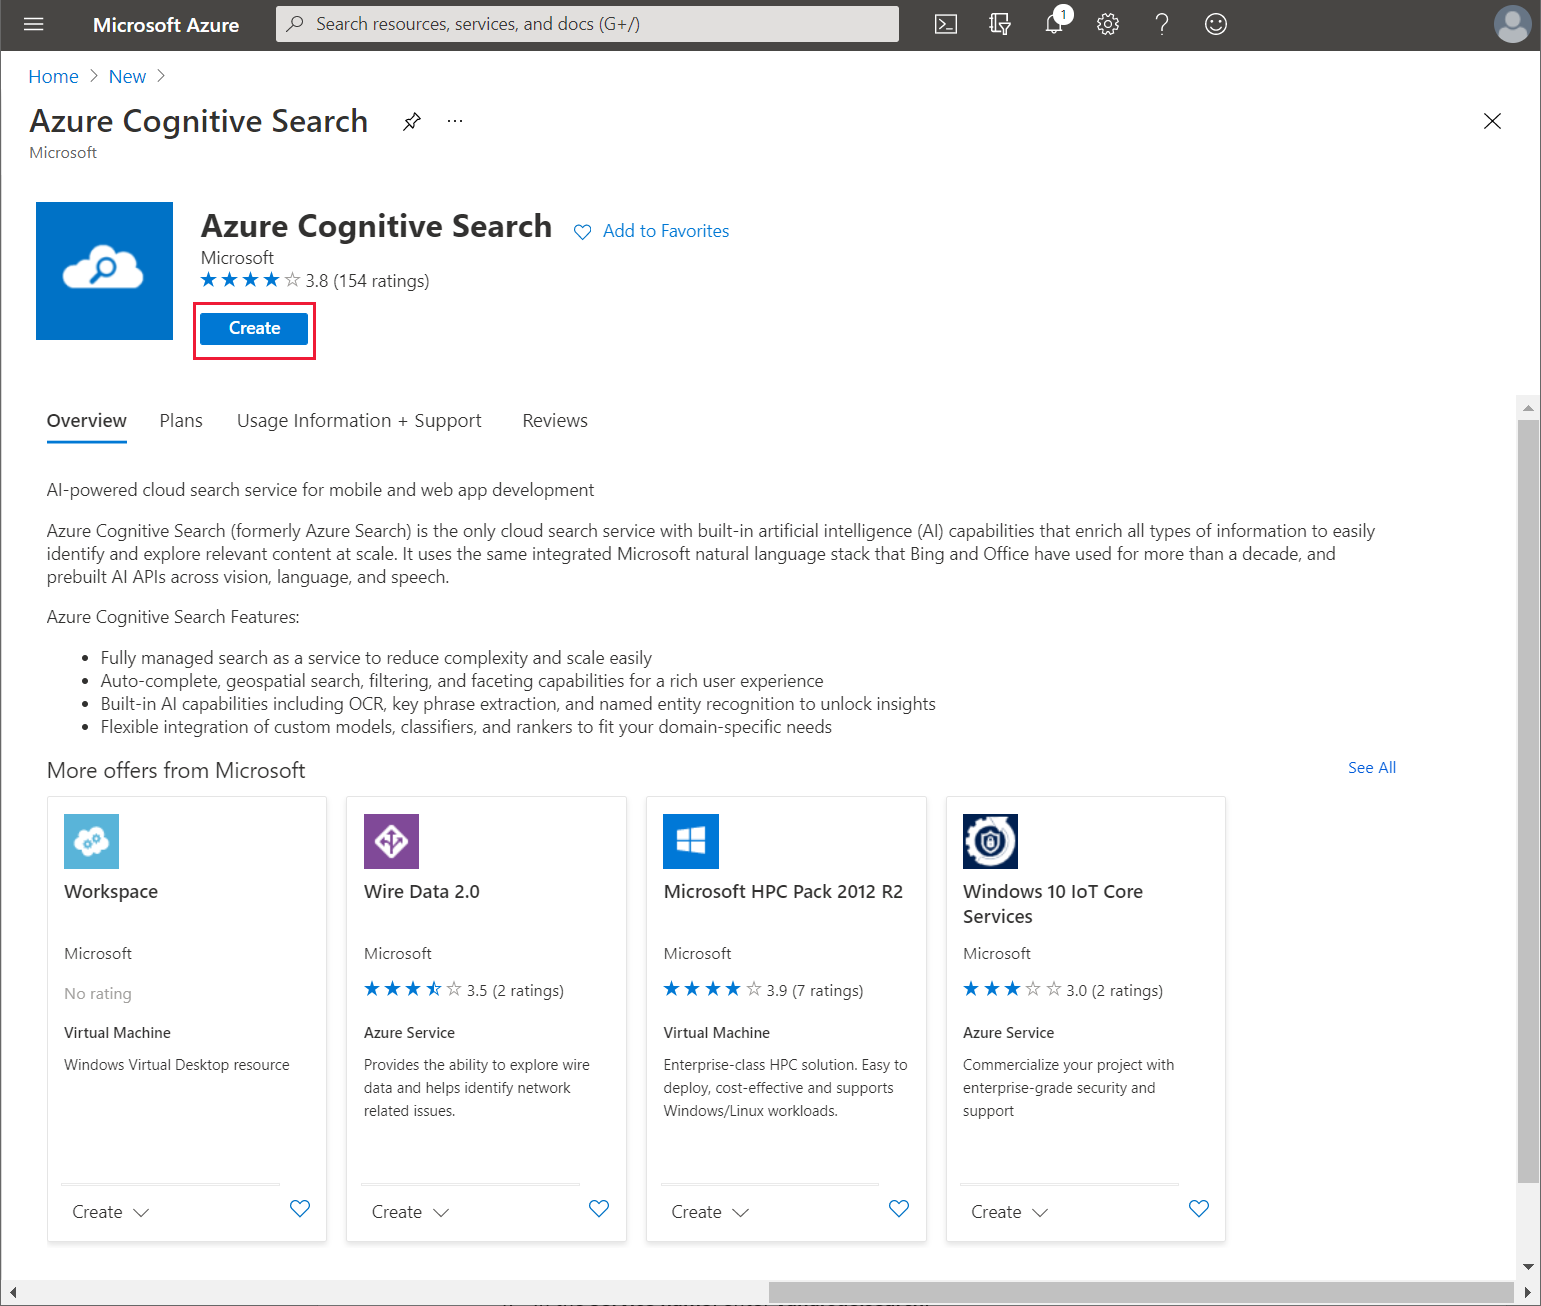
On the Home page, in the Azure portal, select + Create a resource, enter Azure Cognitive Search, select Enter, and then select Create.
On the New Search Service page, enter the following settings, and then select Review + create:
- Subscription: Select your Azure subscription
- Resource group: webapi_rg
- Service name: Enter a unique name for the service
- Location name: Select your nearest region
- Pricing tier: Free
On the validation page, select Create, and wait while the service is provisioned.
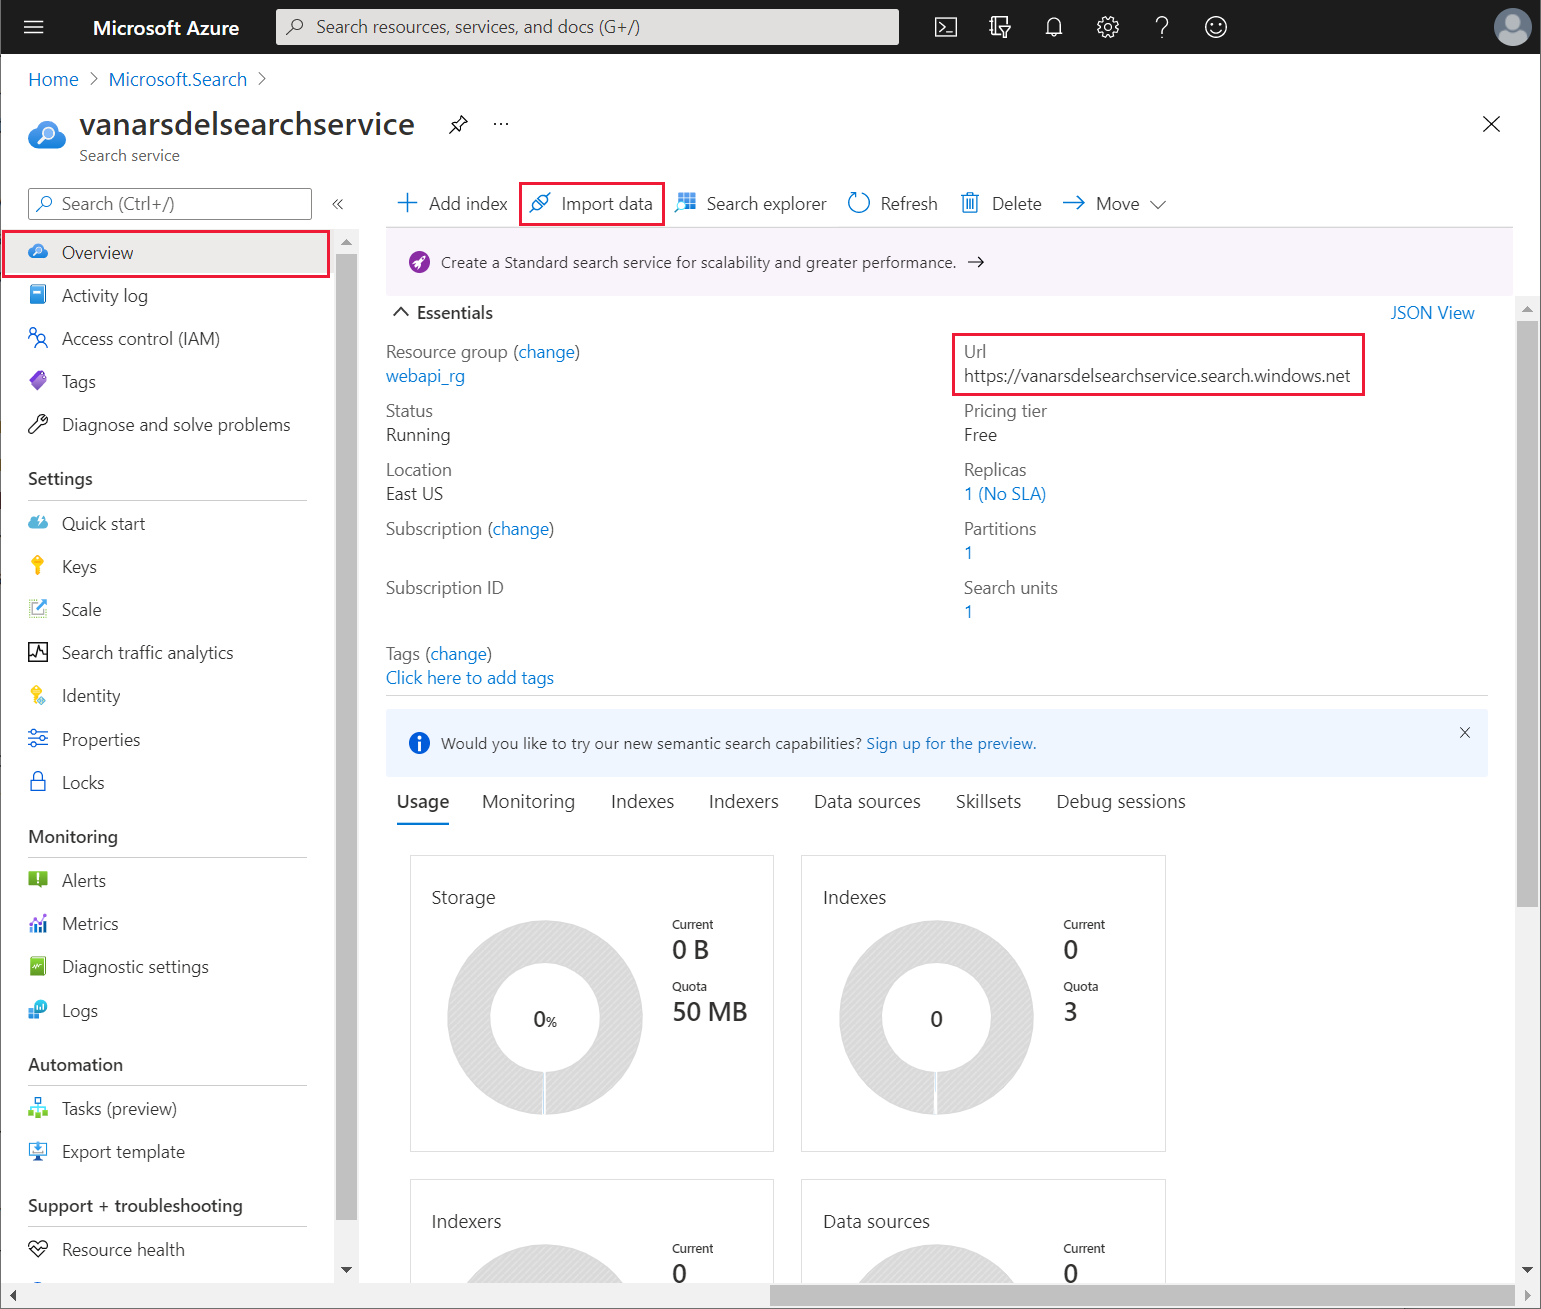
Go to the page for the new search service, select Overview, make a note of the Url (you'll need this later when you create the custom connector for Power Apps), and then select Import Data.
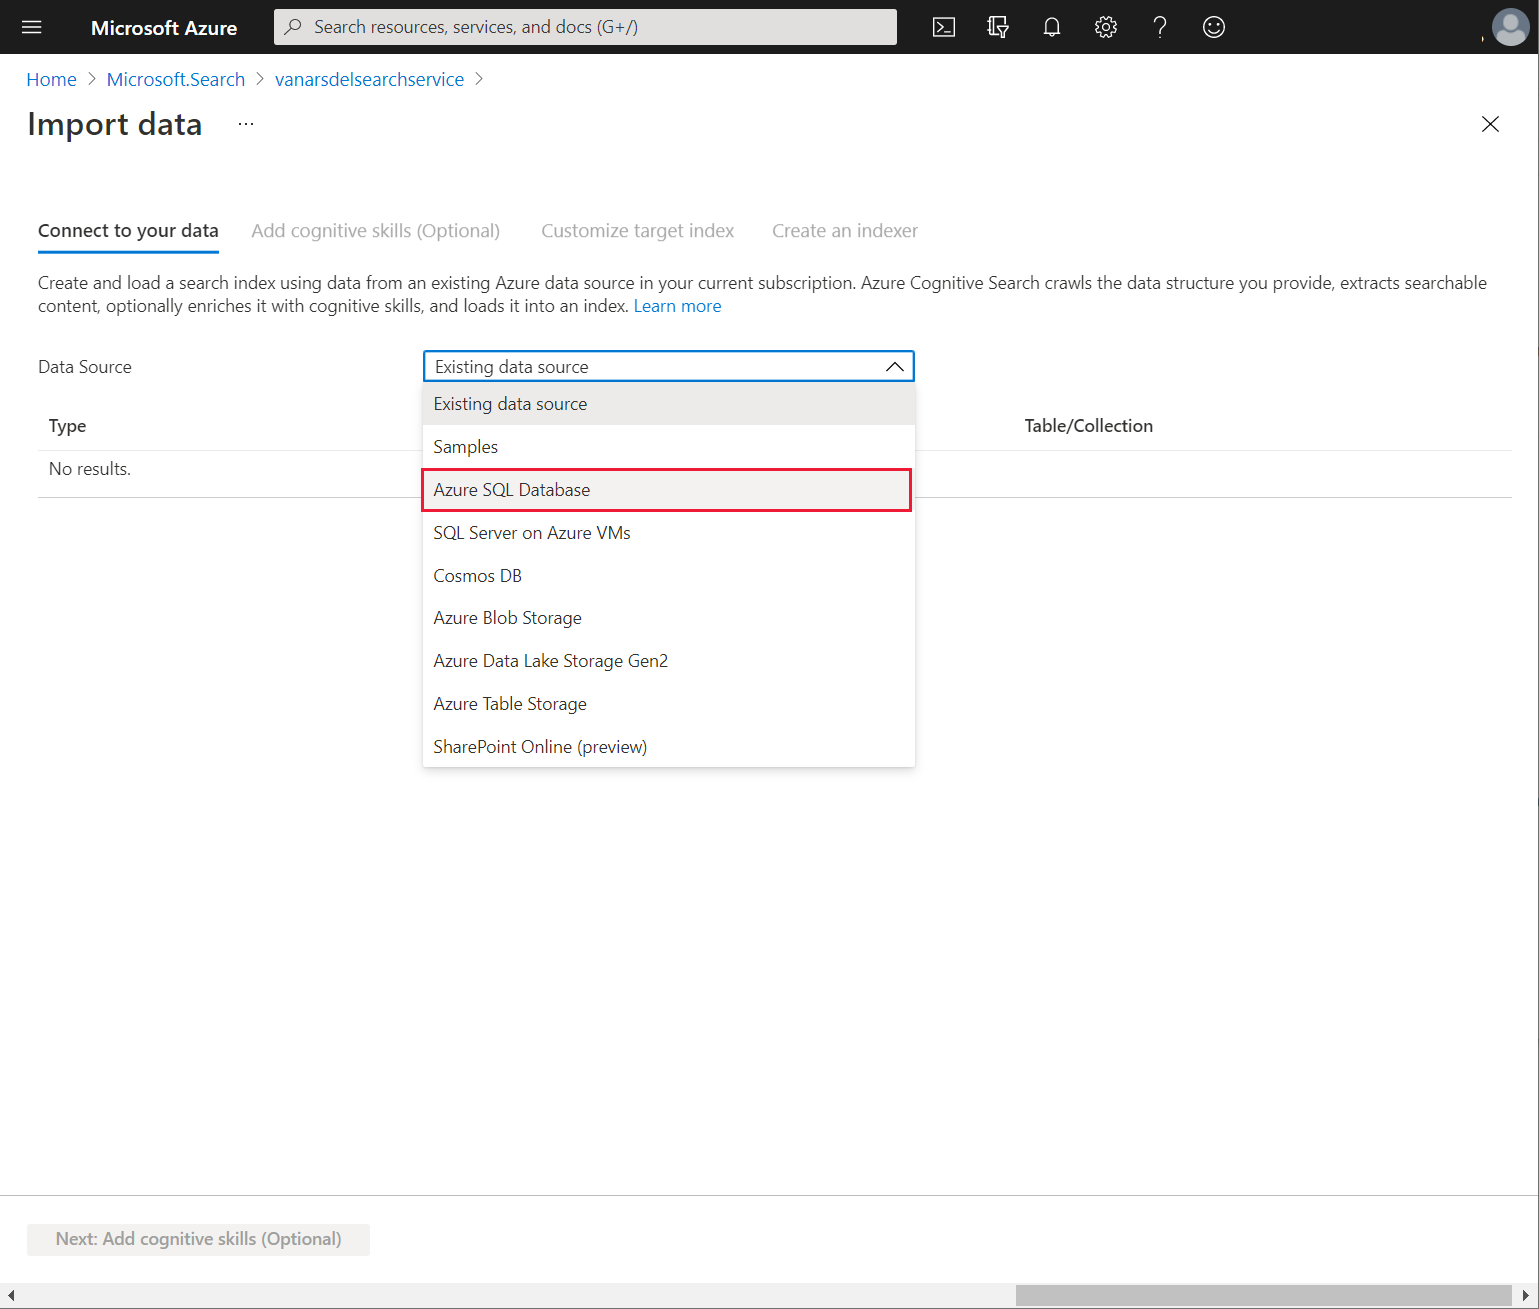
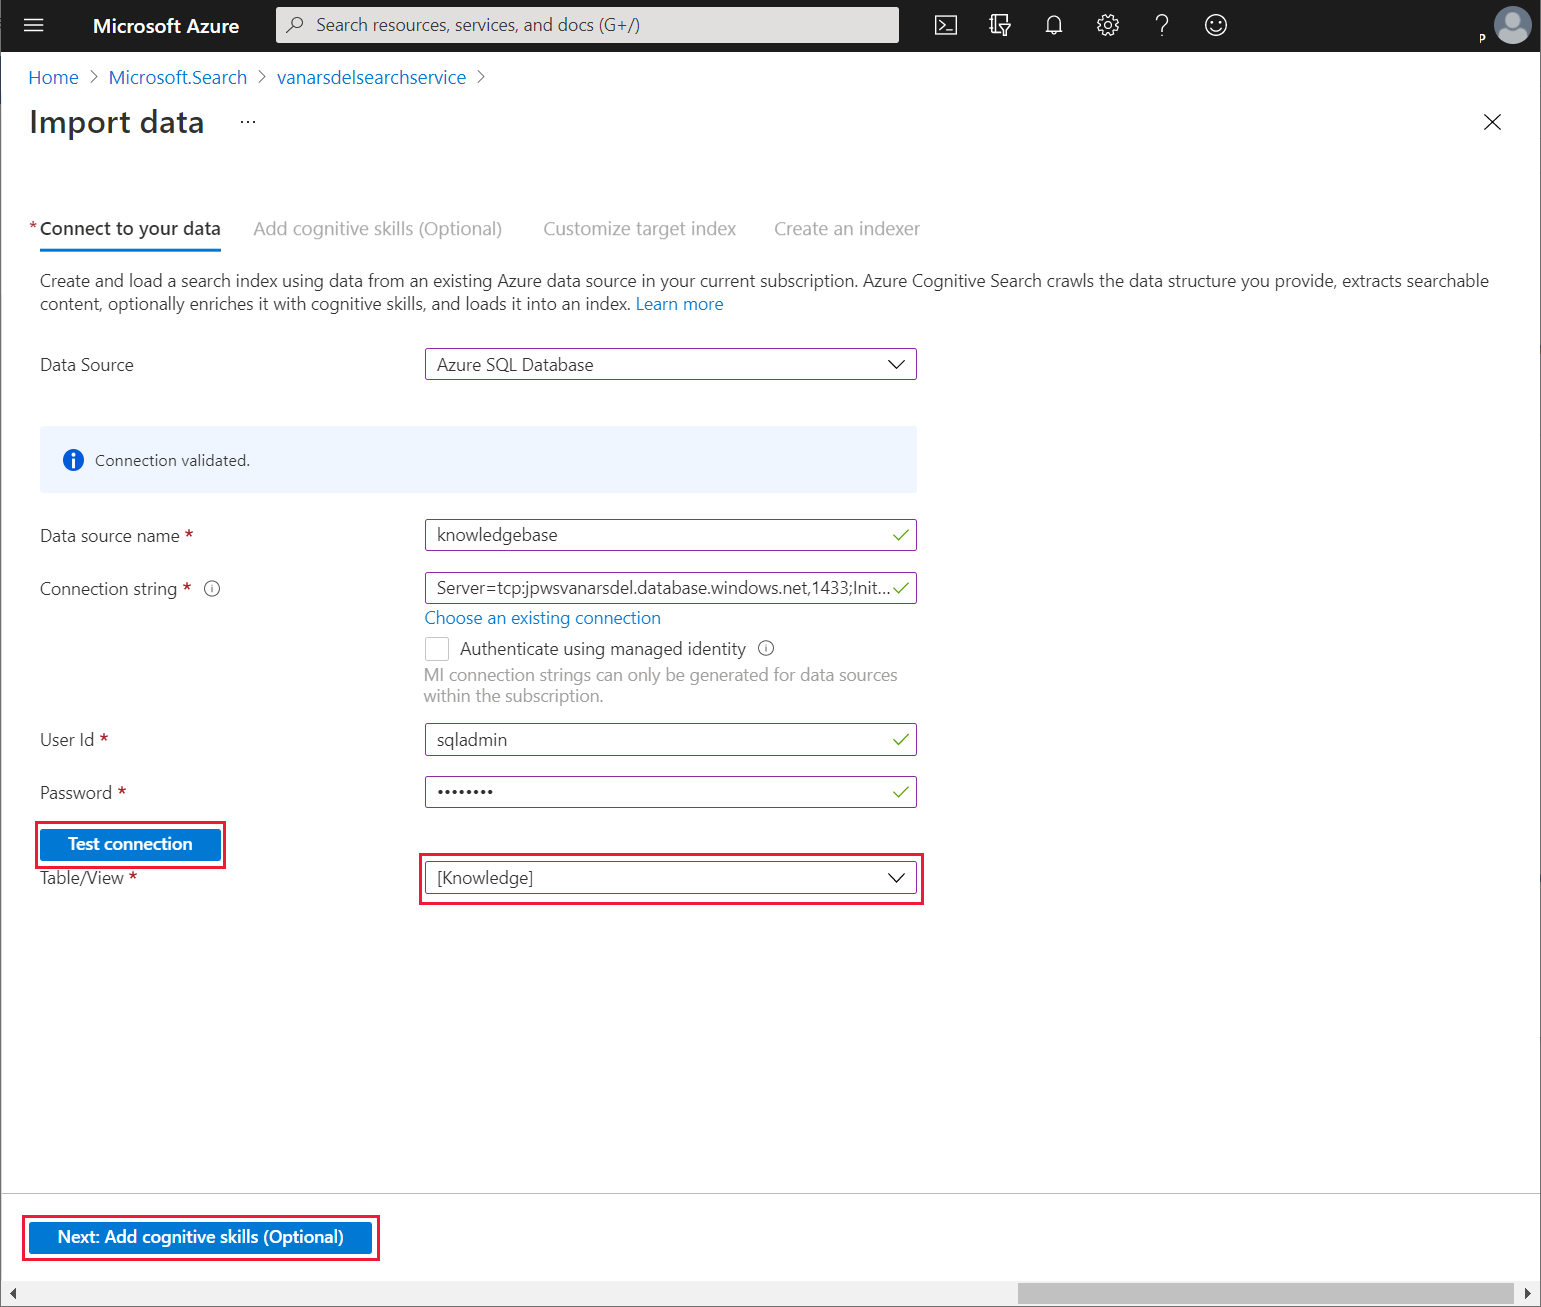
On the Import data page, in the Data Source dropdown list box, select Azure SQL Database.
On the Connect to your data page, specify the following settings:
- Data Source: Azure SQL Database
- Data source name: knowledgebase
- Connection string: Enter the Azure SQL Database connection string for the KnowledgDB database that you recorded earlier; in this string, make sure to set the password to Pa55w.rd
- Leave the User Id and Password fields at their default values; these items are retrieved from the connection string
Select Test connection. Ensure that the test is successful, select [Knowledge] in the Table/View dropdown list box, and then select Next: Add cognitive skills (Optional).
On the Add cognitive skills (Optional) page, select Skip to: Customize target index.
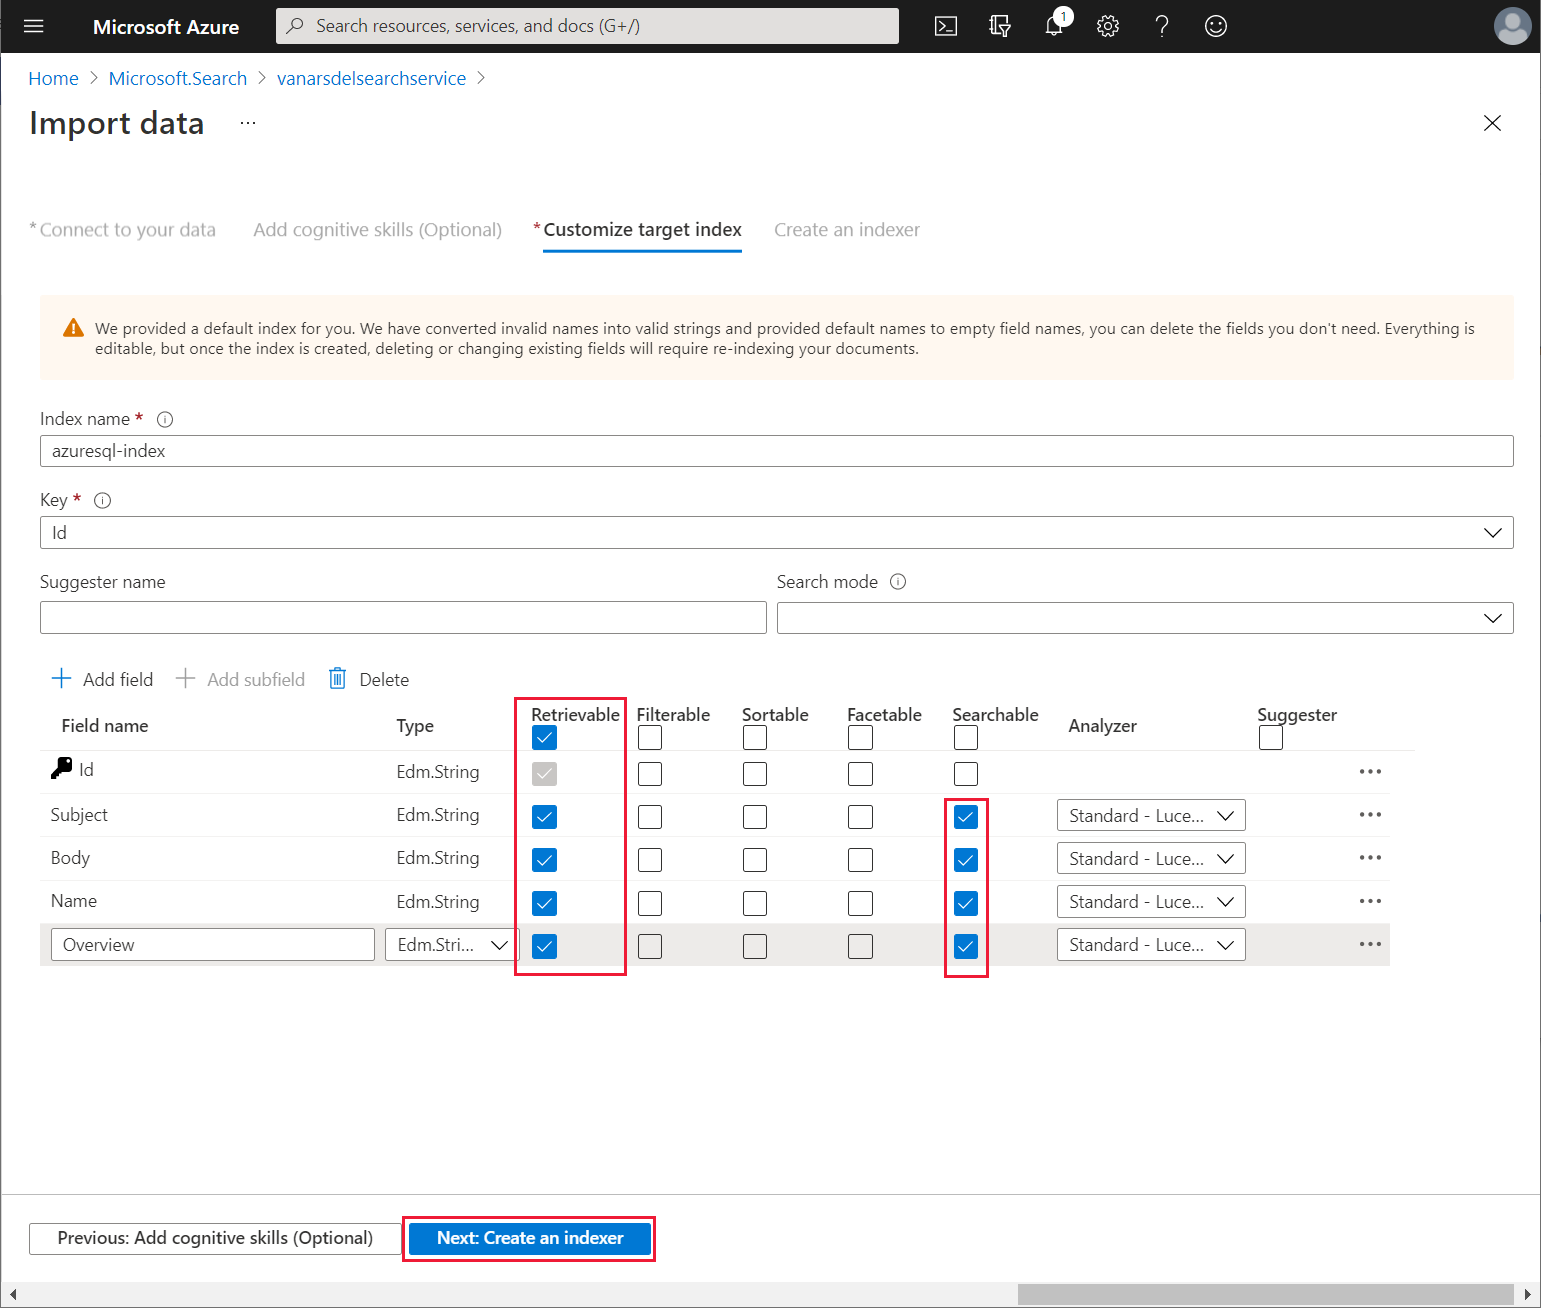
On the Customize target index page, select Retrievable for all columns, and Searchable for Subject, Body, Name, and Overview. Select Next: Create an indexer.
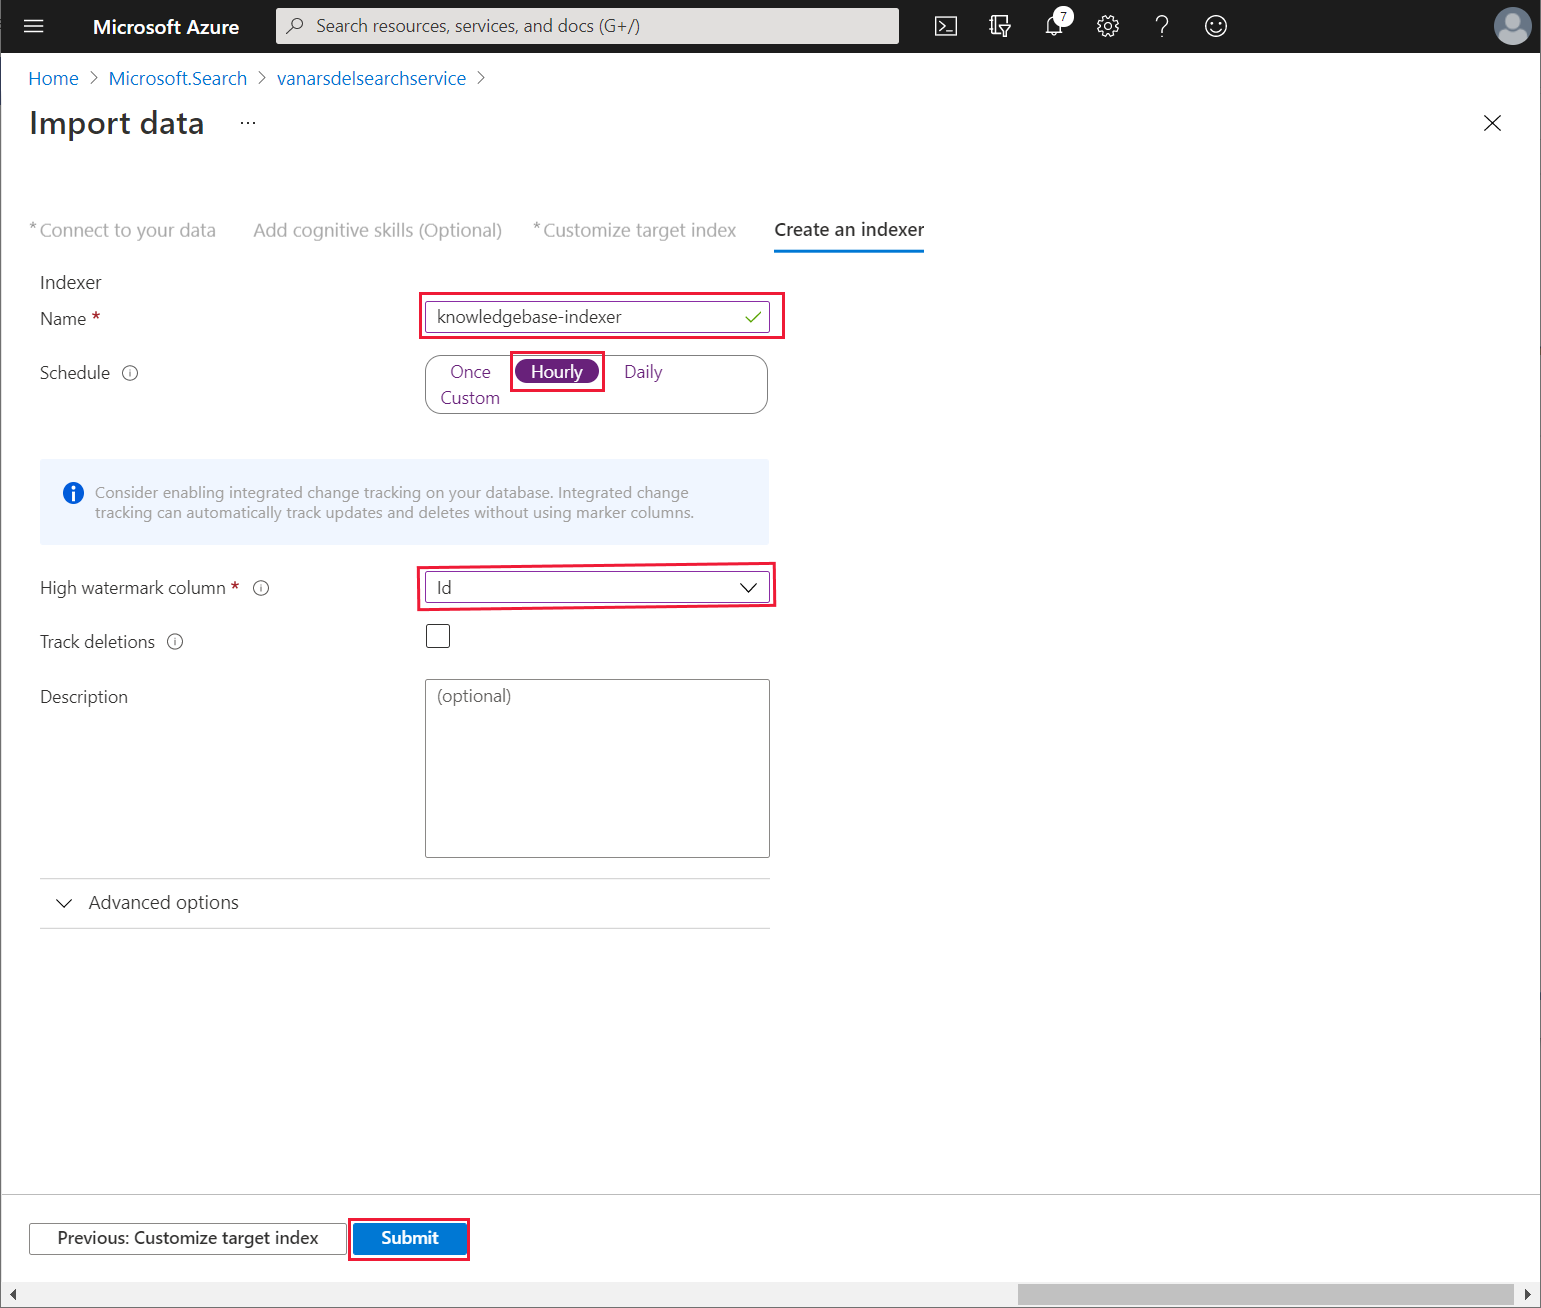
On the Create an indexer page, change the indexer Name to knowledgebase-indexer. For the Schedule, select Hourly, set the High watermark column to Id, and then select Submit:
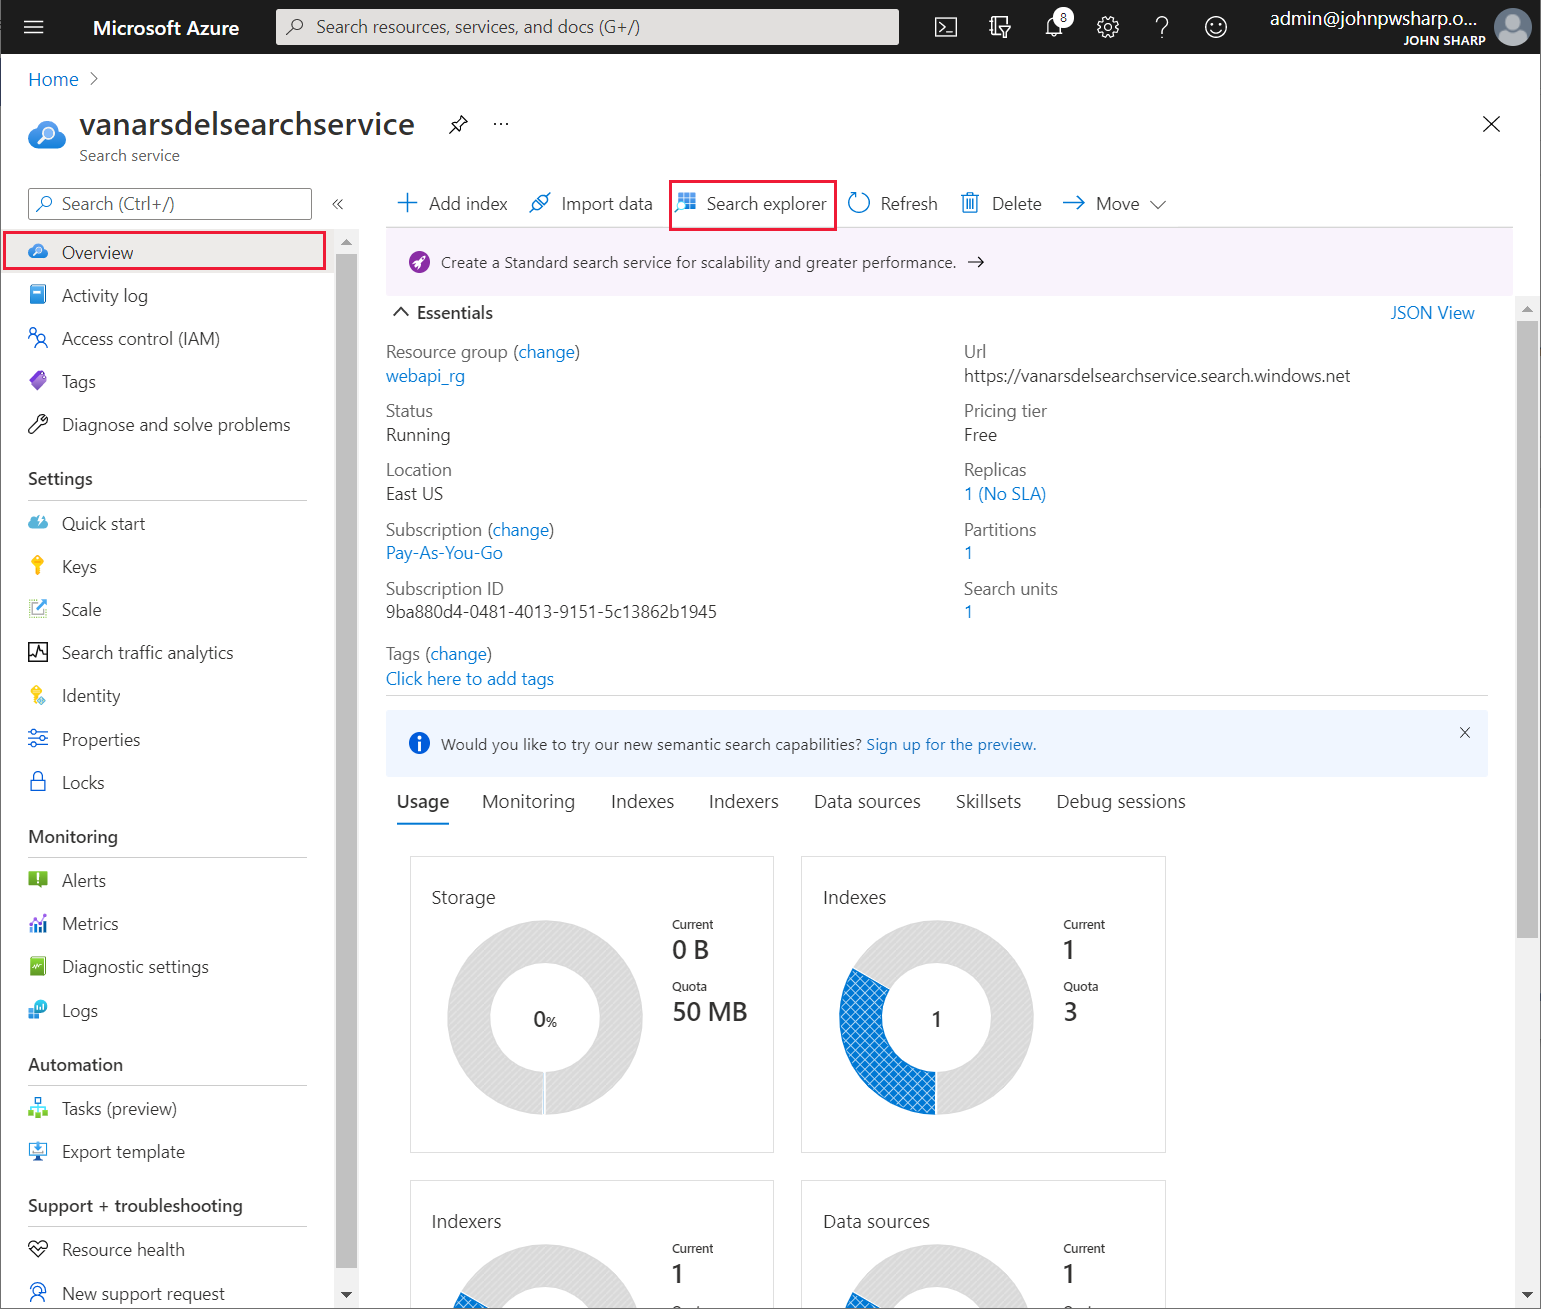
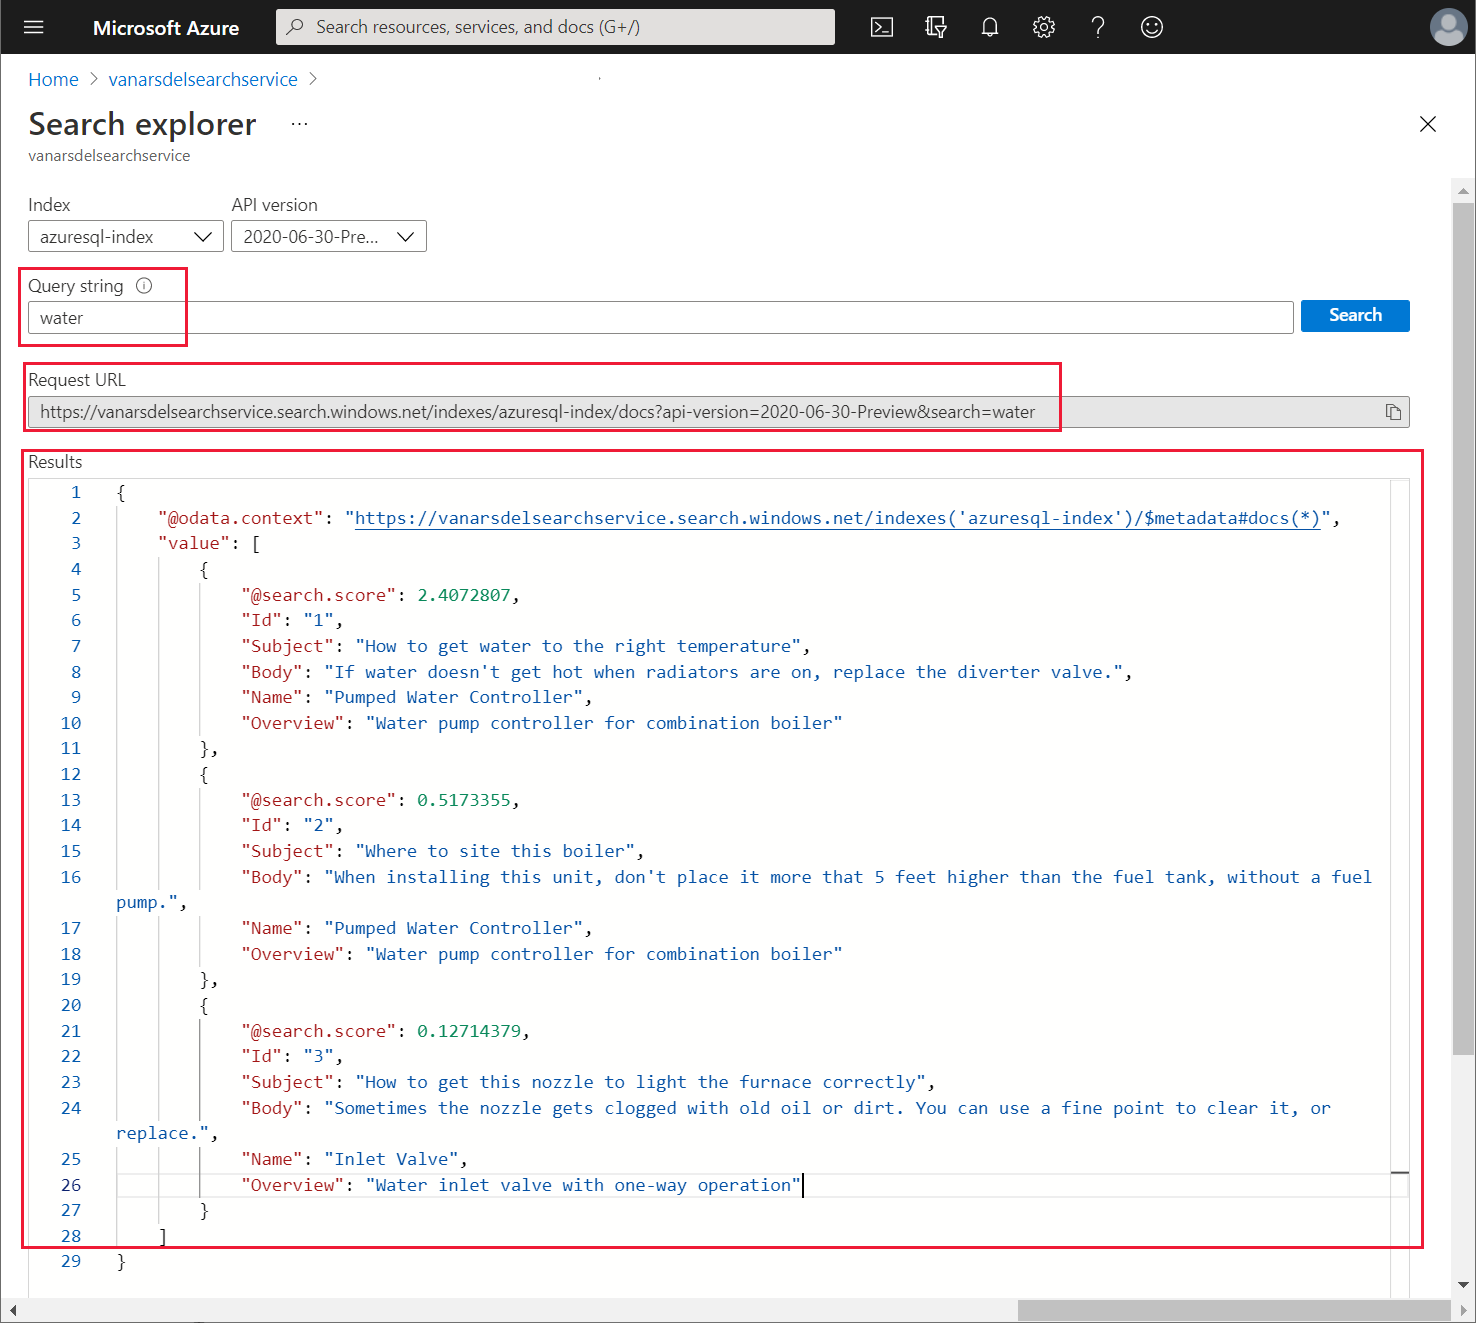
To test the indexer, on the Overview page for the search service, select Search Explorer:
In the Query string field, enter a word to search for in the knowledge base, and then select Search. The search service should generate a list of documents with a match in the Subject, Body, Name, or Overview fields, and display them in the Results pane. Make a note of the Request URL and the sample Results; you'll need these items later as an example request and response when you set up the Power Apps custom connector.
Creating the custom connector for the Azure Cognitive Search service
Kiana can now create a custom connector that Power Apps uses to send search requests to the search service. Kiana does this using Power Apps Studio, as follows:
Sign in to Power Apps.
On the left pane, expand Data, and select Custom Connectors. On the right pane, select + New custom connector, and then select Create from blank:
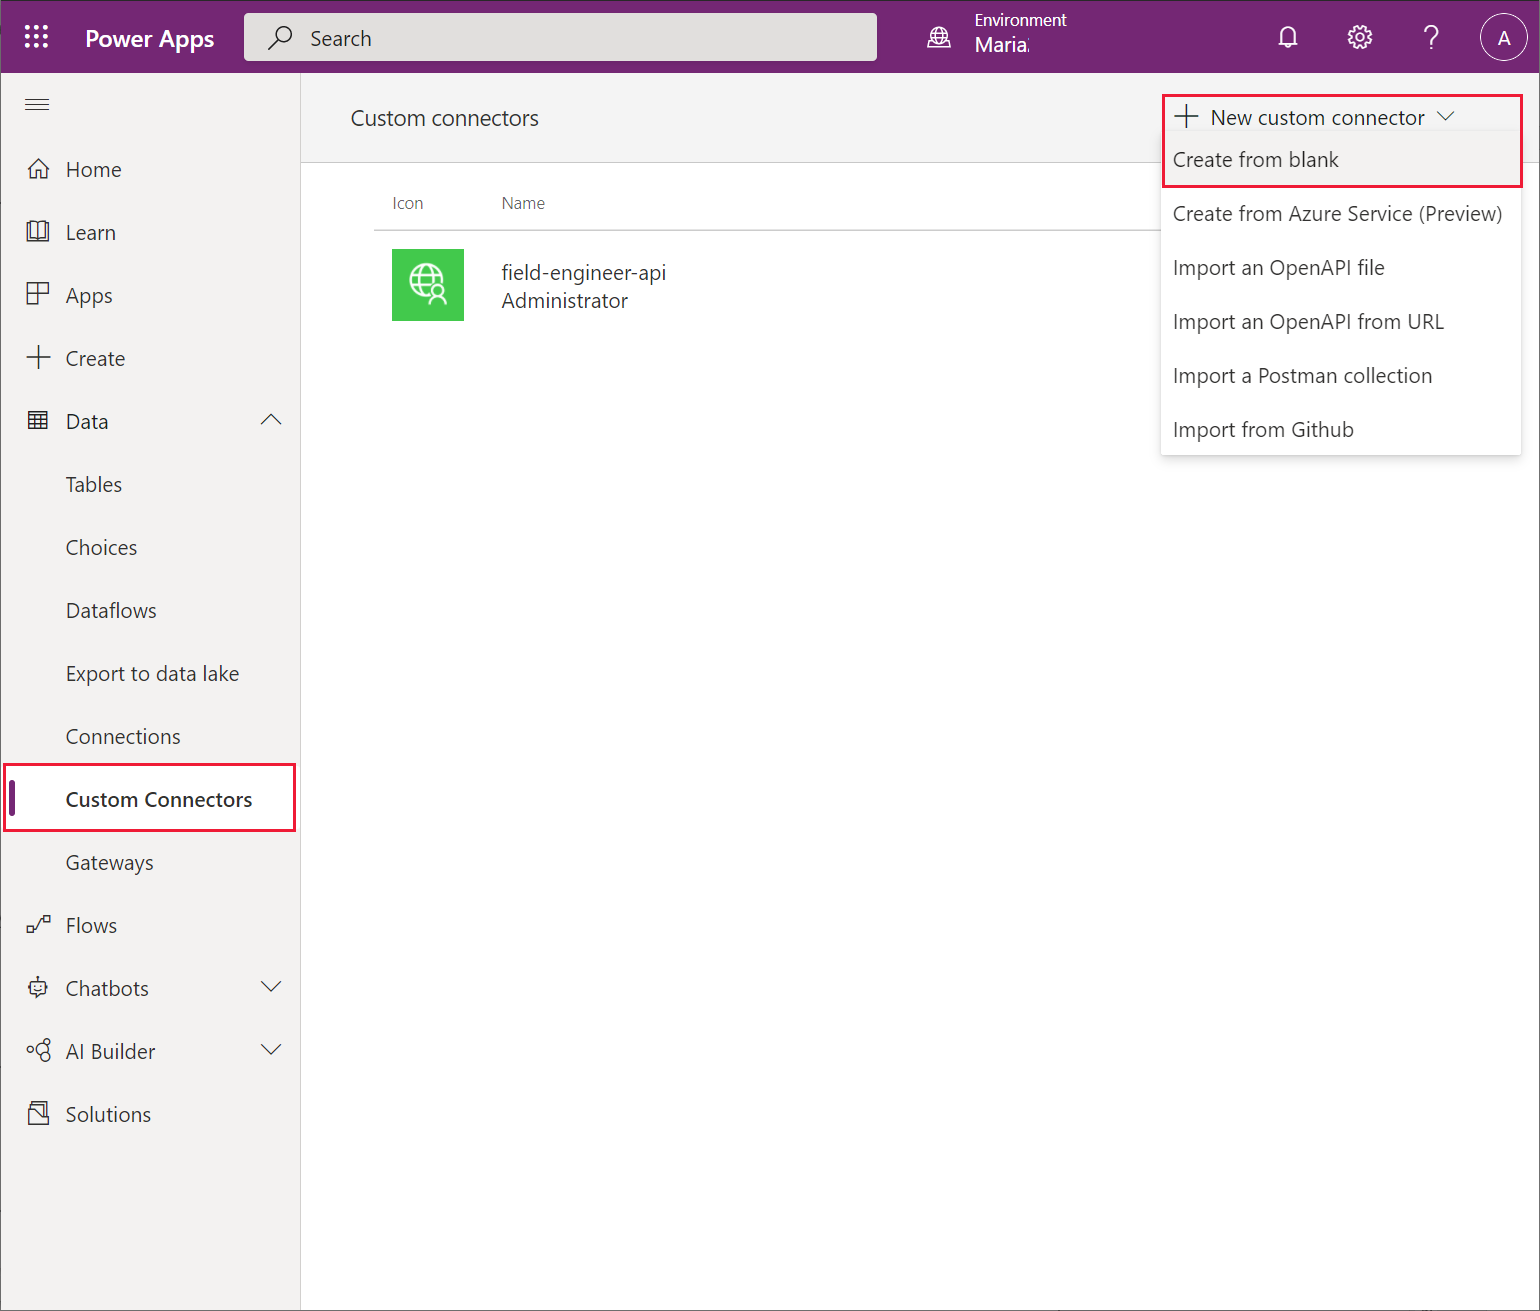
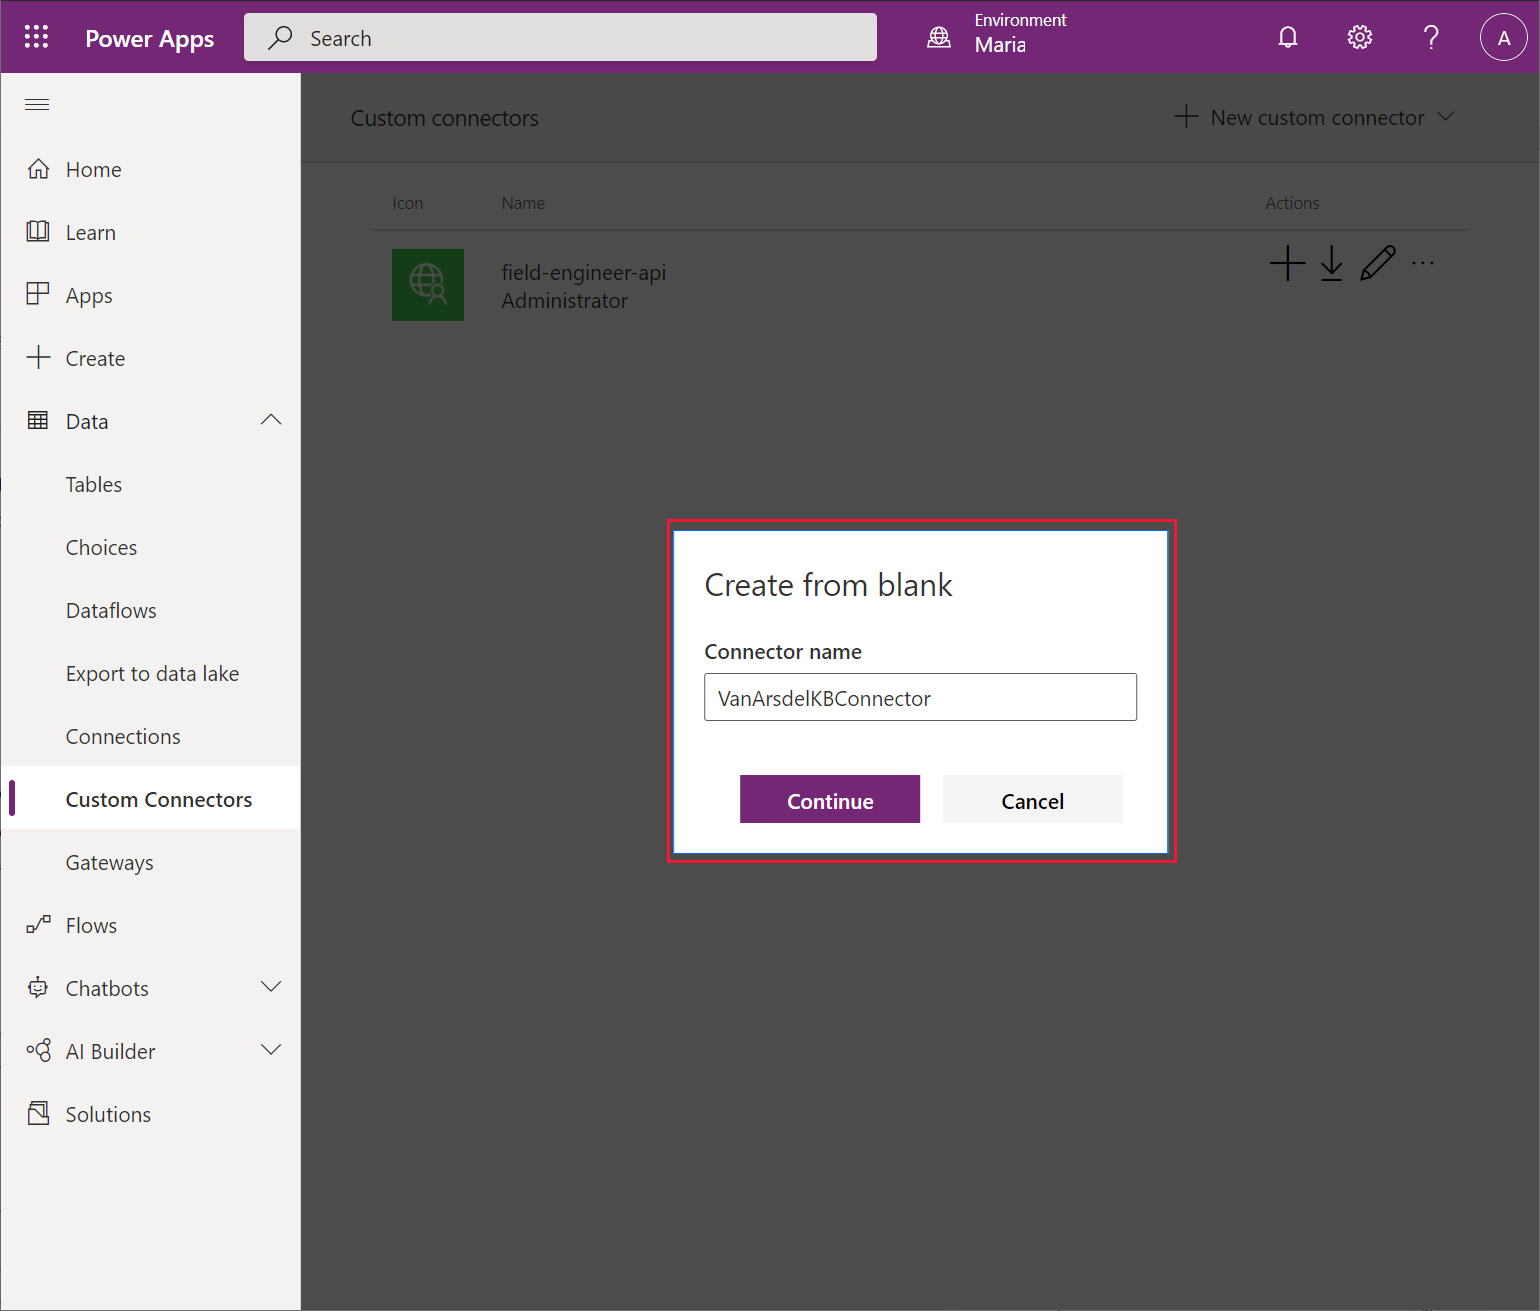
In the Create from blank dialog, set the new connector name to VanArsdelKBConnector, and then select Continue:
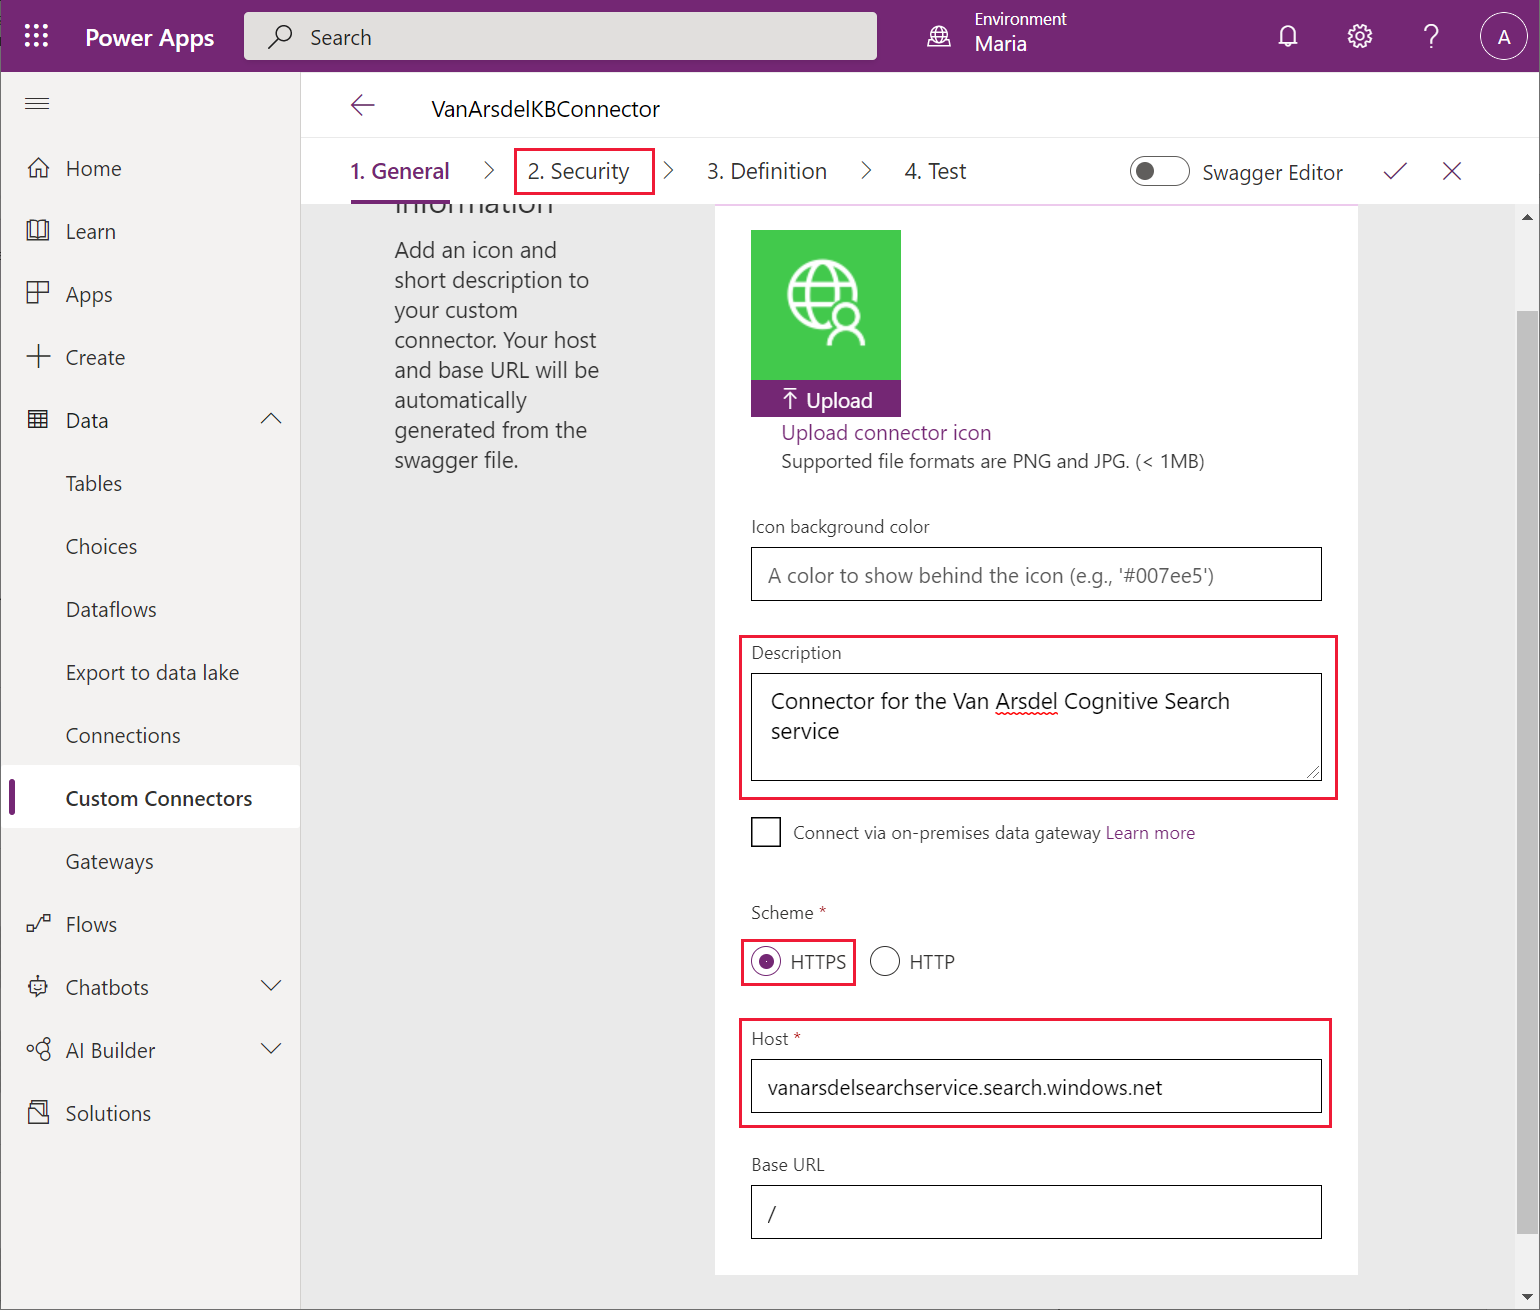
On the General information page, enter a description and set the Scheme to HTTPS. In the Hosts box, enter the URL for your search service (you noted this URL earlier), but without the https:// prefix, and then select Security.
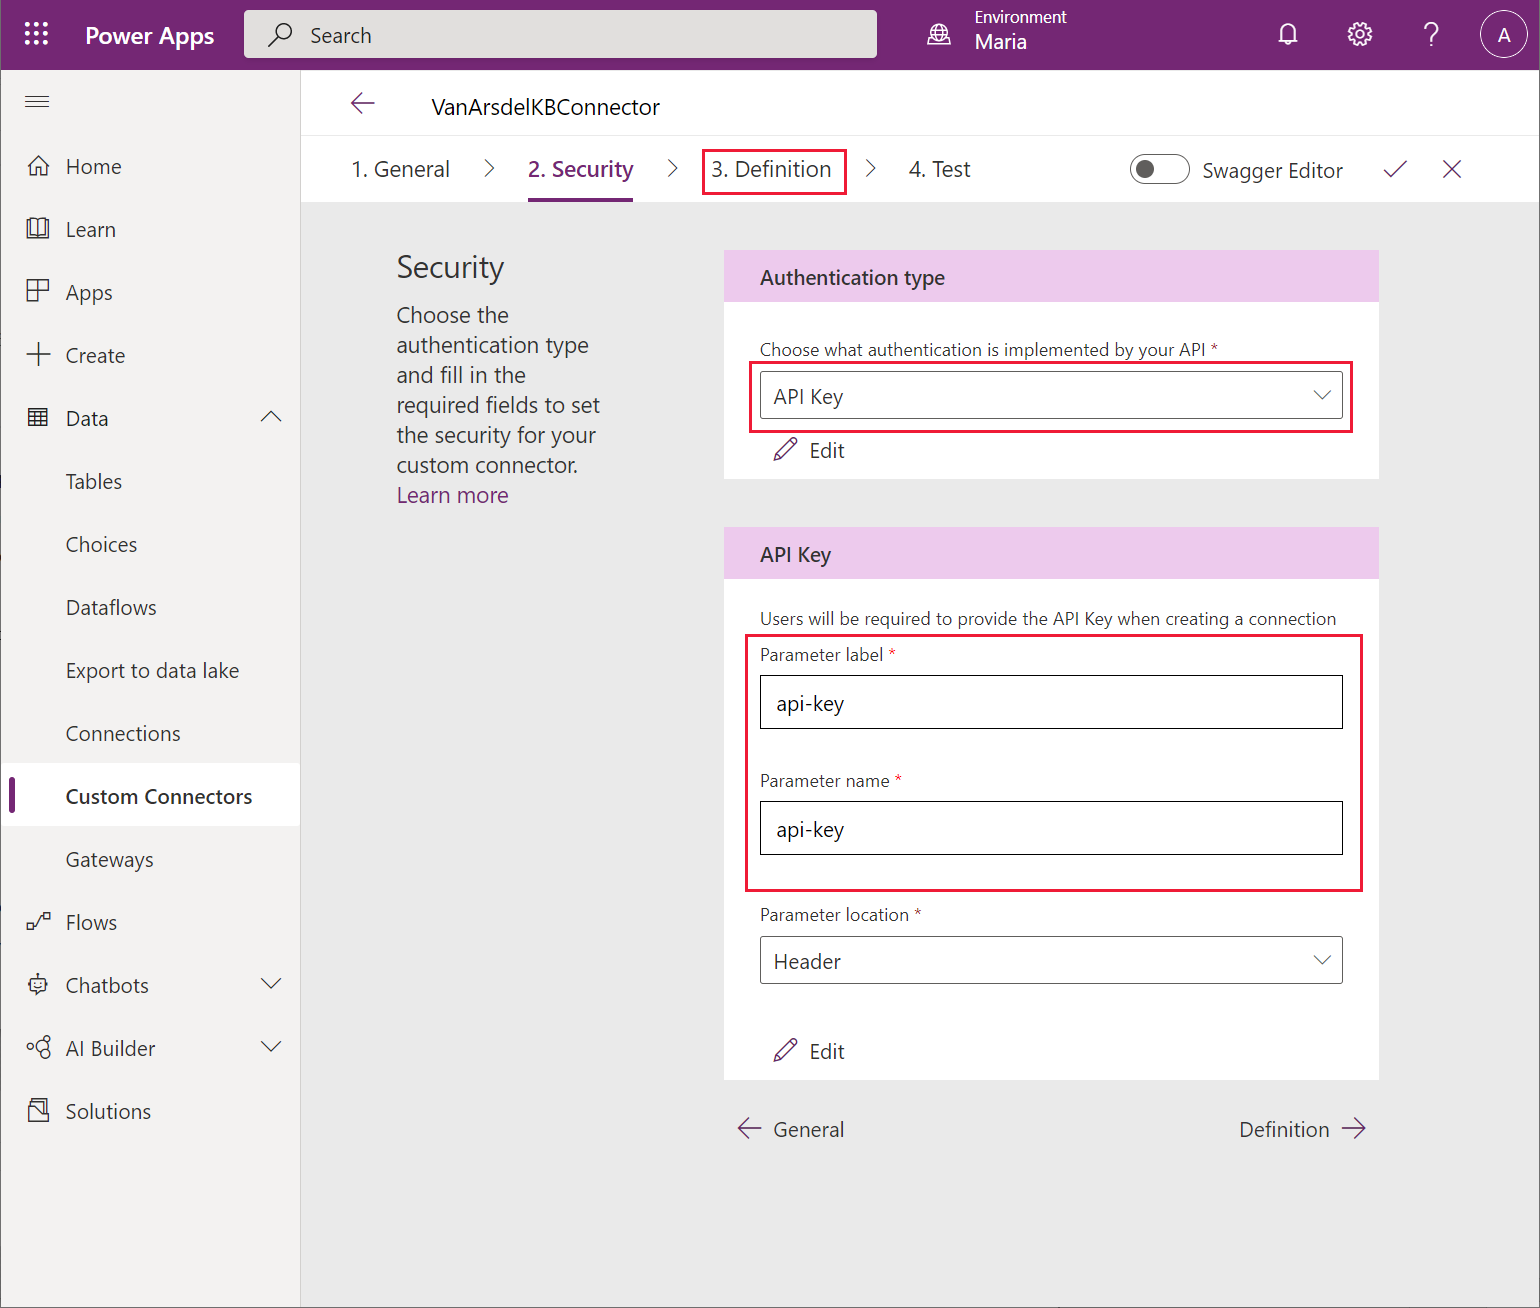
On the Security page, in the Authentication dropdown list box, select API Key. In the Parameter label field, enter api-key. In the Parameter name field, enter api-key. Select Definition.
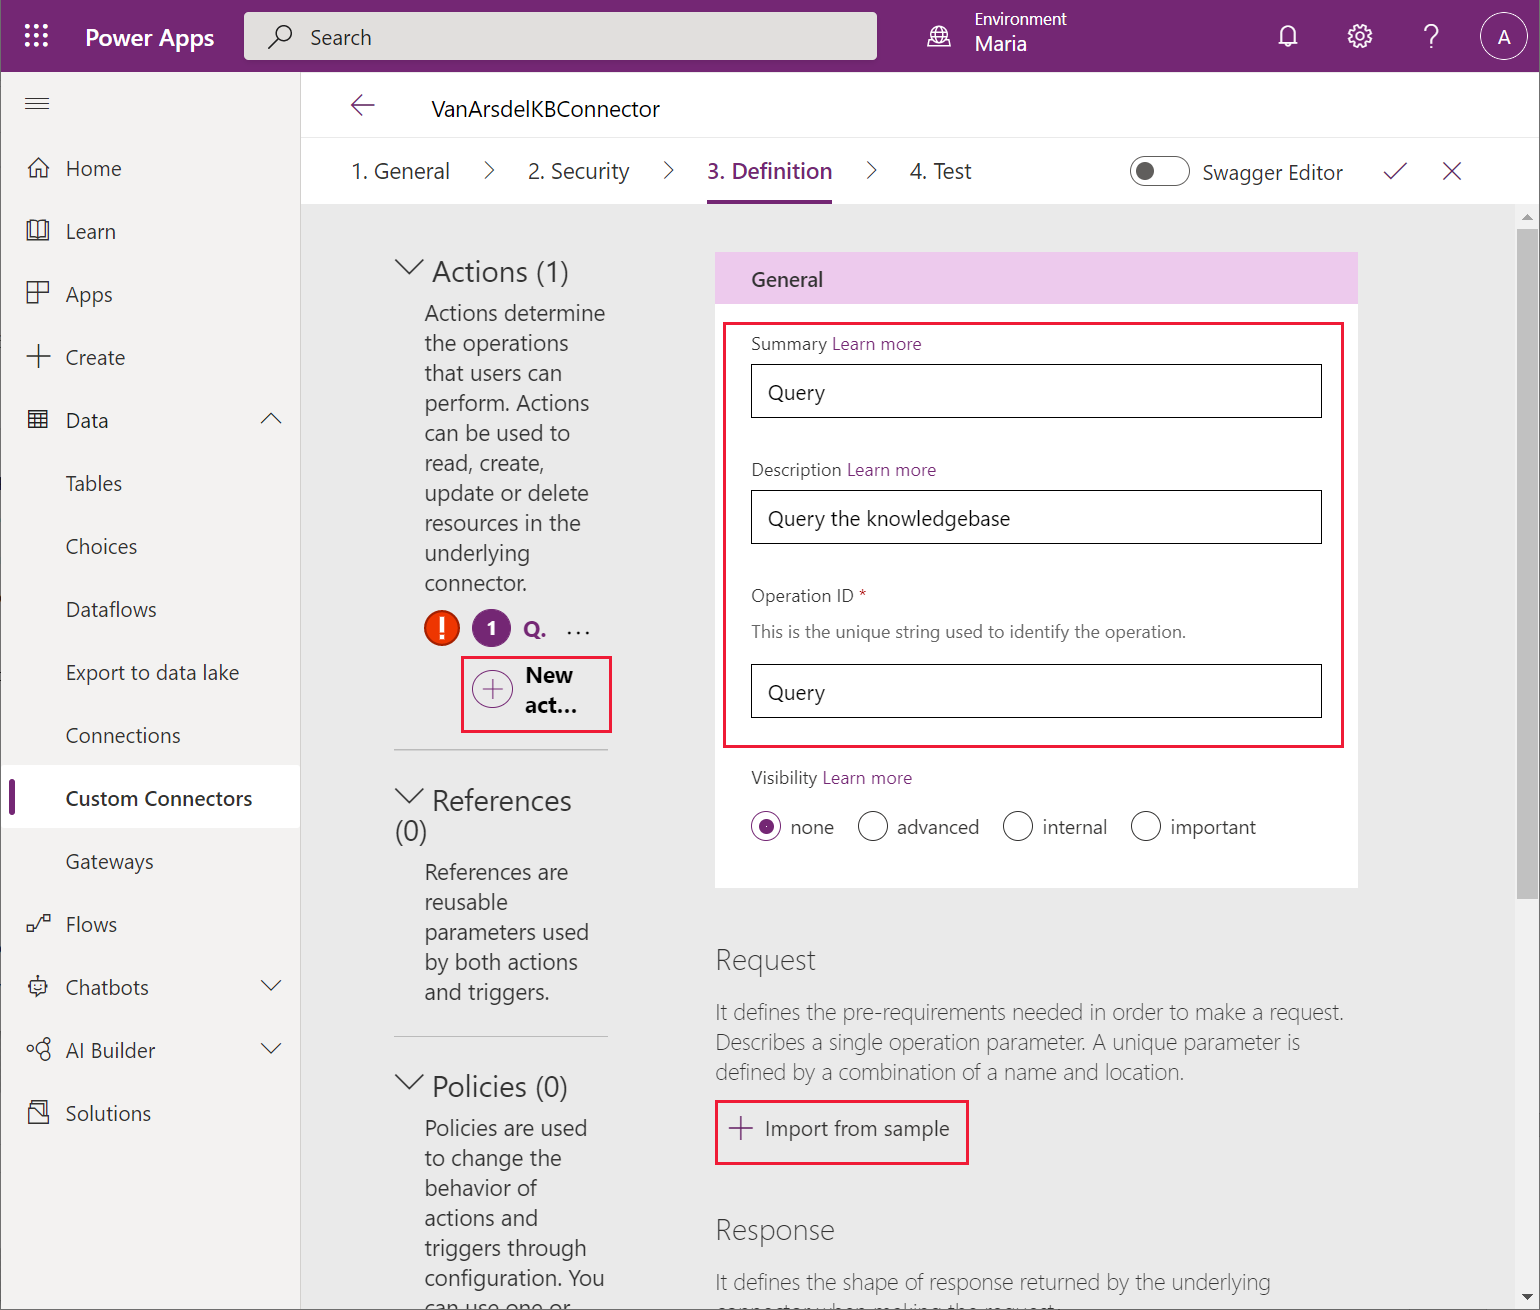
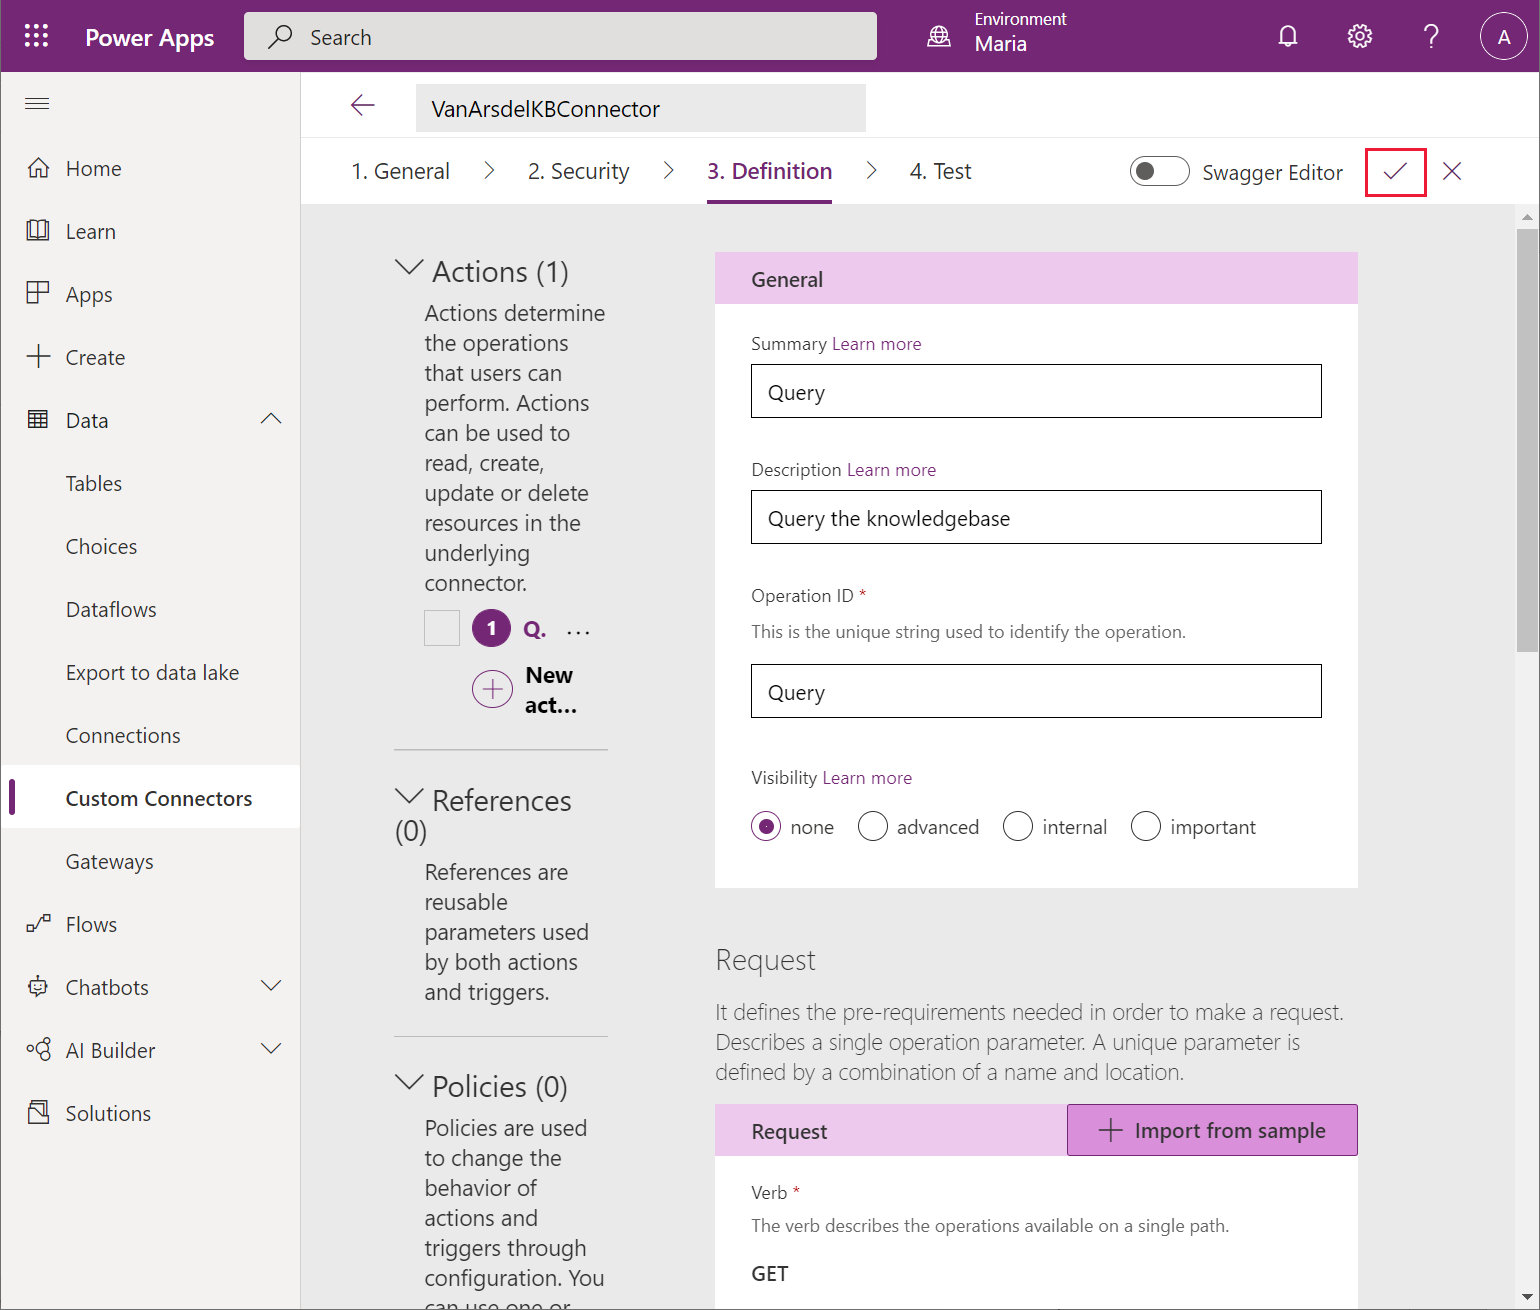
On the Definition page, select New action. In the Summary field, enter Query. In the Description field, enter Query the knowledgebase. In the Operation ID field, enter Query. Under Request, select + Import from sample.
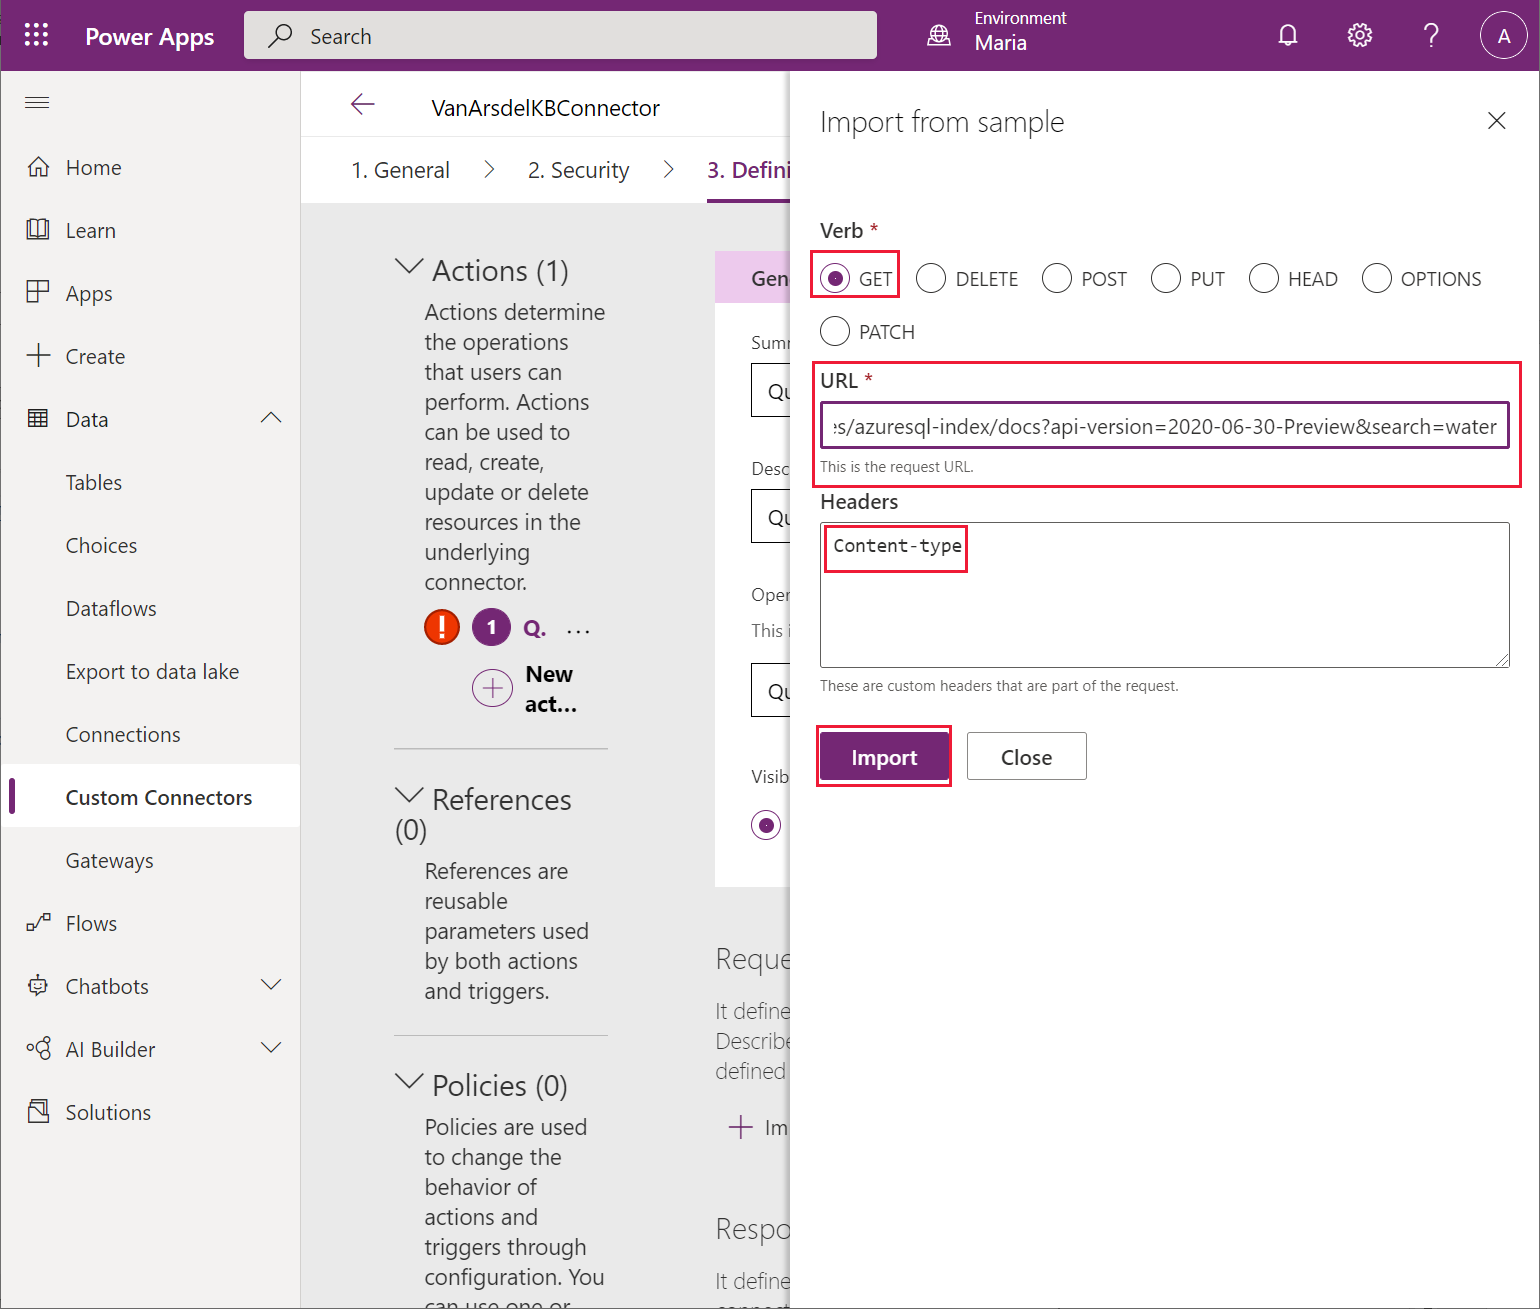
In the Import from sample dialog, enter the following values, and then select Import:
- Verb: GET
- URL: Provide the example request URL that you noted when you tested the search service in the search explorer earlier
- Headers: Content-type
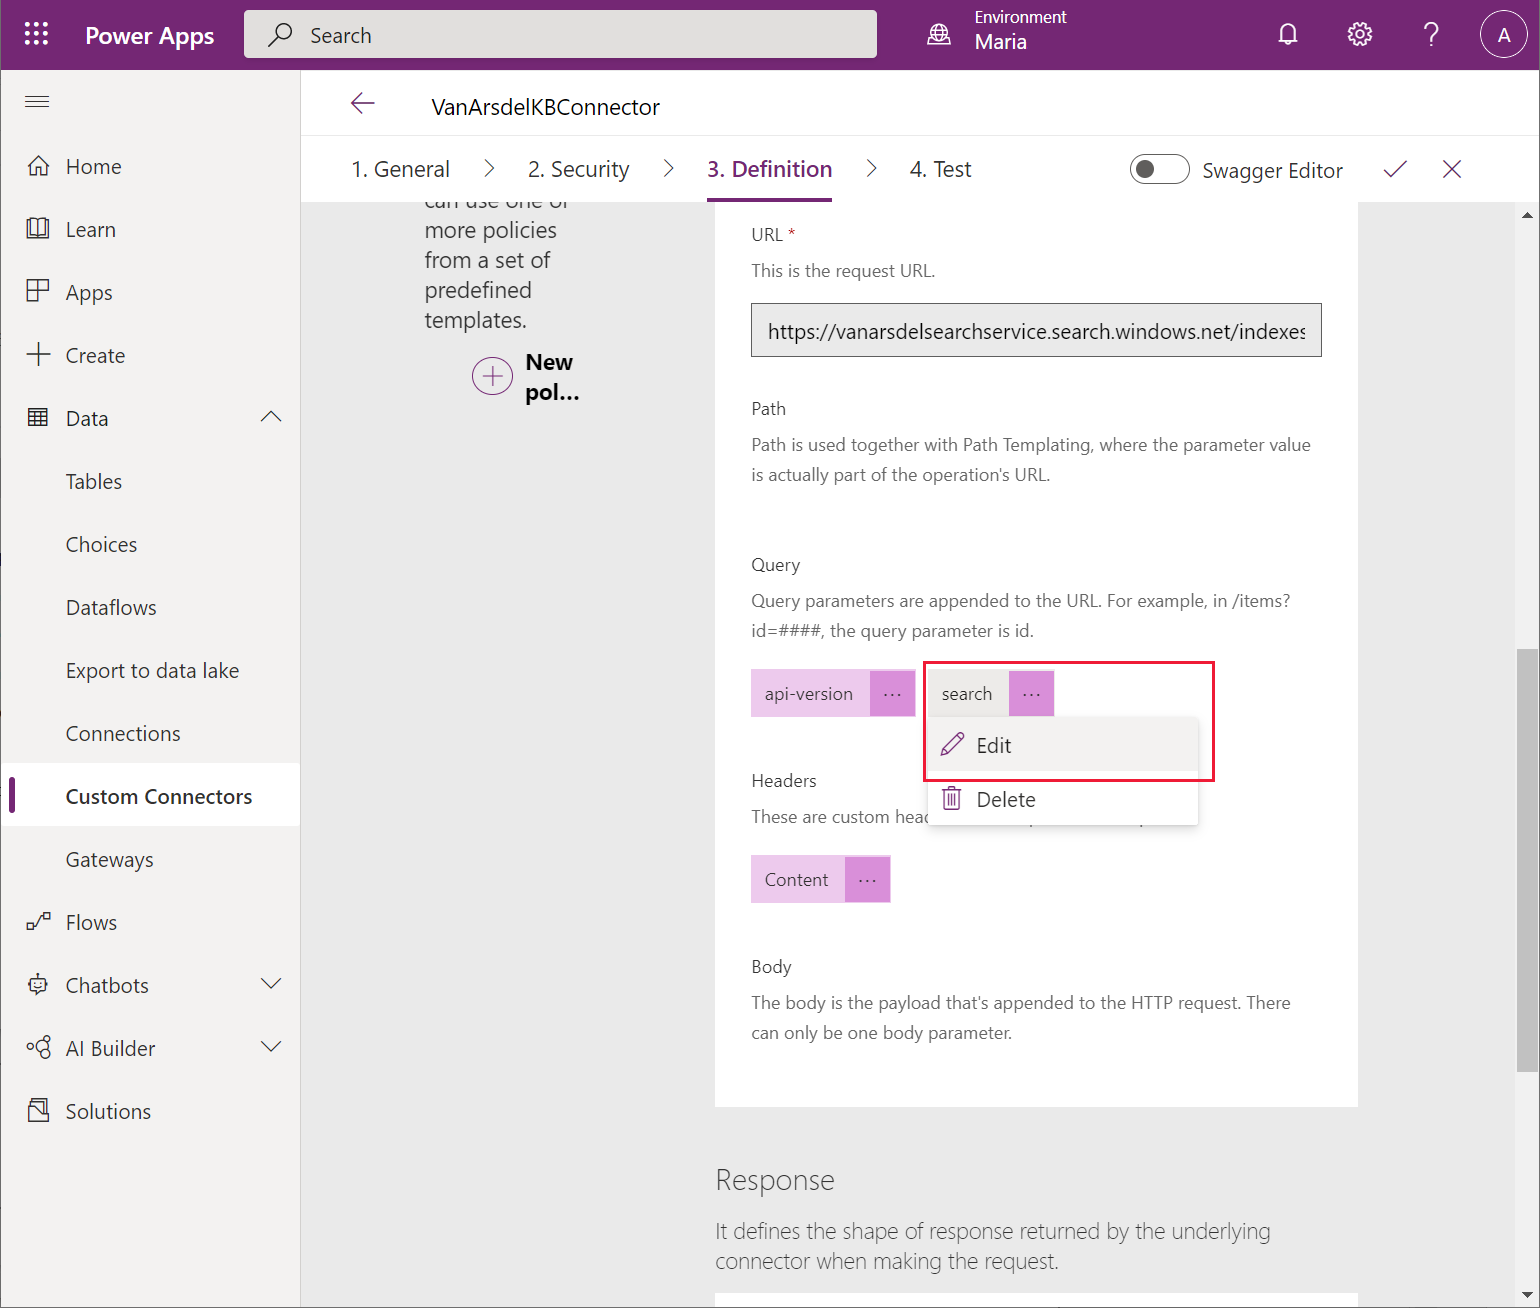
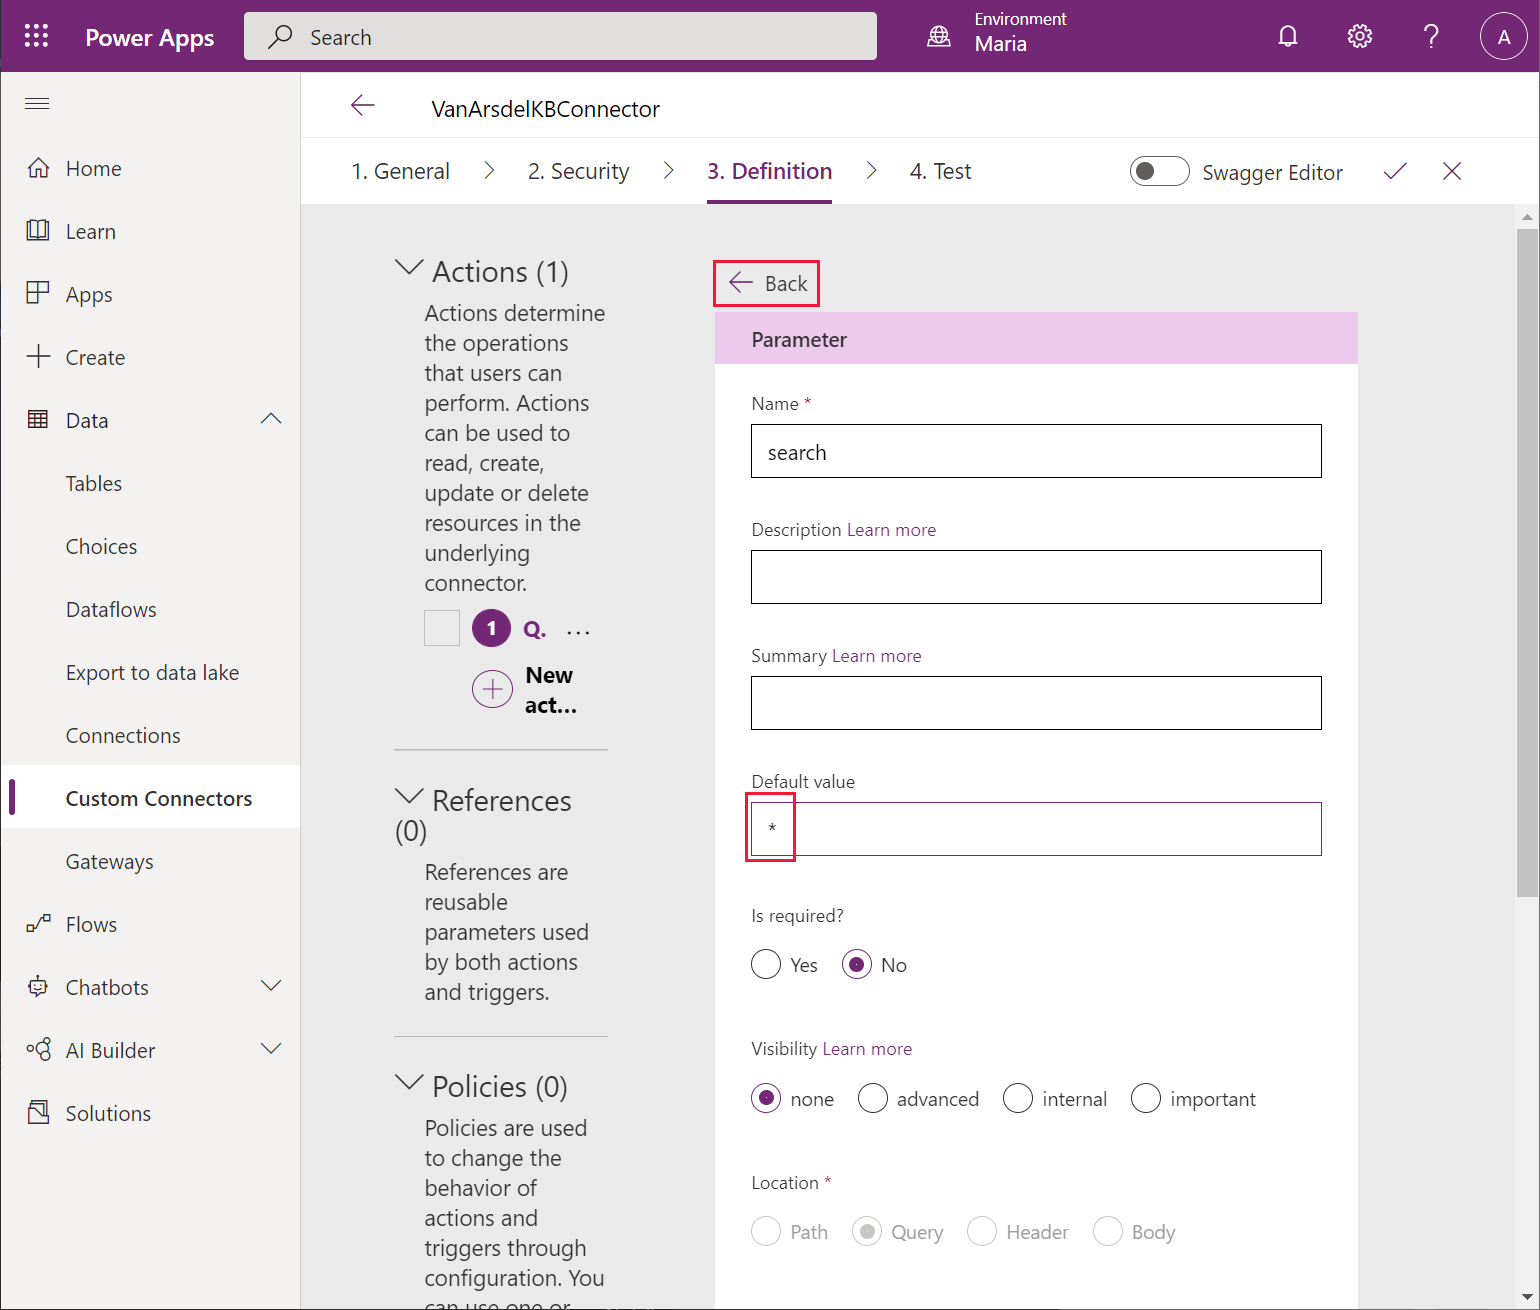
Back on the Definition page, scroll down to the Query section, select the ellipsis button next to search, and then select Edit.
On the edit screen, in the Parameters section, in the Default value field, enter an asterisk (*). Leave the other fields at their default values, and then select Back.
On the Definition page, in the Query section, select the ellipsis button next to api-version, and then select Edit.
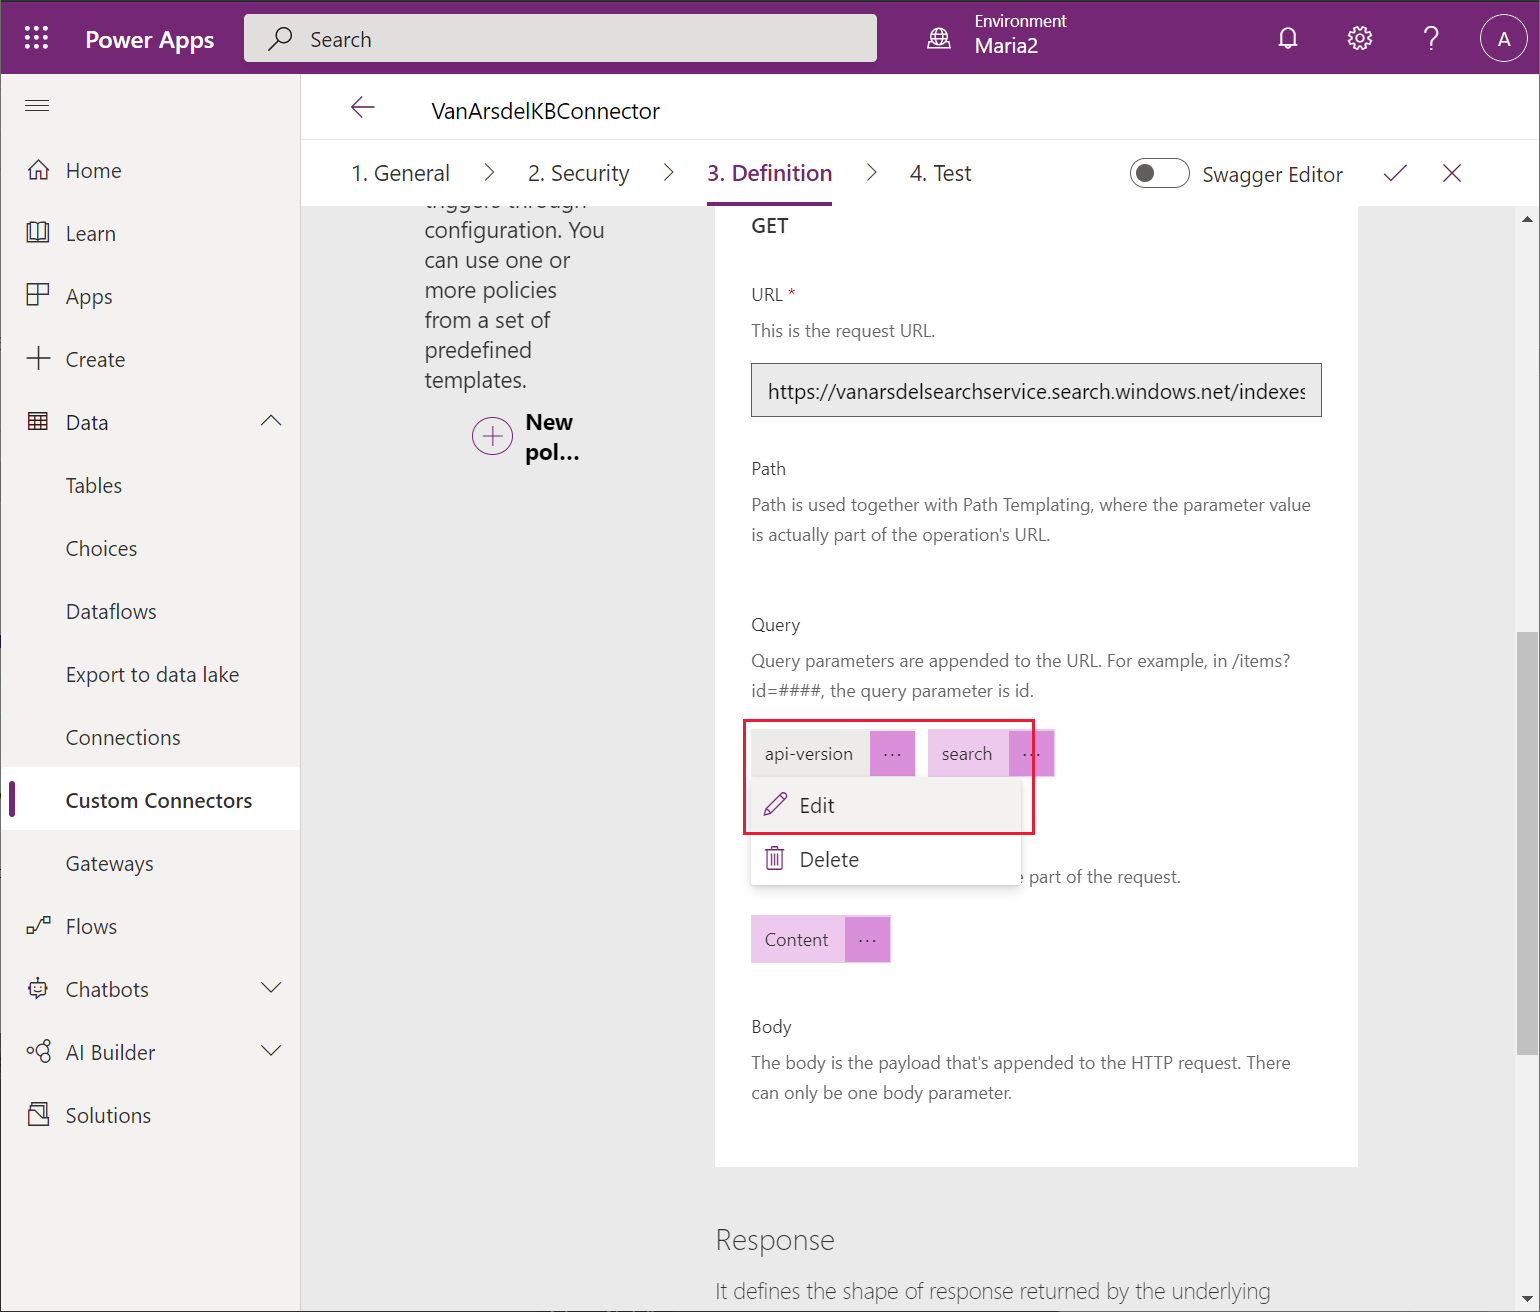
On the edit screen, in the Parameters section, in the Default value field, enter 2020-06-30-Preview (this is the version associated with the current version of Azure Cognitive Search; you can see the version in the request URL that you noted earlier). Set Is required to Yes, and set Visibility to internal. Leave the other fields at their default values, and then select Back.

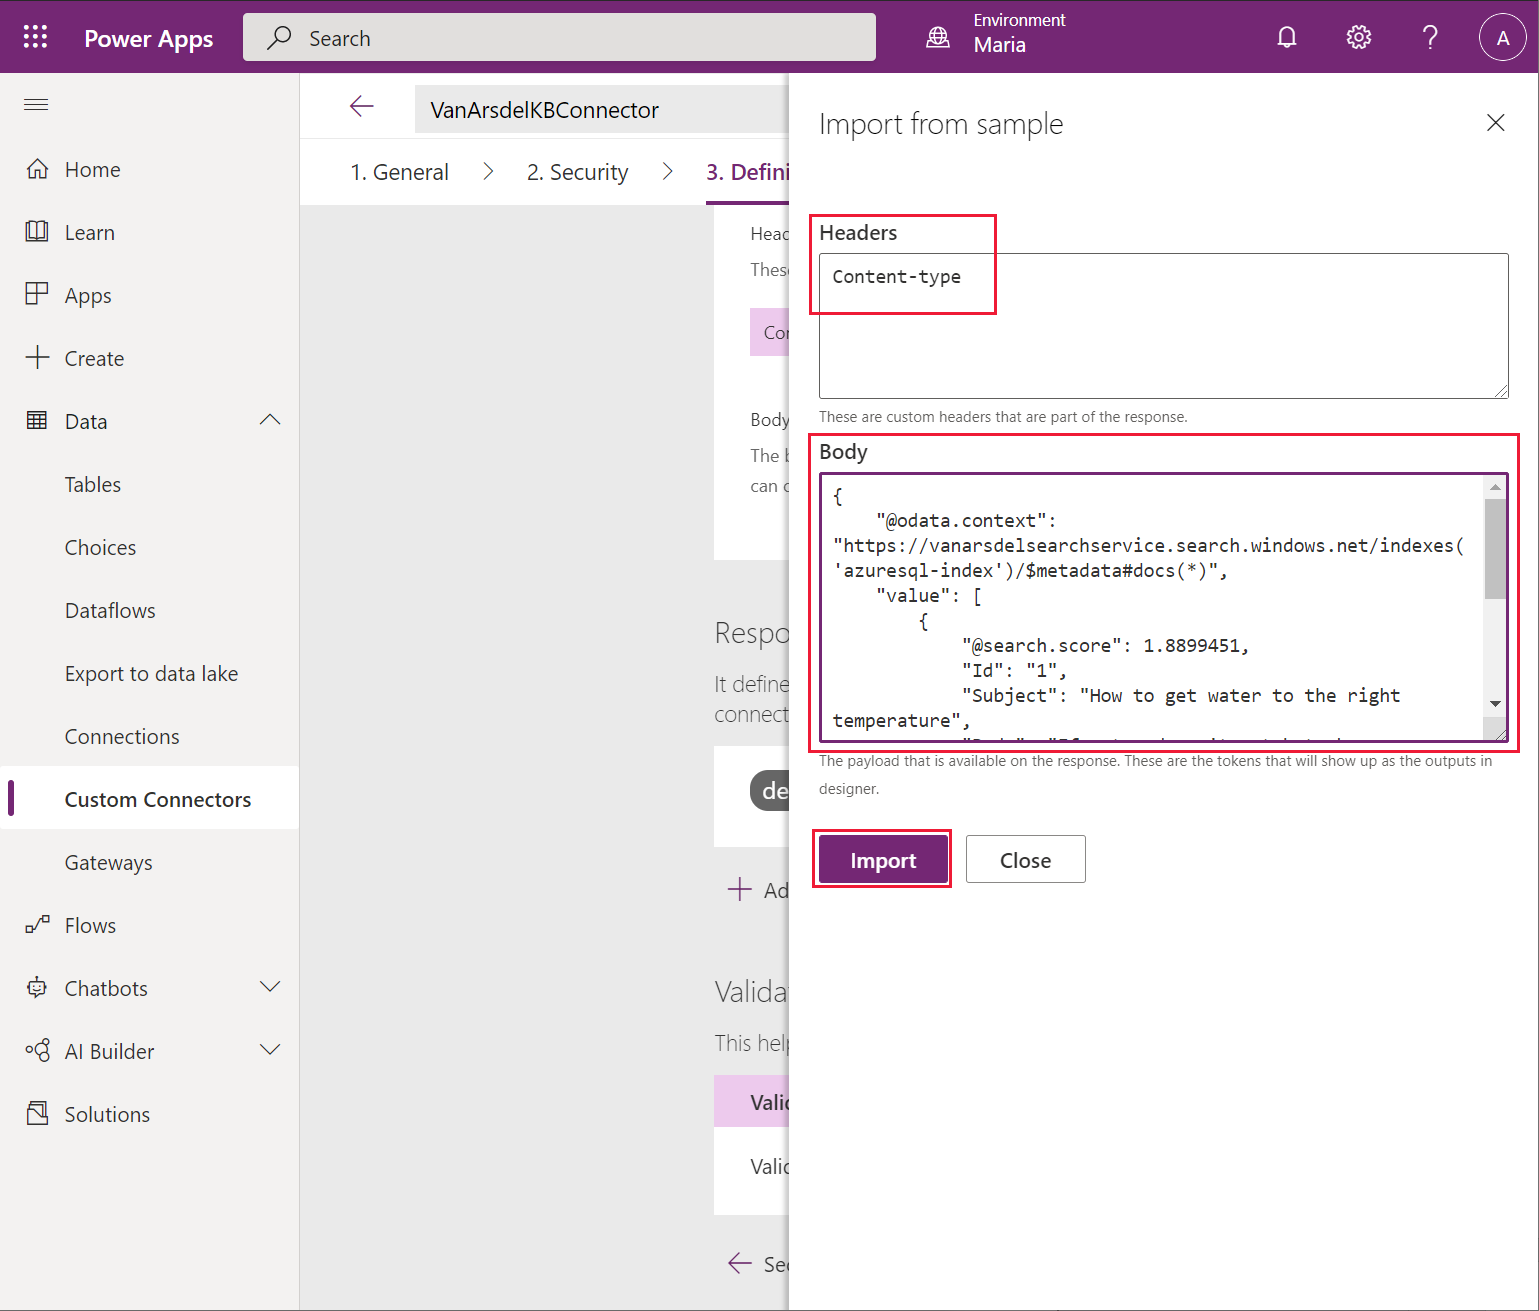
On the Definition page, scroll down to the Response section, and select + Add default response.
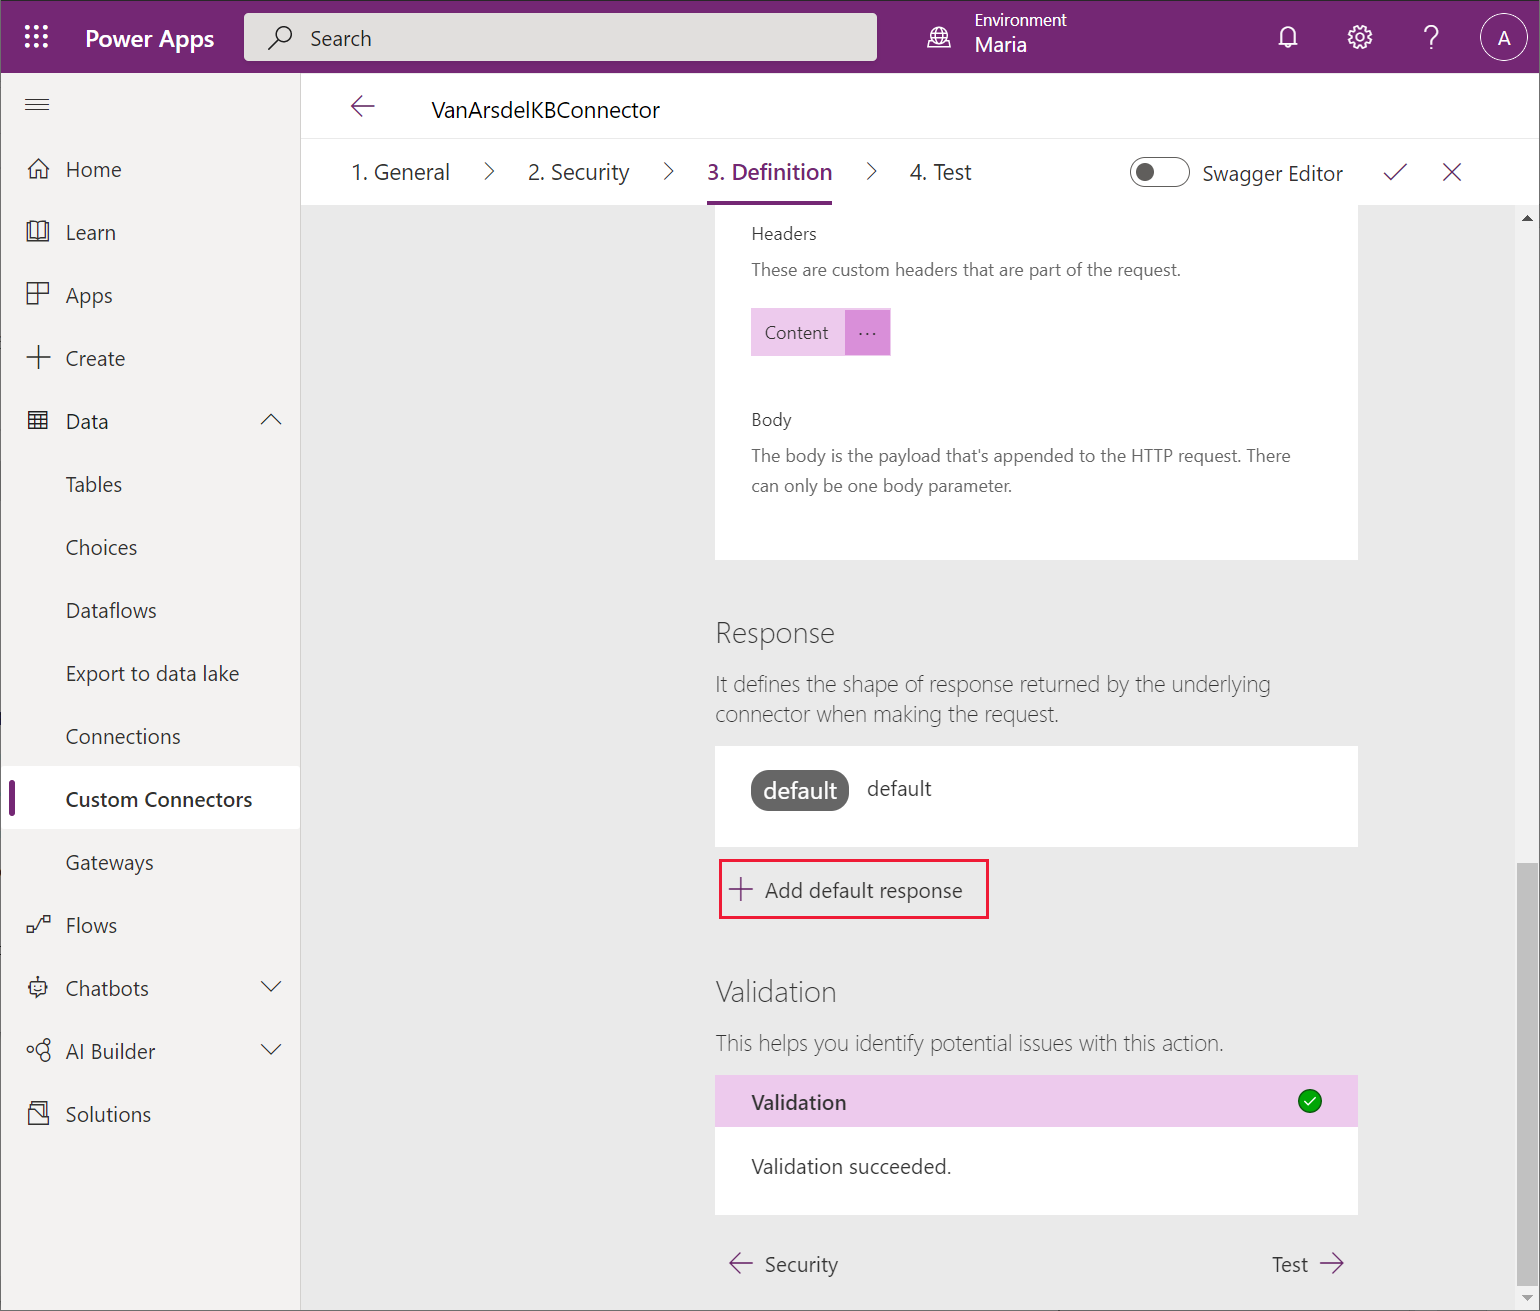 ]
]In the Import from sample dialog, in the Headers field, enter the text Content-type. In the Body field, enter the example results that you recorded when testing the search service, and then select Import.
On the Definition page, select the default response.
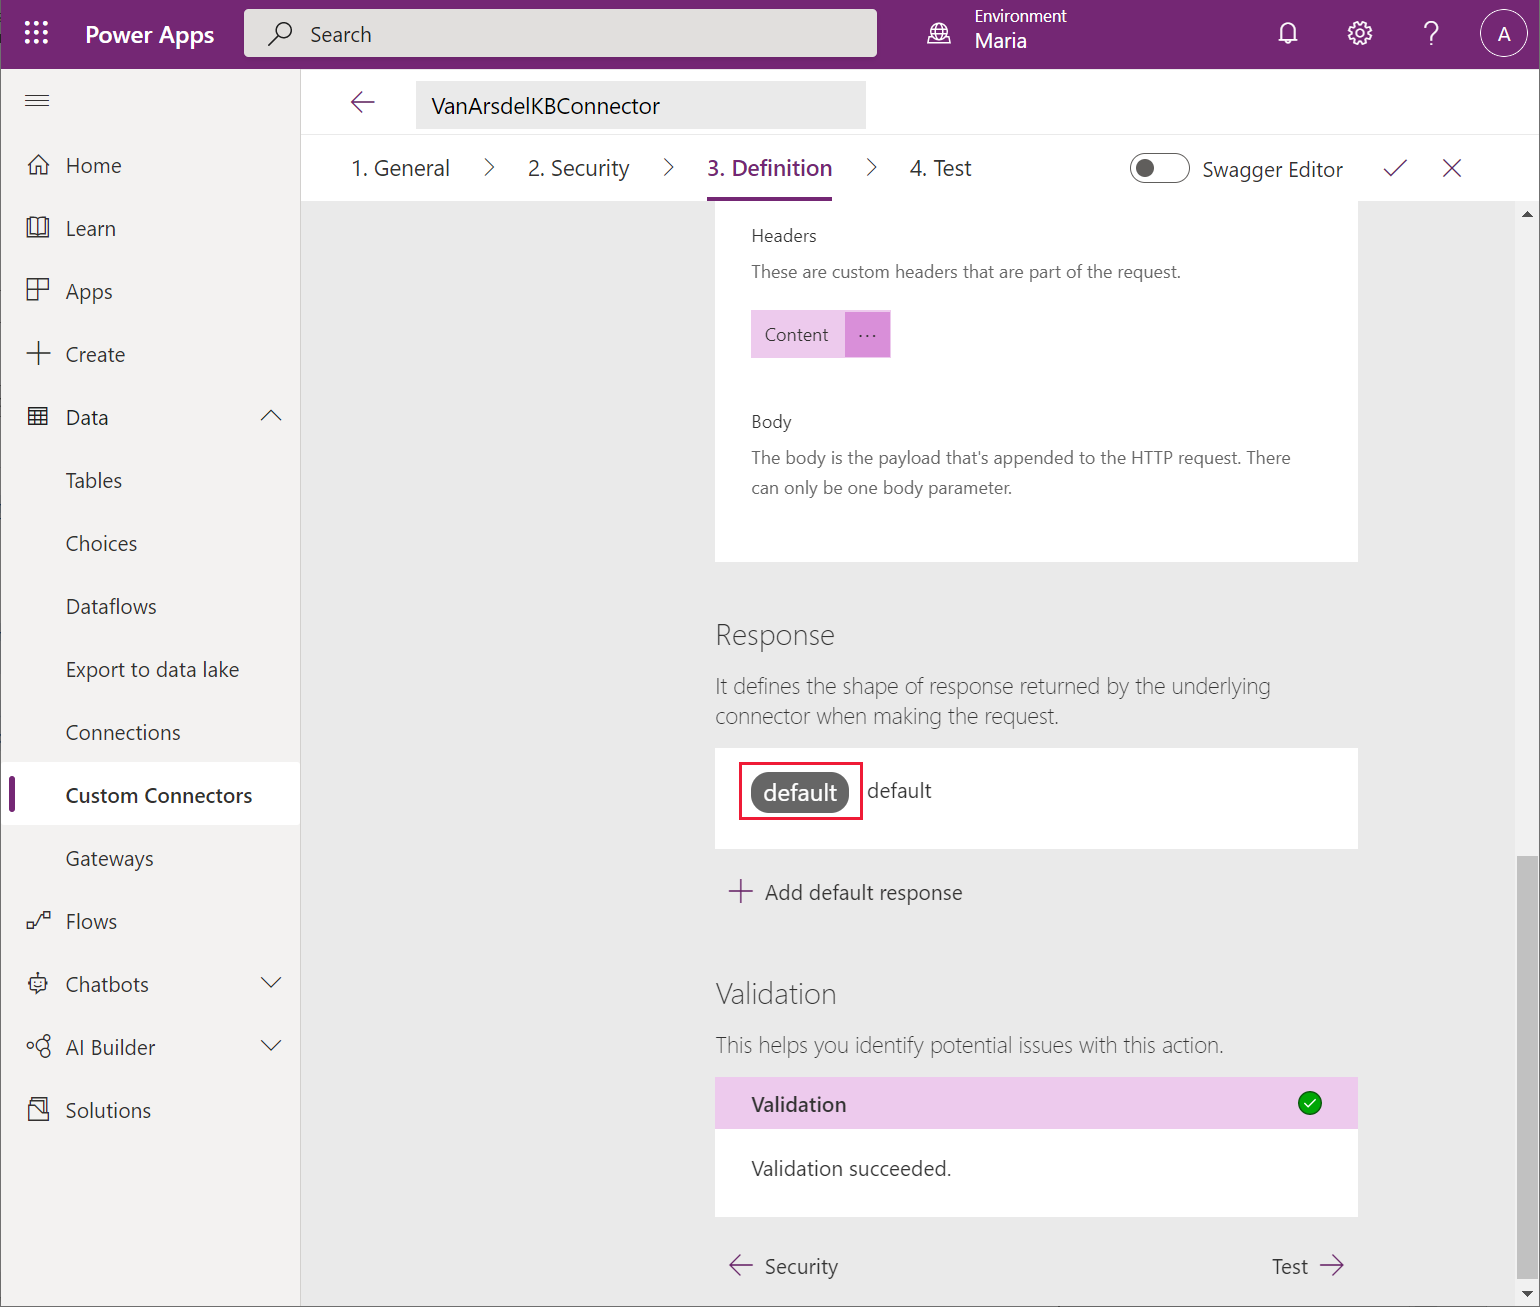
In the Description field of the Content-type response, enter application/json, and then select Back.
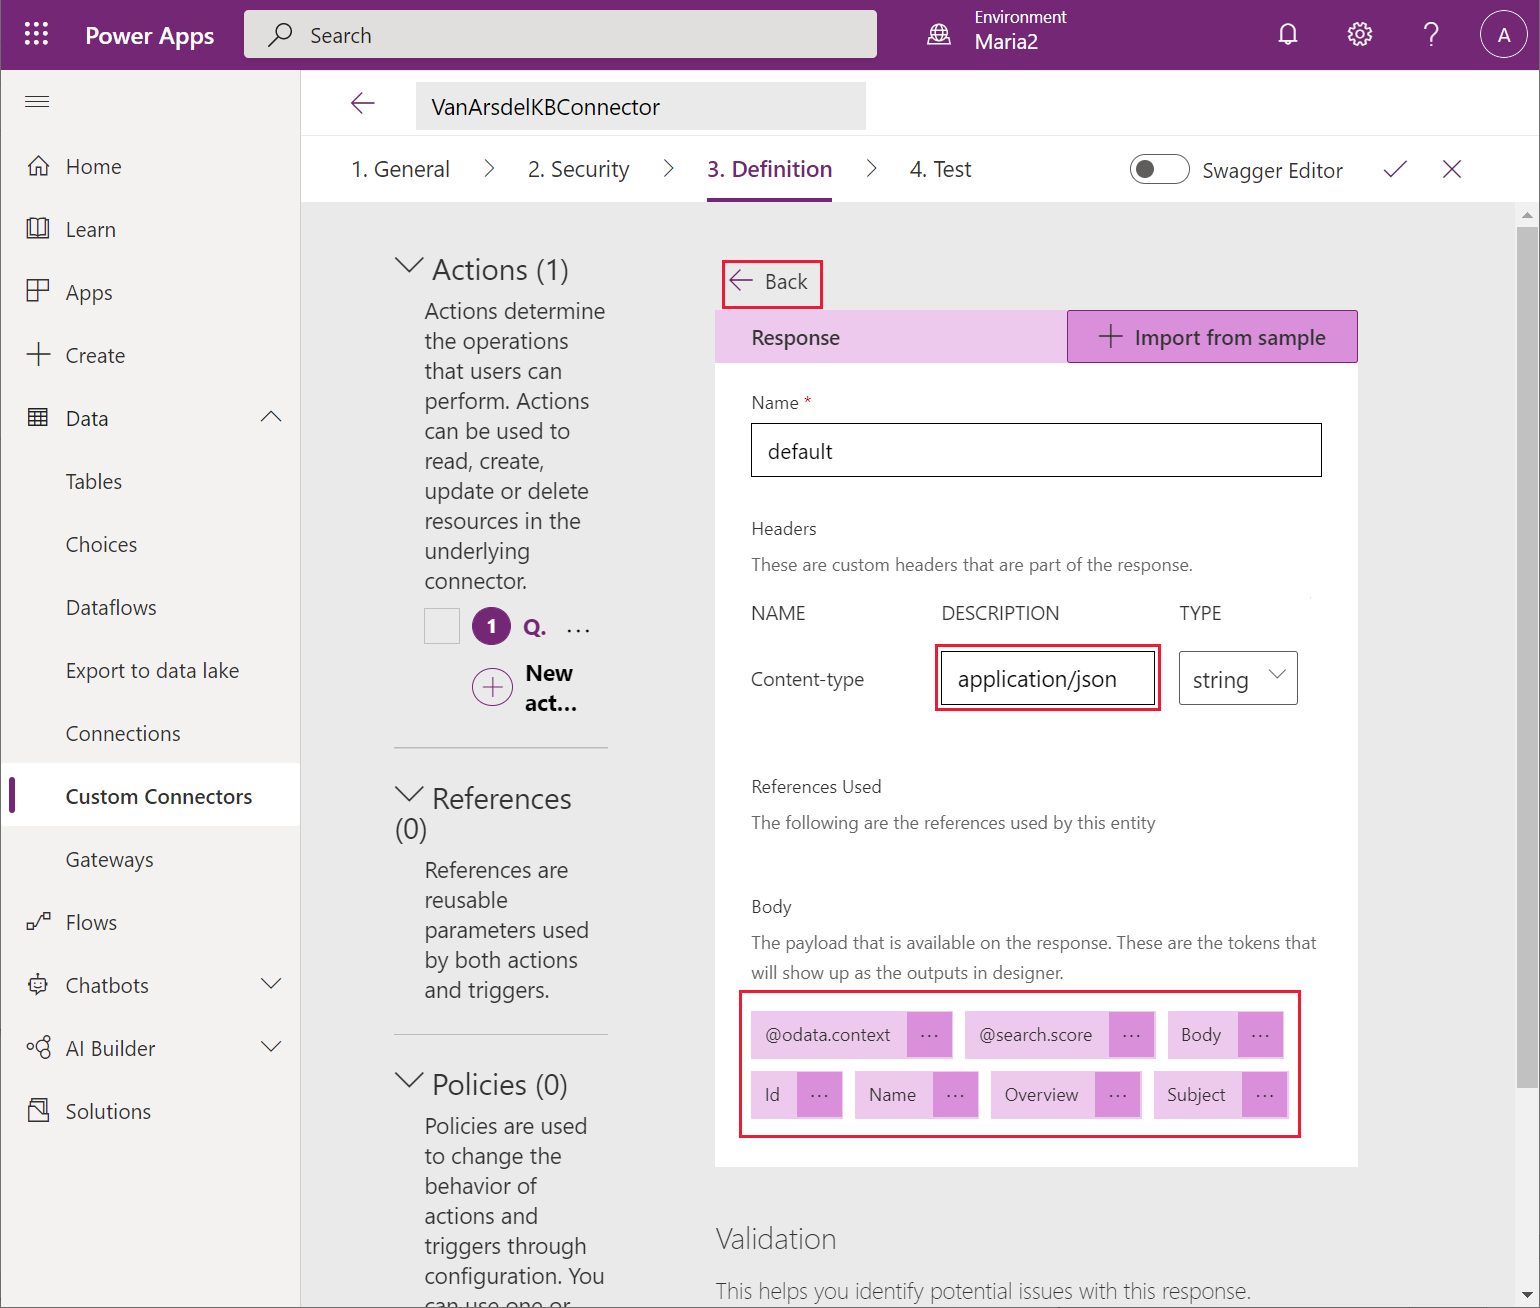
Note
The Body section on this page should display the fields of the response, such as Body, Id, Name, Overview, and Subject if it has been parsed successfully.
Select Create connector.
The connector should be created without reporting any errors or warnings.
Updating the app to use Azure Cognitive Search: Field Knowledgebase
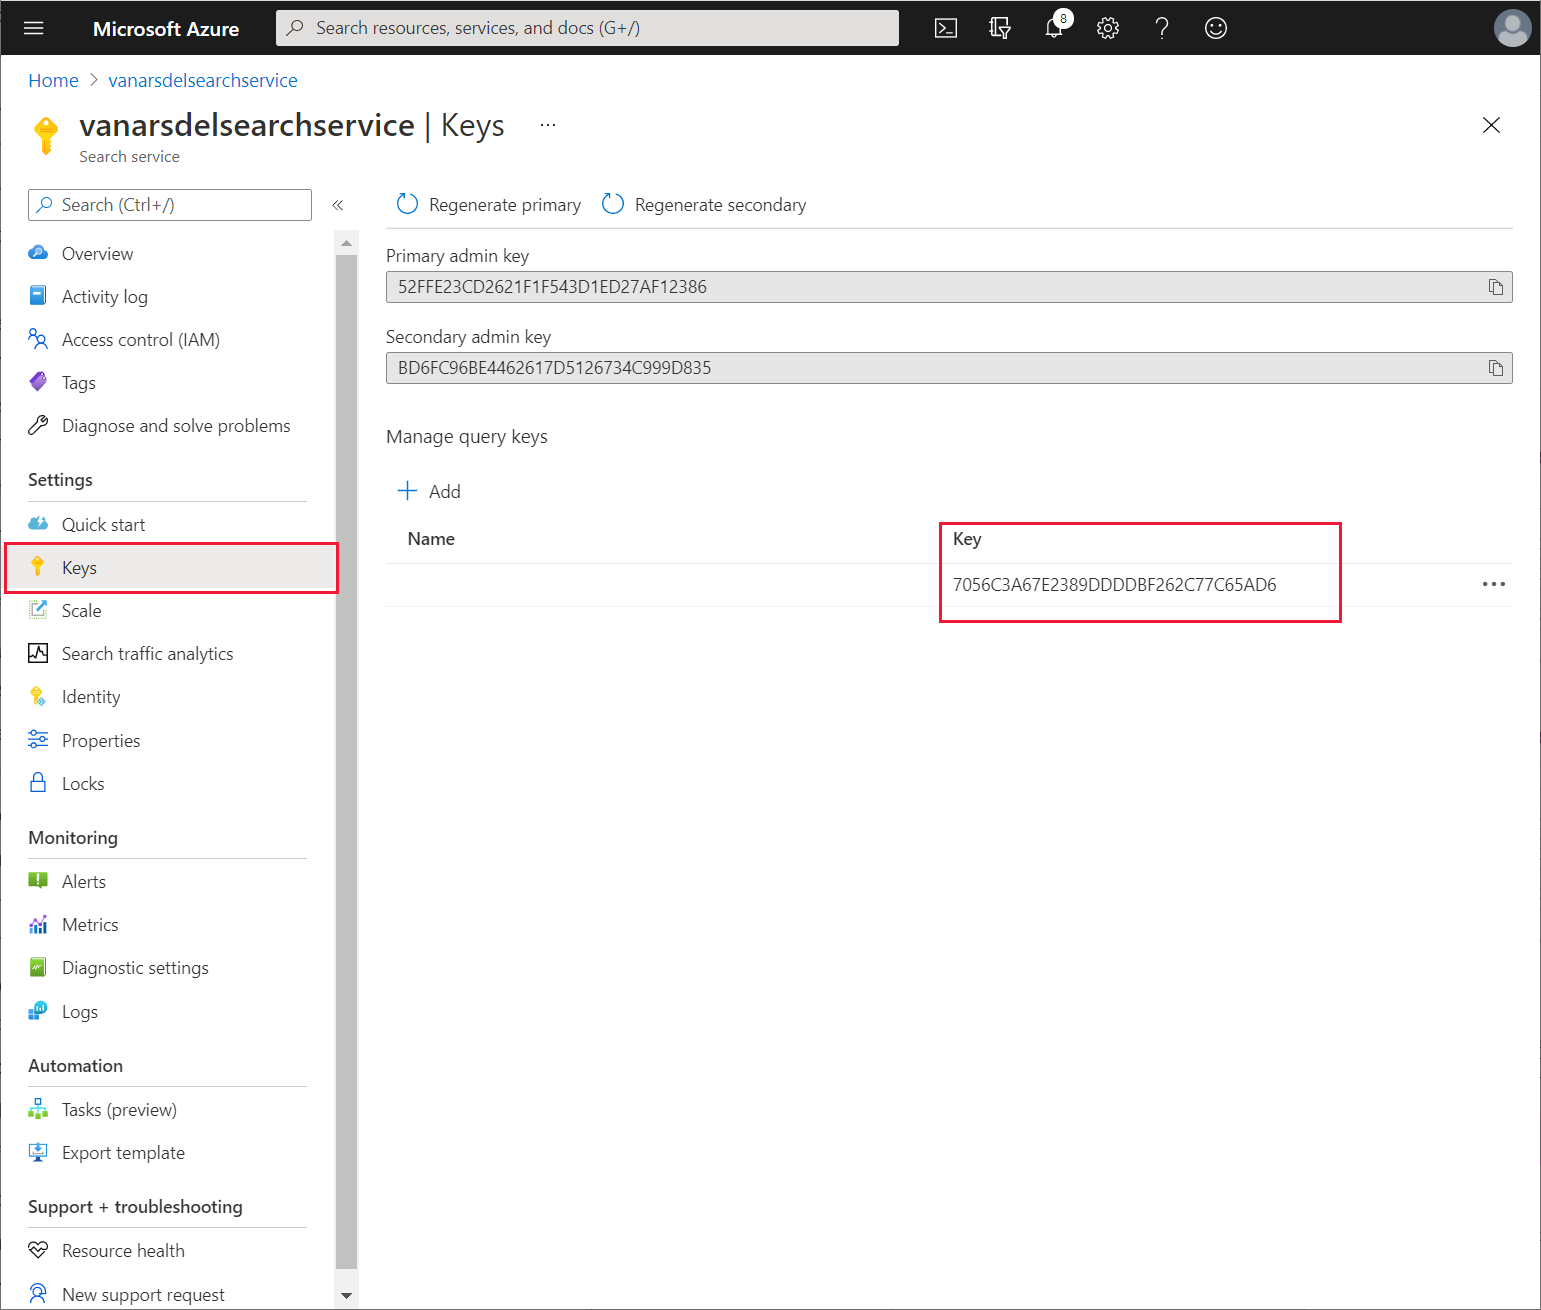
Maria can now use the custom connector in the app. But first, a key is required that grants Maria the privileges required to connect to the Azure Cognitive Search service. Preeti obtains the key from the Keys page for the service in the Azure portal, and gives it to Maria.
Maria edits the app in Power Apps Studio and performs the following tasks:
Open the VanArsdelApp app for editing.
On the View menu, select Data sources, and then select Add data.
In the Search box, under Select a data source, enter Van. The VanArdelKBConnector connector should be listed.
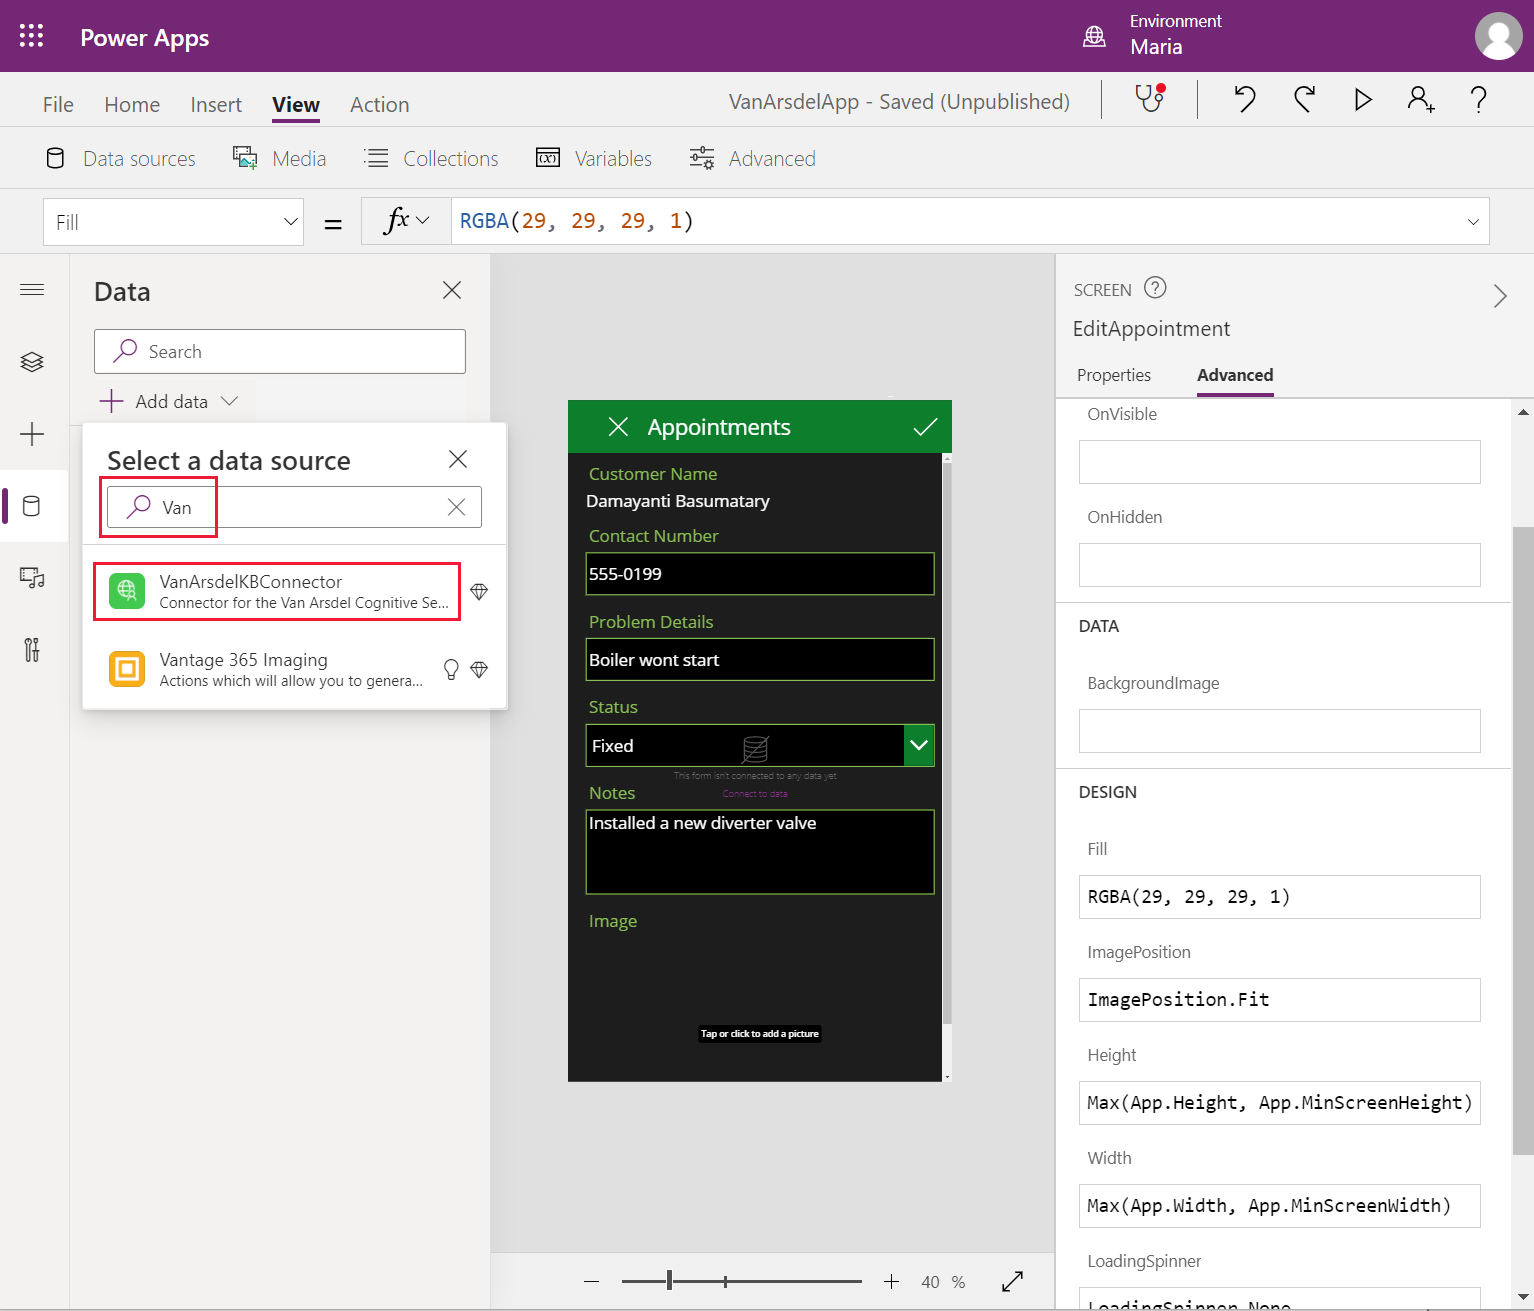
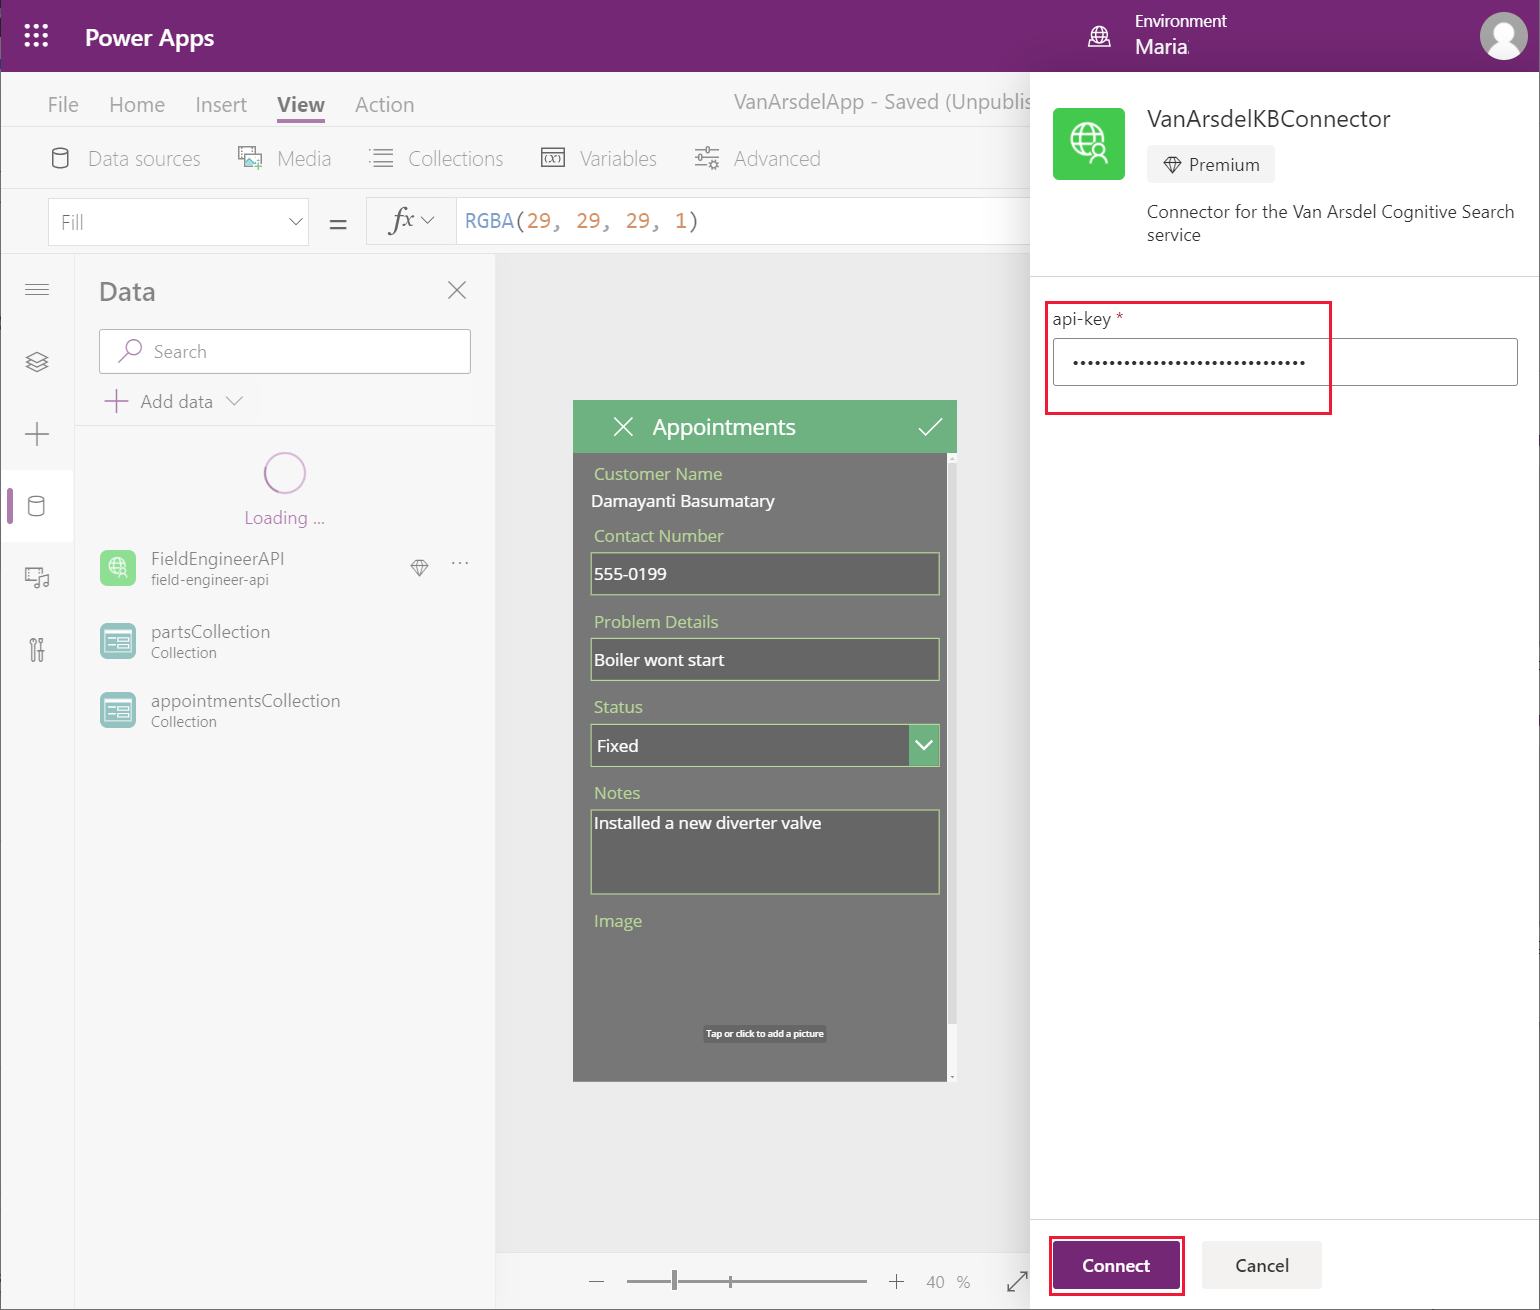
Select the VanArdelKBConnector connector. In the VanArdelKBConnector pane, enter the key that Preeti provided for the search service, and then select Connect.
On the File menu, save and close the app, and then open it again. You might be prompted to authorize use of the custom connector when the app reopens.
Note
This step is necessary to enable the custom connector.
On the Tree view pane, expand the Knowledgebase screen, and select the TextSearchBox2 control. Enter the following formula for the OnChange action.
If(!IsBlank(TextSearchBox2.Text), ClearCollect(azResult, VanArsdelKBConnector.Query({search: TextSearchBox2.Text}).value))This formula calls the Query operation of the custom connector searching for items that match the term the user types into the search box. The results are stored in a collection named azResult.
On the Tree view pane, under the Knowledgebase screen, select the BrowseGallery2 control. Set the Items property to azResult.
Expand the BrowseGallery2 control and remove the Image4 control.
Select the Title2 control. Set the following properties:
- Text: ThisItem.Subject
- X: 24
- Width: Parent.TemplateWidth - 104
Select the Subtitle2 control. Set the Text property to ThisItem.Body.
Select F5 to preview the app. On the Knowledgebase screen, enter a search term, and then select Enter. Matching articles from the knowledge base should be displayed.
Note
The details screen hasn't been created yet, so selecting the > icon next to an article doesn't work.
Close the preview window and return to Power Apps Studio.
On the Tree view pane, right-click the PartDetails screen, and select Duplicate screen. This action will add another screen to the app, named PartDetails_1.
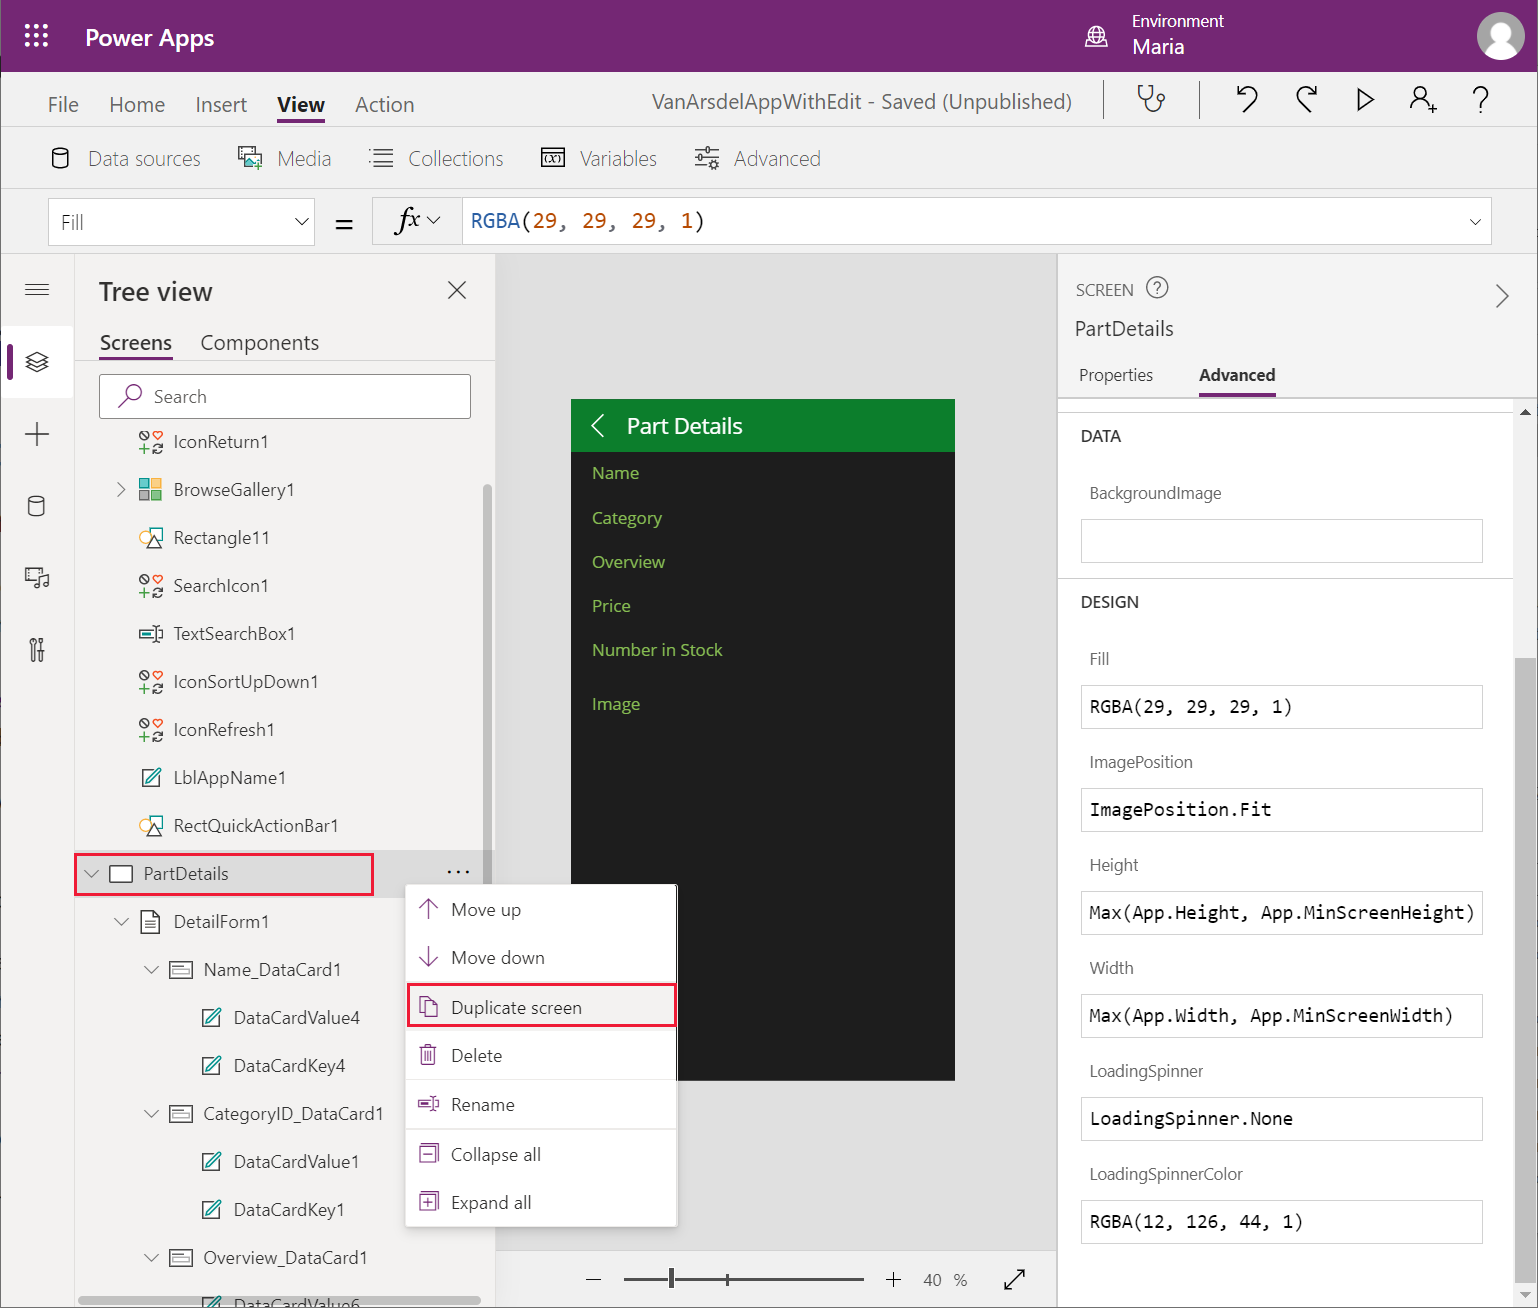
On the Tree view pane, rename the PartDetails_1 screen as KnowledgebaseDetails.
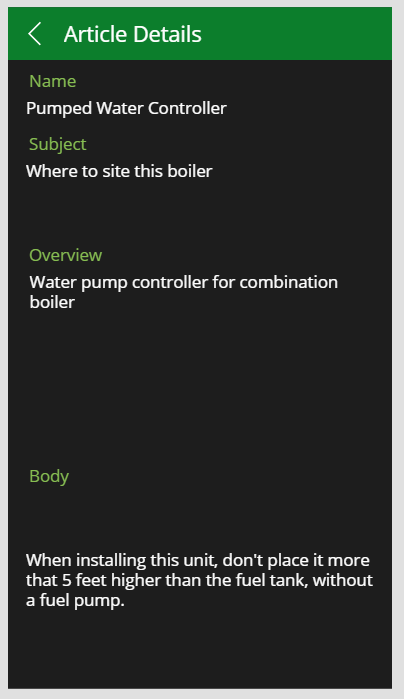
Select the LblAppNameX control on the screen; set the Text property to "Article Details" (including the quotes).
On the Tree view pane, select the DetailFormX control on the screen. Set the following properties:
- DataSource: azResult
- Item: **BrowseGallery2.Selected **
Note
BrowseGallery2 is the browse gallery on the Knowledgebase screen. In your application, this gallery might have a different name.
On the Tree view pane, expand the DetailFormX form, then change the names of the following data card controls:
- Name_DataCard1_1: Name_DataCard
- CategoryID_DataCard1_1: Subject_DataCard
- Overview_DataCard1_1: Overview_DataCard
- Price_DataCard1_1: Body_DataCard
Delete the NumberInStock_DataCard1_1 and Image_DataCard1_1 controls.
Select the Name_DataCard control. Set the Default property to ThisItem.Name.
Select the Subject_DataCard control. Set the following properties:
- DataField: "Subject"
- DisplayName: "Subject"
- Default: ThisItem.Subject
Select the Overview_DataCard control. Set the Default property to ThisItem.Overview.
Select the Body_DataCard control. Set the following properties:
- DataField: "Body"
- DisplayName: "Body"
- Default: ThisItem.Body
Select the DataCardValueX control in the Body_DataCard control. Set the Text property to Parent.Default.
Resize each of the data card controls to spread them out down the screen.
Select the back arrow in the screen header. Change the OnSelect action property to Navigate(Knowledgebase, ScreenTransition.None).
On the Tree view pane, select the Knowledgebase screen, and then select the BrowseGalleryX control. Change the OnSelect action property to Navigate(KnowledgebaseDetails, ScreenTransition.None). This action displays the details screen for the knowledge base article when the user selects the > icon for an entry in the browse screen.
Save the app.
Select F5 to preview the app. On the Knowledgebase screen, enter a search term, and then select Enter. Select an article and verify that its details are displayed. Verify that the Back icon returns the user to the browse screen.
Close the preview window and return to Power Apps Studio.
Maria, Kiana, and Preeti have successfully incorporated the Web API and Azure Cognitive Search into the app.