Note
Access to this page requires authorization. You can try signing in or changing directories.
Access to this page requires authorization. You can try changing directories.
An Observability Agent resource enables the Azure Copilot Observability Agent to perform autonomous tasks. This article shows you how to create a new resource by using the Azure portal. To use Resource Manager and Bicep templates, see Create an Observability Agent resource with Azure Resource Manager.
Prerequisites
- A target Azure Monitor workspace in the same region as the Observability Agent resource.
- Monitoring Contributor role on the resource group where you create the Observability Agent resource.
- If you use a user-assigned managed identity, create the identity and grant the required roles before you create the Observability Agent resource. If you use a system-assigned managed identity, the portal creates it for you.
Note
Each subscription is limited to five Observability Agents by default.
Identity requirements
The agent uses a managed identity to read fired alerts and alert context, analyze application telemetry to build system knowledge, create or update issues in the Azure Monitor workspace, and run investigations. It requires the following roles:
- Issue Contributor on the Azure Monitor workspace where the agent creates issues.
- Monitoring Reader on every subscription that contains alert rules and application resources that the agent needs to read, including underlying infrastructure resources such as App Service, Function App, SQL, Storage, AKS, and virtual machines.
The simplest strategy is to assign Monitoring Contributor on the subscription scope for each subscription containing your alert rules and application resources. This single role grants required permissions needed for alerts context, telemetry analysis and knowledge building, as well as permissions to create issues in the Azure Monitor workspace.
Create or edit an agent resource
- Enter Observability Agents in the search box.
- Under Services, select Observability Agents.
- Select Create from the top of the Observability Agents page.
Configure agent basics (Details tab)
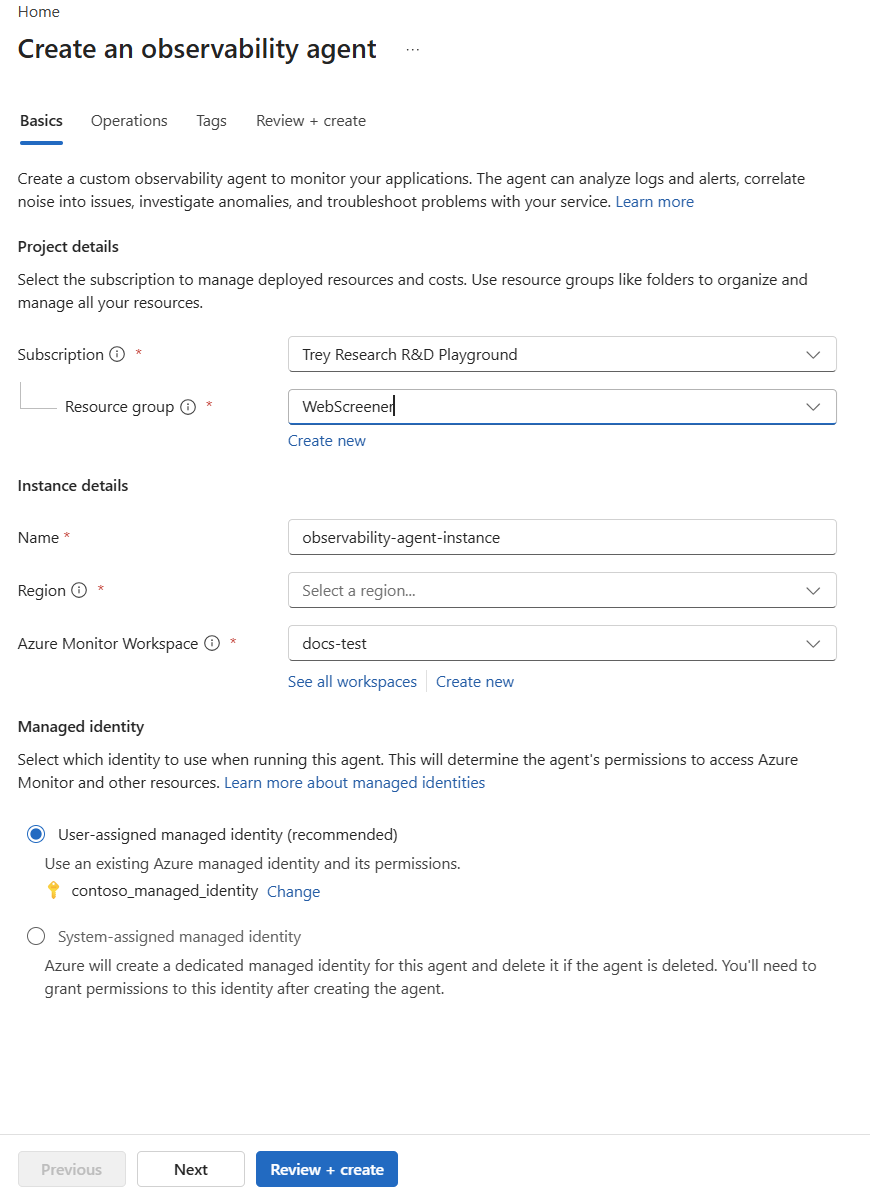
Under Project details, select the Subscription and Resource group where your agent resource will be created.
Under Instance details:
- Name your agent resource.
- Select the region.
- Select the Azure Monitor workspace where issues created by your agent will be stored.
Note
If your selected subscription has a default Azure Monitor workspace configured, it will automatically populate the Azure Monitor Workspace field.
When you select the Azure Monitor Workspace field, workspaces from the selected subscription are displayed in the drop-down list. Select one of these or select See all workspaces if you want to choose a different workspace for the agent resource.
Note
The selected Azure Monitor workspace and the Observability Agent resource must be in the same region.
In the Identity section, select whether to use a system-assigned managed identity or a user-assigned managed identity. See Identity requirements for details on this identity.
Configure agent operations (Operations tab)
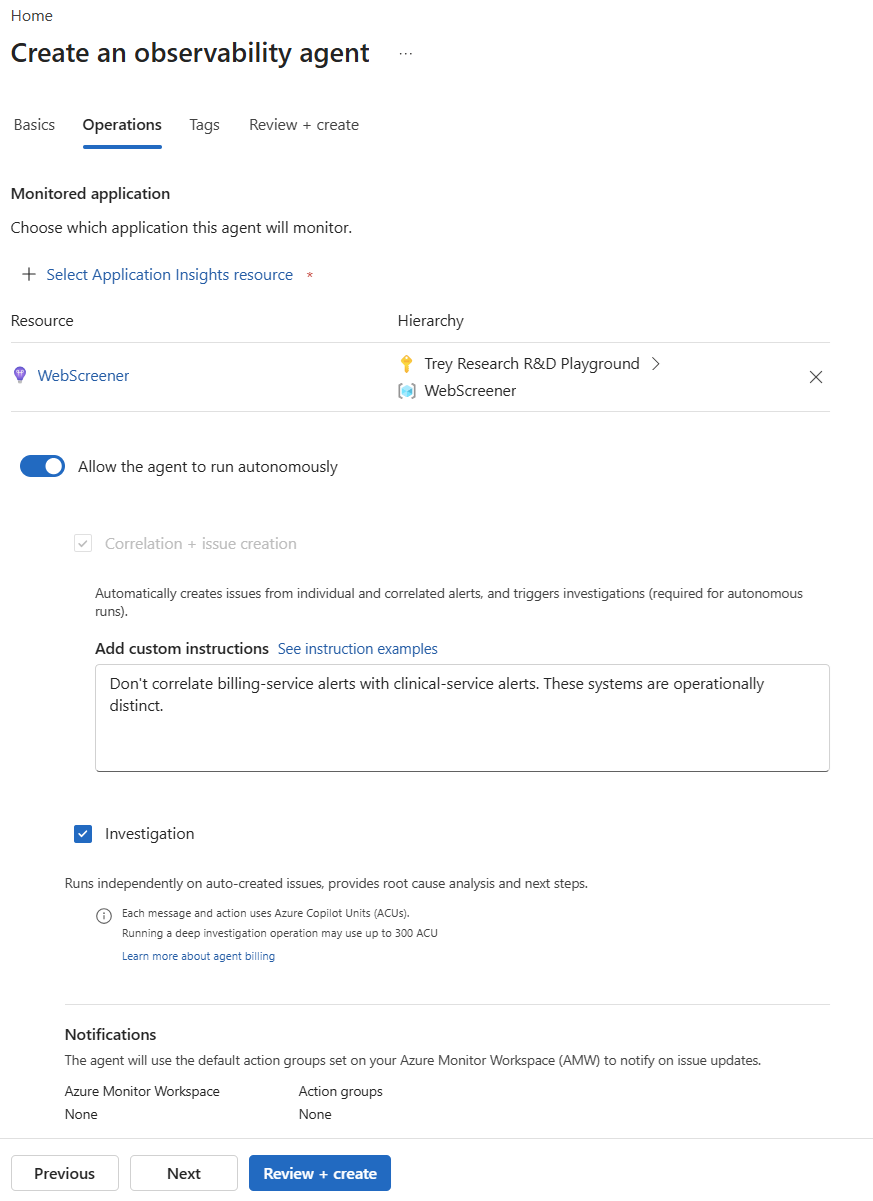
Under Monitored application, select an Application Insights resource the agent will monitor. The Application Insights resource must be in the same subscription as the agent resource.
Allow the agent to run autonomously is on by default and enables two autonomous operations: Correlation + issue creation and Investigation.
- Correlation + issue creation (Optional). When enabled, custom instructions are enabled. In the Add custom instructions section, add instructions in natural language to guide the agent behavior on important alerts that require immediate issue creation, which alerts to correlate or not correlate or important dimensions or dependencies. See Custom instructions for the Azure Copilot Observability Agent to learn more.
- Investigation is on by default. When enabled, investigations run automatically on any issue the agent creates. Clear the Investigation checkbox if you want a person to decide when to run a deep investigation on agent-created issues.
(Optional) In the Notifications section, default action groups set on your Azure Monitor Workspace are listed and will be used by the agent to notify on issue updates. If no action groups are associated, you will see None. Select Add action group to workspace to configure action groups on your workspace.
Configure agent tags (Tags tab)
Optionally set any required tags on the Observability Agent resource.
Review and create the agent resource
- On the Review + create tab, the Observability Agent resource is validated.
- When validation passes and you've reviewed the settings, select the Create button.
Additional resources
- To learn more about Observability Agents, see Azure Copilot Observability Agent.
- To deploy Observability Agents by using templates, see Create Observability Agents by using templates in Azure Monitor.