Managed identities in Azure Container Apps
A managed identity from Microsoft Entra ID allows your container app to access other Microsoft Entra protected resources. For more about managed identities in Microsoft Entra ID, see Managed identities for Azure resources.
Your container app can be granted two types of identities:
- A system-assigned identity is tied to your container app and is deleted when your container app is deleted. An app can only have one system-assigned identity.
- A user-assigned identity is a standalone Azure resource that you can assign to your container app and other resources. A container app can have multiple user-assigned identities. User-assigned identities exist until you delete them.
Why use a managed identity?
You can use a managed identity in a running container app to authenticate to any service that supports Microsoft Entra authentication.
With managed identities:
- Your app connects to resources with the managed identity. You don't need to manage credentials in your container app.
- You can use role-based access control to grant specific permissions to a managed identity.
- System-assigned identities are automatically created and managed. They're deleted when your container app is deleted.
- You can add and delete user-assigned identities and assign them to multiple resources. They're independent of your container app's lifecycle.
- You can use managed identity to authenticate with a private Azure Container Registry without a username and password to pull containers for your container app.
- You can use a managed identity to create connections for Dapr-enabled applications via Dapr components
Common use cases
System-assigned identities are best for workloads that:
- are contained within a single resource
- need independent identities
User-assigned identities are ideal for workloads that:
- run on multiple resources and can share a single identity
- need pre-authorization to a secure resource
Limitations
Init containers can't access managed identities in consumption-only environments and dedicated workload profile environments
Configure managed identities
You can configure your managed identities through:
- the Azure portal
- the Azure CLI
- your Azure Resource Manager (ARM) template
When a managed identity is added, deleted, or modified on a running container app, the app doesn't automatically restart and a new revision isn't created.
Note
When adding a managed identity to a container app deployed before April 11, 2022, you must create a new revision.
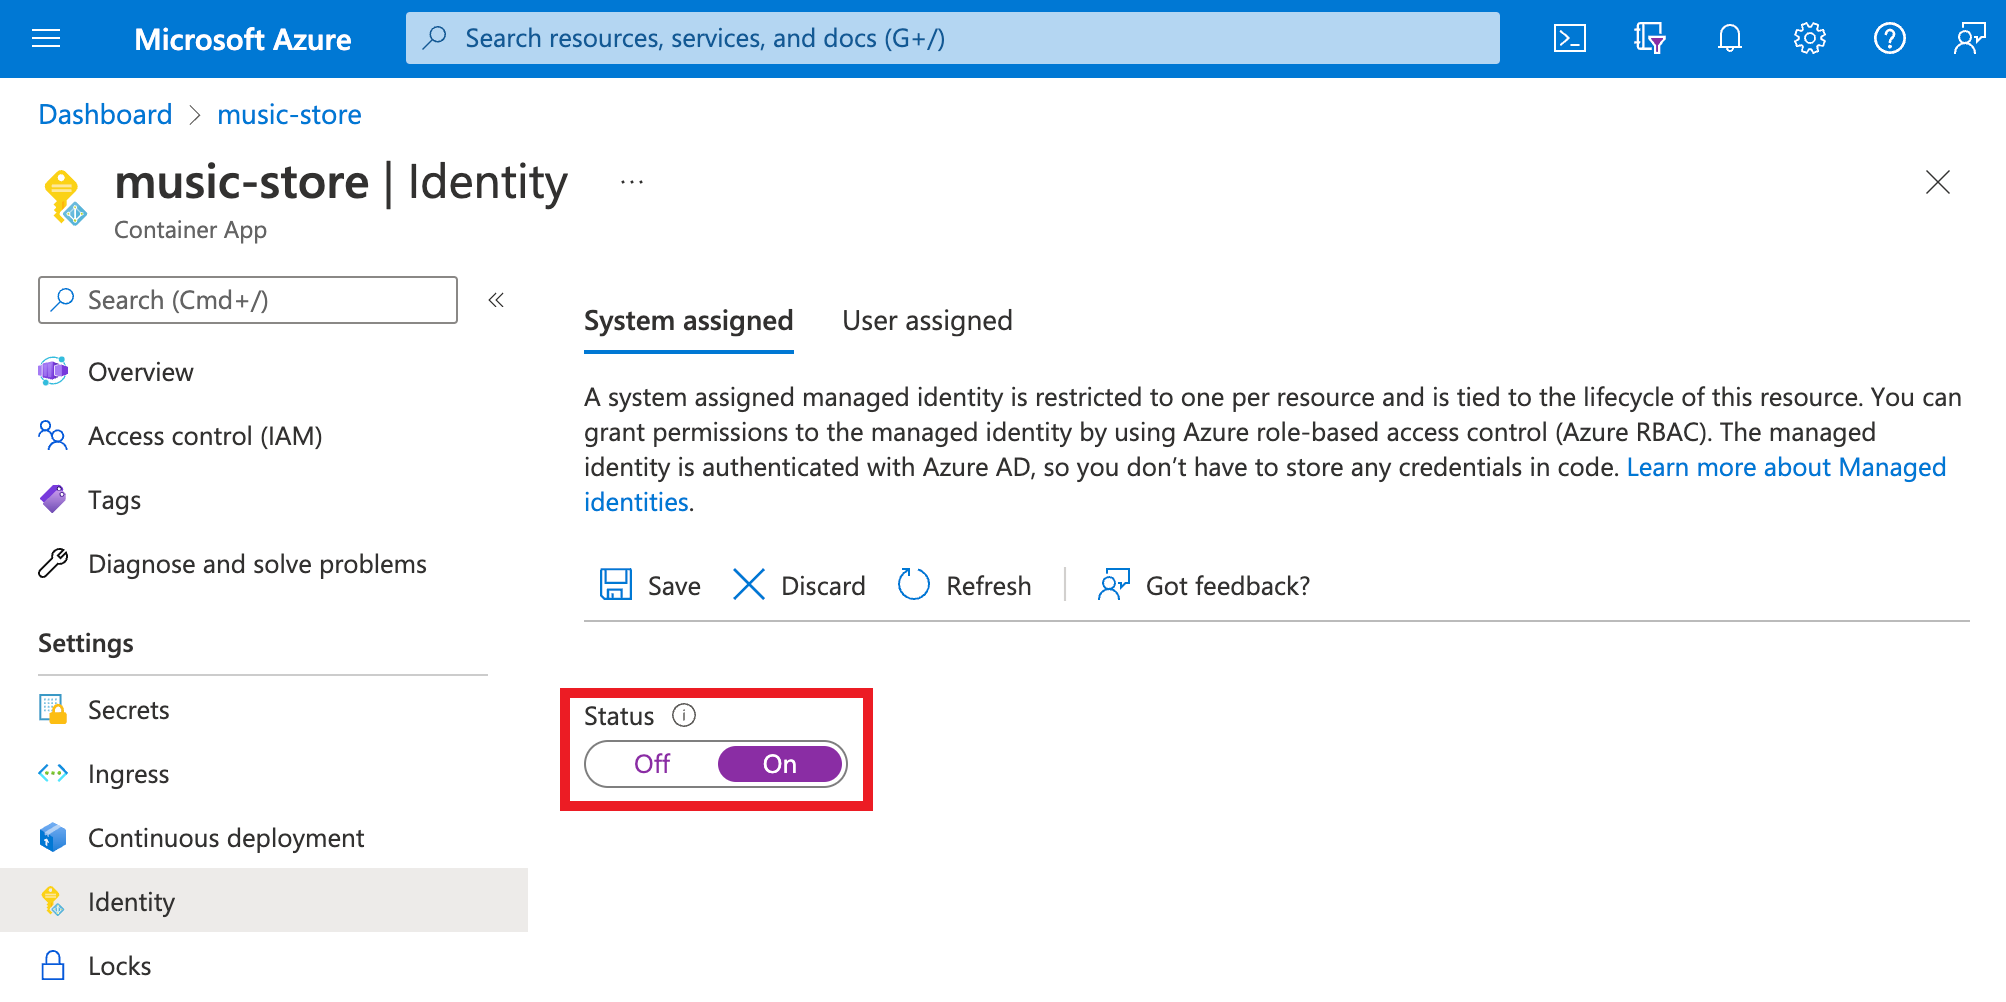
Add a system-assigned identity
Go to your container app in the Azure portal.
From the Settings group, select Identity.
Within the System assigned tab, switch Status to On.
Select Save.
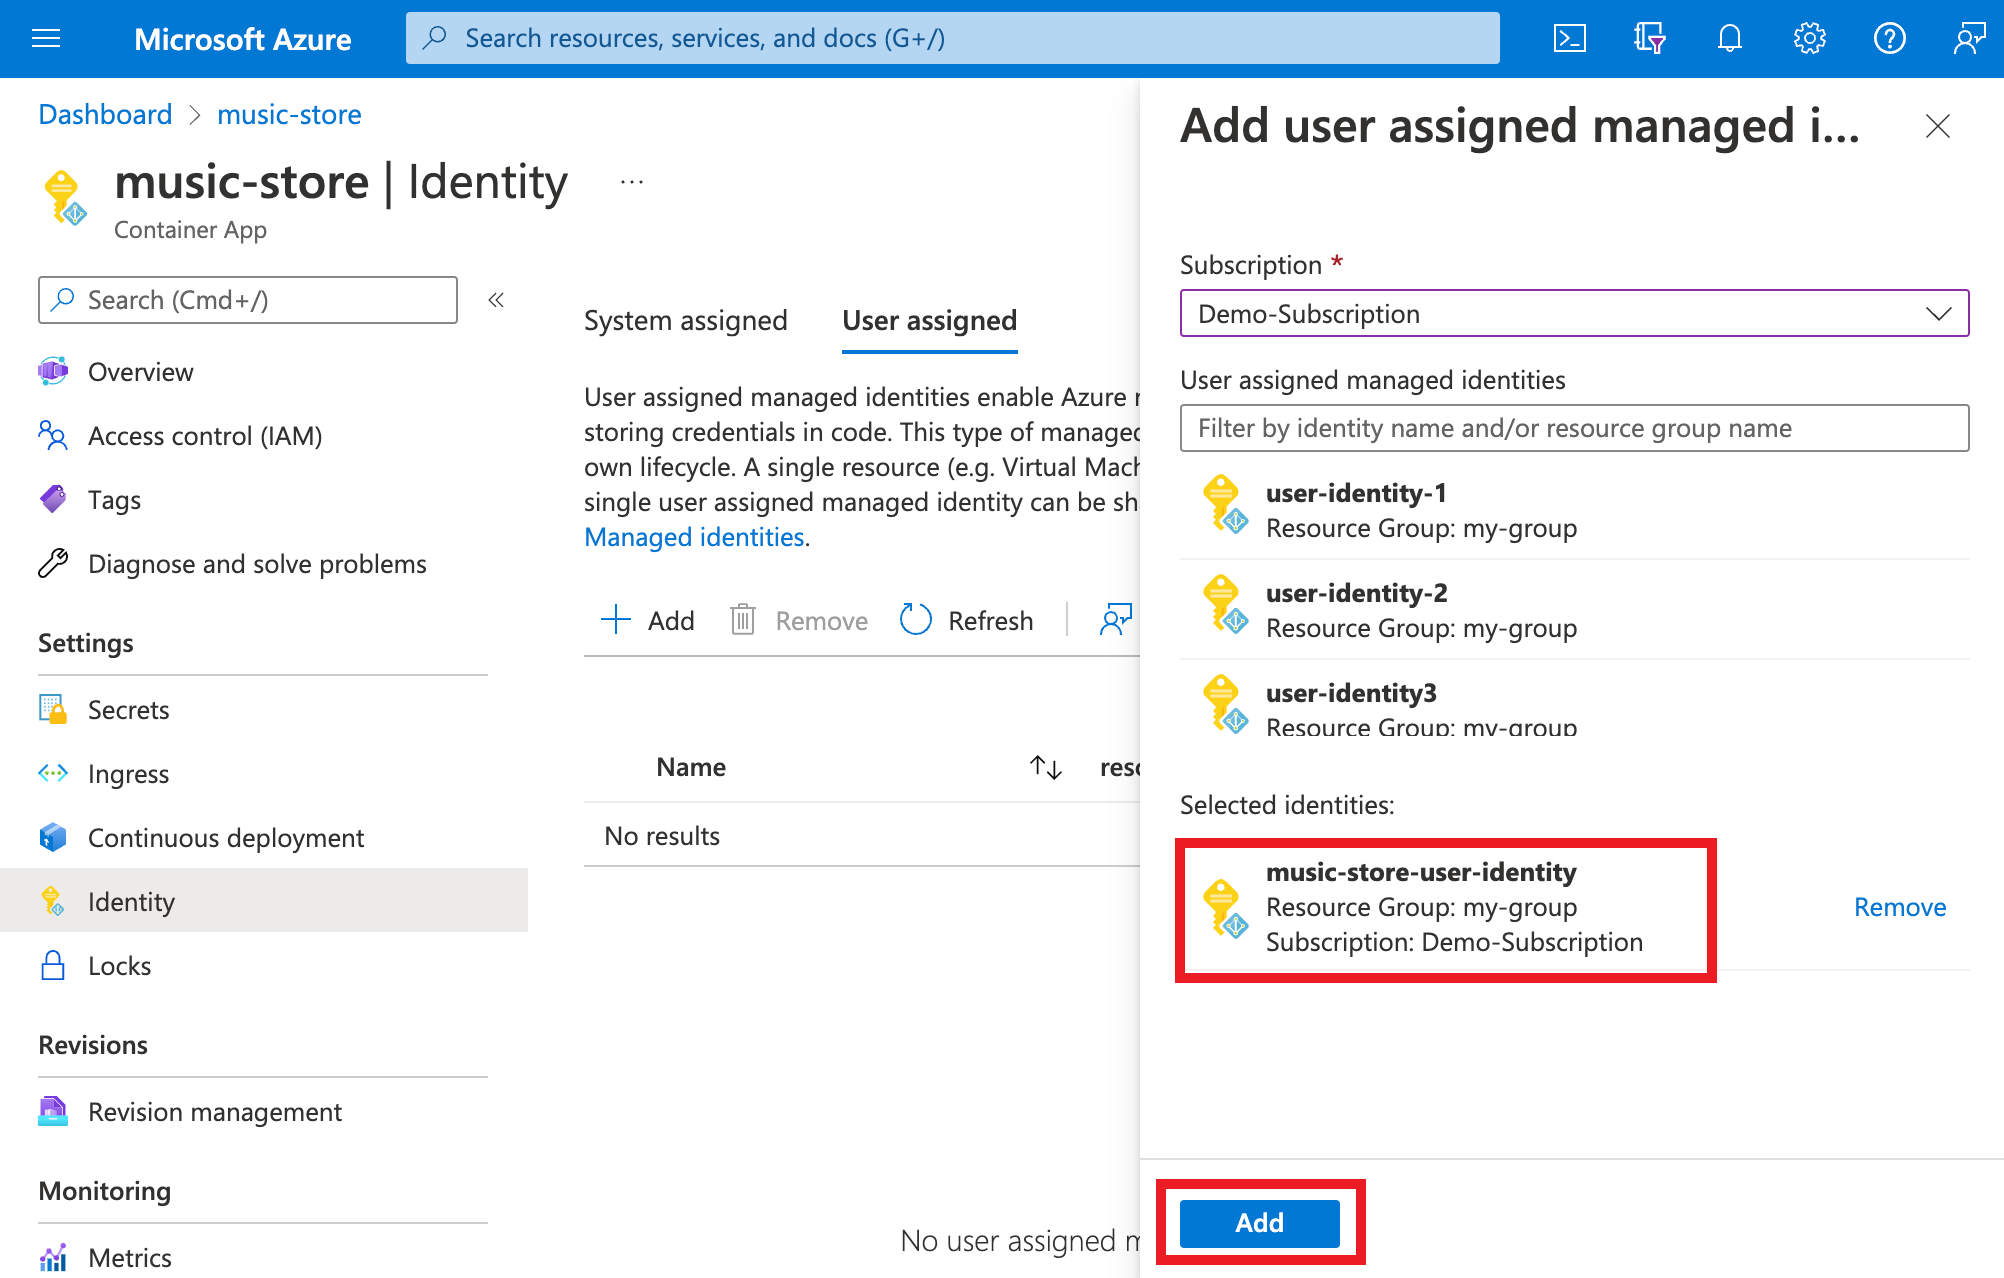
Add a user-assigned identity
Configuring a container app with a user-assigned identity requires that you first create the identity then add its resource identifier to your container app's configuration. You can create user-assigned identities via the Azure portal or the Azure CLI. For information on creating and managing user-assigned identities, see Manage user-assigned managed identities.
First, you'll need to create a user-assigned identity resource.
Create a user-assigned managed identity resource according to the steps found in Manage user-assigned managed identities.
Go to your container app in the Azure portal.
From the Settings group, select Identity.
Within the User assigned tab, select Add.
Search for and select the identity you created earlier.
Select Add.
Configure a target resource
For some resources, you need to configure role assignments for your app's managed identity to grant access. Otherwise, calls from your app to services, such as Azure Key Vault and Azure SQL Database, are rejected even when you use a valid token for that identity. To learn more about Azure role-based access control (Azure RBAC), see What is RBAC?. To learn more about which resources support Microsoft Entra tokens, see Azure services that support Microsoft Entra authentication.
Important
The back-end services for managed identities maintain a cache per resource URI for around 24 hours. If you update the access policy of a particular target resource and immediately retrieve a token for that resource, you may continue to get a cached token with outdated permissions until that token expires. Forcing a token refresh isn't supported.
Connect to Azure services in app code
With managed identities, an app can obtain tokens to access Azure resources that use Microsoft Entra ID, such as Azure SQL Database, Azure Key Vault, and Azure Storage. These tokens represent the application accessing the resource, and not any specific user of the application.
Container Apps provides an internally accessible REST endpoint to retrieve tokens. The REST endpoint is available from within the app with a standard HTTP GET request, which you can send with a generic HTTP client in your preferred language. For .NET, JavaScript, Java, and Python, the Azure Identity client library provides an abstraction over this REST endpoint. You can connect to other Azure services by adding a credential object to the service-specific client.
Note
When using Azure Identity client library, you need to explicitly specify the user-assigned managed identity client ID.
Note
When connecting to Azure SQL data sources with Entity Framework Core, consider using Microsoft.Data.SqlClient, which provides special connection strings for managed identity connectivity.
For .NET apps, the simplest way to work with a managed identity is through the Azure Identity client library for .NET. See the following resources for more information:
- Add Azure Identity client library to your project
- Access Azure service with a system-assigned identity
- Access Azure service with a user-assigned identity
The linked examples use DefaultAzureCredential. This object is effective in most scenarios as the same pattern works in Azure (with managed identities) and on your local machine (without managed identities).
Use managed identity for scale rules
You can use managed identities in your scale rules to authenticate with Azure services that support managed identities. To use a managed identity in your scale rule, use the identity property instead of the auth property in your scale rule. Acceptable values for the identity property are either the Azure resource ID of a user-assigned identity, or system to use a system-assigned identity.
Note
Managed identity authentication in scale rules is in public preview. It's available in API version 2024-02-02-preview.
The following ARM template example shows how to use a managed identity with an Azure Queue Storage scale rule:
The queue storage account uses the accountName property to identify the storage account, while the identity property specifies which managed identity to use. You do not need to use the auth property.
"scale": {
    "minReplicas": 1,
    "maxReplicas": 10,
    "rules": [{
        "name": "myQueueRule",
        "azureQueue": {
            "accountName": "mystorageaccount",
            "queueName": "myqueue",
            "queueLength": 2,
            "identity": "<IDENTITY1_RESOURCE_ID>"
        }
    }]
}
To learn more about using managed identity with scale rules, see Set scaling rules in Azure Container Apps.
Control managed identity availability
Container Apps allows you to specify init containers and main containers. By default, both main and init containers in a consumption workload profile environment can use managed identity to access other Azure services. In consumption-only environments and dedicated workload profile environments, only main containers can use managed identity. Managed identity access tokens are available for every managed identity configured on the container app. However, in some situations only the init container or the main container require access tokens for a managed identity. Other times, you may use a managed identity only to access your Azure Container Registry to pull the container image, and your application itself doesn't need to have access to your Azure Container Registry.
Starting in API version 2024-02-02-preview, you can control which managed identities are available to your container app during the init and main phases to follow the security principle of least privilege. The following options are available:
Init: Available only to init containers. Use this when you want to perform some initialization work that requires a managed identity, but you no longer need the managed identity in the main container. This option is currently only supported in workload profile consumption environmentsMain: Available only to main containers. Use this if your init container does not need managed identity.All: Available to all containers. This value is the default setting.None: Not available to any containers. Use this when you have a managed identity that is only used for ACR image pull, scale rules, or Key Vault secrets and does not need to be available to the code running in your containers.
The following ARM template example shows how to configure a container app on a workload profile consumption environment that:
- Restricts the container app's system-assigned identity to main containers only.
- Restricts a specific user-assigned identity to init containers only.
- Uses a specific user-assigned identity for Azure Container Registry image pull without allowing the code in the containers to use that managed identity to access the registry. In this example, the containers themselves don't need to access the registry.
This approach limits the resources that can be accessed if a malicious actor were to gain unauthorized access to the containers.
{
    "location": "eastus2",
    "identity":{
    "type": "SystemAssigned, UserAssigned",
        "userAssignedIdentities": {
            "<IDENTITY1_RESOURCE_ID>":{},
            "<ACR_IMAGEPULL_IDENTITY_RESOURCE_ID>":{}
         }
     },
    "properties": {
        "workloadProfileName":"Consumption",
        "environmentId": "<CONTAINER_APPS_ENVIRONMENT_ID>",
        "configuration": {
            "registries": [
            {
                "server": "myregistry.azurecr.io",
                "identity": "ACR_IMAGEPULL_IDENTITY_RESOURCE_ID"
            }],
            "identitySettings":[
            {
                "identity": "ACR_IMAGEPULL_IDENTITY_RESOURCE_ID",
                "lifecycle": "None"
            },
            {
                "identity": "<IDENTITY1_RESOURCE_ID>",
                "lifecycle": "Init"
            },
            {
                "identity": "system",
                "lifecycle": "Main"
            }]
        },
        "template": {
            "containers":[
                {
                    "image":"myregistry.azurecr.io/main:1.0",
                    "name":"app-main"
                }
            ],
            "initContainers":[
                {
                    "image":"myregistry.azurecr.io/init:1.0",
                    "name":"app-init",
                }
            ]
        }
    }
}
View managed identities
You can show the system-assigned and user-assigned managed identities using the following Azure CLI command. The output shows the managed identity type, tenant IDs and principal IDs of all managed identities assigned to your container app.
az containerapp identity show --name <APP_NAME> --resource-group <GROUP_NAME>
Remove a managed identity
When you remove a system-assigned identity, it's deleted from Microsoft Entra ID. System-assigned identities are also automatically removed from Microsoft Entra ID when you delete the container app resource itself. Removing user-assigned managed identities from your container app doesn't remove them from Microsoft Entra ID.
In the left navigation of your app's page, scroll down to the Settings group.
Select Identity. Then follow the steps based on the identity type:
- System-assigned identity: Within the System assigned tab, switch Status to Off. Select Save.
- User-assigned identity: Select the User assigned tab, select the checkbox for the identity, and select Remove. Select Yes to confirm.
Next steps
Feedback
Coming soon: Throughout 2024 we will be phasing out GitHub Issues as the feedback mechanism for content and replacing it with a new feedback system. For more information see: https://aka.ms/ContentUserFeedback.
Submit and view feedback for