Verified publisher certification process
This article applies to verified publishers. It explains how to submit your connector and plugin package to Microsoft through Partner Center for certification.
Certification process workflow
The following flowchart shows the basic certification process workflow. For an expanded view of the flowchart, select the magnifying glass icon at the bottom-right.

Set up your Partner Center Seller account
This is a one-time process for creating a Seller account in Partner Center. All Seller accounts go through a vetting process before they can publish offers through Partner Center.
If you already have a Seller account, you need to enroll in the Microsoft 365 and Copilot program.
To create a new Seller account, follow these steps:
If you have an existing developer account in Partner Center, use those same credentials to access Partner Center.
If you don't have an account, then follow the steps in Create a Microsoft AI Cloud Partner Program account in Partner Center.
Before you can publish, verify your account information. To learn how to do this, go to Verify your account information when you enroll in a new Partner Center program.
Submit your package for certification
Sign in to Partner Center.
Under the Home heading, select Marketplace offers card.
On the Marketplace offers | Overview page, select Microsoft 365 and Copilot program.
On the Microsoft 365 and Copilot page, select New offer > Power Platform Connector.
In the Name field in the New Power Platform Connector screen, enter a unique name for your offer.
This name is used to help you identify your offer in Partner Center. We recommend that you include the name of your connector and associated plugin.
Next, you're taken to the Product setup page. You don't need to enter information here. The Status is marked as Complete to indicate there's nothing for you to do.
Package your connector and plugin
On the navigation bar to the left, select Packages.
On the Packages tab in the SAS URI field, enter the link to the SAS URI of your package containing the connector and/or plugin.
To learn more about the guidelines for how to package your connector and plugin, go to Prepare Power Platform connector and plugin files for certification.
(If your connector contains OAuth settings) Enter the client ID and secret in the Client ID and Secret fields.
If your connector doesn't contain OAuth settings, go to the next step.
Select Save draft.
Set properties
On the navigation bar to the left, select Properties.
On the Properties tab, do the following steps:
- In the General Info group, choose up to three (3) categories that your connector and/or plugin associates best with.
- In the Legal and support info group, you need to provide three (3) pieces of information.
In the first field, you can either enter an HTTPS URL to your End User Licensing Agreement, or you can use the Microsoft commercial marketplace Standard Contract. We recommend that you use the Standard Contract.
To choose the Standard Contract, select the checkbox.
In the Privacy policy link field, enter the privacy link for your policies regarding the user's personal information.
In the Support document link field, enter the support link for customers to refer to in case they have issues.
- Select Save to save your draft.
Specify availability parameters
On the navigation bar to the left, select Availability.
On the Availability tab, do the following steps:
- If you wish to make your product available for only limited users, choose to provide HideKey. HideKey is a lowercase alphanumeric string of your choosing.
- On the top-right, select Review and publish.
Review the information you entered. You can also choose the audience who you want to notify the submission status to.
When all the tabs reflect the status as Complete with a green check next to it, select Publish to publish your offer.
Post-submission steps
After you submit your offer, wait 24 to 48 hours for Microsoft to review your offer.
You can review the status of your offer as it is progressing through certification lifecycle. Inside your offer, go to the Product overview tab.
Within 48 hours, Microsoft updates the certification report in the Product overview tab.
If your package passed the certification guidelines, you're asked to move to next stage. If it didn't pass, you're required to update the package based on the certification report and resubmit the package.
Test your connector
If your package passed certification, you're provided with a preview environment where you can test your connector. To do this, in the Product overview for your offer under Publisher signoff, find the link to preview the environment as Power Platform Connector.
This link is live for only 48 business hours. You're expected to test your connector by following the guidelines. To learn about the guidelines, go to Test your connector in certification.
After you test the connector, confirm completion to Microsoft. To do this, in the Product overview for your offer under Publisher signoff, select Go live.
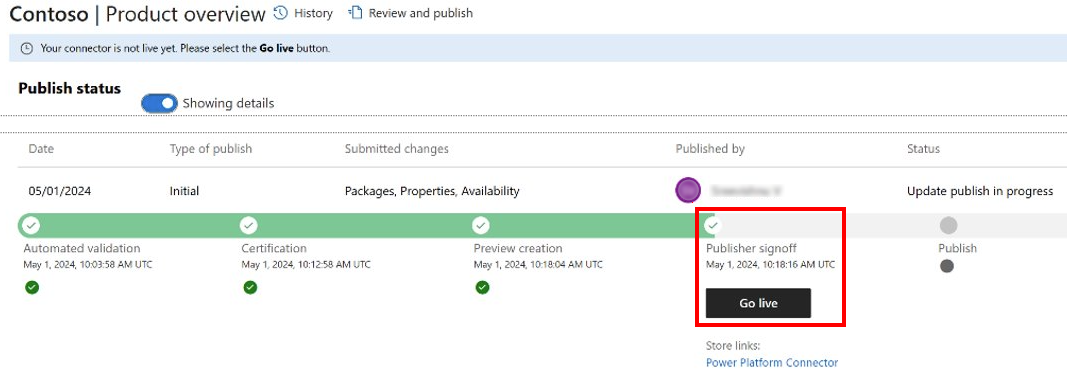
After you confirm, your connector and/or plugin is moved for deployment and is in the Publish phase.
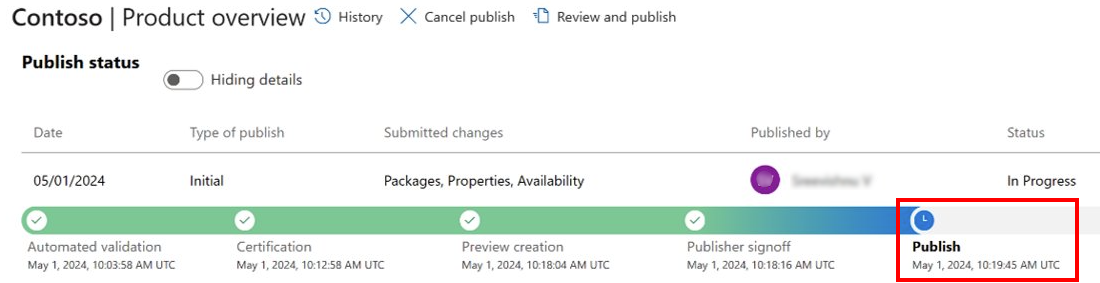
Once your connector and/or plugin is pushed for deployment, the status of your offer is Live. It takes about 3 to 4 weeks for your connector and/or plugin to appear in all regions.
Wait for deployment
After your offer is live, we deploy it across all products and regions.
Important
On average, it takes three to four weeks to deploy the connector. This is required regardless of the size or complexity of your connector and/or plugin, whether it's new, or an update. In order to protect integrity, the connector and/or plugin is subjected to the same validation tasks to test functionality and content that are followed in every deployment.
Production deployment
Our connector deployment schedules for production start Friday mornings, Pacific Standard Time/Pacific Daylight Time. Microsoft schedules the deployment for the upcoming Friday after you've provide Go-Live confirmation.
Region deployment
Deployment to various regions takes place in a predetermined daily sequence. The regions are:
- Testing.
- US preview.
- Asia, except Japan and India.
- Europe, except United Kingdom.
- Brazil, Canada, Japan, and India.
- Australia, United Kingdom, and the United States.
For example, if your connector and/or plugin is scheduled to deploy on Monday, it deploys to the Testing region on day 1. Then, it deploys to the United States preview region on Day 2. Deployment continues daily until the connector is deployed to all six regions.
We don't deploy on Saturdays, Sundays, and United States holidays.
As your connector is finishing certification, we engage you about a marketing opportunity for the connector on the Power Automate blog.
Note
If you want to update your offer content in future, for example, you want to submit version upgrades to the connector and/or plugins, follow the same rules: To initiate the update request, select the Product overview tab for your certified offer, and select the update present for the section you want to modify.
Request removal of the preview tag. After the connector is publicly available for some time and meets certain requirements, it can qualify to be reassigned the general availability tag. This tag shows that the connector is a production-ready product. To learn more, go to Move your connector from preview to general availability.
Open-source the connector
To reduce inconsistencies, you must open-source the connector and plugin.
Benefits to open-source your connector
The following list contains many benefits to open-sourcing your connector:
- Easily add functionality to a previously out-of-the-box released, unchangeable connector.
- Take advantage of contributions from the developer community for connector enhancements and maintenance.
- Enable a platform for users to submit and contribute feature requests.
- Provide a richer tracking history for changes made to the connector.
- Enable collaboration for multiple developers.
Essential program notes
The following points about our program are important.
- You're only open-sourcing your connector files, not your API. This data is already accessible to users through the Microsoft Power Platform public APIs.
- Your connector artifacts are stored and publicly available in our GitHub repository. You can view our existing open-sourced connectors there.
- No PII (personal identifiable information) data or intellectual property is stored in the repository.
- Microsoft includes you in the CODEOWNERS file for the connector in GitHub, and any change to your connector is managed by you.
How to Open-source the connector and plugin
Once you confirm the Go-Live to Microsoft, proceed with open-sourcing your connector and plugin by creating a pull request in the open-source repository. The Microsoft engineer approves your pull request and merges it.
Next step
Test your connector in certification
Provide feedback
We greatly appreciate feedback on issues with our connector platform, or new feature ideas. To provide feedback, go to Submit issues or get help with connectors and select your feedback type.