Enabling Modern Auth in Exchange on-premises
Overview
With the release of Exchange Server 2019 CU13, Exchange Server supports OAuth 2.0 (also known as Modern Authentication) for pure on-premises environments using ADFS as a security token service (STS). This document provides the prerequisites and steps to enable this feature.
Modern Auth in Exchange Server 2019 shouldn't be confused with Hybrid Modern Authentication, which uses Microsoft Entra ID for Modern Authentication. In fact, HMA is still the only recommended method to enable Modern Auth for all on-premises and cloud users in an Exchange Hybrid configuration. This new feature allows Modern Auth use by customers who don't have Microsoft Entra ID or aren't in an Exchange Hybrid configuration.
How will Modern Authentication work and is this feature applicable to me?
With Modern Auth, users can authenticate to Exchange using ADFS. When Modern Auth is enabled for a user, their Outlook client is redirected to ADFS. Users can then authenticate by providing credentials or performing multi-factor authentication. Once ADFS authenticates a user, it generates access tokens. These access tokens are validated by Exchange Server to provide client access to the user's mailbox.
The following diagram illustrates the coordination between Exchange Server, ADFS and Outlook to authenticate a user using Modern Auth.
 In the above chart, steps 3a, 4a, 5a and 6a take place when Modern Auth is enabled for the end user. Steps 3b, 4b occur when Modern Auth is disabled for a user.
Refer to the following table to evaluate if this feature is applicable for you.
| Exchange Configuration | Is this feature applicable? | Remarks |
|---|---|---|
| On-premises Exchange organization with only Exchange Server 2019 | Yes | N/A |
| On-premises Exchange organization with mix of Exchange Server 2019, Exchange Server 2016, and Exchange Server 2013 | No | Exchange Server 2013 is out of support. |
| On-premises Exchange organization with mix of Exchange Server 2019 and Exchange Server 2016 | Yes | Only Exchange 2019 servers can be used as Front-End (Client Access) Servers. |
| Exchange Hybrid organization using HMA | No | HMA using Microsoft Entra ID is the preferred solution. Refer to the guidance on using new auth policies. |
| Exchange Hybrid organization without HMA | No | Use HMA with Microsoft Entra ID. |
Prerequisites to enable Modern Authentication in Exchange
Exchange Server 2019 CU13 or later
To use Modern Auth, all servers used for client connections must have Exchange Server 2019 CU13 installed.
ADFS 2019 or later
To enable Modern Auth in an on-premises Exchange environment, Active Directory Federation Services (ADFS) on Windows Server 2019 or later is required.
You may also need Web Application Proxy Server (on Windows Server 2019 or later) to enable client access from outside corporate network.
Note
The ADFS role cannot be configured on an Exchange Server. For more information, see Plan Your AD FS Deployment Topology
Client Prerequisites
To utilize Modern Auth, users require client applications, such as Outlook or other native operating system clients, that are compatible with Modern Auth via ADFS. At the outset, this feature is available for Outlook on Windows. However, compatibility with ADFS Modern Auth will be extended to other Outlook clients in the future.
Outlook on Windows
Support for Modern Auth via ADFS is available in the following versions of Microsoft Outlook:
Outlook in Microsoft 365 Apps:
| Channel | Supported | Version | Build (or later) |
|---|---|---|---|
| Insider Channel | Yes | 2304 | 16327.20200 |
| Current Channel | Yes | 2304 | 16327.20214 |
| Monthly Enterprise Channel | Yes | 2304 | 16327.20324 |
| Semi-Annual Enterprise Channel (Preview) | Yes | 2402 | 17328.20184 |
| Semi-Annual Enterprise Channel | No | N/A | N/A |
Outlook for Windows (volume license & retail):
| Version | Supported | Version | Build (or later) |
|---|---|---|---|
| Outlook 2016 (Any version) | No | N/A | N/A |
| Outlook 2019 (Any version) | No | N/A | N/A |
| Outlook 2021 (Retail) | Yes | 2304 | 16327.20214 |
| Outlook 2021 (Volume license) | No | N/A | N/A |
You can check the build number of your Office by following steps mentioned here.

Windows OS
The Windows client must be Windows 11 22H2 or later and it must have the March 14, 2023 update installed.
You can review Windows Update history to verify that KB5023706 is installed.

Protocols that work with ADFS Modern Auth
The following table outlines the protocols that can be accessed by utilizing ADFS Modern Auth tokens. We're continuously working to add ADFS Modern Auth support to more Exchange Server protocols.
| Protocol | ADFS Modern Auth Supported |
|---|---|
| MAPI over HTTP (MAPI/HTTP) | Yes |
| Outlook Anywhere (RPC/HTTP) | No |
| Exchange Active Sync (EAS) | No (work in progress) |
| Exchange Web Services (EWS) | Yes |
| Outlook on the Web (OWA) | Yes (claims-based authentication) |
| Exchange Admin Center (ECP) | Yes (claims-based authentication) |
| Offline Address Book (OAB) | Yes |
| IMAP | No |
| POP | No |
Steps to configure Modern Authentication in Exchange Server using ADFS as STS
This section provides details on to implement Modern Auth in Exchange Server 2019 CU13.
Install Exchange 2019 CU13 on all FE Servers (at least)
All servers used for client connections must be upgraded to Exchange 2019 CU13. This ensures that initial client connections to Exchange 2019 use OAuth, and proxied connections to Exchange Server 2016 will use Kerberos.
Exchange 2019 CU13 adds support for new authentication policies to allow or block Modern Auth at user level. Blocking Modern Auth is used to ensure clients that don't support Modern Auth can still connect.
Running /PrepareAD with Setup is required to add several new authentication policy parameters to Exchange Server.
BlockModernAuthActiveSyncBlockModernAuthAutodiscoverBlockModernAuthImapBlockModernAuthMapiBlockModernAuthOfflineAddressBookBlockModernAuthPopBlockModernAuthRpcBlockModernAuthWebServices
After installing CU13, any pre-existing auth policies (including the default authentication policy) will have the above parameters disabled. This means that customers using HMA don't need to change their pre-existing auth policies.
No new authentication policy required for Exchange Hybrid customers
Existing Exchange Hybrid customers should use Hybrid Modern Auth. Hybrid customers using HMA can leave the values of the BlockModernAuth* parameters at 0 to continue using HMA. The steps outlined for setting up Modern Auth with ADFS are only relevant for customers who aren't using Exchange Hybrid and are purely on-premises.
Set up Active Directory Federation Services (ADFS)
Customers need to install and configure ADFS in the environment to allow Exchange clients to use Forms authentication (OAuth) to connect to Exchange Server.
Certificate requirements for ADFS configuration in Exchange Server Organization
ADFS requires two basic types of certificates (refer this article for detailed information):
- A service communication Secure Sockets Layer (SSL) certificate for encrypted web services traffic between the ADFS server, clients, Exchange servers, and the optional Web Application Proxy server. We recommend that you use a certificate that's issued by an internal or commercial certification authority (CA), because all clients need to trust this certificate.
- A token-signing certificate for encrypted communication and authentication between the ADFS server, Active Directory domain controllers, and Exchange servers. You can obtain a token-signing certificate by requesting one from a CA or by creating a self-signed certificate.
For more information about creating and importing SSL certificates in Windows, see Server Certificates.
Here's a summary of the certificates that we're using in this scenario:
| Common name (CN) in the certificate (in the Subject, Subject Alternative Name, or a wildcard certificate match) | Type | Required on servers | Comments |
|---|---|---|---|
| adfs.contoso.com enterpriseregistration.contoso.com |
Issued by a CA | ADFS server, Web Application Proxy server (optional) |
Federation servers use an SSL certificate to secure Web services traffic for SSL communication with clients and with federation server proxies. Because the SSL certificate must be trusted by client computers, we recommend that you use a certificate that is signed by a trusted CA. All certificates that you select must have a corresponding private key. |
| ADFS Token Signing - adfs.contoso.com | Self-signed or issue by a CA | ADFS server, Web Application Proxy server (optional) |
A token-signing certificate is an X509 certificate. Federation servers use associated public/private key pairs to digitally sign all security tokens that they produce. This includes the signing of published federation metadata and artifact resolution requests. You can have multiple token-signing certificates configured in the ADFS Management snap-in to allow for certificate rollover when one certificate is close to expiring. By default, all the certificates in the list are published, but only the primary token-signing certificate is used by ADFS to actually sign tokens. All certificates that you select must have a corresponding private key. You can obtain a token-signing certificate by requesting one from an enterprise CA or a public CA or by creating a self-signed certificate. |
| mail.contoso.com autodiscover.contoso.com |
Issued by a CA | Exchange servers, Web Application Proxy server (optional) |
This is the typical certificate that's used to encrypt external client connections to Outlook on the web (and other Exchange services). For more information, see Certificate requirements for Exchange services. |
Deploy and Configure ADFS Server
Use Windows Server 2019 or later to deploy an ADFS server. Follow the steps: Deploy an ADFS server and Configure and test the ADFS server. Verify that you can open the URL of federation metadata in a web browser from the Exchange server and at least one client machine.
The URL uses the syntax:
https://<FederationServiceName>/federationmetadata/2007-06/federationmetadata.xml
For example,
https://adfs.contoso.com/federationmetadata/2007-06/federationmetadata.xml
Choose appropriate SSO Lifetime
Choose an appropriate SSO lifetime so end users aren't required to frequently reauthenticate. To configure an SSO lifetime, open ADFS management on the ADFS server and choose Edit Federation Service Properties in Actions (present on the right side of the ADFS management window).

Enter the Web SSO lifetime (minutes), which is the maximum time after which users need to reauthenticate.

Configure Authentication Method in ADFS
To use Modern Auth in Outlook on Windows, you need to configure Primary Authentication Methods. We recommend choosing Forms Authentication for both Extranet and Intranet, as shown below.

Enable device registration in ADFS
Verify that device registration is configured, and device authentication is enabled by checking the Device Registration Overview. This step is recommended to reduce the number of authentication prompts for users and can help enforce Access Control Policies in ADFS.

Complete all the steps to configure Device Registration Service Discovery and the Device Registration Discovery Server SSL certificate, as detailed here.
Create ADFS Application Group for Outlook
Right click on
Application Groupsand clickAdd Application Group.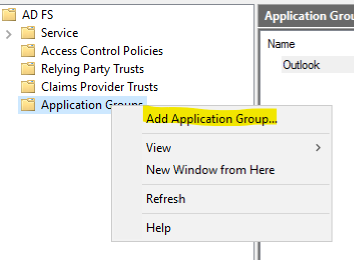
Select
Native Application accessing a web API.Type a name such as
Outlookand click next.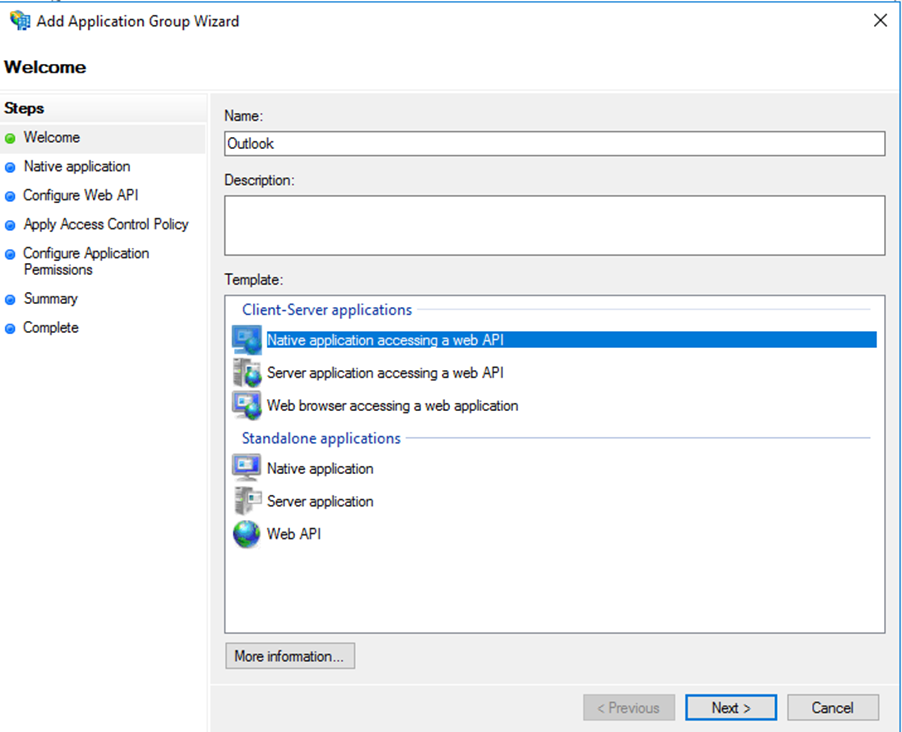
On the
Native application page, add the followingclient identifierandredirect Urifor Outlook and click Next.Client Identifier:
d3590ed6-52b3-4102-aeff-aad2292ab01cRedirect URI (add the following two URIs):
urn:ietf:wg:oauth:2.0:oobms-appx-web://Microsoft.AAD.BrokerPlugin/d3590ed6-52b3-4102-aeff-aad2292ab01c
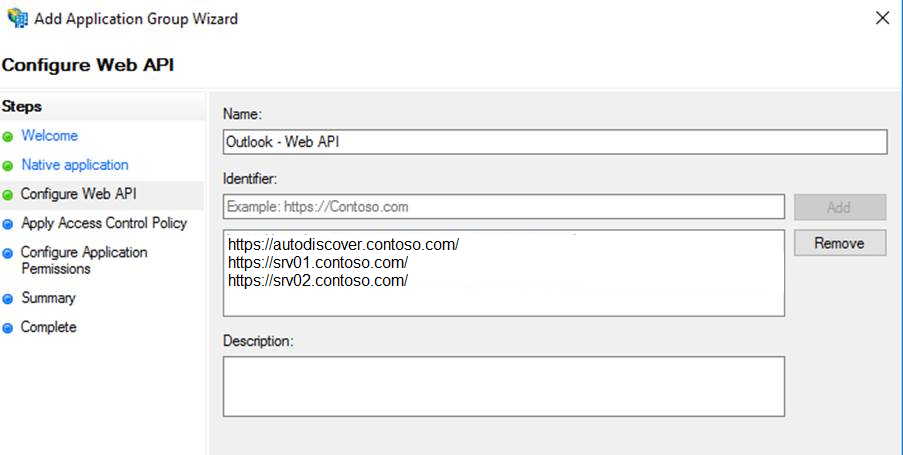
In the
Configure Web APItab, add all FQDNs used by your Exchange environment, including Autodiscover, load balancing FQDNs, server FQDNs, etc. For example:https://autodiscover.contoso.com/https://mail.contoso.com/
Important
It's important here to make sure all client-facing URLs are covered, or it won't work. Include the trailing /'s and ensure the URLs start with https://.
In the
Apply Access Control Policytab, Permit everyone to start with and then change later if needed. Don't check the checkbox at the bottom of the page.In
Configure Application Permissions, chooseNative Application app, and under Permitted Scopescheckuser_impersonationin addition toopenid, which is checked by default.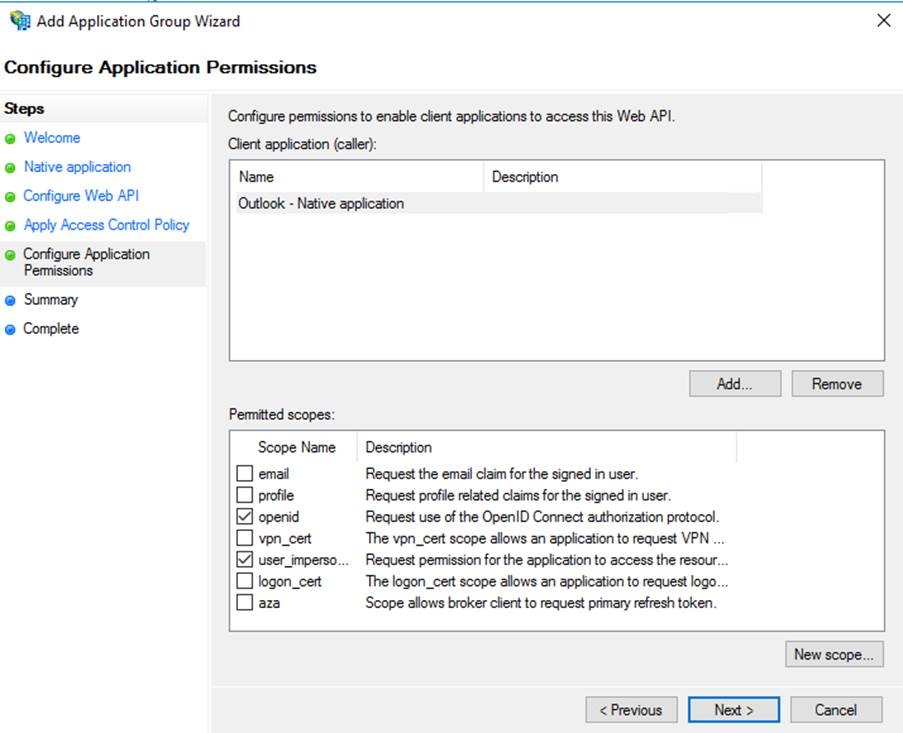
Complete the assistant.


Add Issuance Transform Rules in Outlook Application Group
For the above created application group Outlook, add Issuance Transform Rules. Right click on the Outlook application group and select properties.
Edit the Web API settings, and under Issuance Transform Rules add the following custom rules:

| Claim Rule Name | Custom Rule |
|---|---|
| ActiveDirectoryUserSID | c:[Type == "http://schemas.microsoft.com/ws/2008/06/identity/claims/primarysid"] => issue(claim = c); |
| ActiveDirectoryUPN | c:[Type == "http://schemas.xmlsoap.org/ws/2005/05/identity/claims/upn"] => issue(claim = c); |
| AppIDACR | => issue(Type = "appidacr", Value = "2"); |
| SCP | => issue(Type = "http://schemas.microsoft.com/identity/claims/scope", Value ="user_impersonation"); |
After adding the rules, the Outlook - Web API Properties should look as follows:

Optionally Web Application Proxy can be configured for Extranet Access
Web Application Proxy is part of the Remote Access server role in Windows Server. It provides reverse proxy functionality to allow users to access your web applications from outside the corporate network. Web Application Proxy preauthenticates access to web applications by using ADFS, and functions as an ADFS proxy.
If you plan to use Web Application proxy, use steps mentioned in Install and Configure the Web Application Proxy Server to configure it. Once configured, you can publish rules for Autodiscover.contoso.com or/and mail.contoso.com using the steps mentioned in Publish an Application that uses OAuth2.
Optionally, MFA can also be configured for client access
Refer to the following links to configure ADFS with an MFA provider of your choice.
Configure Access Control Policy requiring MFA.
Client-Side Modern Authentication configuration
We recommend testing Modern Auth with few users before deploying to all users. Once a pilot group of users can use Modern Auth, more users can be deployed.
Client upgrade and OS upgrade:
As outlined in the Client prerequisites section, Modern Auth is supported only for Outlook on Windows. To use Modern Auth, the Outlook client Insider Channel must be installed on Windows 11 OS 22H2 with the March 14, 2023 update or later.
Registry changes in client machines:
Admins need to configure registry values for users.
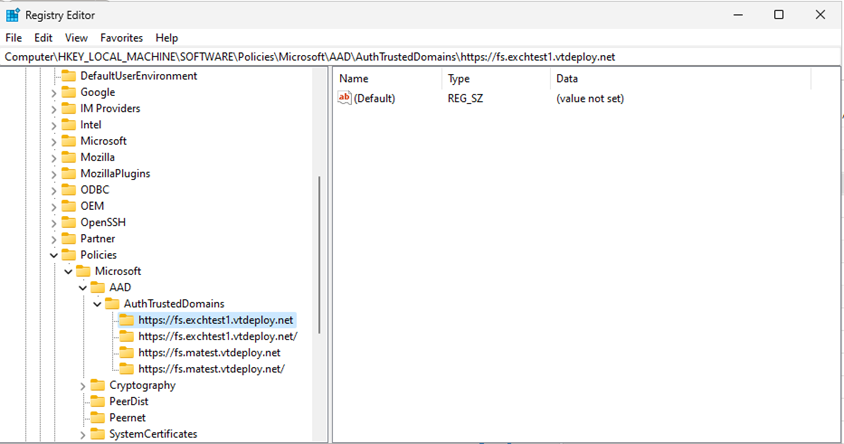
Enable Modern Auth and add your ADFS domain as trusted domain in Outlook:
Add following keys to add ADFS domain as trusted domain:
HKEY_LOCAL_MACHINE\SOFTWARE\Policies\Microsoft\AAD\AuthTrustedDomains\https://ADFS domain/HKEY_LOCAL_MACHINE\SOFTWARE\Policies\Microsoft\AAD\AuthTrustedDomains\https://ADFS domain
Note
Add two keys with and without "/" at the end of ADFS domain.
To enable Modern Auth via ADFS in Outlook on Windows add following
REG_DWORDvalue inHKCU\SOFTWARE\Microsoft\Office\16.0\Common\Identity\:Name Value EnableExchangeOnPremModernAuth 1 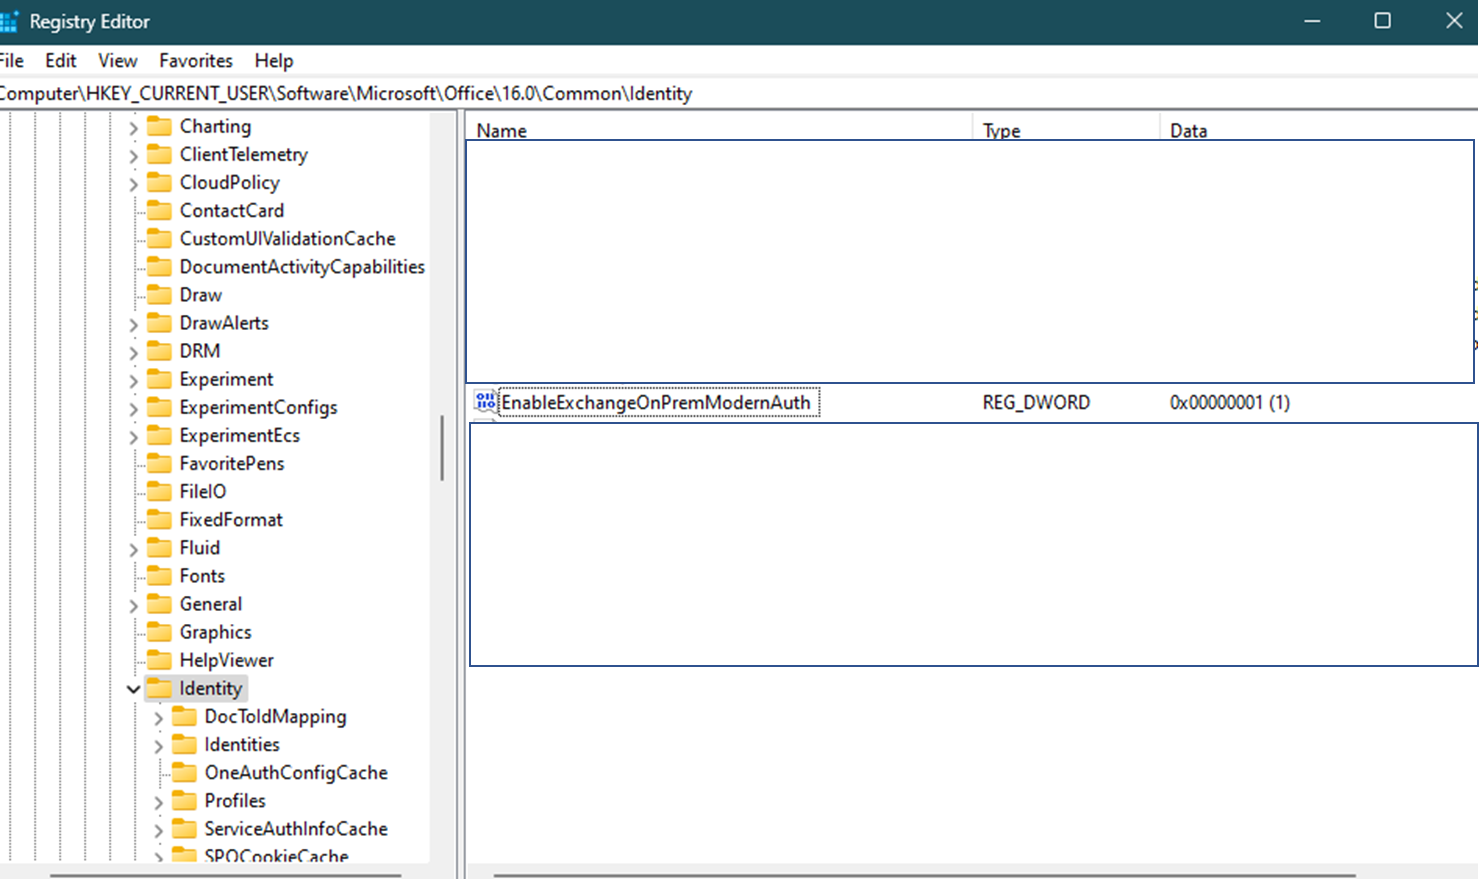
For ease of deployment, these registry changes can be configured using Group Policy. If Group Policy isn't used by your organization, users have to configure their registry manually (or with a script you provide).


Create Authentication Policies for End Users
It's possible that all users in your organization don't have email clients that support Modern Authentication using ADFS. In this scenario, we recommend that you enable Modern Auth for users who have supported clients and block Modern Auth users who don't.
To enable Modern Auth for a set of users and block Modern Auth for your remaining users, you need to create at least two authentication policies:
- Org-wide policy to block Modern Auth by default.
- Second policy to selectively allow Modern Auth for some users.
Create organization-level policy to block Modern Auth by default
After Modern Auth is enabled, all Outlook clients will try to use OAuth tokens, but some clients (for example, Outlook on Mac) can fetch OAuth tokens only from Microsoft Entra ID. Thus, if Modern Auth is enabled, these clients won't be able to connect.
To avoid this scenario, you can set an organization-level policy to disable Modern Auth. In the example below, we create a new authentication policy called Block Modern Auth.
New-AuthenticationPolicy "Block Modern Auth" -BlockModernAuthWebServices -BlockModernAuthActiveSync -BlockModernAuthAutodiscover -BlockModernAuthImap -BlockModernAuthMapi -BlockModernAuthOfflineAddressBook -BlockModernAuthPop -BlockModernAuthRpc
This policy can be set at Org level using the following command.
Set-OrganizationConfig -DefaultAuthenticationPolicy "Block Modern Auth"
Create user-level authentication policy to enable Modern Auth
Next, create a second authentication policy that enables Modern Auth. All users with a supported Outlook client are assigned this authentication policy to enable their client to use Modern Auth.
In the example below, we create a new authentication called Allow Modern Auth using following command:
New-AuthenticationPolicy "Allow Modern Auth"
Configure Exchange Server to use ADFS OAuth tokens
Verify if OAuth is enabled on the following virtual directories. If not enabled, do enable OAuth in all these virtual directories:
Get-MapiVirtualDirectory -Server <ExchangeServerName> | Format-List *auth*
Get-WebServicesVirtualDirectory -Server <ExchangeServerName> | Format-List *auth*
Get-OabVirtualDirectory -Server <ExchangeServerName> | Format-List *auth*
Get-AutodiscoverVirtualDirectory -Server <ExchangeServerName> | Format-List *auth*
Get-ActiveSyncVirtualDirectory -Server <ExchangeServerName> | Format-List *auth*
Run the following command:
New-AuthServer -Type ADFS -Name MyADFSServer -AuthMetadataUrl https://<adfs server FQDN>/FederationMetadata/2007-06/FederationMetadata.xmlThis command is required to create a new auth server object in Exchange Server for ADFS. Auth server objects are a list of trusted issuers. Only OAuth tokens from these issuers are accepted.
Run the following command:
Set-AuthServer -Identity MyADFSServer -IsDefaultAuthorizationEndpoint $trueSet the Auth server we just added as the
DefaultAuthorizationEndpoint. When advertising the Modern Auth header, Exchange Server advertises the auth URL of theDefaultAuthorizationEndpoint. This is how clients know which endpoint to use for authentication.We need to run this command to enable Modern Auth at organization level:
Set-OrganizationConfig -OAuth2ClientProfileEnabled $trueEnable Modern auth for users with supported clients by assigning the
Allow Modern Authauthentication policy:Set-User -Identity User -AuthenticationPolicy "Allow Modern Auth"
Verify Modern Auth flow
Once configured correctly, users experience the ADFS login prompt when they connect to an Exchange server.
Effect on other clients when Modern Auth is enabled for a user
Users enabled for Modern Auth that have multiple clients (for example, Outlook on Windows and Outlook Mobile) will have different experiences for each client. Here's a summary of how clients behave when Modern Auth is enabled. The following table assumes that Block Modern Auth is applied as DefaultAuthenticationPolicy at org level.
| Client | Behavior |
|---|---|
| Outlook on Windows (new versions) | Uses Modern Auth by default. |
| Outlook on Windows (old versions) | Will try to use Modern Auth but will fail. |
| Outlook Mac | Will try to use Modern Auth but will fail; support coming later. |
| Outlook iOS | Will fall back to Basic auth. |
| Outlook Android | Will fall back to Basic auth. |
| iOS Mail app | Will fall back to Basic auth. |
| Gmail app | Will fall back to Basic auth. |
| OWA/ECP | Doesn't use authentication policy. Depending on how it's configured, will use either Modern Auth or Basic auth. |
| Windows Mail app | Doesn't fall back to Basic auth. |
| Thunderbird client | Doesn't fall back to Basic auth. |
| PowerShell | Will use Basic auth. |
Effect on OWA/ECP when Modern Auth is enabled for other clients
Customers may or may not be using ADFS claims-based authentication for Outlook on the web. The steps mentioned above are required to enabled OAuth for other clients, and doesn't affect how OWA/ECP is configured.
Use AD FS claims-based authentication with Outlook on the web
Wait time after change authentication policy
After changing the authentication policy to allow Modern Auth or block legacy auth:
Wait 30 minutes for new policies to be read by front-end servers
or
Perform an IIS reset on all front-end servers.
Migrating to Hybrid Modern Auth after using enabling Modern Auth for Exchange Server
Customers using Modern Auth with ADFS that later decides to configure Exchange Hybrid should move to Hybrid Modern Auth. Detailed steps to migrate will be added to a future version of this document.
Renewing certificates
Evaluate current certificate configuration
When it comes to client connections to Exchange Server, the certificate that should be evaluated is the one bound to the Frontend IIS Site. For an ADFS server, ensuring that all certificates returned in Get-AdfsCertificate are current is ideal.
To identify the relevant certificate on an Exchange Server, perform the following within Exchange Management Shell:
Import-Module WebAdministration
(Get-ChildItem IIS:SSLBindings | Where-Object {($_.Sites -ne $null) -and ($_.Port -eq "443")}).Thumbprint | ForEach-Object {Get-ExchangeCertificate $_ | Where-Object {$_.Services -Match "IIS"} | Format-Table Thumbprint, Services, RootCAType, Status, NotAfter, Issuer -AutoSize -Wrap}
To review active certificates on an ADFS Server, perform the following within PowerShell:
Get-AdfsCertificate | Format-Table CertificateType, Thumbprint, Certificate -AutoSize -Wrap
Update certificates on Exchange Server
If it's been found that the Exchange certificate needs to be updated for client connectivity, a new certificate must be issued and imported onto the Exchange Servers. Afterwards, the certificate should be enabled for IIS at minimum. Evaluate if other services should be enabled for the new certificate based on your configuration.
Below is a sample on creating, completing, enabling, and importing a new certificate across all servers based on the existing certificate within the Exchange Management Shell:
Generate a new certificate request within the Exchange Management Shell based on your existing certificate:
$txtrequest = Get-ExchangeCertificate <Thumbprint> | New-ExchangeCertificate -GenerateRequest -PrivateKeyExportable $trueStage a variable containing the desired output path of your new certificate request:
$requestFile = "C:\temp\CertRequest.req"Create the certificate request file:
[System.IO.File]::WriteAllBytes($requestFile, [System.Text.Encoding]::Unicode.GetBytes($txtrequest))Note
The folder path for the certificate request must already exist.
Share the request file with your Certificate Authority (CA). The steps required to get a completed certificate varies based on your CA.
Note
.p7bis the preferred format for the completed request.Stage a variable containing the full path of the completed request:
$certFile = "C:\temp\ExchangeCert.p7b"Import the request onto the server that originally generated the request:
Import-ExchangeCertificate -FileData ([System.IO.File]::ReadAllBytes($certFile)) -PrivateKeyExportable $trueStage variable for the password to protect the completed certificate:
$pw = Read-Host "Enter password" -AsSecureStringExport the certificate Binary into a variable:
$binCert = Export-ExchangeCertificate <Thumbprint> -BinaryEncodedStage variable for the desired output path of the completed certificate:
$certificate = "\\$env:computername\c$\temp\CompletedExchangeCert.pfx"Export the completed request to be imported on other servers:
[System.IO.File]::WriteAllBytes($certificate, $binCert.FileData)Enable the services that should be bound to the certificate:
Enable-ExchangeCertificate <Thumbprint> -Services IISNote
You may need to add more services to the above sample based on your previous certificates configuration.
Validate the certificate is working as intended by directing a client to the server for all client namespaces with a host file.
Import the Exchange certificate on all other Exchange servers:
Import-ExchangeCertificate -PrivateKeyExportable $true -FileData ([System.IO.File]::ReadAllBytes($certificate)) -Password $pw -Server <Server-Name>Note
Including the
-PrivateKeyExportableparameter is optional when importing to other Exchange servers.Enable the Exchange certificate for needed Exchange services on all other Exchange servers:
Enable-ExchangeCertificate <Thumbprint> -Services IIS -Server <Server-Name>Note
You may need to add more services to the above sample based on your previous certificates configuration.
Update certificate on ADFS
Depending on the certificate type that requires update on ADFS determines if you need to follow the steps described below.
Service-Communications certificate
This sample provides the PowerShell required to import a certificate in .pfx format, such as the one generated by following the Exchange Server certificate steps. Ensure you're logged on the primary ADFS server.
Stage a variable containing the password for the certificate:
$pw = Read-Host "Enter password" -AsSecureStringStage a variable containing the full path for the certificate:
$certificate = "\\E2k19-1\c$\temp\CompletedExchangeCert.pfx"Import the certificate into the personal store of the LocalMachine:
Import-PfxCertificate -FilePath $certificate -CertStoreLocation Cert:\LocalMachine\my -Password $pwUpdate the Service-Communications certificate:
Set-AdfsSslCertificate -Thumbprint <Thumbprint>
Token-Signing and Token-Decryption certificates
Follow the steps outlined in the Obtain and Configure TS and TD Certificates for AD FS documentation.
Note
Using the default self-signed certificate for Token-Signing in ADFS claims-based authentication for Outlook on the web requires the certificate to be installed on the Exchange Servers.