Note
Access to this page requires authorization. You can try signing in or changing directories.
Access to this page requires authorization. You can try changing directories.
The information in this article applies to Windows 2016 and later.
If your organization is federated with Microsoft Entra ID, you can use Microsoft Entra multifactor authentication to secure Active Directory Federation Services (AD FS) resources, both on-premises and in the cloud. Microsoft Entra multifactor authentication enables you to eliminate passwords and provide a more secure way to authenticate. With AD FS, you can configure Microsoft Entra multifactor authentication for primary authentication or use it as an extra authentication provider.
Unlike with AD FS in Windows Server 2012 R2, the AD FS 2016 Microsoft Entra multifactor authentication adapter integrates directly with Microsoft Entra ID and doesn't require an on premises Azure Multifactor Authentication Server. The Microsoft Entra multifactor authentication adapter is built into Windows Server 2016. No other installation is required.
Register users for Microsoft Entra multifactor authentication by using AD FS
AD FS doesn't support inline "proofup" registration of Microsoft Entra multifactor authentication security verification information, such as on a phone number or mobile app. Without support for inline proof, users must get proofed up by visiting https://account.activedirectory.windowsazure.com/Proofup.aspx before they use Microsoft Entra multifactor authentication to authenticate to AD FS applications. When a user that hasn't yet proofed up in Microsoft Entra ID tries to authenticate with Microsoft Entra multifactor authentication at AD FS, they get an AD FS error. As an AD FS administrator, you can customize this error experience to guide the user to the proofup page instead. You can create this message by using onload.js customization to detect the error message string within the AD FS page. Then you can show a new message to direct the user to https://aka.ms/mfasetup so that they can reattempt authentication. For more information, see Customize the AD FS web page to guide users to register MFA verification methods.
Note
Prior to this update, users had to authenticate by using Microsoft Entra multifactor authentication for registration by visiting https://account.activedirectory.windowsazure.com/Proofup.aspx. With this update, an AD FS user who hasn't yet registered Microsoft Entra multifactor authentication verification information can access the Azure proofup page by using the shortcut https://aka.ms/mfasetup with only primary authentication, such as Windows Integrated Authentication or username and password at the AD FS web pages. If the user has no verification methods configured, Microsoft Entra ID performs inline registration. The user sees the message, "Your admin has required that you set up this account for additional security verification." Then the user selects Set it up now. Users who already have at least one verification method configured will still be prompted to provide multifactor authentication (MFA) when visiting the proofup page.
Recommended deployment topologies
This section covers using Microsoft Entra multifactor authentication as the primary authentication method with AD FS and Microsoft Entra multifactor authentication for Office 365.
Microsoft Entra multifactor authentication as primary authentication
There are a couple of great reasons to use Microsoft Entra multifactor authentication as Primary Authentication with AD FS:
- It avoids passwords for sign-in to Microsoft Entra ID, Office 365, and other AD FS apps.
- It protects password based sign-in by requiring another factor, such as verification code prior to the password.
You also might want to use Microsoft Entra multifactor authentication as the primary authentication method and Microsoft Entra Conditional Access, including true MFA by prompting for extra factors. To use Microsoft Entra multifactor authentication on premises, you can configure the Microsoft Entra domain setting by setting SupportsMfa to $true. In this configuration, Microsoft Entra ID can prompt AD FS to perform extra authentication or "true MFA" for conditional access scenarios that require it.
Any AD FS user who isn't registered (hasn't yet configured MFA verification information), should be prompted to configure verification information. To prompt unregistered users, you can use a customized AD FS error page to direct users to https://aka.ms/mfasetup and configure verification information. After configuration, the user can reattempt their AD FS sign-in.
Microsoft Entra multifactor authentication as primary authentication is considered a single factor. After initial configuration users need to provide another factor to manage or update their verification information in Microsoft Entra ID, or to access other resources that require MFA.
Note
With AD FS 2019, you're required to make a modification to the anchor claim type for the Active Directory Claims Provider trust and modify this from the windowsaccountname to User Principal Name (UPN). Run the following PowerShell cmdlet. This has no effect on the internal functioning of the AD FS farm. It's possible a few users might be re-prompted for credentials after this change is made. After logging in again, end users will see no difference.
Set-AdfsClaimsProviderTrust -AnchorClaimType "http://schemas.xmlsoap.org/ws/2005/05/identity/claims/upn" -TargetName "Active Directory"
Microsoft Entra multifactor authentication as extra authentication to Office 365
Microsoft Entra multifactor authentication adapter for AD FS enables your users to do MFA on AD FS. To secure your Microsoft Entra resource, you should require MFA through a Conditional Access policy. You must also set the domain setting SupportsMfa to $true and emit the multipleauthn claim when a user performs two-step verification successfully.
As described previously, any AD FS user who isn't registered (hasn't yet configured MFA verification information) should be prompted to configure verification information. To prompt unregistered users, you can use a customized AD FS error page to direct users to https://aka.ms/mfasetup and configure verification information. After configuration, the user can reattempt their AD FS sign-in.
Prerequisites
The following prerequisites are required when you use Microsoft Entra multifactor authentication for authentication with AD FS:
Note
Microsoft Entra ID and Microsoft Entra multifactor authentication are included in Microsoft Entra ID P1 or P2 and the Enterprise Mobility Suite (EMS). You don't need individual subscriptions if you have either of these applications installed.
- A Windows Server 2016 AD FS on-premises environment.
- The server needs to be able to communicate with the following URLs over port 443.
https://adnotifications.windowsazure.comhttps://login.microsoftonline.com
- The server needs to be able to communicate with the following URLs over port 443.
- Your on-premises environment must be federated with Microsoft Entra ID.
- Microsoft Azure Active Directory module for Windows PowerShell.
- Enterprise administrator credentials to configure the AD FS farm for Microsoft Entra multifactor authentication.
- You'll need either an account that has the Application Administrator role on your instance of Microsoft Entra ID to configure it by using PowerShell.
Note
Azure AD and MSOnline PowerShell modules are deprecated as of March 30, 2024. To learn more, read the deprecation update. After this date, support for these modules are limited to migration assistance to Microsoft Graph PowerShell SDK and security fixes. The deprecated modules will continue to function through March, 30 2025.
We recommend migrating to Microsoft Graph PowerShell to interact with Microsoft Entra ID (formerly Azure AD). For common migration questions, refer to the Migration FAQ. Note: Versions 1.0.x of MSOnline may experience disruption after June 30, 2024.
Configure the AD FS Servers
In order to complete configuration for Microsoft Entra multifactor authentication for AD FS, you need to configure each AD FS server by using the steps described here.
Note
Ensure that these steps are performed on all AD FS servers in your farm. If you've multiple AD FS servers in your farm, you can perform the necessary configuration remotely by using Azure AD PowerShell.
Step 1: Generate a certificate for Microsoft Entra multifactor authentication on each AD FS server
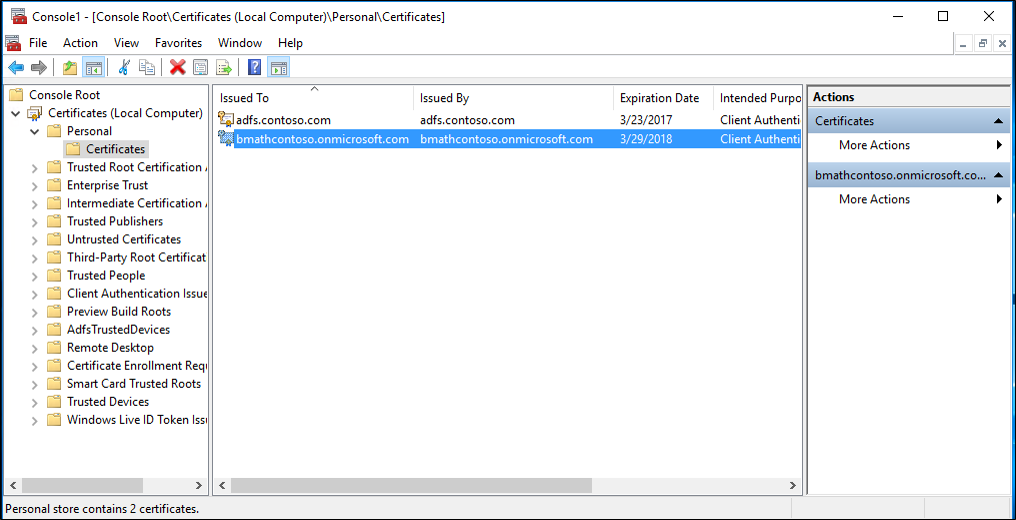
The first thing you need to do is to use the New-AdfsAzureMfaTenantCertificate PowerShell command to generate a certificate for Microsoft Entra multifactor authentication to use. After you generate the certificate, find it in the local machines certificate store. The certificate is marked with a subject name containing the TenantID for your Microsoft Entra directory.
The TenantID is the name of your directory in Microsoft Entra ID. Use the following PowerShell cmdlet to generate the new certificate:
$certbase64 = New-AdfsAzureMfaTenantCertificate -TenantID <tenantID>

Step 2: Add the new credentials to the Azure multifactor authentication Client Service Principal
In order to enable the AD FS servers to communicate with the Azure multifactor authentication Client, you need to add the credentials to the Service Principal for the Azure multifactor authentication Client. The certificates generated by using the New-AdfsAzureMFaTenantCertificate cmdlet serve as these credentials. Open PowerShell, and perform the following steps to add the new credentials to the Azure multifactor authentication Client Service Principal.
Step 3: Set the certificate as the new credential against the Azure multifactor authentication Client
Note
In order to complete this step you need to connect to your instance of Microsoft Entra ID with Microsoft Graph PowerShell by using Connect-MgGraph. These steps assume you've already connected via PowerShell.
Connect-MgGraph -Scopes 'Application.ReadWrite.All'
$servicePrincipalId = (Get-MgServicePrincipal -Filter "appid eq '981f26a1-7f43-403b-a875-f8b09b8cd720'").Id
$keyCredentials = (Get-MgServicePrincipal -Filter "appid eq '981f26a1-7f43-403b-a875-f8b09b8cd720'").KeyCredentials
$certX509 = [System.Security.Cryptography.X509Certificates.X509Certificate2]([System.Convert]::FromBase64String($certBase64))
$newKey = @(@{
    CustomKeyIdentifier = $null
    DisplayName = $certX509.Subject
    EndDateTime = $null
    Key = $certX509.GetRawCertData()
    KeyId = [guid]::NewGuid()
    StartDateTime = $null
    Type = "AsymmetricX509Cert"
    Usage = "Verify"
    AdditionalProperties = $null
})
$keyCredentials += $newKey
Update-MgServicePrincipal -ServicePrincipalId $servicePrincipalId -KeyCredentials $keyCredentials
Important
This command needs to be run on all of the AD FS servers in your farm. Microsoft Entra multifactor authentication will fail on servers that haven't had the certificate set as the new credential against the Azure multifactor authentication Client.
Note
981f26a1-7f43-403b-a875-f8b09b8cd720 is the GUID for Azure multifactor authentication Client.
Configure the AD FS Farm
After you've completed the steps in the previous section for each AD FS server, set the Azure tenant information by using the Set-AdfsAzureMfaTenant cmdlet. This cmdlet needs to be executed only once for an AD FS farm.
Open PowerShell, and enter your own tenantId with the Set-AdfsAzureMfaTenant cmdlet. For customers that use Microsoft Azure Government cloud, add the -Environment USGov parameter:
Note
You need to restart the AD FS service on each server in your farm before these changes take effect. For minimal impact, take each AD FS server out of the NLB rotation one at a time and wait for all connections to drain.
Set-AdfsAzureMfaTenant -TenantId <tenant ID> -ClientId 981f26a1-7f43-403b-a875-f8b09b8cd720

Windows Server without the latest service pack doesn't support the -Environment parameter for the Set-AdfsAzureMfaTenant cmdlet. If you use Azure Government cloud and the previous steps failed to configure your Azure tenant due to the missing -Environment parameter, complete the following steps to manually create the registry entries. Skip these steps if the previous cmdlet correctly registered your tenant information or if you aren't in the Azure Government cloud:
Open Registry Editor on the AD FS server.
Navigate to HKEY_LOCAL_MACHINE\SOFTWARE\Microsoft\ADFS. Create the following registry key values:
Registry key Value SasUrl https://adnotifications.windowsazure.us/StrongAuthenticationService.svc/ConnectorStsUrl https://login.microsoftonline.usResourceUri https://adnotifications.windowsazure.us/StrongAuthenticationService.svc/ConnectorRestart the AD FS service on each server in the farm before these changes take effect. To reduce the effect on your systems, take each AD FS server out of the NLB rotation one at a time and wait for all connections to drain.
After this step, you'll see that Microsoft Entra multifactor authentication is available as a primary authentication method for intranet and extranet use.
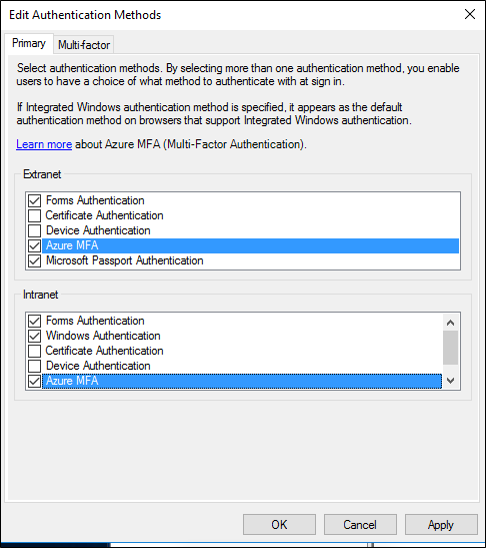
If you want to use Microsoft Entra multifactor authentication as a secondary authentication method, on the Edit Authentication Methods box, select the multifactor tab (the Additional tab in AD FS 2019) and ensure that it's enabled. Otherwise you might receive error messages, such as, "No valid strong authentication method found. Contact your administrator to configure and enable an appropriate strong authentication provider."
Renew and Manage AD FS Microsoft Entra multifactor authentication Certificates
The following guidance is designed to help you manage the Microsoft Entra multifactor authentication certificates on your AD FS servers.
By default, when you configure AD FS with Microsoft Entra multifactor authentication, the certificates generated via the New-AdfsAzureMfaTenantCertificate PowerShell cmdlet are valid for two years. To determine how close to expiration your certificates are, and to renew and install new certificates, use the following procedure.
Assess AD FS Microsoft Entra multifactor authentication certificate expiration date.
On each AD FS server, in the local computer My store, there's a self signed certificate with "Microsoft AD FS Microsoft Entra multifactor authentication" in the Issuer and Subject area. This certificate is the Microsoft Entra multifactor authentication certificate. Check the validity period of this certificate on each AD FS server to determine the expiration date.
Create a new AD FS Microsoft Entra multifactor authentication Certificate on each AD FS server.
If the validity period of your certificates is nearing its end, start the renewal process by generating a new Microsoft Entra multifactor authentication certificate on each AD FS server. In PowerShell generate a new certificate on each AD FS server by using the following cmdlet:
Caution
If your certificate has already expired, don't add the
-Renew $trueparameter to the following command. In this scenario, the existing expired certificate is replaced with a new one instead of being left in place and an additional certificate created.$newcert = New-AdfsAzureMfaTenantCertificate -TenantId <tenant id such as contoso.onmicrosoft.com> -Renew $trueIf the certificate hasn't already expired, the command generates a new certificate that is valid from two days after the current day to two years plus two days in the future. AD FS and Microsoft Entra multifactor authentication operations aren't affected when running the cmdlet or renewing the certificate. The two-day delay is intentional and provides time to follow the next steps to configure the new certificate in the tenant before AD FS starts by using it for Microsoft Entra multifactor authentication.
Configure each new AD FS Microsoft Entra multifactor authentication certificate in the Microsoft Entra tenant.
Note
In order to complete this step you need to connect to your instance of Microsoft Entra ID with Microsoft Graph PowerShell by using
Connect-MgGraph. These steps assume you've already connected via PowerShell.Connect-MgGraph -Scopes 'Application.ReadWrite.All' $servicePrincipalId = (Get-MgServicePrincipal -Filter "appid eq '981f26a1-7f43-403b-a875-f8b09b8cd720'").Id $keyCredentials = (Get-MgServicePrincipal -Filter "appid eq '981f26a1-7f43-403b-a875-f8b09b8cd720'").KeyCredentials $certX509 = [System.Security.Cryptography.X509Certificates.X509Certificate2]([System.Convert]::FromBase64String($newcert)) $newKey = @(@{ CustomKeyIdentifier = $null DisplayName = $certX509.Subject EndDateTime = $null Key = $certX509.GetRawCertData() KeyId = [guid]::NewGuid() StartDateTime = $null Type = "AsymmetricX509Cert" Usage = "Verify" AdditionalProperties = $null }) $keyCredentials += $newKey Update-MgServicePrincipal -ServicePrincipalId $servicePrincipalId -KeyCredentials $keyCredentialsIf your previous certificate is expired, restart the AD FS service to pick up the new certificate. You don't need to restart the AD FS service if you renewed a certificate before it expired.
Verify that the new certificate(s) is used for Microsoft Entra multifactor authentication.
After the new certificate(s) become valid, AD FS will pick them up and use each respective certificate for Microsoft Entra multifactor authentication within a few hours to one day. After AD FS uses the new certificates, on each server you'll see an event logged in the AD FS Admin event log with the following information:
Log Name:      AD FS/Admin
Source:        AD FS
Date:          2/27/2018 7:33:31 PM
Event ID:      547
Task Category: None
Level:         Information
Keywords:      AD FS
User:          DOMAIN\adfssvc
Computer:      ADFS.domain.contoso.com
Description:
The tenant certificate for Azure MFA has been renewed.

TenantId: contoso.onmicrosoft.com.
Old thumbprint: 7CC103D60967318A11D8C51C289EF85214D9FC63.
Old expiration date: 9/15/2019 9:43:17 PM.
New thumbprint: 8110D7415744C9D4D5A4A6309499F7B48B5F3CCF.
New expiration date: 2/27/2020 2:16:07 AM.
Customize the AD FS web page to guide users to register MFA verification methods
Use the following examples to customize your AD FS web pages for users who haven't yet proofed up (configured MFA verification information).
Find the error
First, AD FS returns a couple of different error messages when the user lacks verification information. If you're using Microsoft Entra multifactor authentication as primary authentication, the unproofed user sees an AD FS error page containing the following messages:
    <div id="errorArea">
        <div id="openingMessage" class="groupMargin bigText">
            An error occurred
        </div>
        <div id="errorMessage" class="groupMargin">
            Authentication attempt failed. Select a different sign in option or close the web browser and sign in again. Contact your administrator for more information.
        </div>
When Microsoft Entra ID as extra authentication is being attempted, the unproofed user sees an AD FS error page containing the following messages:
<div id='mfaGreetingDescription' class='groupMargin'>For security reasons, we require additional information to verify your account (mahesh@jenfield.net)</div>
<div id="errorArea">
<div id="openingMessage" class="groupMargin bigText">
An error occurred
</div>
<div id="errorMessage" class="groupMargin">
The selected authentication method is not available for 'username@contoso.com'. Choose another authentication method or contact your system administrator for details.
</div>
Catch the error and update the page text
To catch the error and show the user custom guidance, append the JavaScript to the end of the onload.js file that's part of the AD FS web theme. Doing so allows you to:
- Search for the identifying error string(s).
- Provide custom web content.
Note
For guidance in general on how to customize the onload.js file, see Advanced Customization of AD FS Sign-in Pages.
The following steps show a simple example:
Open Windows PowerShell on your primary AD FS server, and create a new AD FS Web Theme by running the following command.
New-AdfsWebTheme –Name ProofUp –SourceName defaultCreate the folder, and export the default AD FS Web Theme.
New-Item -Path 'C:\Theme' -ItemType Directory;Export-AdfsWebTheme –Name default –DirectoryPath C:\ThemeOpen the C:\Theme\script\onload.js file in a text editor.
Append the following code to the end of the onload.js file:
//Custom Code
//Customize MFA exception
//Begin

var domain_hint = "<YOUR_DOMAIN_NAME_HERE>";
var mfaSecondFactorErr = "The selected authentication method is not available for";
var mfaProofupMessage = "You will be automatically redirected in 5 seconds to set up your account for additional security verification. After you've completed the setup, please return to the application you are attempting to access.<br><br>If you are not redirected automatically, please click <a href='{0}'>here</a>."
var authArea = document.getElementById("authArea");
if (authArea) {
    var errorMessage = document.getElementById("errorMessage");
    if (errorMessage) {
        if (errorMessage.innerHTML.indexOf(mfaSecondFactorErr) >= 0) {

            //Hide the error message
            var openingMessage = document.getElementById("openingMessage");
            if (openingMessage) {
                openingMessage.style.display = 'none'
            }
            var errorDetailsLink = document.getElementById("errorDetailsLink");
            if (errorDetailsLink) {
                errorDetailsLink.style.display = 'none'
            }

            //Provide a message and redirect to Azure AD MFA Registration Url
            var mfaRegisterUrl = "https://account.activedirectory.windowsazure.com/proofup.aspx?proofup=1&whr=" + domain_hint;
            errorMessage.innerHTML = "<br>" + mfaProofupMessage.replace("{0}", mfaRegisterUrl);
            window.setTimeout(function () { window.location.href = mfaRegisterUrl; }, 5000);
        }
    }
}

//End Customize MFA Exception
//End Custom Code
Important
You need to change "<YOUR_DOMAIN_NAME_HERE>"; to use your domain name. For example:
var domain_hint = "contoso.com";.Save the onload.js file.
Import the onload.js file into your custom theme by entering the following Windows PowerShell command:
Set-AdfsWebTheme -TargetName ProofUp -AdditionalFileResource @{Uri='/adfs/portal/script/onload.js';path="c:\theme\script\onload.js"}Apply the custom AD FS Web Theme by entering the following Windows PowerShell command:
Set-AdfsWebConfig -ActiveThemeName "ProofUp"