Upgrade service applications to SharePoint Server Subscription Edition
APPLIES TO:  2013 2016 2019
  Subscription Edition SharePoint in Microsoft 365
When you upgrade from SharePoint Server 2019 or SharePoint Server 2016 to SharePoint Server Subscription Edition, you must use a database-attach upgrade, which means that you upgrade only the content for your environment and not the configuration settings. After you have configured the SharePoint Server Subscription Edition environment, and copied the content and service application databases, you can upgrade the service applications to SharePoint Server Subscription Edition. This article contains the steps that you take to upgrade the service applications.
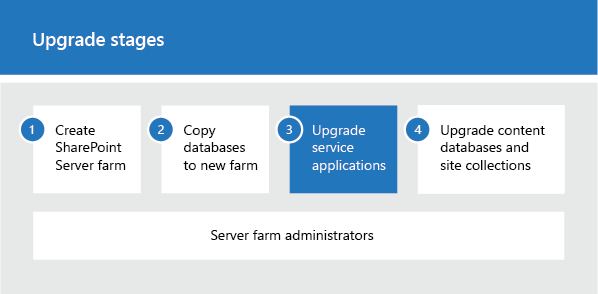
Phase 3 of the upgrade process: Upgrade service applications
| Phases | Description |
|---|---|
| This is the third phase in the process to upgrade SharePoint Server 2019 and SharePoint Server 2016 data and sites to SharePoint Server Subscription Edition. The process includes the following phases that must be completed in order: Create the SharePoint Server Subscription Edition farm for a database attach upgrade Copy databases to the new farm for upgrade to SharePoint Server Subscription Edition Upgrade service applications to SharePoint Server Subscription Edition (this phase) Upgrade content databases to SharePoint Server Subscription Edition For an overview of the whole process, see Overview of the upgrade process to SharePoint Server Subscription Edition. |
Before you begin
Before you upgrade the service applications, review the following information and take any recommended actions.
Ensure that the account that you use to perform the steps in this article is a member of the Farm administrators group in the Central Administration website.
Decide which service application pool to use for the upgraded service applications. The procedures below use the default application pool for service applications which is "SharePoint Web Services Default". You can view a list of available service application pools by using the Get-SPServiceApplicationPool cmdlet in PowerShell. Or you can create a service application pool by using the New-SPServiceApplicationPool cmdlet. For more information, see Get-SPServiceApplicationPool and New-SPServiceApplicationPool.
Tip
Throughout this article, variables (such as $applicationPool, $sss, $upa, and so on) are used in the PowerShell cmdlets to save time and effort. You do not have to use these variables if you would prefer not to. However, if you do not use these variables, you must use IDs for the service applications and service application proxies when you specify the Identity parameters. Each procedure has information about the variables used, or the alternate cmdlets to use to look up any IDs that are required. > Also, many procedures in this article include a step to set the $applicationPool variable. If you are performing all of these procedures in the same session of PowerShell, and you want to use the same application pool for all service applications, you do not have to repeat this step in each procedure. Instead, you can set this variable once at the beginning and use it throughout the procedures in this article.
About upgrading the service application databases
To upgrade a service application database, you create a new service application and provide the name of the existing database to use for the new service application. As the service application is created, the database is upgraded. This process has several steps.
Note
Word Automation Services and Machine Translation Services can't be upgraded. A new service instance will need to be created.
Important
The following steps only apply to the Custom server role type. For more information on server role types, see Planning for a MinRole server deployment in SharePoint Server 2016 and SharePoint Server 2019
Start the service instances.
The first step is to start service instances for the four service applications that you can upgrade: the Business Data Connectivity service, Managed Metadata Web Service, Secure Store service, and Search service. Most of these service instances can be started from Central Administration. However the SharePoint Server Search service instance must be started by using PowerShell.
Create the service applications and upgrade the databases.
After you have started the service instances, the next step is to create the service applications and upgrade the databases. You must use PowerShell to restore the service application databases.
Create proxies for the service applications.
After you have upgraded the service application databases, you create the proxies for the service applications and add them to the default proxy group. You must create proxies for the following service applications:
Managed Metadata service application
Search service application
Secure Store service application
The Business Data Connectivity service application automatically creates a proxy and assigns it to the default proxy group when you create the service application.
Verify that the proxies are in the default group
The following sections provide procedures to complete these steps.
Start the service instances
The following procedures start the service instances.
To start service application instances from Central Administration
Start SharePoint 2019 Central Administration.
In SharePoint 2019 Central Administration, on the Application Management page, in the Service Applications section, click Manage Services on Server.
Next to the Business Data Connectivity service, click Start.
Next to the Managed Metadata Web Service, click Start.
Next to the Secure Store Service, click Start.
The Search service instance must be started by using PowerShell because you cannot start it from Central Administration unless a Search Service application already exists.
Tip
When using MinRoles, Start may not be available as it is managed by the farm. When the associated Service Application has been created, it automatically starts the Service Instance.
To start the Search service instance by using PowerShell
Verify that you have the following memberships:
securityadmin fixed server role on the SQL Server instance.
db_owner fixed database role on all databases that are to be updated.
Administrators group on the server on which you are running the PowerShell cmdlets.
An administrator can use the Add-SPShellAdmin cmdlet to grant permissions to use SharePoint Server Subscription Edition cmdlets.
Note
If you do not have permissions, contact your Setup administrator or SQL Server administrator to request permissions. For additional information about PowerShell permissions, see Add-SPShellAdmin.
Start the SharePoint Subscription Edition Management Shell.
To start the Search service instance, at the Microsoft PowerShell command prompt, type the following commands and press ENTER after each one:
$SearchInst = Get-SPEnterpriseSearchServiceInstance
    # Stores the identity for the Search service instance on this server as a variable
Start-SPServiceInstance $SearchInst # Starts the service instanceFor more information, see Get-SPEnterpriseSearchServiceInstance and Start-SPServiceInstance.
Upgrade the Secure Store service application
To upgrade the Secure Store service application, you create the new service application and upgrade the database, create a proxy and add it to the default proxy group, and then restore the passphrase from the previous environment.
To upgrade the Secure Store service application by using PowerShell
Verify that you have the following memberships:
securityadmin fixed server role on the SQL Server instance.
db_owner fixed database role on all databases that are to be updated.
Administrators group on the server on which you are running the PowerShell cmdlets.
An administrator can use the Add-SPShellAdmin cmdlet to grant permissions to use SharePoint Server cmdlets.
Note
If you do not have permissions, contact your Setup administrator or SQL Server administrator to request permissions. For additional information about PowerShell permissions, see Add-SPShellAdmin.
Start the SharePoint Subscription Edition Management Shell.
To store the application pool that you want to use as a variable for this service application, at the Microsoft PowerShell command prompt, type the following command:
$applicationPool = Get-SPServiceApplicationPool -Identity 'SharePoint Web Services default'Where:
- SharePoint Web Services default is the name of the service application pool that will contain the new service applications. This is the default service application pool. You can specify a different service application pool.
This cmdlet sets the service application pool as a variable that you can use again in the cmdlets that follow. If you have multiple application pools and have to use a different application pool for a particular service application, repeat this step in the procedure to create each service application to use the appropriate application pool.
To upgrade the Secure Store service application, at the PowerShell command prompt, type the following command:
$sss = New-SPSecureStoreServiceApplication -Name 'Secure Store' -ApplicationPool $applicationPool -DatabaseName 'SecureStore_Upgrade_DB' -AuditingEnabledWhere:
SecureStore is the name that you want to give the new Secure Store service application.
$applicationpool is the variable that you set earlier to identify the service application pool to use.
Tip
If you do not use the variable $applicationPool, then you must specify the name of an existing service application pool in the format ' Application Pool Name'. To view a list of service application pools, you can run the Get-SPServiceApplicationPool cmdlet.
SecureStore_Upgrade_DB is the name of the service application database that you want to upgrade.
This command sets a variable, $sss, that you use when you create the proxy later.
For more information, see New-SPSecureStoreApplication.
Type the following command to create a proxy for the Secure Store service application:
$sssp = New-SPSecureStoreServiceApplicationProxy -Name ProxyName -ServiceApplication $sss -DefaultProxyGroupWhere:
ProxyName is the proxy name that you want to use.
$sss is the variable that you set earlier to identify the new Secure Store service application.
Tip
If you do not use the variable $sss, then you must use an ID to identify the Secure Store service application instead of a name. To find the ID, you can run the Get-SPServiceApplication cmdlet to return a list of all service application IDs.
DefaultProxyGroup adds the Secure Store service application proxy to the default proxy group for the local farm.
This command sets a variable, $sssp, for the service application proxy that you use when you restore the passphrase.
For more information, see New-SPSecureStoreServiceApplicationProxy.
After you create the Secure Store service application and the proxy, you have to refresh the encryption key. For information about how to refresh the encryption key, see Refresh the Secure Store encryption key.
Type the following command to restore the passphrase for the Secure Store service application:
Update-SPSecureStoreApplicationServerKey -Passphrase <Passphrase> -ServiceApplicationProxy $ssspWhere:
<Passphrase> is the Passphrase for the Secure Store service application from your previous environment.
$sssp is a variable that you set earlier to identify the new Secure Store service application proxy.
Tip
If you do not use the variable $sssp, then you must use an ID to identify the Secure Store service application proxy instead of a name. To find the ID, you can run the Get-SPServiceApplicationProxy cmdlet to return a list of all service application proxy IDs.
For more information, see Update-SPSecureStoreApplicationServerKey.
Upgrade the Business Data Connectivity service application
To upgrade the Business Data Connectivity service application, you create the new service application and upgrade the database. You do not have to create a proxy for the Business Data Connectivity service application. The Business Data Connectivity service application automatically creates a proxy and assigns it to the default proxy group when you create the service application.
To upgrade the Business Data Connectivity service application by using PowerShell
Verify that you have the following memberships:
securityadmin fixed server role on the SQL Server instance.
db_owner fixed database role on all databases that are to be updated.
Administrators group on the server on which you are running the PowerShell cmdlets.
An administrator can use the Add-SPShellAdmin cmdlet to grant permissions to use SharePoint Server 2019 or SharePoint Server 2016 cmdlets.
Note
If you do not have permissions, contact your Setup administrator or SQL Server administrator to request permissions. For additional information about PowerShell permissions, see Add-SPShellAdmin.
Start the SharePoint Subscription Edition Management Shell.
To store the application pool that you want to use as a variable for this service application, at the Microsoft PowerShell command prompt, type the following command:
$applicationPool = Get-SPServiceApplicationPool -Identity 'SharePoint Web Services default'Where:
- SharePoint Web Services default is the name of the service application pool that will contain the new service applications.
This cmdlet sets the service application pool as a variable that you can use again in the cmdlets that follow. If you have multiple application pools and have to use a different application pool for a particular service application, repeat this step in the procedure to create each service application to use the appropriate application pool.
To upgrade the Business Data Connectivity service application, at the Microsoft PowerShell command prompt, type the following command:
New-SPBusinessDataCatalogServiceApplication -Name 'BDC Service' -ApplicationPool $applicationPool -DatabaseName 'BDC_Service_DB'Where:
BDC Service is the name that you want to give the new Business Data Connectivity service application.
$applicationpool is the variable that you set earlier to identify the service application pool to use.
Tip
If you do not use the variable $applicationPool, then you must specify the name of an existing service application pool in the format ' Application Pool Name'. To view a list of service application pools, you can run the Get-SPServiceApplicationPool cmdlet.
BDC_Service_DB is name of the service application database that you want to upgrade.
For more information, see New-SPBusinessDataCatalogServiceApplication.
Upgrade the Managed Metadata service application
To upgrade the Managed Metadata service application, you create the new service application and upgrade the database, and then create a proxy and add it to the default proxy group.
To upgrade the Managed Metadata service application by using PowerShell
Verify that you have the following memberships:
securityadmin fixed server role on the SQL Server instance.
db_owner fixed database role on all databases that are to be updated.
Administrators group on the server on which you are running the PowerShell cmdlets.
An administrator can use the Add-SPShellAdmin cmdlet to grant permissions to use SharePoint Server 2019 or SharePoint Server 2016 cmdlets.
Note
If you do not have permissions, contact your Setup administrator or SQL Server administrator to request permissions. For additional information about PowerShell permissions, see Add-SPShellAdmin.
Start the SharePoint Subscription Edition Management Shell.
To store the application pool that you want to use as a variable for this service application, at the PowerShell command prompt, type the following command:
$applicationPool = Get-SPServiceApplicationPool -Identity 'SharePoint Web Services default'Where:
- SharePoint Web Services default is the name of the service application pool that will contain the new service applications.
This cmdlet sets the service application pool as a variable that you can use again in the cmdlets that follow. If you have multiple application pools and have to use a different application pool for a particular service application, repeat this step in the procedure to create each service application to use the appropriate application pool.
To upgrade the Managed Metadata service application, at the PowerShell command prompt, type the following command:
$mms = New-SPMetadataServiceApplication -Name 'Managed Metadata Service Application' -ApplicationPool $applicationPool -DatabaseName 'Managed Metadata Service_DB'Where:
Managed Metadata Service Application is the name that you want to give the new Managed Metadata service application.
$applicationpool is the variable that you set earlier to identify the service application pool to use.
Tip
If you do not use the variable $applicationPool, then you must specify the name of an existing service application pool in the format ' Application Pool Name'. To view a list of service application pools, you can run the Get-SPServiceApplicationPool cmdlet.
Managed Metadata Service_DB is name of the service application database that you want to upgrade.
This command sets a variable, $mms, that you use when you create the proxy later.
For more information, see New-SPMetadataServiceApplication.
At the PowerShell command prompt, type the following command to create a proxy for the Managed Metadata service application:
New-SPMetadataServiceApplicationProxy -Name ProxyName -ServiceApplication $mms -DefaultProxyGroupWhere:
ProxyName is the proxy name that you want to use.
$mms is the variable that you set earlier to identify the new Managed Metadata service application.
Tip
If you do not use the variable $mms, then you must use an ID to identify the Managed Metadata service application proxy instead of a name. To find the ID, you can run the Get-SPServiceApplication cmdlet to return a list of all service application IDs.
DefaultProxyGroup adds the Managed Metadata service application proxy to the default proxy group for the local farm.
For more information, see New-SPMetadataServiceApplicationProxy.
Upgrade the User Profile service application
Upgrade the Managed Metadata service application before you upgrade the User Profile service application.
To upgrade the User Profile service application, you copy the Profile and Social databases in your SharePoint Server 2019 or SharePoint Server 2016 farm to your SharePoint Server Subscription Edition farm and create a new User Profile service application from your SharePoint Server 2019 or SharePoint Server 2016 farm in your SharePoint Server Subscription Edition farm. The restore triggers SharePoint Server Subscription Edition to create a new User Profile service application in the SharePoint Server Subscription Edition farm and point it to the copied User Profile databases. To complete the upgrade of the User Profile service application, you create a proxy and add it to the default proxy group.
To upgrade the User Profile service application by using PowerShell
Copy the Profile and Social databases in the SharePoint Server 2019 or SharePoint Server 2016 farm to the SharePoint Server Subscription Edition farm by following these steps:
Important
Perform these steps in the SharePoint Server 2019 and SharePoint Server 2016 environment.
Verify that you have the following memberships:
securityadmin fixed server role on the SQL Server instance.
db_owner fixed database role on all databases that are to be updated.
Administrators group on the server on which you are running the PowerShell cmdlets.
An administrator can use the Add-SPShellAdmin cmdlet to grant permissions to use SharePoint Server 2019 or SharePoint Server 2016 cmdlets.
Note
If you do not have permissions, contact your Setup administrator or SQL Server administrator to request permissions. For additional information about PowerShell permissions, see Add-SPShellAdmin.
Start the SharePoint Management Shell.
Set the User Profile databases to read-only. In the second phase of the process to upgrade SharePoint Server 2019 or SharePoint Server 2016 data and sites to SharePoint Server Subscription Edition, you set all the other databases to read-only.
Copy the Profile and Social databases in the SharePoint Server 2019 or SharePoint Server 2016 farm to the SharePoint Server Subscription Edition farm, follow the procedures in Copy databases to the new farm for upgrade to SharePoint Server Subscription Edition.
Important
Perform the next steps in the SharePoint Server Subscription Edition environment.
Verify that you have the following memberships:
securityadmin fixed server role on the SQL Server instance.
db_owner fixed database role on all databases that are to be updated.
Administrators group on the server on which you are running the PowerShell cmdlets.
An administrator can use the Add-SPShellAdmin cmdlet to grant permissions to use SharePoint Server 2019 or SharePoint Server 2016 cmdlets.
Note
If you do not have permissions, contact your Setup administrator or SQL Server administrator to request permissions. For additional information about PowerShell permissions, see Add-SPShellAdmin.
Start the SharePoint Subscription Edition Management Shell.
To store the application pool that you want to use as a variable for this service application, at the Microsoft PowerShell command prompt, type the following command:
$applicationPool = Get-SPServiceApplicationPool -Identity 'SharePoint Web Services default'Where:
SharePoint Web Services default is the name of the service application pool that will contain the new service applications.
This cmdlet sets the service application pool as a variable that you can use again in the cmdlets that follow. If you have multiple application pools and have to use a different application pool for a particular service application, repeat this step in the procedure to create each service application to use the appropriate application pool.
To restore the User Profile service application and upgrade the Profile and Social databases, at the Microsoft PowerShell command prompt, type the following command:
New-SPProfileServiceApplication -Name '<UserProfileApplicationName>' -ApplicationPool $applicationPool -ProfileDBName '<ProfileDBName>' -SocialDBName '<SocialDBName>' -ProfileSyncDBName '<SyncDBName>'Where:
UserProfileApplicationName is the name of the User Profile service application.
$applicationpool is the variable that you set to identify the service application pool to use.
Note
If you do not use the variable $applicationPool, then you must specify the name of an existing service application pool in the format 'Application Pool Name'. To view a list of service application pools, you can run the Get-SPServiceApplicationPool cmdlet.
ProfileDBName is the name of the Profile database that you want to upgrade.
SocialDBName is the name of the Social database that you want to upgrade.
SyncDBName is the name of the new Synchronization database.
Create the User Profile service application proxy and add it to the default proxy group by completing these actions:
Type the following command to get the ID for the User Profile service application and store it as a variable:
$sa = Get-SPServiceApplication | ?{$_.TypeName -eq 'User Profile Service Application'}For more information, see Get-SPServiceApplication.
Type the following command to create a proxy for the User Profile service application:
New-SPProfileServiceApplicationProxy -Name 'User Profile Service Application Proxy' -ServiceApplication $saWhere:
ProxyName is the proxy name that you want to use.
$sa is the variable that you set earlier to identify the new User Profile service application.
Tip
If you do not use the variable $sa, then you must use an ID to identify the User Profile service application instead of a name. To find the ID, you can run the Get-SPServiceApplication cmdlet to return a list of all service application IDs.
For more information, see New-SPProfileServiceApplicationProxy.
Type the following command to get the User Profile service application proxy ID for the proxy you just created and set it as the variable $proxy:
$proxy = Get-SPServiceApplicationProxy | ?{$_.TypeName -eq 'User Profile Service Application Proxy'}For more information, see Get-SPServiceApplicationProxy.
Type the following command to add the User Profile service application proxy to the default proxy group:
Add-SPServiceApplicationProxyGroupMember -member $proxy -identity ""Where:
$proxy is the variable that you set earlier to identify the ID for the proxy you just created for the User Profile service application.
Tip: If you do not use the variable $proxy, then you must use an ID to identify the User Profile service application proxy instead of a name. To find the ID, you can run the Get-SPServiceApplicationProxy cmdlet to return a list of all service application proxy IDs.
You use an empty Identity parameter ("") to add it to the default group.
For more information, see Add-SPServiceApplicationProxyGroupMember.
Upgrade the Search service application
Upgrade the User Profile service application and the Managed Metadata service application before you upgrade the Search service application.
To upgrade the Search service application, you copy the search administration database in your SharePoint Server 2019 or SharePoint Server 2016 farm to your SharePoint Server Subscription Edition farm and restore the Search service application from your SharePoint Server 2019 or SharePoint Server 2016 farm in your SharePoint Server Subscription Edition farm. The restore triggers SharePoint Server Subscription Edition to create a new Search service application in the SharePoint Server Subscription Edition farm and point it to the copied search administration database. To complete the upgrade of the Search service application you create a proxy and add it to the default proxy group and you ensure that the new Links Database and the new search topology is configured the same way as in the SharePoint Server 2019 or SharePoint Server 2016 farm.
SharePoint Server Subscription Edition normally creates a new search topology with all the search components and databases when it creates a new Search service application. During a restore of a Search service application, SharePoint Server Subscription Edition creates a new search topology, but upgrades the restored Search Administration database instead of creating a new Search Administration database. The upgraded Search Administration database retains any additions or modifications made to the search schema, result sources and query rules from the SharePoint Server 2019 or SharePoint Server 2016 farm.
Note
During this upgrade, search doesn't crawl content in your SharePoint Server 2019 or SharePoint Server 2016. If freshness of search results is important, save time by familiarizing yourself with these steps before starting the upgrade.
Important
As the search topology in the SharePoint Server Subscription Edition farm is new, the index is empty. You have to perform a full crawl of the entire indexed corpus after you have upgraded all content sources (the fourth phase in the process to upgrade SharePoint Server 2019 and SharePoint Server 2016 data and sites to SharePoint Server Subscription Edition).
To upgrade the Search service application by using PowerShell
Copy the search administration database in the SharePoint Server 2019 or SharePoint Server 2016 farm to the SharePoint Server Subscription Edition farm and follow these steps:
Note
You copied all other content and service databases in your SharePoint Server 2019 or SharePoint Server 2016 environment in an earlier step of the process for upgrading to SharePoint Server Subscription Edition. We recommend copying the Search Administration database at this later stage because you have to pause the Search service application in your SharePoint Server 2019 or SharePoint Server 2016 environment while copying the Search Administration database.
Important
Perform these steps in the SharePoint Server 2019 or SharePoint Server 2016 environment.
Verify that you have the following memberships:
securityadmin fixed server role on the SQL Server instance.
db_owner fixed database role on all databases that are to be updated.
Administrators group on the server on which you are running the PowerShell cmdlets.
An administrator can use the Add-SPShellAdmin cmdlet to grant permissions to use SharePoint Server Subscription Edition cmdlets.
Note
If you do not have permissions, contact your Setup administrator or SQL Server administrator to request permissions. For additional information about PowerShell permissions, see Add-SPShellAdmin.
Start the SharePoint 2019 or SharePoint 2016 Management Shell.
Pause the Search service application. At the PowerShell command prompt, type the following command:
  $ssa = Get-SPEnterpriseSearchServiceApplication <SearchServiceApplicationName>
  Suspend-SPEnterpriseSearchServiceApplication -Identity $ssa
Where:
SearchServiceApplicationName is the name of the Search service application you want to pause.
Note
While the Search service application is paused, the index in the SharePoint Server 2019 or SharePoint Server 2016 environment isn't updated. This means that during the upgrade to SharePoint Server Subscription Edition, search results might be less fresh.
Set the Search Administration database to read-only. In the second phase of the process to upgrade SharePoint Server 2019 or SharePoint Server 2016 data and sites to SharePoint Server Subscription Edition, you set all the other databases to read-only. Follow the same instructions now for the Search Administration database.
Copy the search administration database in the SharePoint Server 2019 or SharePoint Server 2016 farm to the SharePoint Server Subscription Edition farm, follow the procedures in Copy databases to the new farm for upgrade to SharePoint Server Subscription Edition for the search administration database only.
Important
Perform the next steps in the SharePoint Server Subscription Edition environment.
Verify that you have the following memberships:
securityadmin fixed server role on the SQL Server instance.
db_owner fixed database role on all databases that are to be updated.
Administrators group on the server on which you are running the PowerShell cmdlets.
An administrator can use the Add-SPShellAdmin cmdlet to grant permissions to use SharePoint Server Subscription Edition cmdlets.
Note
If you do not have permissions, contact your Setup administrator or SQL Server administrator to request permissions. For additional information about PowerShell permissions, see Add-SPShellAdmin.
Start the SharePoint Subscription Edition Management Shell.
To store the application pool that you want to use as a variable for this service application, at the PowerShell command prompt, type the following command:
$applicationPool = Get-SPServiceApplicationPool -Identity 'SharePoint Web Services default'Where:
SharePoint Web Services default is the name of the service application pool that will contain the new service applications.
This cmdlet sets the service application pool as a variable that you can use again in the cmdlets that follow. If you have multiple application pools and have to use a different application pool for a particular service application, repeat this step in the procedure to create each service application to use the appropriate application pool.
To restore the Search service application and upgrade the Search Administration database, at the PowerShell command prompt, type the following command:
$searchInst = Get-SPEnterpriseSearchServiceInstance -local
# Gets the Search service instance and sets a variable to use in the next command
Restore-SPEnterpriseSearchServiceApplication -Name '<SearchServiceApplicationName>' -applicationpool $applicationPool -databasename '<SearchServiceApplicationDBName>' -databaseserver <ServerName> -AdminSearchServiceInstance $searchInst
Where:
SearchServiceApplicationName is the name of the Search service application.
$applicationpool is the variable that you set to identify the service application pool to use.
Note
If you do not use the variable $applicationPool, then you must specify the name of an existing service application pool in the format ' Application Pool Name'. To view a list of service application pools, you can run the Get-SPServiceApplicationPool cmdlet.
SearchServiceApplicationDBName is the name of the search administration database that you want to upgrade, and that this Search service application shall use.
$searchInst is the variable that you set to identify the new Search Service application instance.
Note
A Search service application upgrade might fail, for example due to network or SQL Server latency. If an error message appears during the upgrade, do the following:
Delete the Search Administration database that you were trying to upgrade.
Using the backup copy that you made of the Search Administration database, repeat the following procedures in this article for the Search service application only:
Type the command to upgrade the Search service application again at the PowerShell command prompt.
For more information, see Restore-SPEnterpriseSearchServiceApplication.
Create the Search service application proxy and add it to the default proxy group by completing these actions:
Type the following command to get the ID for the Search service application and store it as a variable:
$ssa = Get-SPEnterpriseSearchServiceApplicationFor more information, see Get-SPEnterpriseSearchServiceApplication.
Type the following command to create a proxy for the Search service application:
New-SPEnterpriseSearchServiceApplicationProxy -Name ProxyName -SearchApplication $ssaWhere:
ProxyName is the proxy name that you want to use.
$ssa is the variable that you set earlier to identify the new Search service application.
Tip
If you do not use the variable $ssa, then you must use an ID to identify the Search service application instead of a name. To find the ID, you can run the Get-SPServiceApplication cmdlet to return a list of all service application IDs.
For more information, see New-SPEnterpriseSearchServiceApplicationProxy.
Type the following command to get the Search service application proxy ID for the proxy you just created and set it as the variable $ssap:
$ssap = Get-SPEnterpriseSearchServiceApplicationProxyFor more information, see Get-SPEnterpriseSearchServiceApplicationProxy.
Type the following command to add the Search service application proxy to the default proxy group:
Add-SPServiceApplicationProxyGroupMember -member $ssap -identity ""Where:
$ssap is the variable that you set earlier to identify the ID for the proxy you just created for the Search service application.
Tip
If you do not use the variable $ssap, then you must use an ID to identify the Search service application proxy instead of a name. To find the ID, you can run the Get-SPServiceApplicationProxy cmdlet to return a list of all service application proxy IDs.
You use an empty Identity parameter ("") to add it to the default group.
For more information, see Add-SPServiceApplicationProxyGroupMember.
If the SharePoint Server 2019 or SharePoint Server 2016 farm uses a Links Database that is partitioned, partition the Links Database in the SharePoint Server Subscription Edition farm the same way. Learn how in Move-SPEnterpriseSearchLinksDatabases.
(Optional) Preserve search relevance settings from the SharePoint Server 2019 or SharePoint Server 2016 farm. As the upgraded Search service application has a new, empty index, search analytics data from the SharePoint Server 2019 or SharePoint Server 2016 farm cannot be fully retained. Copy the Analytics Reporting database from the SharePoint Server 2019 or SharePoint Server 2016 farm and attach it to the new Search service application in the SharePoint Server Subscription Edition farm:
In the SharePoint Server 2019 or SharePoint Server 2016 farm, backup the Analytics Reporting database.
In the SharePoint Server Subscription Edition farm, restore the backed up database to the new database server.
In the SharePoint Server Subscription Edition farm, attach the restored database to the new Search service application.
Verify that the search topology on the new SharePoint Server Subscription Edition farm is alike that of the SharePoint Server 2019 or SharePoint Server 2016 farm. If your requirements for search have changed, now is a good time to scale out the search topology of the new SharePoint Server Subscription Edition farm.
Resume the Search service application in the SharePoint Server environment.
At the PowerShell command prompt, type the following command:
$ssa = Get-SPEnterpriseSearchServiceApplication <SearchServiceApplicationName>
$ssa.ForceResume(0x02)
Where:
- SearchServiceApplicationName is the name of the Search service application you want to resume.
Verify that all of the new proxies are in the default proxy group
Use the following procedure to verify that the steps to create the proxies and add them to the default proxy group worked.
To verify that all of the new proxies are in the default proxy group by using PowerShell
Verify that you have the following memberships:
securityadmin fixed server role on the SQL Server instance.
db_owner fixed database role on all databases that are to be updated.
Administrators group on the server on which you are running the PowerShell cmdlets.
An administrator can use the Add-SPShellAdmin cmdlet to grant permissions to use SharePoint Server 2019 or SharePoint Server 2016 cmdlets.
Note
If you do not have permissions, contact your Setup administrator or SQL Server administrator to request permissions. For additional information about PowerShell permissions, see Add-SPShellAdmin.
Start the SharePoint Subscription Edition Management Shell.
At the PowerShell command prompt, type the following commands:
$pg = Get-SPServiceApplicationProxyGroup -Identity ""
$pg.Proxies
Where:
$pg is a variable you set to represent the default proxy group.
You use an empty Identity parameter ("") to specify the default proxy group.
This returns a list of all proxies in the default proxy group, their display names, type names, and IDs.
For more information, see Get-SPServiceApplicationProxyGroupGet-SPServiceApplicationProxyGroup.
Now that the service applications are upgraded, you can start the process to upgrade the content databases. The first step in that process is to create the web applications that are needed for each content database.
| Phases | Description |
|---|---|
| This is the third phase in the process to upgrade SharePoint Server 2019 and SharePoint Server 2016 data and sites to SharePoint Server Subscription Edition. For an overview of the whole process, see Overview of the upgrade process to SharePoint Server Subscription Edition. |
Next phase: Upgrade content databases to SharePoint Server Subscription Edition
See also
Concepts
Create the SharePoint Server Subscription Edition farm for a database attach upgrade
Copy databases to the new farm for upgrade to SharePoint Server Subscription Edition
Upgrade content databases to SharePoint Server Subscription Edition
Services upgrade overview for SharePoint Server Subscription Edition