Windows 11
A Microsoft operating system designed for productivity, creativity, and ease of use.
8,193 questions
This browser is no longer supported.
Upgrade to Microsoft Edge to take advantage of the latest features, security updates, and technical support.
' cx='32' cy='32' r='32' /%3E%3Ctext x='50%25' y='55%25' dominant-baseline='middle' text-anchor='middle' fill='%23FFF' %3EPE%3C/text%3E%3C/svg%3E)
I performed the Windows 11 22h2 update today and it updated successfully. However, I am no longer able to connect to my schools internet. I am able to connect to my schools guest internet but not the student one. I've run the trouble shooter, but it hasn't been helpful. Is this an issue with the update or my schools internet. If it is a problem with my schools internet is there some way that I could uninstall the update (I am unable to do it through settings) so that I could go back to when it did work?
Thank you!
' cx='32' cy='32' r='32' /%3E%3Ctext x='50%25' y='55%25' dominant-baseline='middle' text-anchor='middle' fill='%23FFF' %3EVE%3C/text%3E%3C/svg%3E)
It takes me 2 weeks to finally get the correct method to fix this for 22H2 and 2x go back to previous version until i figured out what's the issue.
The culprit is TLS version which in 22H2 case went up to version 1.3. What you can do is to force the TLS version to 1.2. Here's how to do it:
Logout and re-login, you should be able to connect to your school internet now.
' cx='32' cy='32' r='32' /%3E%3Ctext x='50%25' y='55%25' dominant-baseline='middle' text-anchor='middle' fill='%23FFF' %3EHB%3C/text%3E%3C/svg%3E)
We have run into this issue as well. The quick fix as we receive this issue is for the customer to forget the SSID (our 802.11 we use is eduroam) and re-connect to the SSID
We have run into this issue as well. The quick fix as we receive this issue is for the customer to forget the SSID (our 802.11 we use is eduroam) and re-connect to the SSID
' cx='32' cy='32' r='32' /%3E%3Ctext x='50%25' y='55%25' dominant-baseline='middle' text-anchor='middle' fill='%23FFF' %3ELJ%3C/text%3E%3C/svg%3E)
This one worked for me.
I could connect to any other network but not to my college's network after I updated to 22H2 this morning.
Besides I was able to connect from Linux with no problem, so it was a W11 update issue.
' cx='32' cy='32' r='32' /%3E%3Ctext x='50%25' y='55%25' dominant-baseline='middle' text-anchor='middle' fill='%23FFF' %3EED%3C/text%3E%3C/svg%3E)
Tried this still didnt work, any other tips for this, We notice that when we first install windows it works but once drivers install it dies. Any ideas
' cx='32' cy='32' r='32' /%3E%3Ctext x='50%25' y='55%25' dominant-baseline='middle' text-anchor='middle' fill='%23FFF' %3EDH%3C/text%3E%3C/svg%3E)
Ok, tried this, but didn't work for me. What I found was that Credential guard is enabled by default in 22H2, and only disabling this resolved the issue on our network.
' cx='32' cy='32' r='32' /%3E%3Ctext x='50%25' y='55%25' dominant-baseline='middle' text-anchor='middle' fill='%23FFF' %3EB%3C/text%3E%3C/svg%3E)
I also took two days to upgrade Windows 11 22H2 then restore 21H2.
I observed that the root cause of connecting failure is NOT support automatically use windows logon name and password (and domain if any) when authenticaion.
You could try to generate the WiFi report by the following command.
netsh wlan show wlanreport
' cx='32' cy='32' r='32' /%3E%3Ctext x='50%25' y='55%25' dominant-baseline='middle' text-anchor='middle' fill='%23FFF' %3EE%3C/text%3E%3C/svg%3E)
OMG I'VE JUST SOLVED IT, I've been trying solutions for 4 weeks, try this:
First, forget the wifi and reset the network settings>network&internet>advanced network settings>network reset after restart ur PC
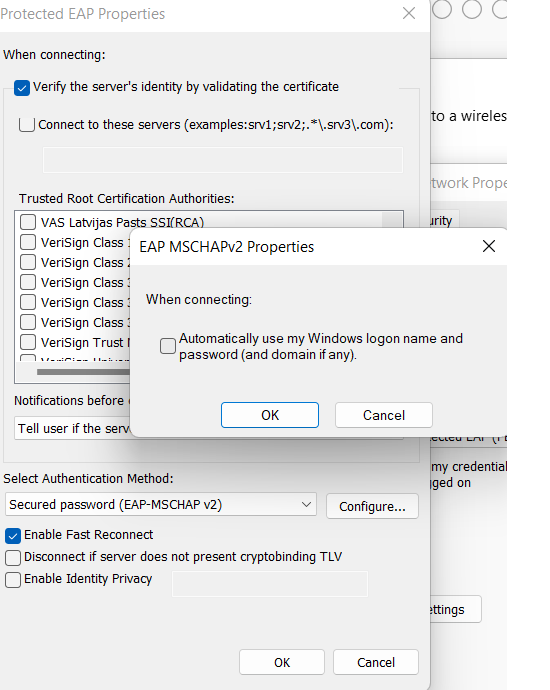
Secondly, the Control panel>network and sharing centre>set up a new connection or network>manually connect to a wireless network>network name (this should be the exact name capitals and signs are essential)>security type: WPA2-Enterprise>next>change connection settings>security>settings>verify the server's identity by validating the certificate (this must be unselected)> click ok and click advanced settings>specify authentication mode select>user authentication>okay>okay>close
Finally, try to connect and write ur username and password
Let me know if its works :)
I am still using the last version of windows btw
' cx='32' cy='32' r='32' /%3E%3Ctext x='50%25' y='55%25' dominant-baseline='middle' text-anchor='middle' fill='%23FFF' %3EAM%3C/text%3E%3C/svg%3E)
the Control panel>network and sharing centre>set up a new connection or network>manually connect to a wireless network>network name (this should be the exact name capitals and signs are essential)>security type: WPA2-Enterprise>next>change connection settings>security>settings>verify the server's identity by validating the certificate (this must be unselected)> click ok and click advanced settings>specify authentication mode select>user authentication>okay>okay>close
Finally, try to connect and write ur username and password
This one worked for me.
' cx='32' cy='32' r='32' /%3E%3Ctext x='50%25' y='55%25' dominant-baseline='middle' text-anchor='middle' fill='%23FFF' %3EP%3C/text%3E%3C/svg%3E)
If you block outgoing traffic, it now needs the dns udp port 53 to identify the network. Add a custom outoing firewall rule for UDP port 53 - the predefined windows rules won't work.
' cx='32' cy='32' r='32' /%3E%3Ctext x='50%25' y='55%25' dominant-baseline='middle' text-anchor='middle' fill='%23FFF' %3EKK%3C/text%3E%3C/svg%3E)
Tried the below-mentioned steps. Still facing the same issue.
' cx='32' cy='32' r='32' /%3E%3Ctext x='50%25' y='55%25' dominant-baseline='middle' text-anchor='middle' fill='%23FFF' %3EIW%3C/text%3E%3C/svg%3E)
I have a similar problem. A brand new Laptop with Windows 11 installed.
One router will connect but the other router tries to connect with same WiFi key then after about 20 seconds reports "Unable to connect"
What is the actual script I would use for "Create DWORD key TlsVersion value FC0"?
' cx='32' cy='32' r='32' /%3E%3Ctext x='50%25' y='55%25' dominant-baseline='middle' text-anchor='middle' fill='%23FFF' %3EES%3C/text%3E%3C/svg%3E)
Bom dia,
Verifiquei que o problema foi gerado devido a atualização para windows 11 22h2, com a conexão wp2-enterprise, o AD não aparece tentativa de login, dando erro.
Solução desativa serviço device Guard
###### WINDOWS CONEXÃO NO WIFI-WP2 Enterprise DEPOIS DA ATUALIZAÇÃO 22H2 ########
* Abra o Power Shell(ADM)
	* gpedit.msc
	 * Politica Computador Local
	   > Comfiguração do Computador > Modelos Administrativos > Sistema > Device Guard
	     * Ativar Segurança Baseada em Virtualização - Desativar
Para facilitar criei uma GPO no AD para os grupo de notebooks novos.
Por favor dei o ok se deu bom?

Hi,
Yes you can perform a rollback steps and please follow the link over uninstall-windows-11-22h2-pc-doesnt-start
==
Please "Accept the answer" if the information helped you. This will help us and others in the community as well.
' cx='32' cy='32' r='32' /%3E%3Ctext x='50%25' y='55%25' dominant-baseline='middle' text-anchor='middle' fill='%23FFF' %3ERA%3C/text%3E%3C/svg%3E)
Try open start go to Settings and then navigate to Windows Update and click on Uninstall updates and follow steps to uninstall it.
Try open start and search for feedback and open the Feedback Hub app and report this issue.
' cx='32' cy='32' r='32' /%3E%3Ctext x='50%25' y='55%25' dominant-baseline='middle' text-anchor='middle' fill='%23FFF' %3EJC%3C/text%3E%3C/svg%3E)
We have had the issue as well. I believe the problem is due to the fact that the RDS connection is trying to connect over UDP and is not trying to connect over TCP if the UDP fails.
If you add the following registry setting the Remote Desktop Connection will work.
Have to set this value to 1 in the registry for Windows 11 client to work outside the network
Computer\HKEY_LOCAL_MACHINE\SOFTWARE\Policies\Microsoft\Windows NT\Terminal Services\Client
KEY VALUE - fClientDisableUDP SET TO 1
I am on the early adopter program with Microsoft and raised this exact issue with Microsoft when the beta came out for Windows 11 and they did not fix the issue.
' cx='32' cy='32' r='32' /%3E%3Ctext x='50%25' y='55%25' dominant-baseline='middle' text-anchor='middle' fill='%23FFF' %3EPY%3C/text%3E%3C/svg%3E)
this solved my issue just like a magic! thanks!
' cx='32' cy='32' r='32' /%3E%3Ctext x='50%25' y='55%25' dominant-baseline='middle' text-anchor='middle' fill='%23FFF' %3ELT%3C/text%3E%3C/svg%3E)
Hello there,
If this is caused by the update you can try to restore the PC to the older date, the date before the update was done.
To restore from a system restore point, select Advanced Options > System Restore. This won't affect your personal files, but it will remove recently installed apps, drivers, and updates that might be causing your PC problems.
You can get detailed steps from here https://support.microsoft.com/en-us/windows/recovery-options-in-windows-31ce2444-7de3-818c-d626-e3b5a3024da5
-----------------------------------------------------------------------------------------------------------------------------------------
--If the reply is helpful, please Upvote and Accept it as an answer--
' cx='32' cy='32' r='32' /%3E%3Ctext x='50%25' y='55%25' dominant-baseline='middle' text-anchor='middle' fill='%23FFF' %3ERG%3C/text%3E%3C/svg%3E)
Ways to fix-
All these actions can be performed using the Device Manager, so let's dive in and try some fixes.
The network adapters section in Windows Device Manager.
Open the Run application using the Win + R shortcut.
In the text box, type devmgmt.msc and press Enter to open the Device Manager.
In the Device Manager window, expand the Network adaptors section.
Right-click on the wireless adaptor for your device, and click on Update driver.
On the next window, choose Search automatically for drivers.
Windows will download and install the latest drivers for your device.
Driver properties in Windows 11
Open Device Manager by either using Windows search or running the devmgmt.msc command in the Run application (Windows Key + R).
Expand the Network adaptors section.
Right-click on the network driver and select Properties.
In the Properties window, go to the Driver tab.
Click on the Roll back driver option. The option will be grayed out if the driver wasn't recently updated.
Windows will install the previous version of the network driver.
Reboot your computer.
Once you have your new drivers ready, it's time to scrub away the old one:
Uninstall driver prompt in Windows 11.
Open Device Manager.
Again, expand the Network adaptors section.
Right-click the network driver.
Click on Uninstall device.
Check the Attempt to remove the driver for this device option.
Click on Uninstall.
When you reboot your PC, Windows will automatically reinstall the driver.
Here is how you can disable IPv6 on your computer:
Wi-FI properties in Windows 11.
Locate the network icon on the System Tray.
Right-click on the icon and choose Network and Internet settings.
Click on Advanced network settings.
Under Related settings, choose More network adaptor options.
Right-click on the wireless network, then choose Properties. Ensure you have admin privileges.
Uncheck the Internet Protocol Version 6 (IPv6) option.
Click OK.
Reconnect to the wireless network again.
3. Disable and Enable the Wireless Network Adaptor
Sometimes, an easy reset of the wireless network adaptor can fix connection issues on Windows. You can do this using the Advanced network options in Windows 11:
Wireless adaptor in Windows 11
Right-click on the Network icon located in the System Tray.
Click on Network and Internet settings.
Click on Advanced network settings.
On the next window, choose More network adaptor options.
Now, right-click the wireless adaptor and click on Disable.
Wait for a moment, then right-click the wireless adaptor and choose Enable.
Reboot your PC and try reconnecting to the network.
This may sound complex, but all you need to do is run a few commands in the Windows Command Prompt, and Windows will handle the rest. Here's how to do that:
Command Prompt in Windows 11
Type cmd in Windows Search.
Right-click on Command Prompt > Run as administrator.
In the Command Prompt console, type the following commands and press Enter after each one:
netsh winsock reset
netsh int ip reset
ipconfig /release
ipconfig /renew
ipconfig /flushdns
Close Command Prompt and reboot your computer to see if the error is still there.
Regards,
Rachel Gomez