'Technically'.....you could go to your Build Share on your MDT server and run the LiteTouch.wsf file on your machine. The caveat is that this image can only go on that model, or else you run into driver issues for other models.
If the image is basically what you will continue to use often enough, on other models even later, its really best to create one VM and capture it. Then it can go on these 100 units and any others in the future, you use add drivers for each future model.
But, yes, you can run the script in your BUILD share and capture it.
Create Image from Client's machine using MDT
Not sure which section this post suppose to be in, anyway, I have got 100 win10 laptops to configure. Instead of doing them one-by-one, I came to the conclusion that it would be more efficient just to configure one and capture its image and deploy it as and when required to the others. My problem is, I have never done this task before and I was wondering if someone could share their expert knowledge with me helping me to achieve this gold.
The school got an MDT server and pxe is also installed and in operation. I have followed a few online videos but to no avail.
Thanks in advance...
14 answers
Sort by: Most helpful
-
Rick Someone 411 Reputation points
2020-11-12T17:26:40.087+00:00 -
RGrossett 1 Reputation point
2020-11-13T10:13:13.36+00:00 I like the sound of this…. I really do!!! Because all of the 100 laptops have the same hardware specification (I think) going down this route is ok. The only other problem I have, is the fact that I do not know the procedures involve… So would it be possible for you to help me along the way? I would really appreciate it!
-
RGrossett 1 Reputation point
2020-11-17T14:17:54+00:00 stuff I have done so far:-
1 I log into the MDT server
2 Fireup the Deployment Workbench
3 Navigate to the MDT Deployment Share (\servername\e$\Deployment Share) then navigate to Task Sequences
4 Right-click on Task Sequences and create a New Task Sequences
5 On the general tab page, I create a task sequence ID (RG001)
6 " " " " " " " " " " Name (HPLAPTOP 255 CAPTURE)
7 On the Select Template tab page, I selected Sysprep and Capture
8 On the Select OS tab page, I selected Windows 10 Enterprise in Windows 10 Enterprise X64 install.wim from 7 other choices
9 On the Specify Product Key tab page, I selected Do not Specify Product Key
10 On the OS Settings tab page, I inserted Organization Name
11 On the Admin Password tab page, I selected Do not Specify Administrator password at this time.
12 Review selection and select finish
13 Then I right-click on HPLAPTOP 255 CAPTURE and select Properties
14 On the General tab page, I selected This can run on any platform
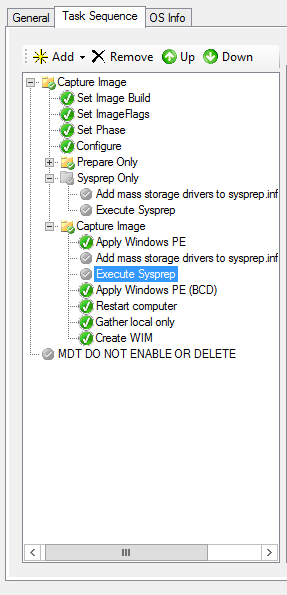
15 On the Task Sequence tab page I Disabled Sysprep only and its two sub sections
16 Under the Capture Image Section, I have also Disabled add mass storage drivers to sysprep.inf for Xp and 2003
17 Under the Capture Image Section, I have also Disabled Execute SysprepIs this the correct way?
Am I missing anything? -
Rick Someone 411 Reputation points
2020-11-17T17:07:17.08+00:00 If you're doing a Sysprep and Capture, just create a Capture TS like you did but you don't need to change Anything in the Task. you merely open your VM (or the physical pc, not recommended) and C$ into your Build (or D$, whatever the Share name is). Launch the LiteTouch.wsf and it will take you to the list of Sysprep & Capture Tasks if you have more than one.
The Capture is the easiest thing, you don't need to, nor should you, disable or modify anything in the Task. You can modify the Properties if the whole Build Share itself and the bootstrap file but leave the Task Sequence be. Here is a sample from my CustomSettings and Bootstrap:[Settings]
Priority=Default[Default]
SMSTSORGNAME=*your org name*
OSInstall=Y
SkipAppsOnUpgrade=NO
SkipAdminPassword=YES
ComputerBackupLocation=%DeployRoot%\Captures
BackupFile=%OSDComputername%#replace(date,"/",".") & ".wim"#
SkipProductKey=YES
SkipComputerName=YES
SkipDomainMembership=YES
SkipUserData=YES
UserDataLocation=YES
SkipLocaleSelection=YES
SkipTaskSequence=NO
SkipTimeZone=YES
SkipApplications=NO
SkipBitLocker=YES
SkipSummary=YES
SkipBDDWelcome=YES
SkipCapture=NO
DoCapture=YES
SkipFinalSummary=NOTimeZone=020
TimeZoneName=Central Standard TimeJoinWorkgroup=WORKGROUP
****BOOTSTRAP****
[Settings]
Priority=Default[Default]
DeployRoot=\MDTSERVER\Build$ (change this to yours)SkipBDDWelcome=YES
UserDomain=your domain
UserID=your domain account username
UserPassword=domain account user p/w -
RGrossett 1 Reputation point
2020-11-19T10:03:42.183+00:00 @Rick Someone
Hi… thanks once again for your rapid response. Please forgive me for my lack of knowledge but I am not sure about a couple of points.
The first part of your reply seems to suggest that I should be using a virtual machine as oppose to the physical laptop that I have configured with applications and restrictions.
If this is true, how will the image be identical to that of the target laptop? My intention was just to copy the target laptop’s image up to the server and then distribute this image among similar laptops.Secondly, should I delete the task sequence ID (RG001) Name (HPLAPTOP 255 CAPTURE) and just create a new task sequence and refrain from configuring the sections within the task?
Third but not least.. will this custom settings and bootstrap settings over-write the current file on our MDT server? If the answer is “yes” I would be very reluctant to proceed down this route as either my manager nor myself know much about the whole process and the current deployment process in place is working perfectly…
I wouldn’t want to be the person guilty of breaking it… I am sure you can appreciate that…
Anyway.. thanks again for your support!