Hi @Magnus Tjerneld · Thank you for reaching out. In order to prevent it from happening, it is important to identify the cause. You can enable auditing for DNS and check security audit logs to identify the cause. Here are the steps to enable auditing for DNS record deletion:
i. Enable Directory Service Access auditing on DNS Server:
Auditpol /set /category:“DS Access” /Success:Enable
Auditpol /set /category:“DS Access” /Failure:Enable
ii. Open ADSIEdit on the DC that has the DNS role. (Start, Run, type adsiedit.msc, and press ENTER).
iii. Right-click ADSI Edit, click ‘Connect to.’
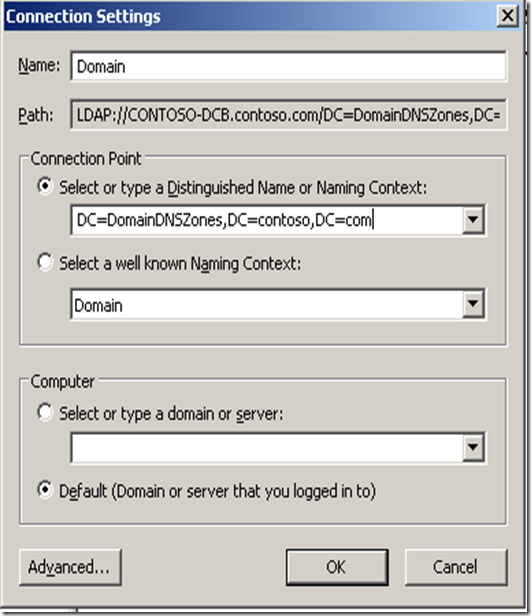
iv. On the Connection Settings window that comes up, select the ‘Select or type a Distinguished Name or Naming Context:’ under Connection Point.
v. Depending on your Domain name and the partition where the zone is stored, type the Distinguished Name for the partition and click OK:
- If the zone is stored in default Domain partition, then I will use DC=contoso,DC=com as the Distinguished Name. (This partition is generally loaded in Adsiedit by default).
- If the zone is stored in DomainDNSZones partition, then I will use DC=DomainDNSZones,DC=contoso,DC=com as the Distinguished Name.
- If the zone is stored in ForestDNSZones partition, then I will use DC=ForestDNSZones,DC=contoso,DC=com as the Distinguished Name.
vi. Navigate to the location of the DNS zone object according to where the zone is stored:
vii. If the zone is stored in default Domain partition then:
- Expand Domain [(dc name).contoso.com] > DC=contoso,DC=com > CN=System > CN=MicrosoftDNS
- If the zone is stored in DomainDNSZones partition then:
- Expand Domain [(dc name).contoso.com] > DC=DomainDNSZones,DC=contoso,DC=com > CN=MicrosoftDNS
- If the zone is stored in ForestDNSZones partition then:
- Expand Domain [(dc name).contoso.com] > DC=ForestDNSZones,DC=contoso,DC=com > CN=MicrosoftDNS
- (Please note that in the case of a ForestDNSZones partition, the DN path will always refer to the forest root domain DN path)
viii. Under CN=MicrosoftDNS you will find DC=<your zone name> (DC=contoso.com in my case). Right click on that and select Properties.
ix. On the Security tab, click the Advanced button.
x. Select the Auditing tab, and click Add.
xi. Under User or Group, type ‘Everyone’ and click on Check Names button. Click OK.
(You may find some already existing entries with the name ‘Everyone’ under the Auditing tab. This may be confusing but please add a new entry as mentioned above.)
xii. On the Auditing Entry window that pops up, under the Object tab, select Success and Failure for access types Write All Properties, Create, Delete, and Delete Subtree and click Ok.
Please "Accept the answer" if the information helped you. This will help us and others in the community as well.
' cx='32' cy='32' r='32' /%3E%3Ctext x='50%25' y='55%25' dominant-baseline='middle' text-anchor='middle' fill='%23FFF' %3EMT%3C/text%3E%3C/svg%3E)