Note
Access to this page requires authorization. You can try signing in or changing directories.
Access to this page requires authorization. You can try changing directories.
Important
Visual Studio App Center was retired on March 31, 2025, except for the Analytics and Diagnostics features, which will continue to be supported until June 30, 2026. Learn more.
App Center Distribution enables your users/testers to install new versions of an app once you distribute it via App Center. Once enabled, the SDK presents an update dialog to users to either download or postpone installation of the latest update. Once they choose to update, the SDK will start to update your application.
Important
The Distribute SDK for Unity doesn't support UWP. The instructions in this page cover only Android and iOS.
Warning
Google Play considers the in-app update code as malicious behavior even if it isn’t used at runtime. Remove this code as directed in this section before submitting your app to Google Play. Failure to not remove the in-app update code can lead to noncompliance and removal of the app from Google Play.
Note
If you're running automated UI tests, enabled in-app updates will block your automated UI tests as they'll try to authenticate against the App Center backend. We recommend disabling in-app updates for your UI tests.
Add in-app updates to your app
Add the App Center Distribute module
The App Center SDK is designed with a modular approach – a developer only needs to integrate the modules of the services that they're interested in.
Follow the Unity getting started docs if you haven't set up and started the SDK in your application, yet. Make sure to import the App Center Distribute package. Its name should be in the format AppCenterDistribute-v{version}.unitypackage.
Note
Android 10 or higher has restrictions on launch activity from the background. Please see article about restrictions on starting activities from the background.
Note
Apps running on Android 10 (Go edition) cannot receive the SYSTEM_ALERT_WINDOW permission. Please see article about SYSTEM_ALERT_WINDOW on Go devices.
Note
Beginning with Android 11, ACTION_MANAGE_OVERLAY_PERMISSION intents always bring the user to the top-level Settings screen, where the user can grant or revoke the SYSTEM_ALERT_WINDOW permissions for apps. Please see article about permissions updates in Android 11.
Remove in-app updates for Google Play builds
Google Play considers the in-app update code as malicious behavior even if it isn’t used at runtime. Remove this code before submitting your app to Google Play. Failure to not remove the in-app update code can lead to noncompliance and removal of the app from Google Play. To remove in-app updates native code, uncheck the Use Distribute checkbox under the Distribute section on the game object with AppCenterBehavior attached.
Use private distribution group
By default, Distribute uses a public distribution group. If you want to use a private distribution group, you'll need to change UpdateTrack to Private.
To do this, choose Private in the Update Track dropdown under Distribute section on the game object with AppCenterBehavior attached.
When using the private track, a browser window will open up to authenticate the user. All the subsequent update checks will get the latest release on the private track.
If a user is on the private track, it means that after the successful authentication, they'll get the latest release from any private distribution groups they're a member of. If a user is on the public track, it means that they'll get the latest release from any public distribution group.
Disable Automatic Check for Update
By default, the SDK automatically checks for new releases:
- When the application starts.
- When the application goes into background then in foreground again.
- When enabling the Distribute module if previously disabled.
If you want to check for new releases manually, you can disable automatic check for update.
To do this, uncheck the Automatic Check for Update checkbox under Distribute section on the game object with AppCenterBehavior attached.
Then you can use the CheckForUpdate API which is described in the following section.
Manually Check for Update
Distribute.CheckForUpdate();
This sends a request to App Center and display an update dialog in case there's a new release available.
Note
A manual check for update call works even when automatic updates are enabled. A manual check for update is ignored if another check is already being done. The manual check for update won't be processed if the user has postponed updates (unless the latest version is a mandatory update).
Customize or localize the in-app update dialog
1. Customize or localize text
You can provide your own resource strings if you'd want to localize the text displayed in the update dialog. Look at the string files for iOS in this iOS resource file and for Android in this Android resource file. Use the same string name/key and specify the localized value to be reflected in the dialog in your own app resource files.
2. Customize the update dialog
You can customize the default update dialog's appearance by implementing the ReleaseAvailable callback.
Warning
You need to register the callback in the Awake method of a MonoBehaviour in the first scene your application loads to avoid missing any release callback invocations.
// In this example, OnReleaseAvailable is a method name in same class
Distribute.ReleaseAvailable = OnReleaseAvailable;
Here is a callback implementation that replaces the SDK dialog with custom logic:
bool OnReleaseAvailable(ReleaseDetails releaseDetails)
{
    // Look at releaseDetails public properties to get version information, release notes text or release notes URL
    string versionName = releaseDetails.ShortVersion;
    string versionCodeOrBuildNumber = releaseDetails.Version;
    string releaseNotes = releaseDetails.ReleaseNotes;
    Uri releaseNotesUrl = releaseDetails.ReleaseNotesUrl;

    // (Do something with the values if you want)

    // On mandatory update, user can't postpone
    if (releaseDetails.MandatoryUpdate)
    {
        // Force user to update (you should probably show some custom UI here)
        Distribute.NotifyUpdateAction(UpdateAction.Update);
    }
    else
    {
        // Allow user to update or postpone (you should probably show some custom UI here)
        // "GetUserUpdateAction()" isn't part of the SDK; it just represents a way of getting user response.
        // This blocks the thread while awaiting the user's response! This example shouldn't be used literally
        UpdateAction updateAction = GetUserUpdateAction();
        Distribute.NotifyUpdateAction(updateAction);
    }
    // Return true if you're using your own UI to get user response, false otherwise
    return true;
}
Implementation notes for Android:
As shown in the example, you must call either Distribute.NotifyUpdateAction(UpdateAction.UPDATE); or Distribute.NotifyUpdateAction(UpdateAction.POSTPONE); if your callback returns true.
If you don't call NotifyUpdateAction, the callback will repeat on every activity change.
The callback can be called again with the same release if the activity changes before the user action is notified to the SDK.
This behavior is needed to cover the following scenarios:
- Your application is sent to the background (like pressing HOME) then resumed in a different activity.
- Your activity is covered by another one without leaving the application (like clicking on some notifications).
- Similar scenarios to the above.
In that case, the activity hosting the dialog might be replaced without user interaction. So the SDK calls the listener again so that you can restore the custom dialog.
3. Execute code if no updates are found
In cases when the SDK checks for updates and doesn't find any updates available newer than the one currently used, a NoReleaseAvailable callback is invoked. This allows you to execute custom code in such scenarios.
You need to register the callback before calling AppCenter.Start as shown in the following example:
// In this example OnNoReleaseAvailable is a method name in same class
Distribute.NoReleaseAvailable = OnNoReleaseAvailable;
AppCenter.Start(...);
void OnNoReleaseAvailable()
{
    AppCenterLog.Info(LogTag, "No release available callback invoked.");
}

## Enable or disable App Center Distribute at runtime

You can enable and disable App Center Distribute at runtime. If you disable it, the SDK won't provide any in-app update functionality but you can still use the Distribute service in the App Center portal.

To disable the Distribute service, use the following code:

```csharp
Distribute.SetEnabledAsync(false);
To enable App Center Distribute again, use the same API but pass true as a parameter.
Distribute.SetEnabledAsync(true);
This API is asynchronous, you can read more about in our App Center Asynchronous APIs guide.
You don't need to await this call to make other API calls (such as IsEnabledAsync) consistent.
The state is persisted in the device's storage across application launches.
Check if App Center Distribute is enabled
You can also check if App Center Distribute is enabled:
Distribute.IsEnabledAsync();
This API is asynchronous, you can read more about in our App Center Asynchronous APIs guide.
Enable in-app updates for debug builds
By default in-app updates are enabled only for release builds.
To enable in-app updates for debug builds on Android and iOS, check the Enable Distribute in Debug checkbox under Distribute section on the game object with AppCenterBehavior attached.
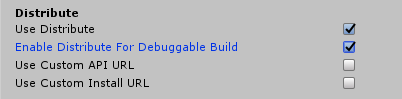
In Unity, a debuggable build is a build with a Development build option checked.
Perform clean up right before the app closes for update
Note
This callback only works on iOS.
Register callback as shown in the following example:
// In this example, OnWillExitApp is a method name in same class
Distribute.WillExitApp = OnWillExitApp;
void OnWillExitApp()
{
    // Perform clean up here
}
With that, OnWillExitApp() will be invoked when Distribute is about to close.
How in-app updates work
Note
For in-app updates to work, an app build should be downloaded from the link. It won't work if installed from an IDE or manually.
The in-app updates feature works as follows:
- This feature only works with RELEASE builds (by default) that are distributed using the App Center Distribute service. It won't work if the iOS Guided Access feature is turned on.
- Once you integrate the SDK, build a release version of your app, and upload it to App Center. Users in the distribution group are notified about the new release via email.
- When each user opens the link in their email, the application will be installed on their device. It's important that they use the email link to install - we don't support side-loading. When an application is downloaded from the link, the SDK saves important information from cookies to check for updates later, otherwise the SDK doesn’t have that key information.
- If the application sets the track to private, a browser will open to authenticate the user and enable in-app updates. The browser won't open again as long as the authentication information remains valid even when switching back to the public track and back to private again later. If the browser authentication is successful, the user is redirected back to the application automatically. If the track is public (which is the default), the next step happens directly.
- A new release of the app shows the in-app update dialog asking users to update your application if it's:
- iOS:
- a higher value of
CFBundleShortVersionStringor - an equal value of
CFBundleShortVersionStringbut a higher value ofCFBundleVersion. - the versions are the same but the build unique identifier is different.
- a higher value of
- Android:
- a higher value of
versionCodeor - an equal value of
versionCodebut a different value ofversionName.
- a higher value of
- iOS:
Tip
If you upload the same .apk/.ipa a second time, the dialog WON'T appear as the binaries are identical. On iOS, if you upload a new build with the same version properties, it will show the update dialog. The reason for this is that it's a different binary. On Android, binaries are considered the same if both version properties are the same.
How do I test in-app updates?
You must upload release builds (that use the Distribute module of the App Center SDK) to the App Center Portal to test in-app updates, increasing version numbers every time.
- Create your app in the App Center Portal if you haven't already.
- Create a new distribution group and give it a name.
- Add yourself (or all people who you want to include on your test of the in-app update feature). Use a new or throw-away email address for this step, one not already used with this app. This ensures that your experience is close to the experience of your real testers.
- Create a new build of your app that includes App Center Distribute and contains the setup logic as described below. If the group is private, don't forget to set the private in-app update track before start using the
UpdateTrackproperty. - Click on the Distribute new release button in the portal and upload your build of the app.
- Once the upload has finished, click Next and select the Distribution group that you previously created as the Destination of that app distribution.
- Review the Distribution and distribute the build to your in-app testing group.
- People in that group will receive an invite to be testers of the app. Once they accept the invite, they can download the app from the App Center Portal from their mobile device. Once they have in-app updates installed, you're ready to test in-app updates.
- Bump the version of your app (
CFBundleShortVersionStringorCFBundleVersionfor iOS,versionCodefor Android). - Build the release version of your app and upload a new build like you did in the previous step. Distribute to the Distribution Group you created earlier. Members of the Distribution Group will be prompted for a new version the next time the app starts.
Tip
Have a look at the information on how to utilize App Center Distribute for more detailed information about Distribution Groups etc. While it's possible to use App Center Distribute to distribute a new version of your app without adding any code, adding App Center Distribute to your app's code will result in a more seamless experience for your testers and users as they get the in-app update experience.