Note
Access to this page requires authorization. You can try signing in or changing directories.
Access to this page requires authorization. You can try changing directories.
This is a blog post in the series "How to change how search results are displayed." To demonstrate how you can customize your search results, I'll use examples from an internal Microsoft Search Center.
For an overview of the blog post in this series, go to How to change the way search results are displayed in SharePoint Server 2013.
In the previous blog post, I showed you a simple method for adding a custom icon and values from two custom managed properties to your search results. In this blog post, I'll show you a somewhat more complete method for changing the way your search results are displayed that includes if statements and hit highlighting. We’ll learn:
- Strategy for killing three birds with one stone - search results version
- How to display values from custom managed properties with hit highlighting, and get automatically improved relevancy
Strategy for killing three birds with one stone - search results version
First, let’s state what we want to achieve:
- Display values from two custom managed properties
- Apply hit highlighting to the two custom managed properties
- Get automatically improved relevancy for our search results
Before I show you how to do this, let's look at the strategy we want to follow to accomplish this. If it gets a bit complicated, please try to hang in there. Hopefully it'll be clear by the end of this blog.
First, remember how we can think about hit highlighting:
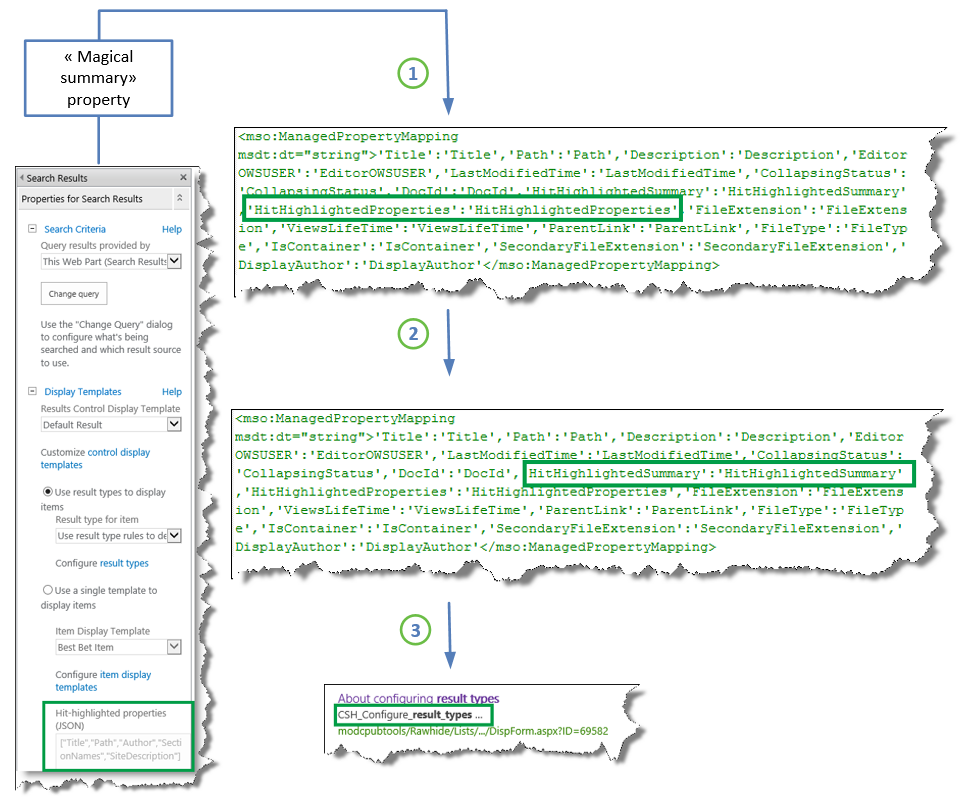
- The managed properties that are listed in the Hit-highlighted properties (JSON) section of the Search Results Web Part and the "magical summary" property are passed to the HitHighlightedProperties property.
- All values of the HitHighlightedProperties property are passed to the HitHighlightedSummary property.
- A truncated version of the values in HitHighlightedSummary is displayed in the Search Results Web Part with three dots at the end.
Also remember that each item display template contains a reference to the Item_CommonItem_Body display template, and that this template contains an onlick method that will result in automatically improved relevance based on the end-user’s click behavior.
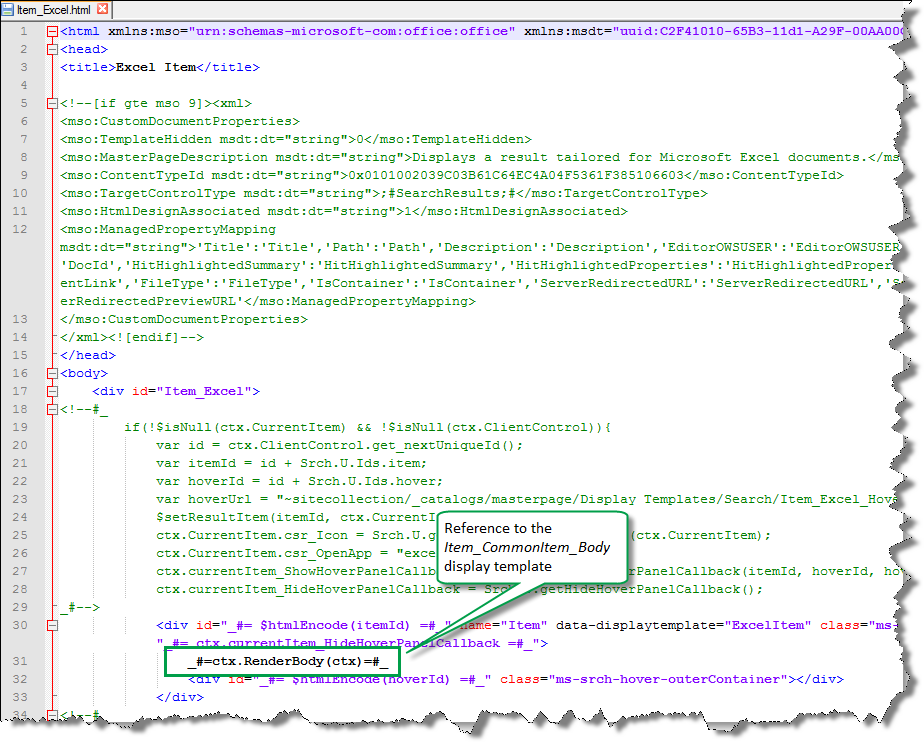
So our strategy is simply this: create variables in the item display template that will be passed on and rendered by the Item_CommonItem_Body display template.
Specifically, that means that we have to do the following:
- Add the custom managed properties that we want to display in our search results to the Hit-highlighted properties in the Search Results Web Part.
- Add the custom managed properties to an item display template.
- In the item display template, create a new variable that will be used by the property HitHighlightedSummary to display our two custom managed properties with hit highlighting.
- In the item display template, leave the reference _#=ctx.RenderBody(ctx)=#_ so that the Item_ComonItem_Body display template will render the search result. This ensures that we get automatically improved relevancy.
OK, now let’s take it step-by-step, with examples of how I did this for my scenario.
How to display values from custom managed properties with hit highlighting, and get automatically improved relevancy
First you have to find the managed property names that correspond to the custom site columns that you want to use. I showed you how to do this in a previous blog.
Then you have to do some configuration on the Search Results Web Part. Here's what you should do:
- On the Search results page, choose the Settings menu, and then choose Edit Page.
- In the Search Results Web Part, choose Web Part Menu --> Edit Web Part.
- In the Web Part tool pane, choose to expand the Display Templates section and then select Use a single template to display items. This will allow you to make changes to the Hit-highlighted properties (JSON) field.
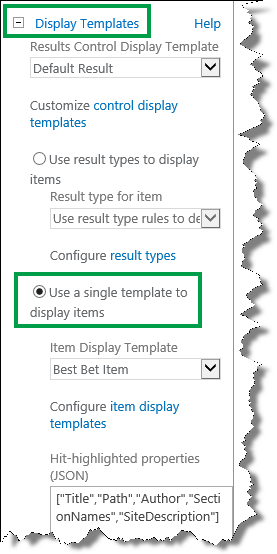
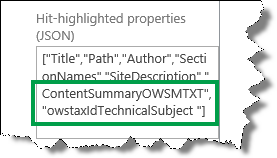
In the Hit-highlighted properties (JSON) field, use the following format to add the custom managed properties that you want to add hit highlighting to:
"<Managed property name>"In my scenario, I wanted to apply hit highlighting to the ContentSummaryOWSMTXT and the owstaxIdTechnicalSubject managed properties.
- Choose Apply to save the changes. This will close the Display Templates section.
- Choose Display Templates to reopen the section, and choose Use result types to display items.
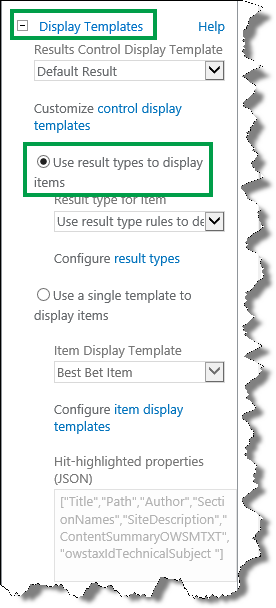
- Choose OK and save the page.
Then you need to add the custom managed properties to an item display template. Here’s what you should do:
Open the item display template that belongs to the result type for which you want to customize search results.
In my scenario, this was TechNet content.
In the item display template, in the ManagedPropertyMapping tag, use the following syntax to add the custom managed properties that you want to display:
'<Current item property name>':<Managed property name>'In my scenario, I wanted the values from the managed properties ContentSummaryOWSMTXT and owstaxIdTechnicalSubject to be displayed in the search result. To make the file easier to maintain, I named the current item properties the same as the managed properties.

Then you need to create variables in the item display template that will be used and rendered by the Item_Common_Item_Body display template. Here's what you should do:
Because you have no guarantee that the values of your custom properties will contain any of the entered query words, that is, hit highlighting will not be used, you have to create variables that ensure that the value of your custom properties will be displayed regardless of hit highlighting.
The following screenshots show how I created two such variables for my custom properties ContentSummaryOWSMTXT and owstaxIdTechnicalSubject.

- In addition, I added a similar variable for the Title property. If you don’t add this, the search results will not be rendered.

- The last step you have to do in the item display template is to create a variable that will override the HitHighlightedSummary property used to display the values.

- Save the item display template.
- NOTE: You do not need to do this step if you are using SharePoint Online.
Go to Site settings --> Search Result Types. Notice that a Property Sync alert is displayed.

This alert is displayed because we added managed properties to an item display template (what we did in step 9). To update the result types with the newly added managed properties, choose Update.

IMPORTANT! If you don't do this update, the newly added managed properties will not display in your search results.
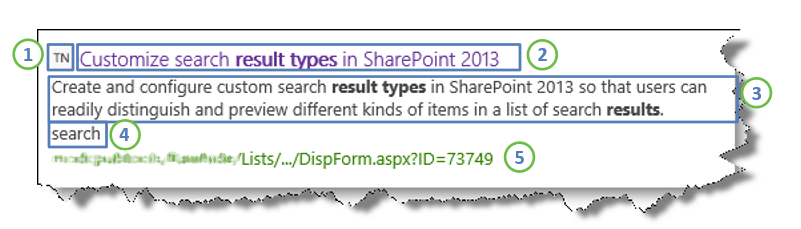
After I made these changes, when users entered a query in the Search Center, the search result included:
- A custom icon.
- The value of Title with hit highlighting.
- The value of ContentSummaryOWSMTXT with hit highlighting.
- The value of owstaxIdTechnicalSubject. The query words did not match the property value, however because of the variable that I created in step 10, the value is displayed.
- A link to the item in the list
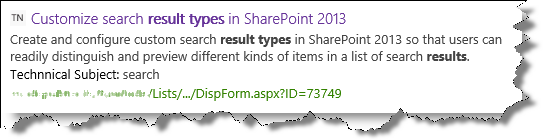
I wanted to make one little change to how the value for owstaxIdTechnicalSubject was displayed. I wanted to give users a bit more context as to what this value represents, so I decided to add the text "Technical Subject:" before the value. Also, because this value is not always present for all list items, I decided that it should only display when a value was present.
To do this, I made a change to the variable that overrides the HitHighlightedSummary property:

Notice that I added a slightly different color to the text "Technical Subject:". With this addition, the final search result is displayed like this:
In our planning, we had decided that we wanted 6 different result types. After creating the TechNet content result type and display template, it was very easy to copy this work over to the other 5 result types.
And here’s the result:

So now that we have changed the way search results are displayed, the next step is to change the values that are displayed in the hover panel.
Next blog post in this series
How to display values from custom managed properties in the hover panel
Comments
Anonymous
January 01, 2003
Hi Bella,Thanks for sharing a great post.I have tried it out and everything looks fine in my development except for my contents are not truncated after passing it into ctx.CurrentItem.HitHighlightedSummary. Do you have any idea why it is not truncating? Thanks in advance.Anonymous
January 01, 2003
Hi where exactly are you suppose to place the variables in the Item template? The link to your file does not workAnonymous
January 01, 2003
Hi DanTheManXX,
Am not quite sure I completely understand your scenario. Do you just want to add two managed properties to your people search results? If so, you should add these to the display template that you use to display your people search results, and refresh your People result source.
BellaAnonymous
January 01, 2003
Hi, Which plan do you have?
To understand your situation a bit better, can you describe what you mean by managed properties coming back as "undefined"? Do you get an error message, or is it the case that you can't see any managed property values? BellaAnonymous
January 01, 2003
thanks for sharing.Anonymous
January 01, 2003
Hi great post. I have a related question
Say I have my custom display template for people search My_Item_Person. which I have successfully amended to add the user's email and work phone. Now I want amend this to display two custom AD properties propa and propb which are both mapped to individual term sets in the term store. replicating In your example you added to Hit-highlighted properties . Hence you are using srch.u.getHighlightedPropeties() as opposed to the $htmlEncode(ctx.CurrentItem.RockBandsLiked);.
You also switch from selecting the displaytemplate to Results Type in the people search web part settings.
Do I need to do this for the people search.Anonymous
January 01, 2003
Hi Santiago,
If I understand your scenario correctly, you want to add the ability for users to be able to Like a specific search result. This functionality is not available by default, so you'll have to implement custom code.
BellaAnonymous
January 01, 2003
Hi Gopal,
It's difficult to say what can be the problem, but have you double checked that you don't have any syntax errors or spelling mistakes in your display template?
BellaAnonymous
January 01, 2003
Hi Bishwadeep, The Item_CommonItem_Body display template also has a sorting, where the property HitHighlightedSummary is displayed between the title and the link. So, by not displaying any properties through the custom display template (in my scenario, TechNet content), but instead creating a variable that can be used by the Item_ComonItem_Body display template to display HitHighlightedSummary, the sorting is done in by Item_ComonItem_Body display template . Hope this helps. BellaAnonymous
January 01, 2003
Hi Charles,
I'm not quite sure I understand your scenario. I'm not aware of a content type named "Publishing Images", but there is a managed property named "Publishing Image". Is that what you mean?
The default display templates used by the Search Results Web Part use different managed properties than the display templates used by the Content Search Web Part. So, to show an image in your search results, you'll have to modify the display templates used by the Search Results Web Part. I describe how you can do that in another blog series:http://blogs.technet.com/b/tothesharepoint/archive/2013/09/03/how-to-change-the-way-search-results-are-displayed-in-sharepoint-server-2013.aspx
Hope this helps,
BellaAnonymous
January 01, 2003
Hi,First, sorry for the late answer. Not sure if I completely understand your scenario, but if you created a variable, then that variable, as you have defined it, will be displayed.Hope this helps. BellaAnonymous
January 01, 2003
I'm seeing this bug on my SPO tenant where if I use results types in my search results web part, none of my custom managed properties work in my display template. They simply come back as undefined. Is there any way around this?Anonymous
January 01, 2003
Hi Leslie,
Happy to hear that you found it helpful :-)
BellaAnonymous
January 01, 2003
Hi Rich,
Yes, I am aware of this behavior. At the moment I don't know how to get around this.
BellaAnonymous
January 01, 2003
The comment has been removedAnonymous
January 01, 2003
Hi Bryn,
The URL to the list item is displayed by the Item_CommonItem_Body display template. You can modify this display template so that "your" URL is shown.
Hope this helps,
BellaAnonymous
January 01, 2003
Hi Von,
I'm not quite sure what you mean by "Office" info. But you can use the same approach that you used to include Work Phone and Email Address. You just have to use the managed properties that contain the "Office" info, and modify the display template that you use to display your People Search results
Hope this helps.
BellaAnonymous
January 01, 2003
Hi Ramirito,
I suggest that you contact Microsoft Support with this issue.
BellaAnonymous
January 01, 2003
Hi, Thanks for letting me know that the file dosen’t work. I have deleted them until we can fix the issue. You can add the variables inside the blocks that begin with <!--#_ and end with _#-->. JavaScript code is used inside these blocks. Hope this helps,
BellaAnonymous
January 01, 2003
Hi Corey,
You can customize your search results in SharePoint Online as well, but there are a few differences between what I describe in this blog series. Could you provide some more details about your scenario in SharePoint Online?
BellaAnonymous
January 01, 2003
This is a really useful post - Thanks Bella!!Anonymous
January 01, 2003
Hello Bella,
I have a issue with search feature when I add the WorkPhone property.
I could see the search results in the server, and even in clients when I use the SharePoint manager account, I could also see the search results when I use an user account in the server, but when I use an user account in the clients shows a text that says "Error." without description or correlation ID.
I created another search people page and I copied the "Search Result Type" Person, changed the Item_Person.html and copied as Item_Person2.html, changed to display just the WorkPhone, and selected the Item_Person2.html as Display template URL with similar behavior.
How could I grant any active directory user to watch the phone numbers?
Thank you.Anonymous
January 01, 2003
Hi JWerner,
Sorry, I'm not sure about the answer to your question :-( I suggest you contact Microsoft Support.
BellaAnonymous
January 01, 2003
Hi Koen,
Sorry, one year later and I still haven't found an answer to this exact issue. I suggest that you contact Microsoft Support with your question.
Thanks,
BellaAnonymous
January 01, 2003
Hi Roland,
No, I don't know of anything specific that you need to do for managed metadata.
I suggest that you contact Microsoft Support with your question.
BellaAnonymous
January 01, 2003
Hi Roland,
Glad to hear that you figured out your issue with managed metadata :-)
In SharePoint Server 2013, you can't control stemming on managed properties.
For more information, see these articles:
- https://technet.microsoft.com/en-us/library/jj219499.aspx
- https://technet.microsoft.com/en-us/library/gg549987.aspx#BKMK_DisableStemming
Hope this helps,
BellaAnonymous
September 16, 2013
I appreciate this post! http://www.desertedroad.comAnonymous
October 03, 2013
Hello Bella, Just wanted to know, in the strategy, how the problem of pushing the custom properties, between title & link is getting sorted, if we continue to use the #=ctx.RenderBody(ctx)=# reference for the Item_CommonItem_Body contextAnonymous
November 19, 2013
Hi Bella, I'm struggeling with Office 365 SharePoint Online and tried to follow your steps, but with no success. I only found JS files and no HTML files in the SharePoint Designer. As soon as I modify the JS file anyway, I get "Display Error" in the Search Result Web Part. Is there any special trick to access the HTML files related to the item display template? Thanks in advance ChristianAnonymous
November 20, 2013
Hi Christian, Have you mapped your network drive? (as described here: blogs.technet.com/.../stage-6-upload-and-apply-a-new-master-page-to-a-publishing-site.aspx) If so, you should see both the HTML and JS files in Windows Explorer. Also, when you modify display templates, you should only modify the HTML files. When you save the HTML file, the changes will automatically be updated in the corresponding JS file. Hope this helps. BellaAnonymous
November 20, 2013
Hi Bella, thank you for your reply. I'm not provided with the Design Manager in my site collection, because it's based on a team site template not a Publishing site - as I'd like to modify the Intranet search. When opening the site collection with SPD 2013 I only see the JS files. I copied and modified one file and (now) it works perfectly, I don't see any other way to modify some display templates within site collections not based on a Publishing Site Template. Are there any reasons not to modify the JS file, if no HTML page exists (MS Support, etc.)? Many thanks in advance Regards ChristianAnonymous
November 21, 2013
Hi Christian, If you got it to work, then great! :-) The reason to modify the HTML file over the JS file is simply because it is easier. Btw, you can enable the Design Manager by activating two features: SharePoint Server Publishing Infrastructure (this is a Site Collection feature)SharePoint Server Publishing (this is a Site feature)(office.microsoft.com/.../enable-publishing-features-HA102802294.aspx) Maybe you can try this and let me know you it goes? Thanks, BellaAnonymous
November 26, 2013
Hi Bella, I'm aware of the Publishing Feature. But we don't need any publishing functionality instead of the Design Manager, therefore it wouldn't be the right approach in the customer's special context. Thank you and best regards ChristianAnonymous
January 22, 2014
Great blog series about customizing the search result in SharePoint 2013Anonymous
February 22, 2014
To confirm, I have found no solution for this in SharePoint Online. Since the sync button is not present on the result types page, custom managed properties do not work at all with result types enabled in the search center. They do not have a value. I've never seen it work. The only way to get them to work is to disable result types.Anonymous
March 10, 2014
Hi Bella,
I have one site column. Made a full crawl then mapped it to newly created managedproperty. The property is now available in refiners but when i am using it in display template its not showing. Please helpAnonymous
March 20, 2014
I was able to modify the html to include Work Phone and Email Address. How to display "Office" info for People Search result? Is this possible?Thanks.Anonymous
April 02, 2014
Hello,
Thanks for these great tutorials.
One question, with Option 2 don't we need to add in the the
#=ctx.CurrentItem.CustomProperty=# ? Are the managed properties automatically retrieved?
Thank you in advance.Anonymous
May 07, 2014
Hi Bella, thanks the information it has helped a great deal. Have you ever had to retrieve managed metadata from a term set into a results page / hover panel? We have the refinement panel working well for this, but if we try to pull the terms into results they show the GUIDs and | : type information.
cheers
RichAnonymous
May 22, 2014
Hello Bella,
I cannot thank you enough for your clear, concise and comprehensive review of the customization of result types. Your work helped me to deliver on a client request. Couldn't have done it without you!
Thanks!!!!!
LeslieAnonymous
June 13, 2014
The comment has been removedAnonymous
September 17, 2014
Hello Bella,
First, thanks for all this information. Very helpful!
Then, I have an issue related with managed properties mapped to "Publishing Images" content types. It works well using the CSWP but when using the Search Results Web Part, variable is empty. Any thoughts for me?Anonymous
October 03, 2014
The comment has been removedAnonymous
January 28, 2015
This is awesome, was just what I needed for the tasks I needed to complete.I learned alot. THANK-YOU, THANK-YOU, THANK-YOU!Anonymous
March 06, 2015
Hi Bella, Almost one year later and I have the same question Rich have asked you.
"Have you ever had to retrieve managed metadata from a term set into a results page / hover panel?"
I hope you solved this one, :)
Regards,
KoenAnonymous
March 16, 2015
Great post! Is it possible to change the title from the default to a custom managed property and maintain the hit highlighting? It looks like the title is always loaded from Srch.U.getHighlightedProperty(id, ctx.CurrentItem, "Title"); within the Item_CommonItem_Body.html display template so I'm not sure if there is a way to override that.Anonymous
May 06, 2015
Hi - I have a potential solution for the metadata question. I did this:
var MyPropertyValue = "" + $getItemValue(ctx, "owstaxIdMyPropertyValue");
This just displays the value without the GUIDs and so forth. It needs the "" to convert the item to a string.Anonymous
May 06, 2015
Hi Bella,
Is there anything specific needed for displaying a managed property that is a managed metadata value? When using the Search Query Tool I get the value correctly back, but the display templates (item and hover) don't show the value?
Thanks,
Roland