August 2009
Volume 24 Number 08
Inside Windows 7 - MultiTouch Capabilities in Windows 7
By Yochay Kiriaty | August 2009
This article discusses:
|
This article uses the following technologies: Windows 7 |
View the entire series:
- Part 1: Introducing Libraries
- Part 2: Introducing Taskbar APIs
- Part 3: MultiTouch Capabilities in Windows 7
This article is based on a prerelease version of Windows 7. Details are subject to change.
Contents
Introduction to Windows 7 Multitouch
Windows 7 Multitouch Platform Programming Models
Working with Gestures
Working with Windows Raw Touch Messages
Summary
This is the third article in a series of articles about Windows 7. The series focuses on new user experiences that developers can tap into to make their applications shine on Windows 7. Part 1 covered Libraries. Part 2 covered Taskbar APIs. Part 3 covers multitouch capabilities in Windows 7. Download Windows 7 Release Candidate now to help you get the most out of this article.
Introduction to Windows 7 Multitouch
In Windows 7we have enriched the Windows experience with touch, making touch a first-class citizen as another way to interact with your PC alongside the mouse and keyboard. In recent years, we have witnessed a wide range of multitouch devices that have generated an extremely positive user experience. Therefore, it is only natural for Windows to introduce such multitouch support in Windows 7 as a core capability.
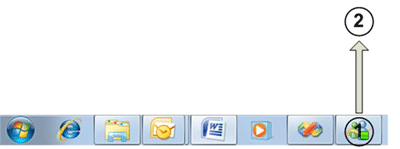
With the Windows 7 Multitouch Platform, you have the freedom to directly interact with your computer. For example, you are able to reach out and slowly scroll through your pictures directly from Windows Explorer, or flick and move through them quickly. It is important to understand that we didn’t create a special Windows 7 Multitouch Shell. There is no special Windows Explorer that is available only on multitouch devices. The simplest example is the Windows 7 Taskbar Jump Lists. When you use the mouse to right-click on any icon on the Taskbar, you see its corresponding Jump List. For example, right-clicking on the Windows Live Messenger icon shows Live Messenger’s Jump List. But how can you right-click using multitouch? Simply touch the Live Messenger icon and drag out with your finger, as shown in Figure 1.

Figure 1 Using Multitouch on Live Messenger’s Jump List
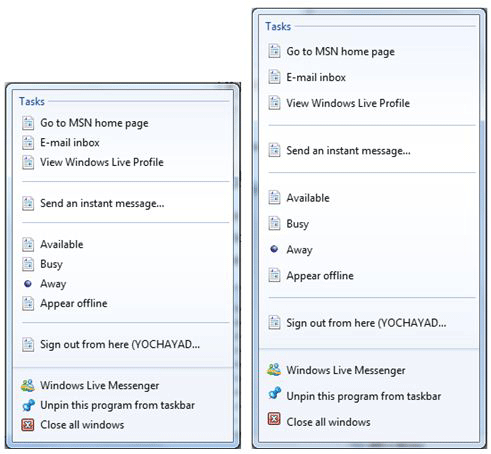
Performing that drag gesture shows Live Messenger’s Jump Lists. As you can see in Figure 2, the touch-triggered Jump List displays the same content as in the standard right-click Jump List. The right-side image shows the Live Messenger’s Jump List using touch. The spacing between each item in the multitouch-enabled Jump List is larger than the spacing between each item in the left image, which is the default right-click Jump List.

Figure 2 Multitouch and Standard Views of Jump Lists
The Windows Live Messenger is just one example where Windows 7 doesn’t create a new set of UIs just for touch scenarios, but instead makes it blend into the existing infrastructure. The Taskbar is only one example of many multitouch optimized experiences that ship with Windows 7, like the XPS viewer, Windows Photo Viewer, and IE8.
Windows 7 Multitouch Platform Programming Models
To provide well-rounded Windows Touch solutions for all kind of applications, the Windows Touch Platform provides various levels of support. There are several scenarios by which you can enhance applications using the Windows Touch Platform features. Before you adopt a specific approach, you should consider what exactly you want to do with your application.
Legacy SupportLet’s assume you already have an existing application with a large install base. You might ask yourself, what will be my users multitouch experience when running the application on a Windows 7 multitouch-enabled computer? The good news is that the Windows 7 Multitouch Platform provides a free out-of-the-box experience for applications that are touch-unaware and were not designed to support multitouch. Specifically, it provides free, out-of-the-box support for a few basic gestures. In other words, you can expect a few basic gestures to work and to have the desired effect in your application. Basic gestures include single finger or two fingers panning, two fingers zoom, and flick gestures that were introduced in the Windows Vista time frame.
Adding Basic Multitouch SupportHere we focus on adding direct gestures support, as well as other behavior, and user interface changes to make applications more touch-friendly beyond simple gesture support.
One example that we’ve already reviewed near the beginning of this article is the touch- optimized Taskbar Jump Lists. By using the getMessageExtraInfomethod, the Taskbar can trace the origin of the input message and determine whether it is a touch message and then respond accordingly.
In addition, you can use gestures to enhance your application and provide better multitouch support. Applications that directly respond to gestures have full control over how they behave when a user is touching the touch-enabled device. For example, Windows 7 ships with the Windows Photo Viewer. In the Photo Viewer application, the viewer receives specific information about the location that the zoom gesture originates from. That is, the zoom gesture contains information about the center point--specific X and Y coordinates--of the zoom gesture, and then the Photo Viewer can focus around the center of the gesture. The Windows Photo Viewer application also uses panning and rotation gestures to provide a very good image viewing experience, with relatively little effort.
With gestures, you can also override the default panning behavior. For example, the default touch scrolling is designed to work in text-centric windows that scroll primarily vertically, like Web pages or documents; dragging horizontally does text selection rather than scrolling. In most applications, this works just fine. But what if your application actually needs to support horizontal scrolling? Also, for some applications the default scroll can appear chunky, going too fast or too slow. With gestures support, you can override the default panning behavior and optimize it for your application’s needs.
Experience Optimized for MultitouchThe best-case scenario is when applications are designed from the ground up to support multitouch. These applications build on top of the Windows Messages Touch message, WM_TOUCH. This message provides raw touch data to the application, and you can consume these messages and handle multiple touch points. Most gestures that we mentioned previously are two-finger gestures, where with WM_TOUCH messages you can receive as many simultaneous touch points as your underlying touch sensitive hardware supports.
The Windows 7 Multitouch Platform also provides manipulation and inertia processors to help you interpret the touch messages. Think of manipulation as a black-box that receives as input the object that is being touched and all the related touch messages. The result is a 2D affine transform matrix representing the transformation that happened as a result of the finger movement. For instance, if you were writing a photo-editing application, you could grab two photos at the same time using however many fingers you wanted to rotate, resize, and translate the photos, and the manipulation process provides the changes you need to reflect on the object.
Inertia provides a very basic physics model for applications and provides you with an easy way to continue the smooth transition of an object even after you picked up your fingers from the touch- sensitive device, to create a simple transition effect rather than stopping the object on the spot.
Working with Gestures
Whenever the user touches a touch-sensitive Windows 7 enabled device, the Windows 7 Multitouch Platform sends gesture messages, WM_GESTURE, to your application by default. This is the free out-of-the-box behavior, and you will need to opt-out if you wish to stop receiving such messages.
Gestures are considered as one or two fingers touch inputs that translate into some kind of predefined action (gesture) that the user performs. Once detected (the OS is doing all the work for you), the OS will send a gesture message to your application. This message contains all the information needed for decoding and making it work. Windows 7 support the following gestures:
- Zoom
- Single finger and two fingers pan
- Rotate
- Two fingers tap
- Press and tap
Handling WM_Gesture MessagesIn order to work with gestures, you will need to handle the WM_GESTURE messages that are sent to your application. If you are a Win32 programmer, you can check for WM_GESTURE messages in your application’s WndProc function.
The WM_GESTURE is the generic message used for all gestures. Therefore, in order to determine which gesture you need to handle, first you need to decode the gesture message. The information about gestures is found in the lParam parameter, and you need to use a special function, GetGestureInfo, to decode the gesture message, as shown in the following code snippet.
GESTUREINFO gi; ZeroMemory(&gi, sizeof(GESTUREINFO)); gi.cbSize = sizeof(gi); BOOL bResult = GetGestureInfo((HGESTUREINFO)lParam, &gi);
After obtaining a GESTUREINFO structure, you can check the dwID to identify which gesture was performed. The GESTUREINFO structure contains several other important members:
- cbSize- the size of the structure, in bytes
- ptsLocation- A POINTS structure containing the coordinates associated with the gesture. These coordinates are always relative to the origin of the screen
- dwFlags- the state of the gesture such as begin, inertia and end
- ullArguments- a 64-bit unsigned integer that contains the arguments for gestures that fit into eight bytes. This is the extra information that is unique for each gesture type
With this knowledge, we can now move forward and write the complete switch-case method that handles all gestures, as shown in Figure 3.
Figure 3 Switch-Case Method
void CMTTestDlg::DecodeGesture(WPARAM wParam, LPARAM lParam) { GESTUREINFO gi; ZeroMemory(&gi, sizeof(GESTUREINFO)); GetGestureInfo((HGESTUREINFO)lParam, &gi); switch (gi.dwID){ case GID_ZOOM: // Code for zooming goes here break; case GID_PAN: break; case GID_ROTATE: break; case GID_TWOFINGERTAP: break; case GID_PRESSANDTAP: break; default: // You have encountered an unknown gesture break; CloseGestureInfoHandle((HGESTUREINFO)lParam); }
Please note that at the end of the function we call the CloseGestureInfoHandlefunction that closes resources associated with the gesture information handler. If you handle the WM_GESTURE message, it is your responsibility for closing the handle using this function. Failure to do so may result in memory leaks.
Handling gesture messages has a fixed flow that includes configuration, decoding the gesture message, and handling the specific gestures according to your application needs. As you can see in the preceding code, it is not that difficult to do so.
Now let’s review in detail the Zoom gestures, which will give you an idea of what all other gestures might look like.
Use the Zoom Gesture to Scale an Object
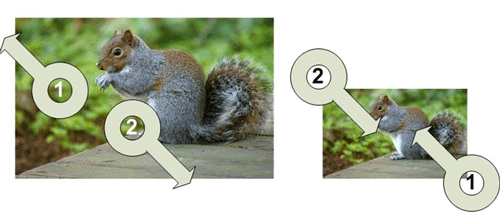
Zoom gesture is usually recognized by users as a “pinch” movement between two touch points, where you move your fingers closer to each other to zoom out, and move your fingers farther apart to zoom in and enlarge the content. The zoom gesture allows you to scale the size of your objects. Figure 4illustrates how the zoom gesture works.

Figure 4 Zoom Gesture
Now, let’s see what code you need to implement in your GID_ZOOM switch to achieve the desired zooming effect.
The gesture info-structure includes the dwFlags member that is used to determine the state of the gesture and can include any of the following values:
- GF_BEGIN– indicates that the gesture is starting, received in the first WM_Gesture message
- GF_INERTIA– indicates that the gesture has triggered inertia
- GF_END– indicates that the gesture has finished
- The defaultof the switch – indicates the rest of the gesture message and is usually referred to as the delta
We will use the GF_BEGIN flag to save the initial start coordinates of the touch point into variables as a reference for the following steps. We save the ptsLocationinto the _ptFirstvariable. For zoom gesture, the ptsLocationindicates the center of the zoom.
The following zoom message that arrives is handled by the default case. We save the coordinates into the _ptSecondvariable. Next, we calculate the zoom center point, the zoom, and last we update rectangular (our graphic object) to reflect the zoom center point and zooming ratio. Figure 5showcases these arguments.
Figure 5 GID_ZOOM Switch
case GID_ZOOM: switch(gi.dwFlags) { case GF_BEGIN: _dwArguments = LODWORD(gi.ullArguments); _ptFirst.x = gi.ptsLocation.x; _ptFirst.y = gi.ptsLocation.y; ScreenToClient(hWnd,&_ptFirst); break; default: // We read here the second point of the gesture. This is middle point between fingers. _ptSecond.x = gi.ptsLocation.x; _ptSecond.y = gi.ptsLocation.y; ScreenToClient(hWnd,&_ptSecond); // We have to calculate zoom center point ptZoomCenter.x = (_ptFirst.x + _ptSecond.x)/2; ptZoomCenter.y = (_ptFirst.y + _ptSecond.y)/2; // The zoom factor is the ratio between the new and the old distance. k = (double)(LODWORD(gi.ullArguments))/(double)(_dwArguments); // Now we process zooming in/out of the object ProcessZoom(k,ptZoomCenter.x,ptZoomCenter.y); InvalidateRect(hWnd,NULL,TRUE); // Now we have to store new information as a starting information for the next step _ptFirst = _ptSecond; _dwArguments = LODWORD(gi.ullArguments); break; } break;
In the default case handler, we save the location of the gesture, and from the two sets of points (representing the current touch point and the previous one) we calculate the zoom center location and store it in ptZoomCenter. We also calculate the zoom factor by calculating the ratio between the two points. A call to the ProcessZoomhelper function updates the new coordinates to reflect the zoom factor and center point.
Handling the rest of the Windows 7 default gestures is very similar to the specific zoom gesture handling described above. All gestures follow the same flow, and just the internal logical implementation differs per gesture, per use-case scenario. Next, we review the optimal model and dive into the API that allows you to receive and handle raw touch events.
Working with Windows Raw Touch Messages
In order to start receiving raw touch messages, WM_TOUCH, first you need to ask the OS to start sending touch messages to your application and stop sending the default gesture messages. To do so, you need to call the *RegisterTouchWindow(HWND hWnd, ULONG uFlags)*function. Calling this function registers a single hWndelement (usually a window) as being touch-enabled.
As with gestures, you handle WM_TOUCH messages in your application’s WndProcfunction. A single WM_TOUCH message can contain several different “touch-points messages” that need to be unpacked into an array of touch input structures. As standard practice, you want to unpack the WM_TOUCH message into array of TOUCHINPUT structures, where each structure in that array represents data from a single touch point. To unpack, you need to call the *GetTouchInputInfo(HTOUCHINPUT hTouchInput, UINT cInputs, PTOUCHINPUT pInputs, int cbSize)*function and pass it the lParamof the WM_TOUCH message and a newly created touch points array, as shown in Figure 6.
Figure 6 Unpacking WM_TOUCH
case WM_TOUCH: { unsigned int numInputs = (unsigned int) wParam; TOUCHINPUT* ti = new TOUCHINPUT[numInputs]; if(GetTouchInputInfo((HTOUCHINPUT)lParam, numInputs, ti, sizeof(TOUCHINPUT))) { // Handle each contact point for(unsigned int i=0; i< numInputs; ++i) { /* handle ti[i] */ } } CloseTouchInputHandle((HTOUCHINPUT)lParam); delete [] ti; } break; default: return DefWindowProc(hWnd, message, wParam, lParam);
Here you can see how we fill the TOUCHPOINT tiarray with the data from each touch point. Next, we iterate through the touch points array, applying our logic to each touch point, the handle ti[i] comment. Last, we need to clean the touch handle by calling CloseTouchInputHandle(HTOUCHINPUT hTouchInput), passing the original WinProc’s lParam. Failing to do so will result in memory leaks.
The preceding code represents the first step in handling WM_TOUCHmessages. A single touch input structure, TOUCHINPUT, contains all the necessary information about a single touch point that you will need to work with:
- dwID– is the touch point identifier that distinguishes a particular touch input from the other
- dwFlags– is a set of bit flags that specify the state of the touch point
- Xand Ycoordinate of the touch point (basically the location of each touch point)
- dwTime– is the time step for the event, in milliseconds
- dwMask– a set of bit flags that specify which of the optional fields in the structure contain valid values
It is important to note that the X and Y coordinates are in hundredths of a pixel of physical screen coordinates (i.e., centa-pixel). This extra-fine resolution promotes high precision and accurate handwrite recognition for other applications that may require such fine resolution. But for most scenarios, you need to remember to divide the touch point X and Y coordinates by a hundred to translate the touch point coordinates to usable screen coordinates before you start using these coordinates.
By now you know how to handle touch messages and you have all the information to go and add real logic to our WM_TOUCH handler described above. Let’s use this knowledge and build a multitouch paint application, also known as Scratch Pad.
Tracking Touch Point IDsTo create the Scratch Pad application, you need to track each touch point movement and the path that it forms, and then paint a line along that path. To distinguish between the different touch points and to make sure you really handle each touch point correctly, we assign different color to each touch point.
After unpacking the touch message into an array of touch input structures, ti, you need to check each touch point state and apply different logic per touch state. In the Scratch Pad example, new touch points are indentified by the down state, TOUCHEVENTF_DOWN. You register the new touch point ID and assign it a color. Once a touch point is removed, TOUCHEVENTF_UP, you complete the last paint and unregister the touch point ID. In between down and up events, you most likely will get a lot of move messages, TOUCHEVENTF_MOVE. For each move message, you add a new point to the existing line and paint the new segment of the line. Figure 7shows the entire WM_TOUCHhandler that is required for the Scratch Pad application to support multitouch.
Figure 7 WM_TOUCH Handler
case WM_TOUCH: { unsigned int numInputs = (unsigned int) wParam; TOUCHINPUT* ti = new TOUCHINPUT[numInputs]; if(GetTouchInputInfo((HTOUCHINPUT)lParam, numInputs, ti, sizeof(TOUCHINPUT))) { // For each contact, dispatch the message to the appropriate message handler. for(unsigned int i=0; i< numInputs; ++i) { if(ti[i].dwFlags & TOUCHEVENTF_DOWN) { OnTouchDownHandler(hWnd, ti[i]); } else if(ti[i].dwFlags & TOUCHEVENTF_MOVE) { OnTouchMoveHandler(hWnd, ti[i]); } else if(ti[i].dwFlags & TOUCHEVENTF_UP) { OnTouchUpHandler(hWnd, ti[i]); } } } CloseTouchInputHandle((HTOUCHINPUT)lParam); delete [] ti; } break;
The key for tracking individual touch points is using the dwIDthat remains the same through the duration of specific touch stroke. In the OnTouchDownHandlerhelper function, you assign this ID to a CStrokeobject that is basically an array of points that represents a line. This line is the path form when you drag your finger across the touch-sensitive device. We are not going to cover the entire code sample that supports the application and actually paints the lines to the screen. Basically, all that you need to do in order to support multitouch can be found in the preceding code sample.
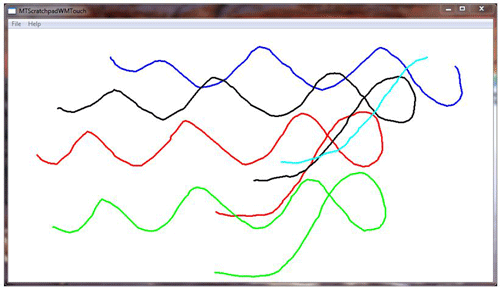
You can view the output of the Scratch Pad application in Figure 8.

Figure 8 Output of the Scratch Application
In the default case handler, we save the location of the gesture, and from the two sets of points (representing the current touch point and the previous one) we calculate the zoom center location and store it in ptZoomCenter. We also calculate the zoom factor by calculating the ratio between the two points. A call to the ProcessZoomhelper function updates the new coordinates to reflect the zoom factor and center point.
Handling the rest of the Windows 7 default gestures is very similar to the specific zoom gesture handling described above. All gestures follow the same flow, and just the internal logical implementation differs per gesture, per use-case scenario. Next, we review the optimal model and dive into the API that allows you to receive and handle raw touch events.
Working with Windows Raw Touch Messages
In order to start receiving raw touch messages, WM_TOUCH, first you need to ask the OS to start sending touch messages to your application and stop sending the default gesture messages. To do so, you need to call the *RegisterTouchWindow(HWND hWnd, ULONG uFlags)*function. Calling this function registers a single hWndelement (usually a window) as being touch-enabled.
As with gestures, you handle WM_TOUCH messages in your application’s WndProcfunction. A single WM_TOUCH message can contain several different “touch-points messages” that need to be unpacked into an array of touch input structures. As standard practice, you want to unpack the WM_TOUCH message into array of TOUCHINPUT structures, where each structure in that array represents data from a single touch point. To unpack, you need to call the *GetTouchInputInfo(HTOUCHINPUT hTouchInput, UINT cInputs, PTOUCHINPUT pInputs, int cbSize)*function and pass it the lParamof the WM_TOUCH message and a newly created touch points array, as shown in Figure 6.
Summary
The Windows 7 Multitouch Platform is a very powerful development platform. From implementing the default gesture support to the more advanced raw touch messages, it gives you a lot of power with relatively simple implementation.
The platform also includes manipulation and inertia processors. Manipulations are similar to gestures in a lot of ways, but they are a lot more powerful. Manipulations are used to simplify transformation operations on any given number of objects. You can perform a combination of specific component gestures such as rotate, zoom, and scale on a specific object at the same time. The manipulation processor yields a two dimensional “transformation matrix” that represents the transformations in X and Y coordinates, the scale change, and the rotation that occurred to the object over time as a result of the performed movement of the touch points. Once the last touch point is pulled up, you may want to apply simple physics to the object so it smoothly comes to a halt, rather than it abruptly stopping on the spot. To support that smooth motion, the Windows 7 multitouch platform provides the Inertia API.
These APIs will be the topic of our next MSDN article.
**Yochay Kiriaty **is a Technical Evangelist at Microsoft, focusing on Windows 7. He has more than a decade of experience in software development. He has written and taught academic computer science courses and is an active contributor to The Windows Blog.