Manage Azure Stack HCI cluster registration
Applies to: Azure Stack HCI, versions 22H2 and 21H2
Depending on your cluster configuration and requirements, you may need to take additional steps after registering your cluster with Azure. This article describes how to manage your cluster registration using Windows Admin Center, PowerShell, or the Azure portal. It also provides answers to the frequently asked questions about cluster registration.
When you register your cluster with Azure, an Azure Resource Manager resource is created to represent the on-premises Azure Stack HCI cluster. Starting with Azure Stack HCI, version 21H2, registering a cluster automatically creates an Azure Arc of the server resource for each server in the Azure Stack HCI cluster. This Azure Arc integration extends the Azure management plane to Azure Stack HCI. The Azure Arc integration enables periodic syncing of information between the Azure resource and the on-premises clusters.
View registration and Arc-enabled servers status
When you connect to a cluster using Windows Admin Center, you'll see the dashboard, which displays the Azure Stack HCI registration and Arc-enabled servers status.
For Azure Stack HCI registration, Connected means that the cluster is already registered with Azure and has successfully synced to the cloud within the last day.
For Arc-enabled servers, Connected means that all physical servers are Arc-enabled and can be managed from the Azure portal.
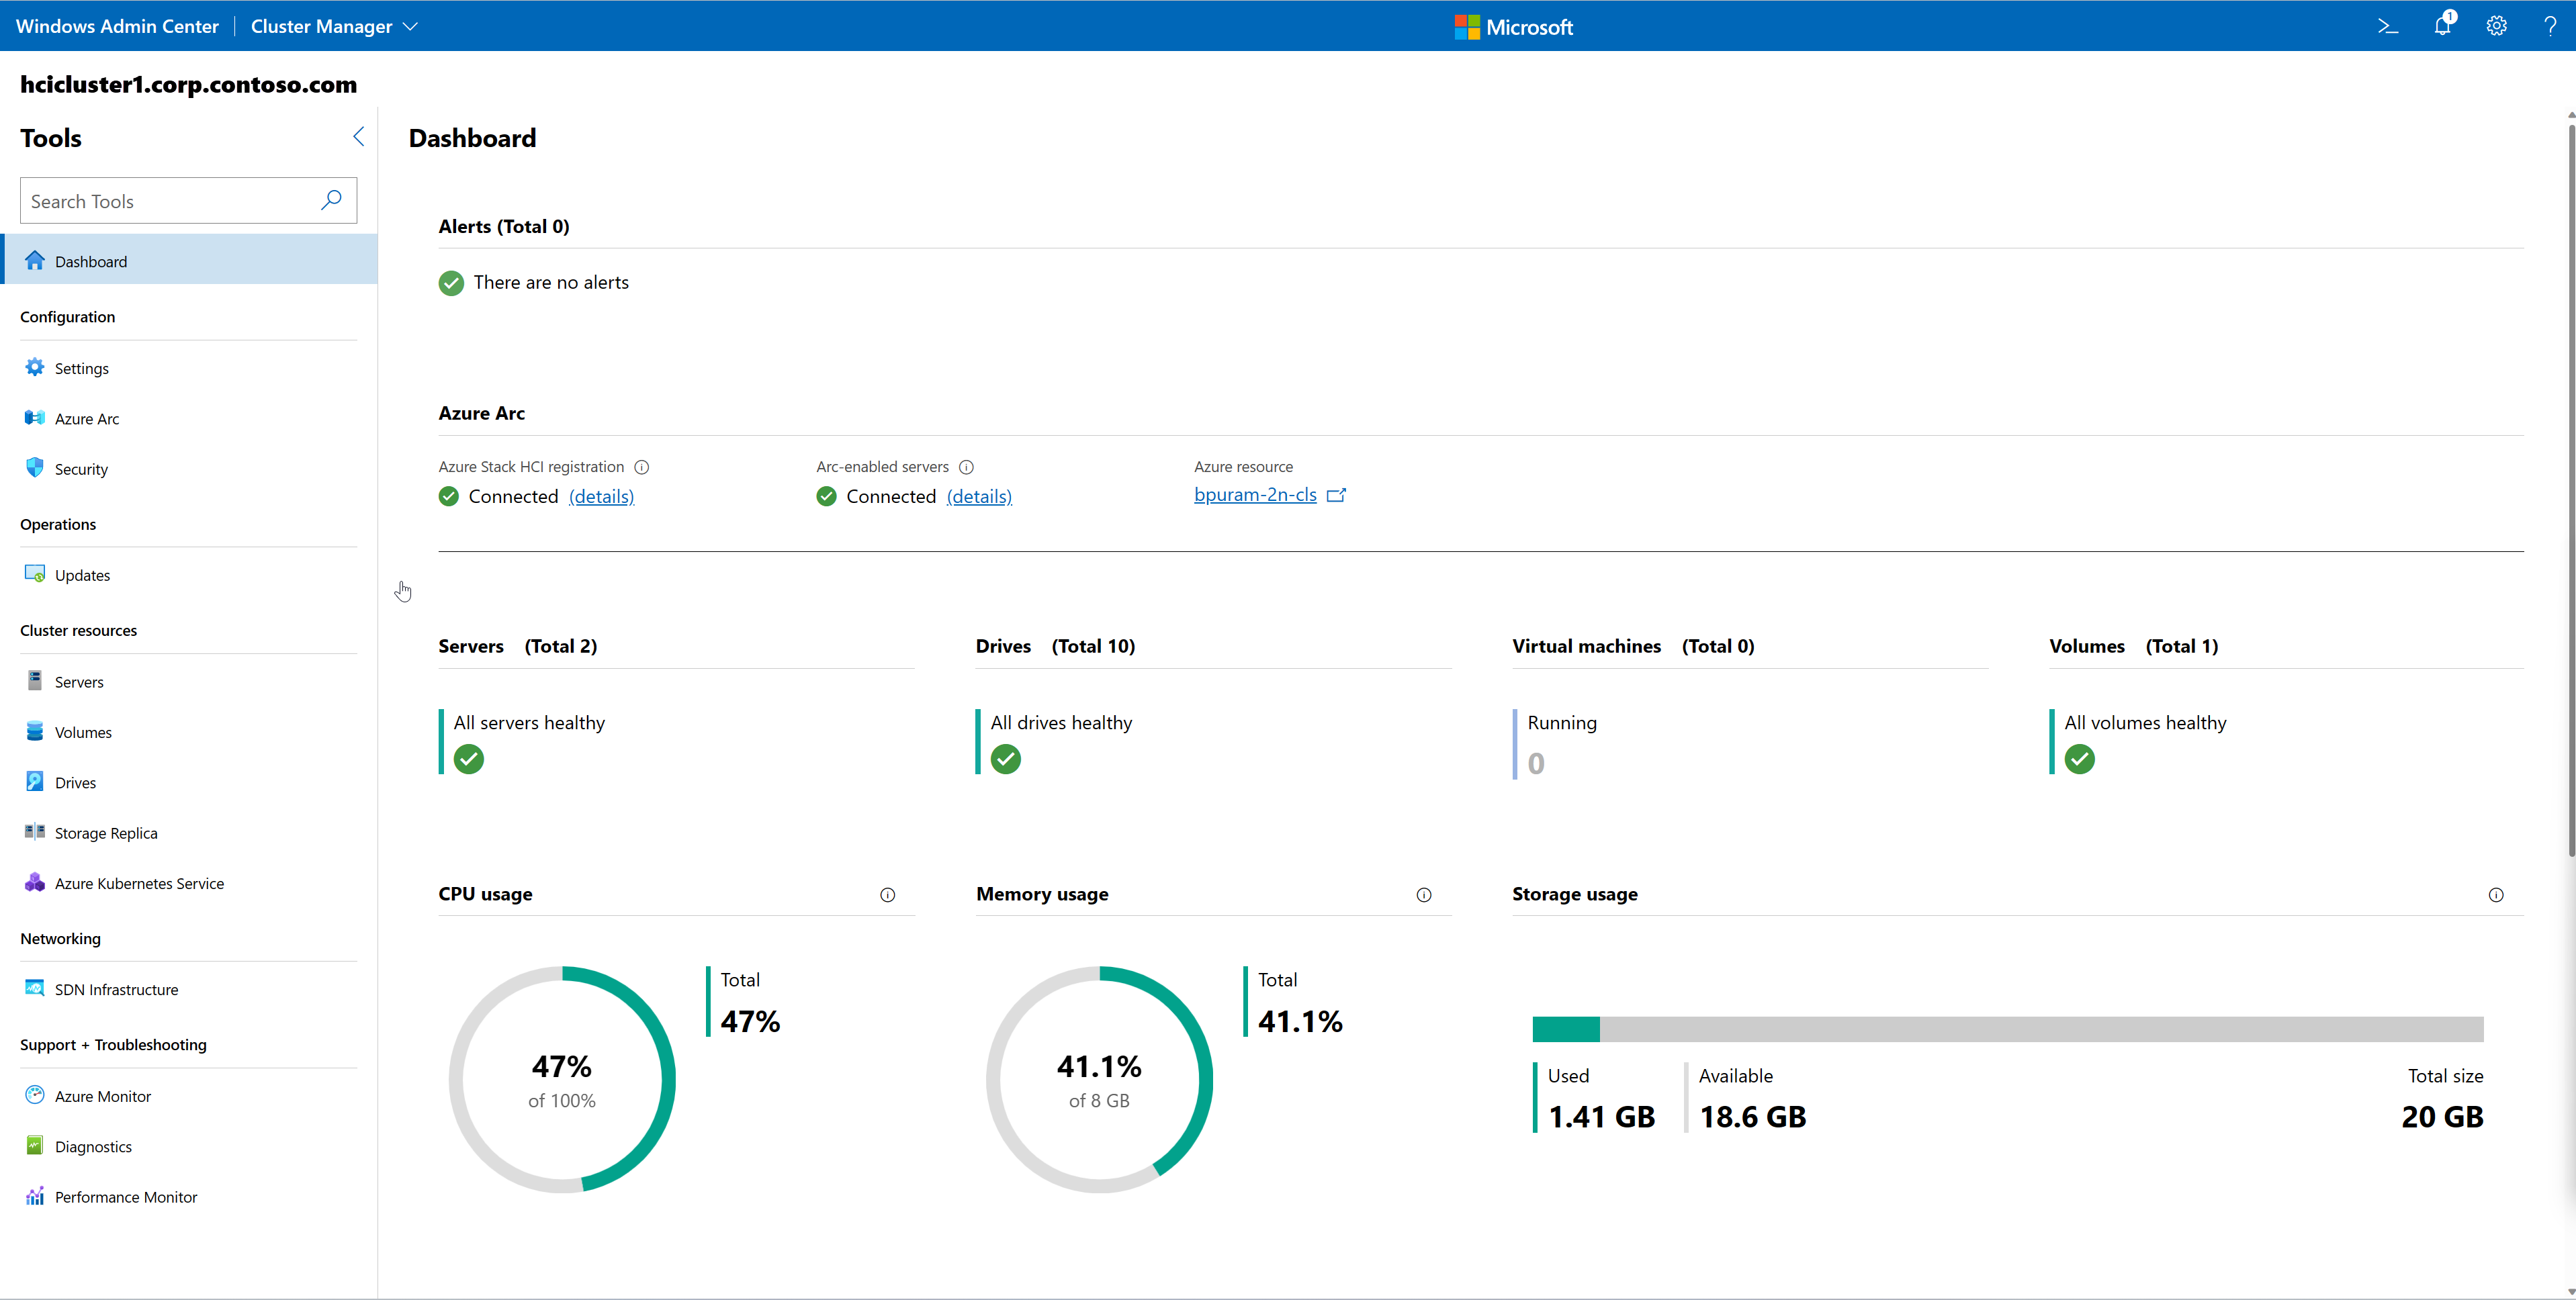

You can get more information by selecting Azure Arc from the Tools menu on the left.
Note
The Azure Arc dashboard is currently in public preview.

On the Overview page, you will find high-level status information about Azure Stack HCI registration and Arc-enabled servers. You can click on either tile to be taken to the individual pages.

On the Azure Stack HCI registration page, you can view both the Azure Stack HCI system and server status. This includes the Azure connection status and last Azure sync. You can find Useful links to troubleshooting documentation and cluster extensions. You can Unregister if needed.

If your cluster is registered with Azure, but the physical servers are not yet Arc-enabled, you can do so from the Arc-enabled servers page. If the physical servers are Arc-enabled, you can view the Azure Arc status and version ID for each server. You can also find Useful links to troubleshooting information.


Enable Azure Arc integration
Starting with Azure Stack HCI, version 21H2, the clusters are automatically Arc-enabled on registration. Azure Arc integration isn't available on Azure Stack HCI, version 20H2.
You need to manually enable Azure Arc integration in the following scenarios:
- You updated your cluster servers from Azure Stack HCI, version 20H2 (which were previously not Arc-enabled manually) to version 21H2.
- If you have previously Arc-enabled your 20H2 clusters, and after upgrading to 21H2 the Arc enablement is still failing, see the guidance here to troubleshoot.
- You disabled Arc enablement previously, and now you intend to Arc-enable your 21H2 or later Azure Stack HCI cluster.
Follow these steps to enable Azure Arc integration:
Install the latest version of the
Az.Resourcesmodule on your management PC:Install-Module -Name Az.ResourcesInstall the latest version of the
Az.StackHCImodule on your management PC:Install-Module -Name Az.StackHCIRerun the
Register-AzStackHCIcmdlet and specify your Azure subscription ID, which must be the same ID with which the cluster was originally registered. The-ComputerNameparameter can be the name of any server in the cluster. This step enables Azure Arc integration on every server in the cluster. It will not affect your current cluster registration with Azure, and you don't need to unregister the cluster first:Register-AzStackHCI -SubscriptionId "<subscription_ID>" -ComputerName Server1 -Region <region> -TenantId "<tenant_id>"Important
If the cluster was originally registered using a
-Region,-ResourceName, or-ResourceGroupNamethat's different from the default settings, you must specify those same parameters and values here. RunningGet-AzureStackHCIwill display these values.
For failures while enabling Arc, see the guidance here for troubleshooting.
Upgrade Arc agent on cluster servers
Starting with Azure Stack HCI, version 21H2, to automatically update the Arc agent when a new version is available, make sure the cluster servers are configured with Microsoft Update. For more information, see Microsoft Update configuration.
Follow these steps to upgrade Arc agent on cluster servers:
In the Server Configuration Tool (SConfig), select the option to Install Updates (option 6):
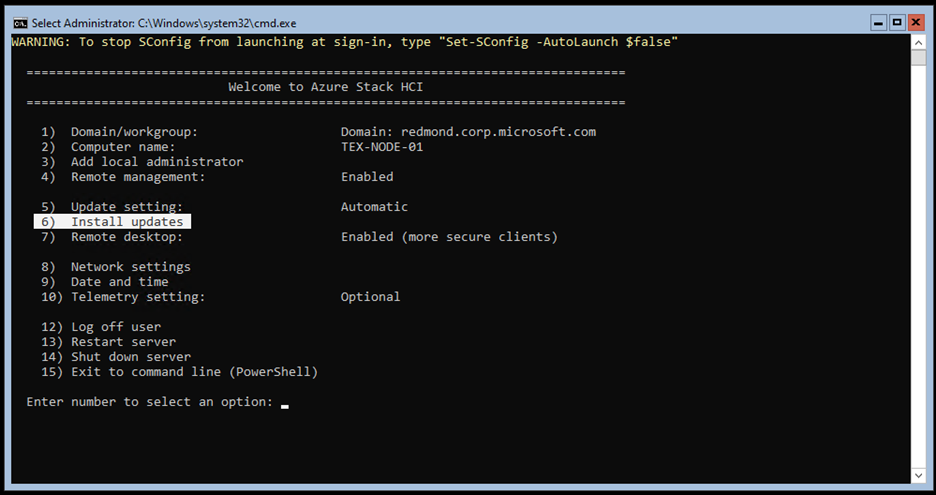
Select the option for All quality updates (option 1).
You can choose to specifically update the Arc agent, or install all of the updates available:
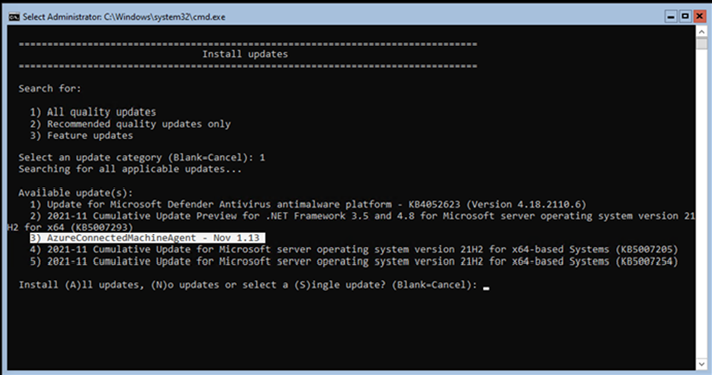
Run
azcmagent versionfrom PowerShell on each node to verify the Arc agent version.


Unregister Azure Stack HCI
You can unregister Azure Stack HCI using Windows Admin Center or using PowerShell.
The unregistration process automatically cleans up the Azure resource that represents the cluster, the Azure resource group (if the group was created during registration and doesn't contain any other resources), and the Microsoft Entra app identity. This cleanup stops all monitoring, support, and billing functionality through Azure Arc.
Follow these steps to unregister your Azure Stack HCI cluster via Windows Admin Center:
Connect to the cluster using Windows Admin Center.
Select Azure Arc from the menu on the left-hand side.
Select Azure Stack HCI registration, select the Unregister button, and then select Unregister again.
Note
If your Windows Admin Center gateway is registered to a different Microsoft Entra tenant ID that was used to initially register the cluster, you might encounter problems when you try to unregister the cluster using Windows Admin Center. If this happens, you can use the PowerShell instructions in the next section.
Clean up after a cluster that was not properly unregistered
If a user destroys an Azure Stack HCI cluster without un-registering it, such as by re-imaging the host servers or deleting virtual cluster nodes, then artifacts will be left over in Azure. These artifacts are harmless and won't incur billing or use resources, but they can clutter the Azure portal. To clean them up, you can manually delete them.
To delete the Azure Stack HCI resource, navigate to the resource in the Azure portal and select Delete from the action bar. You can get the resource details by running the Get-AzureStackHCI cmdlet.
Azure Stack HCI creates two Microsoft Entra applications as part of the registration: resourceName and resourceName.arc. To delete those, go to Microsoft Entra ID > App Registrations > All Applications. Select Delete and confirm.
You can also delete the Azure Stack HCI resource by using PowerShell:
Remove-AzResource -ResourceId "<resource_name>"
You might need to install the Az.Resources module:
Install-Module -Name Az.Resources
If the resource group was created during registration and doesn't contain any other resources, you can delete it too:
Remove-AzResourceGroup -Name "<resourceGroupName>"
Troubleshooting
For information about common errors and mitigation steps to resolve them, see Troubleshoot Azure Stack HCI registration.
FAQs
Find answers to some frequently asked questions:
How do I use a more restricted custom permissions role?
You can further reduce the permissions required to perform Azure Stack HCI registration as described in Assign Azure permissions using PowerShell, provided that some of the operations described below are already performed out-of-band by a user having contributor and user access administrator roles.
Register the required resource providers. Sign in to the subscription you will use to register the cluster. Under Settings > Resource Providers, select the following resource providers and then select Register:
- Microsoft.AzureStackHCI
- Microsoft.HybridCompute
- Microsoft.GuestConfiguration
- Microsoft.HybridConnectivity
Create the resource groups. Make sure the resource groups into which the Azure Stack HCI resources will be projected are pre-created by a privileged user. For more details, see the prerequisites section.
Once these two pre-requisites are set up, create a custom role and use it for registration as described below. First, create a JSON file called customHCIRole.json with the following content. Make sure to change
<subscriptionID>to the ID of your Azure subscription. To get your subscription ID, visit the Azure portal, go to Subscriptions, then copy/paste your ID from the list:{ "Name": "Azure Stack HCI registration role", "Id": null, "IsCustom": true, "Description": "Custom Azure role to allow subscription-level access to register Azure Stack HCI", "Actions": [ "Microsoft.Resources/subscriptions/resourceGroups/read", "Microsoft.AzureStackHCI/clusters/*", "Microsoft.Authorization/roleAssignments/write", "Microsoft.Authorization/roleAssignments/read" ], "NotActions": [ ], "AssignableScopes": [ "/subscriptions/<subscriptionId>" ] }Create the custom role:
New-AzRoleDefinition -InputFile <path to customHCIRole.json>Assign the custom role to the user:
$user = get-AzAdUser -DisplayName <userdisplayname>
$role = Get-AzRoleDefinition -Name "Azure Stack HCI registration role"
New-AzRoleAssignment -ObjectId $user.Id -RoleDefinitionId $role.Id -Scope /subscriptions/<subscriptionid>
You can now register the cluster using Register-AzStackHCI.
If you need to un-register this cluster, add the Microsoft.Resources/subscriptions/resourceGroups/delete permission to the JSON file when creating the custom role.
How do I register a cluster using ArmAccessToken/SPN?
Before registration, make sure the prerequisites are met.
Note
These SPN credentials are used for initial onboarding to Azure Stack HCI. Azure Stack HCI still creates separate SPN credentials for Arc onboarding. To use a custom SPN for Arc onboarding, see How do I register a cluster using SPN for Arc onboarding?.
Run 'Connect-AzAccount' to connect to Azure. To use SPN to connect, you can use:
- Device Code-based authentication. Use
-DeviceCodein the cmdlet. - Certificated based authentication. See this article to configure the SPN for certificate-based authentication. Then use appropriate parameters in the
Connect-AzAccountcmdlet that accept certificate information. The SPN you use should have all the required permissions on the subscriptions as listed here.
- Device Code-based authentication. Use
Assign
$token = Get-AzAccessToken.Use the Register-AzStackHCI with the
TenantId,SubscriptionId,ArmAccessToken, andAccountIdparameters, as follows:Register-AzStackHCI -TenantId "<tenant_ID>" -SubscriptionId "<subscription_ID>" -ComputerName Server1 -Region <region> -ArmAccessToken $token.Token -AccountId $token.UserId
How do I register a cluster using SPN for Arc onboarding?
The following guidelines are for the user running the registration cmdlet who cannot get the Microsoft.Authorization/roleAssignments/write permission assigned. In such cases, they can use the pre-created SPN with Arc onboarding roles (Azure Connected Machine Onboarding and Azure Connected Machine Resource Administrator) assigned to the SPN, and specify the credentials to the registration cmdlet using the -ArcSpnCredential option.
Note
Azure Stack HCI doesn't update the credentials of the SPN created in this way. When the SPN credentials are near expiry, you must regenerate the credentials and run the "repair registration" flow to update the SPN credentials on the cluster.
Note
Use PowerShell module version 1.4.1 or earlier to use SPN credentials for Arc onboarding if you cannot assign the Microsoft.Authorization/roleAssignments/write permission to the registration role.
Before registration, make sure the prerequisites and pre-checks are met. The user registering the cluster has either the "contributor" role assigned for the subscription which is used for the cluster registration, or has the following list of permissions if a custom role is assigned:
- "Microsoft.Resources/subscriptions/resourceGroups/read",
- "Microsoft.Resources/subscriptions/resourceGroups/write",
- "Microsoft.AzureStackHCI/register/action",
- "Microsoft.AzureStackHCI/Unregister/Action",
- "Microsoft.AzureStackHCI/clusters/*",
- "Microsoft.Authorization/roleAssignments/read",
- "Microsoft.HybridCompute/register/action",
- "Microsoft.GuestConfiguration/register/action",
- "Microsoft.HybridConnectivity/register/action"
For unregistration, make sure you also have Microsoft.Resources/subscriptions/resourceGroups/delete permission.
To register the cluster and Arc-enable the servers, run the following PowerShell commands after updating them with your environment information. The following commands require Az.Resources (minimum version 5.6.0) and Az.Accounts (minimum version 2.7.6). You can use the get-installedModule <module name> cmdlet to check the installed version of a PowerShell module.
#Connect to subscription
Connect-AzAccount -TenantId <tenant_id> -SubscriptionId <Subscription_ID> -Scope Process

#Create a new application registration
$app = New-AzADApplication -DisplayName "<unique_name>"

#Create a new SPN corresponding to the application registration
$sp = New-AzADServicePrincipal -ApplicationId  $app.AppId -Role "Reader"

#Roles required on SPN for Arc onboarding
$AzureConnectedMachineOnboardingRole = "Azure Connected Machine Onboarding"
$AzureConnectedMachineResourceAdministratorRole = "Azure Connected Machine Resource Administrator"

#Assign roles to the created SPN
New-AzRoleAssignment -ObjectId $sp.Id -RoleDefinitionName $AzureConnectedMachineOnboardingRole | Out-Null
New-AzRoleAssignment -ObjectId $sp.Id -RoleDefinitionName $AzureConnectedMachineResourceAdministratorRole | Out-Null

# Set password validity time. SPN must be updated on the HCI cluster after this timeframe.
$pwdExpiryInYears = 300
$start = Get-Date
$end = $start.AddYears($pwdExpiryInYears)
$pw = New-AzADSpCredential -ObjectId $sp.Id -StartDate $start -EndDate $end
$password = ConvertTo-SecureString $pw.SecretText -AsPlainText -Force

# Create SPN credentials object to be used in the register-azstackhci cmdlet
$spnCred = New-Object System.Management.Automation.PSCredential ($app.AppId, $password)
Disconnect-AzAccount -ErrorAction Ignore | Out-Null

# Use the SPN credentials created previously in the register-azstackhci cmdlet
Register-AzStackHCI -SubscriptionId < Subscription_ID> -Region <region> -ArcSpnCredential:$spnCred
Is resource move supported for Azure Stack HCI resources?
We do not support resource move for any Azure Stack HCI resources. To change the location of the resources, you must unregister the cluster first, and then re-register it at the new location by passing the appropriate parameters in the Register-AzStackHCI cmdlet.
What are some of the more commonly used registration and Arc cmdlets?
- For Az.StackHCI PowerShell module cmdlets, see the HCI PowerShell documentation.
- Get-AzureStackHCI: returns the current node connection and policy information for Azure Stack HCI.
- Get-AzureStackHCIArcIntegration: returns the status of node Arc integration.
- Sync-AzureStackHCI:
- Performs billing, licensing, and census sync with Azure.
- The system runs this cmdlet automatically every 12 hours.
- You should only use this cmdlet when a cluster's internet connection has been unavailable for an extended period.
- Do not run this cmdlet immediately after server reboot; let the automatic sync happen. Otherwise, it may result in a bad state.
Next steps
For more detailed information, see also:
Feedback
Coming soon: Throughout 2024 we will be phasing out GitHub Issues as the feedback mechanism for content and replacing it with a new feedback system. For more information see: https://aka.ms/ContentUserFeedback.
Submit and view feedback for