Note
Access to this page requires authorization. You can try signing in or changing directories.
Access to this page requires authorization. You can try changing directories.
Applies to: Azure Stack HCI, version 22H2
Important
Azure Stack HCI is now part of Azure Local. However, older versions of Azure Stack HCI, for example 22H2 will continue to reference Azure Stack HCI and won't reflect the name change. Learn more.
This article describes how to enable default network access policies and assign these to virtual machines (VMs) running on Azure Stack HCI.
Default network policies can be used to protect virtual machines running on your Azure Stack HCI from external unauthorized attacks. These policies block all inbound access to virtual machines on Azure Stack HCI (except the specified management ports you want enabled) while allowing all outbound access. Use these policies to ensure that your workload VMs have access to only required assets, thereby making it difficult for the threats to spread laterally.
Note
In this release, you can enable and assign default network policies through the Windows Admin Center.
Enable default network access policies
To enable default network access policies, you need to install Network Controller (NC). Network Controller enforces the default network policies and is deployed in the virtual machines. For more information, see how to Install Network Controller.
Assign default network policies to a VM
You can attach default policies to a VM in two ways:
- During VM creation. You'll need to attach the VM to a logical network (traditional VLAN network) or an SDN virtual network.
- Post VM creation.
Create and attach networks
Depending on the type of network you want to attach your VM to, steps may be different.
Attach VMs to a physical network: Create one or more logical networks to represent those physical networks. A logical network is just a representation of the physical network(s) available to your Azure Stack HCI. For more information, see how to Create a logical network.
Attach VMs to a SDN virtual network: Create a virtual network before you create the VM. For more information, see how to Create a virtual network.
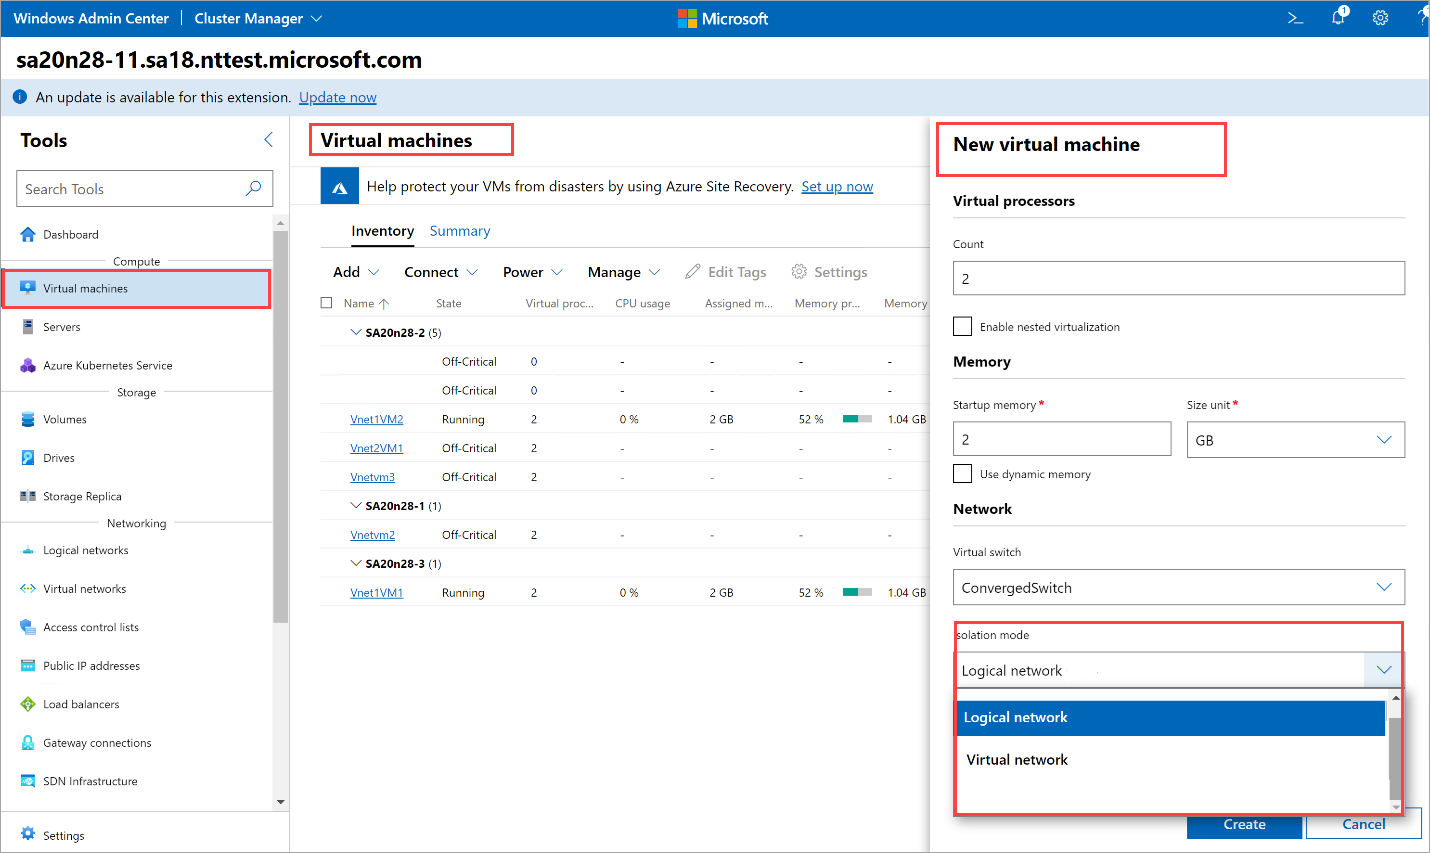
Attach VM to a logical network
After you have created a logical network in Windows Admin Center, you can create a VM in Windows Admin Center and attach it to the logical network. As part of VM creation, select the Isolation Mode as Logical Network, select the appropriate Logical Subnet under the Logical Network, and provide an IP address for the VM.
Note
Unlike in 22H2, you can no longer connect a VM directly to a VLAN using Windows Admin Center. Instead, you must create a logical network representing the VLAN, create a logical network subnet with the VLAN, and then attach the VM to the logical network subnet.
Here's an example that explains how you can attach your VM directly to a VLAN with Azure Stack HCI 22H2 when Network Controller is installed. In this example, we demonstrate how to connect your VM to VLAN 5:
Create a logical network with any name. Ensure that Network Virtualization is disabled.
Add a logical subnet with any name. Provide the VLAN ID (5) when creating the subnet.
Apply the changes.
When creating a VM, attach it to the logical network and logical network subnet created earlier. For more information, see how to Create a logical network.

Apply default network policies
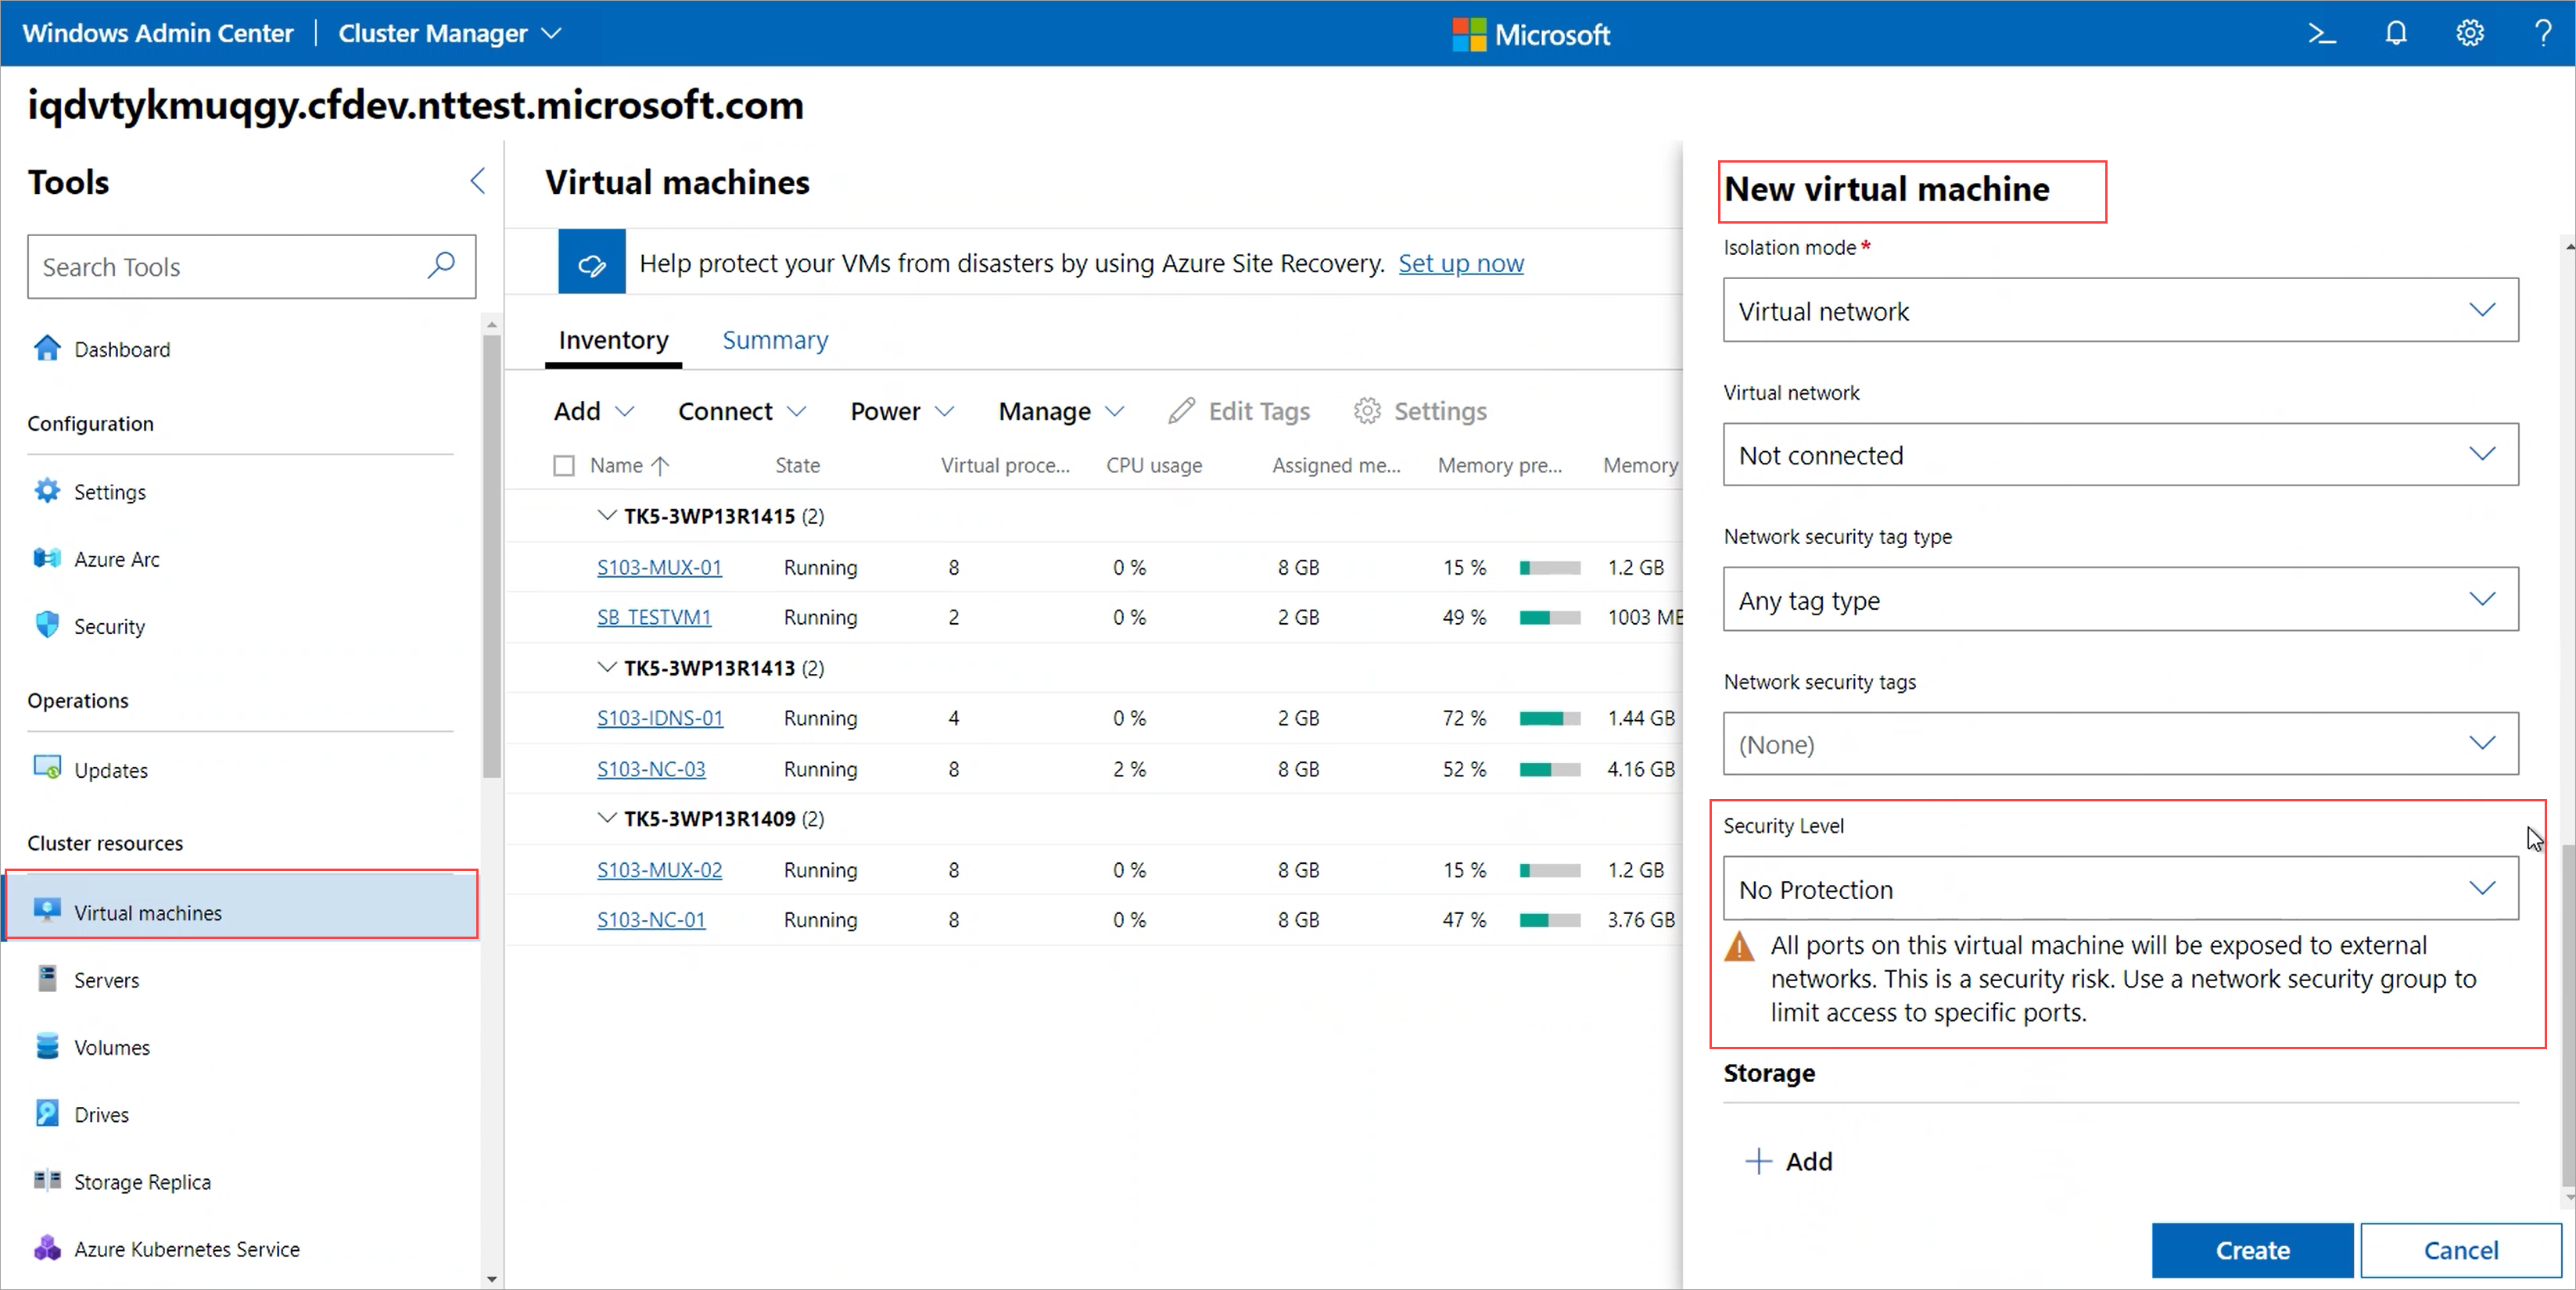
When you create a VM through Windows Admin Center, you'll see a Security level setting.

You have three options:
No protection - Choose this option if you don't want to enforce any network access policies to your VM. When this option is selected, all ports on your VM are exposed to external networks thereby posing a security risk. This option isn't recommended.
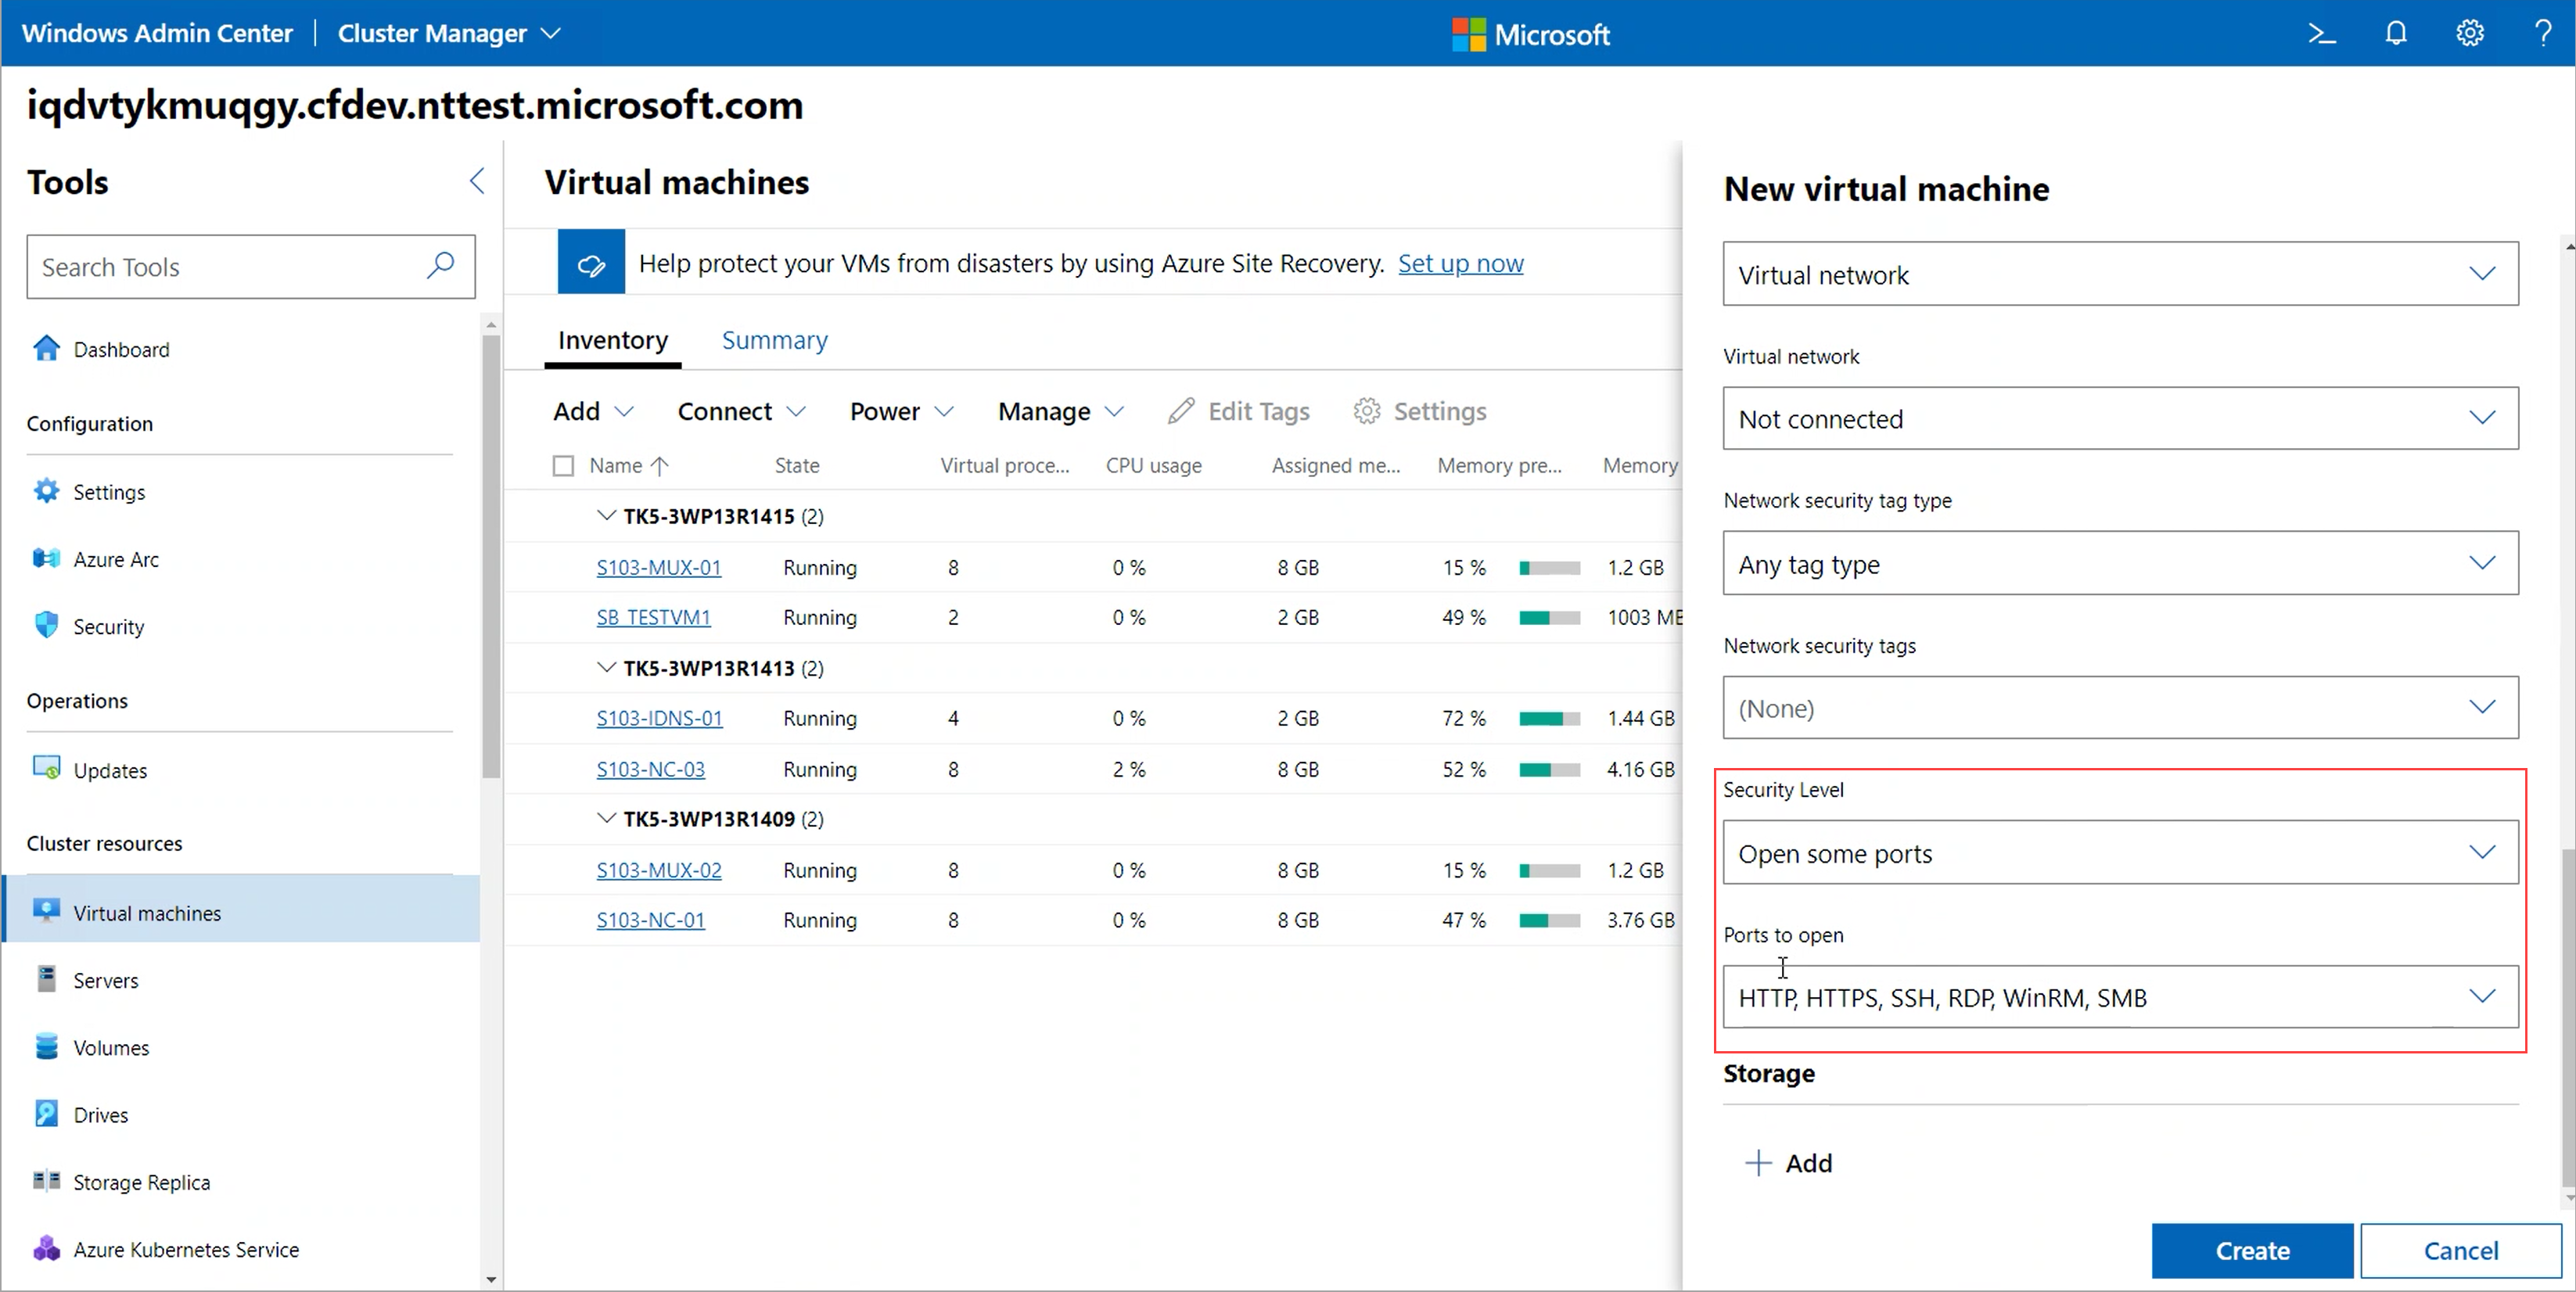
Open some ports - Choose this option to go with default policies. The default policies block all inbound access and allow all outbound access. You can optionally enable inbound access to one or more well defined ports, for example, HTTP, HTTPS, SSH, or RDP as per your requirements.
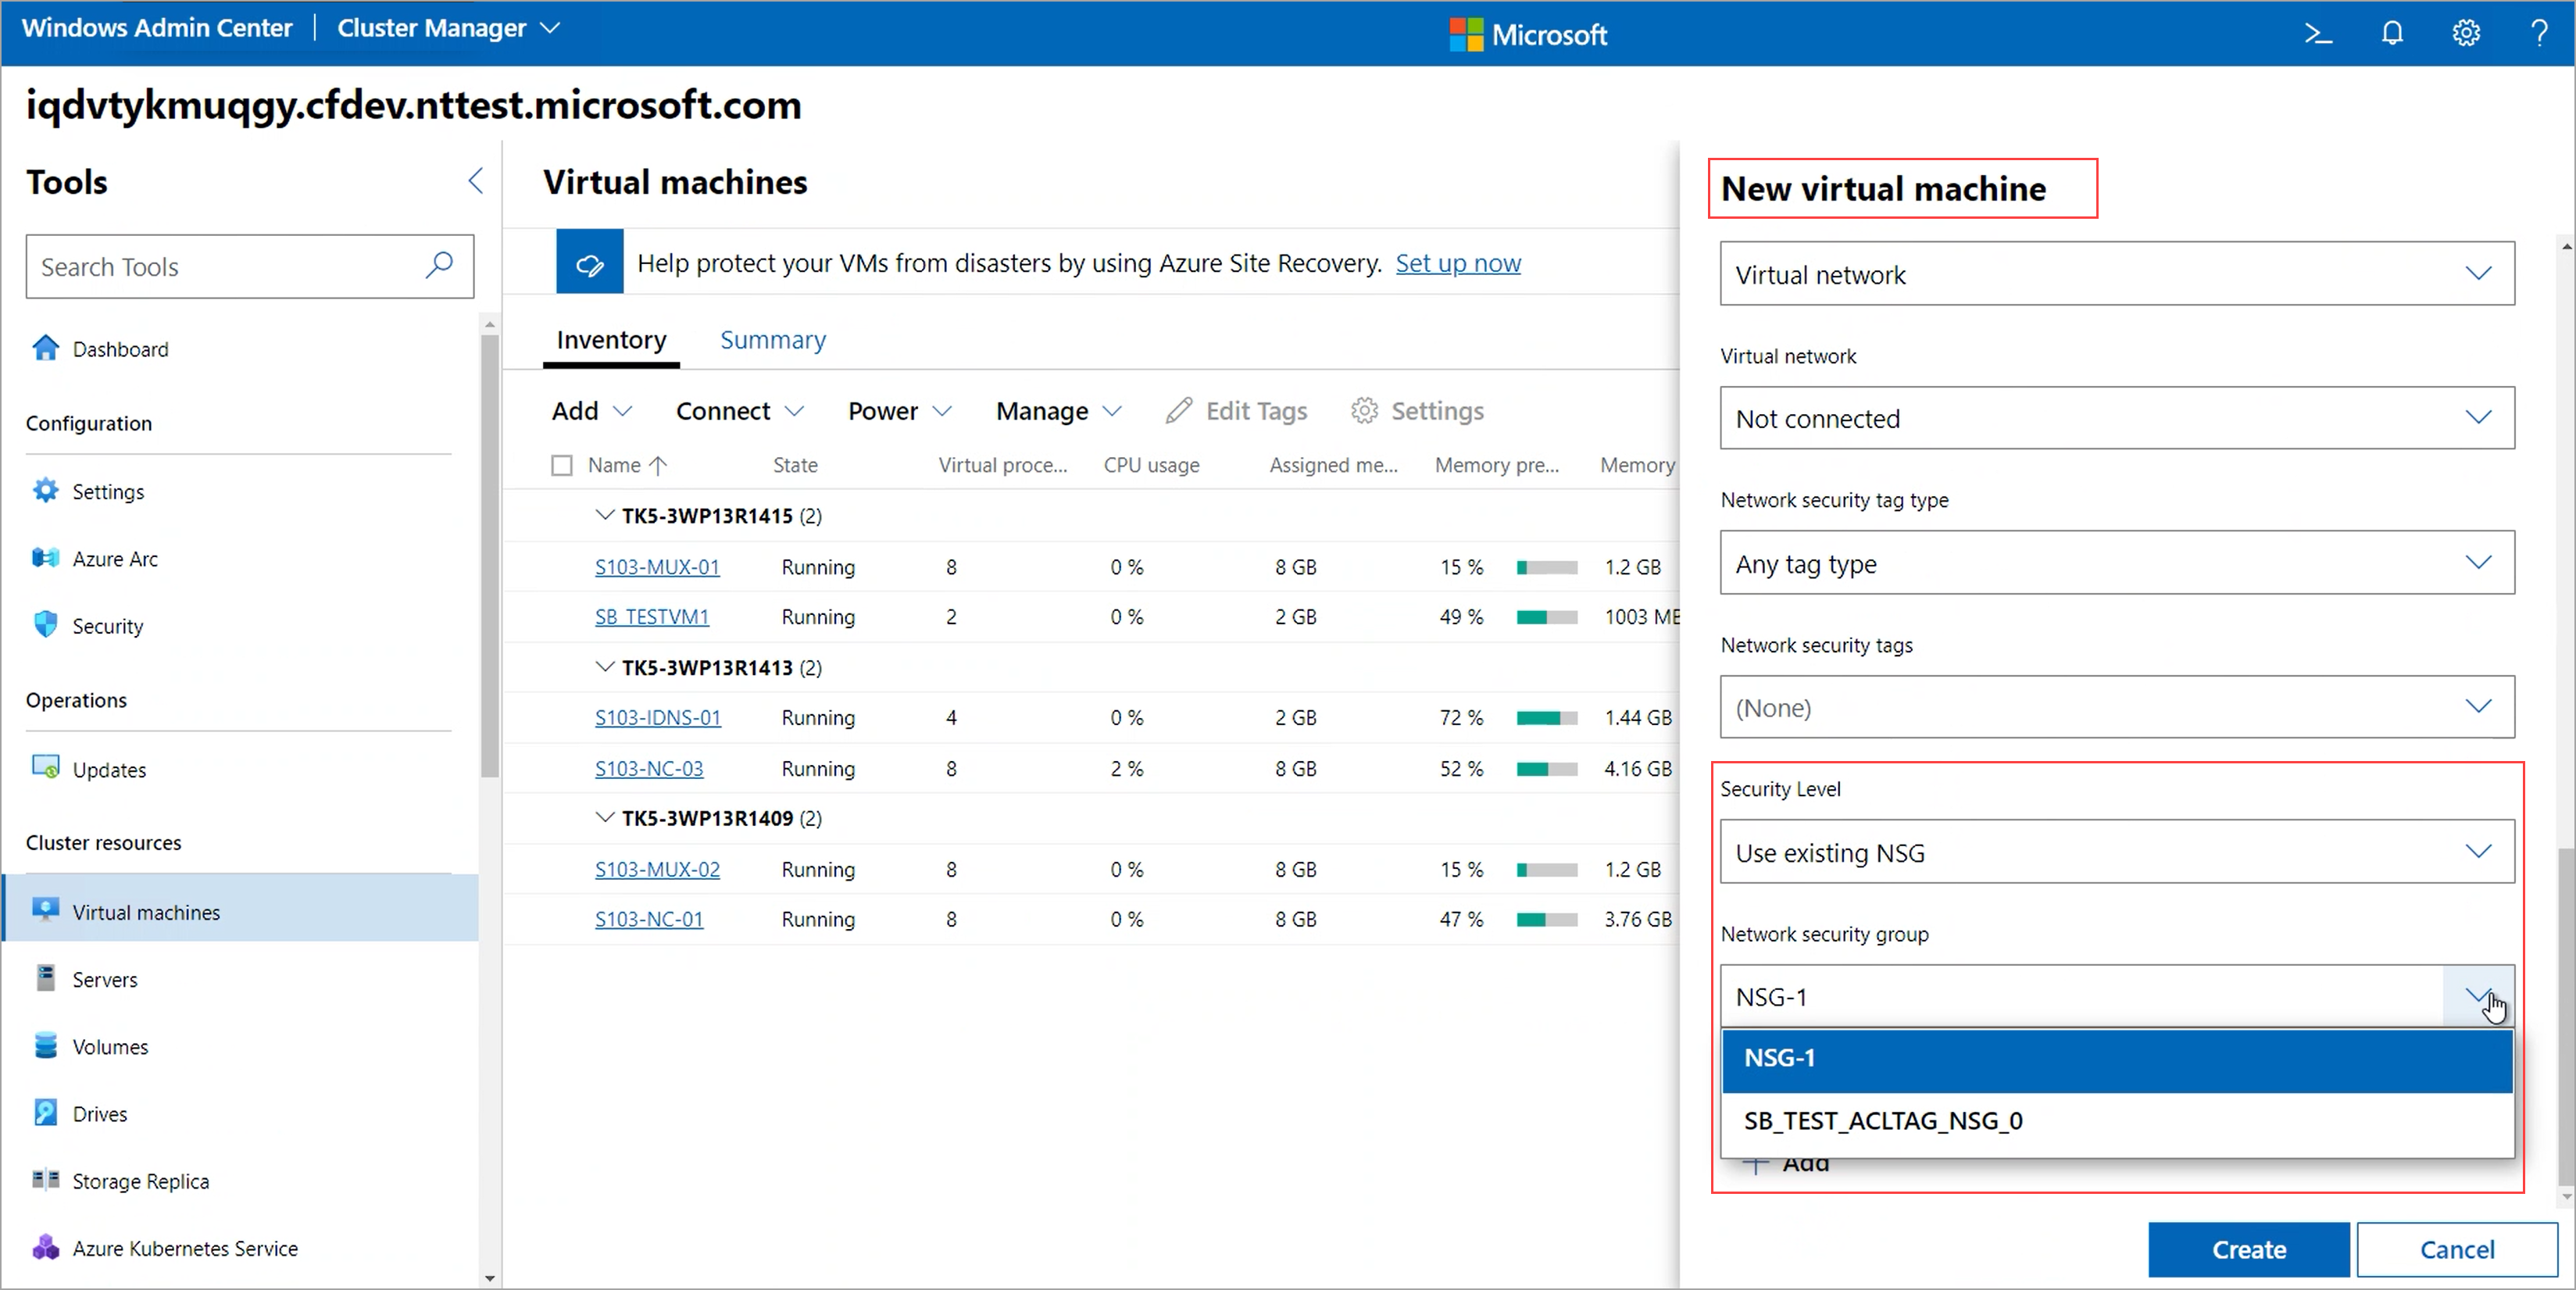
Use existing NSG - Choose this option to apply custom policies. You'll specify a Network Security Group (NSG) that you've already created.


VMs created outside of Windows Admin Center
If you're using alternate mechanisms (for example, Hyper-V UI or New-VM PowerShell cmdlet) to create VMs on your Azure Stack HCI, and you have enabled default network access policies, you might encounter these two issues:
The VMs may not have network connectivity. This happens since the VM is being managed by a Hyper-V switch extension called Virtual Filtering Platform (VFP) and by default, the Hyper-V port connected to the VM is in blocked state.
To unblock the port, run the following commands from a PowerShell session on a Hyper-V host where the VM is located:
Run PowerShell as an administrator.
Download and install the SdnDiagnostics module. Run the following command:
Install-Module -Name SdnDiagnosticsAlternatively, if already installed then use the following:
Update-Module -Name SdnDiagnosticsAccept all prompts to install from PowerShell Gallery.
Confirm if VFP port is applied to the VM
Get-SdnVMNetworkAdapterPortProfile -VMName <VMName>Ensure that VFP port profile information is returned for the adapter. If not, then proceed with associating a port profile.
Specify the ports to be unblocked on the VM.
Set-SdnVMNetworkAdapterPortProfile -VMName <VMName> -MacAddress <MACAddress> -ProfileId ([guid]::Empty) -ProfileData 2
The VM doesn't have default network policies applied. Since this VM was created outside Windows Admin Center, the default policies for the VM aren't applied, and the Network Settings for the VM doesn't display correctly. To rectify this issue, follow these steps:
In Windows Admin Center, Create a logical network. Create a subnet under the logical network and provide no VLAN ID or subnet prefix. Then, attach a VM to the logical network using the following steps:
Under Tools, scroll down to the Networking area, and select Virtual machines
Select the Inventory tab, select the VM, and then select Settings.
On the Settings page, select Networks.
For Isolation Mode, select Logical Network.
Select the Logical network and Logical subnet that you created earlier.
For Security level, you have two options:
- No Protection: Choose this if you don't want any network access policies for your VMs.
- Use existing NSG: Choose this if you want to apply network access policies for your VMs. You can either create a new NSG and attach it to the VM or you can attach any existing NSG to the VM.


Upgrade from 21H2
Note
Skip this section, if you upgraded from Azure Stack HCI 21H2 version and didn't have the Network Controller installed.
If you had Network Controller installed on 21H2 version and also had workload VMs on your cluster, those VMs would be in one of the following 4 isolation modes in VM (in Network Settings):
Default (None): Since this mode no longer exists after you move to 22H2, The Isolation Mode in the VM Network Settings page on Windows Admin Center will be blank. The VM will still continue to have same level of network connectivity as before upgrade to 22H2. To display the correct network settings in Windows Admin Center and apply default policies, follow these steps:
In Windows Admin Center, Create a logical network. Create a subnet under the logical network and provide the VLAN ID for network to which the VM is connected. Then, attach a VM to the logical network using the following steps:
Under Tools, scroll down to the Networking area, and select Virtual machines
Select the Inventory tab, select the VM, and then select Settings.
On the Settings page, select Networks.
For Isolation Mode, select Logical Network.
Select the Logical network and Logical subnet that you created earlier.
For Security level, you have two options:
- No Protection: Choose this if you don't want any network access policies for your VMs.
- Use existing NSG: Choose this if you want to apply network access policies for your VMs. You can either create a new NSG and attach it to the VM or you can attach any existing NSG to the VM.
VLAN: Since this mode no longer exists in 22H2, the Isolation mode in the VM Network Settings page on Windows Admin Center will be blank. The VM will continue to have same level of network connectivity as before upgrading to 22H2.
In Windows Admin Center, Create a logical network. Create a subnet under the logical network and provide no VLAN ID or subnet prefix. Then, attach a VM to the logical network using the following steps:
Under Tools, scroll down to the Networking area, and select Virtual machines
Select the Inventory tab, select the VM, and then select Settings.
On the Settings page, select Networks.
For Isolation Mode, select Logical Network.
Select the Logical network and Logical subnet that you created earlier.
For Security level, you have two options:
- No Protection: Choose this if you don't want any network access policies for your VMs.
- Use existing NSG: Choose this if you want to apply network access policies for your VMs. You can either create a new NSG and attach it to the VM or you can attach any existing NSG to the VM.
Logical Network: The Network Settings page for the VM remains the same as in 21H2.
Virtual Network: The Network Settings page for the VM remains the same as in 21H2.
Next steps
Learn more about: