Note
Access to this page requires authorization. You can try signing in or changing directories.
Access to this page requires authorization. You can try changing directories.
Important
Effective May 1, 2025, Azure AD B2C will no longer be available to purchase for new customers. Learn more in our FAQ.
Azure Active Directory B2C (Azure AD B2C) is built on Microsoft Entra ID, and so it uses Microsoft Entra ID storage to store user accounts. Azure AD B2C directory user profile comes with a built-in set of attributes, such as given name, surname, city, postal code, and phone number, but you can extend the user profile with your own custom attributes without requiring an external data store.
Your custom policy can connect to Microsoft Entra ID storage by using Microsoft Entra ID technical profile to store, update or delete user information. In this article, you learn how to configure a set of Microsoft Entra ID technical profiles to store and read a user account before a JWT is returned.
Scenario overview
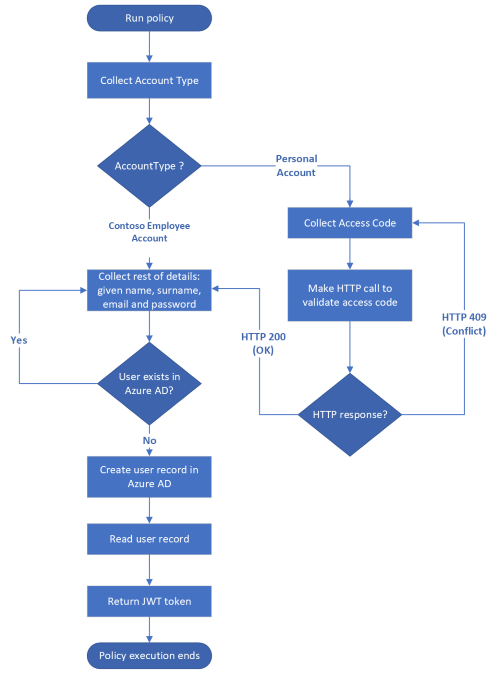
In Call a REST API by using Azure Active Directory B2C custom policy article, we collect information from the user, validated the data, called a REST API, and finally returned a JWT without storing a user account. We must store the user information so that we don't lose the information once the policy finishes execution. This time, once we collect the user information and validate it, we need to store the user information in Azure AD B2C storage, and then read before we return the JWT. The complete process is shown in the following diagram.
Prerequisites
If you don't have one already, create an Azure AD B2C tenant that is linked to your Azure subscription.
You must have Visual Studio Code (VS Code) installed in your computer.
Complete the steps in Call a REST API by using Azure Active Directory B2C custom policy. This article is a part of Create and run your own custom policies how-to guide series.
Note
This article is part of the Create and run your own custom policies in Azure Active Directory B2C how-to guide series. We recommend that you start this series from the first article.
Step 1 - Declare claims
You need to declare two more claims, userPrincipalName, and passwordPolicies:
In the
ContosoCustomPolicy.XMLfile, locate the ClaimsSchema element and declareuserPrincipalNameandpasswordPoliciesclaims by using the following code:<ClaimType Id="userPrincipalName"> <DisplayName>UserPrincipalName</DisplayName> <DataType>string</DataType> <UserHelpText>Your user name as stored in the Azure Active Directory.</UserHelpText> </ClaimType> <ClaimType Id="passwordPolicies"> <DisplayName>Password Policies</DisplayName> <DataType>string</DataType> <UserHelpText>Password policies used by Azure AD to determine password strength, expiry etc.</UserHelpText> </ClaimType>Learn more about the uses of the
userPrincipalNameandpasswordPoliciesclaims in User profile attributes article.
Step 2 - Create Microsoft Entra ID technical profiles
You need to configure two Microsoft Entra ID technical profile. One technical profile writes user details into Microsoft Entra ID storage, and the other reads a user account from Microsoft Entra ID storage.
In the
ContosoCustomPolicy.XMLfile, locate the ClaimsProviders element, and add a new claims provider by using the code below. This claims provider holds the Microsoft Entra ID technical profiles:<ClaimsProvider> <DisplayName>Azure AD Technical Profiles</DisplayName> <TechnicalProfiles> <!--You'll add you Azure AD Technical Profiles here--> </TechnicalProfiles> </ClaimsProvider>In the claims provider you just created, add a Microsoft Entra ID technical profile by using the following code:
    <TechnicalProfile Id="AAD-UserWrite">
        <DisplayName>Write user information to AAD</DisplayName>
        <Protocol Name="Proprietary" Handler="Web.TPEngine.Providers.AzureActiveDirectoryProvider, Web.TPEngine, Version=1.0.0.0, Culture=neutral, PublicKeyToken=null" />
        <Metadata>
            <Item Key="Operation">Write</Item>
            <Item Key="RaiseErrorIfClaimsPrincipalAlreadyExists">true</Item>
            <Item Key="UserMessageIfClaimsPrincipalAlreadyExists">The account already exists. Try to create another account</Item>
        </Metadata>
        <InputClaims>
            <InputClaim ClaimTypeReferenceId="email" PartnerClaimType="signInNames.emailAddress" Required="true" />
        </InputClaims>
        <PersistedClaims>
            <PersistedClaim ClaimTypeReferenceId="email" PartnerClaimType="signInNames.emailAddress" />
            <PersistedClaim ClaimTypeReferenceId="displayName" />
            <PersistedClaim ClaimTypeReferenceId="givenName" />
            <PersistedClaim ClaimTypeReferenceId="surname" />
            <PersistedClaim ClaimTypeReferenceId="password"/>
            <PersistedClaim ClaimTypeReferenceId="passwordPolicies" DefaultValue="DisablePasswordExpiration,DisableStrongPassword" />
        </PersistedClaims>
        <OutputClaims>
            <OutputClaim ClaimTypeReferenceId="objectId" />
            <OutputClaim ClaimTypeReferenceId="userPrincipalName" />
            <OutputClaim ClaimTypeReferenceId="email" PartnerClaimType="signInNames.emailAddress" />
        </OutputClaims>
    </TechnicalProfile>
We've added a new Microsoft Entra ID technical profile,
AAD-UserWrite. You need to take note of the following important parts of the technical profile:Operation: The operation specifies the action to be performed, in this case, Write. Learn more about other operations in a Microsoft Entra ID technical provider.
Persisted claims: The PersistedClaims element contains all of the values that should be stored into Microsoft Entra ID storage.
InputClaims: The InputClaims element contains a claim, which is used to look up an account in the directory, or create a new one. There must be exactly one input claim element in the input claims collection for all Microsoft Entra ID technical profiles. This technical profile uses the email claim, as the key identifier for the user account. Learn more about other key identifiers you can use uniquely identify a user account.
In the
ContosoCustomPolicy.XMLfile, locate theAAD-UserWritetechnical profile, and then add a new technical profile after it by using the following code:<TechnicalProfile Id="AAD-UserRead"> <DisplayName>Read user from Azure AD storage</DisplayName> <Protocol Name="Proprietary" Handler="Web.TPEngine.Providers.AzureActiveDirectoryProvider, Web.TPEngine, Version=1.0.0.0, Culture=neutral, PublicKeyToken=null" /> <Metadata> <Item Key="Operation">Read</Item> <Item Key="RaiseErrorIfClaimsPrincipalAlreadyExists">false</Item> <Item Key="RaiseErrorIfClaimsPrincipalDoesNotExist">false</Item> </Metadata> <InputClaims> <InputClaim ClaimTypeReferenceId="email" PartnerClaimType="signInNames.emailAddress" Required="true" /> </InputClaims> <OutputClaims> <OutputClaim ClaimTypeReferenceId="objectId" /> <OutputClaim ClaimTypeReferenceId="userPrincipalName" /> <OutputClaim ClaimTypeReferenceId="givenName"/> <OutputClaim ClaimTypeReferenceId="surname"/> <OutputClaim ClaimTypeReferenceId="displayName"/> </OutputClaims> </TechnicalProfile>We've added a new Microsoft Entra ID technical profile,
AAD-UserRead. We've configured this technical profile to perform a read operation, and to returnobjectId,userPrincipalName,givenName,surnameanddisplayNameclaims if a user account with theemailin theInputClaimsection is found.
Step 3 - Use the Microsoft Entra ID technical profile
After we collect user details by using the UserInformationCollector self-asserted technical profile, we need to write a user account into Microsoft Entra ID storage by using the AAD-UserWrite technical profile. To do so, use the AAD-UserWrite technical profile as a validation technical profile in the UserInformationCollector self-asserted technical profile.
In the ContosoCustomPolicy.XML file, locate the UserInformationCollector technical profile, and then add AAD-UserWrite technical profile as a validation technical profile in the ValidationTechnicalProfiles collection. You need to add this after the CheckCompanyDomain validation technical profile.
We'll use the AAD-UserRead technical profile in the user journey orchestration steps to read the user details before issuing a JWT.
Step 4 - Update the ClaimGenerator technical profile
We use the ClaimGenerator technical profile to execute three claims transformations, GenerateRandomObjectIdTransformation, CreateDisplayNameTransformation and CreateMessageTransformation.
In the
ContosoCustomPolicy.XMLfile, locate theClaimGeneratortechnical profile and replace it with the following code:<TechnicalProfile Id="UserInputMessageClaimGenerator"> <DisplayName>User Message Claim Generator Technical Profile</DisplayName> <Protocol Name="Proprietary" Handler="Web.TPEngine.Providers.ClaimsTransformationProtocolProvider, Web.TPEngine, Version=1.0.0.0, Culture=neutral, PublicKeyToken=null" /> <OutputClaims> <OutputClaim ClaimTypeReferenceId="message" /> </OutputClaims> <OutputClaimsTransformations> <OutputClaimsTransformation ReferenceId="CreateMessageTransformation" /> </OutputClaimsTransformations> </TechnicalProfile> <TechnicalProfile Id="UserInputDisplayNameGenerator"> <DisplayName>Display Name Claim Generator Technical Profile</DisplayName> <Protocol Name="Proprietary" Handler="Web.TPEngine.Providers.ClaimsTransformationProtocolProvider, Web.TPEngine, Version=1.0.0.0, Culture=neutral, PublicKeyToken=null" /> <OutputClaims> <OutputClaim ClaimTypeReferenceId="displayName" /> </OutputClaims> <OutputClaimsTransformations> <OutputClaimsTransformation ReferenceId="CreateDisplayNameTransformation" /> </OutputClaimsTransformations> </TechnicalProfile>We've broken the technical profile into two separate technical profiles. The UserInputMessageClaimGenerator technical profile generates the message sent as claim in the JWT. The UserInputDisplayNameGenerator technical profile generates the
displayNameclaim. ThedisplayNameclaim value must be available before theAAD-UserWritetechnical profile writes the user record into Microsoft Entra ID storage. In the new code, we remove the GenerateRandomObjectIdTransformation as theobjectIdis created and returned by Microsoft Entra ID after an account is created, so we don't need to generate it ourselves within the policy.In the
ContosoCustomPolicy.XMLfile, locate theUserInformationCollectorself-asserted technical profile, and then add theUserInputDisplayNameGeneratortechnical profile as a validation technical profile. After you do so, theUserInformationCollectortechnical profile'sValidationTechnicalProfilescollection should look similar to the following code:<!--<TechnicalProfile Id="UserInformationCollector">--> <ValidationTechnicalProfiles> <ValidationTechnicalProfile ReferenceId="CheckCompanyDomain"> <Preconditions> <Precondition Type="ClaimEquals" ExecuteActionsIf="false"> <Value>accountType</Value> <Value>work</Value> <Action>SkipThisValidationTechnicalProfile</Action> </Precondition> </Preconditions> </ValidationTechnicalProfile> <ValidationTechnicalProfile ReferenceId="UserInputDisplayNameGenerator"/> <ValidationTechnicalProfile ReferenceId="AAD-UserWrite"/> </ValidationTechnicalProfiles> <!--</TechnicalProfile>-->You must add the validation technical profile before
AAD-UserWriteas thedisplayNameclaim value must be available before theAAD-UserWritetechnical profile writes the user record into Microsoft Entra ID storage.
Step 5 - Update the user journey orchestration steps
Locate your HelloWorldJourney user journey and replace all the orchestration steps with the following code:
    <!--<OrchestrationSteps>-->
        <OrchestrationStep Order="1" Type="ClaimsExchange">
            <ClaimsExchanges>
                <ClaimsExchange Id="AccountTypeInputCollectorClaimsExchange" TechnicalProfileReferenceId="AccountTypeInputCollector"/>
            </ClaimsExchanges>
        </OrchestrationStep>
        <OrchestrationStep Order="2" Type="ClaimsExchange">
            <ClaimsExchanges>
                <ClaimsExchange Id="GetAccessCodeClaimsExchange" TechnicalProfileReferenceId="AccessCodeInputCollector" />
            </ClaimsExchanges>
            </OrchestrationStep>
        <OrchestrationStep Order="3" Type="ClaimsExchange">
            <ClaimsExchanges>
                <ClaimsExchange Id="GetUserInformationClaimsExchange" TechnicalProfileReferenceId="UserInformationCollector"/>
            </ClaimsExchanges>
        </OrchestrationStep>
        <OrchestrationStep Order="4" Type="ClaimsExchange">
            <ClaimsExchanges>
                <ClaimsExchange Id="AADUserReaderExchange" TechnicalProfileReferenceId="AAD-UserRead"/>
            </ClaimsExchanges>
        </OrchestrationStep>
        <OrchestrationStep Order="5" Type="ClaimsExchange">
            <ClaimsExchanges>
                <ClaimsExchange Id="GetMessageClaimsExchange" TechnicalProfileReferenceId="UserInputMessageClaimGenerator"/>
            </ClaimsExchanges>
        </OrchestrationStep>
        <OrchestrationStep Order="6" Type="SendClaims" CpimIssuerTechnicalProfileReferenceId="JwtIssuer"/>
    <!--</OrchestrationSteps>-->
In orchestration step 4, we execute the AAD-UserRead technical profile to read the user details (to be included in the JWT) from the created user account.
Since we don't store the message claim, in orchestration step 5, we execute the UserInputMessageClaimGenerator to generate the message claim for inclusion on the JWT.
Step 6 - Upload policy
Follow the steps in Upload custom policy file to upload your policy file. If you're uploading a file with same name as the one already in the portal, make sure you select Overwrite the custom policy if it already exists.
Step 7 - Test policy
Follow the steps in Test the custom policy to test your custom policy.
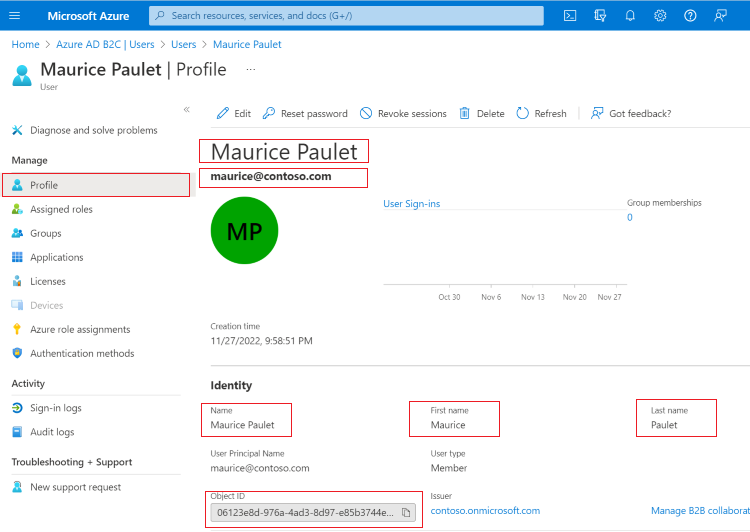
After the policy finishes execution, and you receive your ID token, check that the user record has been created:
Sign in to the Azure portal.
If you have access to multiple tenants, select the Settings icon in the top menu to switch to your Azure AD B2C tenant from the Directories + subscriptions menu.
Under Azure services, select Azure AD B2C. Or use the search box to find and select Azure AD B2C.
Under Manage, select Users.
Locate the user account that you just created, and select it. The account profile looks similar to the screenshot below:
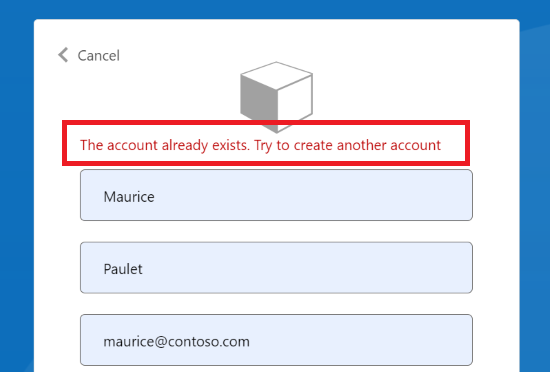
In our AAD-UserWrite Microsoft Entra ID technical profile, we specify that if the user already exists, we raise an error message.
Test your custom policy again by using the same Email Address. Instead of the policy executing to completion to issue an ID token, you should see an error message similar to the screenshot below.
Note
The password claim value is a very important piece of information, so be very careful how you handle it in your custom policy. For a similar reason, Azure AD B2C treats the password claim value as a special value. When you collect the password claim value in the self-asserted technical profile, that value is only available within the same technical profile or within a validation technical profiles that are referenced by that same self-asserted technical profile. Once execution of that self-asserted technical profile completes, and moves to another technical profile, the value is lost.
Verify user email address
We recommend that you verify a user's email before you use it to create a user account. When you verify email addresses, you make sure the accounts are created by real users. You also help users to be sure that they're using their correct email addresses to create an account.
Azure AD B2C's custom policy provides a way to verify email address using verification display control. You send a verification code to the email. After the code has been sent, the user reads the message, enters the verification code into the control provided by the display control, and selects Verify Code button.
A display control is a user interface element that has special functionality and interacts with the Azure Active Directory B2C (Azure AD B2C) back-end service. It allows the user to perform actions on the page that invoke a validation technical profile at the back end. Display controls are displayed on the page and are referenced by a self-asserted technical profile.
To add email verification by using a display control, use the following steps:
Declare claim
You need to declare a claim to be used to hold the verifications code.
To declare the claim, in the ContosoCustomPolicy.XML file, locate the ClaimsSchema element and declare verificationCode claim by using the following code:
    <!--<ClaimsSchema>-->
        ...
        <ClaimType Id="verificationCode">
            <DisplayName>Verification Code</DisplayName>
            <DataType>string</DataType>
            <UserHelpText>Enter your verification code</UserHelpText>
            <UserInputType>TextBox</UserInputType>
        </ClaimType>
    <!--</ClaimsSchema>-->
Configure a send and verify code technical profile
Azure AD B2C uses Microsoft Entra ID SSPR technical profile to verify an email address. This technical profile can generate and send a code to an email address or verifies the code depending on how you configure it.
In the ContosoCustomPolicy.XML file, locate the ClaimsProviders element and add the claims provider by using the following code:
    <ClaimsProvider>
        <DisplayName>Azure AD self-service password reset (SSPR)</DisplayName>
        <TechnicalProfiles>
            <TechnicalProfile Id="AadSspr-SendCode">
            <DisplayName>Send Code</DisplayName>
            <Protocol Name="Proprietary" Handler="Web.TPEngine.Providers.AadSsprProtocolProvider, Web.TPEngine, Version=1.0.0.0, Culture=neutral, PublicKeyToken=null" />
            <Metadata>
                <Item Key="Operation">SendCode</Item>
            </Metadata>
            <InputClaims>
                <InputClaim ClaimTypeReferenceId="email" PartnerClaimType="emailAddress" />
            </InputClaims>
            </TechnicalProfile>
            <TechnicalProfile Id="AadSspr-VerifyCode">
            <DisplayName>Verify Code</DisplayName>
            <Protocol Name="Proprietary" Handler="Web.TPEngine.Providers.AadSsprProtocolProvider, Web.TPEngine, Version=1.0.0.0, Culture=neutral, PublicKeyToken=null" />
            <Metadata>
                <Item Key="Operation">VerifyCode</Item>
            </Metadata>
            <InputClaims>
                <InputClaim ClaimTypeReferenceId="verificationCode" />
                <InputClaim ClaimTypeReferenceId="email" PartnerClaimType="emailAddress" />
            </InputClaims>
            </TechnicalProfile>
        </TechnicalProfiles>
    </ClaimsProvider>
We've configured two technical profiles AadSspr-SendCode and AadSspr-VerifyCode. AadSspr-SendCode generates and sends a code to the email address specified in the InputClaims section whereas AadSspr-VerifyCode verifies the code. You specify the action you want to perform in the technical profile's metadata.
Configure a display control
You need to configure an email verification display control to be able to verify users email. The email verification display control you configure will replace the email display claim that you use to collect an email from the user.
To configure a display control, use the following steps:
In the
ContosoCustomPolicy.XMLfile, locate theBuildingBlockssection, and then add a display control as a child element by using the following code:<!--<BuildingBlocks>--> .... <DisplayControls> <DisplayControl Id="emailVerificationControl" UserInterfaceControlType="VerificationControl"> <DisplayClaims> <DisplayClaim ClaimTypeReferenceId="email" Required="true" /> <DisplayClaim ClaimTypeReferenceId="verificationCode" ControlClaimType="VerificationCode" Required="true" /> </DisplayClaims> <OutputClaims></OutputClaims> <Actions> <Action Id="SendCode"> <ValidationClaimsExchange> <ValidationClaimsExchangeTechnicalProfile TechnicalProfileReferenceId="AadSspr-SendCode" /> </ValidationClaimsExchange> </Action> <Action Id="VerifyCode"> <ValidationClaimsExchange> <ValidationClaimsExchangeTechnicalProfile TechnicalProfileReferenceId="AadSspr-VerifyCode" /> </ValidationClaimsExchange> </Action> </Actions> </DisplayControl> </DisplayControls> <!--</BuildingBlocks>-->We've declared a display control,
emailVerificationControl. Take note of the following important parts:DisplayClaims - Just like in a self-asserted technical profile, this section specifies a collection of claims to be collected from the user within the display control.
Actions - Specifies the order of actions to be performed by the display control. Each action references a technical profile that responsible to perform the actions. For example, the SendCode references the
AadSspr-SendCodetechnical profile, which generates and sends a code to an email address.
In the
ContosoCustomPolicy.XMLfile, locate theUserInformationCollectorself-asserted technical profile and replace the email display claim toemailVerificationControldisplay control:From:
<DisplayClaim ClaimTypeReferenceId="email" Required="true"/>To:
<DisplayClaim DisplayControlReferenceId="emailVerificationControl" />Use the procedure in step 6 and step 7 to upload your policy file, and test it. This time, you must verify your email address before a user account is created.
Update user account by using Microsoft Entra ID technical profile
You can configure a Microsoft Entra ID technical profile to update a user account instead of attempting to create a new one. To do so, set the Microsoft Entra ID technical profile to throw an error if the specified user account doesn't already exist in the metadata collection by using the following code. Also, remove the Key="UserMessageIfClaimsPrincipalAlreadyExists metadata entry. The Operation needs to be set to Write:
    <Item Key="Operation">Write</Item>
    <Item Key="RaiseErrorIfClaimsPrincipalDoesNotExist">false</Item>
Use custom attributes
In this article, you've learned how to store user details using built-in user profile attributes. However, you often need to create your own custom attributes to manage your specific scenario. To do so, follow the instructions in Define custom attributes in Azure Active Directory B2C article.
Related content
Learn how to Set up a sign-up and sign-in flow for a local account by using Azure Active Directory B2C custom policy.
Learn how to define custom attributes in your custom policy.
Learn how to add password expiration to custom policy.
Learn more about Microsoft Entra ID technical profile.