Note
Access to this page requires authorization. You can try signing in or changing directories.
Access to this page requires authorization. You can try changing directories.
Important
Effective May 1, 2025, Azure AD B2C will no longer be available to purchase for new customers. Learn more in our FAQ.
Before you begin, use the Choose a policy type selector at the top of this page to choose the type of policy you’re setting up. Azure Active Directory B2C offers two methods to define how users interact with your applications: through predefined user flows or through fully configurable custom policies. The steps required in this article are different for each method.
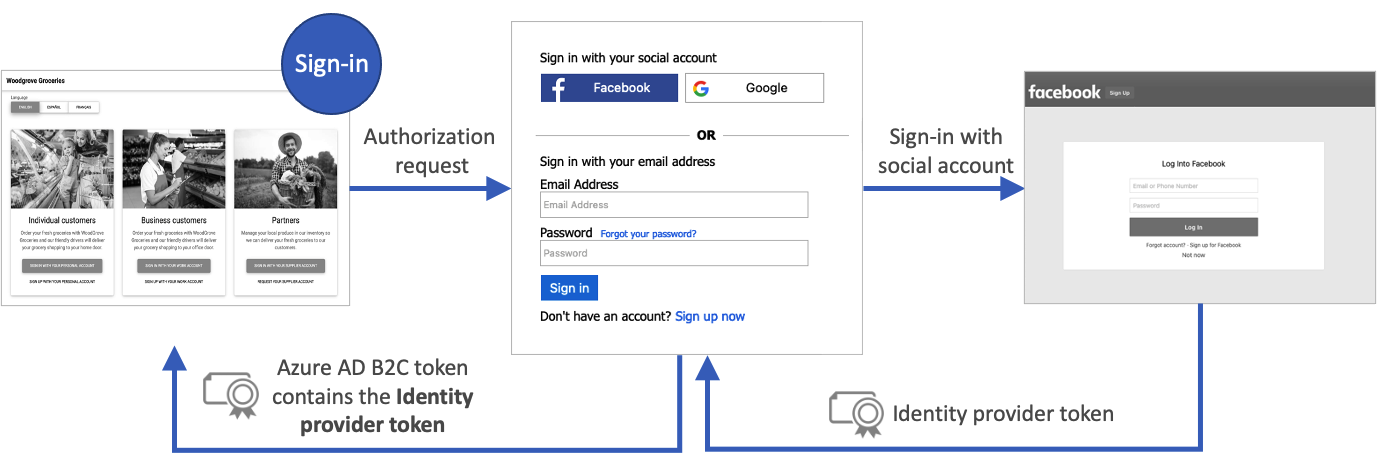
A user flow in Azure Active Directory B2C (Azure AD B2C) provides users of your application an opportunity to sign up or sign in with an identity provider. When the journey starts, Azure AD B2C receives an access token from the identity provider. Azure AD B2C uses that token to retrieve information about the user. You enable a claim in your user flow to pass the token through to the applications that you register in Azure AD B2C.
Azure AD B2C supports passing the access token of OAuth 2.0 identity providers, which include Facebook and Google. For all other identity providers, the claim is returned blank.
Azure AD B2C supports passing the access token of OAuth 2.0 and OpenID Connect identity providers. For all other identity providers, the claim is returned blank. For more details, check out the identity providers federation Live demo.
The following diagram shows how an identity provider token returns to your app:
Prerequisites
- Create a user flow so users can sign up and sign in to your application.
- Register a web application.
- Complete the steps in Get started with custom policies in Active Directory B2C. This tutorial guides you how to update custom policy files to use your Azure AD B2C tenant configuration.
- Register a web application.
Enable the claim
Sign in to the Azure portal as the External ID User Flow Administrator of your Azure AD B2C tenant.
If you have access to multiple tenants, select the Settings icon in the top menu to switch to your Azure AD B2C tenant from the Directories + subscriptions menu.
Choose All services in the top-left corner of the Azure portal, search for and select Azure AD B2C.
Select User flows (policies), and then select your user flow. For example, B2C_1_signupsignin1.
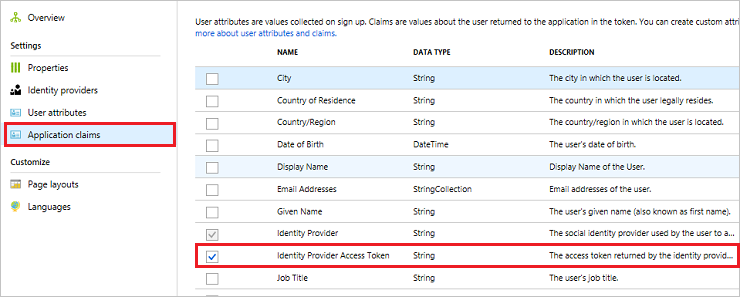
Select Application claims.
Enable the Identity Provider Access Token claim.
Click Save to save the user flow.
Test the user flow
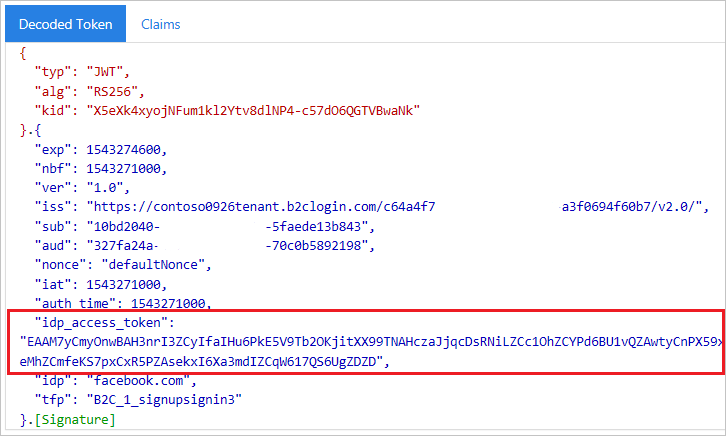
When testing your applications in Azure AD B2C, it can be useful to have the Azure AD B2C token returned to https://jwt.ms to review the claims in it.
On the Overview page of the user flow, select Run user flow.
For Application, select your application that you previously registered. To see the token in the example below, the Reply URL should show
https://jwt.ms.Click Run user flow, and then sign in with your account credentials. You should see the access token of the identity provider in the idp_access_token claim.
You should see something similar to the following example:
Add the claim elements
Open your TrustframeworkExtensions.xml file and add the following ClaimType element with an identifier of
identityProviderAccessTokento the ClaimsSchema element:<BuildingBlocks> <ClaimsSchema> <ClaimType Id="identityProviderAccessToken"> <DisplayName>Identity Provider Access Token</DisplayName> <DataType>string</DataType> <AdminHelpText>Stores the access token of the identity provider.</AdminHelpText> </ClaimType> ... </ClaimsSchema> </BuildingBlocks>Add the OutputClaim element to the TechnicalProfile element for each OAuth 2.0 identity provider that you would like the access token for. The following example shows the element added to the Facebook technical profile:
<ClaimsProvider>
  <DisplayName>Facebook</DisplayName>
  <TechnicalProfiles>
    <TechnicalProfile Id="Facebook-OAUTH">
      <OutputClaims>
        <OutputClaim ClaimTypeReferenceId="identityProviderAccessToken" PartnerClaimType="{oauth2:access_token}" />
      </OutputClaims>
      ...
    </TechnicalProfile>
  </TechnicalProfiles>
</ClaimsProvider>
Save the TrustframeworkExtensions.xml file.
Open your relying party policy file, such as SignUpOrSignIn.xml, and add the OutputClaim element to the TechnicalProfile:
<RelyingParty>
  <DefaultUserJourney ReferenceId="SignUpOrSignIn" />
  <TechnicalProfile Id="PolicyProfile">
    <OutputClaims>
      <OutputClaim ClaimTypeReferenceId="identityProviderAccessToken" PartnerClaimType="idp_access_token"/>
    </OutputClaims>
    ...
  </TechnicalProfile>
</RelyingParty>
Save the policy file.
Test your policy
When testing your applications in Azure AD B2C, it can be useful to have the Azure AD B2C token returned to https://jwt.ms to be able to review the claims in it.
Upload the files
- Sign in to the Azure portal.
- If you have access to multiple tenants, select the Settings icon in the top menu to switch to your Azure AD B2C tenant from the Directories + subscriptions menu.
- Choose All services in the top-left corner of the Azure portal, and then search for and select Azure AD B2C.
- Select Identity Experience Framework.
- On the Custom Policies page, click Upload Policy.
- Select Overwrite the policy if it exists, and then search for and select the TrustframeworkExtensions.xml file.
- Select Upload.
- Repeat steps 5 through 7 for the relying party file, such as SignUpOrSignIn.xml.
Run the policy
Open the policy that you changed. For example, B2C_1A_signup_signin.
For Application, select your application that you previously registered. To see the token in the example below, the Reply URL should show
https://jwt.ms.Select Run now.
You should see something similar to the following example:

Pass the IDP refresh token (optional)
The access token the identity provider returns is valid for a short period of time. Some identity providers also issue a refresh token along with the access token. Your client application can then exchange the identity provider's refresh token for a new access token when needed.
Azure AD B2C custom policy supports passing the refresh token of OAuth 2.0 identity providers, which includes Facebook, Google and GitHub.
To pass the identity provider's refresh token, follow these steps:
Open your TrustframeworkExtensions.xml file and add the following ClaimType element with an identifier of
identityProviderRefreshTokento the ClaimsSchema element.<ClaimType Id="identityProviderRefreshToken"> <DisplayName>Identity provider refresh token</DisplayName> <DataType>string</DataType> </ClaimType>Add the OutputClaim element to the TechnicalProfile element for each OAuth 2.0 identity provider that you would like the refresh token for. The following example shows the element added to the Facebook technical profile:
<ClaimsProvider>
  <DisplayName>Facebook</DisplayName>
  <TechnicalProfiles>
    <TechnicalProfile Id="Facebook-OAUTH">
      <OutputClaims>
        <OutputClaim ClaimTypeReferenceId="identityProviderRefreshToken" PartnerClaimType="{oauth2:refresh_token}" />
      </OutputClaims>
      ...
    </TechnicalProfile>
  </TechnicalProfiles>
</ClaimsProvider>
Some identity providers require you to include metadata or scopes to the identity provider's technical profile.
For Google identity provider, add two claim types
access_typeandprompt. Then add the following input claims to the identity provider's technical profile:<InputClaims> <InputClaim ClaimTypeReferenceId="access_type" PartnerClaimType="access_type" DefaultValue="offline" AlwaysUseDefaultValue="true" /> <!-- The refresh_token is return only on the first authorization for a given user. Subsequent authorization request doesn't return the refresh_token. To fix this issue we add the prompt=consent query string parameter to the authorization request--> <InputClaim ClaimTypeReferenceId="prompt" PartnerClaimType="prompt" DefaultValue="consent" AlwaysUseDefaultValue="true" /> </InputClaims>Other identity providers may have different methods to issue a refresh token. Follow the identity provider's audience and add the necessary elements to your identity provider's technical profile.
Save the changes you made in your TrustframeworkExtensions.xml file.
Open your relying party policy file, such as SignUpOrSignIn.xml, and add the OutputClaim element to the TechnicalProfile:
<RelyingParty>
  <DefaultUserJourney ReferenceId="SignUpOrSignIn" />
  <TechnicalProfile Id="PolicyProfile">
    <OutputClaims>
      <OutputClaim ClaimTypeReferenceId="identityProviderRefreshToken" PartnerClaimType="idp_refresh_token"/>
    </OutputClaims>
    ...
  </TechnicalProfile>
</RelyingParty>
Save the changes you made in your policy's relying party policy file.
Upload the TrustframeworkExtensions.xml file, and then the relying party policy file.
Next steps
Learn more in the overview of Azure AD B2C tokens.