Note
Access to this page requires authorization. You can try signing in or changing directories.
Access to this page requires authorization. You can try changing directories.
This tutorial describes how to use a PowerShell script to implement Microsoft Entra ID API-driven inbound provisioning. Using the steps in this tutorial, you can convert a CSV file containing HR data into a bulk request payload and send it to the Microsoft Entra provisioning /bulkUpload API endpoint. The article also provides guidance on how the same integration pattern can be used with any system of record.
Integration scenario
Business requirement
Your system of record periodically generates CSV file exports containing worker data. You want to implement an integration that reads data from the CSV file and automatically provisions user accounts in your target directory (on-premises Active Directory for hybrid users and Microsoft Entra ID for cloud-only users).
Implementation requirement
From an implementation perspective:
- You want to use an unattended PowerShell script to read data from the CSV file exports and send it to the inbound provisioning API endpoint.
- In your PowerShell script, you don't want to implement the complex logic of comparing identity data between your system of record and target directory.
- You want to use Microsoft Entra provisioning service to apply your IT managed provisioning rules to automatically create/update/enable/disable accounts in the target directory (on-premises Active Directory or Microsoft Entra ID).

Integration scenario variations
While this tutorial uses a CSV file as a system of record, you can customize the sample PowerShell script to read data from any system of record. Here's a list of enterprise integration scenario variations, where API-driven inbound provisioning can be implemented with a PowerShell script.
| # | System of record | Integration guidance on using PowerShell to read source data |
|---|---|---|
| 1 | Database table | If you're using an Azure SQL database or an on-premises SQL Server, you can use the Read-SqlTableData cmdlet to read data stored in a table of a SQL database. You can use the Invoke-SqlCmd cmdlet to run Transact-SQL or XQuery scripts. If you're using an Oracle / MySQL / Postgres database, you can find a PowerShell module either published by the vendor or available in the PowerShell Gallery. Use the module to read data from your database table. |
| 2 | LDAP server | Use the System.DirectoryServices.Protocols .NET API or one of the LDAP modules available in the PowerShell Gallery to query your LDAP server. Understand the LDAP schema and hierarchy to retrieve user data from the LDAP server. |
| 3 | Any system that exposes REST APIs | To read data from a REST API endpoint using PowerShell, you can use the Invoke-RestMethod cmdlet from the Microsoft.PowerShell.Utility module. Check the documentation of your REST API and find out what parameters and headers it expects, what format it returns, and what authentication method it uses. You can then adjust your Invoke-RestMethod command accordingly. |
| 4 | Any system that exposes SOAP APIs | To read data from a SOAP API endpoint using PowerShell, you can use the New-WebServiceProxy cmdlet from the Microsoft.PowerShell.Management module. Check the documentation of your SOAP API and find out what parameters and headers it expects, what format it returns, and what authentication method it uses. You can then adjust your New-WebServiceProxy command accordingly. |
After reading the source data, apply your pre-processing rules and convert the output from your system of record into a bulk request that can be sent to the Microsoft Entra provisioning bulkUpload API endpoint.
Important
If you'd like to share your PowerShell integration script with the community, publish it on PowerShell Gallery and notify us on the GitHub repository entra-id-inbound-provisioning, so we can add a reference it.
How to use this tutorial
The PowerShell sample script published in the Microsoft Entra inbound provisioning GitHub repository automates several tasks. It has logic for handling large CSV files and chunking the bulk request to send 50 records in each request. Here's how you can test it and customize it per your integration requirements.
Note
The sample PowerShell script is provided "as-is" for implementation reference. If you have questions related to the script or if you'd like to enhance it, please use the GitHub project repository.
| # | Automation task | Implementation guidance | Advanced customization |
|---|---|---|---|
| 1 | Read worker data from the CSV file. | Download the PowerShell script. It has out-of-the-box logic to read data from any CSV file. Refer to CSV2SCIM PowerShell usage details to get familiar with the different execution modes of this script. | If your system of record is different, check guidance provided in the section Integration scenario variations on how you can customize the PowerShell script. |
| 2 | Pre-process and convert data to SCIM format. | By default, the PowerShell script converts each record in the CSV file to a SCIM Core User + Enterprise User representation. Follow the steps in the section Generate bulk request payload with standard schema to get familiar with this process. | If your CSV file has different fields, tweak the AttributeMapping.psd file to generate a valid SCIM user. You can also generate bulk request with custom SCIM schema. Update the PowerShell script to include any custom CSV data validation logic. |
| 3 | Use a certificate for authentication to Microsoft Entra ID. | Create a service principal that can access the inbound provisioning API. Refer to steps in the section Configure client certificate for service principal authentication to learn how to use client certificate for authentication. | If you'd like to use managed identity instead of a service principal for authentication, then review the use of Connect-MgGraph in the sample script and update it to use managed identities. |
| 4 | Provision accounts in on-premises Active Directory or Microsoft Entra ID. | Configure API-driven inbound provisioning app. This generates a unique /bulkUpload API endpoint. To run the script using a service principal with certificate-based authentication, refer to the steps in the section Upload bulk request payload using client certificate authentication. Validate the attribute flow and customize the attribute mappings per your integration requirements. | If you plan to use bulk request with custom SCIM schema, then extend the provisioning app schema to include your custom SCIM schema elements. |
| 5 | Scan the provisioning logs and retry provisioning for failed records. | Refer to the steps in the section Get provisioning logs of the latest sync cycles to learn how to fetch and analyze provisioning log data. Identify failed user records and include them in the next upload cycle. | - |
| 6 | Deploy your PowerShell based automation to production. | Once you have verified your API-driven provisioning flow and customized the PowerShell script to meet your requirements, you can deploy the automation as a PowerShell Workflow runbook in Azure Automation or as a server process scheduled to run on a Windows server. | - |
Download the PowerShell script
- Access the GitHub repository
entra-id-inbound-provisioning. - Use the Code > Clone or Code > Download ZIP option to copy contents of this repository into your local folder.
- Navigate to the folder PowerShell/CSV2SCIM. It has the following directory structure:
- src
- CSV2SCIM.ps1 (main script)
- ScimSchemaRepresentations (folder containing standard SCIM schema definitions for validating AttributeMapping.psd1 files)
- EnterpriseUser.json, Group.json, Schema.json, User.json
- Samples
- AttributeMapping.psd1 (sample mapping of columns in CSV file to standard SCIM attributes)
- csv-with-2-records.csv (sample CSV file with two records)
- csv-with-1000-records.csv (sample CSV file with 1000 records)
- Test-ScriptCommands.ps1 (sample usage commands)
- UseClientCertificate.ps1 (script to generate self-signed certificate and upload it as service principal credential for use in OAuth flow)
Sample1(folder with more examples of how CSV file columns can be mapped to SCIM standard attributes. If you get different CSV files for employees, contractors, interns, you can create a separate AttributeMapping.psd1 file for each entity.)
- src
- Download and install the latest version of PowerShell.
- Run the command to enable execution of remote signed scripts:
set-executionpolicy remotesigned - Install the following prerequisite modules:
Install-Module -Name Microsoft.Graph.Applications,Microsoft.Graph.Reports
Generate bulk request payload with standard schema
This section explains how to generate a bulk request payload with standard SCIM Core User and Enterprise User attributes from a CSV file.
To illustrate the procedure, let's use the CSV file Samples/csv-with-2-records.csv.
Open the CSV file
Samples/csv-with-2-records.csvin Notepad++ or Excel to check the columns present in the file.
In Notepad++ or a source code editor like Visual Studio Code, open the PowerShell data file
Samples/AttributeMapping.psd1that enables mapping of CSV file columns to SCIM standard schema attributes. The file that's shipped out-of-the-box already has pre-configured mapping of CSV file columns to corresponding SCIM schema attributes.@{ externalId = 'WorkerID' name = @{ familyName = 'LastName' givenName = 'FirstName' } active = { $_.'WorkerStatus' -eq 'Active' } userName = 'UserID' displayName = 'FullName' nickName = 'UserID' userType = 'WorkerType' title = 'JobTitle' addresses = @( @{ type = { 'work' } streetAddress = 'StreetAddress' locality = 'City' postalCode = 'ZipCode' country = 'CountryCode' } ) phoneNumbers = @( @{ type = { 'work' } value = 'OfficePhone' } ) "urn:ietf:params:scim:schemas:extension:enterprise:2.0:User" = @{ employeeNumber = 'WorkerID' costCenter = 'CostCenter' organization = 'Company' division = 'Division' department = 'Department' manager = @{ value = 'ManagerID' } } }Open PowerShell and change to the directory CSV2SCIM\src.
Run the following command to initialize the
AttributeMappingvariable.$AttributeMapping = Import-PowerShellDataFile '..\Samples\AttributeMapping.psd1'Run the following command to validate if the
AttributeMappingfile has valid SCIM schema attributes. This command returns True if the validation is successful..\CSV2SCIM.ps1 -Path '..\Samples\csv-with-2-records.csv' -AttributeMapping $AttributeMapping -ValidateAttributeMappingLet's say the
AttributeMappingfile has an invalid SCIM attribute called userId, then theValidateAttributeMappingmode displays the following error.
Once you verified that the
AttributeMappingfile is valid, run the following command to generate a bulk request in the fileBulkRequestPayload.jsonthat includes the two records present in the CSV file..\CSV2SCIM.ps1 -Path '..\Samples\csv-with-2-records.csv' -AttributeMapping $AttributeMapping > BulkRequestPayload.jsonYou can open the contents of the file
BulkRequestPayload.jsonto verify if the SCIM attributes are set as per mapping defined in the fileAttributeMapping.psd1.You can post the file generated above as-is to the /bulkUpload API endpoint associated with your provisioning app using Graph Explorer or cURL. Reference:
To directly upload the generated payload to the API endpoint using the same PowerShell script refer to the next section.


Configure client certificate for service principal authentication
Note
The instructions here show how to generate a self-signed certificate. Self-signed certificates are not trusted by default and they can be difficult to maintain. Also, they may use outdated hash and cipher suites that may not be strong. For better security, purchase a certificate signed by a well-known certificate authority.
- Run the following PowerShell script to generate a new self-signed certificate. You can skip this step if you have purchased a certificate signed by a well-known certificate authority.
The generated certificate is stored Current User\Personal\Certificates. You can view it using the Control Panel > Manage user certificates option.$ClientCertificate = New-SelfSignedCertificate -Subject 'CN=CSV2SCIM' -KeyExportPolicy 'NonExportable' -CertStoreLocation Cert:\CurrentUser\My $ThumbPrint = $ClientCertificate.ThumbPrint - To associate this certificate with a valid service principal, log in to your Microsoft Entra admin center as Application Administrator.
- Open the service principal you configured under App Registrations.
- Copy the Object ID from the Overview blade. Use the value to replace the string
<AppObjectId>. Copy the Application (client) Id. We will use it later and it is referenced as<AppClientId>. - Run the following command to upload your certificate to the registered service principal.
You should see the certificate under the Certificates & secrets blade of your registered app.Connect-MgGraph -Scopes "Application.ReadWrite.All" Update-MgApplication -ApplicationId '<AppObjectId>' -KeyCredentials @{ Type = "AsymmetricX509Cert" Usage = "Verify" Key = $ClientCertificate.RawData }
- Add the following two Application permission scopes to the service principal app: Application.Read.All and Synchronization.Read.All. These are required for the PowerShell script to look up the provisioning app by
ServicePrincipalIdand fetch the provisioningJobId.

Upload bulk request payload using client certificate authentication
This section explains how to send the generated bulk request payload to your inbound provisioning API endpoint using a trusted client certificate.
Open the API-driven provisioning app that you configured. Copy the
ServicePrincipalIdassociated with your provisioning app from Provisioning App > Properties > Object ID.
Run the following command by providing the correct values for
ServicePrincipalId,ClientIdandTenantId.$ClientCertificate = Get-ChildItem -Path cert:\CurrentUser\my\ | Where-Object {$_.Subject -eq "CN=CSV2SCIM"} $ThumbPrint = $ClientCertificate.ThumbPrint .\CSV2SCIM.ps1 -Path '..\Samples\csv-with-2-records.csv' -AttributeMapping $AttributeMapping -TenantId "contoso.onmicrosoft.com" -ServicePrincipalId "<ProvisioningAppObjectId>" -ClientId "<AppClientId>" -ClientCertificate (Get-ChildItem Cert:\CurrentUser\My\$ThumbPrint)Visit the Provisioning logs blade of your provisioning app to verify the processing of the above request.

Generate bulk request with custom SCIM schema
This section describes how to generate a bulk request with custom SCIM schema namespace consisting of fields in the CSV file.
In Notepad++ or a source code editor like Visual Studio Code, open the PowerShell data file
Samples/AttributeMapping.psd1that enables mapping of CSV file columns to SCIM standard schema attributes. The file that's shipped out-of-the-box already has pre-configured mapping of CSV file columns to corresponding SCIM schema attributes.Open PowerShell and change to the directory CSV2SCIM\src.
Run the following command to initialize the
AttributeMappingvariable.$AttributeMapping = Import-PowerShellDataFile '..\Samples\AttributeMapping.psd1'Run the following command to validate if the
AttributeMappingfile has valid SCIM schema attributes. This command returns True if the validation is successful..\CSV2SCIM.ps1 -Path '..\Samples\csv-with-2-records.csv' -AttributeMapping $AttributeMapping -ValidateAttributeMappingIn addition to the SCIM Core User and Enterprise User attributes, to get a flat-list of all CSV fields under a custom SCIM schema namespace
urn:ietf:params:scim:schemas:extension:contoso:1.0:User, run the following command..\CSV2SCIM.ps1 -Path '..\Samples\csv-with-2-records.csv' -AttributeMapping $AttributeMapping -ScimSchemaNamespace "urn:ietf:params:scim:schemas:extension:contoso:1.0:User" > BulkRequestPayloadWithCustomNamespace.jsonThe CSV fields will show up under the custom SCIM schema namespace.


Extending provisioning job schema
Often the data file sent by HR teams contains more attributes that don't have a direct representation in the standard SCIM schema. To represent such attributes, we recommend creating a SCIM extension schema and adding attributes under this namespace.
The CSV2SCIM script provides an execution mode called UpdateSchema which reads all columns in the CSV file, adds them under an extension schema namespace, and updates the provisioning app schema.
Note
If the attribute extensions are already present in the provisioning app schema, then this mode only emits a warning that the attribute extension already exists. So, there is no issue running the CSV2SCIM script in the UpdateSchema mode if new fields are added to the CSV file and you want to add them as an extension.
To illustrate the procedure, we'll use the CSV file Samples/csv-with-2-records.csv present in the CSV2SCIM folder.
Open the CSV file
Samples/csv-with-2-records.csvin a Notepad, Excel, or TextPad to check the columns present in the file.
Run the following command:
.\CSV2SCIM.ps1 -Path '..\Samples\csv-with-2-records.csv' -UpdateSchema -ServicePrincipalId <servicePrincipalId> -TenantId "contoso.onmicrosoft.com" -ScimSchemaNamespace "urn:ietf:params:scim:schemas:extension:contoso:1.0:User"You can verify the update to your provisioning app schema by opening the Attribute Mapping page and accessing the Edit attribute list for API option under Advanced options.
The Attribute List shows attributes under the new namespace.

Get provisioning logs of the latest sync cycles
After sending the bulk request, you can query the logs of the latest sync cycles processed by Microsoft Entra ID. You can retrieve the sync statistics and processing details with the PowerShell script and save it for analysis.
To view the log details and sync statistics on the console, run the following command:
.\CSV2SCIM.ps1 -ServicePrincipalId <servicePrincipalId> -TenantId "contoso.onmicrosoft.com" -GetPreviousCycleLogs -NumberOfCycles 1
Note
NumberOfCycles is 1 by default. Specify a number to retrieve more sync cycles.
To view sync statistics on the console and save the logs details to a variable, run the following command:
$logs=.\CSV2SCIM.ps1 -ServicePrincipalId <servicePrincipalId> -TenantId "contoso.onmicrosoft.com" -GetPreviousCycleLogsTo run the command using client certificate authentication, run the command by providing the correct values for
ServicePrincipalId,ClientIdandTenantId:$ClientCertificate = Get-ChildItem -Path cert:\CurrentUser\my\ | Where-Object {$_.Subject -eq "CN=CSV2SCIM"} $ThumbPrint = $ClientCertificate.ThumbPrint $logs=.\CSV2SCIM.ps1 -ServicePrincipalId "<ProvisioningAppObjectId>" -TenantId "contoso.onmicrosoft.com" -ClientId "<AppClientId>" -ClientCertificate (Get-ChildItem Cert:\CurrentUser\My\$ThumbPrint) -GetPreviousCycleLogs -NumberOfCycles 1To see the details of a specific record we can loop into the collection or select a specific index of it, for example:
$logs[0]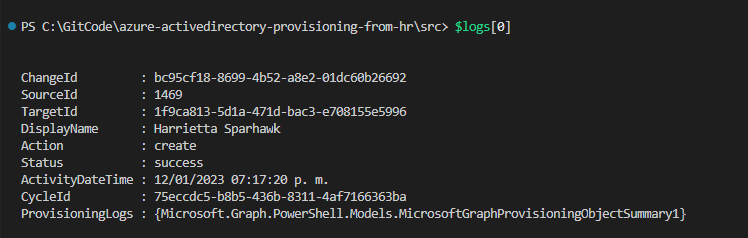
We can also use the
where-objectstatement to search for a specific record using the sourceID or DisplayName. In the ProvisioningLogs property, we can find all the details of the operation done for that specific record.$user = $logs | where sourceId -eq '1222' $user.ProvisioningLogs | fl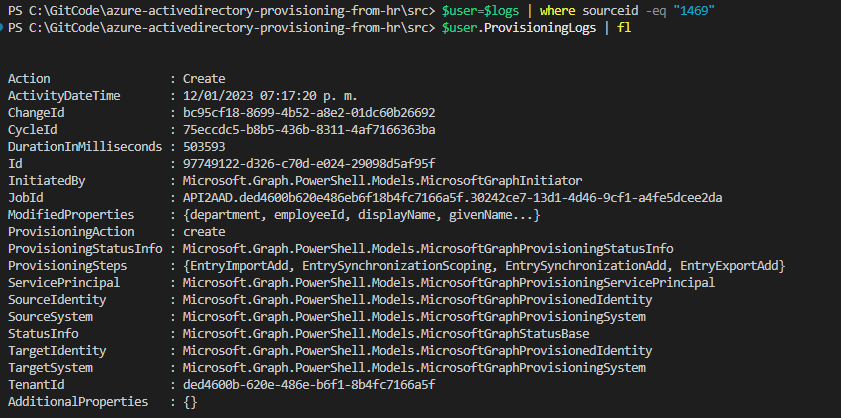
We can see the specific user affected properties on the ModifiedProperties attribute.
$user.ProvisioningLogs.ModifiedProperties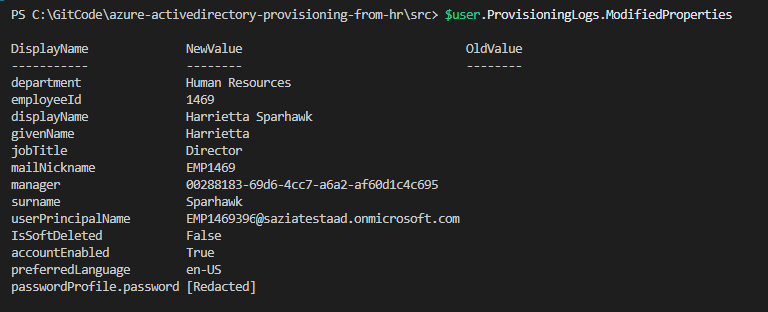

Appendix
CSV2SCIM PowerShell usage details
Here is a list of command-line parameters accepted by the CSV2SCIM PowerShell script.
PS > CSV2SCIM.ps1 -Path <path-to-csv-file>
[-ScimSchemaNamespace <customSCIMSchemaNamespace>]
[-AttributeMapping $AttributeMapping]
[-ServicePrincipalId <spn-guid>]
[-ValidateAttributeMapping]
[-UpdateSchema]
[-ClientId <client-id>]
[-ClientCertificate <certificate-object>]
[-RestartService]
Note
The AttributeMapping and ValidateAttributeMapping command-line parameters refer to the mapping of CSV column attributes to the standard SCIM schema elements.
It doesn't refer to the attribute mappings that you perform in the Microsoft Entra admin center provisioning app between source SCIM schema elements and target Microsoft Entra / on-premises Active Directory attributes.
| Parameter | Description | Processing remarks |
|---|---|---|
| Path | The full or relative path to the CSV file. For example: .\Samples\csv-with-1000-records.csv |
Mandatory: Yes |
| ScimSchemaNamespace | The custom SCIM Schema namespace to use to send all columns in the CSV file as custom SCIM attributes belonging to specific namespace. For example, urn:ietf:params:scim:schemas:extension:csv:1.0:User |
Mandatory: Only when you want to: - Update the provisioning app schema or When you want to include custom SCIM attributes in the payload. |
| AttributeMapping | Points to a PowerShell Data (.psd1 extension) file that maps columns in the CSV file to SCIM Core User and Enterprise User attributes. See example: AttributeMapping.psd file for CSV2SCIM script. For example: powershell $AttributeMapping = Import-PowerShellDataFile '.\Samples\AttributeMapping.psd1'`-AttributeMapping $AttributeMapping |
Mandatory: Yes The only scenario when you don't need to specify this is when using the UpdateSchema switch. |
| ValidateAttributeMapping | Use this Switch flag to validate that the AttributeMapping file contains attributes that comply with the SCIM Core and Enterprise user schema. | Mandatory: No Recommend using it to ensure compliance. |
| ServicePrincipalId | The GUID value of your provisioning app's service principal ID that you can retrieve from the Provisioning App > Properties > Object ID | Mandatory: Only when you want to: - Update the provisioning app schema, or - Send the generated bulk request to the API endpoint. |
| UpdateSchema | Use this switch to instruct the script to read the CSV columns and add them as custom SCIM attributes in your provisioning app schema. | |
| ClientId | The Client ID of a Microsoft Entra registered app to use for OAuth authentication flow. This app must have valid certificate credentials. | Mandatory: Only when performing certificate-based authentication. |
| ClientCertificate | The Client Authentication Certificate to use during OAuth flow. | Mandatory: Only when performing certificate-based authentication. |
| GetPreviousCycleLogs | To get the provisioning logs of the latest sync cycles. | |
| NumberOfCycles | To specify how many sync cycles should be retrieved. This value is 1 by default. | |
| RestartService | With this option, the script temporarily pauses the provisioning job before uploading the data, it uploads the data and then starts the job again to ensure immediate processing of the payload. | Use this option only during testing. |
AttributeMapping.psd file
This file is used to map columns in the CSV file to standard SCIM Core User and Enterprise User attribute schema elements. The file also generates an appropriate representation of the CSV file contents as a bulk request payload.
In the next example, we mapped the following columns in the CSV file to their counterpart SCIM Core User and Enterprise User attributes.

    @{
    externalId   = 'WorkerID'
    name         = @{
        familyName = 'LastName'
        givenName  = 'FirstName'
    }
    active       = { $_.'WorkerStatus' -eq 'Active' }
    userName     = 'UserID'
    displayName  = 'FullName'
    nickName     = 'UserID'
    userType     = 'WorkerType'
    title        = 'JobTitle'
    addresses    = @(
        @{
            type          = { 'work' }
            streetAddress = 'StreetAddress'
            locality      = 'City'
            postalCode    = 'ZipCode'
            country       = 'CountryCode'
        }
    )
    phoneNumbers = @(
        @{
            type  = { 'work' }
            value = 'OfficePhone'
        }
    )
    "urn:ietf:params:scim:schemas:extension:enterprise:2.0:User" = @{
        employeeNumber = 'WorkerID'
        costCenter     = 'CostCenter'
        organization   = 'Company'
        division       = 'Division'
        department     = 'Department'
        manager        = @{
            value = 'ManagerID'
        }
    }
}