Note
Access to this page requires authorization. You can try signing in or changing directories.
Access to this page requires authorization. You can try changing directories.
Microsoft Entra user provisioning service integrates with SAP SuccessFactors Employee Central to manage the identity life cycle of users. Microsoft Entra ID offers three prebuilt integrations:
- SuccessFactors to on-premises Active Directory user provisioning
- SuccessFactors to Microsoft Entra user provisioning
- SuccessFactors Writeback
This article explains how the integration works and how you can customize the provisioning behavior for different HR scenarios.
Microsoft Entra also supports single-sign on to SuccessFactors. For more information, see Microsoft Entra single sign-on (SSO) integration with SuccessFactors.
Establishing connectivity
Microsoft Entra provisioning service uses basic authentication to connect to Employee Central OData API endpoints. When setting up the SuccessFactors provisioning app, use the Tenant URL parameter in the Admin Credentials section to configure the API data center URL.
To further secure the connectivity between Microsoft Entra provisioning service and SuccessFactors, add the Microsoft Entra IP ranges in the SuccessFactors IP allowlist:
- Download the latest IP Ranges for the Azure Public Cloud.
- Open the file and search for tag
AzureActiveDirectory. - Copy all IP address ranges listed within the element addressPrefixes and use the range to build your IP address restriction list.
- Translate the CIDR values to IP ranges.
- Log in to SuccessFactors admin portal to add IP ranges to the allowlist. Refer to SAP support note 2253200. You can now enter IP ranges in this tool.
Supported entities
For every user in SuccessFactors, Microsoft Entra provisioning service retrieves the following entities. Each entity is expanded using the OData API $expand query parameter as outlined in the Retrieval rule column. Some entities are expanded by default, while some entities are expanded only if a specific attribute is present in the mapping.
| # | SuccessFactors Entity | OData Node | Retrieval rule |
|---|---|---|---|
| 1 | PerPerson |
*root node* |
Always |
| 2 | PerPersonal |
personalInfoNav |
Always |
| 3 | PerPhone |
phoneNav |
Always |
| 4 | PerEmail |
emailNav |
Always |
| 5 | EmpEmployment |
employmentNav |
Always |
| 6 | User |
employmentNav/userNav |
Always |
| 7 | EmpJob |
employmentNav/jobInfoNav |
Always |
| 8 | EmpEmploymentTermination |
activeEmploymentsCount |
Always |
| 9 | User's manager |
employmentNav/userNav/manager/empInfo |
Always |
| 10 | FOCompany |
employmentNav/jobInfoNav/companyNav |
Only if company or companyId attribute is mapped |
| 11 | FODepartment |
employmentNav/jobInfoNav/departmentNav |
Only if department or departmentId attribute is mapped |
| 12 | FOBusinessUnit |
employmentNav/jobInfoNav/businessUnitNav |
Only if businessUnit or businessUnitId attribute is mapped |
| 13 | FOCostCenter |
employmentNav/jobInfoNav/costCenterNav |
Only if costCenter or costCenterId attribute is mapped |
| 14 | FODivision |
employmentNav/jobInfoNav/divisionNav |
Only if division or divisionId attribute is mapped |
| 15 | FOJobCode |
employmentNav/jobInfoNav/jobCodeNav |
Only if jobCode or jobCodeId attribute is mapped |
| 16 | FOPayGrade |
employmentNav/jobInfoNav/payGradeNav |
Only if payGrade attribute is mapped |
| 17 | FOLocation |
employmentNav/jobInfoNav/locationNav |
Only if location attribute is mapped |
| 18 | FOCorporateAddressDEFLT |
employmentNav/jobInfoNav/addressNavDEFLT |
If mapping contains one of the following attributes: officeLocationAddress, officeLocationCity, officeLocationZipCode |
| 19 | FOEventReason |
employmentNav/jobInfoNav/eventReasonNav |
Only if eventReason attribute is mapped |
| 20 | EmpGlobalAssignment |
employmentNav/empGlobalAssignmentNav |
Only if assignmentType is mapped |
| 21 | EmploymentType Picklist |
employmentNav/jobInfoNav/employmentTypeNav |
Only if employmentType is mapped |
| 22 | EmployeeClass Picklist |
employmentNav/jobInfoNav/employeeClassNav |
Only if employeeClass is mapped |
| 23 | EmplStatus Picklist |
employmentNav/jobInfoNav/emplStatusNav |
Only if emplStatus is mapped |
| 24 | AssignmentType Picklist |
employmentNav/empGlobalAssignmentNav/assignmentTypeNav |
Only if assignmentType is mapped |
| 25 | Position |
employmentNav/jobInfoNav/positionNav |
Only if positioNav is mapped |
| 26 | Manager User |
employmentNav/jobInfoNav/managerUserNav |
Only if managerUserNav is mapped |
How full sync works
Based on the attribute-mapping, during full sync Microsoft Entra provisioning service sends the following "GET" OData API query to fetch effective data of all active and terminated workers.
| Parameter | Description |
|---|---|
| OData API Host | Appends https to the Tenant URL. Example: https://api4.successfactors.com |
| OData API Endpoint | /odata/v2/PerPerson |
| OData $format query parameter | json |
| OData $filter query parameter | (personEmpTerminationInfoNav/activeEmploymentsCount ne null) and (lastModifiedDateTime le <CurrentExecutionTime>) |
| OData $expand query parameter | This parameter value depends on the attributes mapped. Example: employmentNav/userNav,employmentNav/jobInfoNav,personalInfoNav,personEmpTerminationInfoNav,phoneNav,emailNav,employmentNav/jobInfoNav/companyNav/countryOfRegistrationNav,employmentNav/jobInfoNav/divisionNav,employmentNav/jobInfoNav/departmentNav |
| OData customPageSize query parameter | 100 |
Note
During the full initial sync, both active and terminated workers from SAP SuccessFactors are fetched.
For each SuccessFactors user, the provisioning service looks for an account in the target (Microsoft Entra ID / on-premises Active Directory) using the matching attribute defined in the mapping. For example: if personIdExternal maps to employeeId and is set as the matching attribute, then the provisioning service uses the personIdExternal value to search for the user with employeeId filter. If a user match is found, then it updates the target attributes. If no match is found, then it creates a new entry in the target.
To validate the data returned by your OData API endpoint for a specific personIdExternal, update the SuccessFactorsAPIEndpoint in the API query with your API data center server URL and use a tool like cURL or Graph Explorer to invoke the query. If the "in" filter doesn't work, you can try the "eq" filter.
https://[SuccessFactorsAPIEndpoint]/odata/v2/PerPerson?$format=json&
$filter=(personIdExternal in '[personIdExternalValue]')&
$expand=employmentNav/userNav,employmentNav/jobInfoNav,personalInfoNav,personEmpTerminationInfoNav,
phoneNav,phoneNav/phoneTypeNav,emailNav,employmentNav/jobInfoNav/businessUnitNav,employmentNav/jobInfoNav/companyNav,
employmentNav/jobInfoNav/companyNav/countryOfRegistrationNav,employmentNav/jobInfoNav/costCenterNav,
employmentNav/jobInfoNav/divisionNav,employmentNav/jobInfoNav/departmentNav,employmentNav/jobInfoNav/jobCodeNav,
employmentNav/jobInfoNav/locationNav,employmentNav/jobInfoNav/locationNav/addressNavDEFLT,employmentNav/jobInfoNav/payGradeNav,
employmentNav/empGlobalAssignmentNav,employmentNav/empGlobalAssignmentNav/assignmentTypeNav,employmentNav/jobInfoNav/emplStatusNav,
employmentNav/jobInfoNav/employmentTypeNav,employmentNav/jobInfoNav/employeeClassNav,employmentNav/jobInfoNav/eventReasonNav
How incremental sync works
After full sync, Microsoft Entra provisioning service maintains LastExecutionTimestamp and uses it to create delta queries for retrieving incremental changes. The timestamp attributes present in each SuccessFactors entity, such as lastModifiedDateTime, startDate, endDate, and latestTerminationDate, are evaluated to see if the change falls between the LastExecutionTimestamp and CurrentExecutionTime. If yes, then the entry change is considered to be effective and processed for sync.
Here's the OData API request template that Microsoft Entra ID uses to query SuccessFactors for incremental changes. You can update the variables SuccessFactorsAPIEndpoint, LastExecutionTimestamp and CurrentExecutionTime in the request template use a tool like cURL or Graph Explorer to check what data is returned. Alternatively, you can also retrieve the actual request payload from SuccessFactors by enabling OData API Audit logs.
https://[SuccessFactorsAPIEndpoint]/odata/v2/PerPerson/$count?$format=json&$filter=(personEmpTerminationInfoNav/activeEmploymentsCount ne null) and
((lastModifiedDateTime ge datetimeoffset'<LastExecutionTimestamp>' and lastModifiedDateTime le datetimeoffset'<CurrentExecutionTime>') or
(personalInfoNav/startDate ge datetimeoffset'<LastExecutionTimestamp>' and personalInfoNav/startDate le datetimeoffset'<CurrentExecutionTime>') or
((personalInfoNav/lastModifiedDateTime ge datetimeoffset'<LastExecutionTimestamp>' and personalInfoNav/lastModifiedDateTime le datetimeoffset'<CurrentExecutionTime>') and (personalInfoNav/startDate le datetimeoffset'<CurrentExecutionTime>' and (personalInfoNav/endDate ge datetimeoffset'<CurrentExecutionTime>' or  personalInfoNav/endDate eq null))) or
(employmentNav/startDate ge datetimeoffset'<LastExecutionTimestamp>' and employmentNav/startDate le datetimeoffset'<CurrentExecutionTime>') or
((employmentNav/lastModifiedDateTime ge datetimeoffset'<LastExecutionTimestamp>' and employmentNav/lastModifiedDateTime le datetimeoffset'<CurrentExecutionTime>') and (employmentNav/startDate le datetimeoffset'<CurrentExecutionTime>' and (employmentNav/endDate ge datetimeoffset'<CurrentExecutionTime>' or employmentNav/endDate eq null)))
(employmentNav/jobInfoNav/startDate ge datetimeoffset'<LastExecutionTimestamp>' and employmentNav/jobInfoNav/startDate le datetimeoffset'<CurrentExecutionTime>') or
((employmentNav/jobInfoNav/lastModifiedDateTime ge datetimeoffset'<LastExecutionTimestamp>' and employmentNav/jobInfoNav/lastModifiedDateTime le datetimeoffset'<CurrentExecutionTime>') and (employmentNav/jobInfoNav/startDate le datetimeoffset'<CurrentExecutionTime>' and (employmentNav/jobInfoNav/endDate ge datetimeoffset'<CurrentExecutionTime>' or employmentNav/jobInfoNav/endDate eq null))) or
(phoneNav/lastModifiedDateTime ge datetimeoffset'<LastExecutionTimestamp>' and phoneNav/lastModifiedDateTime le datetimeoffset'<CurrentExecutionTime>') or
(emailNav/lastModifiedDateTime ge datetimeoffset'<LastExecutionTimestamp>' and emailNav/lastModifiedDateTime le datetimeoffset'<CurrentExecutionTime>') or
(personEmpTerminationInfoNav/latestTerminationDate ge datetimeoffset'<previousDayDateStartTime24hrs>' and personEmpTerminationInfoNav/latestTerminationDate le datetimeoffset'<previousDayDateTime24hrs>') or
(employmentNav/userNav/lastModifiedDateTime ge datetimeoffset'<LastExecutionTimestamp>' and employmentNav/userNav/lastModifiedDateTime le datetimeoffset'<CurrentExecutionTime>'))
&$expand=employmentNav/userNav,employmentNav/jobInfoNav,personalInfoNav,personEmpTerminationInfoNav,phoneNav,emailNav,employmentNav/userNav/manager/empInfo,employmentNav/jobInfoNav/companyNav,employmentNav/jobInfoNav/departmentNav,employmentNav/jobInfoNav/locationNav,employmentNav/jobInfoNav/locationNav/addressNavDEFLT,employmentNav/jobInfoNav/locationNav/addressNavDEFLT/stateNav&customPageSize=100
How pre-hire processing works
This section explains how the SAP SuccessFactors connector processes pre-hire records (workers with hire date / start date in future).
Let's say there is a pre-hire with employeeId "1234" in SuccessFactors Employee Central with start date on 1-June-2023. Let's further assume that this pre-hire record was first created either in Employee Central or in the Onboarding module on 15-May-2023. When the provisioning service first observes this record on 15-May-2023 (either as part of full sync or incremental sync), this record is still in pre-hire state. Due to this, SuccessFactors does not send the provisioning service all attributes (example: userNav/username) associated with the user. Only bare minimum data about the user such as companyName, personIdExternal, firstname, lastname and startDate is available. To process pre-hires successfully, the following pre-requisites must be met:
- The
personIdExternalattribute must be set as the primary matching identifier (joining property). If you configure a different attribute (example: userName) as the joining property then the provisioning service will not be able to retrieve the pre-hire information. - The
startDateattribute must be available and its JSONPath must be set to either$.employmentNav.results[0].startDateor$.employmentNav.results[-1:].startDate. - The pre-hire record must be in one of the following states in Employee Central: 'active' (t), 'inactive' (f), or 'active_external_suite' (e). For details about these states refer to the SAP support note 2736579.
Note
For a pre-hire who has no history with the organization, both the [0] and [-1:] index will work for startDate. For a pre-hire who is a re-hire or conversion, we cannot deterministically tell the order and this may cause certain rehire/converted workers to get processed on their actual start date. This is a known limitation in the connector.
During full sync or incremental sync or on-demand provisioning, when the provisioning service encounters a pre-hire record, it sends the following OData query to SuccessFactors with "asOfDate" filter set to the startDate of the user (such as asOfDate=2023-06-01).
https://[SuccessFactorsAPIEndpoint]/odata/v2/PerPerson?$format=json&$
filter=(personIdExternal in '1234' and employmentNav/userNav/status in 't','f','e')&asOfDate=2023-06-01&$
expand=employmentNav/userNav,employmentNav/jobInfoNav,personalInfoNav,personEmpTerminationInfoNav,phoneNav,emailNav,employmentNav/userNav/manager/empInfo,employmentNav/jobInfoNav/companyNav,employmentNav/jobInfoNav/costCenterNav,employmentNav/jobInfoNav/divisionNav,employmentNav/jobInfoNav/departmentNav,employmentNav/
If you are observing issues with pre-hire processing, you can use the above OData request format to query your SuccessFactors instance replacing the API endpoint, personIdExternal and asOfDate filter with values corresponding to your test scenario.
Reading attribute data
When Microsoft Entra provisioning service queries SuccessFactors, it retrieves a JSON result set. The JSON result set includes many attributes stored in Employee Central. By default, the provisioning schema is configured to retrieve only a subset of those attributes.
To retrieve more attributes, follow the steps listed:
Browse to Enterprise Applications > SuccessFactors App > Provisioning > Edit Provisioning > attribute-mapping page.
Scroll down and click Show advanced options.
Click on Edit attribute list for SuccessFactors.
Note
If the Edit attribute list for SuccessFactors option doesn't show in the Microsoft Entra admin center, use the URL https://portal.azure.com/?Microsoft_AAD_IAM_forceSchemaEditorEnabled=true to access the page.
The API expression column in this view displays the JSONPath expressions used by the connector.
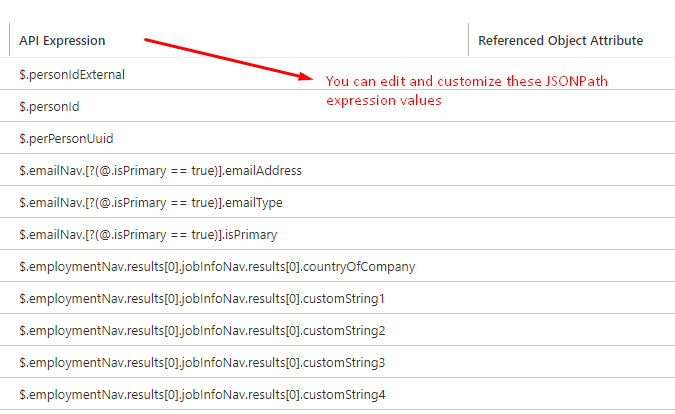
You can either edit an existing JSONPath value or add a new attribute with a valid JSONPath expression to the schema.
The next section provides a list of common scenarios for editing the JSONPath values.
Handling different HR scenarios
JSONPath is a query language for JSON that is similar to XPath for XML. Like XPath, JSONPath allows for the extraction and filtration of data out of a JSON payload.
By using JSONPath transformation, you can customize the behavior of the Microsoft Entra provisioning app to retrieve custom attributes and handle scenarios such as rehiring, worker conversion and global assignment.
This section covers how you can customize the provisioning app for the following HR scenarios:
- Retrieving more attributes
- Retrieving custom attributes
- Mapping employment status to account status
- Handling worker conversion and rehiring scenarios
- Retrieving current active employment record
- Handling global assignment scenario
- Handling concurrent jobs scenario
- Retrieving position details
- Provisioning users in the Onboarding module
- Enabling OData API Audit logs in SuccessFactors
Retrieving more attributes
The default Microsoft Entra SuccessFactors provisioning app schema ships with 90+ predefined attributes. To add more SuccessFactors attributes to the provisioning schema, use the steps listed:
Use the OData query to retrieve data for a valid test user from Employee Central.
 https://[SuccessFactorsAPIEndpoint]/odata/v2/PerPerson?$format=json&
 $filter=(personIdExternal in '[personIdExternalValue]')&
 $expand=employmentNav/userNav,employmentNav/jobInfoNav,personalInfoNav,personEmpTerminationInfoNav,
 phoneNav,phoneNav/phoneTypeNav,emailNav,employmentNav/jobInfoNav/businessUnitNav,employmentNav/jobInfoNav/companyNav,
 employmentNav/jobInfoNav/companyNav/countryOfRegistrationNav,employmentNav/jobInfoNav/costCenterNav,
 employmentNav/jobInfoNav/divisionNav,employmentNav/jobInfoNav/departmentNav,employmentNav/jobInfoNav/jobCodeNav,
 employmentNav/jobInfoNav/locationNav,employmentNav/jobInfoNav/locationNav/addressNavDEFLT,employmentNav/jobInfoNav/payGradeNav,
 employmentNav/empGlobalAssignmentNav,employmentNav/empGlobalAssignmentNav/assignmentTypeNav,employmentNav/jobInfoNav/emplStatusNav,
 employmentNav/jobInfoNav/employmentTypeNav,employmentNav/jobInfoNav/employeeClassNav,employmentNav/jobInfoNav/eventReasonNav
Determine the Employee Central entity associated with the attribute
- If the attribute is part of EmpEmployment entity, then look for the attribute under employmentNav node.
- If the attribute is part of User entity, then look for the attribute under employmentNav/userNav node.
- If the attribute is part of EmpJob entity, then look for the attribute under employmentNav/jobInfoNav node.
Construct the JSON Path associated with the attribute and add this new attribute to the list of SuccessFactors attributes.
- Example 1: Let's say you want to add the attribute
okToRehire, which is part ofemploymentNaventity, then use the JSONPath$.employmentNav.results[0].okToRehire - Example 2: Let's say you want to add the attribute timeZone, which is part of userNav entity, then use the JSONPath
$.employmentNav.results[0].userNav.timeZone - Example 3: Let's say you want to add the attribute flsaStatus, which is part of jobInfoNav entity, then use the JSONPath
$.employmentNav.results[0].jobInfoNav.results[0].flsaStatus
- Example 1: Let's say you want to add the attribute
Save the schema.
Restart provisioning.
Retrieving custom attributes
By default, the following custom attributes are predefined in the Microsoft Entra SuccessFactors provisioning app:
- custom01-custom15 from the User (userNav) entity
- customString1-customString15 from the EmpEmployment (employmentNav) entity called empNavCustomString1-empNavCustomString15
- customString1-customString15 from the EmpJobInfo (jobInfoNav) entity called empJobNavCustomString1-empNavJobCustomString15
Let's say, in your Employee Central instance, customString35 attribute in EmpJobInfo stores the location description. You want to flow this value to Active Directory physicalDeliveryOfficeName attribute. To configure attribute-mapping for this scenario, use the steps:
- Edit the SuccessFactors attribute list to add a new attribute called empJobNavCustomString35.
- Set the JSONPath API expression for this attribute as:
$.employmentNav.results[0].jobInfoNav.results[0].customString35 - Save and reload the mapping change in the Microsoft Entra admin center.
- In the attribute-mapping blade, map empJobNavCustomString35 to physicalDeliveryOfficeName.
- Save the mapping.
Extending this scenario:
- If you want to map custom35 attribute from the User entity, then use the JSONPath
$.employmentNav.results[0].userNav.custom35 - If you want to map customString35 attribute from the EmpEmployment entity, then use the JSONPath
$.employmentNav.results[0].customString35
Mapping employment status to account status
By default, the Microsoft Entra SuccessFactors connector uses the activeEmploymentsCount field of the PersonEmpTerminationInfo object to set account status. You may encounter one of the following issues with this attribute.
- There's a known issue where the connector may disable the account of a terminated worker one day prior to the termination on the last day of work.
- If the
PersonEmpTerminationInfoobject gets set to null, during termination, then AD account disabling doesn't work because the provisioning engine filters out records where thepersonEmpTerminationInfoNavobject is set to null.
If you're running into any of these issues or prefer mapping employment status to account status, you can update the mapping to expand the emplStatus field and use the employment status code present in the field emplStatus.externalCode. Based on SAP support note 2505526, here's a list of employment status codes that you can retrieve in the provisioning app.
- A = Active
- D = Dormant
- U = Unpaid Leave
- P = Paid Leave
- S = Suspended
- F = Furlough
- O = Discarded
- R = Retired
- T = Terminated
Use the steps to update your mapping to retrieve these codes.
Open the attribute-mapping blade of your SuccessFactors provisioning app.
Under Show advanced options, click on Edit SuccessFactors attribute list.
Find the attribute
emplStatusand update the JSONPath to$.employmentNav.results[0].jobInfoNav.results[0].emplStatusNav.externalCode. The update makes the connector retrieve the employment status codes in the table.Save the changes.
In the attribute mapping blade, update the expression mapping for the account status flag.
Provisioning Job Account status attribute Mapping expression SuccessFactors to Active Directory User Provisioning accountDisabledSwitch([emplStatus], "True", "A", "False", "U", "False", "P", "False")SuccessFactors to Microsoft Entra user provisioning accountEnabledSwitch([emplStatus], "False", "A", "True", "U", "True", "P", "True")Save the changes.
Test the configuration using provision on demand.
After confirming that sync works as expected, restart the provisioning job.
Handling worker conversion and rehiring scenarios
About worker conversion scenario: Worker conversion is the process of converting an existing full-time employee to a contractor or a contractor to a full-time employee. In this scenario, Employee Central adds a new EmpEmployment entity along with a new User entity for the same Person entity. The User entity nested under the previous EmpEmployment entity is set to null.
About rehiring scenarios: In SuccessFactors, there are two options to process rehiring employees:
- Option 1: Create a new person profile in Employee Central
- Option 2: Reuse existing person profile in Employee Central
If your HR process uses Option 1, then no changes are required to the provisioning schema. If your HR process uses Option 2, then Employee Central adds a new EmpEmployment entity along with a new User entity for the same Person entity.
You can handle both scenarios so that the new employment data shows up when a conversion or rehire occurs. Bulk update the provisioning app schema using the steps listed:
Open the attribute-mapping blade of your SuccessFactors provisioning app.
Scroll down and click Show advanced options.
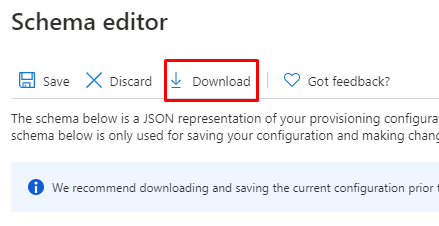
Click on the link Review your schema here to open the schema editor.

Click on the Download link to save a copy of the schema before editing.
In the schema editor, press Ctrl-H key to open the find-replace control.
In the find text box, copy, and paste the value
$.employmentNav.results[0]In the replace text box, copy, and paste the value
$.employmentNav.results[-1:]. This JSONPath expression returns the latest EmpEmployment record.
Click on the "replace all" option to update the schema.
Save the schema.
The above process updates all JSONPath expressions as follows:
- Old JSONPath:
$.employmentNav.results[0].jobInfoNav.results[0].departmentNav.name_localized - New JSONPath:
$.employmentNav.results[-1:].jobInfoNav.results[0].departmentNav.name_localized
- Old JSONPath:
Test the configuration using provision on demand.
After confirming that sync works as expected, restart the provisioning job.
Note
The approach described above only works if SAP SuccessFactors returns the employment objects in ascending order, where the latest employment record is always the last record in the employmentNav results array. The order in which multiple employment records are returned isn't guaranteed by SuccessFactors. If your SuccessFactors instance has multiple employment records corresponding to a worker and you always want to retrieve attributes associated with the active employment record, use steps described in the next section.
Retrieving current active employment record
Using the JSONPath root of $.employmentNav.results[0] or $.employmentNav.results[-1:] to fetch employment records works in most scenarios and keeps the configuration simple. However, depending on how your SuccessFactors instance is configured, there may be a need to update this configuration to ensure that the connector always fetches the latest active employment record.
This section describes how you can update the JSONPath settings to definitely retrieve the current active employment record of the user. It also handles worker conversion and rehiring scenarios.
Open the attribute-mapping blade of your SuccessFactors provisioning app.
Scroll down and click Show advanced options.
Click on the link Review your schema here to open the schema editor.
Click on the Download link to save a copy of the schema before editing.
In the schema editor, press Ctrl-H key to open the find-replace control.
Perform the following find replace operations. Ensure there's no leading or trailing space when performing the find-replace operations. If you're using
[-1:]index instead of[0], then update the string-to-find field accordingly.String to find String to use for replace Purpose $.employmentNav.results[0].jobInfoNav.results[0].emplStatus$.employmentNav..jobInfoNav..results[?(@.emplStatusNav.externalCode == 'A' || @.emplStatusNav.externalCode == 'U' || @.emplStatusNav.externalCode == 'P' )].emplStatusNav.externalCodeWith this find-replace, we're adding the ability to expand emplStatusNav OData object. $.employmentNav.results[0].jobInfoNav.results[0]$.employmentNav..jobInfoNav..results[?(@.emplStatusNav.externalCode == 'A' || @.emplStatusNav.externalCode == 'U' || @.emplStatusNav.externalCode == 'P')]With this find-replace, we instruct the connector to always retrieve attributes associated with the active SuccessFactors EmpJobInfo record. Attributes associated with terminated/inactive records in SuccessFactors are ignored. $.employmentNav.results[0]$.employmentNav..results[?(@.jobInfoNav..results[?(@.emplStatusNav.externalCode == 'A' || @.emplStatusNav.externalCode == 'U' || @.emplStatusNav.externalCode == 'P')])]With this find-replace, we instruct the connector to always retrieve attributes associated with the active SuccessFactors Employment record. Attributes associated with terminated/inactive records in SuccessFactors are ignored. Save the schema.
The above process updates all JSONPath expressions.
For prehire processing to work, the JSONPath associated with
startDateattribute must use either[0]or[-1:]index. Under Show advanced options, click on Edit SuccessFactors attribute list. Find the attributestartDateand set it to the value$.employmentNav.results[-1:].startDateSave the schema.
To ensure that terminations are processed as expected, you can use one of the following settings in the attribute mapping section.
Provisioning Job Account status attribute Expression to use if account status is based on "activeEmploymentsCount" Expression to use if account status is based on "emplStatus" value SuccessFactors to Active Directory User Provisioning accountDisabledSwitch([activeEmploymentsCount], "False", "0", "True")Switch([emplStatus], "True", "A", "False", "U", "False", "P", "False")SuccessFactors to Microsoft Entra user provisioning accountEnabledSwitch([activeEmploymentsCount], "True", "0", "False")Switch([emplStatus], "False", "A", "True", "U", "True", "P", "True")Save your changes. 1.
Test the configuration using provision on demand.
After confirming that sync works as expected, restart the provisioning job.
Handling global assignment scenario
When a user in Employee Central is processed for global assignment, SuccessFactors adds a new EmpEmployment entity and sets the assignmentClass to "GA". It also creates new User entity. Thus, the user now has:
- One EmpEmployment + User entity that corresponds to home assignment with assignmentClass set to "ST" and
- Another EmpEmployment + User entity that corresponds to the global assignment with assignmentClass set to "GA"
To fetch attributes belonging to the standard assignment and global assignment user profile, use the steps listed:
Open the attribute-mapping blade of your SuccessFactors provisioning app.
Scroll down and click Show advanced options.
Click on the link Review your schema here to open the schema editor.
Click on the Download link to save a copy of the schema before editing.
In the schema editor, press Ctrl-H key to open the find-replace control.
In the find text box, copy, and paste the value
$.employmentNav.results[0]In the replace text box, copy, and paste the value
$.employmentNav.results[?(@.assignmentClass == 'ST')]. Note the whitespace surrounding the == operator, which is important for successful processing of the JSONPath expression.Click on the "replace all" option to update the schema.
Save the schema.
The above process updates all JSONPath expressions as follows:
- Old JSONPath:
$.employmentNav.results[0].jobInfoNav.results[0].departmentNav.name_localized - New JSONPath:
$.employmentNav.results[?(@.assignmentClass == 'ST')].jobInfoNav.results[0].departmentNav.name_localized
- Old JSONPath:
Reload the attribute-mapping blade of the app.
Scroll down and click Show advanced options.
Click on Edit attribute list for SuccessFactors.
Add new attributes to fetch global assignment data. For example: if you want to fetch the department name associated with a global assignment profile, you can add the attribute globalAssignmentDepartment with the JSONPath expression set to
$.employmentNav.results[?(@.assignmentClass == 'GA')].jobInfoNav.results[0].departmentNav.name_localized.You can now either flow both department values to Active Directory attributes or selectively flow a value using expression mapping. Example: the expression sets the value of AD department attribute to globalAssignmentDepartment if present, else it sets the value to department associated with standard assignment.
IIF(IsPresent([globalAssignmentDepartment]),[globalAssignmentDepartment],[department])
Save the mapping.
Test the configuration using provision on demand.
After confirming that sync works as expected, restart the provisioning job.
Handling concurrent jobs scenario
When a user in Employee Central has concurrent/multiple jobs, there are two EmpEmployment and User entities with assignmentClass set to "ST". To fetch attributes belonging to both jobs, use the steps listed:
- Open the attribute-mapping blade of your SuccessFactors provisioning app.
- Scroll down and click Show advanced options.
- Click on Edit attribute list for SuccessFactors.
- Let's say you want to pull the department associated with job 1 and job 2. The predefined attribute department already fetches the value of department for the first job. You can define a new attribute called secondJobDepartment and set the JSONPath expression to
$.employmentNav.results[1].jobInfoNav.results[0].departmentNav.name_localized - You can now either flow both department values to Active Directory attributes or selectively flow a value using expression mapping.
- Save the mapping.
- Test the configuration using provision on demand.
- After confirming that sync works as expected, restart the provisioning job.
Retrieving position details
The SuccessFactors connector supports expansion of the position object. To expand and retrieve position object attributes such as job level or position names in a specific language, you can use JSONPath expressions as shown.
| Attribute Name | JSONPath expression |
|---|---|
| positionJobLevel | $.employmentNav.results[0].jobInfoNav.results[0].positionNav.jobLevel |
| positionNameFR | $.employmentNav.results[0].jobInfoNav.results[0].positionNav.externalName_fr_FR |
| positionNameDE | $.employmentNav.results[0].jobInfoNav.results[0].positionNav.externalName_de_DE |
Provisioning users in the Onboarding module
Inbound user provisioning from SAP SuccessFactors to on premises Active Directory and Microsoft Entra ID now supports advance provisioning of prehires present in the SAP SuccessFactors Onboarding 2.0 module. When the Microsoft Entra provisioning service encounters a new hire profile with a future start date, it queries SAP SuccessFactors to get new hires with one of the following status codes: active, inactive, active_external_suite. The status code active_external_suite corresponds to prehires present in the SAP SuccessFactors Onboarding 2.0 module. For a description of these status codes, refer to SAP support note 2736579.
The default behavior of the provisioning service is to process prehires in the Onboarding module.
If you want to exclude processing of prehires in the Onboarding module, update your provisioning job configuration as follows:
- Open the attribute-mapping blade of your SuccessFactors provisioning app.
- Under show advanced options, edit the SuccessFactors attribute list to add a new attribute called
userStatus. - Set the JSONPath API expression for this attribute as:
$.employmentNav.results[0].userNav.status - Save the schema to return back to the attribute mapping blade.
- Edit the Source Object scope to apply a scoping filter
userStatus NOT EQUALS - Save the mapping and validate that the scoping filter works using provisioning on demand.
Enabling OData API Audit logs in SuccessFactors
The Microsoft Entra SuccessFactors connector uses SuccessFactors OData API to retrieve changes and provision users. If you observe issues with the provisioning service and want to confirm what data was retrieved from SuccessFactors, you can enable OData API Audit logs in SuccessFactors. Retrieve the request payload sent by Microsoft Entra ID from the audit logs. To troubleshoot, you can copy this request payload in a tool like cURL or Graph Explorer, set it up to use the same API user that is used by the connector and see if it returns the desired changes from SuccessFactors.
Writeback scenarios
This section covers different write-back scenarios. It recommends configuration approaches based on how email and phone number is set up in SuccessFactors.
Supported scenarios for phone and email write-back
| # | Scenario requirement | Email primary flag value |
Business phone primary flag value |
Cell phone primary flag value |
Business phone mapping |
Cell phone mapping |
|---|---|---|---|---|---|---|
| 1 | * Only set business email as primary. * Don't set phone numbers. |
true | true | false | [Not Set] | [Not Set] |
| 2 | * In SuccessFactors, business email and business phone is primary * Always flow Microsoft Entra telephone number to business phone and mobile to cell phone. |
true | true | false | telephoneNumber | mobile |
| 3 | * In SuccessFactors, business email and cell phone is primary * Always flow Microsoft Entra telephone number to business phone and mobile to cell phone |
true | false | true | telephoneNumber | mobile |
| 4 | * In SuccessFactors business email is primary. * In Microsoft Entra ID, check if work telephone number is present, if present, then check if mobile number is also present. Mark work telephone number as primary only if mobile number isn't present. |
true | Use expression mapping: IIF(IsPresent([telephoneNumber]), IIF(IsPresent([mobile]),"false", "true"), "false") |
Use expression mapping: IIF(IsPresent([mobile]),"false", "true") |
telephoneNumber | mobile |
| 5 | * In SuccessFactors business email and business phone is primary. * In Microsoft Entra ID, if mobile is available, then set it as the business phone, else use telephoneNumber. |
true | true | false | IIF(IsPresent([mobile]), [mobile], [telephoneNumber]) |
[Not Set] |
- If there's no mapping for phone number in the write-back attribute-mapping, then only email is included in the write-back.
- During new hire onboarding in Employee Central, business email and phone number may not be available. If setting business email and business phone as primary is mandatory during onboarding, you can set a dummy value for business phone and email during new hire creation. After some time, the write-back app updates the value.
Enabling writeback with UserID
The SuccessFactors Writeback app uses the following logic to update the User object attributes:
- As a first step, it looks for userId attribute in the changeset. If it's present, then it uses "UserId" for making the SuccessFactors API call.
- If userId isn't found, then it defaults to using the personIdExternal attribute value.
Usually the personIdExternal attribute value in SuccessFactors matches the userId attribute value. However, in scenarios such as rehiring and worker conversion, an employee in SuccessFactors may have two employment records, one active and one inactive. In such scenarios, to ensure that write-back updates the active user profile, update the configuration of the SuccessFactors provisioning apps as described. This configuration ensures that userId is always present in the changeset visible to the connector and is used in the SuccessFactors API call.
- Open the SuccessFactors to Microsoft Entra user provisioning app or SuccessFactors to on-premises AD user provisioning app.
- Ensure that
extensionAttribute[1-15]in Microsoft Entra ID always stores theuserIdof every worker's active employment record. The record maps SuccessFactorsuserIdattribute toextensionAttribute[1-15]in Microsoft Entra ID.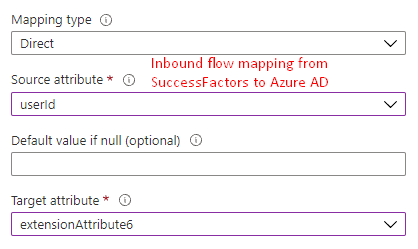
- For guidance regarding JSONPath settings, refer to the section Handling worker conversion and rehiring scenarios to ensure the userId value of the active employment record flows into Microsoft Entra ID.
- Save the mapping.
- Run the provisioning job to ensure that the userId values flow into Microsoft Entra ID.
Note
If you're using SuccessFactors to on-premises Active Directory user provisioning, configure Microsoft Entra Connect to sync the userId attribute value from on-premises Active Directory to Microsoft Entra ID.
- Open the SuccessFactors Writeback app in the Azure portal.
- Map the desired extensionAttribute that contains the userId value to the SuccessFactors userId attribute.
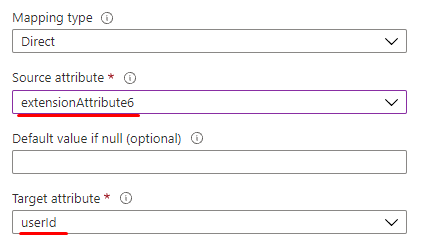
- Save the mapping.
- Go to Attribute mapping -> Advanced -> Review Schema to open the JSON schema editor.
- Download a copy of the schema as backup.
- In the schema editor, hit Ctrl-F and search for the JSON node containing the userId mapping, where it's mapped to a source Microsoft Entra attribute.
- Update the flowBehavior attribute from "FlowWhenChanged" to "FlowAlways" as shown.
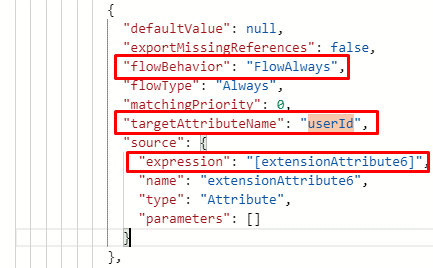
- Save the mapping and test the write-back scenario with provisioning-on-demand.
Unsupported scenarios for phone and email write-back
- In Employee Central, during onboarding personal email and personal phone is set as primary. The write-back app can't switch this setting and set business email and business phone as primary.
- In Employee Central, business phone is set as primary. The write-back app can't change this and set cell phone as primary.
- The write-back app can't read the current primary flag settings and use the same values for the write operation. The flag values configured in the attribute-mapping are always be used.