Using Azure Front Door for geo-acceleration in Microsoft Entra application proxy
This article describes configuring Microsoft Entra application proxy with Azure Front Door to achieve reduced latency and better performance.
What is Azure Front Door?
Azure Front Door delivers low-latency, high-throughput content at scale from the cloud or on-premises infrastructure to users anywhere. Accelerate static and dynamic content delivery with a unified platform built on the massively scalable Microsoft private global network. For more information about Azure Front Door, see What is Azure Front Door?.
Deployment steps
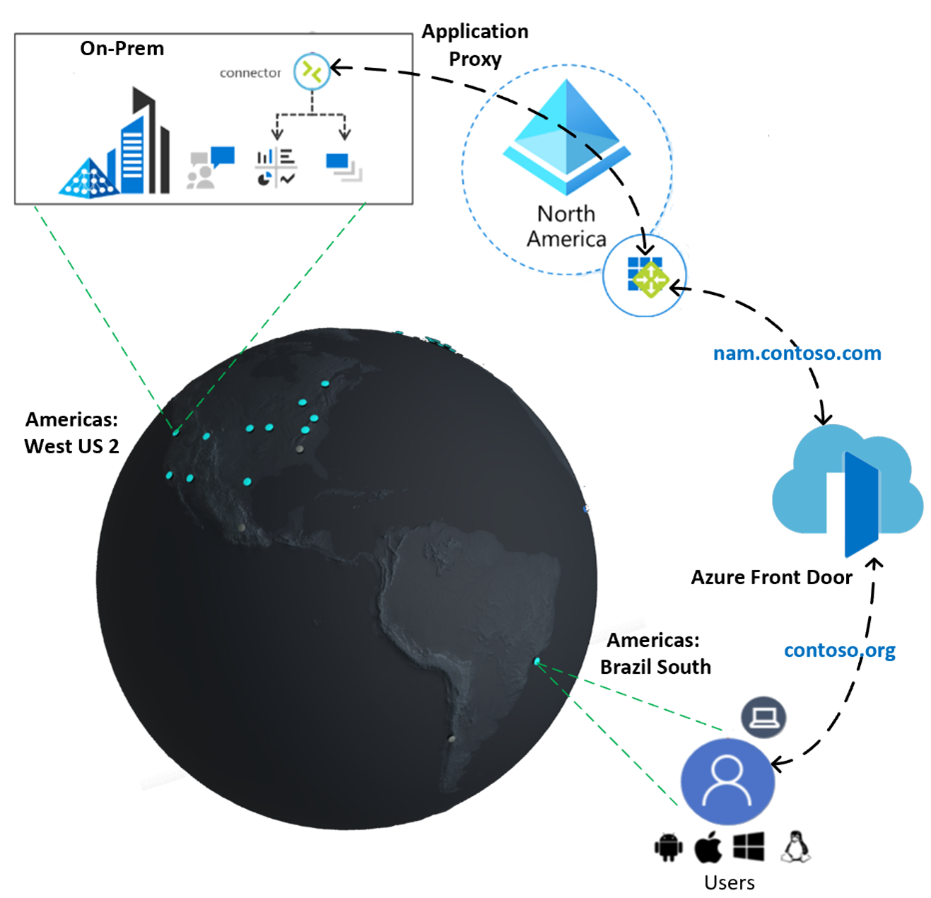
Securely expose a web application on the internet using Microsoft Entra application proxy with Azure Front Door. The reference architecture for the deployment is represented in the diagram.
Prerequisites
- A Front Door Service – Standard or Classic tier.
- Apps that exist in a single region.
- A custom domain to use for the application.
- Application proxy subscription licenses are available in Microsoft Entra ID P1 or P2. For more information about licensing options and features, see Microsoft Entra pricing.
Application proxy configuration
Configure application proxy for Front Door.
- Install the connector for the location of your application instances. For example, US West. Assign the connector group to the correct region for the connector. For example, North America.
- Set up your application instance with application proxy.
- Set the Internal URL to the address on the internal network, for example
contoso.org. - Set the External URL to the domain address users access from the internet. You must configure a custom domain. For example,
contoso.org. For more information on configuring a custom domain, see Custom domains in Microsoft Entra application proxy. - Assign the application to the appropriate connector group. For example, North America.
- Record the URL generated by application proxy. For example,
contoso.msappproxy.net. - Configure a CNAME entry in the Domain Name System (DNS). Point the external URL to the Azure Front Door endpoint. For example,
contoso.org’tocontoso.msappproxy.net.
- Set the Internal URL to the address on the internal network, for example
- In the Azure Front Door service, utilize the URL generated for the application by application proxy as a backend for the backend pool. For example,
contoso.msappproxy.net.
The table shows a sample application proxy configuration. The sample scenario uses the sample application domain www.contoso.org as the external URL.
| Configuration | Additional Information | |
|---|---|---|
| Internal URL | nam.contoso.com |
|
| External URL | contoso.org |
Configure a custom domain for access from the internet. |
| Connector group | North America |
To optimize performance, select the connector group in the geo location closest to the application instance. |
Azure Front Door configuration
Azure Front Door is offered in different tiers including Standard, Premium, and Classic. Select a tier based on your preference. For more information on tier comparison, see Azure Front Door tier comparison.
The configuration steps refer to these definitions.
- Endpoint name - A globally unique name for the endpoint. You use the setting to onboard custom domains as well. For example, the front door endpoint name
contoso-namgenerates the endpoint host namecontoso-nam.azurefd.netand utilizes custom domain host namecontoso.org. - Origin - The setting refers to your application servers. Azure Front Door routes your client requests to origins. Routing is based on the type, port, priority, and weight you specify.
- Origin type - The type of resource you want to add. Front Door supports autodiscovery of your application backends from App Service, Cloud Service, or Storage. For a different resource in Azure or even a non-Azure backend, select Custom host. For example, select Custom host for a backend on the application proxy service.
- Origin host name - The setting represents the backend origin host name. For example,
contoso.msappproxy.net. - Origin host header - The setting represents the host header value being sent to the backend for each request. For example,
contoso.org. For more information about origin and origin groups, see Origins and origin groups – Azure Front Door.
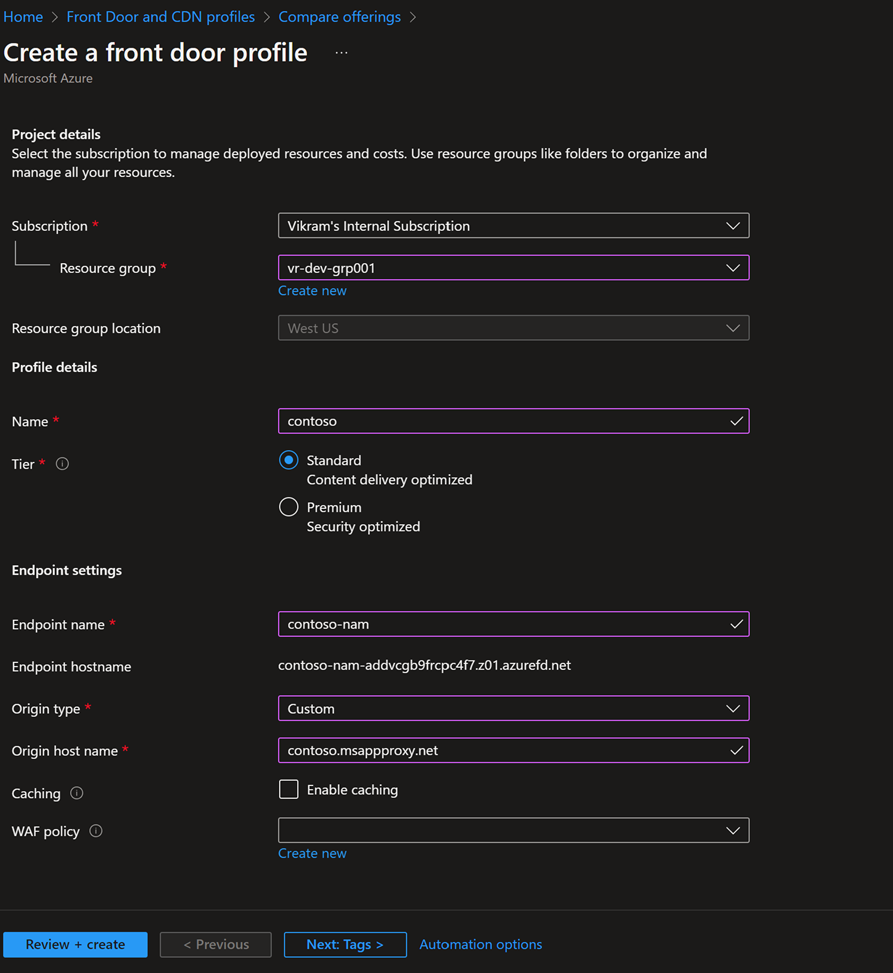
- Create a Front Door (Standard) configuration.
- Add an Endpoint name for generating the Front Door’s default domain on
azurefd.net. For example,contoso-namgenerates the endpoint hostnamecontoso-nam.azurefd.net. - Add an Origin Type for the type of backend resource. Use Custom for the application proxy resource.
- Add an Origin host name to represent the backend host name. For example,
contoso.msappproxy.net. - Optional: Enable caching for the routing rule so Front Door caches your static content.
- Add an Endpoint name for generating the Front Door’s default domain on
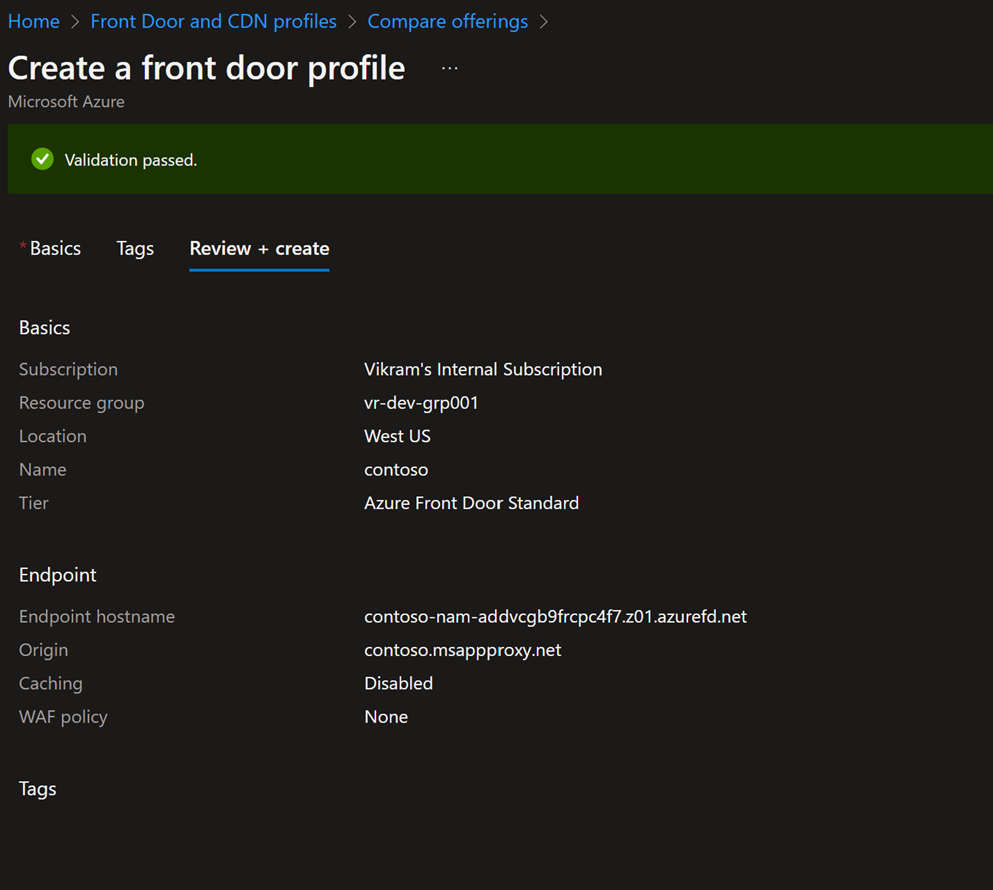
- Verify the deployment is complete and the Front Door Service is ready.
- Give your Front Door service a user-friendly domain host name URL. Create a CNAME record for your application proxy External URL that points to Front Door’s domain host name. The Front Door's domain host name generates the Front Door service. For example,
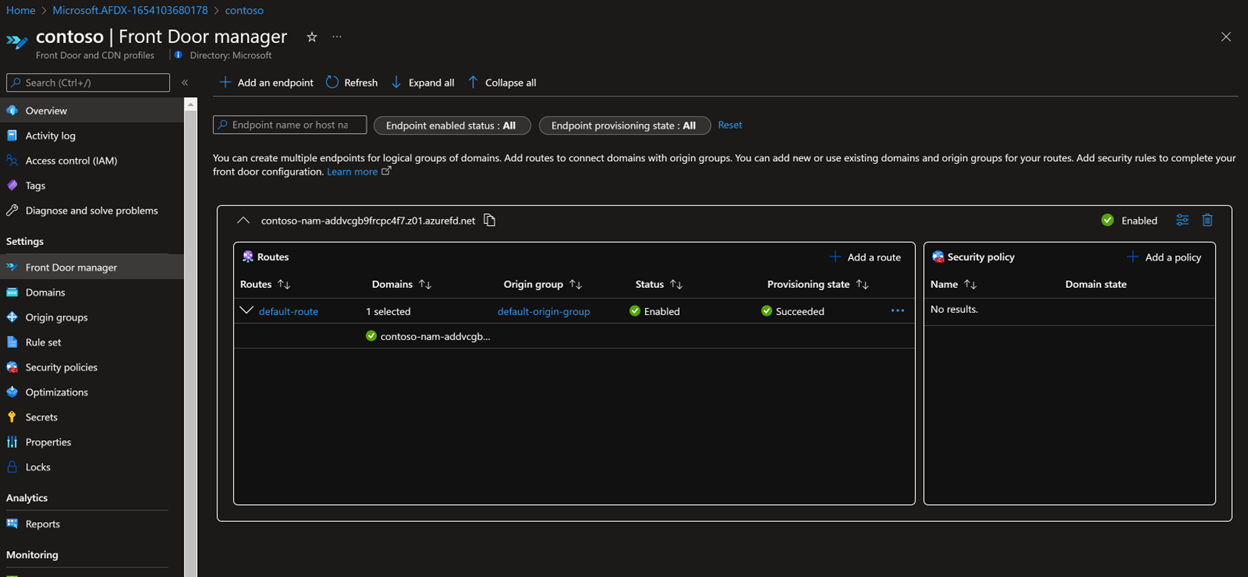
contoso.orgpoints tocontoso.azurefd.net. For more information on custom domains, see How to add a custom domain - Azure Front Door. - Navigate to Front Door Manager on the Front Door service dashboard and add a domain with the custom hostname. For example,
contoso.org. - Navigate to origin groups on the Front Door service dashboard. Select the origin name and validate the origin host header matches the domain of the backend. The origin host header in the example is
contoso.org.
| Configuration | Additional Information | |
|---|---|---|
| Endpoint Name | • Endpoint name: contoso-nam • Front door generated Hostname: contoso-nam.azurefd.net • Custom Domain Hostname: contoso.org |
A custom domain host name must be utilized. |
| Origin hostname | contoso.msappproxy.net |
The URL generated for the app by application proxy must be utilized. |
| Connector group | North America |
Select the connector group in the geo location closest to where the application instance to optimized performance. |
Next steps
Feedback
Coming soon: Throughout 2024 we will be phasing out GitHub Issues as the feedback mechanism for content and replacing it with a new feedback system. For more information see: https://aka.ms/ContentUserFeedback.
Submit and view feedback for


