Tutorial: Use a Windows VM/VMSS to access Azure resources
Managed identities for Azure resources is a feature of Microsoft Entra ID. Each of the Azure services that support managed identities for Azure resources are subject to their own timeline. Make sure you review the availability status of managed identities for your resource and known issues before you begin.
Prerequisites
- An understanding of managed identities. If you're not familiar with the managed identities for Azure resources feature, see this overview.
- An Azure account, sign up for a free account.
- Owner permissions at the appropriate scope (your subscription or resource group) to perform required resource creation and role management steps. If you need assistance with role assignment, see Assign Azure roles to manage access to your Azure subscription resources.
- A Windows virtual machine (VM) that has system assigned managed identities enabled.
- If you need to create a VM for this tutorial, see Create a virtual machine with system-assigned identity enabled.
Use a Windows VM system-assigned managed identity to access Azure Data Lake Store
This tutorial shows you how to use a system-assigned managed identity for a Windows virtual machine (VM) to access an Azure Data Lake Store. Managed identities are automatically managed by Azure. They enable your application to authenticate to services that support Microsoft Entra authentication, without needing to insert credentials into your code.
In this article, you'll learn how to:
- Grant your VM access to an Azure Data Lake Store
- Get an access token using the VM identity and use it to access an Azure Data Lake Store
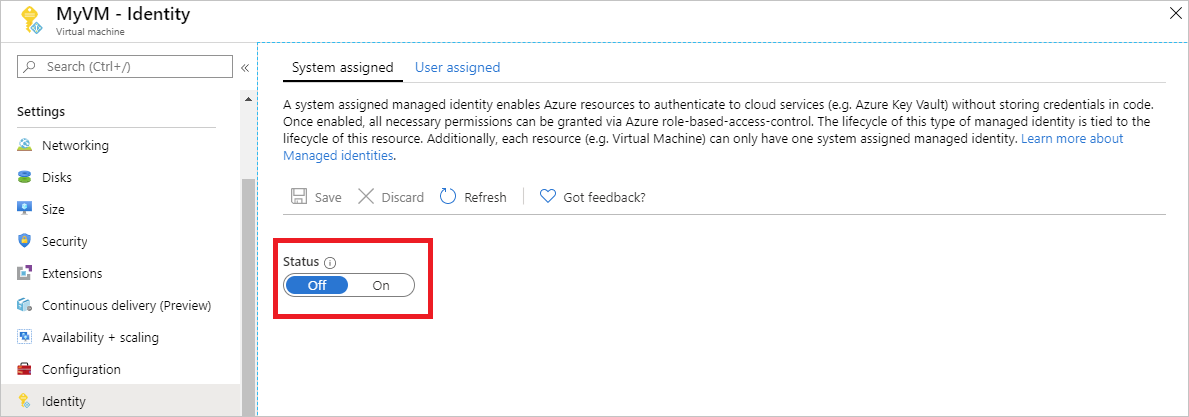
Enable
Enabling a system-assigned managed identity is a one-click experience. You can either enable it during the creation of a VM or in the properties of an existing VM.

To enable a system-assigned managed identity on a new VM:
Grant access
You can grant your VM access to files and folders in an Azure Data Lake Store. For this step, you can use an existing Data Lake Store or create a new one.
To create a new Data Lake Store using the Azure portal, see Azure Data Lake Store quickstart. There are also quickstarts that use the Azure CLI and Azure PowerShell in the Azure Data Lake Store documentation.
In your Data Lake Store, create a new folder and grant your VM's system-assigned identity permission. The identity needs rights to read, write, and execute files in that folder:
- In the Azure portal, select Data Lake Store in the left-hand navigation.
- Select the Data Lake Store you want to use for this tutorial.
- Select Data Explorer in the command bar.
- The root folder of the Data Lake Store is selected. Select Access in the command bar.
- Select Add. In the Select field, enter the name of your VM, for example DevTestVM. Select your VM from the search results, then select Select.
- Select Select Permissions, then Read and Execute. Add to This folder, then select An access permission only.
- Select Ok, then close the Access blade. The permission should be added successfully.
- Next, create a new folder. Select New Folder in the command bar and give the new folder a name. For example, TestFolder, then select Ok.
- Select the folder you created, then select Access in the command bar.
- Select Add, then in the Select field enter the name of your VM and select Select.
- Select Select Permissions, then Read, Write and Execute. Add to This folder, then add as An access permission entry and a default permission entry.
- Select Ok. The permission should be successfully added.
Your VM's system-assigned managed identity can now perform all operations on files in the folder you created. For information on managing access to Data Lake Store, see Access Control in Data Lake Store.
Access data
Azure Data Lake Store natively supports Microsoft Entra authentication, so that it can directly accept access tokens obtained using managed identities for Azure resources. To authenticate to the Data Lake Store filesystem, you send an access token issued by Microsoft Entra ID to your Data Lake Store filesystem endpoint in an Authorization header. The header has the format Bearer <ACCESS_TOKEN_VALUE>.
To learn more about Data Lake Store support for Microsoft Entra authentication, see Authentication with Data Lake Store using Microsoft Entra ID.
Note
The Data Lake Store filesystem client SDKs do not yet support managed identities for Azure resources.
In this tutorial, you authenticate to the Data Lake Store filesystem REST API using PowerShell to make REST requests. To use the VM's system-assigned managed identity for authentication, you need to make the requests from the VM.
In the portal, navigate to Virtual Machines, go to your Windows VM. Then, in the Overview, select Connect.
Enter in your Username and Password you added when you created the Windows VM.
Now that you've created a Remote Desktop Connection with the VM, open PowerShell in the remote session.
Using the PowerShell
Invoke-WebRequestcmdlet, make a request to the local managed identities for Azure resources endpoint to get an access token for Azure Data Lake Store. The resource identifier for Data Lake Store ishttps://datalake.azure.net/. Data Lake does an exact match on the resource identifier, so the trailing slash is important.$response = Invoke-WebRequest -Uri 'http://169.254.169.254/metadata/identity/oauth2/token?api-version=2018-02-01&resource=https%3A%2F%2Fdatalake.azure.net%2F' -Method GET -Headers @{Metadata="true"}Convert the response from a JSON object to a PowerShell object.
$content = $response.Content | ConvertFrom-JsonExtract the access token from the response.
$AccessToken = $content.access_tokenCheck that everything is configured correctly. Using the PowerShell
Invoke-WebRequestcmdlet, make a request to your Data Lake Store's REST endpoint to list the folders in the root folder. It's important the stringBearerin the Authorization header has a capital "B". You can find the name of your Data Lake Store in the Overview section of your Data Lake Store.Invoke-WebRequest -Uri https://<YOUR_ADLS_NAME>.azuredatalakestore.net/webhdfs/v1/?op=LISTSTATUS -Headers @{Authorization="Bearer $AccessToken"}A successful response looks like:
StatusCode        : 200
StatusDescription : OK
Content           : {"FileStatuses":{"FileStatus":[{"length":0,"pathSuffix":"TestFolder","type":"DIRECTORY", "blockSize":0,"accessTime":1507934941392, "modificationTime":1507944835699,"replication":0, "permission":"770","ow..."
RawContent        : HTTP/1.1 200 OK
                    Pragma: no-cache
                    x-ms-request-id: b4b31e16-e968-46a1-879a-3474aa7d4528
                    x-ms-webhdfs-version: 17.04.22.00
                    Status: 0x0
                    X-Content-Type-Options: nosniff
                    Strict-Transport-Security: ma...
Forms             : {}
Headers           : {[Pragma, no-cache], [x-ms-request-id, b4b31e16-e968-46a1-879a-3474aa7d4528],
                    [x-ms-webhdfs-version, 17.04.22.00], [Status, 0x0]...}
Images            : {}
InputFields       : {}
Links             : {}
ParsedHtml        : System.__ComObject
RawContentLength  : 556
Now try uploading a file to your Data Lake Store. First, create a file to upload.
echo "Test file." > Test1.txtUsing the PowerShell
Invoke-WebRequestcmdlet, make a request to your Data Lake Store's REST endpoint to upload the file to the folder you created earlier. This request takes two steps.- Make a request and get a redirection to where the file should be uploaded.
- Upload the file. Remember to set the name of the folder and file appropriately if you used different values than indicated in this tutorial.
$HdfsRedirectResponse = Invoke-WebRequest -Uri https://<YOUR_ADLS_NAME>.azuredatalakestore.net/webhdfs/v1/TestFolder/Test1.txt?op=CREATE -Method PUT -Headers @{Authorization="Bearer $AccessToken"} -Infile Test1.txt -MaximumRedirection 0If you inspect the value of
$HdfsRedirectResponse, it should look like the following response:PS C:\> $HdfsRedirectResponse StatusCode : 307 StatusDescription : Temporary Redirect Content : {} RawContent : HTTP/1.1 307 Temporary Redirect Pragma: no-cache x-ms-request-id: b7ab492f-b514-4483-aada-4aa0611d12b3 ContentLength: 0 x-ms-webhdfs-version: 17.04.22.00 Status: 0x0 X-Content-Type-Options: nosn... Headers : {[Pragma, no-cache], [x-ms-request-id, b7ab492f-b514-4483-aada-4aa0611d12b3], [ContentLength, 0], [x-ms-webhdfs-version, 17.04.22.00]...} RawContentLength : 0Complete the upload by sending a request to the redirect endpoint:
Invoke-WebRequest -Uri $HdfsRedirectResponse.Headers.Location -Method PUT -Headers @{Authorization="Bearer $AccessToken"} -Infile Test1.txt -MaximumRedirection 0A successful response look like:
StatusCode        : 201
StatusDescription : Created
Content           : {}
RawContent        : HTTP/1.1 201 Created
                    Pragma: no-cache
                    x-ms-request-id: 1e70f36f-ead1-4566-acfa-d0c3ec1e2307
                    ContentLength: 0
                    x-ms-webhdfs-version: 17.04.22.00
                    Status: 0x0
                    X-Content-Type-Options: nosniff
                    Strict...
Headers           : {[Pragma, no-cache], [x-ms-request-id, 1e70f36f-ead1-4566-acfa-d0c3ec1e2307],
                    [ContentLength, 0], [x-ms-webhdfs-version, 17.04.22.00]...}
RawContentLength  : 0
Finally, you can use other Data Lake Store filesystem APIs to append to and download files, and more.
Disable
To disable the system-assigned identity on your VM, set the status of the system-assigned identity to Off.
Use a Windows VM system-assigned managed identity to access Azure Storage
This tutorial shows you how to use a system-assigned managed identity for a Windows virtual machine (VM) to access Azure Storage. You learn how to:
- Create a blob container in a storage account
- Grant your Windows VM's system-assigned managed identity access to a storage account
- Get an access and use it to call Azure Storage
Enable
Enabling a system-assigned managed identity is a one-click experience. You can either enable it during the creation of a VM or in the properties of an existing VM.
To enable a system-assigned managed identity on a new VM:
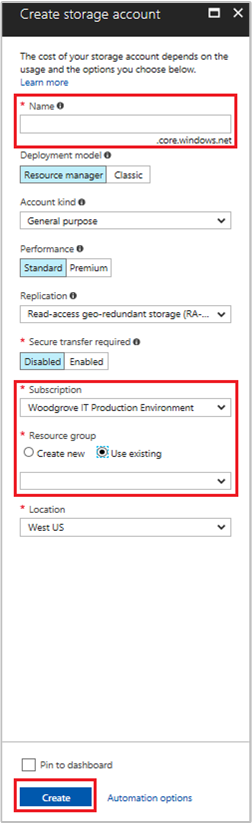
Create storage account
In this section, you create a storage account.
Select the + Create a resource button found on the upper-left corner of the Azure portal.
Select Storage, then Storage account - blob, file, table, queue.
In the Name field, enter a name for the storage account.
Deployment model and Account kind should be set to Resource manager and Storage (general purpose v1).
Ensure the Subscription and Resource Group match the ones you specified when you created your VM in the previous step.
Select Create.
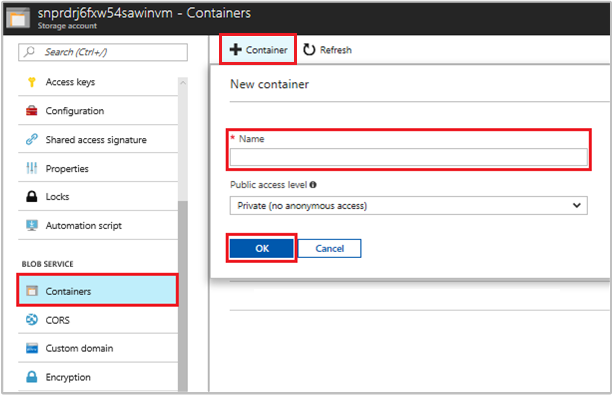
Create a blob container and upload a file to the storage account
Files require blob storage so you need to create a blob container in which to store the file. You then upload a file to the blob container in the new storage account.
Navigate to your newly created storage account.
In the Blob Service section, select Containers.
Select + Container on the top of the page.
In the New container field, enter a name for the container, then in the Public access level option, keep the default value.
Using an editor of your choice, create a file titled hello world.txt on your local machine. Open the file and add the text Hello world!, then save it.
Select the container name to upload the file to the newly created container, then select Upload.
In the Upload blob pane, in the Files section, select the folder icon and browse to the file hello_world.txt on your local machine. Then select the file and Upload.

Grant access
This section shows how to grant your VM access to an Azure Storage container. You can use the VM's system-assigned managed identity to retrieve the data in the Azure storage blob.
Navigate to your newly created storage account.
Select Access control (IAM).
Select Add > Add role assignment to open the Add role assignment page.
Assign the following role. For detailed steps, see Assign Azure roles using the Azure portal.
Setting Value Role Storage Blob Data Reader Assign access to Managed identity System-assigned Virtual Machine Select <your virtual machine> 
Access data
Azure Storage natively supports Microsoft Entra authentication, so it can directly accept access tokens obtained using a managed identity. This approach uses Azure Storage's integration with Microsoft Entra ID, and is different from supplying credentials on the connection string.
Here's a .NET code example of opening a connection to Azure Storage. The example uses an access token and then reads the contents of the file you created earlier. This code must run on the VM to be able to access the VM's managed identity endpoint. .NET Framework 4.6 or higher is required to use the access token method. Replace the value of <URI to blob file> accordingly. You can obtain this value by navigating to file you created and uploaded to blob storage and copying the URL under Properties the Overview page.
using System;
using System.Collections.Generic;
using System.Linq;
using System.Text;
using System.Threading.Tasks;
using System.IO;
using System.Net;
using System.Web.Script.Serialization;
using Microsoft.WindowsAzure.Storage.Auth;
using Microsoft.WindowsAzure.Storage.Blob;

namespace StorageOAuthToken
{
    class Program
    {
        static void Main(string[] args)
        {
            //get token
            string accessToken = GetMSIToken("https://storage.azure.com/");

            //create token credential
            TokenCredential tokenCredential = new TokenCredential(accessToken);

            //create storage credentials
            StorageCredentials storageCredentials = new StorageCredentials(tokenCredential);

            Uri blobAddress = new Uri("<URI to blob file>");

            //create block blob using storage credentials
            CloudBlockBlob blob = new CloudBlockBlob(blobAddress, storageCredentials);

            //retrieve blob contents
            Console.WriteLine(blob.DownloadText());
            Console.ReadLine();
        }

        static string GetMSIToken(string resourceID)
        {
            string accessToken = string.Empty;
            // Build request to acquire MSI token
            HttpWebRequest request = (HttpWebRequest)WebRequest.Create("http://169.254.169.254/metadata/identity/oauth2/token?api-version=2018-02-01&resource=" + resourceID);
            request.Headers["Metadata"] = "true";
            request.Method = "GET";

            try
            {
                // Call /token endpoint
                HttpWebResponse response = (HttpWebResponse)request.GetResponse();

                // Pipe response Stream to a StreamReader, and extract access token
                StreamReader streamResponse = new StreamReader(response.GetResponseStream());
                string stringResponse = streamResponse.ReadToEnd();
                JavaScriptSerializer j = new JavaScriptSerializer();
                Dictionary<string, string> list = (Dictionary<string, string>)j.Deserialize(stringResponse, typeof(Dictionary<string, string>));
                accessToken = list["access_token"];
                return accessToken;
            }
            catch (Exception e)
            {
                string errorText = String.Format("{0} \n\n{1}", e.Message, e.InnerException != null ? e.InnerException.Message : "Acquire token failed");
                return accessToken;
            }
        }
    }
}
The response contains the contents of the file:
Hello world! :)
Disable
To disable the system-assigned identity on your VM, set the status of the system-assigned identity to Off.
Use a Windows VM system-assigned managed identity to access Azure Storage via a SAS credential
This tutorial shows you how to use a system-assigned identity for a Windows virtual machine (VM) to obtain a storage Shared Access Signature (SAS) credential.
A service SAS provides the ability to grant limited access to objects in a storage account for limited time and for a specific service (in this case, a blob service). SAS does this without exposing an account access key. You can use a SAS credential as usual for storage operations; for example, when using a storage SDK. This tutorial demonstrates uploading and downloading a blob using Azure Storage PowerShell.
You'll learn how to:
- Create a storage account
- Grant your VM access to a storage account SAS in Resource Manager
- Get an access token using your VM's identity, and use it to retrieve the SAS from Resource Manager
Note
We recommend that you use the Azure Az PowerShell module to interact with Azure. See Install Azure PowerShell to get started. To learn how to migrate to the Az PowerShell module, see Migrate Azure PowerShell from AzureRM to Az.
Create a storage account
If you don't already have one, you need to create a storage account. Otherwise, follow these steps to grant your VM's system-assigned managed identity access to the SAS credential of an existing storage account.
Select Storage, then Storage Account.
In the Create storage account panel, enter a name for the storage account.
Be sure that Deployment model and Account kind are set to Resource Manager and General purpose.
Check to ensure that the Subscription and Resource Group match the items you specified when you created your VM in the previous step.
Select Create to create your storage account.
Create a blob container in the storage account
Later in the tutorial, you'll upload and download a file to the new storage account. Because files require blob storage, you need to create a blob container to store the file in.
Navigate to your newly created storage account.
Select the Containers link in the left panel, under Blob service.
Select + Container at the top of the page, then a New container panel should appear.
Give the container a name, determine the access level, then Select OK. The name you specify here is used later in the tutorial.
Grant your VM's system-assigned managed identity access to use a storage SAS
Azure Storage doesn't natively support Microsoft Entra authentication. However, you can use a managed identity to retrieve a storage SAS from Resource Manager, then use the SAS to access storage. In this step, you grant your VM's system-assigned managed identity access to your storage account SAS.
Navigate back to your newly created storage account.
Select Access control (IAM).
Select Add > Add role assignment to open the Add role assignment page.
Assign the following role. For detailed steps, see Assign Azure roles using the Azure portal.
Setting Value Role Storage account contributor Assign access to Managed identity System-assigned Virtual machine Select <your Windows virtual machine> 
Get an access token using the VM's identity and use it to call Azure Resource Manager
For the remainder of this tutorial, you work from your VM. You need to use the Azure Resource Manager PowerShell cmdlets in this portion. If you don’t have PowerShell installed, download the latest version before continuing.
In the Azure portal, navigate to Virtual Machines, go to your Windows virtual machine, then from the Overview page Select Connect at the top.
Enter your Username and Password that you added when you created your Windows VM.
Establish a Remote Desktop Connection with the virtual machine.
Open PowerShell in the remote session, then use the PowerShell
Invoke-WebRequestcmdlet to get an Azure Resource Manager token from the local managed identity for Azure resources endpoint.$response = Invoke-WebRequest -Uri 'http://169.254.169.254/metadata/identity/oauth2/token?api-version=2018-02-01&resource=https%3A%2F%2Fmanagement.azure.com%2F' -Method GET -Headers @{Metadata="true"}Note
The value of the
resourceparameter must be an exact match for what is expected by Microsoft Entra ID. When using the Azure Resource Manager resource ID, you must include the trailing slash on the URI.Next, extract the
contentelement, which is stored as a JavaScript Object Notation (JSON) formatted string in the$responseobject.$content = $response.Content | ConvertFrom-JsonNext, extract the access token from the response.
$ArmToken = $content.access_token
Get a SAS credential from Azure Resource Manager to make storage calls
Lastly, use PowerShell to call Resource Manager using the access token that you retrieved in the previous section. You use this token to create a storage SAS credential. Once you have the SAS credential, you can call other storage operations.
For this request, use the following HTTP request parameters to create the SAS credential:
{
    "canonicalizedResource":"/blob/<STORAGE ACCOUNT NAME>/<CONTAINER NAME>",
    "signedResource":"c",              // The kind of resource accessible with the SAS, in this case a container (c).
    "signedPermission":"rcw",          // Permissions for this SAS, in this case (r)ead, (c)reate, and (w)rite. Order is important.
    "signedProtocol":"https",          // Require the SAS be used on https protocol.
    "signedExpiry":"<EXPIRATION TIME>" // UTC expiration time for SAS in ISO 8601 format, for example 2017-09-22T00:06:00Z.
}
The parameters here are included in the POST body of the request for the SAS credential. For more information on parameters for creating a SAS credential, see the List Service SAS REST reference.
Convert the parameters to JSON, then call the storage
listServiceSasendpoint to create the SAS credential:$params = @{canonicalizedResource="/blob/<STORAGE-ACCOUNT-NAME>/<CONTAINER-NAME>";signedResource="c";signedPermission="rcw";signedProtocol="https";signedExpiry="2017-09-23T00:00:00Z"} $jsonParams = $params | ConvertTo-Json$sasResponse = Invoke-WebRequest -Uri https://management.azure.com/subscriptions/<SUBSCRIPTION-ID>/resourceGroups/<RESOURCE-GROUP>/providers/Microsoft.Storage/storageAccounts/<STORAGE-ACCOUNT-NAME>/listServiceSas/?api-version=2017-06-01 -Method POST -Body $jsonParams -Headers @{Authorization="Bearer $ArmToken"}Note
The URL is case-sensitive, so ensure that you use the exact same case used when you named the resource group, including the uppercase "G" in
resourceGroups.Next, extract the SAS credential from the response:
$sasContent = $sasResponse.Content | ConvertFrom-Json
$sasCred = $sasContent.serviceSasToken
If you inspect the SAS credential, you should see something like this:
PS C:\> $sasCred
sv=2015-04-05&sr=c&spr=https&se=2017-09-23T00%3A00%3A00Z&sp=rcw&sig=JVhIWG48nmxqhTIuN0uiFBppdzhwHdehdYan1W%2F4O0E%3D
Create a file called test.txt. Then use the SAS credential to authenticate with the
New-AzStorageContentcmdlet, upload the file to the blob container, then download the file.echo "This is a test text file." > test.txtBe sure to install the Azure Storage cmdlets first, using
Install-Module Azure.Storage. Then upload the blob you just created, using the PowerShellSet-AzStorageBlobContentcmdlet:$ctx = New-AzStorageContext -StorageAccountName <STORAGE-ACCOUNT-NAME> -SasToken $sasCred Set-AzStorageBlobContent -File test.txt -Container <CONTAINER-NAME> -Blob testblob -Context $ctxResponse:
ICloudBlob        : Microsoft.WindowsAzure.Storage.Blob.CloudBlockBlob
BlobType          : BlockBlob
Length            : 56
ContentType       : application/octet-stream
LastModified      : 9/21/2017 6:14:25 PM +00:00
SnapshotTime      :
ContinuationToken :
Context           : Microsoft.WindowsAzure.Commands.Storage.AzureStorageContext
Name              : testblob
You can also download the blob you uploaded, using the
Get-AzStorageBlobContentPowerShell cmdlet:Get-AzStorageBlobContent -Blob testblob -Container <CONTAINER-NAME> -Destination test2.txt -Context $ctxResponse:
ICloudBlob        : Microsoft.WindowsAzure.Storage.Blob.CloudBlockBlob
BlobType          : BlockBlob
Length            : 56
ContentType       : application/octet-stream
LastModified      : 9/21/2017 6:14:25 PM +00:00
SnapshotTime      :
ContinuationToken :
Context           : Microsoft.WindowsAzure.Commands.Storage.AzureStorageContext
Name              : testblob
Use a Windows VM system-assigned managed identity to access Azure SQL Database
This tutorial shows you how to use a system-assigned identity for a Windows virtual machine (VM) to access Azure SQL Database. Managed Service Identities are automatically managed by Azure and enable you to authenticate to services that support Microsoft Entra authentication, without needing to insert credentials into your code.
You'll learn how to:
- Grant your VM access to Azure SQL Database
- Enable Microsoft Entra authentication
- Create a contained user in the database that represents the VM's system assigned identity
- Get an access token using the VM identity and use it to query Azure SQL Database
Enable
Enabling a system-assigned managed identity is a one-click experience. You can either enable it during the creation of a VM or in the properties of an existing VM.
To enable a system-assigned managed identity on a new VM:
Grant access
To grant your VM access to a database in Azure SQL Database, use an existing logical SQL server or create a new one. To create a new server and database using the Azure portal, follow the Azure SQL quickstart. There are also quickstarts that use the Azure CLI and Azure PowerShell in the Azure SQL documentation.
Follow these steps to grant your VM access to a database:
- Enable Microsoft Entra authentication for the server.
- Create a contained user in the database that represents the VM's system-assigned identity.
Enable Microsoft Entra authentication
To configure Microsoft Entra authentication:
- In the Azure portal, select SQL server from the left-hand navigation.
- Select the SQL server you want to enable for Microsoft Entra authentication.
- In the Settings section of the blade, select Active Directory admin.
- In the command bar, select Set admin.
- Select a Microsoft Entra user account to be made an administrator for the server, and select Select.
- In the command bar, select Save.
Create contained user
This section shows you how to create a contained user in the database that represents the VM's system assigned identity. For this step, you need Microsoft SQL Server Management Studio (SSMS) installed. Before starting, it may be helpful to review the following articles for background on Microsoft Entra integration:
- Universal Authentication with SQL Database and Azure Synapse Analytics (SSMS support for MFA)
- Configure and manage Microsoft Entra authentication with SQL Database or Azure Synapse Analytics
SQL databases require unique Microsoft Entra ID display names. With this, Microsoft Entra accounts, such as users, groups and service principals (applications), and VM names enabled for managed identity must be uniquely defined in Microsoft Entra ID specific to their corresponding display names. SQL checks the Microsoft Entra ID display names during T-SQL creation of such users. If the display names aren't unique, the command fails and prompts you to provide a unique Microsoft Entra ID display name for each given account.
To create a contained user
Open SQL Server Management Studio.
In the Connect to Server dialog, enter your server name in the Server name field.
In the Authentication field, select Active Directory - Universal with MFA support.
In the User name field, enter the name of the Microsoft Entra account that you set as the server administrator; for example, cjensen@fabrikam.com.
Select Options.
In the Connect to database field, enter the name of the non-system database you want to configure.
Select Connect, then complete the sign-in process.
In the Object Explorer, expand the Databases folder.
Right-click on a user database, then select New query.
In the query window, enter the following line, and select Execute in the toolbar:
Note
VMNamein the following command is the name of the VM that you enabled system assigned identity on in the prerequsites section.CREATE USER [VMName] FROM EXTERNAL PROVIDERThe command should complete successfully by creating the contained user for the VM's system-assigned identity.
Clear the query window, enter the following line, and select Execute in the toolbar:
Note
VMNamein the following command is the name of the VM that you enabled system assigned identity on in the prerequisites section.If you encounter the error "Principal
VMNamehas a duplicate display name", append the CREATE USER statement with WITH OBJECT_ID='xxx'.ALTER ROLE db_datareader ADD MEMBER [VMName]The command should complete successfully by granting the contained user the ability to read the entire database.
Code running in the VM can now get a token using its system-assigned managed identity and use the token to authenticate to the server.
Access data
This section shows you how to get an access token using the VM's system-assigned managed identity and use it to call Azure SQL. Azure SQL natively supports Microsoft Entra authentication, so it can directly accept access tokens obtained using managed identities for Azure resources. This method doesn't require supplying credentials on the connection string.
Here's a .NET code example of opening a connection to SQL using Active Directory Managed Identity authentication. The code must run on the VM to be able to access the VM's system-assigned managed identity's endpoint.
.NET Framework 4.6.2 or higher or .NET Core 3.1 or higher is required to use this method. Replace the values of AZURE-SQL-SERVERNAME and DATABASE accordingly and add a NuGet reference to the Microsoft.Data.SqlClient library.
using Microsoft.Data.SqlClient;

try
{
//
// Open a connection to the server using Active Directory Managed Identity authentication.
//
string connectionString = "Data Source=<AZURE-SQL-SERVERNAME>; Initial Catalog=<DATABASE>; Authentication=Active Directory Managed Identity; Encrypt=True";
SqlConnection conn = new SqlConnection(connectionString);
conn.Open();
Note
You can use managed identities while working with other programming options using our SDKs.
Or, use PowerShell to test the end-to-end setup without having to write and deploy an app on the VM.
In the portal, navigate to Virtual Machines, go to your Windows VM, then in the Overview, select Connect.
Enter your VM admin credential that you added when you created the Windows VM.
Now that you have created a Remote Desktop Connection with the VM, open PowerShell in a remote session.
Using the PowerShell
Invoke-WebRequestcmdlet, make a request to the local managed identity's endpoint to get an access token for Azure SQL.$response = Invoke-WebRequest -Uri 'http://169.254.169.254/metadata/identity/oauth2/token?api-version=2018-02-01&resource=https%3A%2F%2Fdatabase.windows.net%2F' -Method GET -Headers @{Metadata="true"}Convert the response from a JSON object to a PowerShell object.
$content = $response.Content | ConvertFrom-JsonExtract the access token from the response.
$AccessToken = $content.access_tokenOpen a connection to the server. Remember to replace the values for AZURE-SQL-SERVERNAME and DATABASE.
$SqlConnection = New-Object System.Data.SqlClient.SqlConnection
$SqlConnection.ConnectionString = "Data Source = <AZURE-SQL-SERVERNAME>; Initial Catalog = <DATABASE>; Encrypt=True;"
$SqlConnection.AccessToken = $AccessToken
$SqlConnection.Open()
Next, create and send a query to the server. Remember to replace the value for TABLE.
$SqlCmd = New-Object System.Data.SqlClient.SqlCommand
$SqlCmd.CommandText = "SELECT * from <TABLE>;"
$SqlCmd.Connection = $SqlConnection
$SqlAdapter = New-Object System.Data.SqlClient.SqlDataAdapter
$SqlAdapter.SelectCommand = $SqlCmd
$DataSet = New-Object System.Data.DataSet
$SqlAdapter.Fill($DataSet)
Finally, examine the value of $DataSet.Tables[0] to view the results of the query.
Disable
To disable the system-assigned identity on your VM, set the status of the system-assigned identity to Off.
Use a Windows VM system-assigned managed identity to access Azure Key Vault
This tutorial shows you how a Windows virtual machine (VM) can use a system-assigned managed identity to access Azure Key Vault. Key Vault makes it possible for your client application to use a secret to access resources not secured by Microsoft Entra ID. Managed identities are automatically managed by Azure. They enable you to authenticate to services that support Microsoft Entra authentication, without including authentication information in your code.
You'll learn how to:
- Grant your VM access to a secret stored in a Key Vault
- Get an access token using the VM identity and use it to retrieve the secret from Key Vault
Create a Key Vault
Tip
Steps in this article might vary slightly based on the portal you start from.
This section shows how to grant your VM access to a secret stored in a Key Vault. When you use managed identities for Azure resources, your code can get access tokens to authenticate to resources that support Microsoft Entra authentication.
However, not all Azure services support Microsoft Entra authentication. To use managed identities for Azure resources with those services, store the service credentials in Azure Key Vault, and use the VM's managed identity to access Key Vault to retrieve the credentials.
First, you need to create a Key Vault and grant your VM’s system-assigned managed identity access to the Key Vault.
Sign in to the Azure portal.
At the top of the left navigation bar, select Create a resource.
In the Search the Marketplace box type in Key Vault and press Enter.
Select Key Vault from the results, then select Create.
Provide a Name for the new key vault.

Fill out all required information. Make sure that you choose the subscription and resource group that you're using for this tutorial.
Select Review+ create.
Select Create.
Create a secret
Next, you need to add a secret to the Key Vault, so you can retrieve it later using code running in your VM. In this section you use PowerShell, but the same concepts apply to any code that you execute in your VM.
Navigate to your newly created Key Vault.
Select Secrets, then select Add.
Select Generate/Import.
From the Create a secret screen, in the Upload options leave Manual selected.
Enter a name and value for the secret. The value can be anything you want.
Leave the activation date and expiration date clear, and leave Enabled as Yes.
Select Create to create the secret.

Grant access
The managed identity used by the VM needs to be granted access to read the secret that the Key Vault stores.
Navigate to your newly created Key Vault.
Select Access Policy from the menu on the left side.
Select Add Access Policy.
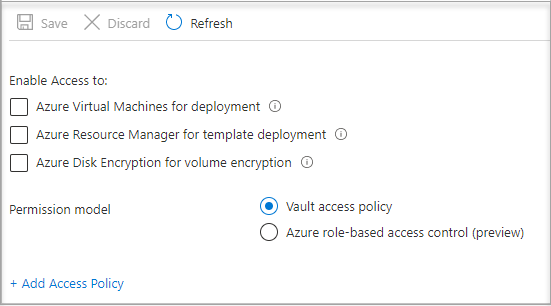
In the Add access policy section, under Configure from template (optional), choose Secret Management from the drop-down menu.
Choose Select Principal, then in the search field enter the name of the VM you created earlier.
Select the VM in the result list, then choose Select.
Select Add.
Select Save.
Access data
This section shows you how to get an access token using the VM identity and use it to retrieve the secret from Key Vault. If you don’t have PowerShell 4.3.1 or greater installed, you'll need to download and install the latest version.
Note
The method of using PowerShell to authenticate and retrieve the secret is preferred in scenarios where managed identities are specifically required, or when embedding the process within an application's code.
First, use the VM’s system-assigned managed identity to get an access token to authenticate to Key Vault:
- In the portal, navigate to Virtual Machines and go to your Windows VM, then in the Overview, select Connect.
- Enter in your Username and Password that you added when you created the Windows VM.
- Now that you've created a Remote Desktop Connection with the VM, open PowerShell in a remote session.
- In PowerShell, invoke the web request on the tenant to get the token for the local host in the specific port for the VM.
Note
If using a sovereign cloud, such as GCC-H, use the endpoint vault.usgovcloudapi.net instead of vault.azure.net in the PowerShell cmdlet.
Example PowerShell request:
$Response = Invoke-RestMethod -Uri 'http://169.254.169.254/metadata/identity/oauth2/token?api-version=2018-02-01&resource=https%3A%2F%2Fvault.azure.net' -Method GET -Headers @{Metadata="true"}
Note
When working with sovereign clouds, you need to make adjustments to the endpoint specified at the end of the cmdlet.
For example, vault.usgovcloudapi.net should be used when working with Azure Government Cloud, with this being the end result:
$Response = Invoke-RestMethod -Uri 'http://169.254.169.254/metadata/identity/oauth2/token?api-version=2018-02-01&resource=https%3A%2F%2Fvault.usgovcloudapi.net' -Method GET -Headers @{Metadata="true"
To confirm that the suffix matches your environment, review the article Azure Key vault security overview.
The response should look like:
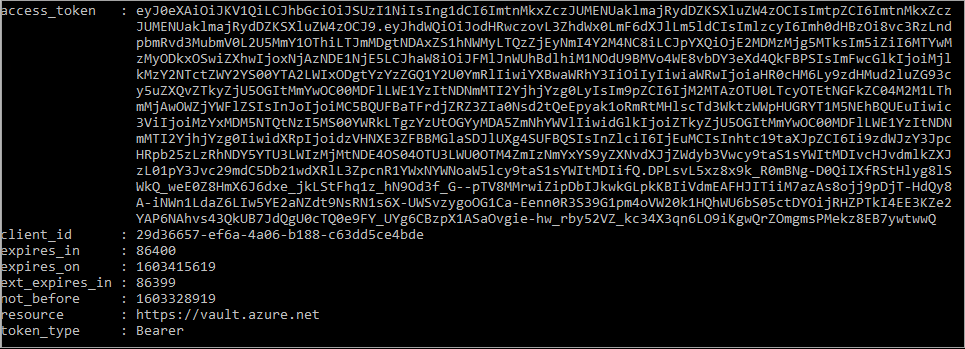
Next, extract the access token from the response.
$KeyVaultToken = $Response.access_token
Finally, use the PowerShell Invoke-WebRequest cmdlet to retrieve the secret you created earlier in the Key Vault, passing the access token in the Authorization header. You’ll need the URL of your Key Vault, which is in the Essentials section of the Overview page of the Key Vault.
Invoke-RestMethod -Uri https://<your-key-vault-URL>/secrets/<secret-name>?api-version=2016-10-01 -Method GET -Headers @{Authorization="Bearer $KeyVaultToken"}
The response should look like this:
  value       id                                                                                    attributes
  -----       --                                                                                    ----------
  'My Secret' https://mi-lab-vault.vault.azure.net/secrets/mi-test/50644e90b13249b584c44b9f712f2e51 @{enabled=True; created=16…
Once you’ve retrieved the secret from the Key Vault, you can use it to authenticate to a service that requires a name and password.
Clean up resources
Finally, when you want to clean up resources, sign in to the Azure portal, select Resource groups, then locate and select the resource group that was created in the process of this tutorial (such as mi-test). Then use the Delete resource group command.
Or, you can also clean up resources using PowerShell or the CLI.
Use a Windows VM system-assigned managed identity to access resource manager
Tip
Steps in this article might vary slightly based on the portal you start from.
This tutorial explains how to create a system-assigned identity, assign it to a Windows Virtual Machine (VM), and then use that identity to access the Azure Resource Manager API. Managed Service Identities are automatically managed by Azure. They enable authentication to services that support Microsoft Entra authentication, without needing to embed credentials into your code.
You'll learn how to:
- Grant your VM access to Azure Resource Manager.
- Get an access token by using the VM's system-assigned managed identity to access Resource Manager.
Sign in to the Azure portal with your administrator account.
Navigate to the Resource Groups tab.
Select the Resource Group that you want to grant the VM's managed identity access.
In the left panel, select Access control (IAM).
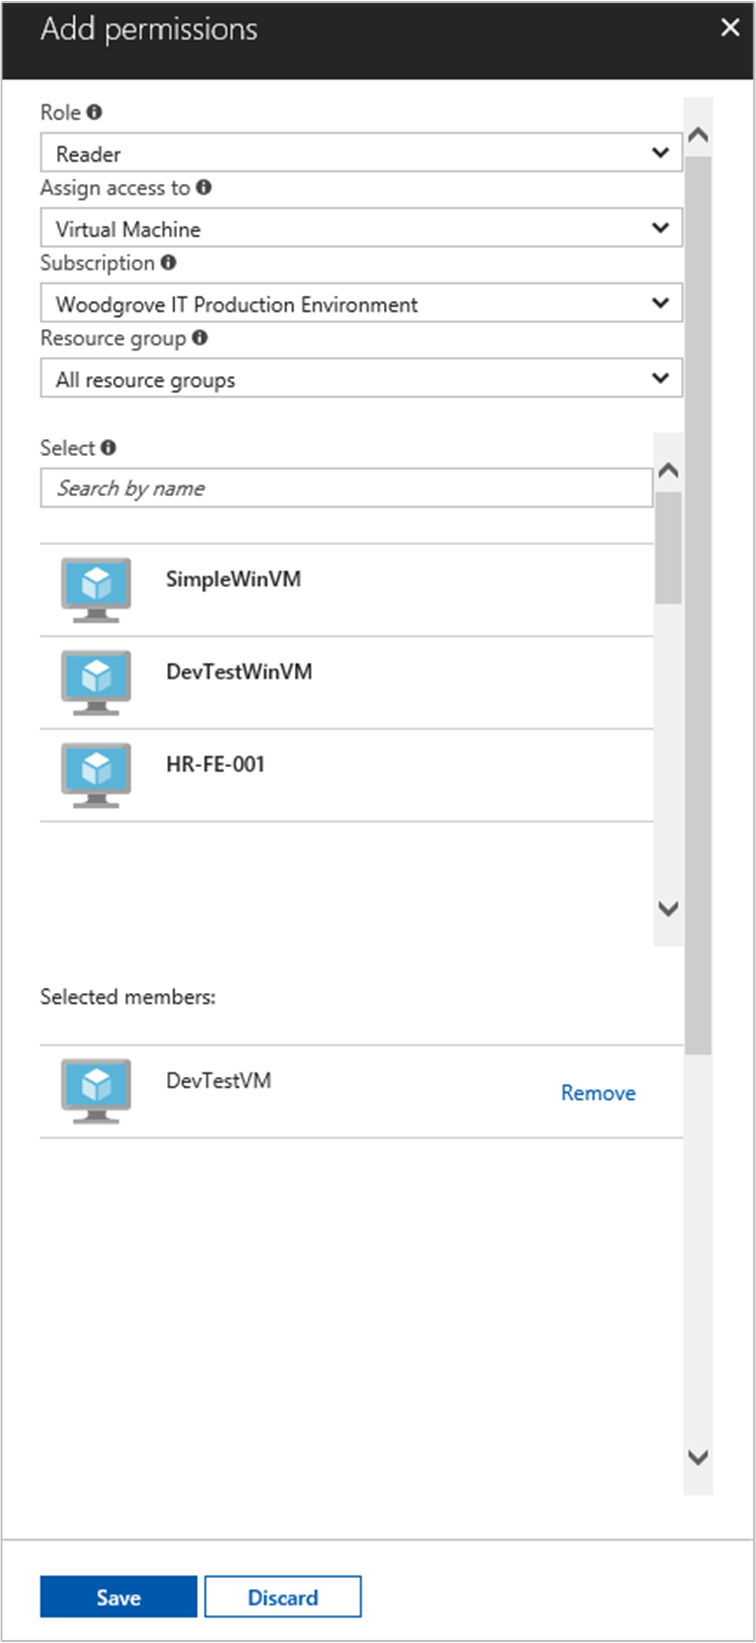
Select Add, then select Add role assignment.
In the Role tab, select Reader. This role allows view all resources, but doesn't allow you to make any changes.
In the Members tab, for the Assign access to option, select Managed identity, then select + Select members.
Ensure the proper subscription is listed in the Subscription dropdown. For Resource Group, select All resource groups.
For the Manage identity dropdown, select Virtual Machine.
For Select, choose your VM in the dropdown, then select Save.
Get an access token
Use the VM's system-assigned managed identity and call the Resource Manager to get an access token.
To complete these steps, you need an SSH client. If you're using Windows, you can use the SSH client in the Windows Subsystem for Linux. If you need assistance configuring your SSH client's keys, see How to Use SSH keys with Windows on Azure, or How to create and use an SSH public and private key pair for Linux VMs in Azure.
- In the portal, navigate to your Linux VM and in the Overview, select Connect.
- Connect to the VM with the SSH client of your choice.
- In the terminal window, using
curl, make a request to the local managed identities for Azure resources endpoint to get an access token for Azure Resource Manager. Thecurlrequest for the access token is below.
curl 'http://169.254.169.254/metadata/identity/oauth2/token?api-version=2018-02-01&resource=https://management.azure.com/' -H Metadata:true
Note
The value of the resource parameter must be an exact match for what is expected by Microsoft Entra ID. In the case of the Resource Manager's resource ID, you must include the trailing slash on the URI.
The response includes the access token you need to access Azure Resource Manager.
Response:
{
  "access_token":"eyJ0eXAiOi...",
  "refresh_token":"",
  "expires_in":"3599",
  "expires_on":"1504130527",
  "not_before":"1504126627",
  "resource":"https://management.azure.com",
  "token_type":"Bearer"
}
Use this access token to access Azure Resource Manager; for example, to read the details of the resource group to which you previously granted this VM access. Replace the values of <SUBSCRIPTION-ID>, <RESOURCE-GROUP>, and <ACCESS-TOKEN> with the ones you created earlier.
Note
The URL is case-sensitive, so ensure if you are using the exact case as you used earlier when you named the resource group, and the uppercase “G” in “resourceGroup”.
curl https://management.azure.com/subscriptions/<SUBSCRIPTION-ID>/resourceGroups/<RESOURCE-GROUP>?api-version=2016-09-01 -H "Authorization: Bearer <ACCESS-TOKEN>"
The response back with the specific resource group information:
{
"id":"/subscriptions/aaaa0a0a-bb1b-cc2c-dd3d-eeeeee4e4e4e/resourceGroups/DevTest",
"name":"DevTest",
"location":"westus",
"properties":
{
  "provisioningState":"Succeeded"
  }
}
Use a user-assigned managed identity on a Windows VM to access Azure Resource Manager
This tutorial explains how to create a user-assigned identity, assign it to a Windows Virtual Machine (VM), and then use that identity to access the Azure Resource Manager API. Managed Service Identities are automatically managed by Azure. They enable authentication to services that support Microsoft Entra authentication, without needing to embed credentials into your code.
You'll learn how to:
- Create a user-assigned managed identity
- Assign your user-assigned identity to your Windows VM
- Grant the user-assigned identity access to a Resource Group in Azure Resource Manager
- Get an access token using the user-assigned identity and use it to call Azure Resource Manager
- Read the properties of a Resource Group
Note
We recommend that you use the Azure Az PowerShell module to interact with Azure. See Install Azure PowerShell to get started. To learn how to migrate to the Az PowerShell module, see Migrate Azure PowerShell from AzureRM to Az.
Configure Azure PowerShell locally
To run scripts in this example, you have two options:
- Use the Azure Cloud Shell, which you can open using the Try It button on the top-right corner of code blocks.
- Run scripts locally with Azure PowerShell, as described in the next section.
To use Azure PowerShell locally for this tutorial (rather than using Cloud Shell), complete the following steps:
Install the latest version of Azure PowerShell, if you haven't already.
Sign in to Azure:
Connect-AzAccountInstall the latest version of PowerShellGet.
Install-Module -Name PowerShellGet -AllowPrereleaseYou may need to
Exitout of the current PowerShell session after you run this command for the next step.Install the released version of the
Az.ManagedServiceIdentitymodule. You need this to perform the user-assigned managed identity operations in this tutorial:Install-Module -Name Az.ManagedServiceIdentity -AllowPrerelease
Enable
For scenarios based on a user-assigned identity, you need to perform the following steps in this section:
- Create an identity.
- Assign the newly created identity.
Create identity
This section shows you how to create a user-assigned identity, which is created as a standalone Azure resource. Using the New-AzUserAssignedIdentity cmdlet, Azure creates an identity in your Microsoft Entra tenant that you can assign to one or more Azure service instances.
Important
When you create user-assigned managed identities, the name must start with a letter or number, and may include a combination of alphanumeric characters, hyphens (-) and underscores (_). For the assignment to a virtual machine or virtual machine scale set to work properly, the name is limited to 24 characters. For more information, see FAQs and known issues.
New-AzUserAssignedIdentity -ResourceGroupName myResourceGroupVM -Name ID1
The response contains details for the created user-assigned identity, similar to the following example. Define the Id and ClientId values for your user-assigned identity, as they are used in subsequent steps:
{
Id: /subscriptions/<SUBSCRIPTIONID>/resourcegroups/myResourceGroupVM/providers/Microsoft.ManagedIdentity/userAssignedIdentities/ID1
ResourceGroupName : myResourceGroupVM
Name: ID1
Location: westus
TenantId: aaaabbbb-0000-cccc-1111-dddd2222eeee
PrincipalId: aaaaaaaa-bbbb-cccc-1111-222222222222
ClientId: 00001111-aaaa-2222-bbbb-3333cccc4444
ClientSecretUrl: https://control-westus.identity.azure.net/subscriptions/<SUBSCRIPTIONID>/resourcegroups/myResourceGroupVM/providers/Microsoft.ManagedIdentity/userAssignedIdentities/ID1/credentials?tid=aaaabbbb-0000-cccc-1111-dddd2222eeee&oid=aaaaaaaa-bbbb-cccc-1111-222222222222&aid=00001111-aaaa-2222-bbbb-3333cccc4444
Type: Microsoft.ManagedIdentity/userAssignedIdentities
}
Assign identity
This section shows you how to Assign the user-assigned identity to a Windows VM. A user-assigned identity can be used by clients on multiple Azure resources. Use the following commands to assign the user-assigned identity to a single VM. Use the Id property returned in the previous step for the -IdentityID parameter.
$vm = Get-AzVM -ResourceGroupName myResourceGroup -Name myVM
Update-AzVM -ResourceGroupName TestRG -VM $vm -IdentityType "UserAssigned" -IdentityID "/subscriptions/<SUBSCRIPTIONID>/resourcegroups/myResourceGroupVM/providers/Microsoft.ManagedIdentity/userAssignedIdentities/ID1"
Grant access
This section shows you how to grant your user-assigned identity access to a resource group in Azure Resource Manager. Managed identities for Azure resources provide identities that your code can use to request access tokens to authenticate to resource APIs that support Microsoft Entra authentication. In this tutorial, your code will access the Azure Resource Manager API.
Before your code can access the API, you need to grant the identity access to a resource in Azure Resource Manager. In this case, you access the resource group for which the VM is contained. Update the value for <SUBSCRIPTIONID> as appropriate for your environment.
$spID = (Get-AzUserAssignedIdentity -ResourceGroupName myResourceGroupVM -Name ID1).principalid
New-AzRoleAssignment -ObjectId $spID -RoleDefinitionName "Reader" -Scope "/subscriptions/<SUBSCRIPTIONID>/resourcegroups/myResourceGroupVM/"
The response contains details for the role assignment created, similar to the following example:
RoleAssignmentId: /subscriptions/<SUBSCRIPTIONID>/resourcegroups/myResourceGroupVM/providers/Microsoft.Authorization/roleAssignments/00000000-0000-0000-0000-000000000000
Scope: /subscriptions/<SUBSCRIPTIONID>/resourcegroups/myResourceGroupVM
DisplayName: ID1
SignInName:
RoleDefinitionName: Reader
RoleDefinitionId: 00000000-0000-0000-0000-000000000000
ObjectId: aaaaaaaa-0000-1111-2222-bbbbbbbbbbbb
ObjectType: ServicePrincipal
CanDelegate: False
Access data
Tip
Steps in this article might vary slightly based on the portal you start from.
Get an access token
For the remainder of the tutorial, you work from the VM that you created earlier.
Sign in to the Azure portal.
In the portal, navigate to Virtual Machines and go to the Windows VM. In the Overview, select Connect.
Enter the Username and Password that you used when you created the Windows VM.
Now that you have created a Remote Desktop Connection with your VM, open PowerShell in a remote session.
Using the PowerShell
Invoke-WebRequestcmdlet, make a request to the local managed identities for Azure resources endpoint to get an access token for Azure Resource Manager. Theclient_idvalue is the value returned when you created the user-assigned managed identity.$response = Invoke-WebRequest -Uri 'http://169.254.169.254/metadata/identity/oauth2/token?api-version=2018-02-01&client_id=00001111-aaaa-2222-bbbb-3333cccc4444&resource=https://management.azure.com/' -Method GET -Headers @{Metadata="true"} $content = $response.Content | ConvertFrom-Json $ArmToken = $content.access_token
Read properties
Finally, use the access token retrieved in the previous step to access Azure Resource Manager, then read the properties of the resource group you granted your user-assigned identity access. Replace <SUBSCRIPTION ID> with the subscription ID of your environment.
(Invoke-WebRequest -Uri https://management.azure.com/subscriptions/80c696ff-5efa-4909-a64d-f1b616f423ca/resourceGroups/myResourceGroupVM?api-version=2016-06-01 -Method GET -ContentType "application/json" -Headers @{Authorization ="Bearer $ArmToken"}).content
The response contains the specific Resource Group information, similar to the following example:
{"id":"/subscriptions/<SUBSCRIPTIONID>/resourceGroups/myResourceGroupVM","name":"myResourceGroupVM","location":"eastus","properties":{"provisioningState":"Succeeded"}}
Learn more
Feedback
Coming soon: Throughout 2024 we will be phasing out GitHub Issues as the feedback mechanism for content and replacing it with a new feedback system. For more information see: https://aka.ms/ContentUserFeedback.
Submit and view feedback for