Microsoft Entra SSO integration with Gainsight
In this article, you'll learn how to integrate Gainsight with Microsoft Entra ID. Use Microsoft Entra ID to manage user access and enable single sign-on with Gainsight. Requires an existing Gainsight subscription. When you integrate Gainsight with Microsoft Entra ID, you can:
- Control in Microsoft Entra ID who has access to Gainsight.
- Enable your users to be automatically signed-in to Gainsight with their Microsoft Entra accounts.
- Manage your accounts in one central location.
You'll configure and test Microsoft Entra single sign-on for Gainsight in a test environment. Gainsight supports both SP and IDP initiated single sign-on.
Prerequisites
To integrate Microsoft Entra ID with Gainsight, you need:
- A Microsoft Entra user account. If you don't already have one, you can Create an account for free.
- One of the following roles: Application Administrator, Cloud Application Administrator, or Application Owner.
- A Microsoft Entra subscription. If you don't have a subscription, you can get a free account.
- Gainsight single sign-on (SSO) enabled subscription.
Add application and assign a test user
Before you begin the process of configuring single sign-on, you need to add the Gainsight application from the Microsoft Entra gallery. You need a test user account to assign to the application and test the single sign-on configuration.
Add Gainsight SAML from the Microsoft Entra gallery
Add Gainsight SAML from the Microsoft Entra application gallery to configure single sign-on with Gainsight. For more information on how to add application from the gallery, see the Quickstart: Add application from the gallery.
Create and assign Microsoft Entra test user
Follow the guidelines in the create and assign a user account article to create a test user account called B.Simon.
Alternatively, you can also use the Enterprise App Configuration Wizard. In this wizard, you can add an application to your tenant, add users/groups to the app, and assign roles. The wizard also provides a link to the single sign-on configuration pane. Learn more about Microsoft 365 wizards..
Configure Microsoft Entra SSO
Complete the following steps to enable Microsoft Entra single sign-on.
Sign in to the Microsoft Entra admin center as at least a Cloud Application Administrator.
Browse to Identity > Applications > Enterprise applications > Gainsight > Single sign-on.
On the Select a single sign-on method page, select SAML.
Provide any dummy url like (
https://gainsight.com) in the Identifier (Entity ID) and Reply URL (Assertion Consumer Service URL) in Basic SAML Configuration.On the Set-up single sign-on with SAML page, in the SAML Signing Certificate section, find Certificate (Base64) and select Download to download the certificate and save it on your computer.

On the Set up Gainsight SAML section, copy the appropriate URL(s) based on your requirement.

Now on the Gainsight Side, Navigate to User Management and click on Authentication tab, create a new SAML Authentication.
Setup SAML 2.0 Authentication in Gainsight
Note
SAML 2.0 Authentication allows the users to login to Gainsight via Microsoft Entra ID. Once Gainsight is configured to authenticate via SAML 2.0, users who want to access Gainsight will no longer be prompted to enter a username or password. Instead, an exchange between Gainsight and Microsoft Entra ID occurs that grants Gainsight access to the users.
To configure SAML 2.0 Authentication:
Log in to your Gainsight company site as an administrator.
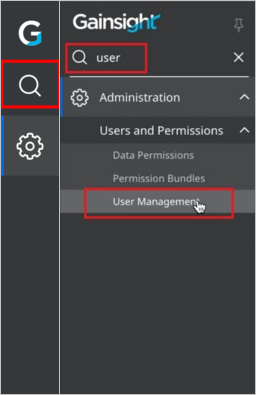
Click search bar on the left side menu and select User Management.

In the User Management page, navigate to Authentication tab and click Add Authentication > SAML.

In the SAML Mechanism page, perform the following steps:

- Enter a unique connection Name in the textbox.
- Enter a valid Email Domain in the textbox.
- In the Sign In URL textbox, paste the Login URL value, which you copied previously.
- In the Sign Out URL textbox, paste the Logout URL value, which you copied previously.
- Open the downloaded Certificate (Base64) and upload it into the Certificate by clicking Browse option.
- Click Save.
- Reopen the new SAML Authentication and click on edit on the newly created connection, and download the metadata. Open the metadata file in your favorite Editor, and copy entityID and Assertion Consumer Service Location URL.
Note
For more information on SAML creation, please refer GAINSIGHT SAML.
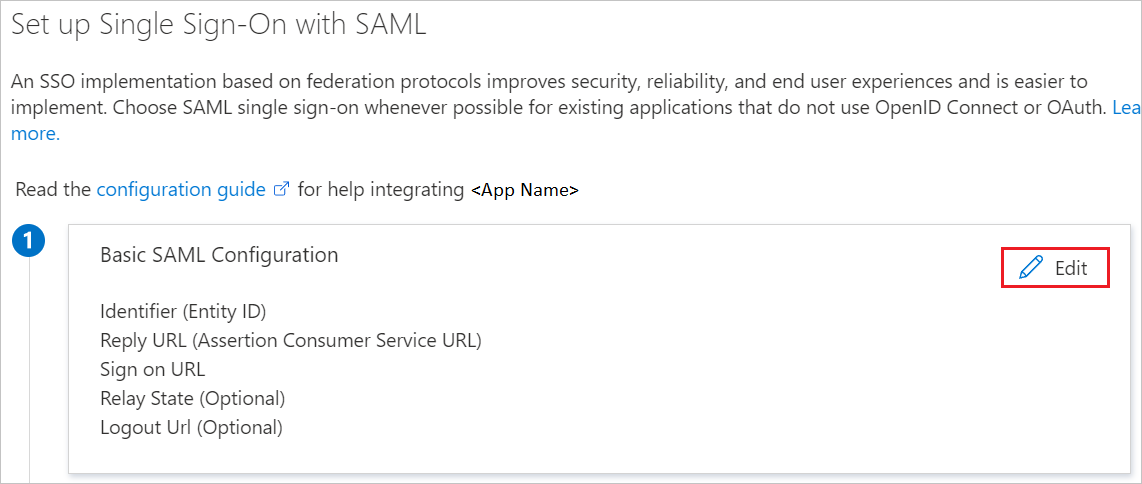
Now back to Azure portal, On the Set up single sign-on with SAML page, select the pencil icon for Basic SAML Configuration to edit the settings.

On the Basic SAML Configuration section, using the values obtained in the Step 4, perform the following steps:
a. In the Identifier (Entity ID) textbox, type a value using one of the following patterns:
Identifier urn:auth0:gainsight:<ID>urn:auth0:gainsight-eu:<ID>b. In the Reply URL (Assertion Consumer Service URL) textbox, type a URL using one of the following patterns:
Reply URL https://secured.gainsightcloud.com/login/callback connection=<ID>https://secured.eu.gainsightcloud.com/login/callback?connection=<ID>Perform the following step, if you wish to configure the application in SP initiated mode:
In the Sign on URL textbox, type a URL using one of the following patterns:
Sign on URL https://secured.gainsightcloud.com/samlp/<ID>https://secured.eu.gainsightcloud.com/samlp/<ID>
Create Gainsight test user
In a different web browser window, sign in to your Gainsight website as an administrator.
In the User Management page, navigate to Users > Add User.

Fill required fields and click Save. Users must be created and activated before you use single sign-on.
Test SSO
In this section, you test your Microsoft Entra single sign-on configuration with following options.
SP initiated:
Click on Test this application, this will redirect to Gainsight Sign-on URL where you can initiate the login flow.
Go to Gainsight Sign-on URL directly and initiate the login flow from there.
IDP initiated:
- Click on Test this application, and you should be automatically signed in to the Gainsight for which you set up the SSO.
You can also use Microsoft My Apps to test the application in any mode. When you click the Gainsight tile in the My Apps, if configured in SP mode you would be redirected to the application sign-on page for initiating the login flow and if configured in IDP mode, you should be automatically signed in to the Gainsight for which you set up the SSO. For more information, see Microsoft Entra My Apps.
Additional resources
Next steps
Once you configure Gainsight you can enforce session control, which protects exfiltration and infiltration of your organization’s sensitive data in real time. Session control extends from Conditional Access. Learn how to enforce session control with Microsoft Cloud App Security.