Note
Access to this page requires authorization. You can try signing in or changing directories.
Access to this page requires authorization. You can try changing directories.
In this article, you learn how to set up a SAML integration for a GitHub enterprise with Enterprise Managed Users with Microsoft Entra ID. Setting up a SAML or OIDC authentication integration, in addition to setting up SCIM provisioning, is required for a GitHub enterprise with Enterprise Managed Users. Setting up authentication and SCIM provisioning for a GitHub enterprise with Enterprise Managed Users allows an admin to:
- Control in Microsoft Entra ID who has access to a GitHub enterprise with Enterprise Managed Users.
- Enable your users to log into a GitHub Enterprise Managed User account via SSO.
- Provision users and groups to the enterprise (once both the authentication and SCIM provisioning integrations have been set up). GitHub teams can be mapped to SCIM-provisioned groups.
- Manage your accounts and groups in one central location, Entra ID.
Note
A GitHub.com enterprise account with Enterprise Managed Users is a specific type of enterprise. This is determined with you request or create a new GitHub enterprise account on GitHub.com. You can read more about the different types of GitHub enterprises in this GitHub article. If you do not have an enterprise that is set up for Enterprise Managed Users, please see this GitHub article for more details and links.
Prerequisites
The scenario outlined in this article assumes that you already have the following prerequisites:
- A Microsoft Entra user account with an active subscription. If you don't already have one, you can Create an account for free.
- One of the following roles:
- GitHub Enterprise Managed User single sign-on (SSO) enabled subscription.
- A GitHub enterprise that is set up for Enterprise Managed Users.
Scenario description
In this article, you configure and test Microsoft Entra SSO in a test environment.
- GitHub Enterprise Managed User supports both SP and IDP initiated SSO.
- GitHub Enterprise Managed User requires Automated user provisioning.
Note
The GitHub Enterprise Managed User application currently doesn't support any of the government cloud platforms.
Adding GitHub Enterprise Managed User from the gallery
To configure the integration of GitHub Enterprise Managed User into Microsoft Entra ID, you need to add GitHub Enterprise Managed User from the gallery to your list of managed SaaS apps.
- Sign in to the Microsoft Entra admin center as at least a Cloud Application Administrator.
- Browse to Entra ID > Enterprise apps > New application.
- Type GitHub Enterprise Managed User in the search box.
- Select GitHub Enterprise Managed User from results panel and then select the Create button. Wait a few seconds while the app is added to your tenant.
Alternatively, you can also use the Enterprise App Configuration Wizard. In this wizard, you can add an application to your tenant, add users/groups to the app, assign roles, and walk through the SSO configuration as well. Learn more about Microsoft 365 wizards.
Configure and test Microsoft Entra SAML SSO for a GitHub enterprise with Enterprise Managed Users
To configure and test Microsoft Entra SSO with GitHub Enterprise Managed User, perform the following steps:
- Configure Microsoft Entra SSO - to enable SAML Single Sign On in your Microsoft Entra tenant.
- Configure GitHub Enterprise Managed User SSO - to configure the single sign-on settings in your GitHub Enterprise.
Configure Microsoft Entra SAML SSO
Follow these steps to enable Microsoft Entra SAML SSO.
Sign in to the Microsoft Entra admin center as at least a Cloud Application Administrator.
Browse to Entra ID > Enterprise apps > GitHub Enterprise Managed User > Single sign-on.
On the Select a single sign-on method page, select SAML.
On the Set up single sign-on with SAML page, select the pencil icon for Basic SAML Configuration to edit the settings.
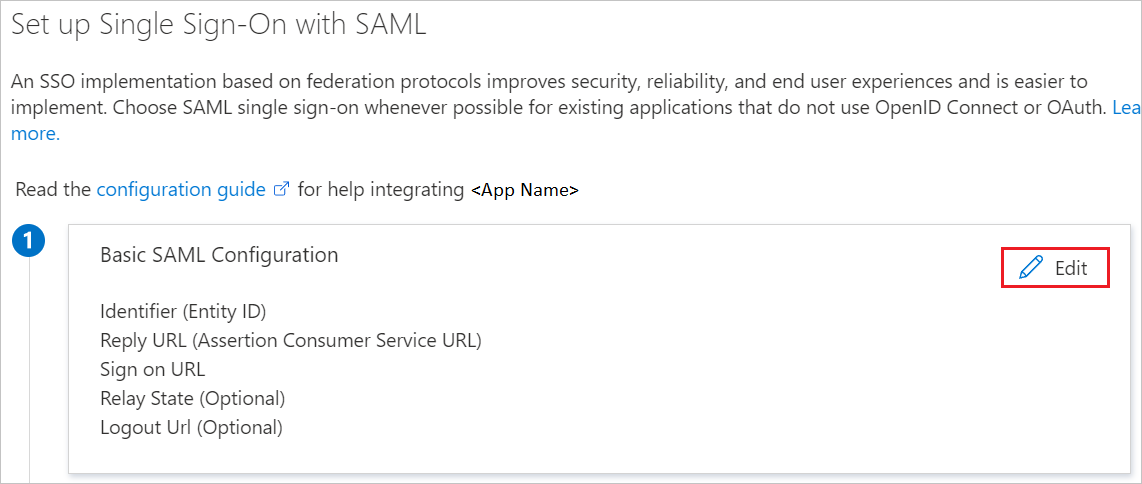
Ensure that you have your Enterprise URL before you begin. The ENTITY field mentioned below is the Enterprise name of your EMU-enabled Enterprise URL. For example, https://github.com/enterprises/contoso - contoso is the ENTITY. On the Basic SAML Configuration section, if you wish to configure the application in IDP initiated mode, enter the values for the following fields:
a. In the Identifier text box, type a URL using the following pattern:
https://github.com/enterprises/{enterprise}Note
Note the identifier format is different from the application's suggested format - please follow the format above. In addition, please ensure the **Identifier doesn't contain a trailing slash.
b. In the Reply URL text box, type a URL using the following pattern:
https://github.com/enterprises/{enterprise}/saml/consumeSelect Set additional URLs and perform the following step if you wish to configure the application in SP initiated mode:
In the Sign-on URL text box, type a URL using the following pattern:
https://github.com/enterprises/{enterprise}/ssoOn the Set up single sign-on with SAML page, in the SAML Certificates section, download the Base64 certificate and save it on your computer.

On the Set up GitHub Enterprise Managed User section, copy the URLs below and save it for configuring GitHub below.

Assign the Microsoft Entra test user
In this section, you assign your account to GitHub Enterprise Managed User in order to complete SSO setup.
- Sign in to the Microsoft Entra admin center as at least a Cloud Application Administrator.
- Browse to Entra ID > Enterprise apps > GitHub Enterprise Managed User.
- In the app's overview page, find the Manage section and select Users and groups.
- Select Add user, then select Users and groups in the Add Assignment dialog.
- In the Users and groups dialog, select your account from the Users list, then select the Select button at the bottom of the screen.
- In the Select a role dialog, select the Enterprise Owner role, then select the Select button at the bottom of the screen. Your account is assigned as an Enterprise Owner for your GitHub instance when you provision your account in the next article.
- In the Add Assignment dialog, select the Assign button.
Configure GitHub Enterprise Managed User SSO
To configure single sign-on on GitHub Enterprise Managed User side, you require the following items from the Entra ID app:
- The URLs from your Microsoft Entra Enterprise Managed User Application above: the
Login URLand theMicrosoft Entra Identifier. - The downloaded base64 certificate.
- The username and password for the setup user account for your GitHub enterprise.
Enable GitHub Enterprise Managed User SAML SSO
In this section, you take the information provided from Microsoft Entra ID above and enter them into your Enterprise settings to enable SSO support.
- Follow the steps in this GitHub documentation to configure SAML authentication for your enterprise.
- When entering the
Sign-on URL, note that this is the Login URL that you copied from Microsoft Entra ID above. - When entering the
Issuer, note that this is theMicrosoft Entra Identifierthat you copied from Microsoft Entra ID above. - When entering the Public Certificate, open the base64 certificate that you downloaded above and paste the text contents of that file into this dialog.
- After completing the steps in GitHub documentation to configure SAML authentication for your enterprise, only SCIM-provisioned enterprise managed users will be able to access the enterprise (with the exception of logging in with the setup user account and using an enterprise recovery code). Complete the steps in the Provisioning tutorial below to configure SCIM provisioning for the GitHub enterprise, so that you can provision Enterprise Managed Users and groups. Users will not be able to log in and access the enterprise until these steps are completed and their user accounts have been SCIM provisioned in the enterprise.
Related content
GitHub Enterprise Managed User requires all accounts to be created through automatic (SCIM) user provisioning, you can find more details here on how to configure automatic user provisioning.