Using the Microsoft Entra Wallet Library with Verified ID
In this tutorial, you learn how a mobile app can use the Microsoft Entra Wallet Library with Verified ID to issue and present verifiable credentials.
Prerequisites
- Android Studio installed on Mac/Windows and an Android test device. You need to enable developer mode on your Android test device.
- An Apple developer account, Mac with Xcode and an iOS test device with developer mode enabled. The iOS version needs to be 16 and above.
- Install the QR Code Reader app on your test device. The WalletLibraryDemo app doesn't come with the ability to scan QR codes, so you need the QR Code Reader app to scan the QR codes with.
You don't need to be a mobile developer to follow this tutorial and get the demo app up and running. The tools and a test device and the courage to try is all you need. You also don't need a Microsoft Entra Verified ID tenant onboarded as you can test the demo app with our public end to end demo website.
Note
Use the latest Wallet Library available to get support for NIST compliant P-256 curve used by Verified ID since February 2024.
What is the Microsoft Entra Wallet Library?
The Microsoft Entra Wallet Library for iOS and Android gives your mobile app the ability to begin using the Microsoft Entra Verified ID platform. Using the Wallet Library, your mobile app can issue and present verifiable credentials in accordance with industry standards.
When should I use the Microsoft Entra Wallet Library?
Microsoft Authenticator has all the functionality to act as the wallet for Microsoft Entra Verified ID. But in cases where you can’t use the Microsoft Authenticator, the Wallet Library is your alternative. An example could be when you already have a mobile app that your users are familiar with and where it makes more sense to include verifiable credentials technology into this app.
You can use the Microsoft Authenticator and a mobile app using the Wallet Library side-by-side on the same mobile device. The Authenticator, if installed, will be the app that has registered the protocol handler for openid://, so your app needs to make sure that the issuance and presentation requests find your app. Use of embedded deep links in HTML-pages that relies on the openid:// protocol will result in the Microsoft Authenticator being launched.
Does Microsoft use the Microsoft Entra Wallet Library?
Yes, the Wallet Library is used by the Microsoft Authenticator. Some features may appear in the Authenticator first, but it is our ambition to make them available in the Wallet Library.
What is the effort of adding the Microsoft Entra Wallet Library to my app?
You add the Wallet Library to your mobile app project via adding a maven dependency for Android and adding a cocoapod dependency for iOS.
For iOS, add the WalletLibrary pod to your Podfile.
target "YourApp" do
  use_frameworks!
  pod "WalletLibrary", "~> 1.0.1"
end
Then you need to add some code to process the requests. For details, please see the WalletLibraryDemo sample code.
/// Create a verifiedIdClient.
let verifiedIdClient = VerifiedIdClientBuilder().build()

/// Create a VerifiedIdRequestInput using a OpenId Request Uri.
let input = VerifiedIdRequestURL(url: URL(string: "openid-vc://...")!)
let result = await verifiedIdClient.createRequest(from: input)

/// Every external method's return value is wrapped in a Result object to ensure proper error handling.
switch (result) {
case .success(let request):
    /// A request created from the method above could be an issuance or a presentation request.
    /// In this example, it is a presentation request, so we can cast it to a VerifiedIdPresentationRequest.
    let presentationRequest = request as? VerifiedIdPresentationRequest
case .failure(let error):
    /// If an error occurs, its value can be accessed here.
    print(error)
}
Then, you have to handle the following major tasks in your app.
- Getting the request URLs. The Wallet Library doesn't come with any functionality to scan a QR code or similar. Obtaining the request URL via methods like scanning a QR code must be added by you.
- Storing the credentials. The Wallet Library creates the private and public key used for signing responses and stores this on the device, but it doesn't come with any functionality for storing credentials. You have to manage credential storage for your mobile app.
- User Interface. Any visual representation of stored credentials and the UI for driving the issuance and presentation process must be implemented by you.
Wallet Library Demo app
The Wallet Library comes with a demo app in the GitHub repo that is ready to use without any modifications. You just have to build and deploy it. The demo app is a lightweight and simple implementation that illustrates issuance and presentation at its minimum. To quickly get going, you can use the QR Code Reader app to scan the QR code, and then copy and paste it into the demo app.
In order to test the demo app, you need a webapp that issues credentials and makes presentation requests for credentials. The Woodgrove public demo webapp is used for this purpose in this tutorial.
Building the Android sample
On your developer machine with Android Studio, do the following:
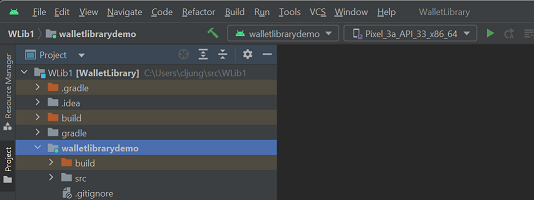
Download or clone the Android Wallet Library GitHub repo You don’t need the walletlibrary folder and you can delete it if you like.
Start Android Studio and open the parent folder of walletlibrarydemo
Select Build menu and then Make Project. This step takes some time.
Connect your Android test device via USB cable to your laptop
Select your test device in Android Studio and click run button (green triangle)
Issuing credentials using the Android sample
Start the WalletLibraryDemo app
On your laptop, launch the public demo website https://aka.ms/vcdemo and do the following
- Enter your First Name and Last Name and press Next
- Select Verify with True Identity
- Click Take a selfie and Upload government issued ID. The demo uses simulated data and you don't need to provide a real selfie or an ID.
- Click Next and OK
Scan the QR code with your QR Code Reader app on your test device, then copy the full URL displayed in the QR Code Reader app. Remember the pin code.
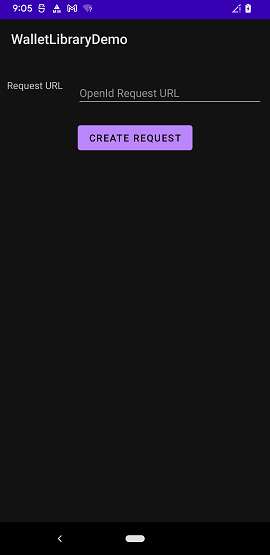
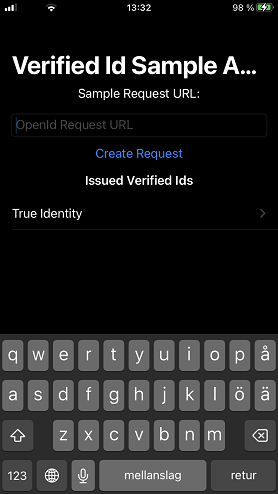
Switch back to WalletLibraryDemo app and paste in the URL from the clipboard
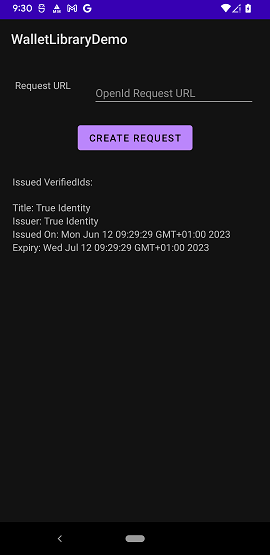
Press CREATE REQUEST button
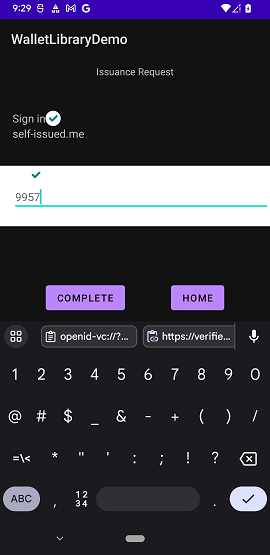
When the app has downloaded the request, it shows a screen like below. Click on the white rectangle, which is a textbox, and enter the pin code that is displayed in the browser page. Then click the COMPLETE button.
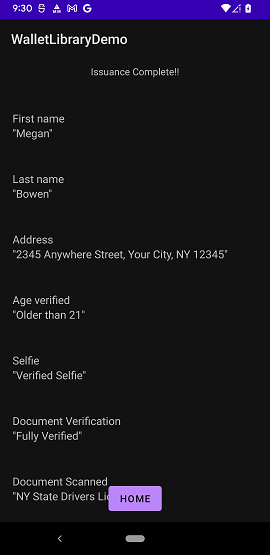
Once issuance completes, the demo app displays the claims in the credential
Presenting credentials using the Android sample
The sample app holds the issued credential in memory, so after issuance, you can use it for presentation.
The WalletLibraryDemo app should display some credential details on the home screen if you have successfully issued a credential.
In the Woodgrove demo in the browser, click Return to Woodgrove if you haven’t done so already and continue with step 3 Access personalized portal.
Scan the QR code with the QR Code Reader app on your test device, then copy the full URL to the clipboard.
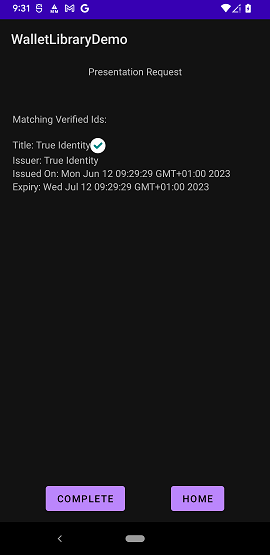
Switch back to the WalletLibraryDemo app and paste in the URL and click CREATE REQUEST button
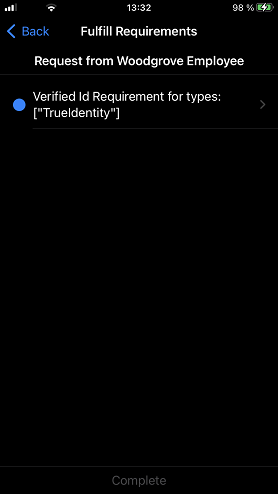
The app retrieves the presentation request and display the matching credentials you have in memory. In this case you only have one. Click on it so that the little check mark appears, then click the COMPLETE button to submit the presentation response
Building the iOS sample
On your Mac developer machine with Xcode, do the following:
Download or clone the iOS Wallet Library GitHub repo.
Start Xcode and open the top level folder for the WalletLibrary
Set focus on WalletLibraryDemo project

Change the Team ID to your Apple Developer Team ID.
Select Product menu and then Build. This step takes some time.
Connect your iOS test device via USB cable to your laptop
Select your test device in Xcode
Select Product menu and then Run or click on run triangle
Issuing credentials using the iOS sample
Start the WalletLibraryDemo app
On your laptop, launch the public demo website https://aka.ms/vcdemo and do the following
- Enter your First Name and Last Name and press Next
- Select Verify with True Identity
- Click Take a selfie and Upload government issued ID. The demo uses simulated data and you don't need to provide a real selfie or an ID.
- Click Next and OK
Scan the QR code with your QR Code Reader app on your test device, then copy the full URL displayed in the QR Code Reader app. Remember the pin code.
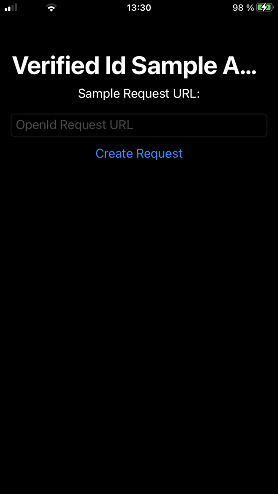
Switch back to WalletLibraryDemo app and paste in the URL from the clipboard
Press Create Request button
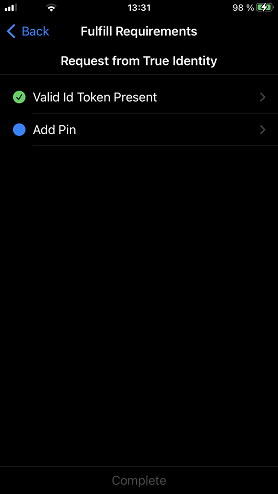
When the app has downloaded the request, it shows a screen like below. Click on the Add Pin text to go to a screen where you can input the pin code, then click Add button to get back and finally click the Complete button.
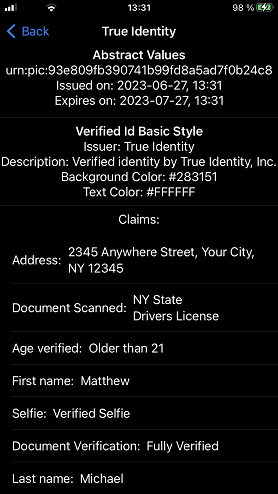
Once issuance completes, the demo app displays the claims in the credential.
Presenting credentials using the iOS sample
The sample app holds the issued credential in memory, so after issuance, you can use it for presentation.
The WalletLibraryDemo app should display credential type name on the home screen if you have successfully issued a credential.
In the Woodgrove demo in the browser, click Return to Woodgrove if you haven’t done so already and continue with step 3 Access personalized portal.
Scan the QR code with the QR Code Reader app on your test device, then copy the full URL to the clipboard.
Switch back to the WalletLibraryDemo app, clear the previous request from the textbox, paste in the URL and click Create Request button
The app retrieves the presentation request and display the matching credentials you have in memory. In this case you only have one. Click on it so that the little check mark switches from blue to green, then click the Complete button to submit the presentation response
Next steps
Learn how to configure your tenant for Microsoft Entra Verified ID.
Feedback
Coming soon: Throughout 2024 we will be phasing out GitHub Issues as the feedback mechanism for content and replacing it with a new feedback system. For more information see: https://aka.ms/ContentUserFeedback.
Submit and view feedback for