Note
Access to this page requires authorization. You can try signing in or changing directories.
Access to this page requires authorization. You can try changing directories.
In this article, learn how to install and use the Microsoft Foundry for Visual Studio Code extension. Create projects, deploy models from the Foundry model catalog, and interact with model playgrounds from within VS Code.
Prerequisites
- An Azure subscription. Create one for free.
- Visual Studio Code installed.
- Your subscription needs to be below your quota limit to deploy a new model in this article. If you already reached your quota limit, you need to have a deployed chat model.
- Appropriate RBAC permissions to create and manage Foundry resources. For more information, see Role-based access control for Foundry.
Install the extension
To use Foundry capabilities in VS Code, install the Foundry for Visual Studio Code extension. Install from the Visual Studio Code Marketplace or directly from within VS Code.
Install from the Visual Studio Code Marketplace
Use the marketplace to install the extension without opening VS Code first.
- Open the Foundry for Visual Studio Code extension page.
- Select the Install button.
- Follow the prompts to install the extension in Visual Studio Code.
- After installation, open Visual Studio Code and verify the extension is installed successfully from the status messages.
- The Foundry icon appears in the primary navigation bar on the left side of VS Code.
Install from within Visual Studio Code
Alternatively, search for the extension directly from the VS Code extensions view.
Open VS Code.
Select Extensions from the left pane.
Select the Settings icon from the top-right on the extensions pane.
Search for and select Foundry.
Select Install.
After installation completes, a status message confirms the extension is installed. The Foundry icon appears in the left navigation bar.
Connect to your Azure resources
After you install the extension, sign in to your Azure subscription and open a Foundry project to begin working with models, agents, and playgrounds.
Note
For a full list of features available in the extension, use the Command Palette. Select F1 to open the command palette and search Foundry. The following screenshot shows some of the available commands.

Sign in to your resources
Sign in to your Azure subscription so the extension can access your Foundry projects and deployed models.
Select the Azure icon on the VS Code navigation bar.
Select Sign in to Azure... in the Azure Resources view.
Under the Resources section, select your Azure subscription and resource group.
Select Foundry and right-click your project.
Select Open in Foundry Extension.
Your Foundry project resources appear in the extension view, and the Foundry icon displays on the VS Code navigation bar.
Navigate the extension interface
The Foundry extension organizes your workspace into three main sections.
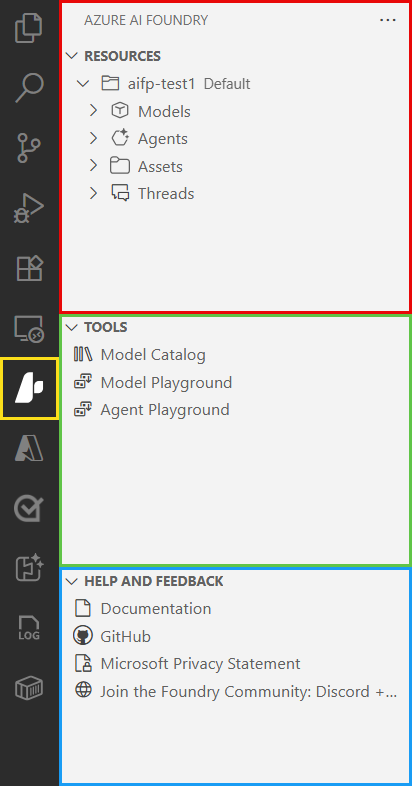
| Section | What it contains | When to use it |
|---|---|---|
| Resources | Deployed models, declarative agents, hosted agents, connections, and vector stores for your Foundry project. | View and manage your project resources. |
| Tools | Model Catalog, Model Playground, Agent Playgrounds (remote and local), Local Visualizer, and Deploy Hosted Agents. | Deploy new models, test prompts, and interact with agents. |
| Help and Feedback | Documentation, GitHub repository, Microsoft Privacy Statement, and community links. | Get help or provide feedback. |
Create a project
Create a new Foundry project directly from the extension to organize your models and resources.
Select the plus icon next to Resources in the Resources section of the Foundry extension view.
You can either create a new resource group or select an existing one.
To create a new resource group:
Select Create new resource group and press Enter.
Enter the Azure resource group name in the Enter new resource group textbox and press Enter.
Select the location you want to use from the list of available locations and press Enter.
To use an existing resource group:
- Select the resource group you want to use from the list of available resource groups and press Enter.
Enter the Foundry project name in the Enter project name textbox and press Enter.
After project deployment, a popup appears with the message Project deployed successfully.
To deploy a model to the newly created project, select the Deploy a model button in the popup. This action opens the Model Catalog page where you can select the desired model to deploy.
Switch the default project
When you open a project in the Foundry extension, that project is set as your default project. To switch your default project:
Right-click on the Foundry project and select the Switch Default Project in Azure Extension option.
Select the Foundry project you want to use from the list of available projects and press Enter.
The selected project now displays Default after the project name.
Tip
Right-click on your project name to access the project endpoint or the project API key.
Work with models
The Foundry extension lets you discover, deploy, and interact with models from the Foundry model catalog directly in VS Code.
Browse the model catalog
The model catalog provides access to models from Microsoft, OpenAI, Meta, DeepSeek, and other providers. You can open the model catalog in several ways:
- Run the Foundry: Open Model Catalog command from the command palette.
- Select the plus icon next to Models in the Resources section of the Foundry extension view.
- Select the Model Catalog link in the Tools section of the Foundry extension view.
Open the model catalog from the command palette
Use the command palette to open the model catalog without navigating the extension view.
Select F1 to open the command palette.
Enter Foundry: Open Model Catalog and press Enter.
The Model Catalog page opens.
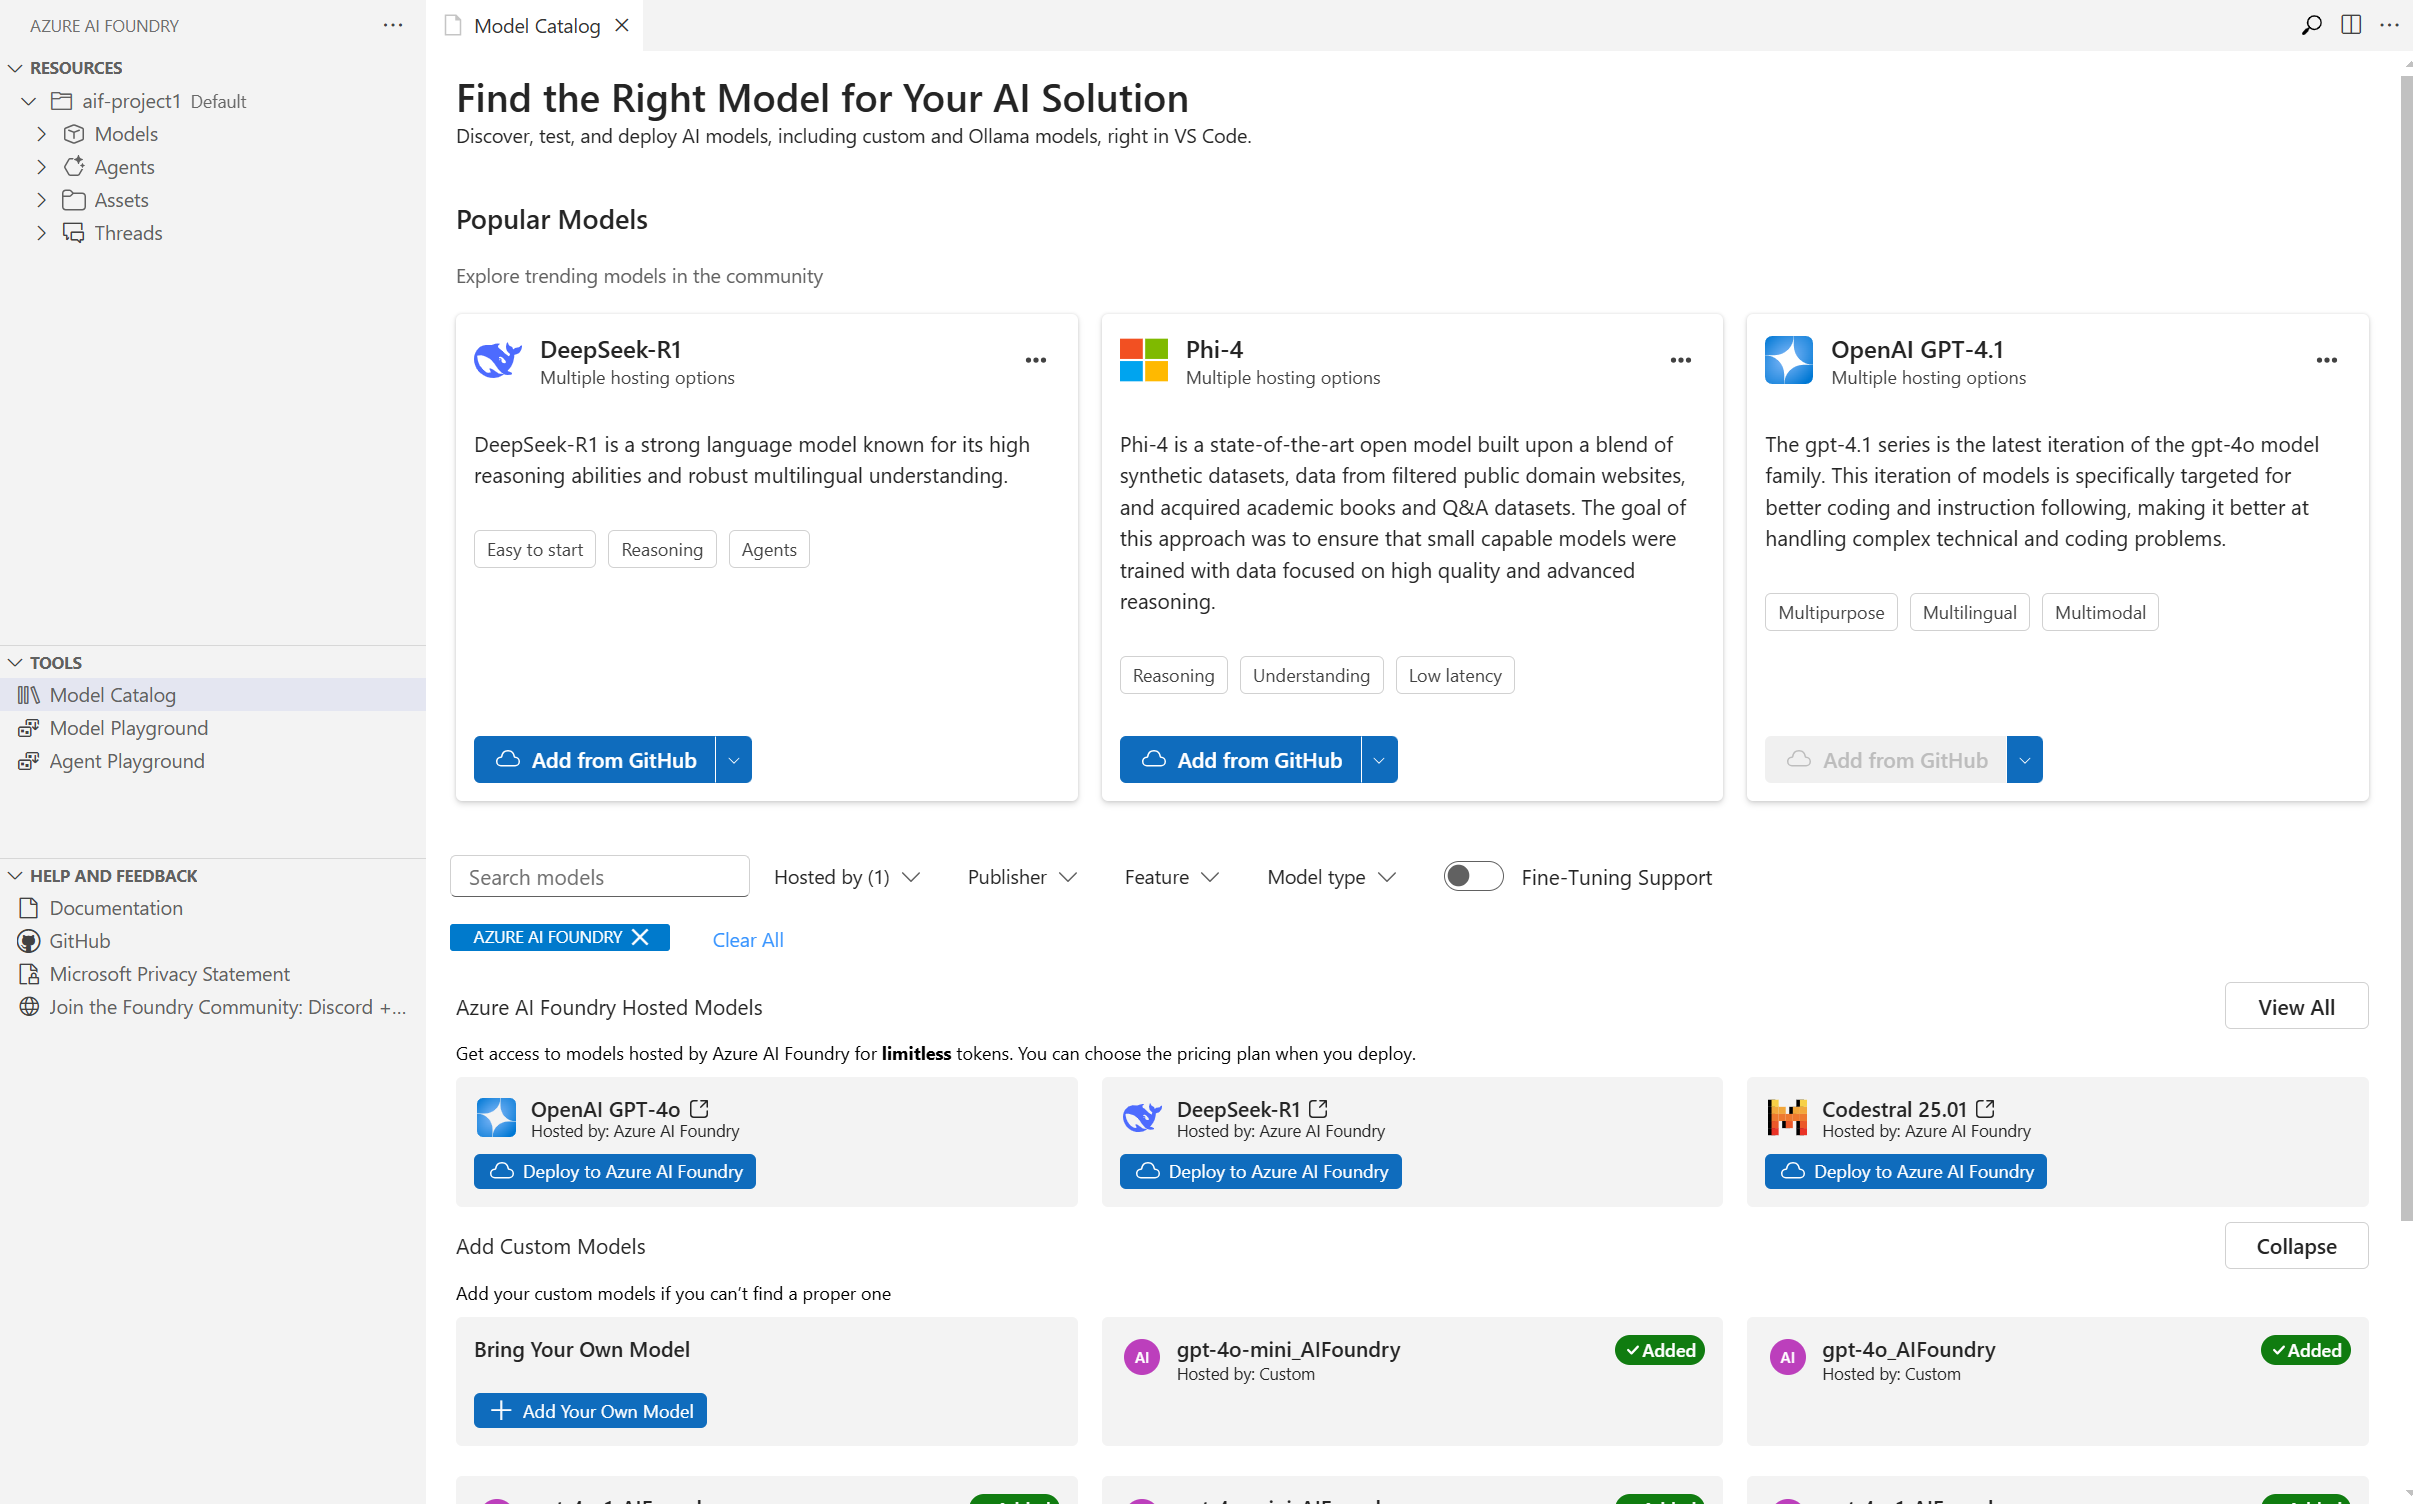
Filter the Model Catalog by Hosted by, Publisher, Feature, or Model type using the dropdowns at the top of the page. Select the Fine-Tuning Support toggle to filter models that support fine-tuning.
Search for a specific model using the search bar at the top-center of the page.

Open the model catalog from the Resources section
In the Foundry extension view, select the plus icon next to Models to open the model catalog.
Tip
You can also right-click on Models and select Deploy new AI model to go directly to the deployment flow.
Open the model catalog from the Tools section
In the Tools section of the Foundry extension view, double-click the Model Catalog link.
Deploy a model from the model catalog
After you find a model in the catalog, deploy it to your Foundry project so you can use it in your applications.
Select the Deploy button next to the selected model name.
The Model deployment page opens.
Enter the model deployment name in the Enter deployment name textbox and press Enter.
Select the deployment type in the Deployment type dropdown.
Select the model version in the Model version dropdown.
(Optional) Adjust the tokens per minute using the Tokens per minute slider.
Select the Deploy in Foundry button in the bottom-left corner.
In the confirmation dialog, select Deploy.
After deployment completes, the model appears by deployment name under the Models section in your project.
View and manage deployed models
Expand the Models section in the Foundry extension view to see all deployed models in your project.
View model card information
Select a deployed model to open a panel with the following details:
- Deployment Info: Name, provisioning state, deployment type, rate limit, version info, model name, and model version.
- Endpoint info: Target URI link, authentication type, and key.
- Useful links: Code sample repository and tutorial links for AI application development.
Update model deployment settings
To update deployment settings such as rate limits:
- Select the Edit button on the top-right of the model card.
- Update the editable fields.
- Select the Save button to apply the changes.
Generate sample code for a model
Generate a starter code file for your deployed model to accelerate application development.
Right-click on your deployed model and select Open code file.
Select your preferred SDK in the Choose preferred SDK dropdown.
Select your preferred language in the Choose language dropdown.
Select your preferred authentication method in the Choose authentication method dropdown.
A sample code file opens in a new tab in VS Code.
The following screenshot shows a generated Python sample that makes a synchronous call to the responses API:

Interact with models in the playground
Use the model playground to chat interactively with your deployed model, adjust settings, and modify system instructions.
To open the playground, double-click the Model Playground link in the Tools section of the Foundry extension view. Alternatively, right-click on your deployed model and select Open in playground.
The Playground page opens.
Type your prompt and review the output.
Select View code in the top-right corner to see how to access the model deployment programmatically.
Select the History link at the top-left of the playground to view your chat history.
Troubleshoot common issues
If you run into problems while using the Foundry extension, check the following common issues:
| Issue | Resolution |
|---|---|
| Extension doesn't appear after installation | Restart VS Code and verify the extension is enabled in the Extensions view. |
| Sign-in fails or subscriptions don't load | Verify your Azure account has the correct permissions. Try signing out and signing in again from the Azure Resources view. |
| Model deployment fails with a quota error | Check your subscription quota and either request an increase or delete unused deployments. |
Clean up resources
The Azure resources that you created in this article are billed to your Azure subscription. If you don't expect to need these resources in the future, delete them to avoid incurring more charges.
Delete your models
In the VS Code navigation bar, refresh the Foundry extension. In the Resources section, expand the Models subsection.
Right-click the deployed model you want to remove and select Delete.
Delete Azure resources
To delete the resource group and all resources within, it:
Warning
Deleting a resource group permanently removes all resources within it, including your Foundry project and any deployed models. This action can't be undone.
- Open the Azure portal.
- Navigate to the resource group that contains your Foundry project.
- Select Delete resource group and confirm the deletion.