Note
Access to this page requires authorization. You can try signing in or changing directories.
Access to this page requires authorization. You can try changing directories.
Applies only to: ![]() Foundry (classic) portal. This article isn't available for the new Foundry portal. Learn more about the new portal.
Foundry (classic) portal. This article isn't available for the new Foundry portal. Learn more about the new portal.
Note
Links in this article might open content in the new Microsoft Foundry documentation instead of the Foundry (classic) documentation you're viewing now.
Note
This document refers to the classic version of the agents API.
Note
For the new Foundry Toolkit workflows—including agent creation from templates, GitHub Copilot-assisted creation, local testing and debugging, and tracing—see Create hosted agent workflows in Visual Studio Code.
Foundry Agent Service lets you build, configure, and deploy agents without leaving Visual Studio Code (VS Code). In this article, you create an agent by using the designer, add tools, test the agent in the playground, generate sample code, and clean up resources when you're done.
Prerequisites
- An Azure subscription. Create one for free.
- Access to Foundry Agent Service.
- Visual Studio Code installed.
- The Foundry Toolkit for Visual Studio Code installed and signed in.
- A deployed model in your project.
Create an agent in the designer
The designer provides a visual interface for configuring your agent's name, model, instructions, and tools.
In the Foundry Toolkit view, find the Classic subsection in the Resources section.
Select the plus (+) icon next to the Classic Agents subsection to create a new agent.
Configure the agent in the designer
After you choose a save location, the agent .yaml file and the designer view open. Configure the following settings:
In the prompt, enter a name for your agent.
In the dropdown list, select the name of your model deployment. The deployment name is what you chose when you deployed an existing model.
The extension generates the Id value. Configure the following fields:
- Add a description for your agent.
- Set system instructions.
- Configure tools for agent use.
To save the .yaml file, select File > Save on the VS Code menu bar.
Review the agent YAML definition
The .yaml file opens alongside the designer and contains the configuration details for your agent. The format is similar to the following example:
# yaml-language-server: $schema=https://aka.ms/ai-foundry-vsc/agent/1.0.0
version: 1.0.0
name: my-agent
description: Description of the agent
id: ''
metadata:
  authors:
    - author1
    - author2
  tags:
    - tag1
    - tag2
model:
  id: 'gpt-4o-1'
  options:
    temperature: 1
    top_p: 1
instructions: Instructions for the agent
tools: []
Add tools to the agent
Agent Service provides the following tools to extend your agent's capabilities and connect to your data sources:
- Grounding with Bing search
- File search
- Code interpreter
- OpenAPI specified tools
- Model Context Protocol (MCP)
For more information about using MCP tools, see Work with Agent Service and MCP server tools in Visual Studio Code (preview).
Add a tool to the agent
In the designer, in the upper-right corner of the TOOL section, select Add tool. In the dropdown list, select the tool that you want to add.
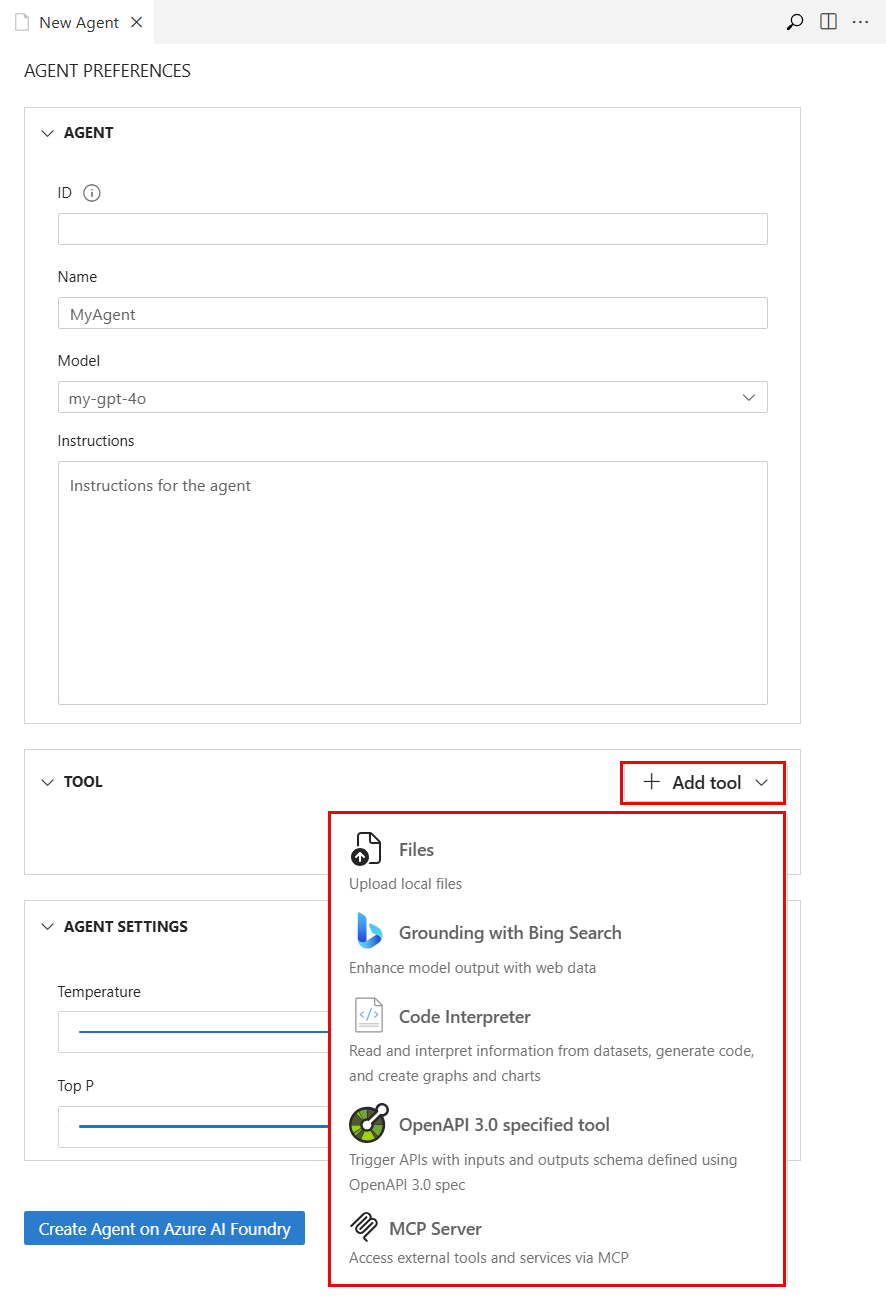
The designer displays the appropriate pane to configure the tool, as shown in the following images:
Grounding with Bing search:

File search:

Code interpreter:

OpenAPI 3.0 specified tools:

After you enter the required information, select Create and connect, Upload and save, or Create Tool. The button label varies by tool type.
After the tool is created, it appears in the TOOL section of the designer.


When you add a tool, you can also add any new assets that it needs. For example, if you add a file search tool, you can use an existing vector store asset or create a new one to host your uploaded files.
Deploy the agent to Foundry
After you finish configuring your agent, deploy it to Foundry so it runs in the cloud.
In the designer, select the Create Agent on Microsoft Foundry button.
In VS Code, refresh the Resources view. The deployed agent appears in the Classic Agents subsection.
View deployed agent details
Select a deployed agent to open the AGENT PREFERENCES pane in view-only mode. From this pane, you can:
- Select Edit Agent to open the agent designer and .yaml definition for editing.
- Select View Code to generate a sample code file that uses the agent.
- Select Open Playground to open the remote agent playground.
Update a deployed agent
You can modify a deployed agent's configuration and sync the changes back to Foundry.
On the AGENT PREFERENCES pane, select Edit Agent. The agent designer opens with the agent's .yaml file.
Edit the agent's configuration, such as the model, tools, and instructions.
Select the Update Agent on Microsoft Foundry button to save your changes. The updated configuration takes effect immediately.
Generate a sample code file
The extension generates boilerplate code for interacting with your deployed agent programmatically.
Right-click your deployed agent, and then select View Code. Or, on the AGENT PREFERENCES pane, select the View Code button.
In the Choose your preferred SDK dropdown list, select your SDK.
In the Choose a language dropdown list, select your language.
In the Choose an auth method dropdown list, select your authentication method.
The extension generates a code file in your selected language and opens it in the editor.
Review the sample code file
The generated code file demonstrates a basic call to interact with the agent through the Foundry Projects API. The following screenshot shows a Python example:

Test the agent in the playground
Use the playground to send messages to your deployed agent and verify its behavior.
Right-click your deployed agent, and then select Open Playground.
Alternatively, select the Remote Agent Playground link in the Tools subsection, select your agent type, and then select your agent from the dropdown lists.
The Remote Agent Playground pane opens and starts a thread with your agent.
Enter your prompt and view the outputs.
This example uses Bing Grounding to illustrate a web search for information. The agent uses the model and tools that you configured in the agent designer. The source of the information appears in the section for agent annotations.


View agent threads
The Threads subsection displays the conversation threads created during runs with your agent. In the Classic section under the Resources view, expand the Threads subsection to view the list.

Note
A thread is a conversation session between an agent and a user. Threads store messages and automatically handle truncation to fit content into a model's context. A message is a single interaction that can include text, images, and other files. A run is a single execution of an agent that can span multiple threads and messages.
View thread details
To view the THREAD DETAILS pane, select a thread from the list.
View run details
To view run information, select the View run info button on the THREAD DETAILS pane. A .json file opens with the details of the run, including the agent configuration, messages, and tool calls.
Clean up resources
If you don't need the resources you created, delete them to avoid ongoing charges to your Azure subscription.
Delete your agents
Tip
Because you can customize the left pane in the Microsoft Foundry portal, you might see different items than shown in these steps. If you don't see what you're looking for, select ... More at the bottom of the left pane.
- In VS Code, refresh the Azure Resources view.
- Expand the Agents subsection to display the list of deployed agents.
- Right-click the agent that you want to delete, and then select Delete.
Delete your models
In VS Code, refresh the Resources view. Expand the Models subsection to display the list of deployed models.
Right-click the model that you want to delete, and then select Delete.
Delete your connected tools
Open the Azure portal.
Go to the resource group that contains the tool resource.
Select the resource, and then select Delete.
Related content
- Work with Agent Service and MCP server tools in Visual Studio Code (preview) to add MCP tools to your agents.
- Agent tools overview for details on file search, code interpreter, and other available tools.
- Foundry Agent Service overview for a deeper look at agent concepts and capabilities.