Note
Access to this page requires authorization. You can try signing in or changing directories.
Access to this page requires authorization. You can try changing directories.
Use this article to learn how to set up the requirements for starting with custom NER and create a project.
Prerequisites
Before you start using custom NER, you need:
- An Azure subscription - Create one for free.
Create a Language resource
Before you start using custom NER, you need an Azure Language in Foundry Tools resource. We recommend that you create your Language resource and connect a storage account to it in the Azure portal. Creating a resource in the Azure portal lets you create an Azure storage account at the same time, with all of the required permissions preconfigured. You can also read further in the article to learn how to use a preexisting resource, and configure it to work with custom named entity recognition.
You also need an Azure storage account where you upload your .txt documents that are used to train a model to extract entities.
Note
- You need to have an owner role assigned on the resource group to create a Language resource.
- If you connect a preexisting storage account, you should have an owner role assigned to it.
Create Language resource and connect storage account
You can create a resource in the following ways:
- The Azure portal
- PowerShell
Note
You shouldn't move the storage account to a different resource group or subscription once it's linked with Azure Language resource.
Create a new resource from the Azure portal
Sign in to the Azure portal to create a new Azure Language in Foundry Tools resource.
In the window that appears, select Custom text classification & custom named entity recognition from the custom features. Select Continue to create your resource at the bottom of the screen.
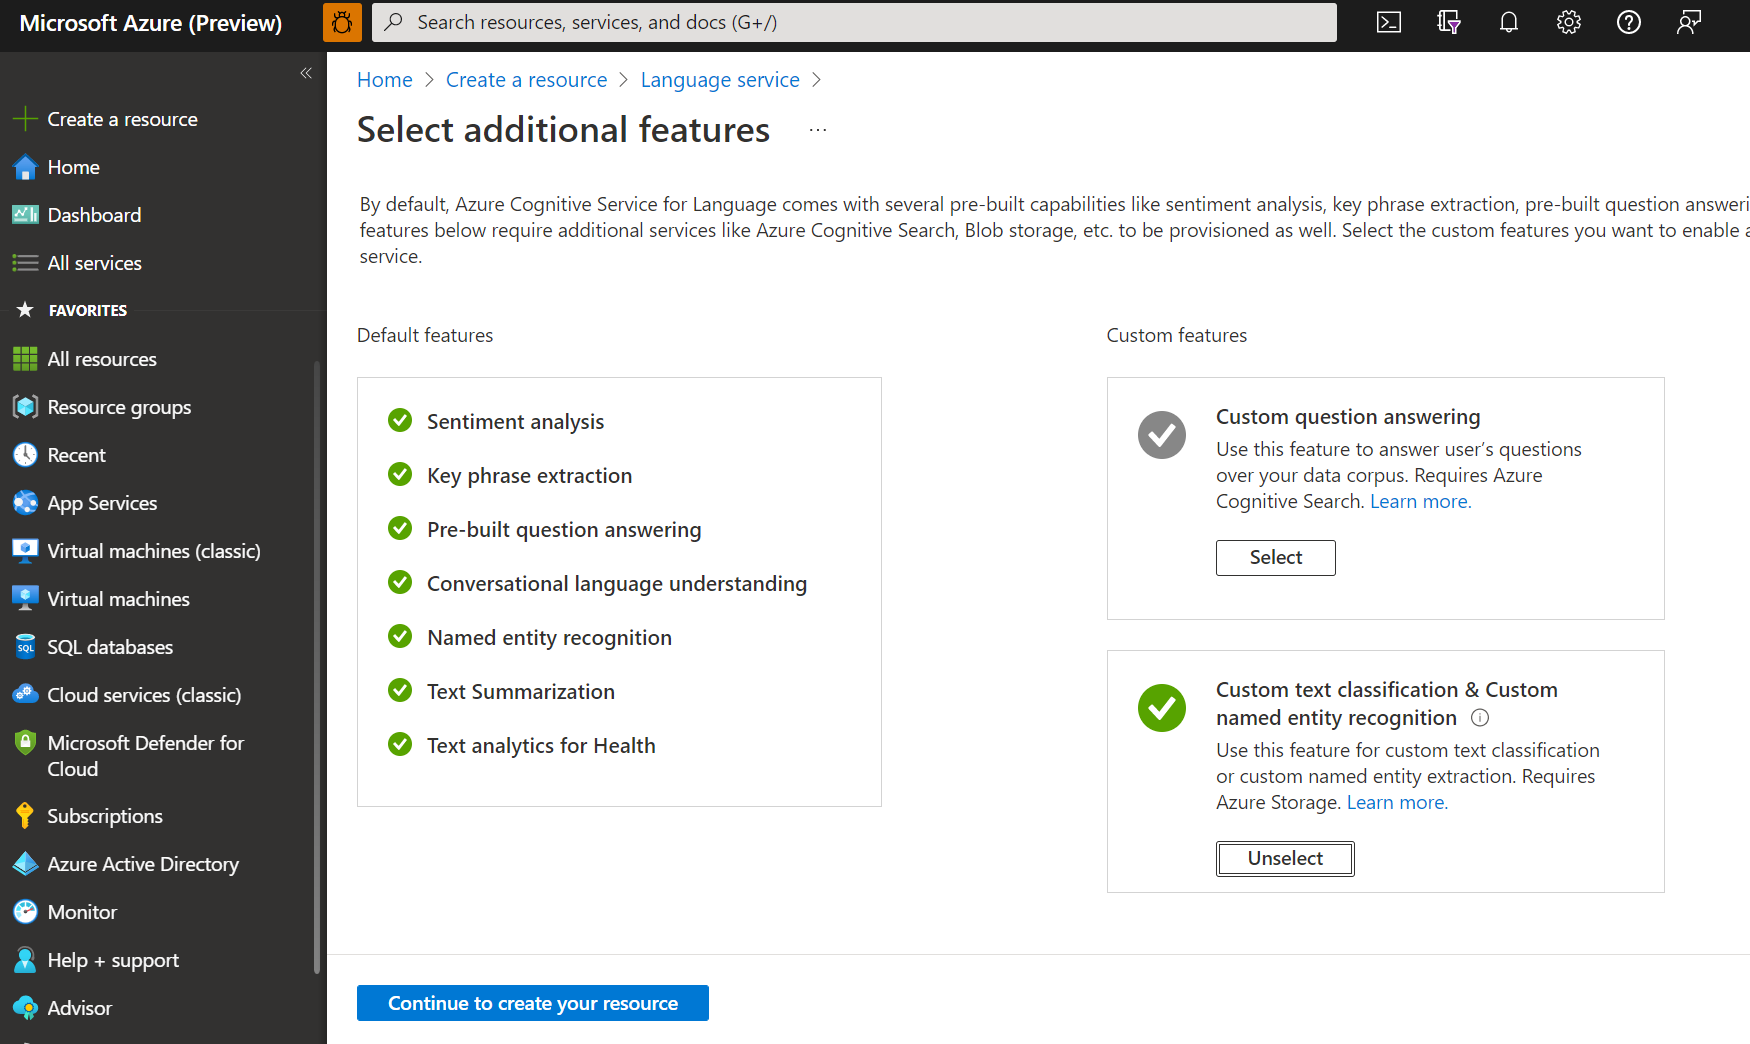
Create a Language resource with following details.
Name Description Subscription Your Azure subscription. Resource group A resource group that contains your resource. You can use an existing one, or create a new one. Region The region for your Language resource. For example, "West US 2." Name A name for your resource. Pricing tier The pricing tier for your Language resource. You can use the Free (F0) tier to try the service. Note
If you get a message saying "your sign in account isn't an owner of the selected storage account's resource group," your account needs to have an owner role assigned on the resource group before you can create a Language resource. Contact your Azure subscription owner for assistance.
In the Custom text classification & custom named entity recognition section, select an existing storage account or select New storage account. These values are to help you get started, and not necessarily the storage account values you want to use in production environments. To avoid latency during building your project, connect to storage accounts in the same region as your Language resource.
Storage account value Recommended value Storage account name Any name Storage account type Standard locally redundant storage (LRS) Make sure the Responsible AI Notice is checked. Select Review + create at the bottom of the page, then select Create.

Create a new Language resource using PowerShell
You can create a new resource and a storage account using the following CLI template and parameters files, which are hosted on GitHub.
Edit the following values in the parameters file:
| Parameter name | Value description |
|---|---|
name |
Name of your Language resource |
location |
Region in which your resource is hosted. for more information, see Service limits. |
sku |
Pricing tier of your resource. |
storageResourceName |
Name of your storage account |
storageLocation |
Region in which your storage account is hosted. |
storageSkuType |
SKU of your storage account. |
storageResourceGroupName |
Resource group of your storage account |
Use the following PowerShell command to deploy the Azure Resource Manager (ARM) template with the files you edited.
New-AzResourceGroupDeployment -Name ExampleDeployment -ResourceGroupName ExampleResourceGroup `
  -TemplateFile <path-to-arm-template> `
  -TemplateParameterFile <path-to-parameters-file>
See the ARM template documentation for information on deploying templates and parameter files.
Note
- The process of connecting a storage account to your Language resource is irreversible. It can't be disconnected later.
- You can only connect your language resource to one storage account.
Using a preexisting Language resource
You can use an existing Language resource to get started with custom NER as long as this resource meets the below requirements:
| Requirement | Description |
|---|---|
| Regions | Make sure your existing resource is provisioned in one of the supported regions. If not, you need to create a new resource in one of these regions. |
| Pricing tier | Learn more about supported pricing tiers. |
| Managed identity | Make sure that the resource's managed identity setting is enabled. Otherwise, read the next section. |
To use custom named entity recognition, you need to create an Azure storage account if you don't have one already.
Enable identity management for your resource
Your Language resource must have identity management, to enable it using the Azure portal:
- Go to your Language resource
- From left hand menu, under Resource Management section, select Identity
- From System assigned tab, make sure to set Status to On
Enable custom named entity recognition feature
Make sure to enable Custom text classification / Custom Named Entity Recognition feature from Azure portal.
- Go to your Language resource in the Azure portal.
- From the left side menu, under Resource Management section, select Features.
- Enable Custom text classification / Custom Named Entity Recognition feature.
- Connect your storage account.
- Select Apply.
Important
Make sure that the user making changes the storage blob data contributor role assigned for them.
Add required roles
Use the following steps to set the required roles for your Language resource and storage account.

Roles for your Azure Language in Foundry Tools resource
Go to your storage account or Language resource in the Azure portal.
Select Access Control (IAM) in the left pane.
Select Add to Add Role Assignments, and choose the appropriate role for your account.
You should have the owner or contributor role assigned on your Language resource.
Within Assign access to, select User, group, or service principal
Select Select members
Select your user name. You can search for user names in the Select field. Repeat this for all roles.
Repeat these steps for all the user accounts that need access to this resource.
Roles for your storage account
- Go to your storage account page in the Azure portal.
- Select Access Control (IAM) in the left pane.
- Select Add to Add Role Assignments, and choose the Storage blob data contributor role on the storage account.
- Within Assign access to, select Managed identity.
- Select Select members
- Select your subscription, and Language as the managed identity. You can search for user names in the Select field.
Roles for your user
Important
If you skip this step, you'll have a 403 error when trying to connect to your custom project. It's important that your current user has this role to access storage account blob data, even if you're the owner of the storage account.
- Go to your storage account page in the Azure portal.
- Select Access Control (IAM) in the left pane.
- Select Add to Add Role Assignments, and choose the Storage blob data contributor role on the storage account.
- Within Assign access to, select User, group, or service principal.
- Select Select members
- Select your User. You can search for user names in the Select field.
Important
If you have a virtual network or private endpoint, be sure to select Allow Azure services on the trusted services list to access this storage account in the Azure portal.
Enable CORS for your storage account
Make sure to allow (GET, PUT, DELETE) methods when enabling Cross-Origin Resource Sharing (CORS).
Set allowed origins field to https://language.cognitive.azure.com. Allow all header by adding * to the allowed header values, and set the maximum age to 500.

Create a custom named entity recognition project (REST API)
Once your resource and storage container are configured, create a new custom NER project. A project is a work area for building your custom AI models based on your data. Only you can access your project along with others who have access to the Azure resource being used. If you labeled data, you can use it to get started by importing a project.
To start creating a custom named entity recognition model, you need to create a project. Creating a project lets you label data, train, evaluate, improve, and deploy your models.
Note
The project name is case-sensitive for all operations.
Create a PATCH request using the following URL, headers, and JSON body to create your project.
Request URL
Use the following URL to create a project. Replace the following placeholders with your own values.
{Endpoint}/language/authoring/analyze-text/projects/{projectName}?api-version={API-VERSION}
| Placeholder | Value | Example |
|---|---|---|
{ENDPOINT} |
The endpoint for authenticating your API request. | https://<your-custom-subdomain>.cognitiveservices.azure.com |
{PROJECT-NAME} |
The name for your project. This value is case-sensitive. | myProject |
{API-VERSION} |
The version of the API you're calling. The value referenced is for the latest released version. For more information, for more information, see Model lifecycle. | 2022-05-01 |
Request headers
Use the following header to authenticate your request.
| Key | Required | Type | Value |
|---|---|---|---|
Ocp-Apim-Subscription-Key |
True | string | The key to your resource. Used for authenticating your API requests. |
Content-Type |
True | string | application/merge-patch+json |
Request body
Use the following JSON in your request. Replace the following placeholders with your own values.
{
  "projectName": "{PROJECT-NAME}",
  "language": "{LANGUAGE-CODE}",
  "projectKind": "CustomEntityRecognition",
  "description": "Project description",
  "multilingual": "True",
  "storageInputContainerName": "{CONTAINER-NAME}"
}
| Key | Placeholder | Value | Example |
|---|---|---|---|
| projectName | {PROJECT-NAME} |
The name of your project. This value is case-sensitive. | myProject |
| language | {LANGUAGE-CODE} |
A string specifying the language code for the documents used in your project. If your project is a multilingual project, select the code for the language most frequently represented in the documents. See language support to learn more about supported language codes. | en-us |
| projectKind | CustomEntityRecognition |
Your project kind. | CustomEntityRecognition |
| multilingual | true |
A boolean value that enables you to have documents in multiple languages in your dataset and when your model is deployed you can query the model in any supported language (not necessarily included in your training documents). See language support to learn more about multilingual support. | true |
| storageInputContainerName | {CONTAINER-NAME |
The name of your Azure storage container your documents were uploaded. | myContainer |
This request returns a 201 response, which means that the project is created.
This request returns an error if:
- The selected resource doesn't have proper permission for the storage account.
Import project (REST API)
If you already labeled data, you can use it to get started with the service. Make sure that your labeled data follows the accepted data formats.
Submit a POST request using the following URL, headers, and JSON body to import your labels file. Make sure that your labels file follow the accepted format.
If a project with the same name already exists, the data of that project is replaced.
{Endpoint}/language/authoring/analyze-text/projects/{projectName}/:import?api-version={API-VERSION}
| Placeholder | Value | Example |
|---|---|---|
{ENDPOINT} |
The endpoint for authenticating your API request. | https://<your-custom-subdomain>.cognitiveservices.azure.com |
{PROJECT-NAME} |
The name for your project. This value is case-sensitive. | myProject |
{API-VERSION} |
The version of the API you're calling. The value referenced here's for the latest version released. For more information, see Model lifecycle. | 2022-05-01 |
Headers
Use the following header to authenticate your request.
| Key | Value |
|---|---|
Ocp-Apim-Subscription-Key |
The key to your resource. Used for authenticating your API requests. |
Body
Use the following JSON in your request. Replace the placeholder values with your own values.
{
    "projectFileVersion": "{API-VERSION}",
    "stringIndexType": "Utf16CodeUnit",
    "metadata": {
        "projectName": "{PROJECT-NAME}",
        "projectKind": "CustomEntityRecognition",
        "description": "Trying out custom NER",
        "language": "{LANGUAGE-CODE}",
        "multilingual": true,
        "storageInputContainerName": "{CONTAINER-NAME}",
        "settings": {}
    },
    "assets": {
    "projectKind": "CustomEntityRecognition",
        "entities": [
            {
                "category": "Entity1"
            },
            {
                "category": "Entity2"
            }
        ],
        "documents": [
            {
                "location": "{DOCUMENT-NAME}",
                "language": "{LANGUAGE-CODE}",
                "dataset": "{DATASET}",
                "entities": [
                    {
                        "regionOffset": 0,
                        "regionLength": 500,
                        "labels": [
                            {
                                "category": "Entity1",
                                "offset": 25,
                                "length": 10
                            },
                            {
                                "category": "Entity2",
                                "offset": 120,
                                "length": 8
                            }
                        ]
                    }
                ]
            },
            {
                "location": "{DOCUMENT-NAME}",
                "language": "{LANGUAGE-CODE}",
                "dataset": "{DATASET}",
                "entities": [
                    {
                        "regionOffset": 0,
                        "regionLength": 100,
                        "labels": [
                            {
                                "category": "Entity2",
                                "offset": 20,
                                "length": 5
                            }
                        ]
                    }
                ]
            }
        ]
    }
}
| Key | Placeholder | Value | Example |
|---|---|---|---|
api-version |
{API-VERSION} |
The version of the API you're calling. The version used here must be the same API version in the URL. Learn more about other available API versions | 2022-03-01-preview |
projectName |
{PROJECT-NAME} |
The name of your project. This value is case-sensitive. | myProject |
projectKind |
CustomEntityRecognition |
Your project kind. | CustomEntityRecognition |
language |
{LANGUAGE-CODE} |
A string specifying the language code for the documents used in your project. If your project is a multilingual project, choose the language code of most the documents. | en-us |
multilingual |
true |
A boolean value that enables you to have documents in multiple languages in your dataset and when your model is deployed you can query the model in any supported language (not necessarily included in your training documents. See language support for information on multilingual support. | true |
storageInputContainerName |
{CONTAINER-NAME} | The name of your Azure storage container containing your uploaded documents. | myContainer |
entities |
Array containing all the entity types you have in the project and extracted from your documents. | ||
documents |
Array containing all the documents in your project and list of the entities labeled within each document. | [] | |
location |
{DOCUMENT-NAME} |
The location of the documents in the storage container. | doc1.txt |
dataset |
{DATASET} |
The test set to which this file goes to when split before training. For more information, see How to train a model. Possible values for this field are Train and Test. |
Train |
Once you send your API request, you receive a 202 response indicating that the job was submitted correctly. In the response headers, extract the operation-location value. Here's an example of the format:
{ENDPOINT}/language/authoring/analyze-text/projects/{PROJECT-NAME}/import/jobs/{JOB-ID}?api-version={API-VERSION}
{JOB-ID} is used to identify your request, since this operation is asynchronous. You use this URL to get the import job status.
Possible error scenarios for this request:
- The selected resource doesn't have proper permissions for the storage account.
- The
storageInputContainerNamespecified doesn't exist. - Invalid language code is used, or if the language code type isn't string.
multilingualvalue is a string and not a boolean.
Get project details (REST API)
Use the following GET request to get your project details. Replace the placeholder values with your own values.
{ENDPOINT}/language/authoring/analyze-text/projects/{PROJECT-NAME}?api-version={API-VERSION}
| Placeholder | Value | Example |
|---|---|---|
{ENDPOINT} |
The endpoint for authenticating your API request. | https://<your-custom-subdomain>.cognitiveservices.azure.com |
{PROJECT-NAME} |
The name for your project. This value is case-sensitive. | myProject |
{API-VERSION} |
The version of the API you're calling. For more information, see Model lifecycle. | 2022-05-01 |
Headers
Use the following header to authenticate your request.
| Key | Value |
|---|---|
Ocp-Apim-Subscription-Key |
The key to your resource. Used for authenticating your API requests. |
Response body
    {
        "createdDateTime": "2021-10-19T23:24:41.572Z",
        "lastModifiedDateTime": "2021-10-19T23:24:41.572Z",
        "lastTrainedDateTime": "2021-10-19T23:24:41.572Z",
        "lastDeployedDateTime": "2021-10-19T23:24:41.572Z",
        "projectKind": "CustomEntityRecognition",
        "storageInputContainerName": "{CONTAINER-NAME}",
        "projectName": "{PROJECT-NAME}",
        "multilingual": false,
        "description": "Project description",
        "language": "{LANGUAGE-CODE}"
    }
| Value | Placeholder | Description | Example |
|---|---|---|---|
projectKind |
CustomEntityRecognition |
Your project kind. | CustomEntityRecognition |
storageInputContainerName |
{CONTAINER-NAME} |
The name of your Azure storage container for your uploaded documents. | myContainer |
projectName |
{PROJECT-NAME} |
The name of your project. This value is case-sensitive. | myProject |
multilingual |
true |
A boolean value that enables you to have documents in multiple languages in your dataset and when your model is deployed you can query the model in any supported language (not necessarily included in your training documents. For more information about multilingual support, see Language support. | true |
language |
{LANGUAGE-CODE} |
A string specifying the language code for the documents used in your project. If your project is a multilingual project, choose the language code for most of the documents. | en-us |
Once you send your API request, you receive a 200 response indicating success and JSON response body with your project details.
Delete project (REST API)
When you no longer need your project, you can delete it with the following DELETE request. Replace the placeholder values with your own values.
{Endpoint}/language/authoring/analyze-text/projects/{projectName}?api-version={API-VERSION}
| Placeholder | Value | Example |
|---|---|---|
{ENDPOINT} |
The endpoint for authenticating your API request. | https://<your-custom-subdomain>.cognitiveservices.azure.com |
{PROJECT-NAME} |
The name for your project. This value is case-sensitive. | myProject |
{API-VERSION} |
The version of the API you're calling. The value referenced is for the latest version released. For more information, see Model lifecycle. | 2022-05-01 |
Headers
Use the following header to authenticate your request.
| Key | Value |
|---|---|
| Ocp-Apim-Subscription-Key | The key to your resource. Used for authenticating your API requests. |
Once you send your API request, you receive a 202 response indicating success, which means your project is deleted. A successful call results with an Operation-Location header used to check the status of the job.
Next steps
You should have an idea of the project schema you use to label your data.
After your project is created, you can start labeling your data. This process informs your entity extraction model how to interpret text, and is used for training and evaluation.