Note
Access to this page requires authorization. You can try signing in or changing directories.
Access to this page requires authorization. You can try changing directories.
The Agent Sandbox cluster extension uses the open-source Kubernetes Agent Sandbox project to manage AI agent execution environments with Pod sandboxing and the Kata VM isolation v2 runtime on Azure Kubernetes Service (AKS). You control AKS node capacity and manage the node pools and cluster.
The Agent Sandbox cluster extension uses the open-source Kubernetes Agent Sandbox project to manage AI agent execution environments with the Serverless sandbox runtime powered by Azure Container Instances (ACI) on Azure Kubernetes Service (AKS). ACI runs your workloads without requiring you to manage the underlying nodes.
Note
For pricing details, see Azure Container Instances pricing.
The project provides a declarative API for managing individual, stateful workloads, such as an AI coding agent's code-execution environment or an interactive notebook session.
For example, a coding assistant can use a Sandbox to run generated Python code, execute unit tests, and collect results without running that code inside the assistant application's own process. You describe the execution environment's container image, runtime, and resource requirements in a Kubernetes Sandbox resource. The extension's controller creates and manages the pod for that environment; the selected runtime provides workload isolation.
You can use the Agent Sandbox extension independently. To capture and restore workload state, use Agent Sandbox together with the Pod snapshot cluster extension (preview).
Important
Each Agent Sandbox extension installation supports only one runtime on an AKS cluster. Select a runtime and provisioning method for the installation and verification steps.
Important
AKS preview features are available on a self-service, opt-in basis. Previews are provided "as is" and "as available," and they're excluded from the service-level agreements and limited warranty. AKS previews are partially covered by customer support on a best-effort basis. As such, these features aren't meant for production use. For more information, see the following support articles:
Prerequisites
- Use a managed-identity AKS cluster running Kubernetes version 1.35 or later with Pod sandboxing enabled and Kata VM isolation v2 configured. Cluster extensions don't support service-principal-based clusters; switch to managed identity before continuing. A cluster without Pod sandboxing isn't sufficient. For general background, see Pod sandboxing and Pod sandboxing considerations. Verify Kata v2 support by following the checks in this article before installing the extension.
- To capture and restore workload state, also meet the requirements for the optional Pod snapshot cluster extension (preview).
- Azure CLI version 2.85.0 or later for cluster extension commands. Run
az --versionto find your version andaz upgradeto upgrade. Also meet the CLI requirements in the linked Kata v2 setup instructions. For more information, see Install Azure CLI. - Kata VM isolation v2 runtime supports only v6 VM SKUs in these families: Dasv6, Dadsv6, Dalsv6, Daldsv6, Easv6, Eadsv6, Falsv6, Fasv6, and Famsv6. To request quota for your AKS cluster, follow the AKS quota request guidance.
- The
k8s-extensionAzure CLI extension installed. Install or update it withaz extension add --name k8s-extension --upgrade. - The
Microsoft.KubernetesConfigurationresource provider registered in your subscription.
Limitations
- Regional availability depends on the AKS release that added Kata VM isolation v2 support. To check whether your region has it, find AKS release
1025in the AKS Release Tracker. - When you use the Agent Sandbox and Pod snapshot cluster extensions together, you can suspend and resume the same Sandbox. This preview doesn't support restoring a single snapshot to multiple independent Sandboxes, including those in a snapshot-backed warm pool.
- AKS Automatic isn't yet supported.
Prepare your AKS cluster
Use an existing compatible cluster or create one by using the optional commands in this section. For general background, see Pod sandboxing. This walkthrough requires Kata VM isolation v2, not the earlier kata-vm-isolation runtime described in that article. The commands depend on Kata v2 availability in your region. Complete the runtime verification steps in the following section before installing the extension. Installing the Agent Sandbox cluster extension doesn't enable Pod sandboxing or configure the node runtime.
Select your subscription.
az account set --subscription "<subscription-name-or-id>"Set the names of your cluster, its resource group, and its Pod sandboxing node pool. For a new cluster, choose an unused cluster name and use
katapoolfor the node pool name.export RESOURCE_GROUP="<resource-group-name>" export CLUSTER_NAME="<aks-cluster-name>" export NODEPOOL_NAME="katapool"For an existing cluster, set
NODEPOOL_NAMEto its Pod sandboxing node pool name and skip the next three steps.For a new cluster, select a region and create a resource group. Use a region with AKS release
1025and Azure Linux node image202610.30.1or newer. Check the AKS Release Tracker and Azure Linux Node Images Release Tracker. Confirm thatStandard_D4as_v6is available and that your subscription has sufficient quota in that region.export LOCATION="<supported-azure-region>"az group create --name "$RESOURCE_GROUP" --location "$LOCATION"Create a cluster with a regular system node pool, Kubernetes 1.35, Azure Linux, an OIDC issuer, and workload identity enabled. The separate system pool provides capacity for components such as the Pod snapshot access broker.
az aks create \
  --resource-group "$RESOURCE_GROUP" \
  --name "$CLUSTER_NAME" \
  --location "$LOCATION" \
  --kubernetes-version 1.35 \
  --os-sku AzureLinux \
  --nodepool-name systempool \
  --node-vm-size Standard_D4as_v6 \
  --node-count 2 \
  --network-plugin azure \
  --network-plugin-mode overlay \
  --enable-managed-identity \
  --enable-oidc-issuer \
  --enable-workload-identity \
  --generate-ssh-keys
Add a User node pool with Pod sandboxing enabled. This example uses two nodes with the same
Standard_D4as_v6SKU, which meets the Pod snapshot walkthrough's node-count and VM-family requirements. Restore requires the exact source VM SKU. Alternatively, pod sandboxing supports v6 VM SKUs in these families: Dasv6, Dadsv6, Dalsv6, Daldsv6, Easv6, Eadsv6, Falsv6, Fasv6, and Famsv6.az aks nodepool add \ --resource-group "$RESOURCE_GROUP" \ --cluster-name "$CLUSTER_NAME" \ --name "$NODEPOOL_NAME" \ --mode User \ --os-sku AzureLinux \ --workload-runtime KataVmIsolation \ --node-vm-size Standard_D4as_v6 \ --node-count 2Reconcile the cluster configuration so AKS recognizes the new pool's workload runtime.
az aks update \
  --resource-group "$RESOURCE_GROUP" \
  --name "$CLUSTER_NAME"
Verify the managed node image and Kata v2 runtime in the following steps before installing either extension.
Install or update the
k8s-extensionAzure CLI extension.az extension add --name k8s-extension --upgradeGet credentials for your cluster.
az aks get-credentials \
  --resource-group "$RESOURCE_GROUP" \
  --name "$CLUSTER_NAME"
Verify the Pod sandboxing node pool's workload runtime, OS SKU, VM size, and node image.
az aks nodepool show \
  --cluster-name "$CLUSTER_NAME" \
  --resource-group "$RESOURCE_GROUP" \
  --name "$NODEPOOL_NAME" \
  --query "{workloadRuntime:workloadRuntime,osSKU:not_null(osSku,osSKU),vmSize:vmSize,nodeImageVersion:nodeImageVersion}" \
  --output table
The output must show
KataVmIsolationandAzureLinux. Confirm that the VM size meets the Kata VM isolation v2 prerequisites. For Pod snapshot, require a supported v6 SKU and Azure Linux node image202610.30.1or newer. These properties alone don't distinguish Kata VM isolation v2 from the earlier Kata runtime.Verify the RuntimeClass handler and confirm that every node in the pool supports Kata v2 before waiting for readiness.
kubectl get runtimeclass kata-vm-isolation-v2 \
  -o jsonpath='{.handler}{"\n"}'
Continue only if the handler is
kata-v2.List nodes in your pool that carry the capability label required by the RuntimeClass.
kubectl get nodes \
  --selector "kubernetes.azure.com/kata-vm-isolation-v2=true,agentpool=$NODEPOOL_NAME"
Get the configured pool size and the number of matching nodes.
az aks nodepool show \
  --resource-group "$RESOURCE_GROUP" \
  --cluster-name "$CLUSTER_NAME" \
  --name "$NODEPOOL_NAME" \
  --query count --output tsv
kubectl get nodes \ --selector "kubernetes.azure.com/kata-vm-isolation-v2=true,agentpool=$NODEPOOL_NAME" \ -o go-template='{{len .items}}{{"\n"}}'Continue only if the matching node count equals the configured pool size and is at least
1, or at least2for the Pod snapshot walkthrough. If the pool is scaling or upgrading, wait for the operation to finish and repeat the count checks.Nodes created before Kata VM isolation v2 was available can be Ready without carrying the required capability label. After Kata v2 becomes available in the region, create a replacement pool with a distinct name by using the pool creation and reconciliation commands in the preceding steps, then repeat the runtime checks. Don't manually add the capability label to unsupported nodes.
kubectl wait --for=condition=Ready node \
  --selector "kubernetes.azure.com/kata-vm-isolation-v2=true,agentpool=$NODEPOOL_NAME" \
  --timeout=5m
If the counts don't match, no nodes match, or the wait times out, complete the Kata v2 setup before installing the Agent Sandbox cluster extension.
Install the Agent Sandbox cluster extension
The commands in this section use the RESOURCE_GROUP and CLUSTER_NAME environment variables. If you started a new shell session, set them again as described in Prepare your AKS cluster.
Use Agent Sandbox extension version 1.0.7 or later. The create command doesn't pin a version and uses the service-offered version with automatic upgrades enabled by default.
The extension adds the following resource types:
| Resource | API group and version | Purpose |
|---|---|---|
Sandbox |
agents.x-k8s.io/v1beta1 |
A single, stateful, isolated environment backed by one pod. |
SandboxTemplate |
extensions.agents.x-k8s.io/v1beta1 |
Defines the environment for warm-pool Sandboxes, including image, runtime, and resources. |
SandboxWarmPool |
extensions.agents.x-k8s.io/v1beta1 |
Maintains a reserve of ready Sandboxes created from a template. |
SandboxClaim |
extensions.agents.x-k8s.io/v1beta1 |
Requests a Sandbox from a warm pool for one agent session. |
Create the Agent Sandbox cluster extension on the AKS cluster you configured with Pod sandboxing and the Kata v2 runtime.
az k8s-extension create \
  --resource-group "$RESOURCE_GROUP" \
  --cluster-name "$CLUSTER_NAME" \
  --cluster-type managedClusters \
  --name agent-sandbox \
  --extension-type Microsoft.AgentSandbox
Check the extension's provisioning state.
az k8s-extension show \
  --resource-group "$RESOURCE_GROUP" \
  --cluster-name "$CLUSTER_NAME" \
  --cluster-type managedClusters \
  --name agent-sandbox \
  --query '{type:extensionType,state:provisioningState,version:currentVersion}'
Continue only after
stateisSucceededandversionis1.0.7or later. A successful installation of an older version doesn't meet this requirement.Wait for the controller and check that the Sandbox API is installed.
kubectl -n agent-sandbox-system rollout status \
  deployment/agent-sandbox-controller --timeout=5m
kubectl get crd sandboxes.agents.x-k8s.iokubectl api-resources --api-group=agents.x-k8s.ioThe following example uses
agents.x-k8s.io/v1beta1. Confirm that thesandboxesresource lists that version in theAPIVERSIONcolumn.
Run an isolated AI agent workload
Create a namespace for the example.
kubectl create namespace agent-demoCreate a file named
agent-sandbox.yamlwith the following manifest. Replace<agent-container-image>with your workload image. Adjust resource requests and limits for your workload.apiVersion: agents.x-k8s.io/v1beta1 kind: Sandbox metadata: name: agent-demo namespace: agent-demo spec: podTemplate: metadata: labels: app: agent-demo spec: enableServiceLinks: false runtimeClassName: kata-vm-isolation-v2 containers: - name: agent image: <agent-container-image> resources: requests: cpu: 250m memory: 512Mi limits: cpu: "1" memory: 1GiApply the manifest.
kubectl apply -f agent-sandbox.yamlWait for the Sandbox to become Ready. This step waits for the controller to create and ready its backing pod before inspecting pods by label.
kubectl -n agent-demo wait --for=condition=Ready \
  sandbox/agent-demo --timeout=5m
kubectl -n agent-demo wait --for=condition=Ready pod \ --selector app=agent-demo --timeout=5mkubectl -n agent-demo get pods --selector app=agent-demo -o widekubectl -n agent-demo get pods -l app=agent-demo \ -o custom-columns=NAME:.metadata.name,RUNTIME:.spec.runtimeClassName,NODE:.spec.nodeNameCheck that
RUNTIMEiskata-vm-isolation-v2andNODEshows the assigned node.Pod readiness alone doesn't prove the workload completed initialization. Check your application's health endpoint or logs as appropriate.
Configure a warm pool
This section is optional. Your standalone Sandbox is ready to use after you complete the preceding verification steps. Configure a warm pool if you need environments available before new agent sessions start.
A warm pool keeps Sandboxes running before an agent requests them, reducing the need to wait for a new environment to start. A SandboxTemplate defines the environment, a SandboxWarmPool maintains the available reserve, and a SandboxClaim requests a Sandbox from that pool. These resources must be in the same namespace.
This example uses the agent-demo namespace that you created in Run an isolated AI agent workload and maintains two available Sandboxes. Warm Sandboxes consume compute resources even when no agent is using them. Plan capacity for the reserve, claimed Sandboxes, and any standalone Sandboxes you created earlier. A warm pool doesn't require the Pod snapshot cluster extension.
Check warm-pool API availability
Confirm that the extension installed all three resource definitions.
kubectl get crd \
  sandboxtemplates.extensions.agents.x-k8s.io \
  sandboxwarmpools.extensions.agents.x-k8s.io \
  sandboxclaims.extensions.agents.x-k8s.io
Verify the API version and claim field used by this example.
kubectl api-resources --api-group=extensions.agents.x-k8s.iokubectl explain sandboxclaims.spec.warmPoolRef \ --api-version=extensions.agents.x-k8s.io/v1beta1Continue only if all three resources serve
extensions.agents.x-k8s.io/v1beta1and the claim supportswarmPoolRef. If a resource or field is missing, check the supported extension version before continuing. Don't install upstream controllers over the managed extension.
Create a template and warm pool
Create
agent-warm-pool.yamlfrom the following template. Replace<agent-container-image>with your long-running agent service image and adjust resource requests and limits for your workload.Important
Before applying this template, add a container
readinessProbethat checks whether your application finishes initialization and can accept work. The probe is application-specific and isn't included in this template. Without it, the pool can report an environment as Ready before the application is usable.apiVersion: extensions.agents.x-k8s.io/v1beta1 kind: SandboxTemplate metadata: name: agent-template namespace: agent-demo spec: podTemplate: metadata: labels: app: agent-warm-pool spec: enableServiceLinks: false runtimeClassName: kata-vm-isolation-v2 containers: - name: agent image: <agent-container-image> resources: requests: cpu: 250m memory: 512Mi limits: cpu: "1" memory: 1Gi --- apiVersion: extensions.agents.x-k8s.io/v1beta1 kind: SandboxWarmPool metadata: name: agent-warm-pool namespace: agent-demo spec: replicas: 2 sandboxTemplateRef: name: agent-templateApply the template and pool.
kubectl apply -f agent-warm-pool.yamlWait until two Sandboxes are Ready, then inspect the pool and its pods.
kubectl -n agent-demo wait \
  --for=jsonpath='{.status.readyReplicas}'=2 \
  sandboxwarmpool/agent-warm-pool --timeout=10m
kubectl -n agent-demo get sandboxwarmpool agent-warm-poolkubectl -n agent-demo get pods \ --selector app=agent-warm-pool -o wideConfirm that the pool reports two ready sandboxes. The pod output shows their assigned nodes and current status. It doesn't verify the nodes' runtime configuration.
Claim a Sandbox
Create a separate claim for each agent session. A claim takes ownership of an available Sandbox, and the pool creates a replacement to restore its reserve. The pool's replica count doesn't limit the total number of claimed Sandboxes.
Create
agent-sandbox-claim.yaml.apiVersion: extensions.agents.x-k8s.io/v1beta1 kind: SandboxClaim metadata: name: agent-session namespace: agent-demo spec: warmPoolRef: name: agent-warm-poolApply the claim and wait for it to become Ready.
kubectl apply -f agent-sandbox-claim.yamlkubectl -n agent-demo wait --for=condition=Ready \ sandboxclaim/agent-session --timeout=10mGet the assigned Sandbox name and inspect its status.
export CLAIMED_SANDBOX="$(kubectl -n agent-demo get \
  sandboxclaim agent-session -o jsonpath='{.status.sandbox.name}')"
kubectl -n agent-demo get sandbox "$CLAIMED_SANDBOX" -o yamlUse your application's health endpoint or logs to verify that the assigned environment is usable. To check that the pool replenishes its reserve, repeat the pool readiness check after the claim completes.
When the session ends, delete its claim and the owned Sandbox resources.
kubectl -n agent-demo delete sandboxclaim agent-session \
  --cascade=foreground --wait=true --timeout=5m
Deleting the claim doesn't return the used Sandbox to the pool. The pool maintains its reserve with separate Sandboxes. Save any application data you need before deleting the claim.
Change warm-pool capacity
To maintain three available Sandboxes instead of two, scale the pool:
kubectl -n agent-demo scale sandboxwarmpool agent-warm-pool --replicas=3
kubectl -n agent-demo wait \
  --for=jsonpath='{.status.readyReplicas}'=3 \
  sandboxwarmpool/agent-warm-pool --timeout=10m
Update spec.replicas in agent-warm-pool.yaml too, so reapplying the file doesn't reset the capacity. Scaling the pool changes the unclaimed reserve, not Sandboxes already assigned to claims. Pool pods remain running and consume resources until you scale down or delete the pool.
Restore a Sandbox from a pod snapshot
This section is optional. Use snapshot restore to resume captured workload state instead of starting a new environment. It doesn't require a warm pool.
You can install the Pod snapshot cluster extension and Agent Sandbox in either order. The Pod snapshot manager detects the Sandbox API when it becomes available, including after the manager starts, without requiring a restart.
The Pod snapshot article shows how to create a Ready snapshot, authorize the Agent Sandbox controller, and request an explicit or implicit restore. Creating a new Sandbox without restore intent starts a new workload normally.
When switching between explicit restore, implicit restore, and cold start, create a new Sandbox with a distinct name and pod-template label. Update the readiness and Pod lookup commands to use the new name and label selector. Alternatively, delete the previous Sandbox, wait for its Pod to be deleted, and recreate it with the desired restore intent. Don't change restore intent on an existing restore Sandbox: the webhook rejects updates to its Pod's immutable restore fields, which can leave the Sandbox Ready=False while its original Pod continues running.
For an explicit restore, add the following fields under spec.podTemplate.metadata in a new Sandbox manifest:
labels:
  podsnapshot.aks.azure.com/restore: "true"
annotations:
  podsnapshot.aks.azure.com/restore-from: <snapshot-name>
The snapshot must be in the same namespace as the Sandbox resource. Keep the source and restore container identities and resource sizing compatible. Don't set runtime-private restore annotations or snapshot paths yourself.
Clean up resources
Keep the extension controllers running until you delete their workloads and dependent resources. If a command fails or times out, stop and resolve the failure before continuing. Don't remove finalizers to force cleanup.
The commands use the dedicated agent-demo namespace. Don't delete this namespace if it contains resources you need to keep. If you also used Pod snapshot, stop scheduled captures before removing workloads, and keep both extensions running until snapshot cleanup finishes.
Set the cluster values again if needed, and get credentials to select the cluster you want to clean up.
export RESOURCE_GROUP="<resource-group-name>"
export CLUSTER_NAME="<aks-cluster-name>"
az aks get-credentials \ --resource-group "$RESOURCE_GROUP" \ --name "$CLUSTER_NAME"If you configured the warm pool example, delete the pool first to stop replenishment, then delete its example claim and template. Delete any additional claims you created for other sessions. Foreground deletion waits for owned resources to be removed.
kubectl -n agent-demo delete sandboxwarmpool agent-warm-pool \
  --ignore-not-found --cascade=foreground --wait=true --timeout=5m

kubectl -n agent-demo delete sandboxclaim agent-session \
  --ignore-not-found --cascade=foreground --wait=true --timeout=5m

kubectl -n agent-demo delete sandboxtemplate agent-template \
  --ignore-not-found --wait=true --timeout=5m
Delete the example Sandbox and wait for its pod to be removed. Delete any additional implicit-restore or cold-start Sandboxes you created in this namespace.
kubectl -n agent-demo delete sandbox agent-demo \
  --ignore-not-found --cascade=foreground --wait=true --timeout=5m
Confirm that no example pods remain. If you captured snapshots, complete the Pod snapshot cleanup before deleting the namespace or uninstalling either extension. Include any snapshots, triggers, and policies you created in
agent-demo, not just theworkload-demonamespace used by that article.kubectl -n agent-demo get podsContinue only when the example pods and any associated snapshots are deleted. Delete the dedicated example namespace if it contains no resources you need to keep.
kubectl delete namespace agent-demo \
  --ignore-not-found --wait=true --timeout=10m
If no Sandboxes, warm pools, or claims in any namespace depend on the extension, delete the
agent-sandboxcluster extension instance. Finish removing snapshot-backed Sandboxes while both controllers are still running.az k8s-extension delete \ --resource-group "$RESOURCE_GROUP" \ --cluster-name "$CLUSTER_NAME" \ --cluster-type managedClusters \ --name agent-sandbox \ --yesList the remaining extensions to verify that
agent-sandboxis removed.az k8s-extension list \ --resource-group "$RESOURCE_GROUP" \ --cluster-name "$CLUSTER_NAME" \ --cluster-type managedClusters \ --query '[].{name:name,state:provisioningState}' -o tableOptionally, delete the AKS cluster only if you created it solely for these walkthroughs and no longer need any workloads or resources on it. If you used both extensions, finish both cleanup procedures before deleting the cluster.
az aks delete \
  --resource-group "$RESOURCE_GROUP" \
  --name "$CLUSTER_NAME" \
  --yes
If you keep the cluster, its nodes continue to incur charges. This command doesn't delete the resource group or the separate snapshot storage account and broker identity. Don't delete a shared cluster or resource group.
Use Workload Manager to provision an AKS cluster for orchestration and the Serverless sandbox runtime powered by ACI for execution. A workload space groups these resources, a runtime link connects them, and the Agent Sandbox cluster extension enables Sandbox support.
Prerequisites
An Azure subscription. If you don't have an Azure subscription, create a free account before you begin.
Quota provisioned for AI sandboxes on your subscription:
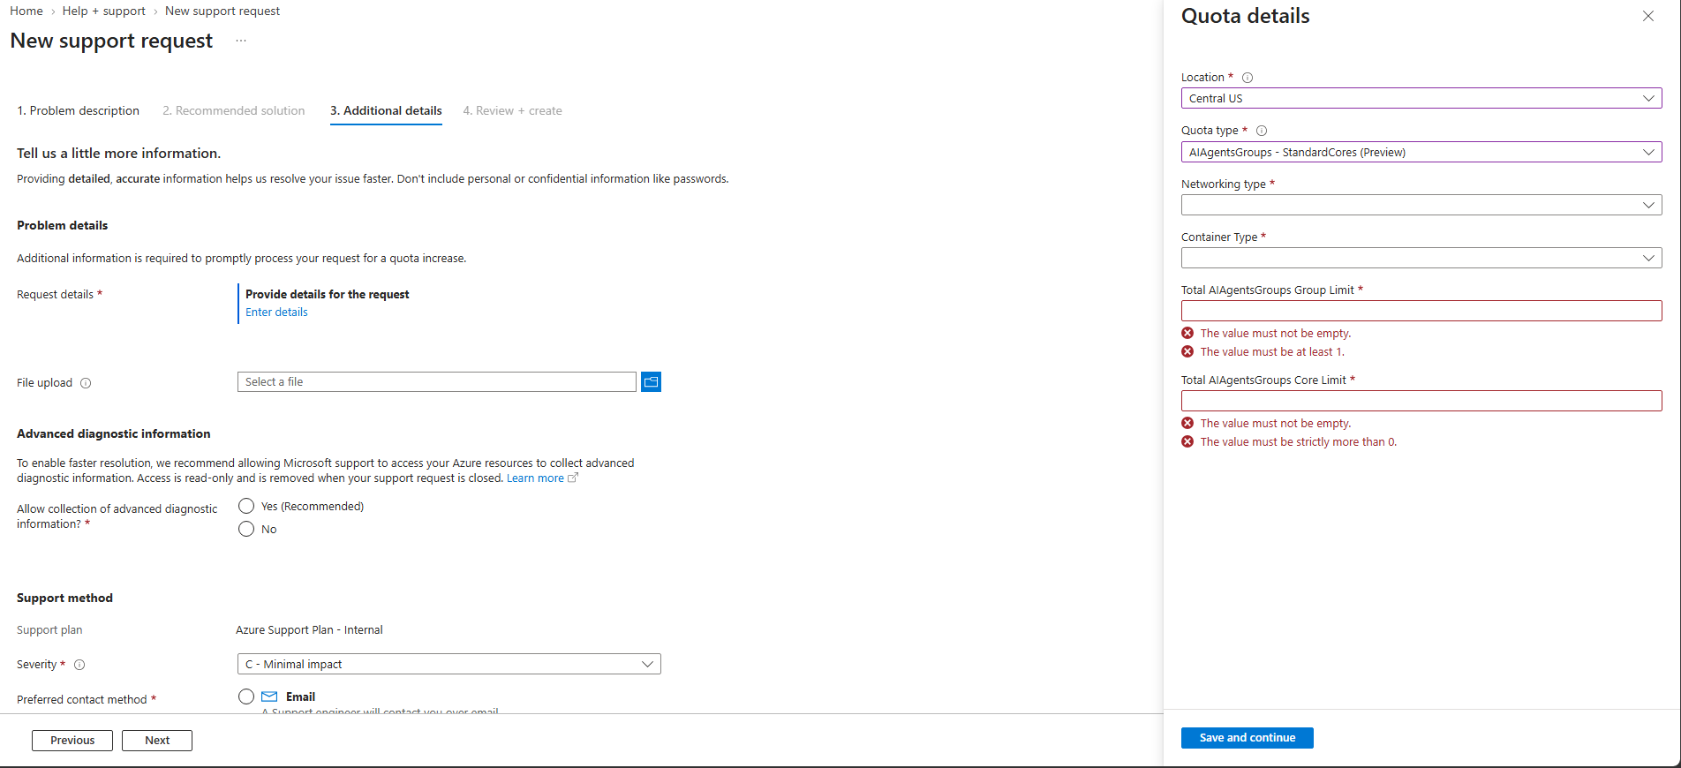
Open New support request in the Azure portal with Issue type set to Service and subscription limits (quotas) and Quota type set to Container Instances. Select your subscription, and go to the Additional details tab.
Select Enter details to open the Quota details pane. Choose your Location, select AIAgentsGroups - StandardCores (Preview) for Quota type, and fill in Networking type, Container Type, Total AIAgentsGroups Group Limit, and Total AIAgentsGroups Core Limit:
Submit the support request. After your quota request is approved, re-register the
Microsoft.ContainerInstanceresource provider so that your subscription picks up the newly enabled capabilities:az provider register --namespace Microsoft.ContainerInstance --wait
The Contributor, Azure Deployment Stack Owner, and Storage Blob Data Contributor roles assigned to the Compute Sandbox Groups service principal on your subscription, so that the service can provision the managed resource group and snapshot storage account in your subscription. To assign the roles, you need permission to create role assignments on the subscription, such as the Owner or User Access Administrator role. For instructions, see Authorize the Compute Sandbox Groups application.
The Contributor role, or another role with
Microsoft.ContainerInstance/AIAgentsGroups/*permissions, assigned to the account running the commands on the resource group of the AI agents group.Workload Manager provisions the AKS cluster in this procedure, so you don't need an existing cluster. The managed cluster must run Kubernetes version 1.35 or later.
You must create the resource group for the workload space in West Central US (
westcentralus).Ensure that your subscription has sufficient AKS, ACI, and networking quota for the selected region.
Ensure that you have permission to create resources and register resource providers and preview features. A subscription administrator with directory read access must approve and assign the application roles described in this procedure.
To capture and restore workload state, also meet the requirements for the optional Pod snapshot cluster extension (preview).
Install Azure CLI version 2.85.0 or later, PowerShell 7 or later, and
kubectl. Runaz --versionto find your CLI version andaz upgradeto upgrade. Run all commands for the selected path in the same PowerShell session. For more information, see Install Azure CLI.Install kubelogin for Microsoft Entra authentication to the managed AKS cluster.
Limitations
- The serverless sandbox runtime is available in Central US, North Central US, West US 2, East US 2, Australia East, Sweden Central, and West Central US.
- Container images must come from Microsoft Container Registry (
mcr.microsoft.com) or Azure Container Registry (*.azurecr.io). Direct pulls from other registries, including Docker Hub, are rejected by this preview runtime. - AKS Automatic isn't yet supported.
Prepare the Workload Manager environment
The following steps create billable Azure resources. Use a dedicated resource group and keep the deployment values unchanged throughout provisioning.
Install or update the Workload Manager CLI extension to preview version
1.0.0b1.az extension add --name workload-manager --version 1.0.0b1 ` --allow-preview true --upgradeVerify the installed version.
az extension show --name workload-manager --query version --output tsvSet your subscription ID, resource group name, and workload space name. The workload space name must contain 3 to 16 lowercase letters or digits.
$SUBSCRIPTION_ID = "<subscription-id>"
$RESOURCE_GROUP = "<new-resource-group-name>"
$SPACE_NAME = "<workload-space-name>"
$LOCATION = "<supported-region>"
$SUBSCRIPTION_SCOPE = "/subscriptions/$SUBSCRIPTION_ID"
$RESOURCE_GROUP_SCOPE = "$SUBSCRIPTION_SCOPE/resourceGroups/$RESOURCE_GROUP"
$WORKLOAD_SPACE_ID = "$RESOURCE_GROUP_SCOPE/providers/Microsoft.Compute/workloadSpaces/$SPACE_NAME"
$AKS_BINDING_NAME = "$SPACE_NAME-aks"
$ACI_BINDING_NAME = "$SPACE_NAME-aci"
$LINK_NAME = "$SPACE_NAME-link"
$AKS_BINDING_ID = "$WORKLOAD_SPACE_ID/runtimeBindings/$AKS_BINDING_NAME"
$ACI_BINDING_ID = "$WORKLOAD_SPACE_ID/runtimeBindings/$ACI_BINDING_NAME"
Register and select a regional ARM cloud profile. This profile routes ARM requests to
https://westcentralus.management.azure.com/. Azure CLI discovers the other endpoints automatically. If the profile is already registered, skip the registration command and select it.az cloud register ` --name WorkloadRP-WestCentralUS ` --endpoint-resource-manager "https://westcentralus.management.azure.com/"az cloud set --name WorkloadRP-WestCentralUSSign in to the selected cloud and set your subscription before registering features, assigning roles, or creating resources. Sign in again after changing cloud profiles; an existing AzureCloud session doesn't replace this step.
The
--subscriptionoption foraz loginrequires Azure CLI 2.85.0 or later, as specified in the prerequisites.az login --subscription "$SUBSCRIPTION_ID"Register the preview feature if it isn't already registered, and check its registration status.
az feature register --namespace Microsoft.Compute --name WorkloadManagerPreviewaz feature show --namespace Microsoft.Compute ` --name WorkloadManagerPreview --query properties.state --output tsvRepeat the
showcommand until it returnsRegistered. Don't continue until registration is complete.Create the resource group for the workload space and its managed resources.
az group create --name "$RESOURCE_GROUP" --location westcentralusRegister the required resource providers.
az provider register --namespace Microsoft.Compute --wait
az provider register --namespace Microsoft.ContainerService --wait
az provider register --namespace Microsoft.ContainerInstance --wait
az provider register --namespace Microsoft.Network --wait
az provider register --namespace Microsoft.ManagedIdentity --wait
az provider register --namespace Microsoft.KubernetesConfiguration --wait
Authorize the Workload Manager application
A subscription administrator must grant the Workload Manager application (032854b2-ba65-4dd6-bdd4-4e86b8756667) the following roles at the resource group scope. Azure CLI resolves the application to its service principal in the tenant you're signed in to.
Before assigning permissions to either application in this procedure, record any existing role assignments. For each newly created assignment, save the id returned by Azure CLI for cleanup. Don't remove preexisting or shared assignments during cleanup.
A repeated create command can return an existing assignment. Don't treat its returned ID as a newly created assignment.
The --assignee option requires a Microsoft Graph lookup. If token-protection Conditional Access blocks Microsoft Graph authentication, ask a directory administrator for each application's tenant-specific service principal Object ID from Enterprise applications in the Microsoft Entra admin center. This isn't the application ID shown above. Use --assignee-object-id together with --assignee-principal-type ServicePrincipal to avoid the Graph lookup without changing the required Azure permissions.
For example, use the following alternative for the Workload Manager Contributor grant. Use the same two assignee options for its other grants, preserving each role, scope, and condition.
az role assignment create `
  --assignee-object-id "<workload-manager-service-principal-object-id>" `
  --assignee-principal-type ServicePrincipal `
  --role "Contributor" `
  --scope "$RESOURCE_GROUP_SCOPE"
| Role | Purpose |
|---|---|
| Contributor | Creates and manages the Azure infrastructure. |
| Role Based Access Control Administrator | Creates and deletes role assignments, subject to the condition below. |
| Azure Kubernetes Service RBAC Cluster Admin | Configures Kubernetes resources on the managed cluster. |
Grant Contributor and Azure Kubernetes Service RBAC Cluster Admin at the resource group scope.
az role assignment create `
  --assignee "032854b2-ba65-4dd6-bdd4-4e86b8756667" `
  --role "Contributor" `
  --scope "$RESOURCE_GROUP_SCOPE"

az role assignment create `
  --assignee "032854b2-ba65-4dd6-bdd4-4e86b8756667" `
  --role "Azure Kubernetes Service RBAC Cluster Admin" `
  --scope "$RESOURCE_GROUP_SCOPE"
Define a condition that restricts write and delete operations on role assignments to service principals, including managed identities, and to these roles: Contributor, Network Contributor, and Azure Kubernetes Service Cluster Admin Role.
Normalize the condition to a single line before passing it to Azure CLI.
$ROLE_CONDITION = @'
(
  !(ActionMatches{'Microsoft.Authorization/roleAssignments/write'})
  OR (
    @Request[Microsoft.Authorization/roleAssignments:RoleDefinitionId] ForAnyOfAnyValues:GuidEquals {b24988ac-6180-42a0-ab88-20f7382dd24c, 4d97b98b-1d4f-4787-a291-c67834d212e7, 0ab0b1a8-8aac-4efd-b8c2-3ee1fb270be8}
    AND @Request[Microsoft.Authorization/roleAssignments:PrincipalType] ForAnyOfAnyValues:StringEqualsIgnoreCase {'ServicePrincipal'}
  )
) AND (
  !(ActionMatches{'Microsoft.Authorization/roleAssignments/delete'})
  OR (
    @Resource[Microsoft.Authorization/roleAssignments:RoleDefinitionId] ForAnyOfAnyValues:GuidEquals {b24988ac-6180-42a0-ab88-20f7382dd24c, 4d97b98b-1d4f-4787-a291-c67834d212e7, 0ab0b1a8-8aac-4efd-b8c2-3ee1fb270be8}
    AND @Resource[Microsoft.Authorization/roleAssignments:PrincipalType] ForAnyOfAnyValues:StringEqualsIgnoreCase {'ServicePrincipal'}
  )
)
'@
$ROLE_CONDITION = ($ROLE_CONDITION -replace '[\r\n]+', ' ').Trim()
Assign Role Based Access Control Administrator with that condition.
az role assignment create `
  --assignee "032854b2-ba65-4dd6-bdd4-4e86b8756667" `
  --role "Role Based Access Control Administrator" `
  --scope "$RESOURCE_GROUP_SCOPE" `
  --condition "$ROLE_CONDITION" `
  --condition-version 2.0
The condition limits this role assignment only. It doesn't restrict permissions granted through other assignments.
Authorize the Compute Sandbox Groups application
For this preview, grant the Compute Sandbox Groups service principal (application ID 1eeacc2b-ec4a-4b1e-977a-2b5fef2131c6) the Contributor, Azure Deployment Stack Owner, and Storage Blob Data Contributor roles at the subscription scope. These roles allow the service to provision the managed resource group and snapshot storage account in your subscription. To assign the roles, you need permission to create role assignments on the subscription, such as the Owner or User Access Administrator role.
Warning
Have your subscription administrator review and approve these subscription-wide grants before continuing. The resource-group condition assigned to Workload Manager doesn't limit this application's access.
As an authorized administrator, assign the three roles.
$SANDBOX_ROLES = @(
  "Contributor"
  "Azure Deployment Stack Owner"
  "Storage Blob Data Contributor"
)

foreach ($ROLE in $SANDBOX_ROLES) {
  az role assignment create `
    --assignee "1eeacc2b-ec4a-4b1e-977a-2b5fef2131c6" `
    --role "$ROLE" `
    --scope "$SUBSCRIPTION_SCOPE"
}
If Microsoft Graph authentication is blocked, replace the
az role assignment createcommand inside the loop with this alternative. Use the Compute Sandbox Groups service principal's tenant-specific Object ID, not its application ID.az role assignment create ` --assignee-object-id "<compute-sandbox-groups-service-principal-object-id>" ` --assignee-principal-type ServicePrincipal ` --role "$ROLE" ` --scope "$SUBSCRIPTION_SCOPE"Allow time for both applications' role assignments to propagate before creating the workload space and runtimes.
Create the workload space and bindings
Create the resources in the following order. Provisioning the AKS and ACI bindings can take several minutes. For each binding and link, repeat its show command until provisioningState is Succeeded before continuing. Each binding must also have a nonempty providerResourceId.
The Workload Manager CLI extension version 1.0.0b1 doesn't expose a separate readiness state in its show output. Provisioning success alone doesn't verify that workloads can run. Complete the controller and runtime checks in the following list before deploying workloads.
Create the workload space, which manages the lifecycle of the runtime composition.
az workload-manager workload-space create `
  --resource-group "$RESOURCE_GROUP" `
  --name "$SPACE_NAME" `
  --location "$LOCATION"
az workload-manager workload-space show ` --resource-group "$RESOURCE_GROUP" ` --name "$SPACE_NAME"Wait for the parent resource's
provisioningStateto beSucceededbefore creating the bindings.Create the managed AKS binding with the
Standardoffering.az workload-manager workload-space runtime-binding create ` --resource-group "$RESOURCE_GROUP" ` --space-name "$SPACE_NAME" ` --name "$AKS_BINDING_NAME" ` --location "$LOCATION" ` --kind Kubernetes ` --managed '{managed-profile:{offering:Standard}}'Check the AKS binding.
az workload-manager workload-space runtime-binding show `
  --resource-group "$RESOURCE_GROUP" `
  --space-name "$SPACE_NAME" `
  --name "$AKS_BINDING_NAME"
Create the managed ACI binding for the serverless sandbox runtime.
az workload-manager workload-space runtime-binding create `
  --resource-group "$RESOURCE_GROUP" `
  --space-name "$SPACE_NAME" `
  --name "$ACI_BINDING_NAME" `
  --location "$LOCATION" `
  --kind ServerlessContainers `
  --managed '{managed-profile:{provider:ACI}}'
Check the ACI binding.
az workload-manager workload-space runtime-binding show `
  --resource-group "$RESOURCE_GROUP" `
  --space-name "$SPACE_NAME" `
  --name "$ACI_BINDING_NAME"
Check the underlying AKS and ACI resources before creating the runtime link. A binding can report
Succeededbefore its provider resource is ready.foreach ($BINDING_NAME in @($AKS_BINDING_NAME, $ACI_BINDING_NAME)) { $PROVIDER_RESOURCE_ID = az workload-manager workload-space runtime-binding show ` --resource-group "$RESOURCE_GROUP" ` --space-name "$SPACE_NAME" ` --name "$BINDING_NAME" ` --query properties.providerResourceId --output tsv if ($LASTEXITCODE -ne 0 -or [string]::IsNullOrWhiteSpace($PROVIDER_RESOURCE_ID)) { throw "Couldn't resolve the provider resource for $BINDING_NAME." } az resource show --ids "$PROVIDER_RESOURCE_ID" ` --query '{name:name,state:properties.provisioningState}' }Repeat the checks until both resources report
Succeeded. If either resource reportsFailed, resolve its provisioning error before continuing.Link the AKS orchestrator to the serverless sandbox runtime by using the bindings' full resource IDs.
az workload-manager workload-space runtime-link create `
  --resource-group "$RESOURCE_GROUP" `
  --space-name "$SPACE_NAME" `
  --name "$LINK_NAME" `
  --location "$LOCATION" `
  --orchestrator-binding "$AKS_BINDING_ID" `
  --execution-binding "$ACI_BINDING_ID"
If creation returns
ProviderNotReady, repeat the provider-resource checks, allow time for readiness to propagate, and retry the same create command. Don't recreate the workload space or bindings. Check that the runtime link reachesSucceededbefore enabling Agent Sandbox.az workload-manager workload-space runtime-link show ` --resource-group "$RESOURCE_GROUP" ` --space-name "$SPACE_NAME" ` --name "$LINK_NAME"Resolve the managed AKS cluster for the controller and workload checks.
$AKS_RESOURCE_ID = az workload-manager workload-space runtime-binding show `
  --resource-group "$RESOURCE_GROUP" `
  --space-name "$SPACE_NAME" `
  --name "$AKS_BINDING_NAME" `
  --query properties.providerResourceId `
  --output tsv

if ([string]::IsNullOrWhiteSpace($AKS_RESOURCE_ID)) {
  throw "The AKS binding hasn't returned a providerResourceId. Wait for provisioning to complete and try again."
}
$AKS_RESOURCE_PARTS = $AKS_RESOURCE_ID.Trim('/').Split('/') if ($AKS_RESOURCE_PARTS.Length -ne 8 -or $AKS_RESOURCE_PARTS[2] -ne 'resourceGroups' -or $AKS_RESOURCE_PARTS[5] -ne 'Microsoft.ContainerService' -or $AKS_RESOURCE_PARTS[6] -ne 'managedClusters') { throw "The AKS binding hasn't returned a managed cluster resource ID." } $AKS_CLUSTER = az aks show ` --resource-group "$($AKS_RESOURCE_PARTS[3])" ` --name "$($AKS_RESOURCE_PARTS[7])" ` --query '{name:name,resourceGroup:resourceGroup,kubernetesVersion:kubernetesVersion}' ` --output json | ConvertFrom-Json if ($LASTEXITCODE -ne 0 -or $null -eq $AKS_CLUSTER) { throw "Couldn't read the managed AKS cluster. Check binding provisioning and your access." } $CLUSTER_NAME = $AKS_CLUSTER.name $AKS_RESOURCE_GROUP = $AKS_CLUSTER.resourceGroup $AKS_CLUSTERConfirm that
kubernetesVersionis 1.35 or later. KeepRESOURCE_GROUPunchanged: it identifies the workload space's resource group, which can differ fromAKS_RESOURCE_GROUP.Grant the walkthrough user Kubernetes administrator access if they don't already have it. Workload Manager's application role assignments don't grant your account access to Kubernetes resources. For a cluster that uses Azure RBAC, an authorized administrator can assign Azure Kubernetes Service RBAC Cluster Admin at the cluster scope. These commands assign the role to the signed-in user.
If Microsoft Graph authentication is blocked, replace the
az ad signed-in-user showassignment with$USER_OBJECT_ID = "<user-object-id>", using the user Object ID supplied by your directory administrator.$USER_OBJECT_ID = az ad signed-in-user show --query id --output tsv if ($LASTEXITCODE -ne 0 -or [string]::IsNullOrWhiteSpace($USER_OBJECT_ID)) { throw "Couldn't resolve the signed-in user." } az role assignment create ` --assignee-object-id "$USER_OBJECT_ID" ` --assignee-principal-type User ` --role "Azure Kubernetes Service RBAC Cluster Admin" ` --scope "$AKS_RESOURCE_ID"Record the assignment ID if you create it for this walkthrough. Allow time for role propagation before running Kubernetes commands. Getting cluster credentials alone doesn't grant Kubernetes access.
Enable Agent Sandbox through the cluster extension
Install the extension directly on the AKS cluster. Use Agent Sandbox extension version 1.0.7 or later. The create command doesn't pin a version and uses the service-offered version with automatic upgrades enabled by default.
Install or update the cluster extension CLI.
az extension add --name k8s-extension --upgradeCreate the extension on the managed AKS cluster.
az k8s-extension create `
  --resource-group "$AKS_RESOURCE_GROUP" `
  --cluster-name "$CLUSTER_NAME" `
  --cluster-type managedClusters `
  --name agent-sandbox `
  --extension-type Microsoft.AgentSandbox
Check the extension's provisioning state and installed version.
az k8s-extension show `
  --resource-group "$AKS_RESOURCE_GROUP" `
  --cluster-name "$CLUSTER_NAME" `
  --cluster-type managedClusters `
  --name agent-sandbox `
  --query '{type:extensionType,state:provisioningState,version:currentVersion}'
Continue only after
stateisSucceededandversionis1.0.7or later. A successful installation of an older version doesn't meet this requirement.
Connect to the managed AKS cluster
Complete these steps after installing the extension and before running any workload commands.
Get credentials and select a context for the managed cluster.
$KUBE_CONTEXT = "$SUBSCRIPTION_ID-$SPACE_NAME"
az aks get-credentials `
  --resource-group "$AKS_RESOURCE_GROUP" `
  --name "$CLUSTER_NAME" `
  --context "$KUBE_CONTEXT" `
  --overwrite-existing

if ($LASTEXITCODE -ne 0) {
  throw "Couldn't get cluster credentials. Check the cluster and your access before continuing."
}

kubectl config use-context "$KUBE_CONTEXT"
Configure Kubernetes authentication to use your current Azure CLI sign-in instead of starting a separate device-code sign-in.
kubelogin convert-kubeconfig --login azurecliVerify connectivity, wait for the controller, and check the Sandbox API and runtime.
kubectl cluster-infokubectl -n agent-sandbox-system rollout status ` deployment/agent-sandbox-controller --timeout=5mkubectl get crd sandboxes.agents.x-k8s.io ` -o jsonpath='{.spec.versions[?(@.served==true)].name}'kubectl get runtimeclass virtualnode2 -o yamlContinue only after the controller rollout succeeds, the served API versions include
v1beta1, and thevirtualnode2RuntimeClass exists. If any check fails, resolve the installation or runtime configuration before creating a Sandbox.
Run an isolated AI agent workload
Create a namespace for the example.
kubectl create namespace agent-demoCreate a file named
agent-sandbox.yamlwith the following manifest. Replace<agent-container-image>with your workload image. Adjust resource requests and limits for your workload.apiVersion: agents.x-k8s.io/v1beta1 kind: Sandbox metadata: name: agent-demo namespace: agent-demo spec: podTemplate: metadata: labels: app: agent-demo spec: enableServiceLinks: false runtimeClassName: virtualnode2 containers: - name: agent image: <agent-container-image> resources: requests: cpu: 250m memory: 512Mi limits: cpu: "1" memory: 1GiApply the manifest.
kubectl apply -f agent-sandbox.yamlWait for the Sandbox and its backing pod to become Ready before you inspect the pod's placement.
kubectl -n agent-demo wait --for=condition=Ready `
  sandbox/agent-demo --timeout=5m
kubectl -n agent-demo wait --for=condition=Ready pod ` --selector app=agent-demo --timeout=5mkubectl -n agent-demo get pods --selector app=agent-demo -o wideCheck that
RUNTIMEisvirtualnode2andNODEshows the assigned node.kubectl -n agent-demo get pods -l app=agent-demo ` -o custom-columns=NAME:.metadata.name,RUNTIME:.spec.runtimeClassName,NODE:.spec.nodeNamePod readiness alone doesn't prove that the workload completed initialization. Check your application's health endpoint or logs as appropriate.
Configure a warm pool
This section is optional. Your standalone Sandbox is ready to use after you complete the preceding verification steps. Configure a warm pool if you need environments available before new agent sessions start.
A warm pool keeps Sandboxes running before an agent requests them, reducing the need to wait for a new environment to start. A SandboxTemplate defines the environment, a SandboxWarmPool maintains the available reserve, and a SandboxClaim requests a Sandbox from that pool. These resources must be in the same namespace.
This example uses the agent-demo namespace created earlier and maintains two available Sandboxes. Warm Sandboxes consume compute resources even when no agent is using them. Plan capacity for the reserve, claimed Sandboxes, and any standalone Sandboxes you created earlier. A warm pool doesn't require the Pod snapshot cluster extension.
Check warm-pool API availability
Confirm that the extension installed all three resource definitions.
kubectl get crd `
  sandboxtemplates.extensions.agents.x-k8s.io `
  sandboxwarmpools.extensions.agents.x-k8s.io `
  sandboxclaims.extensions.agents.x-k8s.io
Verify the API version and claim field used by this example.
kubectl api-resources --api-group=extensions.agents.x-k8s.iokubectl explain sandboxclaims.spec.warmPoolRef ` --api-version=extensions.agents.x-k8s.io/v1beta1Continue only if all three resources serve
extensions.agents.x-k8s.io/v1beta1and the claim supportswarmPoolRef. If a resource or field is missing, check the supported extension version before continuing. Don't install upstream controllers over the managed extension.
Create a template and warm pool
Create
agent-warm-pool.yamlfrom the following template. Replace<agent-container-image>with your long-running agent service image and adjust resource requests and limits for your workload.Important
Before applying this template, add a container
readinessProbethat checks whether your application finishes initialization and can accept work. The probe is application-specific and isn't included in this template. Without it, the pool can report an environment as Ready before the application is usable.apiVersion: extensions.agents.x-k8s.io/v1beta1 kind: SandboxTemplate metadata: name: agent-template namespace: agent-demo spec: podTemplate: metadata: labels: app: agent-warm-pool spec: enableServiceLinks: false runtimeClassName: virtualnode2 containers: - name: agent image: <agent-container-image> resources: requests: cpu: 250m memory: 512Mi limits: cpu: "1" memory: 1Gi --- apiVersion: extensions.agents.x-k8s.io/v1beta1 kind: SandboxWarmPool metadata: name: agent-warm-pool namespace: agent-demo spec: replicas: 2 sandboxTemplateRef: name: agent-templateApply the template and pool.
kubectl apply -f agent-warm-pool.yamlWait until two Sandboxes are Ready, then inspect the pool and its pods.
kubectl -n agent-demo wait `
  --for=jsonpath='{.status.readyReplicas}'=2 `
  sandboxwarmpool/agent-warm-pool --timeout=10m
kubectl -n agent-demo get sandboxwarmpool agent-warm-poolkubectl -n agent-demo get pods ` --selector app=agent-warm-pool -o wideConfirm that the pool reports two ready sandboxes. The pod output shows their assigned nodes and current status. It doesn't verify the nodes' runtime configuration.
Claim a Sandbox
Create a separate claim for each agent session. A claim takes ownership of an available Sandbox, and the pool creates a replacement to restore its reserve. The pool's replica count doesn't limit the total number of claimed Sandboxes.
Create
agent-sandbox-claim.yamlwith the following content.apiVersion: extensions.agents.x-k8s.io/v1beta1 kind: SandboxClaim metadata: name: agent-session namespace: agent-demo spec: warmPoolRef: name: agent-warm-poolApply the claim and wait for it to become Ready.
kubectl apply -f agent-sandbox-claim.yamlkubectl -n agent-demo wait --for=condition=Ready ` sandboxclaim/agent-session --timeout=10mGet the assigned Sandbox name and inspect its status.
$CLAIMED_SANDBOX = kubectl -n agent-demo get `
  sandboxclaim agent-session -o jsonpath='{.status.sandbox.name}'
kubectl -n agent-demo get sandbox "$CLAIMED_SANDBOX" -o yamlUse your application's health endpoint or logs to verify that the assigned environment is usable. To check that the pool replenishes its reserve, repeat the pool readiness check after the claim completes.
When the session ends, delete its claim and the owned Sandbox resources.
kubectl -n agent-demo delete sandboxclaim agent-session `
  --cascade=foreground --wait=true --timeout=5m
Deleting the claim doesn't return the used Sandbox to the pool. The pool maintains its reserve with separate Sandboxes. Save any application data you need before deleting the claim.
Change warm-pool capacity
To maintain three available Sandboxes instead of two, scale the pool:
kubectl -n agent-demo scale sandboxwarmpool agent-warm-pool --replicas=3
kubectl -n agent-demo wait `
  --for=jsonpath='{.status.readyReplicas}'=3 `
  sandboxwarmpool/agent-warm-pool --timeout=10m
Also update spec.replicas in agent-warm-pool.yaml so reapplying the file doesn't reset the capacity. Scaling the pool changes the unclaimed reserve, not Sandboxes already assigned to claims. Pool pods remain running and consume resources until you scale down or delete the pool.
Restore a Sandbox from a pod snapshot
This section is optional. Use snapshot restore to resume captured workload state instead of starting a new environment. It doesn't require a warm pool.
You can install the Pod snapshot cluster extension and Agent Sandbox in either order. The Pod snapshot manager detects the Sandbox API when it becomes available, including after the manager starts, without requiring a restart.
When following the Pod snapshot article, reuse this workload space and its deployment values. Don't create another workload space, new bindings, or a new runtime link. Install Pod snapshot directly on the managed AKS cluster identified earlier.
The serverless sandbox runtime supports only explicit restore. Specify the name of the snapshot to restore. Creating a Sandbox without restore intent starts a new workload normally. Follow the serverless runtime instructions in the Pod snapshot article to create a Ready snapshot, authorize the Agent Sandbox controller, and verify restored application state.
For an explicit restore, add the following fields under spec.podTemplate.metadata:
labels:
  podsnapshot.aks.azure.com/restore: "true"
annotations:
  podsnapshot.aks.azure.com/restore-from: <snapshot-name>
The snapshot must be in the Sandbox's namespace. Keep the source and restore container identities and resource sizing compatible. Don't set runtime-private restore annotations or snapshot paths yourself.
Clean up resources
Keep the extension controllers and serverless runtime running until you delete their workloads and dependent resources. If you configured scheduled snapshots, stop scheduled captures and wait for active captures to finish before deleting workloads. If a cleanup command fails or times out, resolve the failure before continuing. Don't remove finalizers to force cleanup.
Run these commands in the same PowerShell session and Kubernetes context used for setup. If you return in a new shell, restore the deployment values and reconnect to the managed AKS cluster first.
If you used both articles, perform their workload and snapshot cleanup before uninstalling either extension. Stop scheduled captures first, remove warm pools and Sandbox consumers in both example namespaces, and then delete snapshots. Uninstall both extensions before deleting the workload space once.
If you configured the warm-pool example, delete the pool first to stop replenishment. Then delete its example claim and template. Delete any additional claims you created for other sessions. Foreground deletion waits for owned resources to be removed.
kubectl -n agent-demo delete sandboxwarmpool agent-warm-pool `
  --ignore-not-found --cascade=foreground --wait=true --timeout=5m
kubectl -n agent-demo delete sandboxclaim agent-session ` --ignore-not-found --cascade=foreground --wait=true --timeout=5mkubectl -n agent-demo delete sandboxtemplate agent-template ` --ignore-not-found --wait=true --timeout=5mDelete the example Sandbox while its controller is still running.
kubectl -n agent-demo delete sandbox agent-demo `
  --ignore-not-found --cascade=foreground --wait=true --timeout=10m
Foreground deletion waits for dependent resources. If deletion times out, inspect the remaining pods, namespace events, and controller logs. ACI runtime errors can delay pod termination. Keep both controllers and the runtime running while you resolve the error and retry deletion. Don't force-delete pods or remove finalizers.
Confirm that no example pods remain. If you captured snapshots, complete the serverless runtime cleanup in the Pod snapshot article before deleting the namespace or uninstalling either extension. Include any snapshots, triggers, and policies you created in
agent-demo, not just theaci-workload-demonamespace used by that article. Keep the workload space and runtime resources until both cleanup procedures are complete.kubectl -n agent-demo get podsIf example pods are still terminating, wait for their deletion before continuing. If a pod isn't terminating, investigate its owner and delete the example workload that owns it.
kubectl -n agent-demo wait --for=delete pods --all --timeout=10mContinue only when the example pods and any associated snapshots are deleted. Delete the dedicated example namespace if it contains no resources you need to keep.
kubectl delete namespace agent-demo `
  --ignore-not-found --wait=true --timeout=10m
If no Sandboxes, warm pools, or claims in any namespace depend on Agent Sandbox, delete the
agent-sandboxcluster extension instance. Finish removing snapshot-backed Sandboxes while both controllers are still running.az k8s-extension delete ` --resource-group "$AKS_RESOURCE_GROUP" ` --cluster-name "$CLUSTER_NAME" ` --cluster-type managedClusters ` --name agent-sandbox ` --yesVerify that
agent-sandboxis no longer listed.az k8s-extension list ` --resource-group "$AKS_RESOURCE_GROUP" ` --cluster-name "$CLUSTER_NAME" ` --cluster-type managedClusters ` --query '[].{name:name,state:provisioningState}' --output tableDelete the workload space and its owned resources only if you created it solely for this walkthrough and no workloads need it.
Uninstalling Agent Sandbox doesn't delete the AKS cluster or ACI runtime resources; they can continue to incur charges. If you installed Pod snapshot, finish deleting its workloads, snapshots, and extension before deleting the workload space. Workload-space deletion removes its owned AKS and ACI resources and can permanently delete workload data. The resource group and both applications' prerequisite role assignments remain. Don't delete a shared workload space or resource group.
Record the AKS managed node resource group's name before deleting the workload space.
$NODE_RESOURCE_GROUP = az aks show `
  --subscription "$SUBSCRIPTION_ID" `
  --resource-group "$AKS_RESOURCE_GROUP" `
  --name "$CLUSTER_NAME" `
  --query nodeResourceGroup --output tsv
if ([string]::IsNullOrWhiteSpace($NODE_RESOURCE_GROUP)) {
  throw "Couldn't retrieve the AKS managed node resource group."
}
az workload-manager workload-space delete ` --resource-group "$RESOURCE_GROUP" ` --name "$SPACE_NAME" ` --yesWait for deletion to finish. Verify that the workload space no longer exists and that its owned AKS and ACI resources no longer appear in their resource groups. Investigate any remaining managed resources before considering infrastructure cleanup complete.
Switch back to the standard Azure cloud profile when you finish using the regional endpoint. This step doesn't delete any resources.
az cloud set --name AzureCloudOptionally, delete the resource group only if you created it solely for this walkthrough and it contains no resources you need to keep.
Complete workload and snapshot cleanup first. Keep the prerequisite application grants until infrastructure deletion finishes, including when resource-group deletion is used to recover a failed workload-space deletion.
Verify that both the dedicated resource group and the managed node resource group are gone before considering cleanup complete.
az group delete `
  --subscription "$SUBSCRIPTION_ID" `
  --name "$RESOURCE_GROUP" `
  --yes
Verify that the command returns
false.az group exists ` --subscription "$SUBSCRIPTION_ID" ` --name "$RESOURCE_GROUP"Verify that the managed node resource group check also returns
false.az group exists ` --subscription "$SUBSCRIPTION_ID" ` --name "$NODE_RESOURCE_GROUP"After infrastructure cleanup, have your subscription administrator review the application role assignments created for this walkthrough. Remove an assignment only if it still exists, you created it during this walkthrough, and no other workload space or service needs it. Don't remove preexisting or shared assignments.
Subscription-scoped grants can be shared across teams' resource groups. Deleting your workload space or resource group doesn't mean those grants are unused.
Use the assignment's
idfrom the correspondingaz role assignment createoutput. Repeat for each assignment approved for removal.az role assignment delete ` --ids "<role-assignment-resource-id-created-for-this-walkthrough>"