Note
Access to this page requires authorization. You can try signing in or changing directories.
Access to this page requires authorization. You can try changing directories.
The Pod snapshot cluster extension captures the runtime state of a pod that uses Pod sandboxing with the Kata runtime on Azure Kubernetes Service (AKS). This runtime uses Azure Blob storage and supports explicit or implicit snapshot selection.
The Pod snapshot cluster extension captures the runtime state of a pod that uses the Serverless sandbox runtime powered by Azure Container Instances (ACI) on Azure Kubernetes Service (AKS). This runtime provides managed snapshot storage and supports explicit snapshot selection only.
Note
For pricing details, see Azure Container Instances pricing.
Restore that state to a new pod to resume processes without repeating initialization. Restore doesn't recreate the original Kubernetes Pod object. Use snapshots for workloads with costly initialization, including AI agents, isolated business application sessions, development environments, and workers that load large in-memory datasets.
You can restore Pods independently of the Agent Sandbox cluster extension (preview) or use both extensions to restore Sandbox workloads.
This article walks through installation, capture, and restore using your own workload. Adapt the manifests to your application's runtime requirements. Optional sections cover Sandbox restore and scheduled snapshots. Compare end-to-end restore time with cold-start time to assess startup improvements. Your application or orchestration layer still manages workload creation and idle shutdown.
Important
Each Pod snapshot extension installation supports only one runtime on an AKS cluster. Select a runtime and provisioning method for the installation and verification steps.
Important
AKS preview features are available on a self-service, opt-in basis. Previews are provided "as is" and "as available," and they're excluded from the service-level agreements and limited warranty. AKS previews are partially covered by customer support on a best-effort basis. As such, these features aren't meant for production use. For more information, see the following support articles:
Prerequisites
Use an AKS cluster running Kubernetes version 1.35 or later with Pod sandboxing enabled and Kata VM isolation v2 configured. A cluster without Pod sandboxing isn't sufficient. For general background, see Pod sandboxing and Pod sandboxing considerations. Verify Kata v2 support by following the checks in this article before installing the extension.
A Bash environment with Azure CLI version 2.85.0 or later,
kubectl, andenvsubstinstalled. Theenvsubstcommand is provided by GNU gettext. Use Azure Cloud Shell in Bash mode or a local Bash environment on Linux, macOS, or Windows Subsystem for Linux (WSL).Kata VM isolation v2 runtime supports only v6 VM SKUs in these families: Dasv6, Dadsv6, Dalsv6, Daldsv6, Easv6, Eadsv6, Falsv6, Fasv6, and Famsv6. To request quota for your AKS cluster, follow the AKS quota request guidance.
Two Ready nodes with the same supported VM SKU for this walkthrough. Restore requires the exact source VM SKU.
An available system node pool for the snapshot access broker. The snapshot access broker is a component that the pod snapshot cluster extension runs in the
pod-snapshot-systemnamespace. It authenticates to Azure Blob Storage by using workload identity and gives node workers short-lived access scoped to their operations.Permission to create the storage account, managed identity, and cluster extension; assign Azure roles; and manage the Kubernetes resources and restore permissions in the example namespace.
An AKS OIDC issuer and Microsoft Entra Workload ID enabled for the broker's workload identity. For an existing cluster, follow Enable OIDC issuer and Microsoft Entra Workload ID on an AKS cluster and select Update an existing AKS cluster before continuing.
For the optional Sandbox restore example, install the Agent Sandbox cluster extension (preview) and wait for its controller to become Ready before creating Sandbox workloads. You can install the two extensions in either order.
The
k8s-extensionAzure CLI extension installed. Install or update it withaz extension add --name k8s-extension --upgrade.The
Microsoft.KubernetesConfiguration,Microsoft.Storage, andMicrosoft.ManagedIdentityresource providers registered in your subscription.
Limitations
- Use a region that has both AKS release
1025(see the AKS Release Tracker) and Azure Linux node image202610.30.1or newer (see the Azure Linux Node Images Release Tracker). - Source and destination VM SKUs must match exactly. The examples don't establish support for restore across architectures, regions, or unqualified runtime versions.
- Snapshot and restore are validated with Kata guests configured with up to 32 GiB of memory.
- Restore uses the standard 32 MiB memory overhead of the kata-vm-isolation-v2 RuntimeClass.
- To snapshot an already restored pod, don't specify limits in the pod that's being snapshotted.
- You can capture and restore regular containers and completed one-shot init containers. Incomplete init containers, native sidecars with
restartPolicy: Always, and ephemeral containers aren't supported. - Snapshots capture one pod's runtime state. They aren't application-consistent backups of a distributed service or replacements for persistent-volume backups.
- External network sessions, remote leases, and external service state require application-specific validation after restore.
- Container identity must be compatible with the selected snapshot. Keep source and restore resource sizing aligned and
enableServiceLinks: falseon both. - Azure Blob storage configurations must use the account configured for the broker. Node-local files are staging copies, not durable storage.
- Restore requires explicit Kubernetes authorization in addition to permission to create the workload.
- Restoring through Deployments, ReplicaSets, and Jobs isn't supported in this preview. Create a raw Pod or use the Agent Sandbox restore workflow instead.
- Don't edit internal snapshot provenance, inject runtime-private restore paths, or disable the restore admission guards to make an incompatible workload start.
- When you use the Agent Sandbox and Pod snapshot cluster extensions together, you can suspend and resume the same Sandbox. This preview doesn't support restoring a single snapshot to multiple independent Sandboxes, including those in a snapshot-backed warm pool.
- AKS Automatic isn't supported yet.
How snapshot and restore work
The extension uses the following Kubernetes resources:
| Resource | Purpose |
|---|---|
| PodSnapshotStorageConfig | Defines the snapshot storage backend. This resource is cluster-scoped. |
| PodSnapshotPolicy | Selects eligible pods and defines capture and retention behavior in a namespace. |
| PodSnapshotManualTrigger | Requests a capture of a specific pod under a named policy. |
| PodSnapshot | Records the resulting snapshot, its source identity, and readiness. |
For Pod sandboxing and Kata VM isolation v2, the node worker captures the sandbox state and uploads it to Azure Blob storage. The snapshot access broker is a component that the extension runs in the pod-snapshot-system namespace. It authenticates by using workload identity and gives node workers short-lived access scoped to their operations.
On restore, admission resolves a snapshot, authorizes the caller, validates the workload, and selects a node with the exact source VM SKU. The extension stages the snapshot on that node before allowing the pod to start. If restore authorization or compatibility checks fail, the request is rejected. A staging failure leaves the pod gated rather than silently starting a fresh workload.
Warning
Snapshots contain captured workload state, which can include credentials and other sensitive data in memory. Restrict access to the storage account and snapshot restore permissions. Restoring process memory doesn't guarantee that external connections, remote leases, or distributed application state remain valid.
Prepare your environment
Use an existing compatible cluster or create one with the optional commands in this section. For general background, see Pod sandboxing. This walkthrough requires Kata VM isolation v2, not the earlier kata-vm-isolation runtime described in that article. The commands depend on Kata v2 availability in your region; complete the runtime verification steps in the next section before installing the extension. Installing the Pod snapshot cluster extension doesn't enable Pod sandboxing or configure the node runtime.
Run all commands in this article in the same Bash session so exported variables remain available for later commands and manifest substitution.
Select your subscription.
az account set --subscription "<subscription-name-or-id>"Set values for your cluster, its Kata node pool, and the resources this article creates. For a new cluster, choose an unused cluster name and set
NODEPOOL_NAMEtokatapool. For an existing cluster, use its Kata node pool name. Use a globally unique storage account name containing 3-24 lowercase letters and digits. Replace the image placeholder with your workload's digest-pinned image reference.export RESOURCE_GROUP="<resource-group-name>" export CLUSTER_NAME="<aks-cluster-name>" export LOCATION="<supported-azure-region>" export NODEPOOL_NAME="katapool" export STORAGE_ACCOUNT="<unique-storage-account-name>" export STORAGE_CONTAINER="pod-snapshots" export BROKER_IDENTITY="pod-snapshot-broker-demo" export WORKLOAD_IMAGE="<your-container-image>@sha256:<image-digest>"Use an image that your Kata nodes can pull, and configure image pull credentials if required. Use the same immutable image reference throughout capture and restore. Your workload doesn't need a specific HTTP endpoint to use Pod snapshot.
If you already have a compatible cluster, skip the next three steps.
For a new cluster, create a resource group in
$LOCATION. Use a region with AKS release1025and Azure Linux node image202610.30.1or newer, as described in the limitations. Confirm thatStandard_D4as_v6is available and that your subscription has sufficient quota in that region.az group create --name "$RESOURCE_GROUP" --location "$LOCATION"Create a cluster with Kubernetes 1.35, Azure Linux, an OIDC issuer, and workload identity enabled. Keep the system node pool separate from the Kata pool so the snapshot access broker has eligible nodes.
az aks create \
  --resource-group "$RESOURCE_GROUP" \
  --name "$CLUSTER_NAME" \
  --location "$LOCATION" \
  --kubernetes-version 1.35 \
  --os-sku AzureLinux \
  --nodepool-name systempool \
  --node-vm-size Standard_D4as_v6 \
  --node-count 2 \
  --network-plugin azure \
  --network-plugin-mode overlay \
  --enable-managed-identity \
  --enable-oidc-issuer \
  --enable-workload-identity \
  --generate-ssh-keys
Add a User node pool with Pod sandboxing enabled. The two nodes use the same supported v6 VM SKU,
Standard_D4as_v6. Restore requires the exact source VM SKU. Alternatively, pod sandboxing supports v6 VM SKUs in these families: Dasv6, Dadsv6, Dalsv6, Daldsv6, Easv6, Eadsv6, Falsv6, Fasv6, and Famsv6.az aks nodepool add \ --resource-group "$RESOURCE_GROUP" \ --cluster-name "$CLUSTER_NAME" \ --name "$NODEPOOL_NAME" \ --mode User \ --os-sku AzureLinux \ --workload-runtime KataVmIsolation \ --node-vm-size Standard_D4as_v6 \ --node-count 2Reconcile the cluster configuration so AKS recognizes the new pool's workload runtime.
az aks update \
  --resource-group "$RESOURCE_GROUP" \
  --name "$CLUSTER_NAME"
These commands create cluster capacity but don't establish that Kata v2 is configured. Complete the node-image, RuntimeClass, capability-label, and readiness checks that follow before installing the extension.
Install or update the
k8s-extensionAzure CLI extension.az extension add --name k8s-extension --upgradeGet credentials for your cluster.
az aks get-credentials \
  --resource-group "$RESOURCE_GROUP" \
  --name "$CLUSTER_NAME"
Verify the Pod sandboxing node pool's workload runtime, OS SKU, and VM size.
az aks nodepool show \
  --cluster-name "$CLUSTER_NAME" \
  --resource-group "$RESOURCE_GROUP" \
  --name "$NODEPOOL_NAME" \
  --query "{workloadRuntime:workloadRuntime,osSKU:not_null(osSku,osSKU),vmSize:vmSize}" \
  --output table
The output must show
KataVmIsolationandAzureLinux. Confirm that the VM size meets the Kata VM isolation v2 prerequisites. These properties alone don't distinguish Kata VM isolation v2 from the earlier Kata runtime.Verify the RuntimeClass handler and confirm that every node in the pool supports Kata v2 before waiting for readiness.
kubectl get runtimeclass kata-vm-isolation-v2 \
  -o jsonpath='{.handler}{"\n"}'
Continue only if the handler is
kata-v2.List nodes in your pool that carry the capability label required by the RuntimeClass.
kubectl get nodes \
  --selector "kubernetes.azure.com/kata-vm-isolation-v2=true,agentpool=$NODEPOOL_NAME"
Get the configured pool size and the number of matching nodes.
az aks nodepool show \
  --resource-group "$RESOURCE_GROUP" \
  --cluster-name "$CLUSTER_NAME" \
  --name "$NODEPOOL_NAME" \
  --query count --output tsv
kubectl get nodes \ --selector "kubernetes.azure.com/kata-vm-isolation-v2=true,agentpool=$NODEPOOL_NAME" \ -o go-template='{{len .items}}{{"\n"}}'Continue only if the matching node count equals the configured pool size and is at least
2for this walkthrough. If the pool is scaling or upgrading, wait for the operation to finish and repeat the count checks.A node pool created before Kata VM isolation v2 was available must be recreated after Kata v2 becomes available in the region. Its existing nodes can be Ready without carrying
kubernetes.azure.com/kata-vm-isolation-v2=true, leaving Kata v2 pods Pending because they don't match the RuntimeClass's node affinity. Create a replacement pool with a distinct name by using the pool creation and reconciliation commands in the previous steps, then repeat the runtime checks. Don't manually add the capability label to unsupported nodes.kubectl wait --for=condition=Ready node \ --selector "kubernetes.azure.com/kata-vm-isolation-v2=true,agentpool=$NODEPOOL_NAME" \ --timeout=5mIf the counts don't match, no nodes match, or the wait times out, complete the Kata VM isolation v2 setup before installing the Pod snapshot cluster extension.
Check the Kata nodes' VM SKUs and node image against the snapshot prerequisites.
kubectl get nodes -L node.kubernetes.io/instance-typeaz aks nodepool show \ --resource-group "$RESOURCE_GROUP" \ --cluster-name "$CLUSTER_NAME" \ --name "$NODEPOOL_NAME" \ --query nodeImageVersion -o tsvDon't continue if the nodes, handler, or image don't meet the prerequisites. Don't modify the managed host or guest runtime to bypass a failed check.
Configure Blob storage and workload identity
Create a dedicated storage account and identity for this example. The broker uses that identity to access the account. Each storage configuration must name the account configured for the broker.
Create a storage account with shared-key authentication and public Blob access disabled.
az storage account create \
  --resource-group "$RESOURCE_GROUP" \
  --name "$STORAGE_ACCOUNT" \
  --location "$LOCATION" \
  --sku Standard_LRS \
  --kind StorageV2 \
  --https-only true \
  --allow-blob-public-access false \
  --allow-shared-key-access false
Create the container through the Azure management plane.
az storage container-rm create \
  --resource-group "$RESOURCE_GROUP" \
  --storage-account "$STORAGE_ACCOUNT" \
  --name "$STORAGE_CONTAINER" \
  --public-access off
Create the broker's user-assigned managed identity.
az identity create \
  --resource-group "$RESOURCE_GROUP" \
  --name "$BROKER_IDENTITY" \
  --location "$LOCATION"
Get its client ID, principal ID, and tenant ID, plus the storage resource ID and cluster OIDC issuer.
export BROKER_CLIENT_ID="$(az identity show \
  --resource-group "$RESOURCE_GROUP" --name "$BROKER_IDENTITY" \
  --query clientId -o tsv)"
export BROKER_PRINCIPAL_ID="$(az identity show \
  --resource-group "$RESOURCE_GROUP" --name "$BROKER_IDENTITY" \
  --query principalId -o tsv)"
export TENANT_ID="$(az account show --query tenantId -o tsv)"
export STORAGE_ID="$(az storage account show \
  --resource-group "$RESOURCE_GROUP" --name "$STORAGE_ACCOUNT" \
  --query id -o tsv)"
export OIDC_ISSUER="$(az aks show \
  --resource-group "$RESOURCE_GROUP" --name "$CLUSTER_NAME" \
  --query oidcIssuerProfile.issuerUrl -o tsv)"
The OIDC issuer can't be empty. If it's missing, configure the issuer by following Create an OIDC issuer for your cluster before continuing.
Assign the broker identity
Storage Blob Data Contributorat the storage account scope.az role assignment create \ --assignee-object-id "$BROKER_PRINCIPAL_ID" \ --assignee-principal-type ServicePrincipal \ --role "Storage Blob Data Contributor" \ --scope "$STORAGE_ID"Federate the identity to the broker ServiceAccount in the extension's release namespace.
az identity federated-credential create \
  --resource-group "$RESOURCE_GROUP" \
  --identity-name "$BROKER_IDENTITY" \
  --name pod-snapshot-broker \
  --issuer "$OIDC_ISSUER" \
  --subject system:serviceaccount:pod-snapshot-system:pod-snapshot-broker \
  --audiences api://AzureADTokenExchange
Azure role assignments can take several minutes to propagate. These broker settings are separate from the identity metadata that the extension platform supplies.
Install the Pod snapshot cluster extension
Use Pod snapshot extension version 0.1.1 or later. The create command doesn't pin a version and uses the service-offered version with automatic upgrades enabled by default.
You can install the Pod snapshot cluster extension and the Agent Sandbox cluster extension in either order. The Pod snapshot manager detects the Sandbox API when it becomes available, including after the manager starts, without requiring a restart. The Agent Sandbox cluster extension isn't required to capture and restore raw Pods.
Install the cluster-scoped extension with the broker storage and identity settings. The node selector limits node-worker placement to your Kata node pool; escaped dots preserve the label key when the settings are passed to Helm.
az k8s-extension create \
  --resource-group "$RESOURCE_GROUP" \
  --cluster-name "$CLUSTER_NAME" \
  --cluster-type managedClusters \
  --name pod-snapshot \
  --extension-type Microsoft.PodSnapshot \
  --configuration-settings \
    "broker.storageAccount=$STORAGE_ACCOUNT" \
    "azureBlob.workloadIdentity.clientID=$BROKER_CLIENT_ID" \
    "azureBlob.workloadIdentity.tenantID=$TENANT_ID" \
    "nodeWorker.nodeSelector.kubernetes\\.azure\\.com/agentpool=$NODEPOOL_NAME"
This example doesn't grant restore access automatically. Configure namespaced permissions later in this article.
Inspect the extension's provisioning state.
az k8s-extension show \
  --resource-group "$RESOURCE_GROUP" \
  --cluster-name "$CLUSTER_NAME" \
  --cluster-type managedClusters \
  --name pod-snapshot \
  --query '{type:extensionType,state:provisioningState,version:currentVersion}'
Continue only after
stateisSucceededandversionis0.1.1or later. A successful installation of an older version doesn't meet this requirement.Wait for the manager, broker, and node workers.
kubectl -n pod-snapshot-system rollout status \
  deployment/pod-snapshot-manager \
  deployment/pod-snapshot-broker \
  daemonset/pod-snapshot-node-worker --timeout=10m
kubectl -n pod-snapshot-system get pods -o wideConfirm that a Ready node worker runs on each Kata node. A DaemonSet rollout can succeed with zero workers.
Configure a storage resource and policy
Create
snapshot-policy.yamlwith the following content.apiVersion: podsnapshot.aks.azure.com/v1alpha1 kind: PodSnapshotStorageConfig metadata: name: workload-storage spec: snapshotStorageConfig: azureBlob: account: ${STORAGE_ACCOUNT} container: ${STORAGE_CONTAINER} prefix: workload-demo --- apiVersion: v1 kind: Namespace metadata: name: workload-demo --- apiVersion: podsnapshot.aks.azure.com/v1alpha1 kind: PodSnapshotPolicy metadata: name: workload-policy namespace: workload-demo spec: storageConfigName: workload-storage selector: matchLabels: app: workload triggerConfig: type: manual postCheckpoint: resumepostCheckpoint: resumelets the source workload continue after capture. The policy selects pods labeledapp: workload.Substitute the storage values and apply the manifest.
envsubst '${STORAGE_ACCOUNT} ${STORAGE_CONTAINER}' \
  < snapshot-policy.yaml | kubectl apply -f -
Wait for the policy to become Ready.
kubectl -n workload-demo wait --for=condition=Ready \
  podsnapshotpolicy/workload-policy --timeout=5m
Prepare your workload
Choose a workload with an observable application state so you can verify that the restored pod resumes from the snapshot instead of starting from its initial state. For example, check an in-memory session identifier, initialized application data, or progress through a long-running task. Adapt resource requests, limits, commands, arguments, configuration, and health checks to your application, and use compatible settings for capture and restore.
The following manifests are templates for your workload, not a supplied sample application. Without an application-specific readiness probe, pod readiness doesn't establish that initialization is complete. Add an appropriate probe and confirm application readiness before capture.
The manifests keep capture and restore workloads on $NODEPOOL_NAME, the pool covered by the node workers you installed earlier.
Preload your container image on the Kata nodes
Optionally, preload your image before measuring restore performance to reduce image preparation time during the test. The following temporary DaemonSet prepares the nodes by starting one copy of your application on each node. It doesn't cache application data or create a snapshot.
Important
This step runs your application, not just an image download. Use a test workload that's safe to run in multiple copies and stop afterward.
Create
workload-image-preload.yaml. Include the application configuration and image pull credentials it needs.apiVersion: apps/v1 kind: DaemonSet metadata: name: workload-image-preload namespace: workload-demo spec: selector: matchLabels: app: workload-image-preload template: metadata: labels: app: workload-image-preload spec: enableServiceLinks: false runtimeClassName: kata-vm-isolation-v2 nodeSelector: kubernetes.azure.com/kata-vm-isolation-v2: "true" kubernetes.azure.com/agentpool: ${NODEPOOL_NAME} containers: - name: workload image: ${WORKLOAD_IMAGE} resources: requests: cpu: 50m memory: 256Mi limits: cpu: 250m memory: 256MiApply the DaemonSet and check its readiness.
envsubst '${WORKLOAD_IMAGE} ${NODEPOOL_NAME}' \
  < workload-image-preload.yaml | kubectl apply -f -
kubectl -n workload-demo rollout status daemonset/workload-image-preload --timeout=10mkubectl -n workload-demo get daemonset workload-image-preload \ -o jsonpath='desired={.status.desiredNumberScheduled}{" "}ready={.status.numberReady}{"\n"}'If you perform this optional step, confirm that the desired and ready counts match the number of eligible Kata nodes in
$NODEPOOL_NAME.Delete the temporary DaemonSet after all its pods are ready.
kubectl -n workload-demo delete daemonset workload-image-preload --wait=true
Start the source pod
Start the pod whose state you want to capture.
Create
workload-pod.yaml:apiVersion: v1 kind: Pod metadata: name: workload namespace: workload-demo labels: app: workload spec: enableServiceLinks: false runtimeClassName: kata-vm-isolation-v2 nodeSelector: kubernetes.azure.com/agentpool: ${NODEPOOL_NAME} containers: - name: workload image: ${WORKLOAD_IMAGE} imagePullPolicy: IfNotPresent resources: requests: cpu: 50m memory: 256Mi limits: cpu: 250m memory: 256MiApply the manifest and wait for the source pod to become Ready before creating a trigger.
envsubst '${WORKLOAD_IMAGE} ${NODEPOOL_NAME}' < workload-pod.yaml \
  | kubectl apply -f -
kubectl -n workload-demo wait --for=condition=Ready pod/workload --timeout=5mWait for application initialization to finish, then record state that distinguishes a resumed process from a fresh start. Use your application's API, logs, or another application-specific check. Record the expected restored state before creating the trigger. Data read only from an external database or persistent volume doesn't prove that process memory was restored.
Capture pod state
Create
snapshot-trigger.yaml. Every trigger must name the governing policy, and the target pod must match that policy's selector.apiVersion: podsnapshot.aks.azure.com/v1alpha1 kind: PodSnapshotManualTrigger metadata: name: workload-snapshot namespace: workload-demo spec: targetPod: workload policyName: workload-policyApply the trigger and wait for it to report completion.
kubectl apply -f snapshot-trigger.yamlkubectl -n workload-demo wait --for=condition=Triggered \ podsnapshotmanualtrigger/workload-snapshot --timeout=10mGet the name of the
PodSnapshotresource and wait for it to become Ready. Trigger completion and snapshot readiness are separate checks.export SNAPSHOT_NAME="$(kubectl -n workload-demo get \ podsnapshotmanualtrigger workload-snapshot \ -o jsonpath='{.status.snapshotCreated.name}')"kubectl -n workload-demo wait --for=condition=Ready \ "podsnapshot/$SNAPSHOT_NAME" --timeout=10mInspect the recorded snapshot identity, source VM SKU, and storage status.
kubectl -n workload-demo get podsnapshot "$SNAPSHOT_NAME" -o yamlConfirm that the snapshot is Ready and its Azure Blob status identifies the configured account and container.
Authorize snapshot restore
The restore label requests restore; it doesn't grant permission. The admission actor must have the custom restore verb on the selected PodSnapshot. For a raw Pod request, that actor is the Kubernetes user creating the pod. For a Sandbox, the actor is the Agent Sandbox controller that creates the pod.
Warning
Don't grant the restore verb to built-in Kubernetes controllers, such as system:serviceaccount:kube-system:replicaset-controller or system:serviceaccount:kube-system:job-controller, to enable restore through Deployments, ReplicaSets, or Jobs. The controller creates the Pod, so restore authorization checks the controller's identity, not the user who created the workload. Granting restore access to a controller delegates that access to users who can make it create Pods in the namespace, even if those users don't have restore permission themselves.
As a Kubernetes administrator, create
snapshot-restore-access.yaml. Replace<kubernetes-user-name>with the authenticated Kubernetes username of the user who will create the restore pod.apiVersion: rbac.authorization.k8s.io/v1 kind: Role metadata: name: workload-snapshot-restorer namespace: workload-demo rules: - apiGroups: ["podsnapshot.aks.azure.com"] resources: ["podsnapshots"] resourceNames: ["${SNAPSHOT_NAME}"] verbs: ["restore"] --- apiVersion: rbac.authorization.k8s.io/v1 kind: RoleBinding metadata: name: workload-user-restorer namespace: workload-demo subjects: - kind: User name: <kubernetes-user-name> apiGroup: rbac.authorization.k8s.io roleRef: kind: Role name: workload-snapshot-restorer apiGroup: rbac.authorization.k8s.ioThis Role grants restore access to one snapshot in one namespace. It doesn't grant permission to create pods or administer other resources.
Substitute the snapshot name and apply the permissions.
envsubst '${SNAPSHOT_NAME}' < snapshot-restore-access.yaml \
  | kubectl apply -f -
As the user who will create the restore pod, verify restore permission.
kubectl auth can-i restore \
  "podsnapshots.podsnapshot.aks.azure.com/$SNAPSHOT_NAME" \
  --namespace workload-demo
The warning
Warning: verb 'restore' is not a known verbis expected becauserestoreis a custom verb. It doesn't indicate an authorization failure. Continue only if the command returnsyes.
Start a workload from captured pod state
Delete the source pod after the snapshot is Ready. Keep the policy, storage configuration, and snapshot.
kubectl -n workload-demo delete pod workload --wait=trueCreate
workload-restore.yaml. Keep the image, container name, command, arguments, resource sizing, andenableServiceLinkssetting aligned with the source workload.apiVersion: v1 kind: Pod metadata: name: workload-restore namespace: workload-demo labels: app: workload podsnapshot.aks.azure.com/restore: "true" annotations: podsnapshot.aks.azure.com/restore-from: ${SNAPSHOT_NAME} spec: enableServiceLinks: false runtimeClassName: kata-vm-isolation-v2 nodeSelector: kubernetes.azure.com/agentpool: ${NODEPOOL_NAME} containers: - name: workload image: ${WORKLOAD_IMAGE} imagePullPolicy: IfNotPresent resources: requests: cpu: 50m memory: 256Mi limits: cpu: 250m memory: 256MiCopy any application-specific commands, arguments, configuration, health checks, and image pull credentials from your source manifest into the restore manifest. Name the snapshot, not an artifact path. Admission injects runtime-private restore annotations after authorization.
Apply the manifest and wait for the restore pod.
envsubst '${WORKLOAD_IMAGE} ${SNAPSHOT_NAME} ${NODEPOOL_NAME}' \
  < workload-restore.yaml \
  | kubectl apply -f -
kubectl -n workload-demo wait --for=condition=Ready \ pod/workload-restore --timeout=10mUse the same application-specific check to compare the restored state with the state recorded before capture. Confirm that initialized data, session identity, or task progress resumed from the captured point rather than returning to its initial state. Check external connections and dependencies separately. A Ready pod or a shorter startup time alone doesn't prove that process state was restored.
Inspect the restored pod and its events.
kubectl -n workload-demo get pod workload-restore -o widekubectl -n workload-demo get events \ --field-selector involvedObject.name=workload-restore \ --sort-by='.lastTimestamp'Check for the
AKSPodRestoredevent, but verify the application state as well. Pod readiness and the event alone aren't proof that the requested snapshot's process state was consumed. The restored pod might use the source node or another node in$NODEPOOL_NAMEwith the exact same VM SKU.
Restore an Agent Sandbox workload
This section is optional. The preceding example captures and restores a pod without Agent Sandbox. Continue here if you also want to restore a workload managed by the Agent Sandbox cluster extension.
Before creating the Sandbox, install the Agent Sandbox cluster extension and wait for its controller to become Ready, as described in the prerequisites. You don't need to restart the Pod snapshot cluster extension if you install the Agent Sandbox cluster extension later.
The Agent Sandbox extension creates a pod from spec.podTemplate. Put restore intent on that pod template, not only on the Sandbox metadata.
Authorize the Agent Sandbox controller for the example snapshot. Create
sandbox-restore-access.yaml:apiVersion: rbac.authorization.k8s.io/v1 kind: RoleBinding metadata: name: workload-sandbox-restorer namespace: workload-demo subjects: - kind: ServiceAccount name: agent-sandbox-controller namespace: agent-sandbox-system roleRef: kind: Role name: workload-snapshot-restorer apiGroup: rbac.authorization.k8s.iokubectl apply -f sandbox-restore-access.yamlBy granting this permission to a controller, you delegate snapshot restore to users who can make that controller create a restore pod. Restrict Sandbox creation and update permissions accordingly.
Create
workload-sandbox-restore.yaml:apiVersion: agents.x-k8s.io/v1beta1 kind: Sandbox metadata: name: workload-sandbox-restore namespace: workload-demo spec: podTemplate: metadata: labels: app: workload example: workload-sandbox-restore podsnapshot.aks.azure.com/restore: "true" annotations: podsnapshot.aks.azure.com/restore-from: ${SNAPSHOT_NAME} spec: enableServiceLinks: false runtimeClassName: kata-vm-isolation-v2 nodeSelector: kubernetes.azure.com/agentpool: ${NODEPOOL_NAME} containers: - name: workload image: ${WORKLOAD_IMAGE} imagePullPolicy: IfNotPresent resources: requests: cpu: 50m memory: 256Mi limits: cpu: 250m memory: 256MiCopy your source workload's application-specific settings into
spec.podTemplate.spec, keeping the container identity and resource sizing compatible with the snapshot.Apply the manifest and inspect the Sandbox and its pod.
envsubst '${WORKLOAD_IMAGE} ${SNAPSHOT_NAME} ${NODEPOOL_NAME}' \
  < workload-sandbox-restore.yaml | kubectl apply -f -
kubectl -n workload-demo get sandbox workload-sandbox-restoreWait for the Sandbox to become Ready before selecting its pod. This approach avoids checking for a pod before the controller creates it.
kubectl -n workload-demo wait --for=condition=Ready \
  sandbox/workload-sandbox-restore --timeout=10m
kubectl -n workload-demo wait --for=condition=Ready pod \ --selector example=workload-sandbox-restore --timeout=10mGet the name of the pod created by the Sandbox controller.
export SANDBOX_POD="$(kubectl -n workload-demo get pods \
  --selector example=workload-sandbox-restore \
  -o jsonpath='{.items[0].metadata.name}')"
Use your application's API, logs, or another application-specific check against this pod to verify the captured state, independently of the earlier raw Pod restore. Confirm that the process resumed rather than initialized again.
As an alternative to this explicit restore example, you can restore a Sandbox without naming a snapshot. See Restore by using implicit snapshot selection.
Restore by using implicit snapshot selection
Important
Implicit selection is an alternative to explicit snapshot selection, not a required next step. Delete the explicit-restore Sandbox and wait for its Pod to be deleted before trying implicit restore. Deleting the Sandbox doesn't delete the snapshot. A restore doesn't create a new snapshot, so implicit selection can reuse the same snapshot used for explicit restore unless a newer matching Ready snapshot exists.
For a raw Pod on a Pod sandboxing node pool, use the restore manifest in the previous section but omit the podsnapshot.aks.azure.com/restore-from annotation and keep the podsnapshot.aks.azure.com/restore: "true" label. Use a new Pod name if the earlier restore pod still exists. The extension computes a template hash from the regular containers' names, images, commands, and arguments and selects the most recently Ready matching snapshot in the same namespace. You don't need to supply a hash label manually.
For a Sandbox on a Pod sandboxing node pool, omit the restore-from annotation but keep the restore: "true" label to request implicit selection. The extension selects the most recently Ready snapshot in the same namespace whose nonempty container identity matches exactly.
Create a new Sandbox named workload-sandbox-implicit rather than editing the existing explicit-restore Sandbox. Set spec.podTemplate.metadata.labels.example to workload-sandbox-implicit. Update the readiness and Pod lookup commands to use the new Sandbox name and the selector example=workload-sandbox-implicit.
Don't change restore intent on an existing restore Sandbox. The webhook rejects updates to its Pod's immutable restore fields, which can leave the Sandbox Ready=False while its original Pod continues running.
Regular-container matching includes names, images, commands, and arguments. Completed one-shot init-container matching also includes order and restart policy. Resource values aren't part of that identity, so keep them aligned explicitly. Extra containers or a changed image don't qualify as a partial match.
Authorization is checked after snapshot selection. The example Role authorizes only the snapshot named in SNAPSHOT_NAME. If a scheduled policy creates a newer matching Ready snapshot, implicit restore selects that newer snapshot. If the caller isn't authorized to restore it, the request is denied; selection doesn't fall back to the older snapshot named in the Role or to a cold start.
If you combine implicit restore with scheduled snapshots and intend to allow namespace-wide restore access, replace snapshot-restore-access.yaml with the following Role, which omits resourceNames. The existing RoleBindings continue to reference this Role.
apiVersion: rbac.authorization.k8s.io/v1
kind: Role
metadata:
  name: workload-snapshot-restorer
  namespace: workload-demo
rules:
  - apiGroups: ["podsnapshot.aks.azure.com"]
    resources: ["podsnapshots"]
    verbs: ["restore"]
kubectl apply -f snapshot-restore-access.yaml
Warning
This Role grants its bound users or ServiceAccounts restore access to every current and future PodSnapshot in workload-demo, including snapshots from other workloads or policies. It doesn't grant permission to create Pods, read snapshots, or access snapshots in other namespaces. If you created the Agent Sandbox controller RoleBinding, the broader access also applies to that controller and is delegated to users who can make it create restore Pods. Use this Role only when all bound identities are trusted to restore any snapshot in the namespace; otherwise, keep resourceNames and explicitly authorize each selected snapshot.
To start a workload without restoring a snapshot, create a new Pod or Sandbox without the restore label and restore-from annotation. For a Sandbox, use a distinct name and pod-template example label, such as workload-sandbox-cold-start, and update the readiness and Pod lookup commands to use the new name and label selector. Alternatively, delete the previous Sandbox, wait for its Pod to be deleted, and recreate the Sandbox without restore intent. Removing restore intent from an existing restore Sandbox doesn't cold-start its running Pod.
Schedule snapshots and configure retention
This section is optional and doesn't require Agent Sandbox. It reuses the storage configuration and namespace that you created earlier. The restore walkthrough deletes the original source pod. Recreate it as a cold-start source for scheduled captures rather than selecting the restored examples, which still specify container limits and don't meet the re-snapshot limitation.
A cron policy captures one representative Ready pod matching its selector per run, not every matching pod. Use concurrencyPolicy: Forbid to prevent overlapping captures and postCheckpoint: resume to keep the source running. A cron policy with postCheckpoint: stop doesn't become Ready.
In the original workload-pod.yaml, add a dedicated label to metadata.labels:
metadata:
  name: workload
  namespace: workload-demo
  labels:
    app: workload
    snapshot-schedule: workload-nightly
Keep the original pod specification, including your application-specific settings. Don't add the restore label or restore-from annotation. Don't add the snapshot-schedule label to restored pods or Sandbox pod templates.
Reapply the source manifest and wait for the cold-start pod to become Ready:
envsubst '${WORKLOAD_IMAGE} ${NODEPOOL_NAME}' < workload-pod.yaml \
  | kubectl apply -f -
kubectl -n workload-demo wait --for=condition=Ready pod/workload --timeout=5m
Confirm that application initialization finishes by using the application-specific check from the source workload steps before enabling scheduled captures.
Create workload-cron-policy.yaml:
apiVersion: podsnapshot.aks.azure.com/v1alpha1
kind: PodSnapshotPolicy
metadata:
  name: workload-nightly
  namespace: workload-demo
spec:
  storageConfigName: workload-storage
  selector:
    matchLabels:
      app: workload
      snapshot-schedule: workload-nightly
  triggerConfig:
    type: cron
    schedule: "0 3 * * *"
    timeZone: America/Los_Angeles
    startingDeadlineSeconds: 600
    concurrencyPolicy: Forbid
    postCheckpoint: resume
  retentionConfig:
    maxSnapshots: 7
    lastAccessTimeout: 168h
| Field | Example value | Meaning |
|---|---|---|
schedule |
"0 3 * * *" |
Captures once per day at 03:00 in the specified time zone. |
timeZone |
America/Los_Angeles |
Time zone for the schedule. |
startingDeadlineSeconds |
600 |
Limits how late a missed run can start. |
concurrencyPolicy |
Forbid |
Prevents overlapping captures. |
postCheckpoint |
resume |
Keeps the source pod running. A cron policy with stop doesn't become Ready. |
retentionConfig.maxSnapshots |
7 |
Caps usable Ready snapshots per policy, not per source pod. |
retentionConfig.lastAccessTimeout |
168h |
Enables age-based cleanup based on snapshot access. |
Protected snapshots can delay retention cleanup while a restore is in flight.
Note
Snapshot size generally increases with the pod's guest memory, not just the application's own state. Pods with larger memory limits can produce snapshots that consume several GB in Azure Blob storage. Measure representative snapshot sizes and choose maxSnapshots and storage account capacity and cost budgets accordingly. The cap is shared across all pods selected by a policy; plan for the combined size of retained snapshots and allow extra capacity while protected snapshots delay cleanup.
kubectl apply -f workload-cron-policy.yaml
kubectl -n workload-demo get podsnapshotpolicy workload-nightly -o yaml
The schedule requires a Ready cold-start source pod labeled app: workload and snapshot-schedule: workload-nightly. The dedicated label excludes the restored examples. To stop future scheduled captures, delete the cron policy. Snapshots that the policy creates aren't owned by it, so deleting the policy preserves them and stops its retention rules from applying to them. Delete those snapshots explicitly when you no longer need them.
Clean up resources
Stop scheduled captures, delete workload consumers, and then delete snapshots before uninstalling the extension. Snapshot finalizers need the running controllers and storage access to finish cleanup. If a command fails or times out, stop and resolve the failure before continuing. Don't remove finalizers to force cleanup.
These commands delete all pods and snapshots in the dedicated workload-demo namespace. Don't use them unchanged in a namespace that contains workloads or snapshots you need to keep. Keep Agent Sandbox running until its Sandbox resources and pods are deleted.
Set the resource names again if you return in a new shell. Get credentials to select the cluster you intend to clean up.
export RESOURCE_GROUP="<resource-group-name>"
export CLUSTER_NAME="<aks-cluster-name>"
export STORAGE_ACCOUNT="<unique-storage-account-name>"
export BROKER_IDENTITY="pod-snapshot-broker-demo"
az aks get-credentials \
  --resource-group "$RESOURCE_GROUP" \
  --name "$CLUSTER_NAME"
If you created the cron policy, delete it first to stop new scheduled captures and wait for its active run to finish. Allow any in-flight manual capture to finish before deleting its trigger or source pod.
kubectl -n workload-demo delete podsnapshotpolicy workload-nightly \
  --ignore-not-found --wait=true --timeout=10m
Delete the optional image-preload DaemonSet if it still exists, and wait for its pods to be removed.
kubectl -n workload-demo delete daemonset workload-image-preload \
  --ignore-not-found --cascade=foreground --wait=true --timeout=5m
If you created any Sandbox examples, delete them while Agent Sandbox is still running.
kubectl -n workload-demo delete sandbox \
  workload-sandbox-restore \
  workload-sandbox-implicit \
  workload-sandbox-cold-start \
  --ignore-not-found --cascade=foreground --wait=true --timeout=10m
Delete the remaining example pods, including the recreated source for scheduled captures and any raw Pods created for implicit restore or cold start. In this dedicated namespace, no workload controller should remain to recreate them.
kubectl -n workload-demo delete pods --all --wait=true --timeout=10mConfirm that no pods remain before deleting snapshots.
kubectl -n workload-demo get podsDelete the manual trigger after its capture finishes.
kubectl -n workload-demo delete podsnapshotmanualtrigger workload-snapshot \
  --ignore-not-found --cascade=foreground --wait=true --timeout=10m
Delete all snapshots in the dedicated example namespace, including snapshots created by the manual trigger and cron policy. Wait for their finalizers to finish storage cleanup. Don't delete the namespace or storage resources until all snapshots are deleted.
kubectl -n workload-demo delete podsnapshots --all --wait=true --timeout=10mVerify that the dedicated example namespace contains no remaining snapshots before deleting it. Namespace deletion also removes the example policy and namespaced restore Role and RoleBindings.
kubectl -n workload-demo get podsnapshotskubectl delete namespace workload-demo \ --ignore-not-found --wait=true --timeout=10mDelete the cluster-scoped storage configuration only if no policies in other namespaces reference it. Otherwise, keep the configuration and its storage resources.
kubectl delete podsnapshotstorageconfig workload-storage \
  --ignore-not-found --wait=true --timeout=5m
If no other workloads need the extension, uninstall it.
az k8s-extension delete \
  --resource-group "$RESOURCE_GROUP" \
  --cluster-name "$CLUSTER_NAME" \
  --cluster-type managedClusters \
  --name pod-snapshot \
  --yes
List the remaining extensions to verify removal.
az k8s-extension list \
  --resource-group "$RESOURCE_GROUP" \
  --cluster-name "$CLUSTER_NAME" \
  --cluster-type managedClusters \
  --query '[].{name:name,state:provisioningState}' -o table
Only if the storage account and identity were created solely for this example and are no longer used, remove their role assignment and Azure resources.
export BROKER_PRINCIPAL_ID="$(az identity show \
  --resource-group "$RESOURCE_GROUP" --name "$BROKER_IDENTITY" \
  --query principalId -o tsv)"
export STORAGE_ID="$(az storage account show \
  --resource-group "$RESOURCE_GROUP" --name "$STORAGE_ACCOUNT" \
  --query id -o tsv)"
az role assignment delete \ --assignee "$BROKER_PRINCIPAL_ID" \ --role "Storage Blob Data Contributor" \ --scope "$STORAGE_ID"az identity delete \ --resource-group "$RESOURCE_GROUP" \ --name "$BROKER_IDENTITY"az storage account delete \ --resource-group "$RESOURCE_GROUP" \ --name "$STORAGE_ACCOUNT" \ --yesDeleting the storage account permanently removes its contents. Don't delete a shared account or your existing AKS cluster as part of this example's cleanup.
Optionally, delete the AKS cluster only if you created it solely for these walkthroughs and no longer need any workloads or resources on it. If you also installed Agent Sandbox, finish its cleanup procedure before deleting the cluster.
az aks delete \
  --resource-group "$RESOURCE_GROUP" \
  --name "$CLUSTER_NAME" \
  --yes
If you keep the cluster, its nodes continue to incur charges. This command doesn't delete the resource group or separate storage and identity resources. Don't delete a shared cluster or resource group.
Use Workload Manager to provision an AKS cluster for orchestration and the Serverless sandbox runtime powered by ACI for execution. A workload space groups these resources, and a runtime link connects them. Complete this setup before deploying the Pod snapshot extension.
Prerequisites
An Azure subscription. If you don't have an Azure subscription, create a free account before you begin.
Quota provisioned for AI sandboxes on your subscription:
Open New support request in the Azure portal with Issue type set to Service and subscription limits (quotas) and Quota type set to Container Instances. Select your subscription, and go to the Additional details tab.
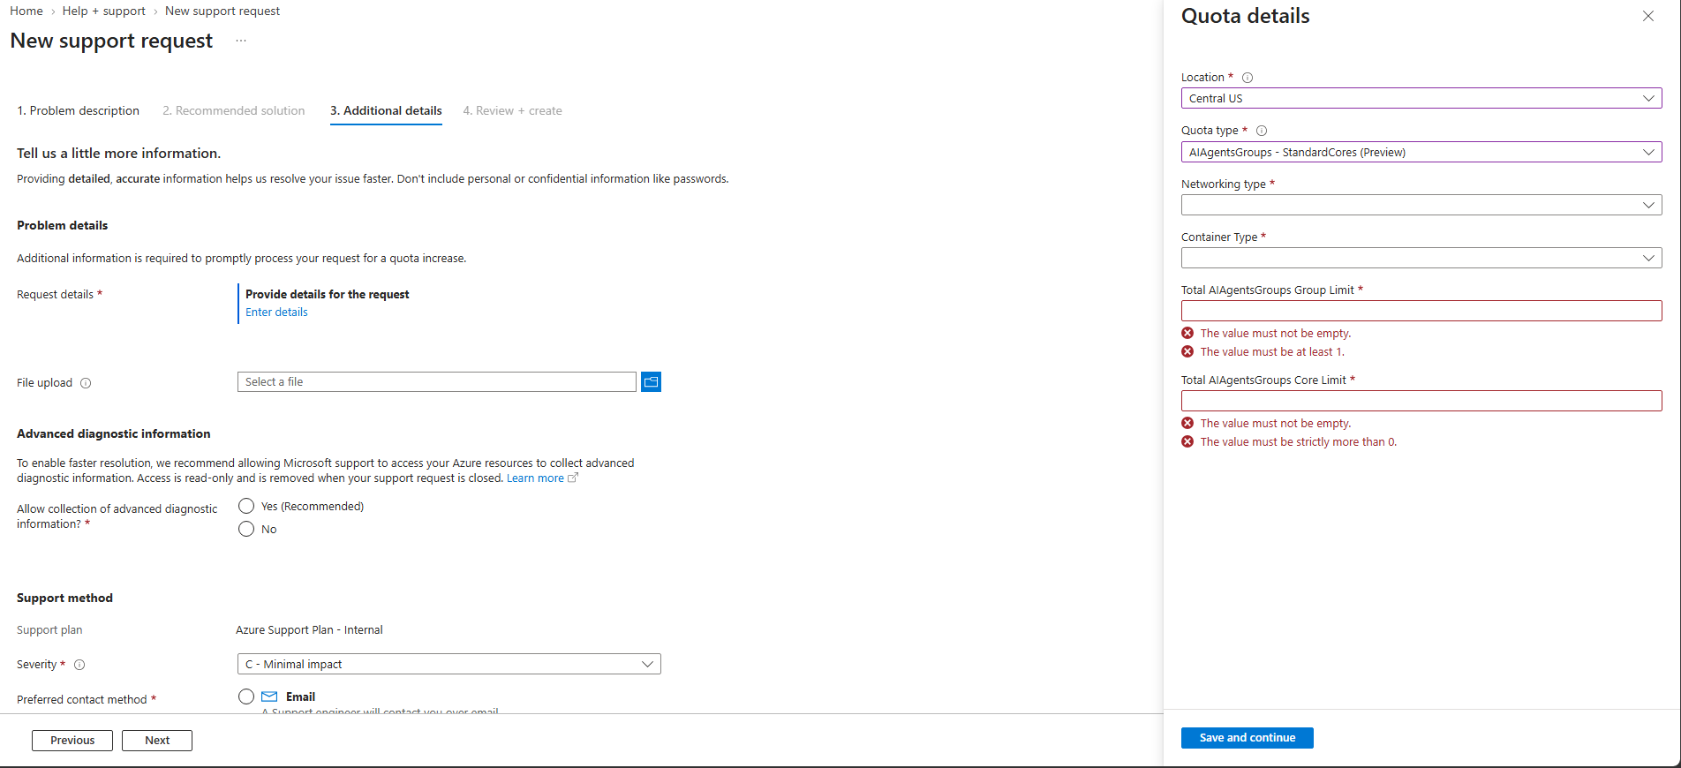
Select Enter details to open the Quota details pane. Choose your Location, select AIAgentsGroups - StandardCores (Preview) for Quota type, and fill in Networking type, Container Type, Total AIAgentsGroups Group Limit, and Total AIAgentsGroups Core Limit:
Submit the support request. After your quota request is approved, re-register the
Microsoft.ContainerInstanceresource provider so that your subscription picks up the newly enabled capabilities:az provider register --namespace Microsoft.ContainerInstance --wait
The Contributor, Azure Deployment Stack Owner, and Storage Blob Data Contributor roles assigned to the Compute Sandbox Groups service principal on your subscription, so that the service can provision the managed resource group and snapshot storage account in your subscription. To assign the roles, you need permission to create role assignments on the subscription, such as the Owner or User Access Administrator role. For instructions, see Authorize the Compute Sandbox Groups application.
The Contributor role, or another role with
Microsoft.ContainerInstance/AIAgentsGroups/*permissions, assigned to the account running the commands on the resource group of the AI agents group.Workload Manager provisions the AKS cluster in this procedure, so you don't need an existing cluster. The managed cluster must run Kubernetes version 1.35 or later.
You must create the resource group for the workload space in West Central US (
westcentralus).Ensure that your subscription has sufficient AKS, ACI, and networking quota for the selected region.
Ensure that you have permission to create resources and register resource providers and preview features. A subscription administrator with directory read access must approve and assign the application roles described in this procedure.
Install Azure CLI version 2.85.0 or later, PowerShell 7 or later, and
kubectl. Runaz --versionto find your CLI version andaz upgradeto upgrade. Run all commands for the selected path in the same PowerShell session. For more information, see Install Azure CLI.Install kubelogin for Microsoft Entra authentication to the managed AKS cluster.
The
k8s-extensionAzure CLI extension installed. Install or update it withaz extension add --name k8s-extension --upgrade.The
Microsoft.KubernetesConfigurationresource provider registered in your subscription.
Limitations
- The serverless sandbox runtime is available in Central US, North Central US, West US 2, East US 2, Australia East, Sweden Central, and West Central US.
- Container images must come from Microsoft Container Registry (
mcr.microsoft.com) or Azure Container Registry (*.azurecr.io). Direct pulls from other registries, including Docker Hub, are rejected by this preview runtime. - Only explicit snapshot selection is supported for Pods and Sandbox workloads. Specify the snapshot name in the
podsnapshot.aks.azure.com/restore-fromannotation. Implicit snapshot selection isn't supported. - Restore requires a Ready, non-cordoned virtual node with the snapshot's sandbox-group identifier. The node must satisfy the pod's selectors, required node affinity, and taint tolerations. Don't change sandbox-group labels to bypass placement checks.
- Incomplete init containers, native sidecars with
restartPolicy: Always, and ephemeral containers aren't supported. One-shot init containers must complete successfully before capture. - Container identity must match the selected snapshot, including container names, images, commands, and arguments. Keep the source and restore resource settings aligned, and set
enableServiceLinks: falseon both workloads. - Restoring through Deployments, ReplicaSets, and Jobs isn't supported in this preview. Create a raw Pod or use the Agent Sandbox restore workflow instead.
- Snapshots capture one pod's runtime state. They aren't application-consistent backups of a distributed service or replacements for persistent-volume backups. Validate external network sessions, remote leases, and external service state after restore.
- Restore requires the custom Kubernetes
restorepermission on the selected snapshot, in addition to permission to create the workload. For Sandbox workloads, authorize the controller that creates the pod; granting it restore permission delegates that access to users who can make it create restore pods. - Keep Pod snapshot and the serverless runtime running until snapshot deletion completes. Cleanup requires a Ready virtual node with the recorded sandbox-group identifier. Don't remove finalizers to bypass failed cleanup.
- AKS Automatic isn't yet supported.
How snapshot and restore work
The extension uses the following Kubernetes resources:
| Resource | Purpose |
|---|---|
| PodSnapshotStorageConfig | Selects the managed VN2 snapshot storage backend. This resource is cluster-scoped. |
| PodSnapshotPolicy | Selects eligible pods and defines capture and retention behavior in a namespace. |
| PodSnapshotManualTrigger | Requests a capture of a specific pod under a named policy. |
| PodSnapshot | Records the resulting snapshot, its source identity, provider storage details, and readiness. |
For the Serverless sandbox runtime powered by ACI, the runtime-provided VN2 snapshot agent captures the sandbox state and records the result through the Pod snapshot extension. ACI manages snapshot storage. You don't configure Azure Blob storage or broker workload identity for this runtime.
On restore, specify a snapshot explicitly. Admission resolves the snapshot, authorizes the caller, validates the workload, and selects a Ready virtual node that has the snapshot's sandbox-group identifier and satisfies the pod's scheduling constraints. It injects the provider restore annotation so the runtime can restore the captured state. Restore doesn't require Blob downloads or node-local staging. If authorization, compatibility, or node-selection checks fail, the request is rejected rather than silently starting a fresh workload.
Warning
Snapshots contain captured workload state, which can include credentials and other sensitive data in memory. ACI manages snapshot storage; you don't configure a customer storage account for this backend. Restrict snapshot restore permissions and access to workloads that can request restore. Don't inject runtime-private restore annotations or disable the restore admission guards.
Prepare the Workload Manager environment
The following steps create billable Azure resources. Use a dedicated resource group and keep the deployment values unchanged throughout provisioning.
Install or update the Workload Manager CLI extension to preview version
1.0.0b1.az extension add --name workload-manager --version 1.0.0b1 ` --allow-preview true --upgradeVerify the installed version.
az extension show --name workload-manager --query version --output tsvSet your subscription ID, resource group name, and workload space name. The workload space name must contain 3 to 16 lowercase letters or digits.
$SUBSCRIPTION_ID = "<subscription-id>"
$RESOURCE_GROUP = "<new-resource-group-name>"
$SPACE_NAME = "<workload-space-name>"
$LOCATION = "<supported-region>"
$SUBSCRIPTION_SCOPE = "/subscriptions/$SUBSCRIPTION_ID"
$RESOURCE_GROUP_SCOPE = "$SUBSCRIPTION_SCOPE/resourceGroups/$RESOURCE_GROUP"
$WORKLOAD_SPACE_ID = "$RESOURCE_GROUP_SCOPE/providers/Microsoft.Compute/workloadSpaces/$SPACE_NAME"
$AKS_BINDING_NAME = "$SPACE_NAME-aks"
$ACI_BINDING_NAME = "$SPACE_NAME-aci"
$LINK_NAME = "$SPACE_NAME-link"
$AKS_BINDING_ID = "$WORKLOAD_SPACE_ID/runtimeBindings/$AKS_BINDING_NAME"
$ACI_BINDING_ID = "$WORKLOAD_SPACE_ID/runtimeBindings/$ACI_BINDING_NAME"
Register and select a regional ARM cloud profile. This profile routes ARM requests to
https://westcentralus.management.azure.com/. Azure CLI discovers the other endpoints automatically. If the profile is already registered, skip the registration command and select it.az cloud register ` --name WorkloadRP-WestCentralUS ` --endpoint-resource-manager "https://westcentralus.management.azure.com/"az cloud set --name WorkloadRP-WestCentralUSSign in to the selected cloud and set your subscription before registering features, assigning roles, or creating resources. Sign in again after changing cloud profiles; an existing AzureCloud session doesn't replace this step.
The
--subscriptionoption foraz loginrequires Azure CLI 2.85.0 or later, as specified in the prerequisites.az login --subscription "$SUBSCRIPTION_ID"Register the preview feature if it isn't already registered, and check its registration status.
az feature register --namespace Microsoft.Compute --name WorkloadManagerPreviewaz feature show --namespace Microsoft.Compute ` --name WorkloadManagerPreview --query properties.state --output tsvRepeat the
showcommand until it returnsRegistered. Don't continue until registration is complete.Create the resource group for the workload space and its managed resources.
az group create --name "$RESOURCE_GROUP" --location westcentralusRegister the required resource providers.
az provider register --namespace Microsoft.Compute --wait
az provider register --namespace Microsoft.ContainerService --wait
az provider register --namespace Microsoft.ContainerInstance --wait
az provider register --namespace Microsoft.Network --wait
az provider register --namespace Microsoft.ManagedIdentity --wait
az provider register --namespace Microsoft.KubernetesConfiguration --wait
Authorize the Workload Manager application
A subscription administrator must grant the Workload Manager application (032854b2-ba65-4dd6-bdd4-4e86b8756667) the following roles at the resource group scope. Azure CLI resolves the application to its service principal in the tenant you're signed in to.
Before assigning permissions to either application in this procedure, record any existing role assignments. For each newly created assignment, save the id returned by Azure CLI for cleanup. An existing assignment isn't a walkthrough-created resource and must not be removed during cleanup.
A repeated create command can return an existing assignment. Don't treat its returned ID as a newly created assignment.
The --assignee option requires a Microsoft Graph lookup. If token-protection Conditional Access blocks Microsoft Graph authentication, ask a directory administrator for each application's tenant-specific service principal Object ID from Enterprise applications in the Microsoft Entra admin center. This isn't the application ID shown above. Use --assignee-object-id together with --assignee-principal-type ServicePrincipal to avoid the Graph lookup without changing the required Azure permissions.
For example, use the following alternative for the Workload Manager Contributor grant. Use the same two assignee options for its other grants, preserving each role, scope, and condition.
az role assignment create `
  --assignee-object-id "<workload-manager-service-principal-object-id>" `
  --assignee-principal-type ServicePrincipal `
  --role "Contributor" `
  --scope "$RESOURCE_GROUP_SCOPE"
| Role | Purpose |
|---|---|
| Contributor | Creates and manages the Azure infrastructure. |
| Role Based Access Control Administrator | Creates and deletes role assignments, subject to the condition below. |
| Azure Kubernetes Service RBAC Cluster Admin | Configures Kubernetes resources on the managed cluster. |
Grant Contributor and Azure Kubernetes Service RBAC Cluster Admin at the resource group scope.
az role assignment create `
  --assignee "032854b2-ba65-4dd6-bdd4-4e86b8756667" `
  --role "Contributor" `
  --scope "$RESOURCE_GROUP_SCOPE"

az role assignment create `
  --assignee "032854b2-ba65-4dd6-bdd4-4e86b8756667" `
  --role "Azure Kubernetes Service RBAC Cluster Admin" `
  --scope "$RESOURCE_GROUP_SCOPE"
Define a condition that restricts write and delete operations on role assignments to service principals, including managed identities, and to these roles: Contributor, Network Contributor, and Azure Kubernetes Service Cluster Admin Role.
Normalize the condition to a single line before passing it to Azure CLI.
$ROLE_CONDITION = @'
(
  !(ActionMatches{'Microsoft.Authorization/roleAssignments/write'})
  OR (
    @Request[Microsoft.Authorization/roleAssignments:RoleDefinitionId] ForAnyOfAnyValues:GuidEquals {b24988ac-6180-42a0-ab88-20f7382dd24c, 4d97b98b-1d4f-4787-a291-c67834d212e7, 0ab0b1a8-8aac-4efd-b8c2-3ee1fb270be8}
    AND @Request[Microsoft.Authorization/roleAssignments:PrincipalType] ForAnyOfAnyValues:StringEqualsIgnoreCase {'ServicePrincipal'}
  )
) AND (
  !(ActionMatches{'Microsoft.Authorization/roleAssignments/delete'})
  OR (
    @Resource[Microsoft.Authorization/roleAssignments:RoleDefinitionId] ForAnyOfAnyValues:GuidEquals {b24988ac-6180-42a0-ab88-20f7382dd24c, 4d97b98b-1d4f-4787-a291-c67834d212e7, 0ab0b1a8-8aac-4efd-b8c2-3ee1fb270be8}
    AND @Resource[Microsoft.Authorization/roleAssignments:PrincipalType] ForAnyOfAnyValues:StringEqualsIgnoreCase {'ServicePrincipal'}
  )
)
'@
$ROLE_CONDITION = ($ROLE_CONDITION -replace '[\r\n]+', ' ').Trim()
Assign Role Based Access Control Administrator with that condition.
az role assignment create `
  --assignee "032854b2-ba65-4dd6-bdd4-4e86b8756667" `
  --role "Role Based Access Control Administrator" `
  --scope "$RESOURCE_GROUP_SCOPE" `
  --condition "$ROLE_CONDITION" `
  --condition-version 2.0
The condition limits this role assignment only. It doesn't restrict permissions granted through other assignments.
Authorize the Compute Sandbox Groups application
For this preview, grant the Compute Sandbox Groups service principal (application ID 1eeacc2b-ec4a-4b1e-977a-2b5fef2131c6) the Contributor, Azure Deployment Stack Owner, and Storage Blob Data Contributor roles at the subscription scope. These roles allow the service to provision the managed resource group and snapshot storage account in your subscription. To assign the roles, you need permission to create role assignments on the subscription, such as the Owner or User Access Administrator role.
Warning
Have your subscription administrator review and approve these subscription-wide grants before continuing. The resource-group condition assigned to Workload Manager doesn't limit this application's access.
As an authorized administrator, assign the three roles.
$SANDBOX_ROLES = @(
  "Contributor"
  "Azure Deployment Stack Owner"
  "Storage Blob Data Contributor"
)

foreach ($ROLE in $SANDBOX_ROLES) {
  az role assignment create `
    --assignee "1eeacc2b-ec4a-4b1e-977a-2b5fef2131c6" `
    --role "$ROLE" `
    --scope "$SUBSCRIPTION_SCOPE"
}
If Microsoft Graph authentication is blocked, replace the
az role assignment createcommand inside the loop with this alternative. Use the Compute Sandbox Groups service principal's tenant-specific Object ID, not its application ID.az role assignment create ` --assignee-object-id "<compute-sandbox-groups-service-principal-object-id>" ` --assignee-principal-type ServicePrincipal ` --role "$ROLE" ` --scope "$SUBSCRIPTION_SCOPE"Allow time for both applications' role assignments to propagate before creating the workload space and runtimes.
Create the workload space and bindings
Create the resources in the following order. Provisioning the AKS and ACI bindings can take several minutes. For each binding and link, repeat its show command until provisioningState is Succeeded before continuing. Each binding must also have a nonempty providerResourceId.
The Workload Manager CLI extension version 1.0.0b1 doesn't expose a separate readiness state in its show output. Provisioning success alone doesn't verify that Pod snapshot is installed or ready to capture and restore workloads. Complete the extension and controller checks in the following list before deploying workloads.
Create the workload space, which manages the lifecycle of the runtime composition.
az workload-manager workload-space create `
  --resource-group "$RESOURCE_GROUP" `
  --name "$SPACE_NAME" `
  --location "$LOCATION"
az workload-manager workload-space show ` --resource-group "$RESOURCE_GROUP" ` --name "$SPACE_NAME"Wait for the parent resource's
provisioningStateto beSucceededbefore creating the bindings.Create the managed AKS binding with the
Standardoffering.az workload-manager workload-space runtime-binding create ` --resource-group "$RESOURCE_GROUP" ` --space-name "$SPACE_NAME" ` --name "$AKS_BINDING_NAME" ` --location "$LOCATION" ` --kind Kubernetes ` --managed '{managed-profile:{offering:Standard}}'Check the AKS binding.
az workload-manager workload-space runtime-binding show ` --resource-group "$RESOURCE_GROUP" ` --space-name "$SPACE_NAME" ` --name "$AKS_BINDING_NAME"Create the managed ACI binding for the serverless sandbox runtime.
az workload-manager workload-space runtime-binding create ` --resource-group "$RESOURCE_GROUP" ` --space-name "$SPACE_NAME" ` --name "$ACI_BINDING_NAME" ` --location "$LOCATION" ` --kind ServerlessContainers ` --managed '{managed-profile:{provider:ACI}}'Check the ACI binding.
az workload-manager workload-space runtime-binding show ` --resource-group "$RESOURCE_GROUP" ` --space-name "$SPACE_NAME" ` --name "$ACI_BINDING_NAME"Check the underlying AKS and ACI resources before creating the runtime link. A binding can report
Succeededbefore its provider resource is ready.foreach ($BINDING_NAME in @($AKS_BINDING_NAME, $ACI_BINDING_NAME)) { $PROVIDER_RESOURCE_ID = az workload-manager workload-space runtime-binding show ` --resource-group "$RESOURCE_GROUP" ` --space-name "$SPACE_NAME" ` --name "$BINDING_NAME" ` --query properties.providerResourceId --output tsv if ($LASTEXITCODE -ne 0 -or [string]::IsNullOrWhiteSpace($PROVIDER_RESOURCE_ID)) { throw "Couldn't resolve the provider resource for $BINDING_NAME." } az resource show --ids "$PROVIDER_RESOURCE_ID" ` --query '{name:name,state:properties.provisioningState}' }Repeat the checks until both resources report
Succeeded. If either resource reportsFailed, resolve its provisioning error before continuing.Link the AKS orchestrator to the serverless sandbox runtime by using the bindings' full resource IDs.
az workload-manager workload-space runtime-link create ` --resource-group "$RESOURCE_GROUP" ` --space-name "$SPACE_NAME" ` --name "$LINK_NAME" ` --location "$LOCATION" ` --orchestrator-binding "$AKS_BINDING_ID" ` --execution-binding "$ACI_BINDING_ID"If creation returns
ProviderNotReady, repeat the provider-resource checks, allow time for readiness to propagate, and retry the same create command. Don't recreate the workload space or bindings. Check that the runtime link reachesSucceededbefore installing Pod snapshot.az workload-manager workload-space runtime-link show ` --resource-group "$RESOURCE_GROUP" ` --space-name "$SPACE_NAME" ` --name "$LINK_NAME"Resolve the managed AKS cluster on which you'll install the Pod snapshot extension.
$AKS_RESOURCE_ID = az workload-manager workload-space runtime-binding show ` --resource-group "$RESOURCE_GROUP" ` --space-name "$SPACE_NAME" ` --name "$AKS_BINDING_NAME" ` --query properties.providerResourceId ` --output tsv if ([string]::IsNullOrWhiteSpace($AKS_RESOURCE_ID)) { throw "The AKS binding didn't return a providerResourceId. Wait for provisioning to complete and try again." }$AKS_RESOURCE_PARTS = $AKS_RESOURCE_ID.Trim('/').Split('/') if ($AKS_RESOURCE_PARTS.Length -ne 8 -or $AKS_RESOURCE_PARTS[2] -ne 'resourceGroups' -or $AKS_RESOURCE_PARTS[5] -ne 'Microsoft.ContainerService' -or $AKS_RESOURCE_PARTS[6] -ne 'managedClusters') { throw "The AKS binding didn't return a managed cluster resource ID." } $AKS_CLUSTER = az aks show ` --resource-group "$($AKS_RESOURCE_PARTS[3])" ` --name "$($AKS_RESOURCE_PARTS[7])" ` --query '{name:name,resourceGroup:resourceGroup,kubernetesVersion:kubernetesVersion}' ` --output json | ConvertFrom-Json if ($LASTEXITCODE -ne 0 -or $null -eq $AKS_CLUSTER) { throw "Couldn't read the managed AKS cluster. Check binding provisioning and your access." } $CLUSTER_NAME = $AKS_CLUSTER.name $AKS_RESOURCE_GROUP = $AKS_CLUSTER.resourceGroup $AKS_CLUSTERConfirm that
kubernetesVersionis 1.35 or later. KeepRESOURCE_GROUPunchanged: it identifies the workload space's resource group, which can differ fromAKS_RESOURCE_GROUP.Grant the walkthrough user Kubernetes administrator access if they don't already have it. Workload Manager's application role assignments don't grant your account access to Kubernetes resources. For a cluster that uses Azure RBAC, an authorized administrator can assign Azure Kubernetes Service RBAC Cluster Admin at the cluster scope. These commands assign the role to the signed-in user.
If Microsoft Graph authentication is blocked, replace the
az ad signed-in-user showassignment with$USER_OBJECT_ID = "<user-object-id>", using the user Object ID supplied by your directory administrator.$USER_OBJECT_ID = az ad signed-in-user show --query id --output tsv if ($LASTEXITCODE -ne 0 -or [string]::IsNullOrWhiteSpace($USER_OBJECT_ID)) { throw "Couldn't resolve the signed-in user." } az role assignment create ` --assignee-object-id "$USER_OBJECT_ID" ` --assignee-principal-type User ` --role "Azure Kubernetes Service RBAC Cluster Admin" ` --scope "$AKS_RESOURCE_ID"Record the assignment ID if you create it for this walkthrough. Allow time for role propagation before running Kubernetes commands. Getting cluster credentials alone doesn't grant Kubernetes access.
Install the Pod snapshot cluster extension
Install the extension directly on the managed AKS cluster by using az k8s-extension with the cluster name and resource group resolved from the AKS runtime binding. Run these commands in the same PowerShell session as the setup steps.
Use Pod snapshot extension version 0.1.1 or later. The create command doesn't pin a version and uses the service-offered version with automatic upgrades enabled by default.
You can install Pod snapshot and Agent Sandbox in either order. The Pod snapshot manager detects the Sandbox API when it becomes available, including after the manager starts, without requiring a restart. Agent Sandbox isn't required to capture and restore raw Pods.
Install or update the cluster extension CLI.
az extension add --name k8s-extension --upgradeCreate the Pod snapshot extension for the serverless sandbox runtime.
az k8s-extension create ` --subscription "$SUBSCRIPTION_ID" ` --resource-group "$AKS_RESOURCE_GROUP" ` --cluster-name "$CLUSTER_NAME" ` --cluster-type managedClusters ` --name pod-snapshot ` --extension-type Microsoft.PodSnapshot ` --configuration-settings ` "nodeWorker.enabled=false" ` "broker.enabled=false"These settings disable the node worker and Azure Blob access broker. The serverless runtime provides its own snapshot agent and managed storage; don't configure Blob storage or broker workload identity for this installation.
Check the extension's provisioning state and installed version.
az k8s-extension show ` --subscription "$SUBSCRIPTION_ID" ` --resource-group "$AKS_RESOURCE_GROUP" ` --cluster-name "$CLUSTER_NAME" ` --cluster-type managedClusters ` --name pod-snapshot ` --query '{type:extensionType,state:provisioningState,version:currentVersion}'Continue only after
stateisSucceededandversionis0.1.1or later. A successful installation of an older version doesn't meet this requirement.Check the workload space again after you provision its bindings and runtime link and install Pod snapshot.
az workload-manager workload-space show ` --resource-group "$RESOURCE_GROUP" ` --name "$SPACE_NAME" ` --query 'properties.{provisioningState:provisioningState}'Continue only after
provisioningStateisSucceeded. This CLI check doesn't verify aggregate readiness or workload behavior. Complete the Kubernetes checks in the next step.Connect to the managed AKS cluster and wait for the Pod snapshot manager to become Ready before applying snapshot resources.
$KUBE_CONTEXT = "$SUBSCRIPTION_ID-$SPACE_NAME"
az aks get-credentials `
  --subscription "$SUBSCRIPTION_ID" `
  --resource-group "$AKS_RESOURCE_GROUP" `
  --name "$CLUSTER_NAME" `
  --context "$KUBE_CONTEXT" `
  --overwrite-existing

if ($LASTEXITCODE -ne 0) {
  throw "Couldn't get cluster credentials. Check the cluster and your access before continuing."
}

kubectl config use-context "$KUBE_CONTEXT"
Configure Kubernetes authentication to use your current Azure CLI sign-in instead of starting a separate device-code sign-in.
kubelogin convert-kubeconfig --login azureclikubectl -n pod-snapshot-system rollout status ` deployment/pod-snapshot-manager --timeout=10mkubectl -n pod-snapshot-system get pods -o widekubectl get runtimeclass virtualnode2 -o yamlContinue only after the manager rollout succeeds and the
virtualnode2RuntimeClass exists. If a check fails, resolve the installation or runtime configuration before creating snapshot resources.
Configure a storage resource and policy
Create a cluster-scoped storage configuration that selects the managed VN2 backend. This Pod snapshot storage configuration doesn't require a customer storage account, container, Blob role assignment, or broker workload identity. The runtime manages snapshot storage.
Create
vn2-storage.yamlwith the following content. Don't specify a namespace becausePodSnapshotStorageConfigis cluster-scoped.apiVersion: podsnapshot.aks.azure.com/v1alpha1 kind: PodSnapshotStorageConfig metadata: name: vn2-storage spec: snapshotStorageConfig: managedVn2: {}Apply the storage configuration and inspect it.
kubectl apply -f vn2-storage.yamlkubectl get podsnapshotstorageconfig vn2-storage -o yaml
Use the managed VN2 storage configuration for the serverless workload. The ACI runtime manages snapshot execution and storage.
Verify the runtime and virtual node.
kubectl get runtimeclass virtualnode2 -o yamlkubectl get nodes ` -L podsnapshot.aks.azure.com/sandbox-group-identifierContinue only when the runtime exists and its virtual node is Ready with a nonempty sandbox-group identifier. The runtime must provide its snapshot agent and the agent's Kubernetes permissions. Installing Pod snapshot doesn't deploy the VN2 snapshot agent. Don't add or change sandbox-group labels manually.
Create
aci-snapshot-policy.yaml.apiVersion: v1 kind: Namespace metadata: name: aci-workload-demo --- apiVersion: podsnapshot.aks.azure.com/v1alpha1 kind: PodSnapshotPolicy metadata: name: aci-workload-policy namespace: aci-workload-demo spec: storageConfigName: vn2-storage selector: matchLabels: app: aci-workload triggerConfig: type: manual postCheckpoint: resumepostCheckpoint: resumekeeps the source workload running after capture.Apply the policy and wait for it to become Ready.
kubectl apply -f aci-snapshot-policy.yamlkubectl -n aci-workload-demo wait --for=condition=Ready ` podsnapshotpolicy/aci-workload-policy --timeout=5mIf validation fails, inspect the policy's
PolicySpecSupportedandStorageConfigValidconditions.
Prepare your workload
Use a digest-pinned container image that the serverless runtime supports and can pull. Configure image pull credentials if required, and use the same immutable image reference for capture and restore. Your workload doesn't need a specific HTTP endpoint to use Pod snapshot.
Choose a workload with observable application state, such as an in-memory session identifier, initialized application data, or task progress. Adapt the resource settings, commands, arguments, configuration, and health checks to your application. Without an application-specific readiness probe, Pod readiness doesn't establish that initialization has completed.
Create
aci-workload.yaml. Replace<your-container-image>@sha256:<image-digest>with your workload image reference and add its application-specific settings. This pod usesvirtualnode2.apiVersion: v1 kind: Pod metadata: name: aci-workload namespace: aci-workload-demo labels: app: aci-workload spec: enableServiceLinks: false runtimeClassName: virtualnode2 containers: - name: workload image: <your-container-image>@sha256:<image-digest> resources: requests: cpu: "1" memory: 1Gi limits: cpu: "1" memory: 1GiApply the manifest and wait for the source pod to become Ready.
kubectl apply -f aci-workload.yamlkubectl -n aci-workload-demo wait --for=condition=Ready ` pod/aci-workload --timeout=10mkubectl -n aci-workload-demo get pod aci-workload -o wideVerify that the pod runs on the serverless runtime's virtual node before capturing it.
Wait for application initialization to finish, then record state that distinguishes a resumed process from a fresh start. Use your application's API, logs, or another application-specific check. Record the expected restored state before creating the trigger. Data read only from an external database or persistent volume doesn't prove that process memory was restored.
Capture pod state
Capture a Ready pod that matches the policy selector. Don't create a PodSnapshot directly; the trigger creates it and records its name.
Create
aci-snapshot-trigger.yaml.apiVersion: podsnapshot.aks.azure.com/v1alpha1 kind: PodSnapshotManualTrigger metadata: name: aci-workload-snapshot namespace: aci-workload-demo spec: targetPod: aci-workload policyName: aci-workload-policyApply the trigger and wait for completion.
kubectl apply -f aci-snapshot-trigger.yamlkubectl -n aci-workload-demo wait --for=condition=Triggered ` podsnapshotmanualtrigger/aci-workload-snapshot --timeout=10mResolve the snapshot name and wait for the snapshot itself to become Ready.
$SNAPSHOT_NAME = kubectl -n aci-workload-demo get `
  podsnapshotmanualtrigger aci-workload-snapshot `
  -o jsonpath='{.status.snapshotCreated.name}'

if ([string]::IsNullOrWhiteSpace($SNAPSHOT_NAME)) {
  throw "The trigger hasn't recorded a snapshot name. Inspect its conditions before continuing."
}
kubectl -n aci-workload-demo wait --for=condition=Ready ` "podsnapshot/$SNAPSHOT_NAME" --timeout=10mkubectl -n aci-workload-demo get podsnapshot "$SNAPSHOT_NAME" -o yamlConfirm that
status.storageStatus.managedVn2records a nonemptysnapshotName, a nonemptysandboxGroupIdentifier, and a successfuloperationState. This is provider-managed storage, not Azure Blob status. Keep the KubernetesPodSnapshotname in$SNAPSHOT_NAME; don't replace it with the provider'ssnapshotName.
Authorize snapshot restore
The user who creates the restore pod needs permission to create pods and to use the custom restore verb on the selected snapshot. The restore label alone doesn't grant access.
Warning
Don't grant the restore verb to built-in Kubernetes controllers, such as system:serviceaccount:kube-system:replicaset-controller or system:serviceaccount:kube-system:job-controller, to enable restore through Deployments, ReplicaSets, or Jobs. The controller creates the Pod, so restore authorization checks the controller's identity, not the user who created the workload. Granting restore access to a controller delegates that access to users who can make it create Pods in the namespace, even if those users don't have restore permission themselves.
As a Kubernetes administrator, create
aci-restore-access.yaml. Replace<snapshot-name>with$SNAPSHOT_NAMEand<kubernetes-user-name>with the authenticated Kubernetes username of the user who creates the restore pod.apiVersion: rbac.authorization.k8s.io/v1 kind: Role metadata: name: aci-snapshot-restorer namespace: aci-workload-demo rules: - apiGroups: ["podsnapshot.aks.azure.com"] resources: ["podsnapshots"] resourceNames: ["<snapshot-name>"] verbs: ["restore"] --- apiVersion: rbac.authorization.k8s.io/v1 kind: RoleBinding metadata: name: aci-user-restorer namespace: aci-workload-demo subjects: - kind: User name: <kubernetes-user-name> apiGroup: rbac.authorization.k8s.io roleRef: kind: Role name: aci-snapshot-restorer apiGroup: rbac.authorization.k8s.ioApply the permissions.
kubectl apply -f aci-restore-access.yamlAs the user who will create the restore pod, verify restore permission.
kubectl auth can-i restore `
  "podsnapshots.podsnapshot.aks.azure.com/$SNAPSHOT_NAME" `
  --namespace aci-workload-demo
The warning
Warning: verb 'restore' is not a known verbis expected becauserestoreis a custom verb. It doesn't indicate an authorization failure. Continue only if the command returnsyes.
Start a workload from captured pod state
ACI supports only explicit restore. Specify the name of a Ready snapshot in the same namespace. Admission selects a Ready virtual node with the snapshot's sandbox-group identifier and injects the provider restore annotation.
After verifying snapshot readiness, delete the source pod. Keep the policy, storage configuration, snapshot, and serverless runtime.
kubectl -n aci-workload-demo delete pod aci-workload --wait=trueCreate
aci-workload-restore.yaml. Replace<snapshot-name>with$SNAPSHOT_NAMEand use the exact image reference from the source pod. Keep its container name, command, arguments, resource sizing, andenableServiceLinkssetting unchanged.apiVersion: v1 kind: Pod metadata: name: aci-workload-restore namespace: aci-workload-demo labels: app: aci-workload podsnapshot.aks.azure.com/restore: "true" annotations: podsnapshot.aks.azure.com/restore-from: <snapshot-name> spec: enableServiceLinks: false runtimeClassName: virtualnode2 containers: - name: workload image: <your-container-image>@sha256:<image-digest> resources: requests: cpu: "1" memory: 1Gi limits: cpu: "1" memory: 1GiCopy any application-specific commands, arguments, configuration, health checks, and image pull credentials from your source manifest into the restore manifest. Don't set the internal provider snapshot annotation yourself. If no eligible Ready node matches the snapshot's sandbox group and the pod's scheduling constraints, admission denies the restore instead of starting a new workload.
Apply the restore manifest and wait for readiness.
kubectl apply -f aci-workload-restore.yamlkubectl -n aci-workload-demo wait --for=condition=Ready ` pod/aci-workload-restore --timeout=10mUse the same application-specific check to compare the restored state with the state recorded before capture. Confirm that initialized data, session identity, or task progress resumed from the captured point rather than returning to its initial state. Check external connections and dependencies separately. A Ready pod or a shorter startup time alone doesn't prove that process state was restored.
Inspect the pod's placement and restore event.
kubectl -n aci-workload-demo get pod aci-workload-restore -o widekubectl -n aci-workload-demo get events ` --field-selector involvedObject.name=aci-workload-restore ` --sort-by='.lastTimestamp'The manager emits
AKSPodRestoredand updates the snapshot'slastAccessTimeafter the restored ACI pod is Ready. Verify application-state continuity as well as the event.
Restore an Agent Sandbox workload
This section is optional. To install Agent Sandbox version 1.0.7 or later, follow the serverless runtime instructions in the Agent Sandbox cluster extension article, and wait for its controller to become Ready. Reuse this workload space and its deployment values. Don't create another workload space, new bindings, or a new runtime link.
You can install Agent Sandbox before or after installing Pod snapshot without restarting the Pod snapshot manager. This example reuses the Ready snapshot and the aci-snapshot-restorer Role created earlier. ACI supports only explicit snapshot selection for Pods and Sandbox workloads.
As a Kubernetes administrator, create
aci-sandbox-restore-access.yamlto authorize the Agent Sandbox controller.apiVersion: rbac.authorization.k8s.io/v1 kind: RoleBinding metadata: name: aci-sandbox-restorer namespace: aci-workload-demo subjects: - kind: ServiceAccount name: agent-sandbox-controller namespace: agent-sandbox-system roleRef: kind: Role name: aci-snapshot-restorer apiGroup: rbac.authorization.k8s.iokubectl apply -f aci-sandbox-restore-access.yamlThis binding delegates snapshot restore to users who can make the controller create restore pods. Restrict Sandbox creation and update permissions accordingly.
Create
aci-workload-sandbox-restore.yaml. Replace<snapshot-name>with$SNAPSHOT_NAMEand use the exact image reference from the source pod. Put restore intent on the pod template, not only on Sandbox metadata.apiVersion: agents.x-k8s.io/v1beta1 kind: Sandbox metadata: name: aci-workload-sandbox-restore namespace: aci-workload-demo spec: podTemplate: metadata: labels: app: aci-workload example: aci-workload-sandbox-restore podsnapshot.aks.azure.com/restore: "true" annotations: podsnapshot.aks.azure.com/restore-from: <snapshot-name> spec: enableServiceLinks: false runtimeClassName: virtualnode2 containers: - name: workload image: <your-container-image>@sha256:<image-digest> resources: requests: cpu: "1" memory: 1Gi limits: cpu: "1" memory: 1GiCopy your source workload's application-specific commands, arguments, configuration, health checks, and image pull credentials into
spec.podTemplate.spec. Keep container identity and resource sizing compatible with the snapshot.Apply the manifest and wait for the Sandbox and its backing pod to become Ready.
kubectl apply -f aci-workload-sandbox-restore.yamlkubectl -n aci-workload-demo wait --for=condition=Ready ` sandbox/aci-workload-sandbox-restore --timeout=10mkubectl -n aci-workload-demo wait --for=condition=Ready pod ` --selector example=aci-workload-sandbox-restore --timeout=10mGet the name of the pod created by the Sandbox controller.
$ACI_SANDBOX_POD = kubectl -n aci-workload-demo get pods `
  --selector example=aci-workload-sandbox-restore `
  -o jsonpath='{.items[0].metadata.name}'

kubectl -n aci-workload-demo get pod "$ACI_SANDBOX_POD" -o wide
Use your application's API, logs, or another application-specific check against this pod to verify the captured state, independently of the earlier raw Pod restore. A Ready Sandbox alone doesn't prove application-state continuity.
Schedule snapshots and configure retention
This section is optional and doesn't require Agent Sandbox. It reuses the managed VN2 storage configuration and namespace created earlier. Keep at least one eligible workload pod running before you apply the policy.
A cron policy captures one representative Ready pod matching its selector per run, not every matching pod. Use concurrencyPolicy: Forbid to prevent overlapping captures and postCheckpoint: resume to keep the source running. A cron policy with postCheckpoint: stop doesn't become Ready.
Create aci-workload-cron-policy.yaml:
apiVersion: podsnapshot.aks.azure.com/v1alpha1
kind: PodSnapshotPolicy
metadata:
  name: aci-workload-nightly
  namespace: aci-workload-demo
spec:
  storageConfigName: vn2-storage
  selector:
    matchLabels:
      app: aci-workload
  triggerConfig:
    type: cron
    schedule: "0 3 * * *"
    timeZone: America/Los_Angeles
    startingDeadlineSeconds: 600
    concurrencyPolicy: Forbid
    postCheckpoint: resume
  retentionConfig:
    maxSnapshots: 7
    lastAccessTimeout: 168h
This policy schedules a daily capture at 03:00 in the specified time zone. startingDeadlineSeconds limits how late a missed run can start. maxSnapshots caps usable Ready snapshots per policy, not per source pod. lastAccessTimeout enables cleanup based on the time since a snapshot was last accessed. Protected snapshots can delay retention cleanup while a restore is in flight. Plan for the capacity and cost of provider-managed snapshots, including snapshots retained during protected restores.
kubectl apply -f aci-workload-cron-policy.yaml
kubectl -n aci-workload-demo get podsnapshotpolicy aci-workload-nightly -o yaml
ACI supports only explicit restore, including for scheduled snapshots. To restore a scheduled snapshot, specify its name in restore-from and update the example Role's resourceNames to authorize that exact snapshot. Retention can delete an older snapshot named by the Role. The Role doesn't prevent snapshot deletion.
To stop future scheduled captures, delete the cron policy. The policy doesn't own the snapshots it creates, so deleting the policy preserves them and stops its retention rules from applying to them. Delete those snapshots explicitly when you no longer need them.
Clean up resources
Stop scheduled captures, delete workload consumers, and then delete snapshots before uninstalling Pod snapshot or deleting the runtime link and bindings. The extension requires the runtime's snapshot agent to complete provider-managed snapshot deletion. If a cleanup command fails or times out, resolve the failure before continuing. Don't remove finalizers to force cleanup.
Run these commands in the same PowerShell session and Kubernetes context used for setup. If you return in a new shell, restore the deployment values and reconnect to the managed AKS cluster first. Set $SNAPSHOT_NAME again before running commands that use it. List the snapshots, then replace <snapshot-name> with the name of your example snapshot.
kubectl -n aci-workload-demo get podsnapshots
$SNAPSHOT_NAME = "<snapshot-name>"
Before removing Azure resources or permissions, identify which resources and role assignments you created solely for this walkthrough. Keep the IDs of newly created role assignments so an administrator can remove those exact assignments later. Don't remove preexisting grants or permissions used by other workload spaces.
If you used both articles, stop scheduled captures first, remove Agent Sandbox warm pools and Sandbox consumers in both example namespaces, and then delete snapshots. Complete workload and snapshot cleanup before uninstalling either extension. Uninstall both extensions before deleting the workload space once.
The following commands delete all snapshots in the dedicated aci-workload-demo namespace. Don't run them unchanged in a namespace that contains workloads or snapshots you need to keep.
If you created the cron policy, delete it first to stop new scheduled captures and wait for its active run to finish. Allow any in-flight manual capture to finish before deleting its trigger or source pod.
kubectl -n aci-workload-demo delete podsnapshotpolicy aci-workload-nightly `
  --ignore-not-found --wait=true --timeout=10m
If you created the optional Sandbox, delete it while its controller is running.
kubectl -n aci-workload-demo delete sandbox aci-workload-sandbox-restore `
  --ignore-not-found --cascade=foreground --wait=true --timeout=10m
Then delete the example pods.
kubectl -n aci-workload-demo delete pod aci-workload aci-workload-restore `
  --ignore-not-found --wait=true --timeout=10m
Confirm that no example pods remain before deleting snapshots.
kubectl -n aci-workload-demo get podsIf example pods are still terminating, wait for their deletion before continuing. If a pod isn't terminating, investigate its owner and delete the example workload that owns it. If waiting times out, inspect namespace events and controller logs, resolve the reported error, and retry. Keep both controllers and the runtime running; don't force-delete pods or remove finalizers.
kubectl -n aci-workload-demo wait --for=delete pods --all --timeout=10mDelete the trigger and snapshot. Don't continue until cleanup finishes successfully.
kubectl -n aci-workload-demo delete podsnapshotmanualtrigger `
  aci-workload-snapshot --ignore-not-found --wait=true
kubectl -n aci-workload-demo delete podsnapshot "$SNAPSHOT_NAME" ` --ignore-not-found --wait=true --timeout=10mDelete all remaining snapshots in the dedicated example namespace, including snapshots created by the cron policy. Wait for their finalizers to finish provider-managed storage cleanup. Don't delete the namespace or runtime resources until all snapshots are deleted.
kubectl -n aci-workload-demo delete podsnapshots --all --wait=true --timeout=10mConfirm that no snapshots remain in the example namespace, then delete the dedicated example namespace if it contains no resources you need to keep.
kubectl -n aci-workload-demo get podsnapshotsDelete the manual capture policy after its triggers and snapshots are gone.
kubectl -n aci-workload-demo delete podsnapshotpolicy aci-workload-policy `
  --ignore-not-found --wait=true --timeout=5m
kubectl delete namespace aci-workload-demo --wait=true --timeout=10mDelete the cluster-scoped storage configuration only if no policies in other namespaces reference it. Otherwise, keep the configuration.
kubectl delete podsnapshotstorageconfig vn2-storage `
  --ignore-not-found --wait=true --timeout=5m
If no workloads, snapshots, or policies in any namespace need Pod snapshot, uninstall the
pod-snapshotcluster extension instance.az k8s-extension delete ` --subscription "$SUBSCRIPTION_ID" ` --resource-group "$AKS_RESOURCE_GROUP" ` --cluster-name "$CLUSTER_NAME" ` --cluster-type managedClusters ` --name pod-snapshot ` --yesList the remaining extensions to verify that
pod-snapshotis removed.az k8s-extension list ` --subscription "$SUBSCRIPTION_ID" ` --resource-group "$AKS_RESOURCE_GROUP" ` --cluster-name "$CLUSTER_NAME" ` --cluster-type managedClusters ` --query '[].{name:name,state:provisioningState}' --output tableUninstalling Pod snapshot doesn't delete the workload space, AKS cluster, or ACI runtime. Those resources can continue to incur charges. Delete them separately only when they're dedicated to this example and no longer needed.
Delete the workload space and its owned resources only if you created it solely for this walkthrough and no workloads need it.
If you installed Agent Sandbox, remove its Sandbox workloads and extension by following its serverless runtime cleanup procedure before deleting the workload space. Workload-space deletion removes its owned AKS and ACI resources and can permanently delete workload data. The resource group and both applications' prerequisite role assignments remain. Don't delete a shared workload space or resource group.
Record the AKS managed node resource group's name before deleting the workload space.
$NODE_RESOURCE_GROUP = az aks show `
  --subscription "$SUBSCRIPTION_ID" `
  --resource-group "$AKS_RESOURCE_GROUP" `
  --name "$CLUSTER_NAME" `
  --query nodeResourceGroup --output tsv
if ([string]::IsNullOrWhiteSpace($NODE_RESOURCE_GROUP)) {
  throw "Couldn't retrieve the AKS managed node resource group."
}
az workload-manager workload-space delete ` --resource-group "$RESOURCE_GROUP" ` --name "$SPACE_NAME" ` --yesWait for deletion to finish. Verify that the workload space no longer exists and that its owned AKS and ACI resources no longer appear in their resource groups. Investigate any remaining managed resources before considering infrastructure cleanup complete.
Switch back to the standard Azure cloud profile when you finish using the regional endpoint. This step doesn't delete any resources.
az cloud set --name AzureCloudOptionally, delete the resource group only if you created it solely for this walkthrough and it contains no resources you need to keep.
Complete workload and snapshot cleanup first. Keep the prerequisite application grants until infrastructure deletion finishes, including when resource-group deletion is used to recover a failed workload-space deletion.
Verify that both the dedicated resource group and the managed node resource group are gone before considering cleanup complete.
az group delete `
  --subscription "$SUBSCRIPTION_ID" `
  --name "$RESOURCE_GROUP" `
  --yes
Verify that the command returns
false.az group exists ` --subscription "$SUBSCRIPTION_ID" ` --name "$RESOURCE_GROUP"Verify that the managed node resource group check also returns
false.az group exists ` --subscription "$SUBSCRIPTION_ID" ` --name "$NODE_RESOURCE_GROUP"After infrastructure cleanup, have your subscription administrator review the application role assignments created for this walkthrough. Remove an assignment only if it still exists, you created it during this walkthrough, and no other workload space or service needs it. Don't remove preexisting or shared assignments.
Subscription-scoped grants can be shared across teams' resource groups. Deleting your workload space or resource group doesn't mean those grants are unused.
Use the assignment's
idfrom the correspondingaz role assignment createoutput. Repeat for each assignment approved for removal.az role assignment delete ` --ids "<role-assignment-resource-id-created-for-this-walkthrough>"