Note
Access to this page requires authorization. You can try signing in or changing directories.
Access to this page requires authorization. You can try changing directories.
Applies to: AKS desktop and AKS on bare metal clusters.
Important
AKS on bare metal support in AKS desktop is currently in preview. Preview features are provided without a service-level agreement and aren't recommended for production workloads. Certain features might not be supported or might have constrained capabilities.
To report a problem or suggest an improvement, file an AKS desktop issue.
AKS desktop gives developers and operators a consistent experience across cloud, hybrid, and edge clusters. For AKS on bare metal, you can register a cluster with guided steps, browse Kubernetes resources, review access, manage existing applications, and troubleshoot workloads without running connection commands or exposing the Kubernetes API server through an inbound firewall port.
AKS desktop uses Azure Arc cluster connect to reach the Kubernetes API server through an outbound cluster connection.
This preview capability requires AKS desktop v0.11.0 or later. To verify your installed version, see Check your installed version. AKS on bare metal clusters are labeled AKS Hybrid & Edge in the application. This article uses AKS on bare metal for the product and the UI label when you need to identify an option in AKS desktop.
Important
AKS preview features are available on a self-service, opt-in basis. Previews are provided "as is" and "as available," and they're excluded from the service-level agreements and limited warranty. AKS previews are partially covered by customer support on a best-effort basis. As such, these features aren't meant for production use. For more information, see the following support articles:
What you learn
You learn how to:
- Add an AKS on bare metal cluster to AKS desktop.
- Browse cluster resources and manage existing applications.
- Review access information for clusters that use Kubernetes RBAC or Azure RBAC.
- Restart the cluster connect proxy when troubleshooting.
Prerequisites
Before you begin, ensure that you have:
- An Azure account with access to the subscription and resource group that contain the AKS on bare metal cluster.
- An existing online AKS on bare metal cluster. Upgrade the Azure Arc agents to the latest supported version.
- Azure CLI with the latest
connectedk8sextension. Install the extension withaz extension add --name connectedk8s, or update it withaz extension update --name connectedk8s. - Outbound network access for the Azure Arc endpoints required by cluster connect. Cluster connect doesn't require an inbound firewall port.
- Permission to retrieve a cluster connect-based kubeconfig. The Azure Arc Enabled Kubernetes Cluster User Role provides this permission.
- Kubernetes API permissions appropriate for your tasks. For native Kubernetes RBAC, an administrator must create the required RoleBinding or ClusterRoleBinding. For Azure RBAC, assign an appropriate Azure Arc Kubernetes Viewer, Azure Arc Kubernetes Writer, Azure Arc Kubernetes Admin, or Azure Arc Kubernetes Cluster Admin role at the cluster or namespace scope.
- A nonproduction cluster for initial validation and troubleshooting.
Understand how AKS desktop connects
Azure Arc cluster connect provides secure access to an Arc-enabled Kubernetes API server through an outbound connection from the cluster. When you open a saved AKS on bare metal cluster, AKS desktop starts and verifies the local cluster connect proxy before it loads cluster resources.
The proxy uses your current Azure sign-in and the authorization model configured for the cluster. AKS desktop doesn't bypass Azure RBAC or Kubernetes RBAC. If your identity can't perform an operation, AKS desktop displays an authorization error instead of requesting broader access automatically.
The Start AKS Hybrid & Edge proxy command is a troubleshooting action. You shouldn't need to run it during the normal connection flow.
Add an AKS on bare metal cluster
Open AKS desktop and sign in with the Microsoft Entra account that has access to the cluster.
On the sign-in page, select Add Cluster from Azure.
Select the Azure subscription and the AKS on bare metal cluster. AKS desktop labels an AKS on bare metal cluster as AKS Hybrid & Edge in the cluster list.
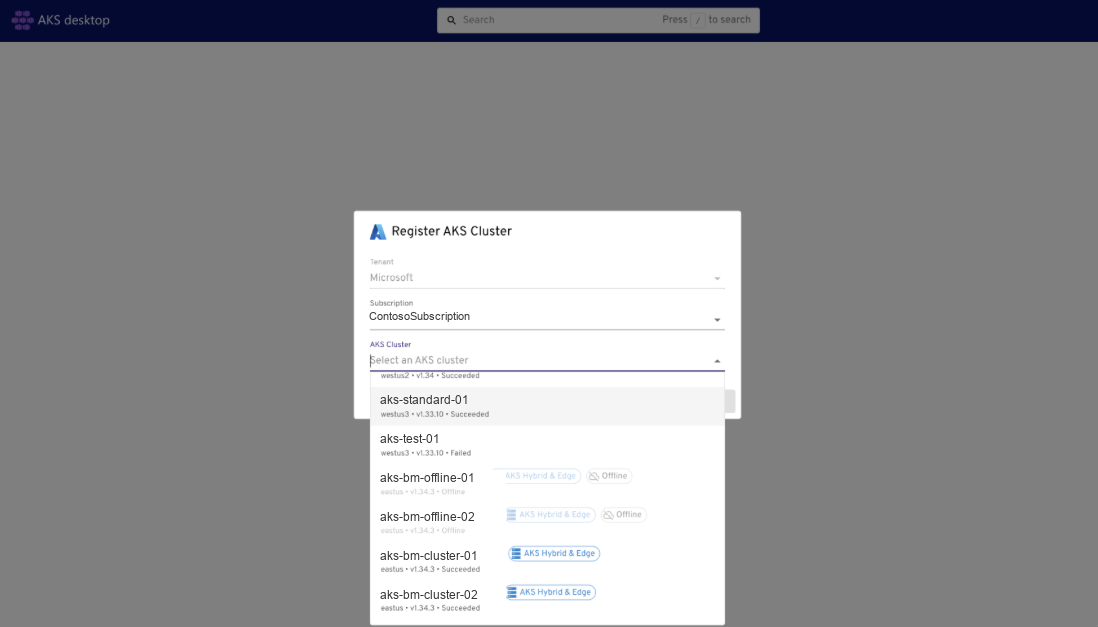
Review the displayed cluster and access information, and then select Register Cluster.
From All Clusters, select the cluster you added. AKS desktop starts the cluster connect proxy automatically and waits for the connection before loading the cluster view.
Confirm that the cluster overview and Kubernetes resources load for the selected cluster.
Expected result: The cluster opens without requiring a direct inbound network path to the Kubernetes API server. Resource data is scoped to the selected cluster and reflects the permissions of the signed-in identity.
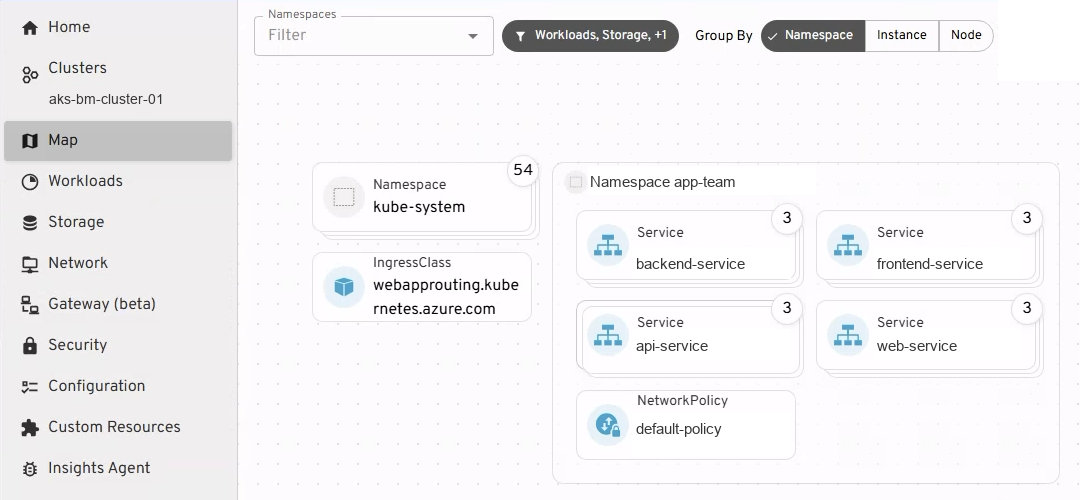
After registration, the cluster appears alongside your other clusters in All Clusters. Once AKS desktop establishes the cluster connect proxy, you can use the standard cluster resource experience to browse resources across namespaces, inspect workload configuration and logs, view resource relationships in Map, and troubleshoot workloads. Available actions and resources continue to reflect the cluster's capabilities and your assigned permissions.
To manage an existing application, import its namespace as a Project.
Restart the proxy for troubleshooting
If AKS desktop can't complete automatic proxy setup, use the manual proxy command to retry the connection.
- Confirm that you're signed in to the correct Azure tenant and subscription.
- Open All Clusters, select the action menu to the far right of your cluster, and then select Start AKS Hybrid & Edge proxy.
- Wait for the proxy status to report AKS Hybrid & Edge proxy is running, and then reopen the cluster.
- If the proxy still fails, record the error and follow the troubleshooting guidance in the next section.
Troubleshoot common issues
The cluster doesn't connect
- Confirm that the cluster is connected to Azure Arc and that its agents are current and healthy.
- Confirm outbound connectivity to all Azure Arc endpoints required for cluster connect.
- Confirm that the
clusterconnect-agentpod and the other pods in theazure-arcnamespace are running. - Sign out and back in if the Azure CLI or AKS desktop session expired, and then confirm the tenant and subscription.
- If you troubleshoot outside AKS desktop, update Azure CLI and the
connectedk8sextension, and then runaz connectedk8s proxywith the correct cluster and resource group. For more information, see Troubleshoot Azure Arc-enabled Kubernetes clusters.
Access is denied or the Access tab is incomplete
- Verify that your identity has permission to retrieve a cluster connect-based kubeconfig. The Azure Arc Enabled Kubernetes Cluster User Role provides this permission, regardless of whether the cluster uses native Kubernetes RBAC or Azure RBAC for Kubernetes authorization.
- Determine which Kubernetes authorization model the cluster uses:
- For native Kubernetes RBAC, verify that your Microsoft Entra identity has the RoleBinding or ClusterRoleBinding required for the operation.
- For Azure RBAC, verify that your identity has an appropriate Azure Arc Kubernetes data-plane role at the cluster or namespace scope required for the operation.
- Allow time for new Azure role assignments to propagate and then reopen the cluster.
Security recommendations
- Grant the least-privileged Azure and Kubernetes roles required for each task. Avoid using
cluster-adminfor routine access. - Scope Azure Arc Kubernetes role assignments to a namespace when cluster-wide access isn't required.
- Use cluster connect instead of exposing the Kubernetes API server through an inbound firewall rule.
- Don't include kubeconfig content, service account tokens, or other credentials in screenshots or support logs.
Next steps
- AKS desktop overview
- Connect to AKS clusters, view resources, and manage applications using AKS desktop
- Overview of Projects in AKS desktop
- Use Headlamp plugins in AKS desktop
- Use cluster connect to securely connect to Azure Arc-enabled Kubernetes clusters
- Troubleshoot Azure Arc-enabled Kubernetes clusters