Note
Access to this page requires authorization. You can try signing in or changing directories.
Access to this page requires authorization. You can try changing directories.
Deploying and managing Kubernetes applications typically requires writing YAML manifests, running kubectl commands, and switching between multiple tools. AKS desktop removes this complexity with guided workflows that let developers and DevOps engineers deploy, monitor, troubleshoot, and clean up applications without deep Kubernetes expertise.
This guide walks you through deploying a TypeScript application using AKS desktop, from creating a cluster through exploring application logs, metrics, scaling, and built-in troubleshooting tools.
Prerequisites
- An Azure subscription. If you don't have an Azure subscription, you can create a free Azure account.
- Azure CLI version 2.64.0 or later must be installed. Check your version using the
az --versioncommand. To install or upgrade, see Install Azure CLI. - The
aks-previewAzure CLI extension. Install it using theaz extension add --name aks-previewcommand. - AKS desktop installed. AKS desktop supports the following operating systems (OS): Windows, Linux, and Mac.
- If using an existing cluster, the cluster needs to be Microsoft Entra ID authenticated. To ensure your cluster is Microsoft Entra ID authenticated, use an AKS Automatic cluster. You also need the Azure Kubernetes Service RBAC Cluster Admin role or equivalent permissions on the target cluster.
Create Azure resources
If you don't have an existing AKS cluster and Azure Container Registry (ACR), you can create them using the Azure CLI. These sections show how to create a new resource group, AKS cluster, and ACR. If you already have these resources, you can skip to Register your cluster with AKS desktop.
Set environment variables
To simplify the commands, set the following environment variables in your terminal. Make sure to set myLocation to your Azure region. The example here uses RAND to create unique resource names. You can replace these with your own values if you prefer.
RAND=$RANDOM
export RAND
echo "Random resource identifier will be: ${RAND}"
myResourceGroup=bbash$RAND
myLocation=westus3
myClusterName=clu-$RAND
registryName=bbashreg$RAND
Create a resource group
Create an Azure resource group using the az group create command.
az group create --name $myResourceGroup --location $myLocation
Create an Azure container registry
Create an Azure container registry using the az acr create command.
az acr create --resource-group $myResourceGroup --name $registryName --sku Basic
Create an AKS cluster with ACR integration
Create an AKS cluster with ACR integration using the az aks create command. The --attach-acr parameter grants the AKS cluster permission to pull images from the ACR. This example command also sets the --sku to automatic. We recommend using AKS Automatic clusters for the best experience with AKS desktop, but you can also use a Standard cluster.
az aks create --resource-group $myResourceGroup --name $myClusterName --sku automatic --attach-acr $registryName
Grant cluster admin permissions
Get the cluster resource ID using the
az aks showcommand and set it to an environment variable.AKS_ID=$(az aks show --resource-group $myResourceGroup --name $myClusterName --query id --output tsv)Grant yourself admin permissions to the cluster using the
az role assignment createcommand with the Azure Kubernetes Service RBAC Cluster Admin role. Make sure to replace<your-entra-id>with your Microsoft Entra ID object ID.az role assignment create --role "Azure Kubernetes Service RBAC Cluster Admin" \ --assignee <your-entra-id> \ --scope $AKS_ID
Create a container image for testing
This example creates an image from the Contoso Air sample application, but you can use any container image to test deploying an application with AKS desktop. If you want to use a different image, make sure you replace the image details in the deployment steps.
Create a new directory, navigate into it, and clone the Contoso Air sample application. Then navigate to the web application directory. If you're using a different application or directory structure, adjust these commands accordingly.
mkdir myapp
cd myapp
git clone https://github.com/Azure-Samples/contoso-air
cd contoso-air/src/web
Build and push the container image to your container registry using the
az acr buildcommand. If you're using a different image, make sure to update the image name and path accordingly.az acr build --resource-group $myResourceGroup --registry $registryName --image contosoair:v1 .
Register your cluster with AKS desktop
Make sure you're signed in to AKS desktop with the same account that has access to the AKS cluster. Once signed in, select Add from Azure Subscription.
Enter the name of your Azure subscription if you have more than one. (Alternatively, select the arrow to open the drop-down list, then select your Azure subscription.)
Select your cluster, and then select Register Cluster

Create a managed Project in AKS desktop
In AKS desktop, navigate to the Projects tab and select Create a New Managed Project.
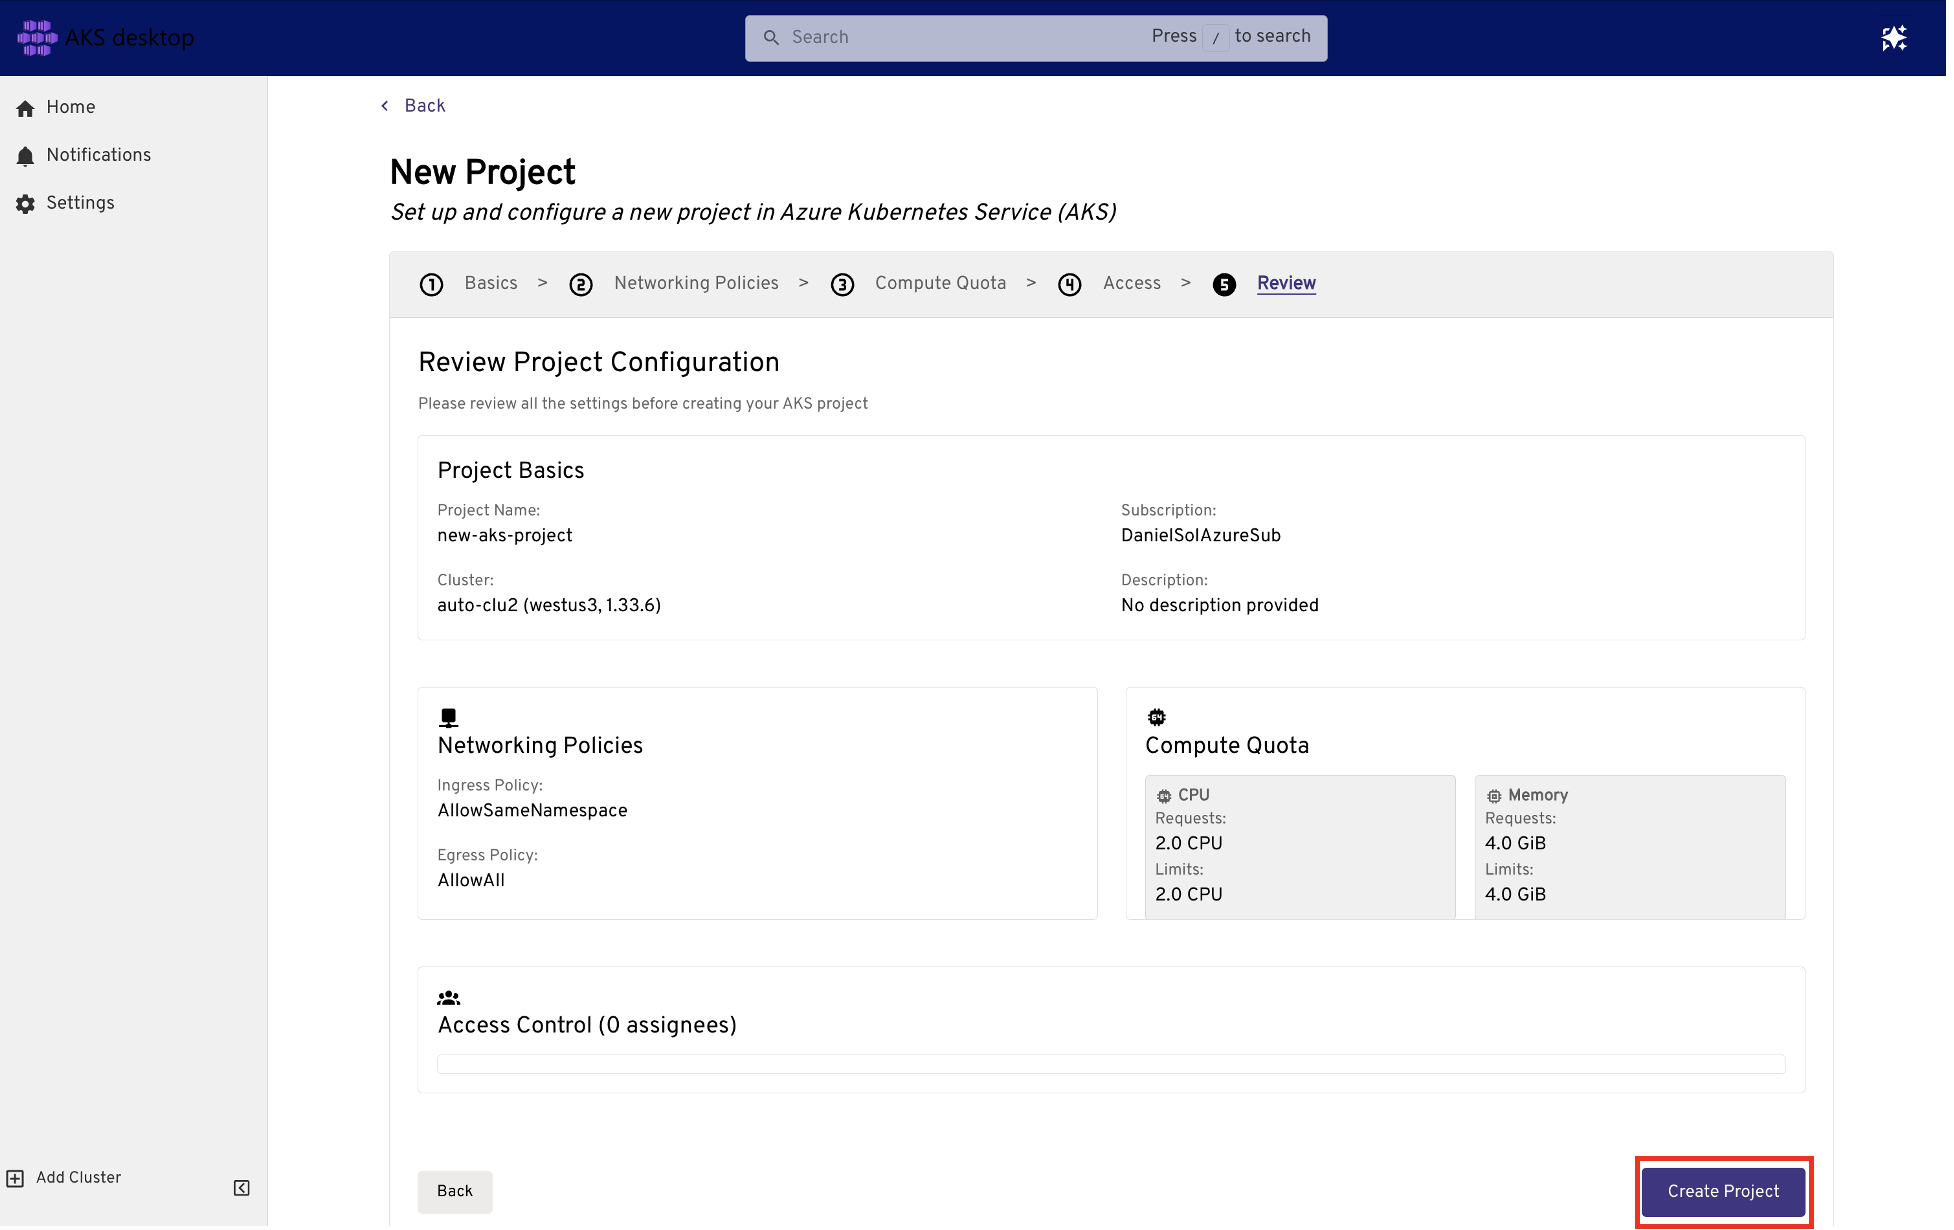
Configure the following Project settings:
- Basics:
- Project Name: For example,
my-dev-frontend - Subscription:
<your-subscription-name> - Cluster:
<your-cluster-name>
- Project Name: For example,
Note
When set the Azure subscription and AKS cluster, AKS desktop checks for cluster and subscription feature support required for the AKS desktop experience.
Networking Policies: You can leave the default settings for this quickstart or update them as needed.
- To expose the application publicly, change Ingress to
Allow all traffic.
- To expose the application publicly, change Ingress to
Compute Quota: Leave default for the test application.
Access: Add someone or delete the entry by deleting the line item.
- Basics:
Under Review, verify the settings for your Project, and then select Create Project.
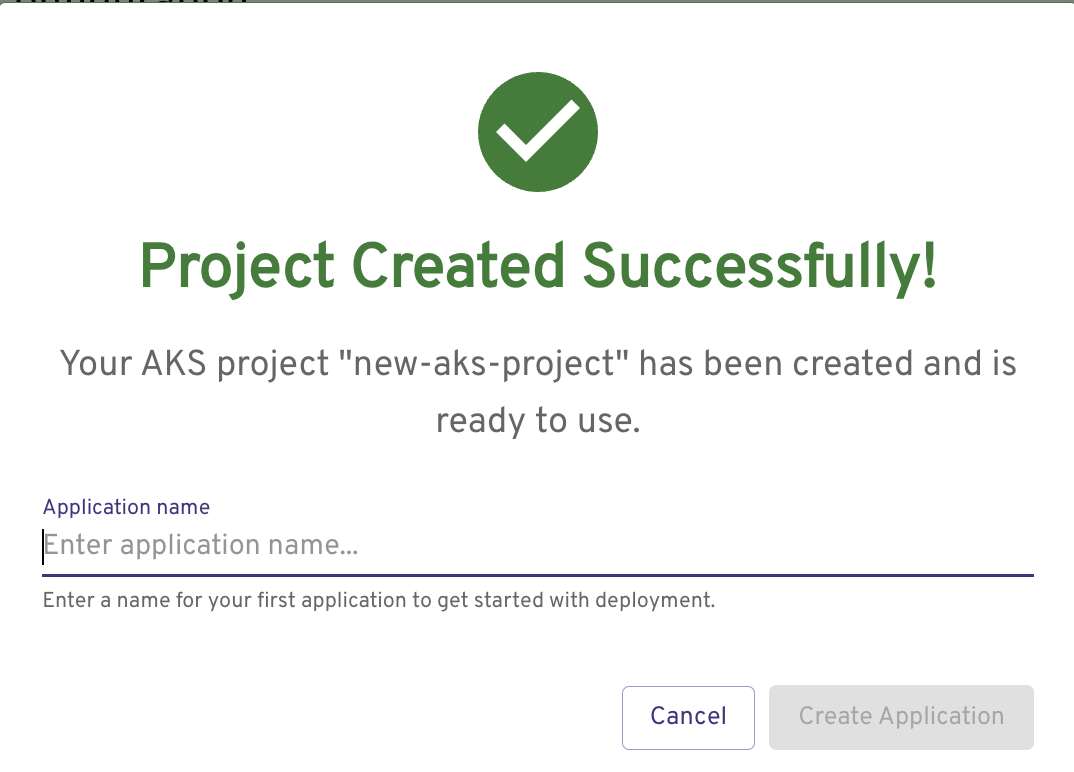
Deploy an application
Provide an application name, and then select Create Application.
Select a source for your application. For this example, select Container Image > Next.
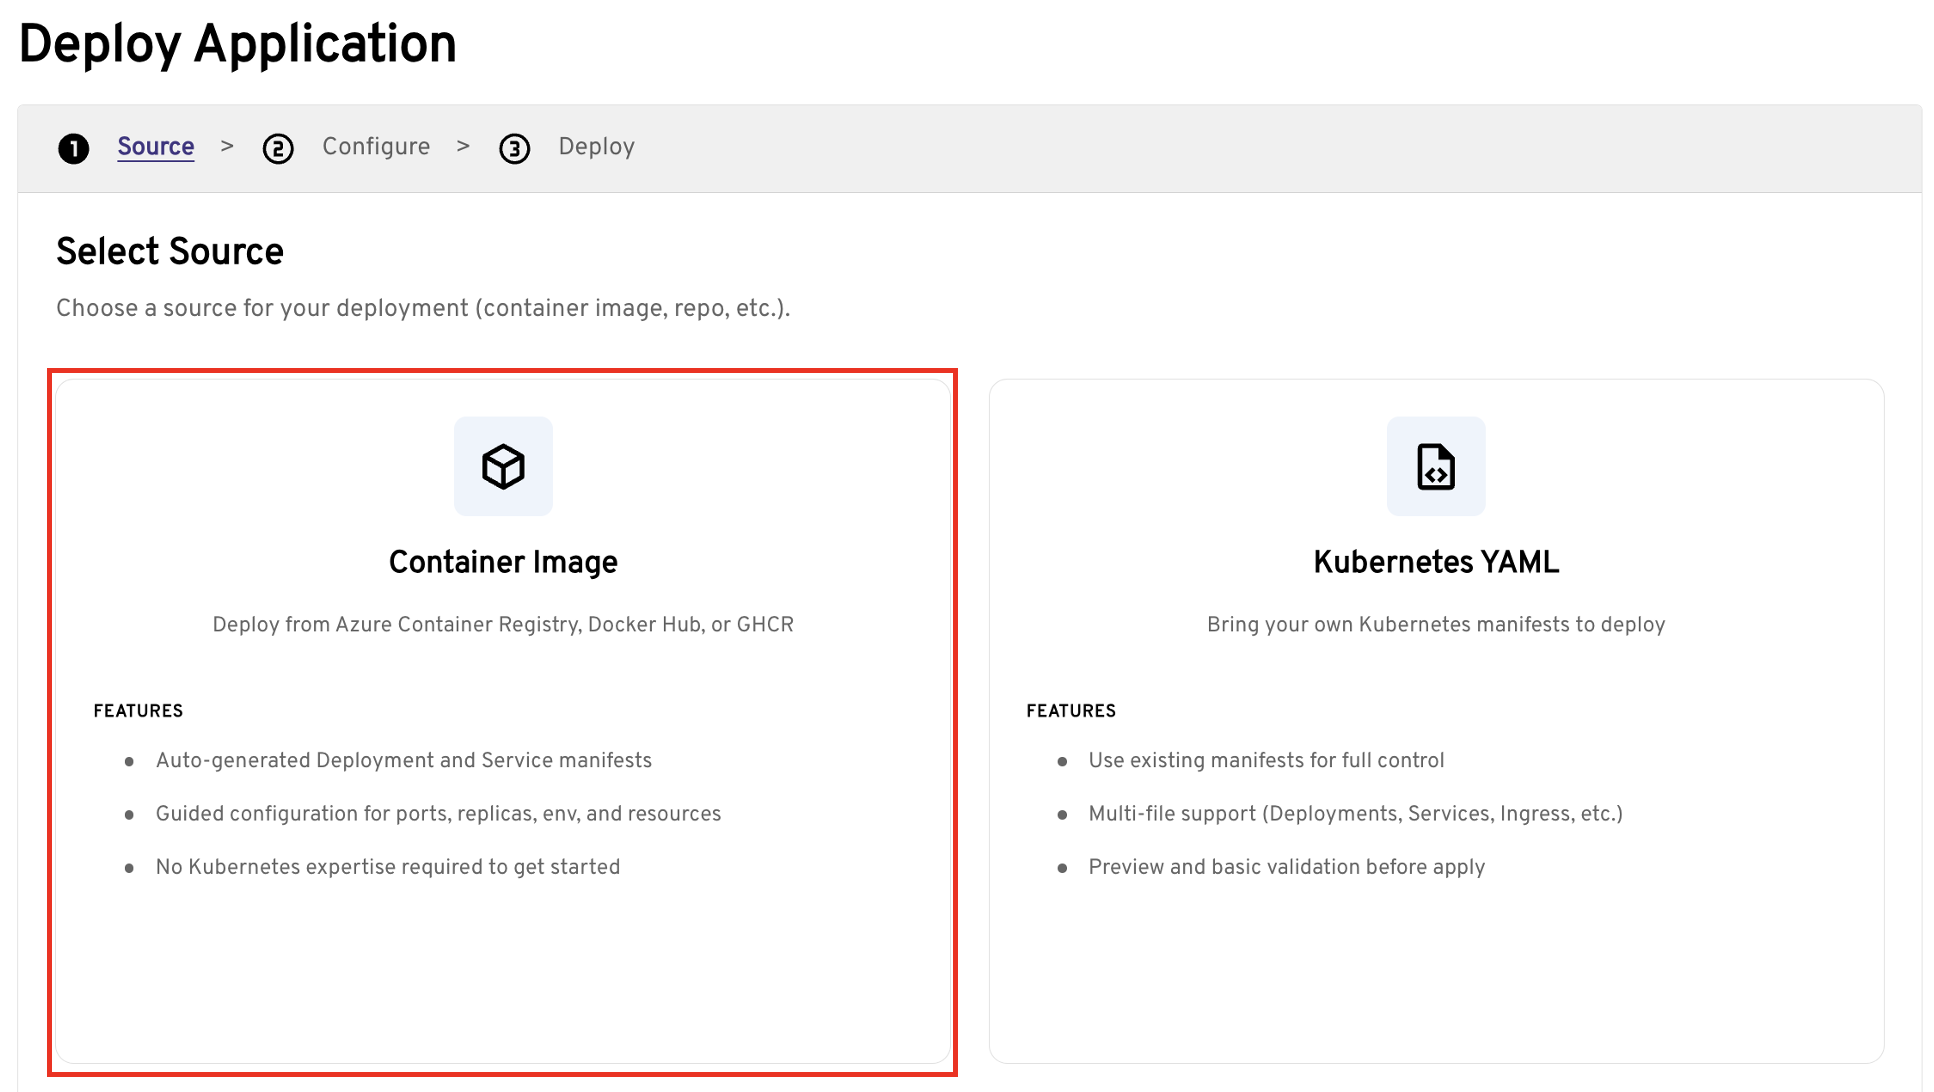
Configure the following application settings. You can accept the defaults or update them as needed.
Container image name:
- Add your container image name. In this example, we use
myacr.azurecr.io/contosoair:v1.
Important
You can't use the
latesttag. Specify an explicit tag such asv1.- Add your container image name. In this example, we use
Networking:
- Target port: For the example container, set to
3000. - Enable public access: Set if you want to access the application from a public URL.
- Target port: For the example container, set to
HPA (Horizontal Pod Autoscaler):
- Enable HPA: Set to enable automatic scaling of the application based on resource usage.
Select Deploy to deploy the application. It might take a few minutes for the application to finish deploying. You can view the deployment status on the Project overview page. Wait until all resources show a healthy state before exploring the application.
Explore the application
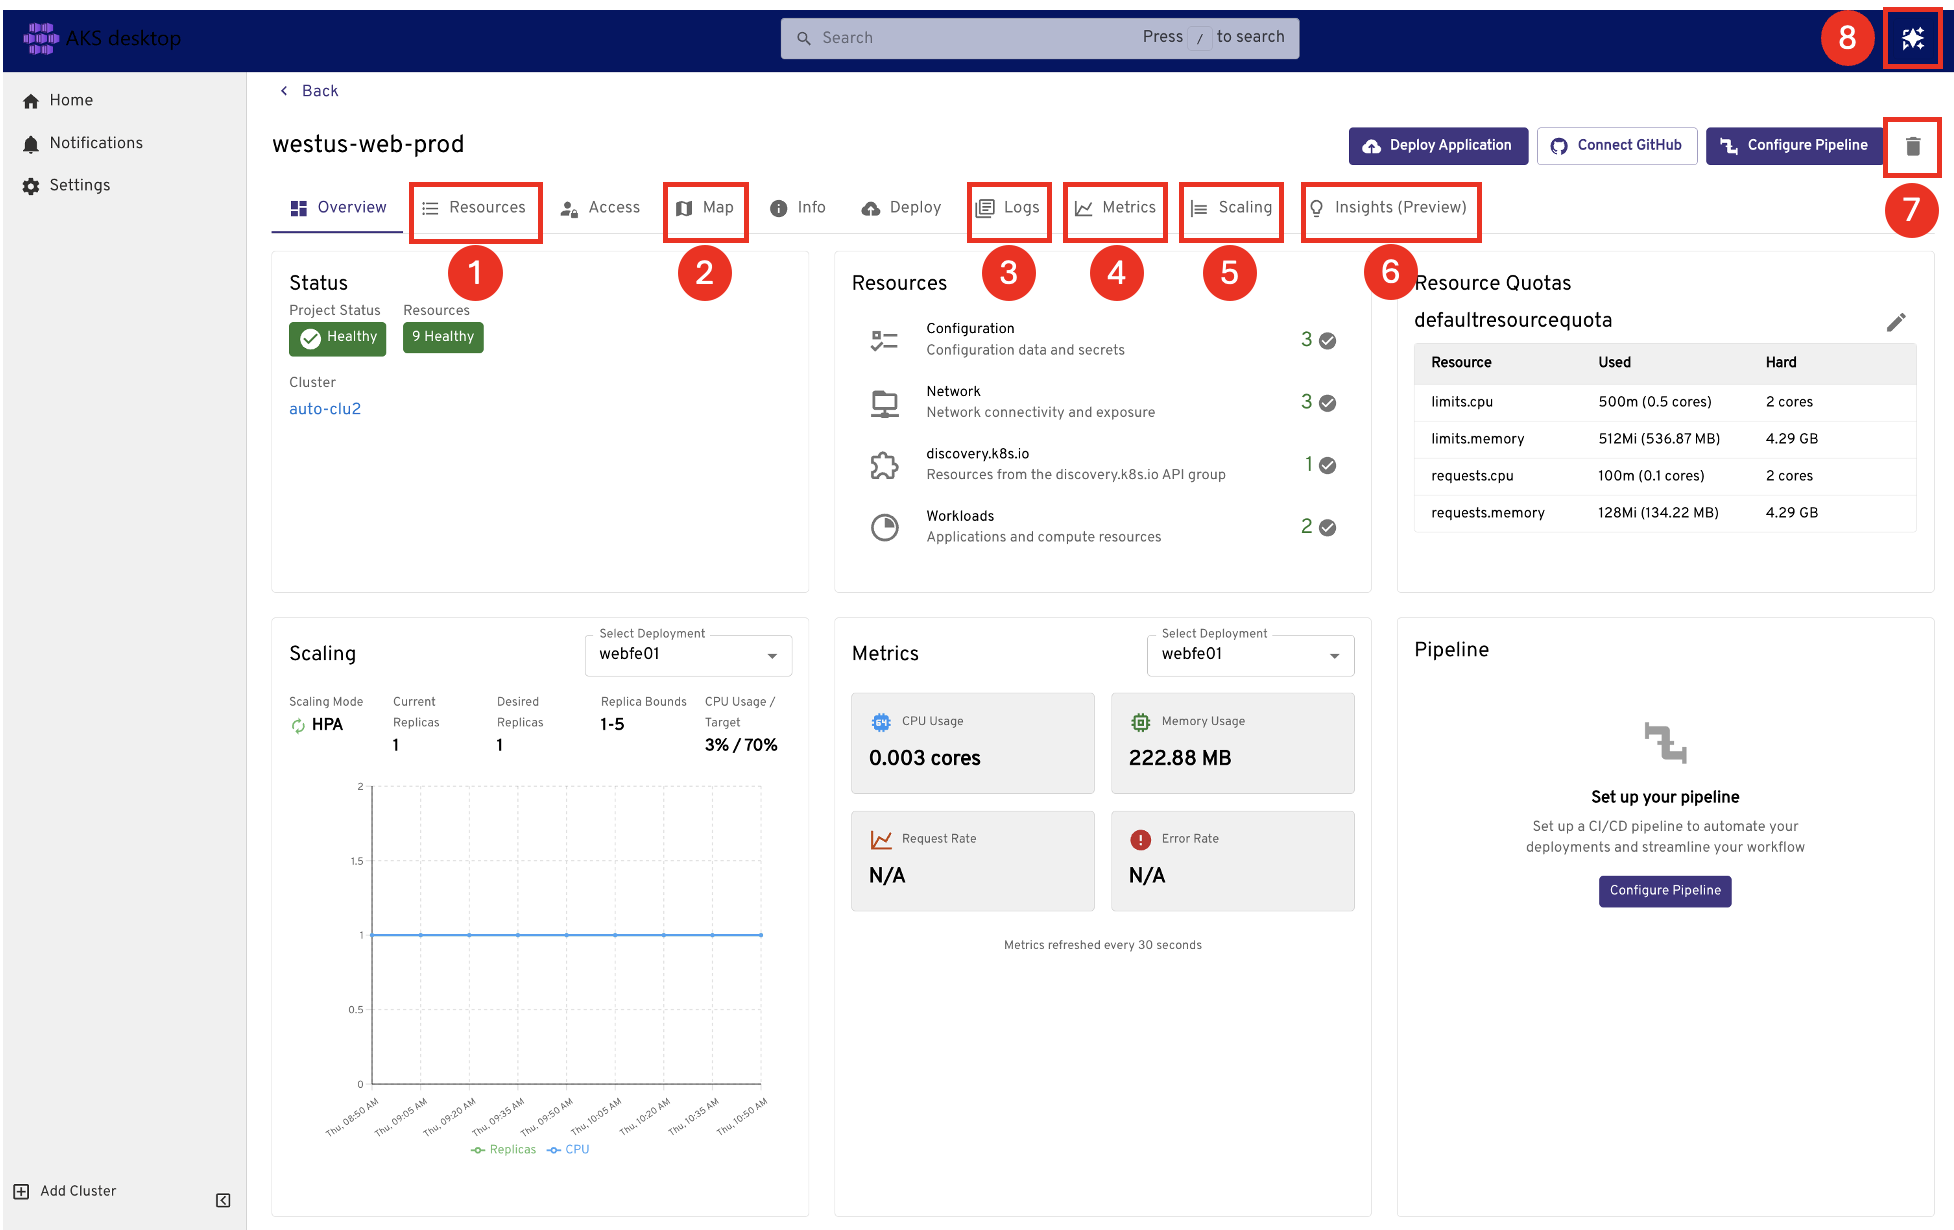
From the Project overview page, you can explore your application using the following tabs:
- Resources: View all Kubernetes resources for the application.
- Map: Visualize how all Kubernetes resources interact with and depend on each other.
- Logs: View pod logs.
- Metrics: View core application resource consumption.
- Scaling: View scaling events and make updates.
- Insights: Troubleshoot DNS failures, network traffic, and resource usage (preview). For more information, see Troubleshoot an application in AKS desktop using Insights.
- Delete: Delete the Project.
- AI assistant: Use natural language to diagnose and resolve issues in your cluster (preview). For more information, see Use the AI troubleshooting assistant in AKS desktop.
Clean up resources
When you're finished with the quickstart, you can clean up the resources you created to avoid unnecessary costs.
To remove the project, select Delete. If you also want to remove the underlying Azure managed Namespace resource, select Also delete the namespaces.
Related content
For more information about AKS desktop, see the following resources: