Note
Access to this page requires authorization. You can try signing in or changing directories.
Access to this page requires authorization. You can try changing directories.
This article helps you deploy a private link-based AKS cluster using Azure CLI or Terraform. If you're interested in creating an AKS cluster without required private link or tunnel, see Create an Azure Kubernetes Service (AKS) cluster with API Server VNet integration.
Overview of private clusters in AKS
In a private cluster, the control plane or API server has internal IP addresses that are defined in the RFC1918 - Address Allocation for Private Internet document. By using a private cluster, you can ensure network traffic between your API server and your node pools remains only on the private network.
The control plane or API server is in an AKS-managed Azure resource group, and your cluster or node pool is in your resource group. The server and the cluster or node pool can communicate with each other through the Azure Private Link service in the API server virtual network and a private endpoint exposed on the subnet of your AKS cluster.
When you create a private AKS cluster, AKS creates both private and public fully qualified domain names (FQDNs) with corresponding DNS zones by default. For detailed DNS configuration options, see Configure a private DNS zone, private DNS subzone, or custom subdomain.
Region availability
Private clusters are available in public regions, Azure Government, and Microsoft Azure operated by 21Vianet regions where AKS is supported.
Important
All Microsoft Defender for Cloud features will be officially retired in the Azure in China region on August 18, 2026. Due to this upcoming retirement, Azure in China customers are no longer able to onboard new subscriptions to the service. A new subscription is any subscription that was not already onboarded to the Microsoft Defender for Cloud service prior to August 18, 2025, the date of the retirement announcement. For more information on the retirement, see Microsoft Defender for Cloud Deprecation in Microsoft Azure Operated by 21Vianet Announcement.
Customers should work with their account representatives for Microsoft Azure operated by 21Vianet to assess the impact of this retirement on their own operations.
Prerequisites for private AKS clusters
An active Azure subscription. If you don't have an Azure subscription, create a free account before you begin.
Set your subscription context using the
az account setcommand. For example:az account set --subscription "00000000-0000-0000-0000-000000000000"Azure CLI version 2.28.0 or higher. Find your version using the
az --versioncommand. If you need to install or upgrade, see Install Azure CLI.If using Azure Resource Manager (ARM) or the Azure REST API, the AKS API version must be 2021-05-01 or higher.
To use a custom DNS server, add the Azure public IP address 168.63.129.16 as the upstream DNS server in the custom DNS server, and make sure to add this public IP address as the first DNS server. For more information about the Azure IP address, see What is IP address 168.63.129.16?
- The cluster's DNS zone should be what you forward to 168.63.129.16. You can find more information on zone names in Azure services DNS zone configuration.
Existing AKS clusters enabled with API Server VNet integration can have private cluster mode enabled. For more information, see Enable or disable private cluster mode on an existing cluster with API Server VNet integration.
If you need to enable Azure Container Registry on a private AKS cluster, set up a private link for the container registry in the cluster virtual network (VNet) or set up peering between the container registry's VNet and the private cluster's VNet.
kubectl installed. You can install it locally using the
az aks install-clicommand.
- Terraform installed locally. For installation instructions, see Install Terraform.
Important
Starting on November 30, 2025, Azure Kubernetes Service (AKS) no longer supports or provides security updates for Azure Linux 2.0. The Azure Linux 2.0 node image is frozen at the 202512.06.0 release. Beginning on March 31, 2026, node images will be removed, and you'll be unable to scale your node pools. Migrate to a supported Azure Linux version by upgrading your node pools to a supported Kubernetes version or migrating to osSku AzureLinux3. For more information, see the Retirement GitHub issue and the Azure Updates retirement announcement. To stay informed on announcements and updates, follow the AKS release notes.
Limitations
- IP authorized ranges only apply to the public API server. You can't apply these ranges to the private API server endpoint.
- Azure Private Link service limitations apply to private clusters.
- There's no support for Azure DevOps Microsoft-hosted Agents with private clusters. Consider using self-hosted agents.
- Deleting or modifying the private endpoint in the customer subnet causes the cluster to stop functioning.
- Azure Private Link service is supported on Standard Azure Load Balancer only. Basic Azure Load Balancer isn't supported.
Hub and spoke with custom DNS for private AKS clusters
Hub and spoke architectures are commonly used to deploy networks in Azure. In many of these deployments, DNS settings in the spoke VNets are configured to reference a central DNS forwarder to allow for on-premises and Azure-based DNS resolution.
The following diagram illustrates a hub and spoke architecture for a private AKS cluster with custom DNS:
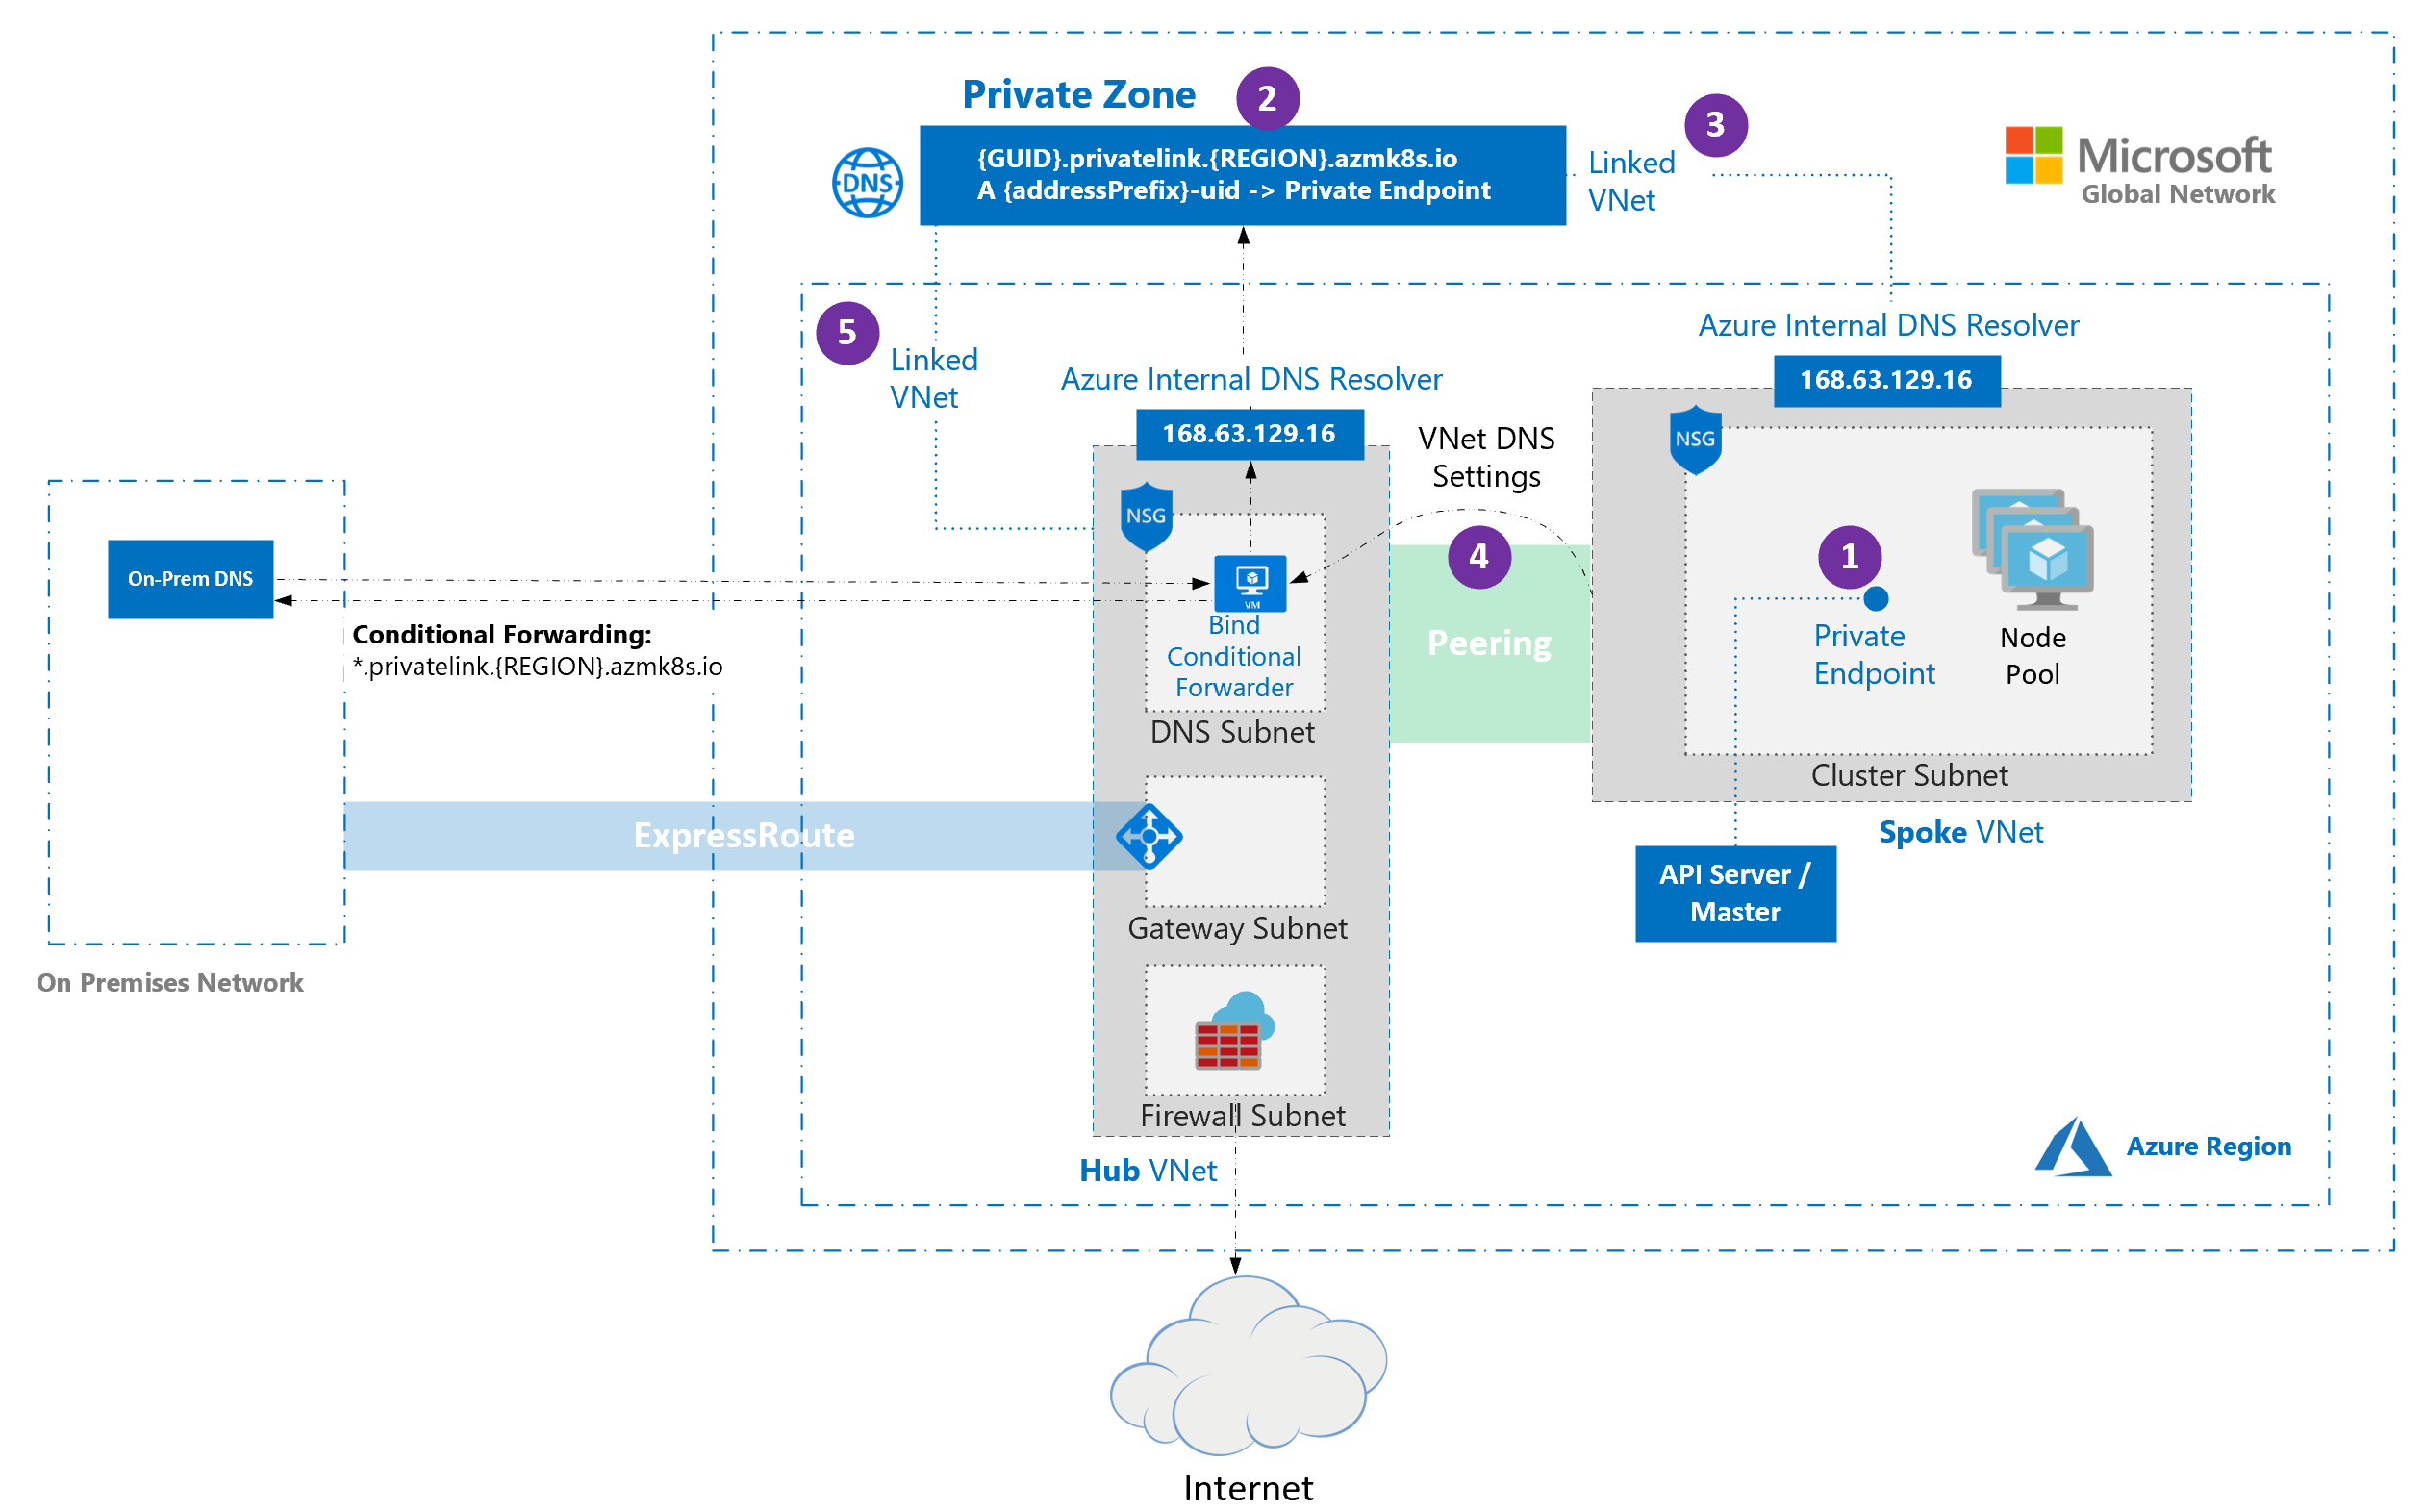
- When a private cluster is created, a private endpoint (1) and a private DNS zone (2) are created in the cluster-managed resource group by default. The cluster uses an
Arecord in the private zone to resolve the IP of the private endpoint for communication to the API server. - The private DNS zone is linked only to the VNet that the cluster nodes are attached to (3), which means that the private endpoint can only be resolved by hosts in that linked VNet. In scenarios where no custom DNS is configured on the VNet (default), it works without issue as hosts point at 168.63.129.16 for DNS that can resolve records in the private DNS zone because of the link.
- If you keep the default private DNS zone behavior, AKS tries to link the zone directly to the spoke VNet that hosts the cluster even when the zone is already linked to a hub VNet.
- In spoke VNets that use custom DNS servers, this action can fail if the cluster's managed identity lacks Network Contributor on the spoke VNet. To prevent the failure, choose one of the following supported configurations:
- Custom private DNS zone: Provide an existing private zone and set
privateDNSZone/--private-dns-zoneto its resource ID. Link that zone to the appropriate VNet (for example, the hub VNet) and setpublicDNStofalse/ use--disable-public-fqdn. - Public DNS only: Disable private zone creation by setting
privateDNSZone/--private-dns-zonetononeand leavepublicDNSat its default value (true) / don't use--disable-public-fqdn.
- Custom private DNS zone: Provide an existing private zone and set
- In spoke VNets that use custom DNS servers, this action can fail if the cluster's managed identity lacks Network Contributor on the spoke VNet. To prevent the failure, choose one of the following supported configurations:
- If you're using bring your own (BYO) route table with kubenet and BYO DNS with private clusters, cluster creation fails. You need to associate the
RouteTablein the node resource group to the subnet after the cluster creation failed to make the creation successful.
Limitations for private AKS clusters with custom DNS
- Setting
privateDNSZone/--private-dns-zonetononeandpublicDNS: false/--disable-public-fqdnat the same time isn't supported. - Conditional forwarding doesn't support subdomains.
Create a resource group
Create a resource group using the az group create command. You can also use an existing resource group for your AKS cluster.
az group create \
    --name <private-cluster-resource-group> \
    --location <location>
Create a private AKS cluster with default basic networking
Create a private cluster with default basic networking using the az aks create command with the --enable-private-cluster flag.
Key parameters in this command:
--enable-private-cluster: Enables private cluster mode.
az aks create \
    --name <private-cluster-name> \
    --resource-group <private-cluster-resource-group> \
    --load-balancer-sku standard \
    --enable-private-cluster \
    --generate-ssh-keys
Create a file named
main.tfand add the following code to define the Terraform version and specify the Azure provider:terraform { required_version = ">= 1.3.0" required_providers { azurerm = { source = "hashicorp/azurerm" version = "~> 4.0" } } } provider "azurerm" { features {} subscription_id = var.subscription_id }Add the following code to
main.tfto create input variables for your Azure subscription ID, resource group name, location, and AKS cluster name. You can modify the default values as needed.variable "subscription_id" { description = "The Azure subscription ID." type = string } variable "resource_group_name" { description = "The name of the resource group for the AKS cluster." type = string default = "rg-private-aks-basic" } variable "location" { description = "The Azure region where the resources will be created." type = string default = "eastus" } variable "aks_cluster_name" { description = "The name of the AKS cluster." type = string default = "aks-private-basic" }Add the following code to
main.tfto create an Azure resource group:resource "azurerm_resource_group" "this" { name = var.resource_group_name location = var.location }Add the following code to
main.tfto create a private AKS cluster with basic networking:resource "azurerm_kubernetes_cluster" "this" { name = var.aks_cluster_name location = azurerm_resource_group.this.location resource_group_name = azurerm_resource_group.this.name dns_prefix = "privatebasicaks" private_cluster_enabled = true default_node_pool { name = "system" node_count = 1 vm_size = "Standard_DS2_v2" } identity { type = "SystemAssigned" } network_profile { load_balancer_sku = "standard" network_plugin = "kubenet" } }Follow the steps to initialize Terraform, format and validate the Terraform configuration, create a Terraform execution plan, apply the Terraform configuration, and connect to the AKS cluster.
Create a private AKS cluster with advanced networking
Create a private cluster with advanced networking using the az aks create command.
Key parameters in this command:
--enable-private-cluster: Enables private cluster mode.--network-plugin azure: Specifies the Azure CNI networking plugin.--vnet-subnet-id <subnet-id>: The resource ID of an existing subnet in a VNet.--dns-service-ip <dns-service-ip>: An available IP address within the Kubernetes service address range to use for the cluster DNS service. For example,10.2.0.10.--service-cidr <service-cidr>: A CIDR notation IP range from which to assign service cluster IPs. For example,10.2.0.0/24.
az aks create \
    --resource-group <private-cluster-resource-group> \
    --name <private-cluster-name> \
    --load-balancer-sku standard \
    --enable-private-cluster \
    --network-plugin azure \
    --vnet-subnet-id <subnet-id> \
    --dns-service-ip <dns-service-ip> \
    --service-cidr <service-cidr> \
    --generate-ssh-keys
Create a file named
main.tfand add the following code to define the Terraform version and specify the Azure provider:terraform { required_version = ">= 1.3.0" required_providers { azurerm = { source = "hashicorp/azurerm" version = "~> 4.0" } } } provider "azurerm" { features {} subscription_id = var.subscription_id }Add the following code to
main.tfto create input variables for your Azure subscription ID, resource group name, location, AKS cluster name, virtual network (VNet) name, and subnet name. You can modify the default values as needed.variable "subscription_id" { description = "The Azure subscription ID." type = string } variable "resource_group_name" { description = "The name of the resource group for the AKS cluster." type = string default = "rg-private-aks-advanced" } variable "location" { description = "The Azure region where the resources will be created." type = string default = "eastus" } variable "aks_cluster_name" { description = "The name of the AKS cluster." type = string default = "aks-private-advanced" } variable "vnet_name" { description = "The name of the virtual network." type = string default = "vnet-private-aks" } variable "subnet_name" { description = "The name of the subnet used by AKS." type = string default = "snet-aks" }Add the following code to
main.tfto create an Azure resource group, VNet, and subnet:resource "azurerm_resource_group" "this" { name = var.resource_group_name location = var.location } resource "azurerm_virtual_network" "this" { name = var.vnet_name location = azurerm_resource_group.this.location resource_group_name = azurerm_resource_group.this.name address_space = ["10.0.0.0/8"] } resource "azurerm_subnet" "aks" { name = var.subnet_name resource_group_name = azurerm_resource_group.this.name virtual_network_name = azurerm_virtual_network.this.name address_prefixes = ["10.240.0.0/16"] }Add the following code to
main.tfto create the AKS cluster with advanced networking:resource "azurerm_kubernetes_cluster" "this" { name = var.aks_cluster_name location = azurerm_resource_group.this.location resource_group_name = azurerm_resource_group.this.name dns_prefix = "privateadvancedaks" private_cluster_enabled = true default_node_pool { name = "system" node_count = 1 vm_size = "Standard_DS2_v2" vnet_subnet_id = azurerm_subnet.aks.id } identity { type = "SystemAssigned" } network_profile { load_balancer_sku = "standard" network_plugin = "azure" dns_service_ip = "10.2.0.10" service_cidr = "10.2.0.0/24" } }Follow the steps to initialize Terraform, format and validate the Terraform configuration, create a Terraform execution plan, apply the Terraform configuration, and connect to the AKS cluster.
Use custom domains with private AKS clusters
If you want to configure custom domains that can only be resolved internally, see Use custom domains.
Disable a public FQDN on a private AKS cluster
Disable a public FQDN on a new cluster
Disable a public FQDN when creating a private AKS cluster using the az aks create command with the --disable-public-fqdn flag.
Key parameters in this command:
--disable-public-fqdn: Disables the public fully qualified domain name (FQDN) for the API server.--assign-identity <resource-id>: Specifies the managed identity to use for the cluster.--private-dns-zone [system|none]: Specifies the private DNS zone to use for the cluster.systemis the default value when configuring a private DNS zone. If you omit--private-dns-zone, AKS creates a private DNS zone in the node resource group.nonedisables the creation of a private DNS zone.
az aks create \
    --name <private-cluster-name> \
    --resource-group <private-cluster-resource-group> \
    --load-balancer-sku standard \
    --enable-private-cluster \
    --assign-identity <resource-id> \
    --private-dns-zone [system|none] \
    --disable-public-fqdn \
    --generate-ssh-keys
Follow steps 1-3 in Create a private AKS cluster with advanced networking or Create a private AKS cluster with default basic networking to set up the Terraform configuration and create the necessary resources depending on your scenario. This example uses advanced networking.
Add the following code to
main.tfto create a private AKS cluster with a user-assigned identity and the public FQDN disabled:resource "azurerm_user_assigned_identity" "aks" { name = "id-private-aks-public-fqdn-off" location = azurerm_resource_group.this.location resource_group_name = azurerm_resource_group.this.name } resource "azurerm_kubernetes_cluster" "this" { name = var.aks_cluster_name location = azurerm_resource_group.this.location resource_group_name = azurerm_resource_group.this.name dns_prefix = "privateaks" private_cluster_enabled = true private_cluster_public_fqdn_enabled = false private_dns_zone_id = "System" default_node_pool { name = "system" node_count = 1 vm_size = "Standard_DS2_v2" vnet_subnet_id = azurerm_subnet.aks.id } identity { type = "UserAssigned" identity_ids = [azurerm_user_assigned_identity.aks.id] } network_profile { load_balancer_sku = "standard" network_plugin = "azure" dns_service_ip = "10.2.0.10" service_cidr = "10.2.0.0/24" } }Follow the steps to initialize Terraform, format and validate the Terraform configuration, create a Terraform execution plan, apply the Terraform configuration, and connect to the AKS cluster.
Disable a public FQDN on an existing cluster
Disable a public FQDN on an existing AKS cluster using the az aks update command with the --disable-public-fqdn flag.
Key parameters in this command:
--disable-public-fqdn: Disables the public fully qualified domain name (FQDN) for the API server.
az aks update \
    --name <private-cluster-name> \
    --resource-group <private-cluster-resource-group> \
    --disable-public-fqdn
Add the following code to the existing
main.tfto disable the public FQDN on an existing AKS cluster. This example uses advanced networking. You can modify it to use default basic networking by changing the relevant Terraform resources and parameters.resource "azurerm_kubernetes_cluster" "this" { name = var.aks_cluster_name location = azurerm_resource_group.this.location resource_group_name = azurerm_resource_group.this.name dns_prefix = "privateaks" private_cluster_enabled = true private_cluster_public_fqdn_enabled = false private_dns_zone_id = "System" default_node_pool { name = "system" node_count = 1 vm_size = "Standard_DS2_v2" vnet_subnet_id = azurerm_subnet.aks.id } identity { type = "UserAssigned" identity_ids = [azurerm_user_assigned_identity.aks.id] } network_profile { load_balancer_sku = "standard" network_plugin = "azure" dns_service_ip = "10.2.0.10" service_cidr = "10.2.0.0/24" } }Apply the updated Terraform configuration using the
terraform planandterraform applycommands.terraform plan terraform apply
Configuration options for private DNS
You can configure private DNS settings for a private AKS cluster using the Azure CLI (with the --private-dns-zone parameter) or an Azure Resource Manager (ARM) template (with the privateDNSZone property). The following table outlines the options available for the --private-dns-zone parameter / privateDNSZone property:
| Setting | Description |
|---|---|
system |
The default value when configuring a private DNS zone. If you omit --private-dns-zone / privateDNSZone, AKS creates a private DNS zone in the node resource group. |
none |
If you set --private-dns-zone / privateDNSZone to none, AKS doesn't create a private DNS zone. |
<custom-private-dns-zone-resource-id> |
To use this parameter, you need to create a private DNS zone in the following format for Azure global cloud: privatelink.<region>.azmk8s.io or <subzone>.privatelink.<region>.azmk8s.io. You need the resource ID of the private DNS zone for future use. You also need a user-assigned identity or service principal with the Private DNS Zone Contributor and Network Contributor roles. For clusters using API Server VNet integration, a private DNS zone supports the naming format of private.<region>.azmk8s.io or <subzone>.private.<region>.azmk8s.io. You can't change or delete these resources resource after creating the cluster, as it can cause performance issues and cluster upgrade failures. You can use --fqdn-subdomain <subdomain> with <custom-private-dns-zone-resource-id> only to provide subdomain capabilities to privatelink.<region>.azmk8s.io. If you're specifying a subzone, there's a 32 character limit for the <subzone> name. |
Considerations for private DNS
Keep the following considerations in mind when configuring private DNS for a private AKS cluster:
- If the private DNS zone is in a different subscription than the AKS cluster, you need to register the
Microsoft.ContainerServiceAzure provider in both subscriptions. - If your AKS cluster is configured with an Active Directory service principal, AKS doesn't support using a system-assigned managed identity with custom private DNS zone. The cluster must use user-assigned managed identity authentication.
Create a private AKS cluster with a private DNS zone
Create a private AKS cluster with a private DNS zone using the az aks create command.
Key parameters in this command:
--enable-private-cluster: Enables private cluster mode.--private-dns-zone [system|none]: Configures the private DNS zone for the cluster.systemis the default value when configuring a private DNS zone. If you omit--private-dns-zone, AKS creates a private DNS zone in the node resource group.nonedisables the creation of a private DNS zone.--assign-identity <resource-id>: The resource ID of a user-assigned managed identity with the Private DNS Zone Contributor and Network Contributor roles.
az aks create \
    --name <private-cluster-name> \
    --resource-group <private-cluster-resource-group> \
    --load-balancer-sku standard \
    --enable-private-cluster \
    --assign-identity <resource-id> \
    --private-dns-zone [system|none] \
    --generate-ssh-keys
Follow steps 1-3 in Create a private AKS cluster with advanced networking or Create a private AKS cluster with default basic networking to set up the Terraform configuration and create the necessary resources depending on your scenario. This example uses advanced networking.
Add the following code to
main.tfto create a private AKS cluster with an AKS-managed private DNS zone:resource "azurerm_kubernetes_cluster" "this" { name = var.aks_cluster_name location = azurerm_resource_group.this.location resource_group_name = azurerm_resource_group.this.name dns_prefix = "aks-system-dns" private_cluster_enabled = true private_dns_zone_id = "System" default_node_pool { name = "system" node_count = 1 vm_size = "Standard_DS2_v2" vnet_subnet_id = azurerm_subnet.aks.id } identity { type = "SystemAssigned" } network_profile { network_plugin = "azure" load_balancer_sku = "standard" dns_service_ip = "10.2.0.10" service_cidr = "10.2.0.0/24" } }Follow the steps to initialize Terraform, format and validate the Terraform configuration, create a Terraform execution plan, apply the Terraform configuration, and connect to the AKS cluster.
Create a private AKS cluster without a private DNS zone
Follow steps 1-3 in Create a private AKS cluster with advanced networking or Create a private AKS cluster with default basic networking to set up the Terraform configuration and create the necessary resources depending on your scenario. This example uses advanced networking.
Add the following code to
main.tfto create the AKS cluster without a private DNS zone:resource "azurerm_kubernetes_cluster" "this" { name = var.aks_cluster_name location = azurerm_resource_group.this.location resource_group_name = azurerm_resource_group.this.name dns_prefix = "aks-no-dns" private_cluster_enabled = true private_dns_zone_id = "None" default_node_pool { name = "system" node_count = 1 vm_size = "Standard_DS2_v2" vnet_subnet_id = azurerm_subnet.aks.id } identity { type = "SystemAssigned" } network_profile { network_plugin = "azure" load_balancer_sku = "standard" dns_service_ip = "10.2.0.10" service_cidr = "10.2.0.0/24" } }Follow the steps to initialize Terraform, format and validate the Terraform configuration, create a Terraform execution plan, apply the Terraform configuration, and connect to the AKS cluster.
Create a private AKS cluster with a custom private DNS zone or private DNS subzone
Create a private AKS cluster with a custom private DNS zone or subzone using the az aks create command.
Key parameters in this command:
--enable-private-cluster: Enables private cluster mode.--private-dns-zone [<custom-private-dns-zone-resource-id>|<custom-private-dns-subzone-resource-id>]: The resource ID of an existing private DNS zone or subzone in the following format for Azure global cloud:privatelink.<region>.azmk8s.ioor<subzone>.privatelink.<region>.azmk8s.io.--assign-identity <resource-id>: The resource ID of a user-assigned managed identity with the Private DNS Zone Contributor and Network Contributor roles.
az aks create \
    --name <private-cluster-name> \
    --resource-group <private-cluster-resource-group> \
    --load-balancer-sku standard \
    --enable-private-cluster \
    --assign-identity <resource-id> \
    --private-dns-zone [<custom-private-dns-zone-resource-id>|<custom-private-dns-subzone-resource-id>] \
    --generate-ssh-keys
When using a custom private DNS zone, you're responsible for creating and managing the DNS infrastructure instead of relying on Azure-managed DNS. This includes creating the DNS zone, linking it to your VNet, and assigning the necessary permissions for AKS to manage records.
For custom DNS configurations, you must use a user-assigned managed identity with the Private DNS Zone Contributor and Network Contributor roles.
Follow steps 1-3 in Create a private AKS cluster with advanced networking or Create a private AKS cluster with default basic networking to set up the Terraform configuration and create the necessary resources depending on your scenario. This example uses advanced networking.
Add the code to
main.tfto create a private AKS cluster with a custom private DNS zone or subzone:resource "azurerm_user_assigned_identity" "aks" { name = "aks-custom-dns-id" location = azurerm_resource_group.this.location resource_group_name = azurerm_resource_group.this.name } resource "azurerm_private_dns_zone" "aks" { name = "privatelink.eastus.azmk8s.io" resource_group_name = azurerm_resource_group.this.name } resource "azurerm_private_dns_zone_virtual_network_link" "link" { name = "aks-dns-link" resource_group_name = azurerm_resource_group.this.name private_dns_zone_name = azurerm_private_dns_zone.aks.name virtual_network_id = azurerm_virtual_network.this.id } resource "azurerm_role_assignment" "dns" { scope = azurerm_private_dns_zone.aks.id role_definition_name = "Private DNS Zone Contributor" principal_id = azurerm_user_assigned_identity.aks.principal_id } resource "azurerm_role_assignment" "network" { scope = azurerm_virtual_network.this.id role_definition_name = "Network Contributor" principal_id = azurerm_user_assigned_identity.aks.principal_id } resource "azurerm_kubernetes_cluster" "this" { name = var.aks_cluster_name location = azurerm_resource_group.this.location resource_group_name = azurerm_resource_group.this.name dns_prefix = "aks-custom-dns" private_cluster_enabled = true private_dns_zone_id = azurerm_private_dns_zone.aks.id default_node_pool { name = "system" node_count = 1 vm_size = "Standard_DS2_v2" vnet_subnet_id = azurerm_subnet.aks.id } identity { type = "UserAssigned" identity_ids = [azurerm_user_assigned_identity.aks.id] } network_profile { network_plugin = "azure" load_balancer_sku = "standard" dns_service_ip = "10.2.0.10" service_cidr = "10.2.0.0/24" } depends_on = [ azurerm_role_assignment.dns, azurerm_role_assignment.network ] }Follow the steps to initialize Terraform, format and validate the Terraform configuration, create a Terraform execution plan, apply the Terraform configuration, and connect to the AKS cluster.
Create a private AKS cluster with a custom private DNS zone and custom subdomain
Create a private AKS cluster with a custom private DNS zone and subdomain using the az aks create command.
Key parameters in this command:
--enable-private-cluster: Enables private cluster mode.--private-dns-zone <custom-private-dns-zone-resource-id>: The resource ID of an existing private DNS zone in the following format for Azure global cloud:privatelink.<region>.azmk8s.io.--fqdn-subdomain <subdomain>: The subdomain to use for the cluster FQDN within the custom private DNS zone.--assign-identity <resource-id>: The resource ID of a user-assigned managed identity with the Private DNS Zone Contributor and Network Contributor roles.
az aks create \
    --name <private-cluster-name> \
    --resource-group <private-cluster-resource-group> \
    --load-balancer-sku standard \
    --enable-private-cluster \
    --assign-identity <resource-id> \
    --private-dns-zone <custom-private-dns-zone-resource-id> \
    --fqdn-subdomain <subdomain> \
    --generate-ssh-keys
Follow steps 1-3 in Create a private AKS cluster with advanced networking or Create a private AKS cluster with default basic networking to set up the Terraform configuration and create the necessary resources depending on your scenario. This example uses advanced networking.
Add the following code to
main.tfto create a private AKS cluster with a custom private DNS zone and subdomain:resource "azurerm_kubernetes_cluster" "this" { name = var.aks_cluster_name location = azurerm_resource_group.this.location resource_group_name = azurerm_resource_group.this.name dns_prefix = "aks-subdomain" private_cluster_enabled = true private_dns_zone_id = azurerm_private_dns_zone.aks.id fqdn_subdomain = "team1" default_node_pool { name = "system" node_count = 1 vm_size = "Standard_DS2_v2" vnet_subnet_id = azurerm_subnet.aks.id } identity { type = "UserAssigned" identity_ids = [azurerm_user_assigned_identity.aks.id] } network_profile { network_plugin = "azure" load_balancer_sku = "standard" dns_service_ip = "10.2.0.10" service_cidr = "10.2.0.0/24" } }Follow the steps to initialize Terraform, format and validate the Terraform configuration, create a Terraform execution plan, apply the Terraform configuration, and connect to the AKS cluster.
Update an existing private AKS cluster from a private DNS zone to public
You can only update from byo (bring your own) or system to none. No other combination of update values is supported.
Warning
When you update a private cluster from byo or system to none, the agent nodes change to use a public FQDN. In an AKS cluster that uses Azure Virtual Machine Scale Sets, a node image upgrade is performed to update your nodes with the public FQDN.
Update a private cluster from byo or system to none using the az aks update command with the --private-dns-zone parameter set to none.
az aks update \
    --name <private-cluster-name> \
    --resource-group <private-cluster-resource-group> \
    --private-dns-zone none
Add the following code to the existing
main.tfto update the private AKS cluster from a private DNS zone to public. This example uses advanced networking. You can modify it to use default basic networking by changing the relevant Terraform resources and parameters.resource "azurerm_kubernetes_cluster" "this" { name = var.aks_cluster_name location = azurerm_resource_group.this.location resource_group_name = azurerm_resource_group.this.name dns_prefix = "aks-update" private_cluster_enabled = true private_dns_zone_id = "None" default_node_pool { name = "system" node_count = 1 vm_size = "Standard_DS2_v2" vnet_subnet_id = azurerm_subnet.aks.id } identity { type = "UserAssigned" identity_ids = [azurerm_user_assigned_identity.aks.id] } network_profile { network_plugin = "azure" load_balancer_sku = "standard" dns_service_ip = "10.2.0.10" service_cidr = "10.2.0.0/24" } }Apply the updated Terraform configuration using the
terraform planandterraform applycommands.terraform plan terraform apply
Initialize Terraform
Initialize Terraform in the directory containing your main.tf file using the terraform init command. This command downloads the Azure provider required to manage Azure resources with Terraform.
terraform init
Format and validate the Terraform configuration
Format and validate the Terraform configuration using the terraform fmt and terraform validate commands.
terraform fmt
terraform validate
Create a Terraform execution plan
Create a Terraform execution plan using the terraform plan command. This command shows you the resources that Terraform will create or modify in your Azure subscription.
terraform plan -var="subscription_id=<your-subscription-id>"
Apply the Terraform configuration
After reviewing and confirming the execution plan, apply the Terraform configuration using the terraform apply command. This command creates or modifies the resources defined in your main.tf file in your Azure subscription.
terraform apply -var="subscription_id=<your-subscription-id>"
Configure kubectl to connect to a private AKS cluster
To manage a Kubernetes cluster, use the Kubernetes command-line client, kubectl. kubectl is already installed if you use Azure Cloud Shell. To install kubectl locally, use the az aks install-cli command.
Configure
kubectlto connect to your Kubernetes cluster using theaz aks get-credentialscommand. This command downloads credentials and configures the Kubernetes CLI to use them.az aks get-credentials --resource-group <private-cluster-resource-group> --name <private-cluster-name>Verify the connection to your cluster using the
kubectl getcommand. This command returns a list of the cluster nodes.kubectl get nodesThe command returns output similar to the following example output:
NAME                                STATUS   ROLES   AGE    VERSION
aks-nodepool1-12345678-vmss000000   Ready    agent   3h6m   v1.15.11
aks-nodepool1-12345678-vmss000001   Ready    agent   3h6m   v1.15.11
aks-nodepool1-12345678-vmss000002   Ready    agent   3h6m   v1.15.11