Note
Access to this page requires authorization. You can try signing in or changing directories.
Access to this page requires authorization. You can try changing directories.
In this quickstart, you deploy a Python web app (Django, Flask, or FastAPI) to Azure App Service. Azure App Service is a fully managed web hosting service that supports Python apps hosted in a Linux server environment.
To complete this quickstart, you need:
- An Azure account with an active subscription. Create an account for free.
- Python 3.14 or higher installed locally.
Note
This article contains current instructions on deploying a Python web app using Azure App Service. Python on Windows is no longer supported.
Skip to the end
You can quickly deploy the sample app in this tutorial using Azure Developer CLI and see it running in Azure. Just run the following commands in the Azure Cloud Shellwant, and follow the prompt:
mkdir flask-quickstart
cd flask-quickstart
azd init --template https://github.com/Azure-Samples/msdocs-python-flask-webapp-quickstart
azd up
And, to delete the resources:
azd down
Sample application
This quickstart can be completed using either Flask, Django, or FastAPI. A sample application in each framework is provided to help you follow along with this quickstart. Download or clone the sample application to your local workstation.
git clone https://github.com/Azure-Samples/msdocs-python-flask-webapp-quickstart
To run the application locally:
Go to the application folder:
cd msdocs-python-flask-webapp-quickstartCreate a virtual environment for the app:
py -m venv .venv .venv\scripts\activateInstall the dependencies:
pip install -r requirements.txtRun the app:
flask runBrowse to the sample application at
http://localhost:5000in a web browser.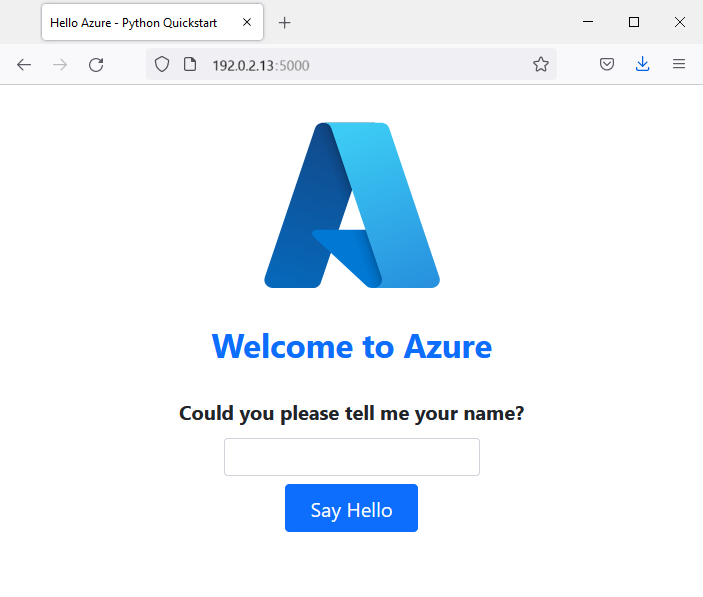
Having issues? Let us know.

Create a web app in Azure
To host your application in Azure, you need to create an Azure App Service web app in Azure. You can create a web app using the Azure CLI, VS Code, Azure Tools extension pack, or the Azure portal.
Azure CLI commands can be run on a computer with the Azure CLI installed.
Azure CLI has a command az webapp up that will create the necessary resources and deploy your application in a single step.
If necessary, log in to Azure using az login.
az login
Create the webapp and other resources, then deploy your code to Azure using az webapp up.
az webapp up --runtime PYTHON:3.14 --sku B1 --logs
- The
--runtimeparameter specifies what version of Python your app is running. This example uses Python 3.13. To list all available runtimes, use the commandaz webapp list-runtimes --os linux --output table. - The
--skuparameter defines the size (CPU, memory) and cost of the app service plan. This example uses the B1 (Basic) service plan, which will incur a small cost in your Azure subscription. For a full list of App Service plans, view the App Service pricing page. - The
--logsflag configures default logging required to enable viewing the log stream immediately after launching the webapp. - You can optionally specify a name with the argument
--name <app-name>. If you don't provide one, then a name will be automatically generated. - You can optionally include the argument
--location <location-name>where<location_name>is an available Azure region. You can retrieve a list of allowable regions for your Azure account by running theaz appservice list-locationscommand.
The command may take a few minutes to complete. While the command is running, it provides messages about creating the resource group, the App Service plan, and the app resource, configuring logging, and doing ZIP deployment. It then returns a message that includes the app's URL, which is the app's URL on Azure.
The webapp '<app-name>' doesn't exist
Creating Resource group '<group-name>' ...
Resource group creation complete
Creating AppServicePlan '<app-service-plan-name>' ...
Creating webapp '<app-name>' ...
Configuring default logging for the app, if not already enabled
Creating zip with contents of dir /home/cephas/myExpressApp ...
Getting scm site credentials for zip deployment
Starting zip deployment. This operation can take a while to complete ...
Deployment endpoint responded with status code 202
You can launch the app at <URL>
{
  "URL": "<URL>",
  "appserviceplan": "<app-service-plan-name>",
  "location": "centralus",
  "name": "<app-name>",
  "os": "<os-type>",
  "resourcegroup": "<group-name>",
  "runtime_version": "python|3.14",
  "runtime_version_detected": "0.0",
  "sku": "FREE",
  "src_path": "<your-folder-location>"
}
Note
The az webapp up command does the following actions:
Create a default resource group.
Create a default App Service plan.
Create an app with the specified name.
Zip deploy all files from the current working directory, with build automation enabled.
Cache the parameters locally in the .azure/config file so that you don't need to specify them again when deploying later with
az webapp upor otheraz webappcommands from the project folder. The cached values are used automatically by default.


Having issues? Let us know.
Deploy your application code to Azure
Azure App Service supports multiple methods to deploy your application code to Azure, including GitHub Actions and all major CI/CD tools. This article focuses on how to deploy your code from your local workstation to Azure.
Since the az webapp up command created the necessary resources and deployed your application in a single step, you can move on to the next step.


Having issues? Refer first to the Troubleshooting guide. If that doesn't help, let us know.
Configure startup script
Based on the presence of certain files in a deployment, App Service automatically detects whether an app is a Django or Flask app and performs default steps to run your app. For apps based on other web frameworks like FastAPI, you might need to configure a startup script for App Service to run your app. Otherwise, App Service runs a default read-only app located in the opt/defaultsite folder.
- Python 3.14 and later: App Service automatically detects and runs FastAPI apps. No startup command is required.
- Python 3.13 and earlier: You must configure a custom startup command.
To learn more about how App Service runs Python apps and how you can configure and customize its behavior with your app, see Configure a Linux Python app for Azure App Service.
App Service automatically detects the presence of a Flask app. No additional configuration is needed for this quickstart.


Browse to the app
Browse to the deployed application in your web browser. You can follow a link from the Azure portal. Go to the Overview page and select Default Domain. If you see a default app page, wait a minute and refresh the browser.
The Python sample code is running a Linux container in App Service using a built-in image.
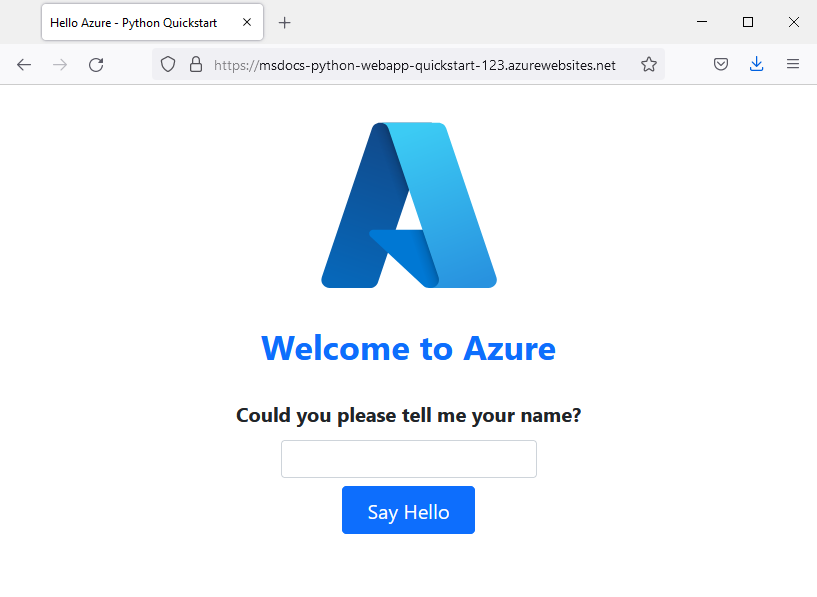
Congratulations! You've deployed your Python app to App Service.
Having issues? Refer first to the Troubleshooting guide. If that doesn't help, let us know.
Stream logs
Azure App Service captures all message output to the console to assist you in diagnosing issues with your application. The sample apps include print() statements to demonstrate this capability.
@app.route('/')
def index():
   print('Request for index page received')
   return render_template('index.html')

@app.route('/favicon.ico')
def favicon():
    return send_from_directory(os.path.join(app.root_path, 'static'),
                               'favicon.ico', mimetype='image/vnd.microsoft.icon')

@app.route('/hello', methods=['POST'])
def hello():
   name = request.form.get('name')

   if name:
       print('Request for hello page received with name=%s' % name)
       return render_template('hello.html', name = name)
   else:
       print('Request for hello page received with no name or blank name -- redirecting')
       return redirect(url_for('index'))
You can review the contents of the App Service diagnostic logs by using the Azure CLI, VS Code, or the Azure portal.
First, you need to configure Azure App Service to output logs to the App Service filesystem by using the az webapp log config command.
az webapp log config \
    --web-server-logging filesystem \
    --name $APP_SERVICE_NAME \
    --resource-group $RESOURCE_GROUP_NAME
To stream logs, use the az webapp log tail command.
az webapp log tail \
    --name $APP_SERVICE_NAME \
    --resource-group $RESOURCE_GROUP_NAME
Refresh the home page in the app or attempt other requests to generate some log messages. The output should look similar to the following.
Starting Live Log Stream ---

2021-12-23T02:15:52.740703322Z Request for index page received
2021-12-23T02:15:52.740740222Z 169.254.130.1 - - [23/Dec/2021:02:15:52 +0000] "GET / HTTP/1.1" 200 1360 "https://msdocs-python-webapp-quickstart-123.azurewebsites.net/hello" "Mozilla/5.0 (Windows NT 10.0; Win64; x64; rv:95.0) Gecko/20100101 Firefox/95.0"
2021-12-23T02:15:52.841043070Z 169.254.130.1 - - [23/Dec/2021:02:15:52 +0000] "GET /static/bootstrap/css/bootstrap.min.css HTTP/1.1" 200 0 "https://msdocs-python-webapp-quickstart-123.azurewebsites.net/" "Mozilla/5.0 (Windows NT 10.0; Win64; x64; rv:95.0) Gecko/20100101 Firefox/95.0"
2021-12-23T02:15:52.884541951Z 169.254.130.1 - - [23/Dec/2021:02:15:52 +0000] "GET /static/images/azure-icon.svg HTTP/1.1" 200 0 "https://msdocs-python-webapp-quickstart-123.azurewebsites.net/" "Mozilla/5.0 (Windows NT 10.0; Win64; x64; rv:95.0) Gecko/20100101 Firefox/95.0"
2021-12-23T02:15:53.043211176Z 169.254.130.1 - - [23/Dec/2021:02:15:53 +0000] "GET /favicon.ico HTTP/1.1" 404 232 "https://msdocs-python-webapp-quickstart-123.azurewebsites.net/" "Mozilla/5.0 (Windows NT 10.0; Win64; x64; rv:95.0) Gecko/20100101 Firefox/95.0"

2021-12-23T02:16:01.304306845Z Request for hello page received with name=David
2021-12-23T02:16:01.304335945Z 169.254.130.1 - - [23/Dec/2021:02:16:01 +0000] "POST /hello HTTP/1.1" 200 695 "https://msdocs-python-webapp-quickstart-123.azurewebsites.net/" "Mozilla/5.0 (Windows NT 10.0; Win64; x64; rv:95.0) Gecko/20100101 Firefox/95.0"
2021-12-23T02:16:01.398399251Z 169.254.130.1 - - [23/Dec/2021:02:16:01 +0000] "GET /static/bootstrap/css/bootstrap.min.css HTTP/1.1" 304 0 "https://msdocs-python-webapp-quickstart-123.azurewebsites.net/hello" "Mozilla/5.0 (Windows NT 10.0; Win64; x64; rv:95.0) Gecko/20100101 Firefox/95.0"
2021-12-23T02:16:01.430740060Z 169.254.130.1 - - [23/Dec/2021:02:16:01 +0000] "GET /static/images/azure-icon.svg HTTP/1.1" 304 0 "https://msdocs-python-webapp-quickstart-123.azurewebsites.net/hello" "Mozilla/5.0 (Windows NT 10.0; Win64; x64; rv:95.0) Gecko/20100101 Firefox/95.0"


Having issues? Refer first to the Troubleshooting guide. If that doesn't help, let us know.
Clean up resources
When you're finished with the sample app, you can remove all of the resources for the app from Azure. Removing the resource group ensures that you don't incur extra charges and helps keep your Azure subscription uncluttered. Removing the resource group also removes all resources in the resource group and is the fastest way to remove all Azure resources for your app.
Delete the resource group by using the az group delete command.
az group delete \
    --name msdocs-python-webapp-quickstart \
    --no-wait
The --no-wait argument allows the command to return before the operation is complete.


Having issues? Let us know.