Note
Access to this page requires authorization. You can try signing in or changing directories.
Access to this page requires authorization. You can try changing directories.
Azure App Service can use managed identities to connect to back-end services without a connection string. This approach eliminates connection secrets to manage and keeps your back-end connectivity secure in a production environment. When you're finished, you have an app that makes programmatic calls to Foundry Tools without storing any connection secrets in App Service.
For back-end services that don't support managed identities and still require connection secrets, you can use Azure Key Vault to manage connection secrets. This tutorial uses Foundry Tools as an example. When you're finished, you have an app that makes programmatic calls to Foundry Tools without storing any connection secrets inside App Service.
Tip
Foundry Tools supports authentication through managed identities. This tutorial uses subscription key authentication to demonstrate how you could connect to an Azure service that doesn't support managed identities from App Service.
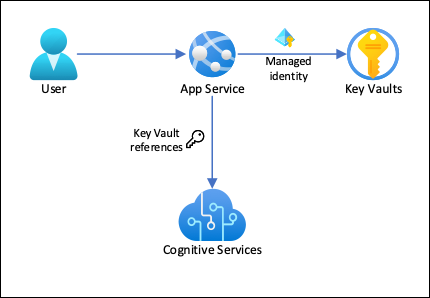
In this architecture:
- Managed identities secure connectivity to the key vault.
- App Service accesses the secrets by using Key Vault references as app settings.
- Access to the key vault is restricted to the app. App contributors, such as administrators, might have complete control of the App Service resources and at the same time have no access to the Key Vault secrets.
- If your application code already accesses connection secrets with app settings, no change is required.
In this tutorial, you learn:
- Enable managed identities
- Use managed identities to connect to Key Vault
- Use Key Vault references
- Access Foundry Tools
Prerequisites
Prepare your environment for the Azure CLI.
Use the Bash environment in Azure Cloud Shell. For more information, see Get started with Azure Cloud Shell.

If you prefer to run CLI reference commands locally, install the Azure CLI. If you're running on Windows or macOS, consider running Azure CLI in a Docker container. For more information, see How to run the Azure CLI in a Docker container.
If you're using a local installation, sign in to the Azure CLI by using the az login command. To finish the authentication process, follow the steps displayed in your terminal. For other sign-in options, see Authenticate to Azure using Azure CLI.
When you're prompted, install the Azure CLI extension on first use. For more information about extensions, see Use and manage extensions with the Azure CLI.
Run az version to find the version and dependent libraries that are installed. To upgrade to the latest version, run az upgrade.
Create an app with connectivity to Foundry Tools
Create a resource group to contain all of your resources:
# Save the resource group name as a variable for convenience
groupName=myKVResourceGroup
region=canadacentral

az group create --name $groupName --location $region
Create a Foundry Tools resource. Replace <cs-resource-name> with a unique name.
# Save the resource name as a variable for convenience.
csResourceName=<cs-resource-name>

az cognitiveservices account create --resource-group $groupName --name $csResourceName --location $region --kind TextAnalytics --sku F0 --custom-domain $csResourceName
Note
--sku F0creates a free-tier Foundry Tools resource. Each subscription is limited to a quota of one free-tierTextAnalyticsresource. If you've already used your quota, use--sku Sinstead.
Configure JavaScript app
Clone the sample repository locally and deploy the sample application to App Service. Replace <app-name> with a unique name.
# Clone and prepare sample application
git clone https://github.com/Azure-Samples/app-service-language-detector.git
cd app-service-language-detector/javascript
zip -r default.zip .

# Save app name as variable for convenience
appName=<app-name>

az appservice plan create --resource-group $groupName --name $appName --sku FREE --location $region --is-linux
az webapp create --resource-group $groupName --plan $appName --name $appName --runtime "node:24-lts"
az webapp config appsettings set --resource-group $groupName --name $appName --settings SCM_DO_BUILD_DURING_DEPLOYMENT=true
az webapp deploy --resource-group $groupName --name $appName --src-path ./default.zip
The preceding commands:
- Create a Linux App Service plan
- Create a web app for Node.js 24 LTS
- Configure the web app to install the npm packages on deployment
- Upload the zip file, and install the npm packages
Configure secrets as app settings
Configure the Foundry Tools secrets as app settings
CS_ACCOUNT_NAMEandCS_ACCOUNT_KEY.# Get the subscription key for the Foundry Tools resource csKey1=$(az cognitiveservices account keys list --resource-group $groupName --name $csResourceName --query key1 --output tsv) az webapp config appsettings set --resource-group $groupName --name $appName --settings CS_ACCOUNT_NAME="$csResourceName" CS_ACCOUNT_KEY="$csKey1"In a browser, go to your deployed app at
<app-name>.azurewebsites.net. Try the language detector by entering strings in various languages.
If you look at the application code, the debug output for the detection results might be in the same font color as the background. You can see the output by highlighting the white space directly below the result.
Secure back-end connectivity
Connection secrets are now stored as app settings in your App Service app. This approach already secures connection secrets from your application codebase. However, any contributor who can manage your app can also see the app settings. In this section, you move the connection secrets to a key vault. You lock down access so that only you can manage it and only the App Service app can read it by using its managed identity.
Create a key vault. Replace <vault-name> with a unique name.
# Save the key vault name as a variable for convenience
vaultName=<vault-name>

az keyvault create --resource-group $groupName --name $vaultName --location $region --sku standard --enable-rbac-authorization
The
--enable-rbac-authorizationparameter sets Azure role-based access control (RBAC) as the permission model. This setting invalidates all access policies permissions by default.Give yourself the Key Vault Secrets Officer RBAC role for the vault.
vaultResourceId=$(az keyvault show --name $vaultName --query id --output tsv)
myId=$(az ad signed-in-user show --query id --output tsv)
az role assignment create --role "Key Vault Secrets Officer" --assignee-object-id $myId --assignee-principal-type User --scope $vaultResourceId
Enable the system-assigned managed identity for your app, and give it the Key Vault Secrets User RBAC role for the vault.
az webapp identity assign --resource-group $groupName --name $appName --scope $vaultResourceId --role "Key Vault Secrets User"Add the Foundry Tools resource name and subscription key as secrets to the vault, and save their IDs as environment variables for the next step.
csResourceKVUri=$(az keyvault secret set --vault-name $vaultName --name csresource --value $csResourceName --query id --output tsv)
csKeyKVUri=$(az keyvault secret set --vault-name $vaultName --name cskey --value $csKey1 --query id --output tsv)
Previously, you set the secrets as app settings
CS_ACCOUNT_NAMEandCS_ACCOUNT_KEYin your app. Now, set them as key vault references instead.az webapp config appsettings set --resource-group $groupName --name $appName --settings CS_ACCOUNT_NAME="@Microsoft.KeyVault(SecretUri=$csResourceKVUri)" CS_ACCOUNT_KEY="@Microsoft.KeyVault(SecretUri=$csKeyKVUri)"In a browser, go to
<app-name>.azurewebsites.netagain. If you get detection results back, you're connecting to the Foundry Tools endpoint by using key vault references.
Congratulations, your app now connects to Foundry Tools by using secrets kept in your key vault, and you didn't make any changes to your application code.
Clean up resources
In the preceding steps, you created Azure resources in a resource group. If you don't expect to need these resources in the future, delete the resource group by running the following command in the Cloud Shell:
az group delete --name $groupName
This command might take a minute to run.